
Below I am going to show how to make bootable perdrive with ISO.
To Install Windows
You can use the link http://www.softsea.com/download/ISO-to-USB.html to download ISO to USB software for windows ISO images.
Install the software on your local desktop or laptop and open it
- Select the ISO file downloaded using the browse button on the right.
- Select the USB drive which you want to make it bootable. if you don’t find the USB click on refresh to refresh the list.
- Give the required USB name in Volume Label.
- Check the box of Bootable, only support windows bootable ISO image to make the USB bootable.
- Click Burn to burn the ISO to USB.
you will get a warning saying that all the data will be erased from USB and it will get formatted. click on yes and the status bar starts.
Once the burn is complete click on OK. if you prompted with any error burn again using the same steps.
To Install Linux distributions and VMware
You can use the link https://rufus.akeo.ie/downloads/rufus-2.18.exe to download rufus to make bootable usb.
Run the software as Administrator
- Select the USB pendrive in device tab which you want to make bootable
- Leave Partition scheme, File system, Cluster size default value
- Enter the label name which you required
- Select the ISO image using the cd drive symbol on the software and leave other entries default
- Click start to burn the image to USB

- Keep the option in Write in ISO image mode and click ok
- Now your USB is ready for installation.
Creating a bootable key from an ISO file is a convenient solution to install programs (especially operating systems) on your computer in case you can not use CDs and DVDs and also because for reasons of size they are more practical to carry with you.
Most often it is customary to create a bootable USB stick starting from an ISO image of Windows (any version it is, XP, Vista, 7, 8 or 10) to install or restore the operating system from scratch starting from the boot.
Among other things, creating a USB bootable pen is a fairly simple operation thanks to the various free special programs like those that we will now see.
The only requirement to create a bootable USB stick with this software is to have the Windows ISO file to write to the removable drive in question (which must have enough space and not contain files inside it because they will be lost during the creation).
1. Rufus
Rufus works on Windows operating systems from XP onwards. It does not require installation, easy to use, once started you can leave everything as it is set, indicate the ISO image to be used, the unit and create the bootable USB stick by clicking Start. If necessary, however, you can change the File System and assign a name to the unit in question.
Compatible with Windows:XP, Vista, 7, 8, 10 | Size: 442 KB | Download Rufus
2. Passcape ISO Burner Passcape ISO Burner
of its kind is a very versatile program as it not only allows you to create a USB stick bootable from an ISO file (by selecting the Create bootable USB disk option ), but is also able to burn it to CD or DVD and eventually to unpack a folder the contents of the ISO file. It does not require installation.
Compatible with Windows: XP, Vista, 7, 8, 10 | Size: 313 KB | Download Passcape ISO Burner
3. ISO to USB ISO to USB is immediately easy to use, once started you must indicate the ISO file to use, indicate the USB stick on which to write it, check the option ”
Bootable, only support Windows bootable ISO image “and click the Burn button to start everything. If necessary, it is also possible to change the File System and the name to be assigned to the unit. Requires installation.
Compatible with Windows: XP, Vista, 7, 8, 10 | Size: 1.43 MB | Download ISO to USB
4. Windows 7 USB / DVD Download Tool
Even if the name could be misleading, Windows 7 USB / DVD Download Tool works not only with Windows 7 but also with XP, Vista and 8. And it is an excellent application for create bootable USB or DVD drives at system boot in just four steps. Requires installation.
Compatible with Windows: XP, Vista, 7, 8, 10 | Size: 2.59 MB | Download Windows 7 USB / DVD Download Tool
5.Windows 8 USB Installer Maker
Again the name may be misleading, but Windows 8 USB Installer Maker runs from Windows XP onwards. Easy to use does not require installation, after indicating ISO files and USB drives, all you have to do is click theCreatebuttonto create the bootable stick.
Compatible with Windows: XP, Vista, 7, 8, 10 | Size:2 MB | Download Windows 8 USB Installer Maker
6. WinUSB Maker
WinUSB Maker is another portable program to create bootable USB drives. Easy to use, once started it is necessary to check the “ISO image Bootable Disk” option, indicate the ISO file and the USB stick to be used and start it all by clicking on the Make it Bootable button.
Compatible with Windows: XP, Vista, 7, 8, 10 | Size: 1.22 MB | Download WinUSB Maker
Introduction
ISO files are unique in that they are disk image files that encapsulate the entire content of a CD or DVD, preserving it as a single file. Essentially, an ISO file acts as a digital replica of an optical disk, making it convenient for data storage and distribution. However, unlike standard image or audio files, ISO files can’t be directly opened; they need to be written to a storage device, such as a USB memory, to become bootable.
Creating a bootable USB drive from an ISO file is a common practice, especially when installing or repairing operating systems, creating rescue disks, or installing software on devices without optical drives. In this comprehensive guide, we will discuss the significance of ISO files, and walk you through the process of creating bootable USB drives using five popular software options.
Understanding ISO Files
Before delving into the software and methods for creating bootable USB drives, it’s essential to understand what ISO files are and why they need to be written to storage devices.
ISO files, often referred to as disk image files, contain a complete representation of the data found on a CD or DVD. They serve as an efficient way to store the contents of optical media, making them easily accessible on a computer. These files are valuable for creating backups, distributing software, or installing operating systems.
To use the data within an ISO file, it must be transferred to a storage device like a USB memory, which can be booted from. This process involves writing the ISO file to the USB drive using specific software, ensuring that the contents can be accessed by a computer or other compatible device.
Popular Software for Writing ISO Files to USB Memory

There are several software programs available to facilitate the task of writing ISO files to a USB memory. Each of these programs offers unique features and capabilities, catering to different user needs. Here are five commonly used options:
- DVDFab DVD Copy

DVDFab DVD Copy is a versatile software solution that allows users to write ISO files from DVDs to a USB drive. The software offers a range of customization options, including selecting specific titles, chapters, audio tracks, and subtitles before writing the ISO file to the USB memory. Here’s how to use DVDFab DVD Copy:
- Download and Install DVDFab: Start by downloading and installing the latest version of DVDFab on your computer.
- Select “Copy” from the Menu: After installation, open DVDFab and select the “Copy” option from the top menu.
- Configure Output Settings: Customize the output settings, specifying the title, chapters, audio tracks, and subtitles you want to include in the ISO file.
- Insert USB Drive: Plug the USB drive into your computer, select it as the destination, and click the “Start” button to begin writing the ISO file.
- ISO to USB
ISO to USB is a straightforward and free software designed exclusively for writing ISO files to USB drives. It is easy to use, although it may lack Japanese language support. Follow these steps to create a bootable USB drive using ISO to USB:
- Select the ISO File: Click the “Browse” button to locate and select the ISO file on your computer.
- Choose the USB Drive: After connecting the USB drive to your PC, press the ‘V’ key on your keyboard to select the connected USB drive’s name.
- File System Selection: Choose “FAT32” from the file system dropdown menu for compatibility.
- Enable Bootable Option: If you intend to create a bootable USB drive, check the box labeled “Bootable, only supports Windows bootable ISO image.”
- Initiate Writing: Click the “Burn” button to write the ISO file to the USB memory.
- Rufus
Rufus is another free software solution with user-friendly operations, along with Japanese language support. It is particularly suitable for those who appreciate simplicity and ease of use. Here’s how to use Rufus to create a bootable USB drive from an ISO file:
- Connect USB Drive: Plug the USB memory into your PC, and Rufus will automatically detect the connected USB drive.
- Select ISO File: Click “Select” to browse your computer and choose the ISO file you wish to write to the USB drive.
- Choose Partition Scheme: For the partition scheme, select “GPT.”
- Initiate Writing: After configuring the settings, click “Start” to begin writing the ISO file to the USB memory.
- AOMEI Partition Assistant Pro
AOMEI Partition Assistant Pro is a paid software solution with advanced features. While it comes with a price tag, it offers more extensive capabilities, including the ability to write ISO files to USB drives. Follow these steps to utilize AOMEI Partition Assistant Pro:
- Connect USB Memory: Plug in your USB memory and launch the AOMEI Partition Assistant Pro software.
- Create Bootable Media: Select “Create Bootable Media” from the menu on the left.
- Choose USB Boot Device: In the bootable media creation window, opt for “USB Boot Device.”
- Initiate Writing: Click “Proceed” to start writing the ISO file to the USB memory.
- USBWriter
USBWriter is a free software option known for its simplicity and ease of use, though it might not natively support Japanese. You can apply a Japanese language patch for added convenience. Follow these steps to write an ISO file to a USB memory using USBWriter:
- Select the ISO File: Click the “[Browse…]” button to choose the ISO file stored on your computer.
- Choose USB Drive: Once your USB memory is connected to your computer, press the ‘V’ key on your keyboard to select the connected USB drive, which will appear in the “Target device” field.
- Initiate Writing: Click “Write,” and if prompted, select “Yes” to confirm the writing of the ISO file to the USB memory.
Common Troubleshooting Steps
During the process of writing ISO files to USB memory, it’s not uncommon to encounter various issues. Here are some common errors and their respective troubleshooting steps:
- ISO File Size Exceeds USB Capacity:
- Solution: Use a USB memory with a larger capacity or consider creating a custom ISO file that fits within the USB memory’s size.
- Download Verification Prompt:
- Solution: If you receive a prompt requesting download verification, carefully review the message content, and if it is legitimate, click “Yes” to proceed.
- Hybrid ISO Image Detected:
- Solution: Select “Write ISO Image Mode” and confirm by clicking “OK.”
- Data Erasure Warning:
- Solution: If you encounter a warning that data will be erased from the USB memory, make sure to back up any important data, then click “OK” to continue.
In conclusion, ISO files, or disk image files, are unique in that they encapsulate an entire CD or DVD’s contents into a single file. To make these files accessible and bootable, they must be written to a storage device, such as a USB memory. This guide has introduced you to five popular software options for this purpose, along with step-by-step instructions for using each program.
Whether you’re looking for a free and user-friendly option, advanced features, or Japanese language support, you now have a range of software choices to create bootable USB drives from ISO files. These bootable USB drives can be indispensable for installing operating systems, running diagnostic tools, or creating backups.
Greetings, fellow readers and word wanderers! I’m Evelyn, the creative mind behind lyricsgoo.com. On this captivating blog, we venture into the vast realms of literature, poetry, and everything in between. Get ready to be spellbound by the beauty of words and the power of storytelling. Join me on this literary odyssey, where we explore the art of expression and the magic of prose. From insightful book reviews to thought-provoking musings, lyricsgoo.com is your gateway to a world of captivating narratives.
Here is a list of best free bootable USB Creator software. These let you create a bootable USB flash drive easily. All these bootable USB creator software are completely free and can be downloaded to Windows PC. These free software offer various features, like: create bootable USB flash drive, format USB flash drive, create bootable CD/DVD, make bootable SSD, convert FAT 32 file system to NTFS, creating USB bootable flash drive for Windows Vista/7/8/8.1 installation, how to setup a USB flash drive, creating multi-boot usb flash drives for Windows installation. So, go through this list of free bootable USB creator software and see which ones you like the most.
Passcape ISO Burner
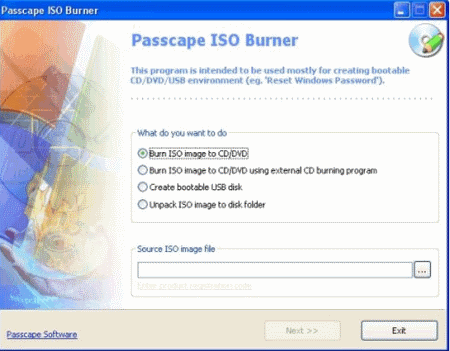
Passcape ISO Burner is a free software to create bootable USB disks. For using this software you need to click on the option “Create bootable USB disk” on the main interface of Passcape ISO Burner. The next step is to specify the source ISO image file. After that choose the USB flash drive that you want to make bootable. And the final step is to click on “Create” button to create the Bootable USB flash drive.
Rufus
Rufus is a free software to create Bootable USB flash drive. It is a lightweight and portable software and installation is not required for this freeware. For using this software you need to connect a USB flash drive to the PC and then use the simple drop down menus and choose the appropriate option to create a bootable USB flash drive.
Image Writer
Image Writer is a free software to create bootable USB flash drives. If you have an ISO file on your PC this freeware can write that ISO image to your USB flash drive. For using this software you need to specify the drive of your USB flash drive and then click on “Write” button. Image Writer instantly writes that ISO image file to your USB flash drive.
ISO to USB
ISO to USB is a free and lightweight software to create bootable USB flash drives. This freeware also burns the ISO image file to the USB flash drive. For using this software first you need to select the desired ISO file, after that check the box “Bootable, only supports Windows bootable ISO image.” And the final step is to click on “Burn” button to create the bootable USB flash drive.
Free ISO to USB
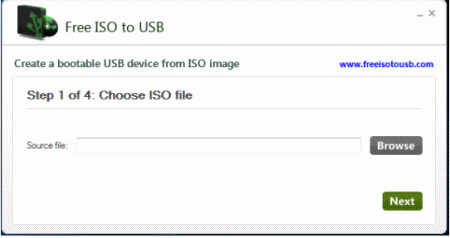
Free ISO to USB is a free software to create a bootable USB flash drive from ISO image file. For using this software you need to choose the desired ISO file and then click on “Next” button. The final step is to click on “Began Copying” button to create the bootable USB flash drive.
Windows 7 USB/DVD Download Tool

Windows 7 USB/DVD Download Tool is a free software to create bootable USB flash drive or bootable DVD from ISO image file. For using this software first you need to select the desired ISO file and after that click on “Next” button. The final step is to click on “Begin Copying” button to create the bootable USB flash drive.
HP USB Disk Storage Format Tool
HP USB Disk Storage Format Tool is a free software to create USB flash drives. For using this software you need to connect your USB flash drive to your PC and after that in the main interface of this freeware select the file system: FAT 32 or NTFS, and after that specify volume label, next choose the appropriate format options and final step is to click on “Start” button to create the bootable USB flash drive.
WinToFlash
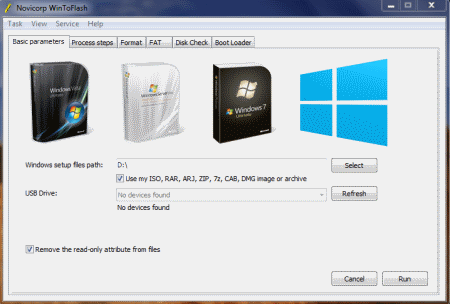
WinToFlash is a free software to create bootable USB flash drives from MS Windows installation CD/DVD. This freeware is compatible with Windows XP/2003/Vista/2008/7/8 etc. WinToFlash is a portable application and installation is not required for this freeware. For using this freeware you need to click on the “Windows setup transfer wizard” button and after that specify the location of Windows installation CD/DVD and then choose the USB flash drive and the final step is to click on “Next’ button to create the bootable USB flash drive.
WinUSB Maker

WinUSB Maker is a free software to create bootable USB flash drives from ISO image files or setup files in the hard disk. For using this freeware select the desired setup folder or ISO image and then click on “Make it Bootable” button to create a bootable USB flash drive.
Setup from USB

Setup from USB is a free tool to create bootable USB flash drive for Windows Vista or Windows 7. By using this freeware you can easily install Windows Vista and Windows 7 on any computer that supports USB devices. This freeware easily saves your precious time while installing Windows Vista and Windows 7 on a PC, because installing a OS through a USB flash drive takes less time as compared to an optical drive.
Koala
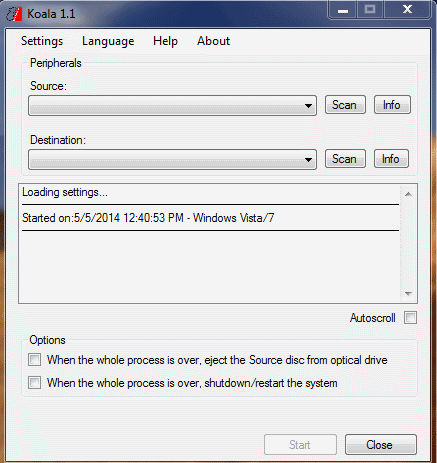
Koala is a free software to create bootable USB flash drives for Windows Vista, Windows 7 and Windows 8. For using this freeware you need to insert Windows Vista, Windows 7 or Windows 8 installation DVD in the optical drive and also insert your USB flash drive on the PC. And the final step is to click on “Start” button to create a Bootable USB drive.
WinUSB-Maker
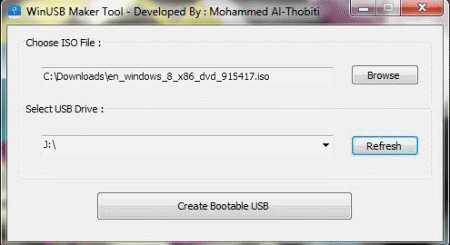
WinUSB-Maker is a free software to create bootable USB flash drives for Windows 7 and Windows 8 from ISO images of Windows 7 and Windows 8. For using this freeware you need to choose the desired ISO file and then select the USB drive. And the final step is to click on “Create Bootable USB” button to create a bootable USB flash drive.
WinToUSB

WinToUSB is a free software to create bootable USB flash drives of Windows Vista, Windows 7 and Windows 8 from ISO images and installation discs of Windows Vista, Windows 7 and Windows 8. For using this freeware you need to choose the desired ISO image and then click on “Next” button after that choose the destination drive (USB drive) and then again click on “Next” button to create a bootable USB flash drive.
SARDU
SARDU is a free tool for creating multi-boot USB flash drive or multi-boot CD/DVD. The CD/DVD or USB device can also contain rescue CD of antivirus and various utilities. This freeware will let you convert all of your bootable ISO files into a single ISO image file or USB with a boot menu. SARDU will make a multi-boot device (USB flash drive) with antivirus, Windows PE and Windows XP, Vista, 7 etc.
Bootable USB Drive Creator Tool
Bootable USB Drive Creator Tool is a free software to create a bootable USB flash drive. For using this software you need to specify the file system and drive name on the main interface of this freeware and then you have to check the options “Quick Format” and “Create Bootable Drive”. The final step is to click on “Start button” to create the bootable drive.
ZOTAC WinUSB Maker
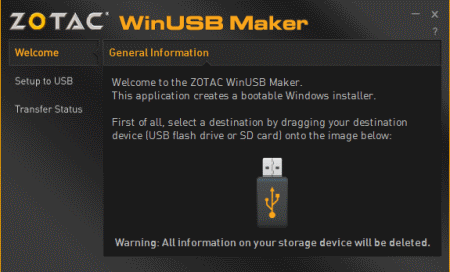
ZOTAC WinUSB Maker is a free software to create bootable USB flash drive for installation of Microsoft Windows. For using this freeware you need to insert your USB device into the USB port of your PC. After that follow the on-screen instructions to create a bootable USB flash drive. By using this freeware you can do a quick and easy installation of Microsoft Windows into those computers which do not have any optical drive.
Indasy USB Bootable
Indasy USB Bootable is a freeware to create bootable USB flash drive for Microsoft Windows installation. For using this software you need to select the USB Drive and also the CD/DVD ROM drive. The final step is to click on the “Create Bootable” button to create the bootable USB flash drive. .Net Framework 3.5 or above is required to run this application.
Bootable disk is required when we need to do a fresh Windows installation. Bootable disk is a disk which contains special files to boot up or startup the computer to start a utility or program. In this case to install a Windows 10 operating system we require a bootable disk to start the installation process of Windows 10.
A bootable disk is not required when we upgrade from older operating system like Windows 7 to Windows 10. But if we downloaded an ISO file to install it on a different PC or for a clean install we must have to create a bootable disk.
Lets learn how we can create a bootable Windows 10 disk.
Microsoft has provided official tools to create a bootable disk without using any third party software. We here explain the 3 main methods.
1. Using Windows Media Creation Tool by Microsoft
This is the easiest and most reliable method. The utility automatically downloads Windows 10 and copy the files from a USB disk by making it a bootable disk. This method can also be used to download ISO files only. Follow the steps below.
- Download the Windows Media Creation Tool: Click here to download media creation tool.
- Double-click on the downloaded file.
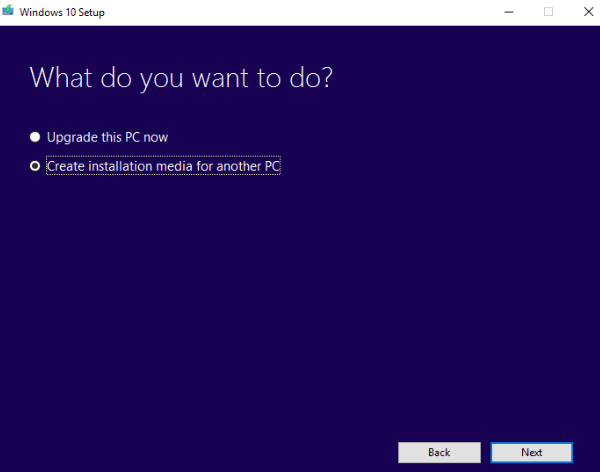
- Select “create installation media for another PC“.
- Select Language / Edition and Architecture as per your requirement.
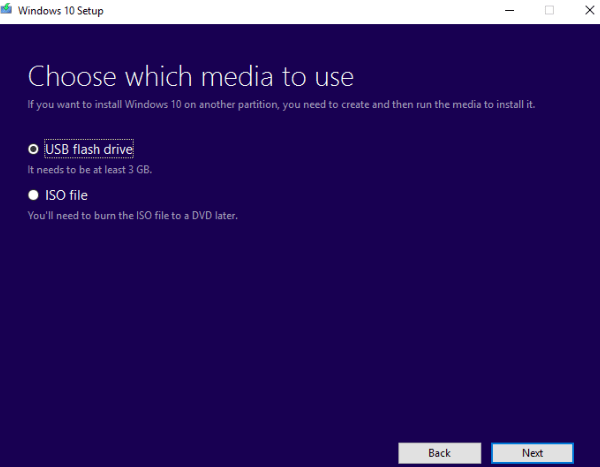
To learn more about it, go to https://www.microsoft.com/en-in/software-download/windows10 - Select USB flash drive for USB or ISO file for DVD.
- Your disk will be ready after the completion of the process. It requires atleast 8 GB of pen drive. Make sure there will not be any important data in the disk as it will format the disk during the creation of the bootable disk.

- Select “USB Flash Drive” option and click on Next.

You can download Windows 10 ISO files for free directly from Microsoft using this media creation tool. An activation key will be required during the installation process.
2. Using Windows USB / DVD Download Tool
This is an old and still working method to create a bootable media for Windows Installation. The name can confuse you but it is also working perfectly for Windows 10 as well. However, this method requires an ISO image of Windows 10. So first you have to download the Windows 10 iso file.
- This process requires an empty USB stick (Min: 8GB). Quickly format the USB drive first.
- Download Windows USB / DVD Download Tool & Install it on your computer.
- After finishing of its installation, Run it.
- It requires an ISO image file for Windows. Select the ISO image and start the process. you can download the ISO file of windows 10 using the media creation tool as mentioned in method 1.
- Start Windows USB / DVD Download Tool to create a bootable disk
- Select the Windows 10 ISO file by clicking on the browse button.
- Then click on Next.

- After that, it will ask you to select the USB drive.
- It will prompt you to format the USB drive. Please allow it to format the USB flash drive and start making the Windows 10 USB. Follow the remaining on-screen instructions too.
- After completion of the process, your Windows 10 bootable USB / DVD installer USB will be ready to use.


3. Create Bootable Windows 10 disk with the help of third party software.
However, you will not be required to go with this method (third party tool) because the above given two methods will work for sure. Under any circumstances, you’ll only go with the option if the above two have not worked for you.
Making a boot-able flash drive becomes pretty easy with a third party software, named Rufus. Here are the essential guidelines when using Rufus to make a bootable Windows 10 flash drive. Let’s learn the same.
- Download Rufus.
- Open Rufus.exe
- When the software launches on the screen, plug in your USB flash drive.
- Find the option Create a bootable USB drive.
- From the menu that follows, select an ISO image.
- Now click on next button to this menu and click on the Windows 10 ISO you want to install on your computer.
- Now click on the start button at the bottom, and it will begin to create a bootable USB flash drive.
- Once completed, your USB will become bootable and you will be ready to install / reinstall Windows 10 on any computer using this Windows 10 USB flash drive.
4. Create Bootable Windows 10 USB through Command Prompt
This method is useful for advanced users. Sometimes users only have access to command prompts only and are unable to start Windows. If you have an ISO file, you can create a bootable pen drive using this method. Follow the given guidelines carefully as this method is a little complicated:
- Plug in your USB drive to your computer.
- Open “Command Prompt” (Admin).
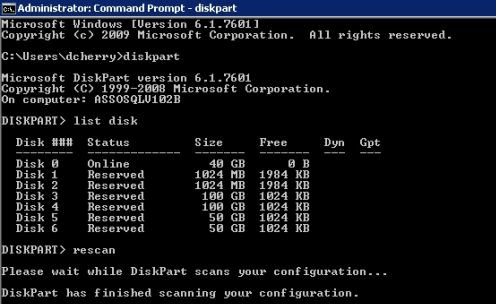
- In the Command prompt, type in the following command: diskpart and press the enter key from your keyboard.

- Now type list disk and press enter key. This will display a list of available connected disks.
- From this list, you need to select your USB drive. To do this, type select disk # and press Enter (Replace # with your disk number from the list). You will get a message saying “Disk 1 is now the selected disk’
- The next step is to clean the USB drive. To do this, type clean and press enter.
- Now create a bootable partition, simply type Create partition primary and press Enter.
- You need to select the partition you just created. Type select partition 1 and then type active and hit Enter.
- Now format the USB drive by typing “format fs=ntfs quick”. After this, press Enter.
- Assign drive letter. To assign a letter to your USB drive, just type assign. You may skip this step.
- Now get exit from disk part command by typing EXIT command. Go back to the command prompt on the main screen.
- Now minimize it for a while.
Copy the Windows 10 files to USB flash drive
Copy all the files of Windows 10 and paste them in the USB drive manually. Files can be copied from a Windows 10 disk or by extraction from an ISO file.
- Open the Windows 10 Disk / saved Windows 10 folder. If you do not have this, then download the Windows 10 ISO file from the Microsoft website and extract the ISO file to a folder, then open the extracted folder.
- Select all the files of Windows 10 and copy them.
- Now open the USB flash drive and paste all the copied files there.
Now make the USB flash drive bootable
Let’s suppose that the F: drive would be your USB drive and the E: drive is your DVD drive. Make sure the Windows 10 bootable DVD is inserted into the DVD drive from where the data is copied to the USB bootable drive.
Change the Windows active directory to the F: drive (DVD Drive). The default active directory is “C:\Windows\System32” in CMD. That Windows 10 DVD should be inserted into the DVD drive.
- Open the command prompt (admin) once again.
- Type E: and then press enter. The active directory will be changed immediately.
- Now type in the CD boot command and press enter.
- To create the bootsector in the F: drive (USB Pen Drive), type bootsect/nt60 F: into the command line.
- That’s it!! Your flash drive is now a Windows 10 bootable USB drive
And that is all there is to know about the manual creation of a bootable Windows 10 USB flash drive. all the methods are equally useful. If you’re an expert you can use the manual method without taking help from software, but beginners are advised to seek software help to avoid any complications. The best and easy method is using the Windows Media Creation Tool .
Are you still using the Windows 7? Microsoft has ended the windows 7 support.
Upgrade to Windows 10 as early as possible.
Why we need to create a bootable Windows 10 USB drive?
Since the availability of USB drives, the use of CD and DVD has prominently declined. The major reasons behind this are the ease of use, portability, larger capacity and faster copying of data files by the USB drives in comparison to the older methods. All you need is a flash drive with a capacity of more than 4GB, although 6 to 12 GB of available space is ideal for storing additional files as well. Create a bootable USB drive and keep it in a safe place that you can use this disk to easily fix the installation issues.
How to download windows 10 bootable USB or ISO image for clean windows installation.
Given above method 1 can be used to easily download the ISO image file. We didn’t found any other direct link to download ISO image for offline purpose. So downloading it using the media creation tool is the only method to get it directly from the Microsoft.
You can also upgrade to Windows 10 for Free using windows 7 license key.
Please share your experience with the creation of bootable windows 10 disk using the below comment box.