
In today’s fast-paced world, where every second counts, the importance of technology in our daily lives cannot be overstated. From managing our schedules to facilitating remote work, we rely on our devices to operate seamlessly. However, the moment we encounter a booting issue, the smooth flow of productivity is interrupted, often leading to frustration and lost time. This is where understanding the Windows Boot Manager becomes crucial. In this article, we will delve deep into what the Windows Boot Manager is, its functionalities, and how it plays an essential role in ensuring our Windows operating system boots up efficiently.
Section 1: Understanding the Basics of Booting
Before diving into the specifics of the Windows Boot Manager, it’s essential to grasp the fundamental concept of booting. Think of booting as the process of starting up your computer, similar to starting a car. Just as a car needs a sequence of events to turn on the engine and get moving, a computer needs a series of steps to load the operating system and become functional.
Defining the Booting Process:
In computing terms, the booting process, also known as “bootstrapping,” refers to the sequence of operations that a computer performs to initialize its hardware and load the operating system (OS) into memory, making it ready for use. This process begins the moment you press the power button.
Cold Boot vs. Warm Boot:
There are two primary types of booting:
- Cold Boot: Also known as a hard boot, this occurs when the computer is started from a completely powered-off state. It involves a full hardware and software initialization.
- Warm Boot: Also known as a soft boot, this happens when the computer is restarted while it is already running. It is generally faster because some hardware components might not need to be reinitialized.
The Role of Firmware:
Firmware plays a pivotal role in the booting sequence. Firmware is a type of software embedded in hardware devices that provides low-level control for the device’s specific hardware. The most common types of firmware in computers are BIOS (Basic Input/Output System) and UEFI (Unified Extensible Firmware Interface).
- BIOS (Basic Input/Output System): Historically, the BIOS was the first software to run when a computer was turned on. It performed a Power-On Self-Test (POST) to check hardware components and then loaded the operating system from a bootable device.
- UEFI (Unified Extensible Firmware Interface): UEFI is a more modern replacement for BIOS. It offers several advantages, including support for larger hard drives, faster boot times, and enhanced security features like Secure Boot.
The firmware initializes the hardware, performs essential system checks, and then hands over control to the operating system, marking the beginning of the Windows Boot Manager’s role.
Section 2: The Role of Windows Boot Manager
The Windows Boot Manager (WBM) is a crucial component in the Windows operating system that handles the initial stage of the boot process. It acts as an intermediary between the computer’s firmware (BIOS or UEFI) and the Windows operating system.
Defining Windows Boot Manager (WBM):
The Windows Boot Manager (WBM) is a small piece of software that runs immediately after the firmware completes its initial checks. Its primary purpose is to locate and start the Windows operating system or provide options to choose between multiple operating systems installed on the computer.
WBM in the Boot Process:
The WBM fits into the boot process after the firmware initializes the hardware and before the Windows kernel starts loading. Here’s a simplified sequence:
- Power On: The computer is turned on, and the firmware (BIOS/UEFI) takes control.
- POST (Power-On Self-Test): The firmware performs a hardware check.
- Boot Device Selection: The firmware identifies the boot device (usually a hard drive or SSD).
- WBM Activation: The firmware loads and executes the Windows Boot Manager from the boot device.
- OS Selection: The WBM presents a menu if multiple operating systems are installed or directly starts the default operating system.
- OS Loading: The WBM loads the selected operating system kernel, which then takes over and completes the boot process.
Significance of Boot Configuration Data (BCD):
The Boot Configuration Data (BCD) store is a database that contains the boot configuration parameters. It tells the WBM which operating systems are available, where they are located on the disk, and how they should be loaded. The BCD store replaces the older boot.ini file used in previous versions of Windows (like Windows XP).
- Interface with WBM: The WBM reads the BCD store to determine the available boot options. It uses this information to present a boot menu (if needed) and to load the selected operating system. If the BCD store is missing or corrupt, the WBM will fail, resulting in a boot error.
Section 3: Components of Windows Boot Manager
The Windows Boot Manager is composed of several key components that work together to ensure a smooth boot process. Understanding these components is crucial for troubleshooting and advanced system management.
Key Components of WBM:
-
Boot Configuration Data (BCD):
- Function: The BCD is a database that stores the configuration parameters needed to boot Windows. It contains entries for each installed operating system, recovery tools, and boot options.
- Contents: The BCD includes:
- Boot entries for each OS
- Paths to the OS kernel and other boot files
- Boot options such as Safe Mode, debugging settings, and memory testing
- Storage: The BCD is typically stored in a file named
BCDlocated in the\Bootdirectory on the system partition (usually the active partition).
-
Boot Loader (Winload.exe/Winload.efi):
- Function: The boot loader is responsible for loading the operating system kernel into memory. After the WBM selects an operating system from the BCD, it invokes the appropriate boot loader.
- Types:
Winload.exe: Used for BIOS-based systems.Winload.efi: Used for UEFI-based systems.
- Process: The boot loader loads the necessary system files, drivers, and the kernel (
ntoskrnl.exe) into memory, preparing the system for operation.
-
Boot Options:
- Function: Boot options are settings that can be configured to modify the boot process. These include:
- Timeout: The time the WBM waits for user input before booting the default OS.
- Default OS: The operating system that the WBM boots if no selection is made.
- Advanced Boot Options: Options like Safe Mode, debugging mode, and recovery environment.
- Configuration: Boot options can be configured using the
bcdeditcommand-line tool or through the System Configuration Utility (msconfig).
- Function: Boot options are settings that can be configured to modify the boot process. These include:
Interaction of Components:
These components interact in a specific sequence to facilitate the boot process:
- WBM Initialization: The firmware loads the WBM from the boot device.
- BCD Reading: The WBM reads the BCD to determine available boot options and settings.
- OS Selection: The WBM presents a boot menu (if multiple options exist) or automatically selects the default OS.
- Boot Loader Invocation: The WBM invokes the boot loader (
Winload.exeorWinload.efi) for the selected OS. - Kernel Loading: The boot loader loads the OS kernel and essential drivers into memory.
- OS Handover: The boot loader hands over control to the OS kernel, which completes the boot process.
Section 4: How Windows Boot Manager Works
To truly understand the Windows Boot Manager, it’s essential to delve into the step-by-step process of how it initiates the boot sequence and interacts with other system components.
Step-by-Step Boot Sequence:
-
Power On: When you press the power button, the computer’s power supply unit (PSU) provides power to the motherboard and other components.
-
Firmware Initialization (BIOS/UEFI):
- BIOS: In older systems with BIOS, the BIOS performs a Power-On Self-Test (POST) to check the hardware components. If any errors are detected, the boot process halts, and an error message is displayed.
- UEFI: In modern systems with UEFI, the UEFI firmware also performs a POST but offers more advanced features, including a graphical interface and support for larger hard drives.
-
Boot Device Selection:
- The firmware determines the boot order, which is a list of devices that the system will attempt to boot from. This order is typically configured in the BIOS/UEFI settings. Common boot devices include hard drives, SSDs, USB drives, and optical drives.
-
Loading the Windows Boot Manager:
- Once the boot device is identified, the firmware loads the Windows Boot Manager from the boot sector of the system partition. The WBM is usually located in the
\Bootdirectory on the active partition.
- Once the boot device is identified, the firmware loads the Windows Boot Manager from the boot sector of the system partition. The WBM is usually located in the
-
Reading the Boot Configuration Data (BCD):
- The WBM reads the BCD file to determine the available boot options. The BCD contains entries for each installed operating system, recovery tools, and boot settings.
-
Presenting the Boot Menu (If Necessary):
- If multiple operating systems or boot options are configured in the BCD, the WBM presents a boot menu to the user. This menu allows the user to select which operating system or tool to boot.
-
Loading the Selected Operating System:
- Once the user selects an operating system or the default OS is automatically selected, the WBM loads the appropriate boot loader (
Winload.exefor BIOS systems,Winload.efifor UEFI systems).
- Once the user selects an operating system or the default OS is automatically selected, the WBM loads the appropriate boot loader (
-
Boot Loader Activities:
- The boot loader loads the operating system kernel (
ntoskrnl.exe) and other essential system files into memory. It also initializes the necessary drivers and prepares the system for operation.
- The boot loader loads the operating system kernel (
-
Handover to the Operating System:
- The boot loader hands over control to the operating system kernel. From this point on, the operating system takes over the boot process, completing the loading of system services, drivers, and user interface components.
Roles of BIOS/UEFI in Conjunction with WBM:
- Initialization: BIOS/UEFI initializes the hardware components and performs the Power-On Self-Test (POST).
- Boot Device Selection: BIOS/UEFI determines the boot order and selects the boot device.
- Loading WBM: BIOS/UEFI loads the Windows Boot Manager from the boot sector of the system partition.
- Handover: BIOS/UEFI hands over control to the WBM, which then manages the rest of the boot process.
Handling Multiple Operating Systems:
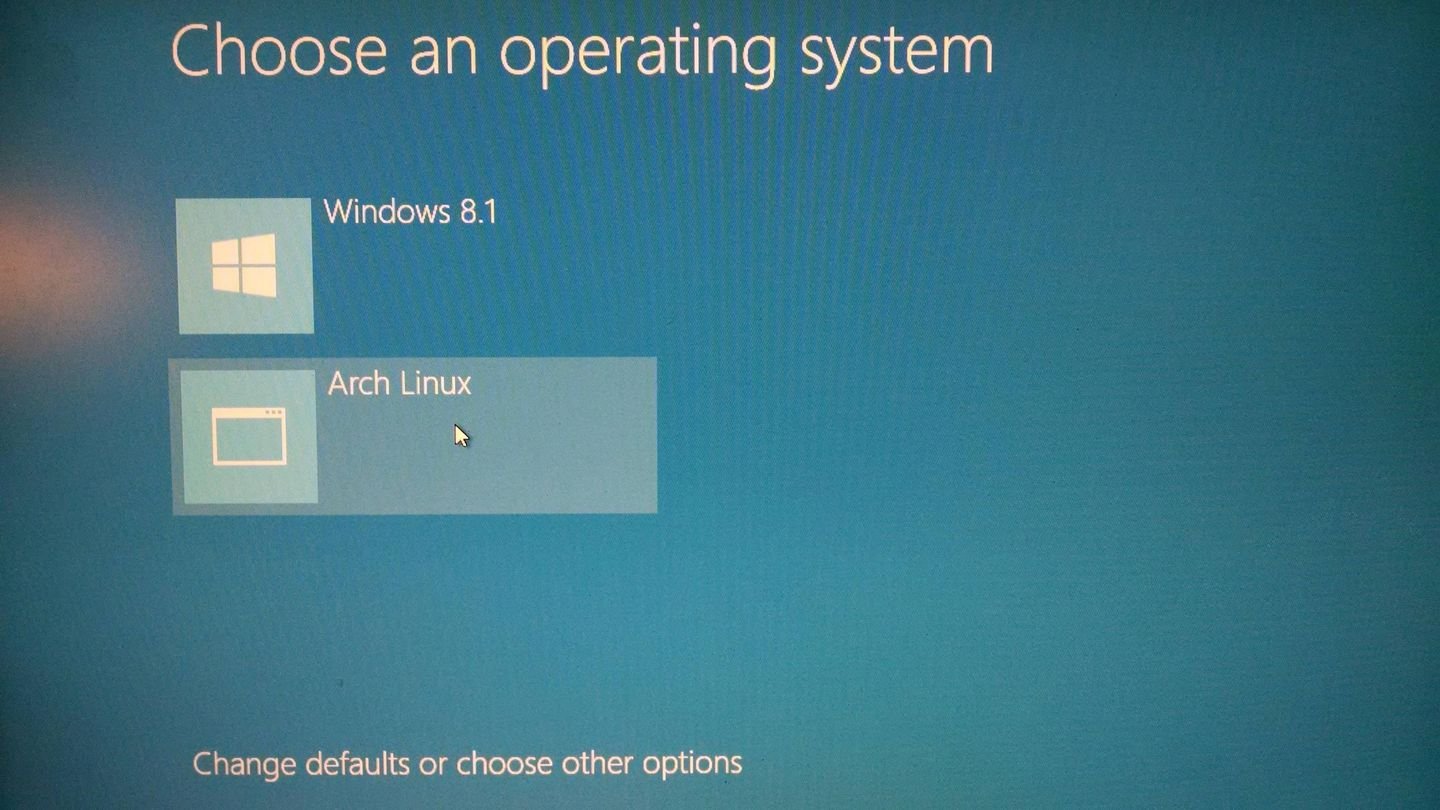
The WBM is designed to handle multiple operating systems installed on the same computer. When multiple operating systems are detected, the WBM creates a boot menu that allows the user to choose which operating system to boot.
- BCD Configuration: Each operating system has its own entry in the BCD, specifying the location of the OS kernel and other boot files.
- Boot Menu: The WBM presents a boot menu with a list of available operating systems. The user can select an OS, and the WBM will load the corresponding boot loader and kernel.
- Default OS: The WBM can be configured to automatically boot a default operating system after a specified timeout period.
Section 5: Common Issues and Troubleshooting with Windows Boot Manager
The Windows Boot Manager is essential for starting your computer, but it can sometimes encounter issues that prevent the system from booting correctly. Understanding these issues and how to troubleshoot them is crucial for maintaining a functional system.
Common Booting Issues Related to WBM:
-
Missing or Corrupt BCD Files:
- Cause: The BCD file can become missing or corrupt due to disk errors, malware infections, improper shutdowns, or failed system updates.
- Symptoms: The system may display an error message such as “Boot Configuration Data file is missing,” “An operating system wasn’t found,” or “BOOTMGR is missing.”
-
Boot Loop Issues:
- Cause: A boot loop occurs when the system repeatedly restarts without successfully loading the operating system. This can be caused by driver issues, corrupted system files, or hardware problems.
- Symptoms: The system repeatedly restarts, often displaying the Windows logo or a blue screen of death (BSOD) before restarting again.
-
Incorrect Boot Sequence Configurations:
- Cause: The boot sequence in the BIOS/UEFI settings may be configured incorrectly, causing the system to attempt to boot from the wrong device.
- Symptoms: The system may fail to boot from the hard drive or SSD, displaying a message such as “No bootable device found” or attempting to boot from a network or USB drive.
Troubleshooting Guide Using WBM:
-
Using Command-Line Tools (bcdedit):
bcdeditis a powerful command-line tool for managing the BCD store. It can be used to repair, modify, and recreate the BCD file.- Accessing the Command Prompt:
- Boot from a Windows installation disc or recovery media.
- Select “Repair your computer” or “Troubleshoot” -> “Advanced options” -> “Command Prompt.”
- Common
bcdeditCommands:bcdedit /enum: Lists the entries in the BCD store.bcdedit /rebuildbcd: Scans for installed operating systems and rebuilds the BCD store.bcdedit /create /d "Windows 10" /application osloader: Creates a new boot entry for Windows 10.bcdedit /set {bootmgr} displaybootmenu yes: Enables the boot menu.bcdedit /set {bootmgr} timeout 30: Sets the boot menu timeout to 30 seconds.
-
Repairing the BCD Store:
- If the BCD store is corrupt, you can repair it using the
bootreccommand-line tool. - Accessing the Command Prompt:
- Boot from a Windows installation disc or recovery media.
- Select “Repair your computer” or “Troubleshoot” -> “Advanced options” -> “Command Prompt.”
- Common
bootrecCommands:bootrec /fixmbr: Writes a new Master Boot Record (MBR) to the system partition.bootrec /fixboot: Writes a new boot sector to the system partition.bootrec /scanos: Scans all disks for Windows installations.bootrec /rebuildbcd: Rebuilds the BCD store.
- If the BCD store is corrupt, you can repair it using the
-
Using Recovery Options:
- Windows includes several recovery options that can help troubleshoot booting issues.
- System Restore: Reverts the system to a previous state, undoing changes that may have caused the booting issue.
- Startup Repair: Automatically diagnoses and repairs common booting issues.
- System Image Recovery: Restores the system from a previously created system image.
Section 6: Advanced Features of Windows Boot Manager
Beyond basic booting functionality, the Windows Boot Manager offers advanced features that cater to system maintenance, troubleshooting, and customization. These features are invaluable for power users and system administrators who need greater control over the boot process.
Advanced Features:
-
Recovery Environment (WinRE):
- Function: The Windows Recovery Environment (WinRE) is a set of tools that can help diagnose and repair booting issues. It provides access to various troubleshooting options, including System Restore, Startup Repair, Command Prompt, and System Image Recovery.
- Accessing WinRE:
- Boot from a Windows installation disc or recovery media.
- Repeatedly interrupt the boot process (e.g., by pressing the power button during startup).
- Select “Repair your computer” or “Troubleshoot” from the boot menu.
- Tools Available in WinRE:
- Startup Repair: Automatically diagnoses and repairs common booting issues.
- System Restore: Reverts the system to a previous state.
- Command Prompt: Provides access to command-line tools for advanced troubleshooting.
- System Image Recovery: Restores the system from a system image.
- Uninstall Updates: Removes recently installed updates that may be causing issues.
-
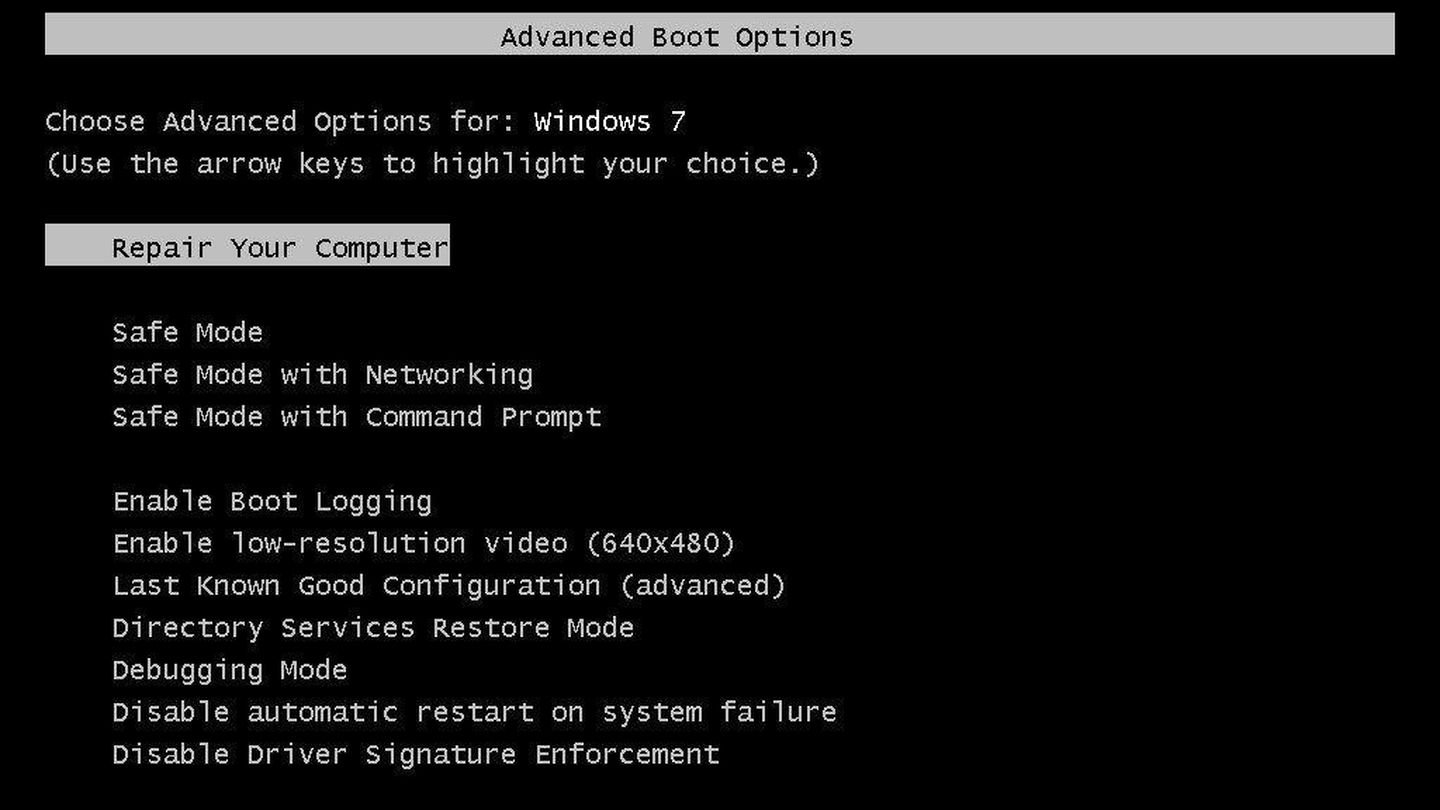
Safe Mode Booting Options:
- Function: Safe Mode is a diagnostic mode that starts Windows with a minimal set of drivers and services. It is useful for troubleshooting driver issues, malware infections, and other problems that prevent Windows from booting normally.
- Accessing Safe Mode:
- Repeatedly interrupt the boot process to access the Windows Recovery Environment (WinRE).
- Select “Troubleshoot” -> “Advanced options” -> “Startup Settings” -> “Restart.”
- Press the appropriate function key (F4, F5, or F6) to select the desired Safe Mode option:
- Safe Mode: Starts Windows with minimal drivers and services.
- Safe Mode with Networking: Starts Windows with minimal drivers and services, plus network support.
- Safe Mode with Command Prompt: Starts Windows with minimal drivers and services, displaying a command prompt instead of the graphical user interface.
-
Custom Boot Configurations:
- Function: The Windows Boot Manager allows advanced users to create custom boot configurations, such as booting from a virtual hard disk (VHD) or setting up dual-boot configurations with different versions of Windows or other operating systems.
- Customizing Boot Options:
- Use the
bcdeditcommand-line tool to create and modify boot entries. - Configure boot options such as memory testing, debugging settings, and boot logging.
- Use the
- Booting from VHD:
- Create a VHD file using Disk Management or the
diskpartcommand-line tool. - Create a new boot entry in the BCD that points to the VHD file.
- Boot from the VHD, which acts as a separate operating system installation.
- Create a VHD file using Disk Management or the
Leveraging WBM for System Maintenance and Optimization:
- Regular BCD Backups: Back up the BCD store regularly to prevent data loss in case of corruption.
- Boot Time Optimization: Configure the boot menu timeout to a reasonable value to speed up the boot process.
- Driver Management: Use Safe Mode to troubleshoot and uninstall problematic drivers.
- System Recovery: Utilize WinRE to perform system restore or system image recovery when needed.
Section 7: The Evolution of Windows Boot Manager
The Windows Boot Manager has evolved significantly over the years, reflecting changes in hardware technology, operating system design, and user needs. Tracing its history helps understand its current functionalities and future directions.
History and Evolution of WBM:
-
Early Versions of Windows (Pre-Vista):
- BOOT.INI: In older versions of Windows such as Windows 95, 98, NT, 2000, and XP, the boot configuration was stored in the
BOOT.INIfile. This file was a simple text file that contained the list of installed operating systems and their locations on the disk. - Limitations: The
BOOT.INIfile had limitations, such as the inability to handle large hard drives and the lack of advanced boot options.
- BOOT.INI: In older versions of Windows such as Windows 95, 98, NT, 2000, and XP, the boot configuration was stored in the
-
Introduction of Windows Boot Manager (Vista and Later):
- BCD Store: With the release of Windows Vista, Microsoft introduced the Windows Boot Manager (WBM) and the Boot Configuration Data (BCD) store. The BCD store replaced the
BOOT.INIfile and provided a more flexible and extensible boot configuration system. - Improvements: The BCD store offered several improvements over the
BOOT.INIfile, including support for larger hard drives, advanced boot options, and a more secure boot process.
- BCD Store: With the release of Windows Vista, Microsoft introduced the Windows Boot Manager (WBM) and the Boot Configuration Data (BCD) store. The BCD store replaced the
-
Evolution in Windows 7 and 8:
- Enhanced Boot Options: Windows 7 and 8 introduced additional boot options and recovery tools, making it easier to troubleshoot booting issues.
- Improved Performance: The boot process was optimized for faster startup times and better overall performance.
-
Windows 10 and 11:
- UEFI Support: Windows 10 and 11 fully embraced UEFI firmware and Secure Boot, enhancing the security and performance of the boot process.
- Fast Startup: The Fast Startup feature, introduced in Windows 8 and enhanced in Windows 10 and 11, combines elements of hibernation and shutdown to speed up the boot process.
- Recovery Environment Enhancements: The Windows Recovery Environment (WinRE) was further enhanced with additional troubleshooting tools and options.
Improvements and Changes in Recent Windows Updates:
- Security Enhancements: Recent Windows updates have focused on improving the security of the boot process, including enhancements to Secure Boot and anti-malware protection.
- Performance Optimizations: Microsoft continues to optimize the boot process for faster startup times and better overall performance.
- User Interface Improvements: The boot menu and recovery environment have been refined to provide a more user-friendly experience.
Section 8: The Future of Booting Technologies
The future of booting technologies is likely to be shaped by ongoing trends in hardware, software, and security. Emerging technologies like UEFI, Secure Boot, and cloud-based recovery are expected to play a significant role in the evolution of the boot process.
Future Developments in Booting Technologies:
-
UEFI Enhancements:
- Advanced Firmware Features: Future versions of UEFI may include more advanced firmware features, such as built-in diagnostics, remote management capabilities, and support for new hardware technologies.
- Improved Security: UEFI is likely to incorporate additional security features to protect against boot-level attacks and malware.
-
Secure Boot Evolution:
- Enhanced Security Measures: Secure Boot is expected to evolve with more robust security measures to prevent unauthorized modifications to the boot process.
- Integration with TPM: Integration with Trusted Platform Modules (TPM) may provide additional security benefits, such as hardware-based encryption and authentication.
-
Cloud-Based Recovery:
- Remote Troubleshooting: Cloud-based recovery solutions may enable remote troubleshooting and repair of booting issues, allowing users to recover their systems from anywhere with an internet connection.
- Automated Updates: Cloud-based systems may automatically update the boot configuration and firmware to ensure compatibility and security.
-
Artificial Intelligence (AI) Integration:
- Predictive Maintenance: AI algorithms may be used to predict potential booting issues and proactively take steps to prevent them.
- Automated Troubleshooting: AI-powered troubleshooting tools may automatically diagnose and repair booting issues, reducing the need for manual intervention.
Influence of Emerging Technologies:
- UEFI and Secure Boot: These technologies are expected to become increasingly prevalent, providing enhanced security and performance for the boot process.
- Cloud Computing: Cloud-based recovery and management solutions may revolutionize the way booting issues are addressed and resolved.
- Artificial Intelligence: AI algorithms may play a key role in predictive maintenance, automated troubleshooting, and overall system optimization.
Potential Enhancements to WBM:
- Improved User Interface: A more user-friendly boot menu and recovery environment could make it easier for users to troubleshoot booting issues.
- Automated Troubleshooting: Automated troubleshooting tools could diagnose and repair common booting issues without requiring user intervention.
- Integration with Cloud Services: Integration with cloud services could provide remote recovery options and automated updates.
Conclusion
The Windows Boot Manager is a critical component that ensures the seamless startup of our Windows operating systems. Understanding its role, components, and troubleshooting techniques is essential in today’s technology-driven world. By grasping the basics of booting, the functions of WBM, and how to address common issues, users can save valuable time and maintain a smoother workflow.
In an era where time is of the essence, mastering the knowledge to navigate booting challenges is not just about fixing problems—it’s about optimizing our digital experience and ensuring that technology serves us efficiently. As booting technologies continue to evolve, staying informed about the Windows Boot Manager and its future developments will undoubtedly empower us to make the most of our systems.
Learn more
From the very beginning, things need to run smoothly, and that’s precisely where the ‘computer boot sequence’ comes into play. This critical process involves an array of system and memory checks initiated at the computer’s startup, laying the groundwork for a robust and reliable system operation.
In this article, we’ll dissect the boot sequence with precision, casting light on the nuances that distinguish the boot processes between the leading operating systems—Windows and Linux. Moreover, we’ll delve into the intricacies of boot configuration options, and equip you with the technical acumen to troubleshoot the most prevalent boot-related issues. Join us on this sequential journey!
Table of Contents:
- What is the Computer Boot Sequence?
- Understanding BIOS and UEFI
- The Boot Sequence Process
- Boot Files and Their Functions
- Configuring Boot Options
- Troubleshooting Boot Issues
- Windows and Linux Boot Sequence Detailed
- References

1. What is the Computer Boot Sequence?
The computer boot sequence is like the morning routine your computer goes through every time you turn it on. Just as you wouldn’t sprint out the door without brushing your teeth, your computer doesn’t jump straight to letting you play games or write a term paper. Instead, it starts with a Power-On Self-Test (POST), where it checks its hardware to make sure everything’s in place: memory is intact, the keyboard is ready, and the screen is functioning. This is the BIOS (Basic Input/Output System) at work on older systems, or UEFI (Unified Extensible Firmware Interface) on newer ones, which is like an upgraded, faster version of BIOS with better security and more features. If the POST goes well, the BIOS/UEFI hands off control to the operating system.
Think of the operating system as the brain of your computer, and the BIOS/UEFI is like the alarm clock that wakes it up. Once the BIOS/UEFI finds the operating system through a set order of storage places—like checking the closet (hard drive) or the drawers (removable media) for your favorite shirt (the OS)—it starts loading it so you can start your day, or in this case, your work or play on the computer. Whether it’s Windows or Linux, the operating system begins to load its essential files into memory, setting up a workspace so all the programs you want to use have a place to run efficiently and securely. This sequence is meticulously engineered to ensure that by the time you see your desktop or home screen, your computer is ready and capable to tackle whatever task you throw at it.
2. Understanding BIOS and UEFI
Before your computer can leap into action, it must converse with its BIOS (Basic Input/Output System) or UEFI (Unified Extensible Firmware Interface). These systems are the unsung heroes of the boot sequence, orchestrating a harmony of hardware checks and system balances before the operating system takes the stage. BIOS, the legacy system, conducts a Power-On Self-Test (POST), ensuring each hardware component is functioning correctly before seeking out the storage device that holds the operating system. UEFI, the modern successor of BIOS, enhances this process with speed and added security measures, including protection against malware during boot-up. The transition from BIOS to UEFI wasn’t just a step; it was a leap toward a more secure, swift, and smooth booting experience. UEFI’s ability to store boot data in an easily accessible and modifiable environment—a feature absent in BIOS—allows for a more versatile pre-OS environment and faster boot and resume times.
3. The Boot Sequence Process
When power floods into a dormant computer, it triggers the BIOS or UEFI to wake from its slumber. Here’s what happens next:
BIOS Boot Sequence:
- POST: BIOS checks the health of your hardware.
- Bootloader: It then searches for the bootloader in the predefined boot device order.
- Operating System: The bootloader, found on something like your hard drive, hands over control to the operating system.
UEFI Boot Sequence:
- Initialization: UEFI runs its own diagnostics, far more elaborate than BIOS’ POST.
- Secure Boot: It verifies the operating system’s bootloader is signed with a recognized key, thwarting unauthorized bootloaders.
- EFI Executables: UEFI runs the EFI executables specified in its boot manager, a flexible system allowing multiple boot entries.
For Windows 10/11, UEFI will look for the EFI\Microsoft\Boot\bootmgfw.efi file to start Windows Boot Manager, leading to the familiar loading screen. Linux, when installed with UEFI, uses a bootloader such as GRUB, located at EFI\linux\grubx64.efi, to present you with a menu where you can choose to start Linux or another operating system.
Each step in these sequences is critical—like dominos in a line, one flaw, and the whole process can stumble, leaving a technician with the task of troubleshooting where and why the boot sequence broke down. Understanding these steps is crucial, not just for those moments when things go awry, but for appreciating the complex ballet of code and hardware that powers up our digital lives. Please read our article about the boot process.
4. Boot Files and Their Functions
The boot process of a computer system is akin to assembling a puzzle, where each piece, or boot file, must fit precisely with the others to create a complete picture that is the user’s operational environment. In Windows systems, this process begins with the BIOS or UEFI firmware identifying bootmgr (Windows Boot Manager) or bootmgfw.efi in UEFI systems, which then reads the BCD (Boot Configuration Data) store to understand the available boot options. Once the proper OS is selected, winload.exe is launched to initialize the Windows kernel.
Linux systems engage in a similar, yet distinct dance. They often use the GRUB (GRand Unified Bootloader) to read its configuration file, grub.cfg, located in the /boot/grub directory. This file directs GRUB on how to load the kernel and initial ramdisk image (initrd), which then transitions control to the Linux system.
These boot files are the choreographers of the boot sequence, dictating each step of the system’s awakening. They interact in a coordinated sequence, ensuring that the hardware is prepared, the kernel is properly loaded, and the user’s environment is precisely as they left it—ready for another day’s tasks.
5. Configuring Boot Options
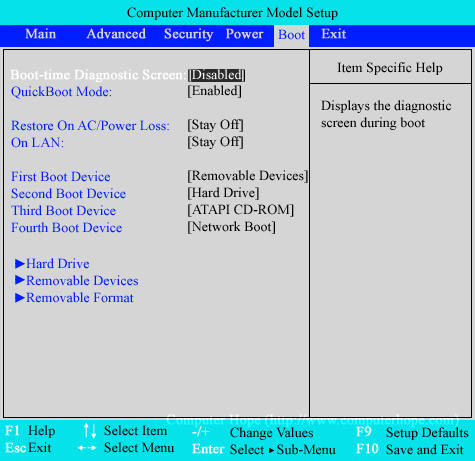
Navigating the BIOS or UEFI to configure boot options is like setting preferences for the starting players in a game—the order dictates which devices are checked first for a bootable operating system. Accessing these settings requires a key press (often Delete, F2, F10, or Esc) immediately after power-on. Within the BIOS or UEFI interface, users can sift through menus to find ‘Boot Options’ or ‘Boot Order’ and adjust the priority of devices, such as hard drives, USB drives, or DVD drives.
Altering the boot order becomes necessary in various scenarios. Perhaps there’s a need to boot from an installation media for a fresh OS install or to run a live system for troubleshooting without disturbing the primary storage. It may also be needed to prioritize a faster SSD over an older HDD, or to ensure that a dual-boot system checks for the correct bootloader. Changing boot sequence is like telling your computer, “Check here first for instructions,” and the BIOS/UEFI obliges, seeking out an OS where you’ve directed, providing a streamlined start-up aligned with the user’s immediate needs.
6. Troubleshooting Boot Issues
When the seamless boot sequence encounters turbulence, it’s akin to a conductor facing a suddenly discordant orchestra. Troubleshooting boot issues, therefore, requires a methodical approach to diagnosing and harmonizing the system’s components. Common boot sequence errors often manifest in messages like ‘No bootable device found,’ ‘Missing operating system,’ or an ominous string of beeps upon startup.
To strike the right chord in troubleshooting, start with these diagnostic tips:
- Listen and Observe: Error messages or beep codes can provide immediate clues. Refer to your motherboard’s manual for beep codes, as they can indicate specific hardware issues.
- Check Connections: Ensure all cables are connected firmly. A loose hard drive cable can lead to boot failures.
- Access BIOS/UEFI Settings: If the system bypasses your intended boot device, enter the BIOS/UEFI settings to verify the boot order.
- Boot in Safe Mode (Windows): If you suspect OS corruption, booting in Safe Mode may circumvent the issue, allowing you to perform repairs.
- Live USB/CD (Linux): A non-booting Linux system can often be addressed by booting from a Live USB, giving you the tools to repair the system.
Utilizing boot sequence information for resolution involves tracing the boot process step by step, isolating where the sequence halts. If the BIOS/UEFI doesn’t recognize storage devices, checking BIOS settings and physical connections is the first step. If the bootloader is the culprit, repairing it with recovery media or installation tools often gets the symphony back in tune.
7. Windows and Linux Boot Sequence Detailed
- Windows 10/11 Boot Sequence:
- Phase 0 – Pre-Boot: UEFI firmware checks hardware, security, and initializes system components.
- Phase 1 – Boot Loader: The Windows Boot Manager finds the Windows loader (winload.exe) for the chosen entry.
- Phase 2 – Kernel Loading: The Windows kernel is loaded and system drivers are initialized.
- Phase 3 – Logon: User logon screen is presented.
- Linux Boot Sequence (Using GRUB):
- Phase 0 – Pre-Boot: BIOS/UEFI performs POST and hands over to the bootloader.
- Phase 1 – Boot Loader: GRUB displays menu and loads the selected kernel image.
- Phase 2 – Kernel Phase: Kernel initializes the system and mounts the root file system.
- Phase 3 – Init/Systemd Phase: Init or systemd runs scripts/services leading to the login prompt.
8. References
- Books:
- “Operating Systems: Principles and Practice” by Thomas Anderson and Michael Dahlin
- “Guide to Parallel Operating Systems with Windows 10 and Linux” by Ron Carswell, Shen Jiang, and Terrill Freese
- RFCs and Publications:
- UEFI Specification (Release 2.10, Aug 29, 2022)
- “Booting process of Linux“, Wikipedia
- “Overview of Boot Options in Windows“, Microsoft Learn (Dec 12, 2023)
- “Secure the Windows Boot Process“, Microsoft Learn (Nov 8, 2023)
- “Secure Boot and Trusted Boot“, Microsoft Learn (Oct 10, 2023)
Are you wondering how exactly the windows booting process occurs and all that goes behind in the background? If yes, then you are at the right place. In this tutorial, you will learn how the windows boot process works step by step.
Let’s dive in.
Join 70 other subscribers
Table of Content
- What is firmware ?
- What is CMOS ?
- What is Flash Memory ?
- Step by Step Windows boot Processing
- What bios stands for and what is Bios ?
- What is Power On Self Test (POST)
- Master Boot Record (MBR)
- Windows Boot Manager
- Windows Boot Loader
- Loading the Windows kernel
- High Level Summary of Windows Boot Process
- High Level Summary of Windows Boot Process(Other way)
- Conclusion
What is firmware ?
Firmware is a software program stored on a hardware device to control, operate, or maintain the hardware in the background. Firmware is found on computer motherboards to hold hardware settings and settings related to BIOS and is stored in non-volatile memory devices such as ROM, EPROM, or flash memory.

What is CMOS ?
A complementary metal-oxide-semiconductor (CMOS) is a type of integrated circuit technology that
holds basic information, including the date and time and system configuration settings,
needed the basic input/output system (BIOS) to start the computer.
The CMOS (Complementary Metal-Oxide Semiconductor) chip stores the settings that you make
with the BIOS configuration program.
What is Flash Memory ?
Flash Memory is lifelong and unchanged storage used to store information even when the system is powered off. Flash memory is widely used with car radios, cell phones, digital cameras, PDAs, solid-state drives, tablets, and printers.
Step by Step Windows boot Processing
Now that you have a basic idea about a few components used in booting the windows machine. Let’s discuss in detail each step of how to perform window booting.

What bios stands for and what is Bios ?
Bios stands for Basic Input Output System and is the first software to run when a computer is started and is stored on a small memory chip on the motherboard. BIOS provides steps to the computer to perform basic functions such as booting.
(BIOS) is a program that’s stored in nonvolatile memory such as read-only memory (ROM) or flash memory, making it firmware
- BIOS is also used to identify and configure the hardware in a computer such as the hard drive, floppy drive, optical drive, CPU, memory, and related equipment.
- BIOS performs a POST (Power On Self Test) that checks all the hardware devices connected to a computer like RAM, hard disk, etc, and makes sure that the system can run smoothly with those hardware devices. If the POST is a failure the system halts with a beep sound.
- The other task of the BIOS is to read the MBR. MBR stands for Master Boot Record and it’s the first sector on a hard disk. MBR contains the partition table and boot loader.

What is Power On Self Test (POST)
Power On Self Test (POST) checks all the hardware devices connected to a computer like RAM, hard disk, etc., and makes sure that the system can run smoothly with those hardware devices. If the POST fails, the system halts with a beep sound.
The first set of startup instructions in BIOS is the POST, which is responsible for the following system and diagnostic functions:
- Performs initial hardware checks, such as determining the amount of memory present
- Verifies that the devices needed to start an operating system, such as a hard disk, are present
- Retrieves system configuration settings from nonvolatile memory, which is located on the motherboard
- If a single beep is sounded from the PC, then there are no hardware issues present in the system. However, an alternative beep sequence indicates that the PC has detected a hardware issue that needs to be resolved before moving on to the next stages of the process
Master Boot Record (MBR)
After POST performs the testing, the BIOS reads the Master Boot Record (MBR). MBR is stored on the hard disk’s first sector and contains the boot loader.
Windows Boot Manager
Windows Boot Manager enables you to choose from multiple operating systems or select the kernels or helps to start Windows Memory Diagnostics. Windows Boot Manager starts the Windows Boot Loader. Located at %SystemDrive%\bootmgr.
Windows Boot Loader
The boot loader is a small program that loads the kernel to the computer’s memory that is in the RAM. There are three boot files in a Windows operating system: NTLDR, NTDETECT.COM, and Boot.ini.
- The path of NTLDR (NT Loader) is C:\Windows\i386\NTLDR.
- C:\boot.ini contains the configuration files of NTLDR
- This file detect hardware’s and passes information to NTLDR
Loading the Windows kernel
The Windows Boot Loader is responsible for loading the Windows kernel (Ntoskrnl.exe), Hardware Abstraction Layer (HAL), Hal.dll file that helps the kernel to interact with hardware. Next, Windows executes the configuration information stored in the registry in HKLM\SYSTEM\CurrentControlSet and starts services and drivers. Winlogon.exe starts the login procedures of the windows machine.
High Level Summary of Windows Boot Process
- The computer loads the basic input/output system (BIOS) from ROM. The BIOS provides the most basic information about storage devices, boot sequence, security, Plug and Play (auto device recognition) capability and a few other items.
- The BIOS triggers a test called a power-on self-test (POST) to make sure all the major components are functioning properly. You may hear your drives spin and see some LEDs flash, but the screen, at first, remains black.
- The BIOS has the CPU send signals over the system bus to be sure all of the basic components are functioning. The bus includes the electrical circuits printed on and into the motherboard, connecting all the components with each other.
- The POST tests the memory contained on the display adapter and the video signals that control the display. This is the first point you’ll see something appear on your PC’s monitor.
- During a cold boot the memory controller checks all of the memory addresses with a quick read/write operation to ensure that there are no errors in the memory chips. Read/write means that data is written to a bit and then read back from that bit. You should see some output to your screen – on some PCs you may see a running account of the amount of memory being checked.
- The computer loads the operating system (OS) from the hard drive into the system’s RAM. That ends the POST and the BIOS transfers control to the operating system. Generally, the critical parts of the operating system – the kernel – are maintained in RAM as long as the computer is on. This allows the CPU to have immediate access to the operating system, which enhances the performance and functionality of the overall system
High Level Summary of Windows Boot Process(Other way)
- BIOS is the first software to run when a computer is started and stored on a small memory chip on the motherboard. BIOS is also used to identify hardware issues using POST and configure the hardware in a computer such as the hard drive, floppy drive, optical drive, CPU, memory, and related equipment.
- The other task of the BIOS is to read the MBR using windows boot manager.
- Further, Windows Boot Manager enables you to choose from multiple operating systems or select the kernels or helps to start Windows Memory Diagnostics. Windows Boot Manager starts the Windows Boot Loader (GRUB or LILO) located at %SystemDrive%\bootmgr.
- The boot loader ( GRUB or LILO) is a small program that loads the kernel to the memory of the computer that is RAM. There are three boot files in a Windows operating system, and they are NTLDR, NTDETECT.COM, and Boot.ini.
- The path of NTLDR (NT Loader) is C:\Windows\i386\NTLDR.
- C:\boot.ini contains the configuration files of NTLDR
- This file detect hardware’s and passes information to NTLDR
- Next, The Windows Boot Loader is responsible for loading the Windows kernel (Ntoskrnl.exe) and the Hardware Abstraction Layer (HAL), Hal.dll( Hal.dll file) that helps the kernel to interact with hardware.
- Now, the Windows executive processes the configuration information stored in the registry in HKLM\SYSTEM\CurrentControlSet and starts services and drivers.
- Finally, winlogon.exe starts the login procedures of the windows machine
Conclusion
In this tutorial, you learned various needed components, or you should know how to understand how booting works in a windows machine.
Finally, you learned step by step boot process in windows Machine. So, with this knowledge, you should have a strong understanding of the windows reboot issues?
Многие из наc сталкиваются с Windows Boot Manager, но не понимают, что это такое. Иногда данное меню появляется при загрузке ноутбука. Что делать в таких ситуациях? Рассказываем в нашем материале.
Источник: Super User / Boot Manager
Windows Boot Manager (bootmgr) — это системный компонент операционной системы Windows, который отвечает за загрузку операционной системы. Он был введен в Windows Vista и продолжает использоваться в последующих версиях, включая Windows 7, 8, 10 и 11. Boot Manager является частью архитектуры загрузки системы и выполняет несколько ключевых функций:
- Управление процессом загрузки — Windows Boot Manager определяет, какую операционную систему запускать, и передает управление загрузке ядра (Windows Loader, winload.exe). В случае, если на компьютере установлено несколько операционных систем, Boot Manager предоставляет меню для выбора, какую из них загрузить;
- Загрузка загрузочного конфигурационного файла (BCD) — Boot Manager загружает и интерпретирует данные из Boot Configuration Data (BCD) — это хранилище, в котором содержатся параметры и опции загрузки для установленных операционных систем;
- Работа с многозагрузочными конфигурациями — Boot Manager поддерживает загрузку нескольких операционных систем, позволяя пользователю выбирать среди них при старте компьютера.
Сравнение с NTLDR
Источник: Wondershare Recover It / NTLDR
NTLDR (NT Loader) — это предшественник Windows Boot Manager, который использовался в более ранних версиях Windows, таких как Windows NT, 2000 и XP. Хотя NTLDR и Boot Manager выполняют схожие функции, они существенно различаются по архитектуре, функциональности и возможностям.
|
Boot Manager |
NTLDR |
|
|
Архитектура |
Имеет модульную архитектуру и разделяет функции между несколькими компонентами, такими как Boot Manager (bootmgr) и Windows Loader (winload.exe). Это позволяет более гибко управлять процессом загрузки и расширяет возможности загрузчика |
Был монолитным загрузчиком, который управлял загрузкой операционной системы и сразу загружал ядро Windows, а также мог загружать более старые версии DOS с использованием файла boot.ini. |
|
Поддержка современных технологий |
Поддерживает как MBR, так и GPT (GUID Partition Table), а также работает в средах UEFI, что делает его более универсальным и современным инструментом для управления загрузкой операционной системы. |
Был ограничен по своим возможностям и не поддерживал современные технологии, такие как UEFI, и новые файловые системы. Он работал только с MBR (Master Boot Record) и не мог эффективно взаимодействовать с новыми аппаратными стандартами. |
|
Конфигурация и управление |
Boot Manager использует более сложную и мощную систему конфигурации на базе BCD (Boot Configuration Data), которая предоставляет расширенные возможности для настройки и управления процессом загрузки, включая поддержку различных операционных систем и конфигураций оборудования. |
Конфигурация загрузки в NTLDR осуществлялась через простой текстовый файл boot.ini, который ограничивал возможности пользователя в настройке загрузки и усложнял управление многозагрузочными системами. |
|
Графический интерфейс |
Предлагает более удобный и понятный графический интерфейс для выбора операционной системы, что упрощает взаимодействие пользователя с системой. |
Предоставлял текстовое меню для выбора операционной системы при многозагрузочной конфигурации, что было функционально, но ограничено в возможностях. |
Как работает Windows Boot Manager
Работа начинается сразу после включения компьютера и завершает свои действия перед запуском ядра операционной системы.
Этапы загрузки
Процесс загрузки с использованием Windows Boot Manager можно разделить на несколько этапов:
- Инициализация BIOS/UEFI. Когда компьютер включается, первичный процесс загрузки начинается с BIOS (Basic Input/Output System) или UEFI (Unified Extensible Firmware Interface). Эта программа загружается первой и проверяет основные компоненты системы (процессор, память, устройства ввода-вывода). BIOS или UEFI определяет, с какого устройства нужно загрузить операционную систему (жесткий диск, SSD, USB-накопитель и так далее);
- Загрузка Windows Boot Manager. После завершения работы BIOS/UEFI управление передается Windows Boot Manager, который находится на системном разделе жесткого диска (обычно этот раздел скрыт от пользователя). Boot Manager загружает и читает файл конфигурации BCD (Boot Configuration Data), который содержит информацию о доступных операционных системах и их параметрах загрузки;
- Меню выбора операционной системы. Если на компьютере установлено несколько операционных систем, Windows Boot Manager отображает меню выбора, позволяя пользователю выбрать, какую операционную систему загрузить. В случае отсутствия альтернативных ОС Boot Manager автоматически загружает единственную доступную систему;
- Передача управления Windows Loader. После выбора или автоматической загрузки операционной системы Windows Boot Manager передает управление Windows Loader (winload.exe). Этот компонент отвечает за загрузку ядра операционной системы и всех необходимых драйверов для начала работы системы;
- Загрузка ядра операционной системы. Windows Loader загружает ядро Windows, инициализирует системные драйверы и запускает системные процессы, такие как управление памятью и взаимодействие с оборудованием. После успешной загрузки ядра система переходит в стадию инициализации пользовательских процессов и служб.
Конфигурационные файлы
Windows Boot Manager использует несколько конфигурационных файлов и данных для управления процессом загрузки:
- BCD (Boot Configuration Data) — является центральным хранилищем конфигурационных данных, которые используются Windows Boot Manager. В нем содержатся записи о каждой установленной операционной системе, а также параметры загрузки, такие как путь к загрузчику ОС, режимы загрузки (обычный, безопасный или другой), а также параметры, влияющие на работу оборудования;
- winload.exe — исполняемый файл, загружаемый Windows Boot Manager после выбора операционной системы. Он отвечает за загрузку ядра и начальных драйверов, необходимых для запуска ОС;
- bootmgr — является основным исполняемым файлом Windows Boot Manager. Он хранится в корне системного раздела и загружается BIOS/UEFI для инициализации процесса загрузки.
Взаимодействие с BIOS/UEFI
Источник: Xataka Windows / BIOS и UEFI
BIOS и UEFI — это программные интерфейсы, которые находятся на границе между аппаратным обеспечением компьютера и операционной системой. Их основная задача — инициализировать и тестировать оборудование перед запуском операционной системы, а также передать управление загрузчику (в данном случае Windows Boot Manager).
BIOS работает в режиме реального времени и использует MBR (Master Boot Record) для управления загрузкой. В случае с BIOS Windows Boot Manager хранится на системном разделе, и управление передается через указание на загрузочный сектор диска, который запускает bootmgr.
UEFI является более современным интерфейсом и поддерживает работу с GPT (GUID Partition Table), что позволяет управлять загрузкой более эффективно и использовать объемы дисков, превышающие 2 ТБ. В UEFI Windows Boot Manager находится в разделе EFI, и управление передается через специальный загрузочный менеджер UEFI, который запускает bootmgfw.efi (аналог bootmgr в среде UEFI).
BIOS и UEFI могут работать в разных режимах. Для Windows это может быть либо Legacy BIOS, либо UEFI. При использовании UEFI возможна работа в режимах Secure Boot, который предотвращает загрузку неподписанного кода, тем самым защищая систему от вредоносных программ.
Можно ли отключить Windows Boot Manager?
Источник: Make Use Of / Windows Logo
Технически, Windows Boot Manager можно отключить, но это не рекомендуется для стабильной работы системы. Boot Manager является ключевым компонентом процесса загрузки Windows и управляет выбором операционной системы, настройками конфигурации загрузки и взаимодействием с ядром системы.
Отключение Boot Manager может привести к ряду проблем, таких как невозможность загрузить операционную систему, нарушение конфигураций многозагрузочных систем или повреждение данных загрузки.
Почему не рекомендуется отключать Boot Manager
- Отключение Windows Boot Manager может сделать систему нестабильной или даже нерабочей. Этот компонент управляет процессом загрузки и обеспечивает правильную передачу управления ядру ОС. Без него Windows не сможет корректно загружаться;
- Если на вашем компьютере установлено несколько операционных систем (например, Windows и Linux), отключение Boot Manager приведет к потере возможности выбирать между ними при загрузке. Это может усложнить процесс управления многозагрузочными конфигурациями;
- В современных системах с UEFI и Secure Boot отключение Boot Manager может привести к нарушению работы системы безопасности, а также вызвать ошибки при загрузке ОС;
- Boot Manager опирается на файл конфигурации BCD для управления параметрами загрузки, такими как выбор операционной системы или безопасный режим. Без Boot Manager система не сможет корректно обрабатывать эти параметры.
Временное отключение
Если необходимо временно отключить или скрыть меню Windows Boot Manager, это можно сделать путем изменения настроек. Однако важно понимать, что такое отключение является временной мерой, и система будет по-прежнему использовать Boot Manager для загрузки.
Можно настроить время отображения меню выбора операционной системы. Для этого нужно изменить тайм-аут в файле BCD с помощью утилиты bcdedit. Например:
- bashCopy codebcdedit /timeout 0
Это отключит отображение меню выбора ОС, и система будет загружаться автоматически без задержки.
Если на компьютере установлено несколько операционных систем, можно выбрать одну из них по умолчанию и автоматически загружать её, не отображая меню выбора. Это можно сделать через настройки системы:
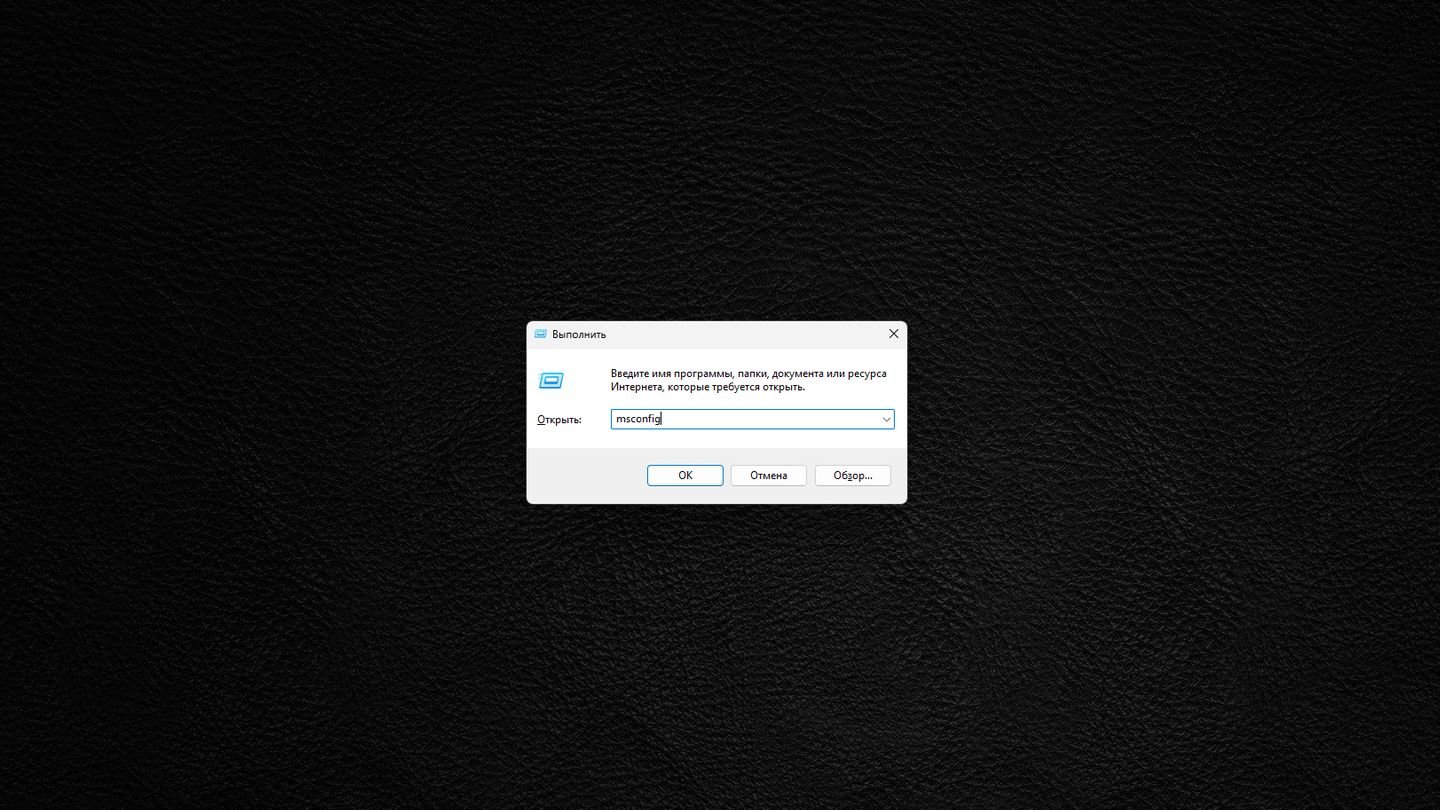
- Нажмите Win + R, введите msconfig.
Источник: CQ / Windows 11
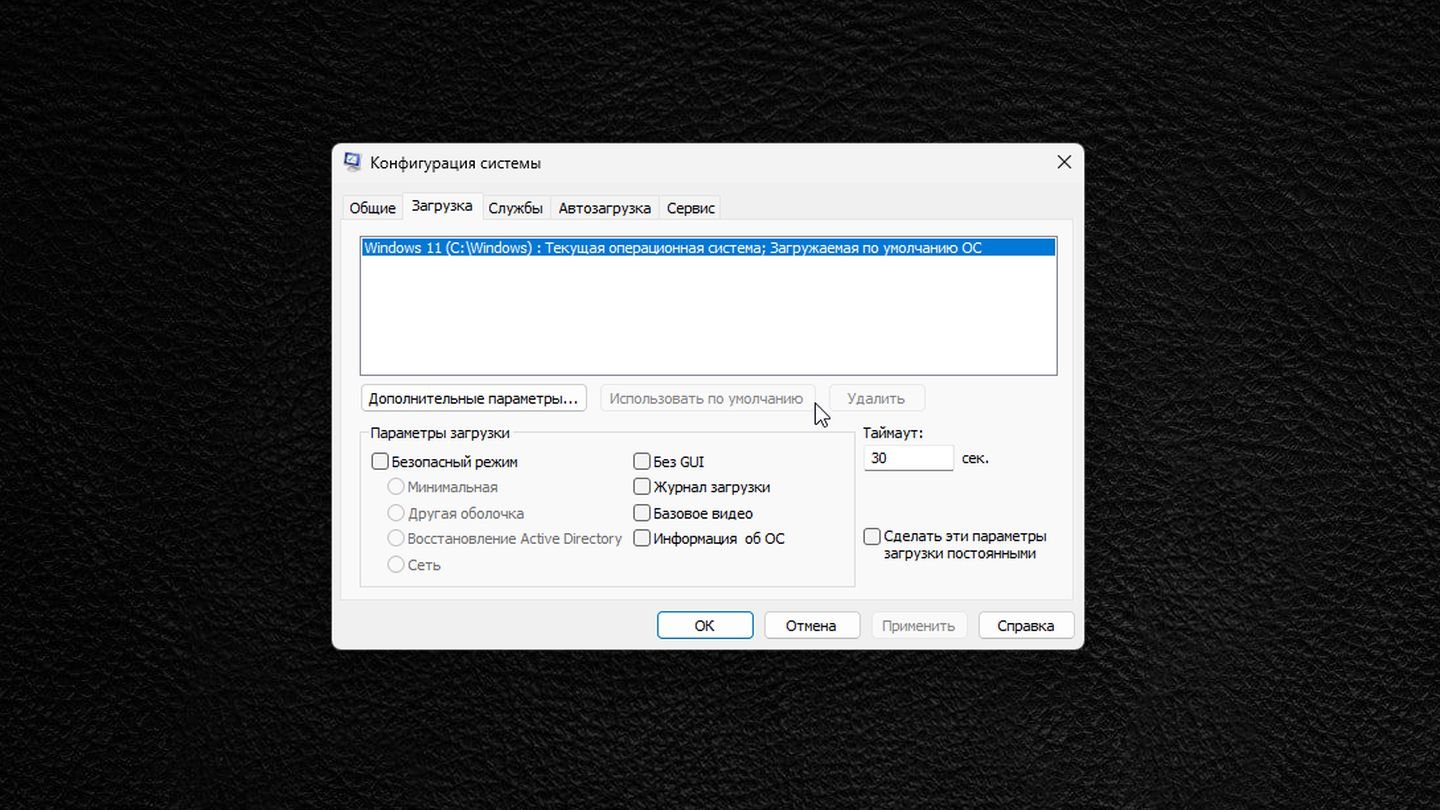
- В разделе «Загрузка» выберите нужную ОС и установите ее по умолчанию.
Источник: CQ / Windows 11
- Установите таймер загрузки на 0 секунд.
Альтернативные варианты загрузки одной ОС
В системах с UEFI вы можете настроить загрузку ОС напрямую через интерфейс UEFI, выбрав в меню загрузки нужный диск или раздел, содержащий операционную систему. Это позволяет загружаться в обход некоторых функций Boot Manager, но в случае сбоя все равно потребуется восстановить Boot Manager.
Существуют сторонние загрузчики, такие как GRUB (обычно используется в системах Linux), которые могут управлять процессом загрузки на уровне выше, чем Boot Manager. Однако использование таких загрузчиков требует знаний и конфигурации и может привести к дополнительным сложностям в системах с Windows.
Заглавное фото: HP