
Windows tablets have become increasingly popular due to their portability, versatility, and user-friendly interface. However, when it comes to accessing the boot menu, many users find themselves struggling to navigate the process. In this article, we will delve into the world of Windows tablets and explore the various methods to access the boot menu, providing you with a comprehensive guide to help you unlock your device’s full potential.
Understanding the Boot Menu
Before we dive into the methods of accessing the boot menu, it’s essential to understand what it is and why it’s crucial for your Windows tablet. The boot menu, also known as the boot options or boot settings, is a menu that appears during the boot process, allowing you to select the operating system, boot device, or perform diagnostic tests. The boot menu is usually accessed by pressing a specific key or combination of keys during the boot process.
Why Access the Boot Menu?
Accessing the boot menu is necessary for various reasons, including:
- Boot device selection: If you have multiple storage devices connected to your tablet, you may need to select the correct boot device to load the operating system.
- Operating system selection: If you have multiple operating systems installed on your tablet, you can select the desired OS from the boot menu.
- Diagnostic tests: The boot menu often provides options to run diagnostic tests, such as memory tests or disk checks, to help troubleshoot issues with your tablet.
- Boot order modification: You can modify the boot order to prioritize certain devices or operating systems.
Methods to Access the Boot Menu on a Windows Tablet
The methods to access the boot menu on a Windows tablet vary depending on the device manufacturer and model. Here are some common methods:
Method 1: Using the Windows + X Key Combination
On some Windows tablets, you can access the boot menu by pressing the Windows key + X during the boot process. This will open the boot options menu, allowing you to select the desired boot device or operating system.
Method 2: Using the F12 Key
Many Windows tablets use the F12 key to access the boot menu. To do this:
- Restart your tablet.
- As soon as the tablet starts booting, press the F12 key repeatedly.
- The boot menu should appear, allowing you to select the desired boot device or operating system.
Method 3: Using the F2 or F10 Key
Some Windows tablets use the F2 or F10 key to access the boot menu. To do this:
- Restart your tablet.
- As soon as the tablet starts booting, press the F2 or F10 key repeatedly.
- The boot menu should appear, allowing you to select the desired boot device or operating system.
Method 4: Using the UEFI Firmware Settings
If your Windows tablet uses UEFI firmware, you can access the boot menu by entering the UEFI settings. To do this:
- Restart your tablet.
- As soon as the tablet starts booting, press the key to enter the UEFI settings (usually F2, F10, or Del).
- Navigate to the Boot tab and select the desired boot device or operating system.
Method 5: Using the Windows Settings App
On Windows 10 and later versions, you can access the boot menu from the Windows Settings app. To do this:
- Go to the Start menu and select the Settings app.
- Click on Update & Security.
- Click on Recovery.
- Under Advanced startup, click on Restart now.
- The boot menu should appear, allowing you to select the desired boot device or operating system.
Troubleshooting Common Issues
If you’re having trouble accessing the boot menu on your Windows tablet, here are some common issues and their solutions:
Issue 1: The Boot Menu Doesn’t Appear
- Check the keyboard: Ensure that the keyboard is functioning correctly and that the keys are not stuck.
- Check the boot order: Ensure that the boot order is set correctly in the UEFI settings.
- Check for firmware updates: Ensure that the UEFI firmware is up-to-date.
Issue 2: The Boot Menu Appears but Doesn’t Respond
- Check the keyboard: Ensure that the keyboard is functioning correctly and that the keys are not stuck.
- Check for conflicts: Ensure that there are no conflicts with other devices or operating systems.
Conclusion
Accessing the boot menu on a Windows tablet can be a challenging task, but with the right methods and troubleshooting techniques, you can unlock your device’s full potential. By following the methods outlined in this article, you should be able to access the boot menu and perform various tasks, such as selecting the boot device, operating system, or running diagnostic tests. Remember to always refer to your device’s user manual or manufacturer’s website for specific instructions, as the methods may vary depending on the device model and manufacturer.
Additional Tips and Recommendations
- Backup your data: Before making any changes to the boot menu, ensure that you have backed up your important data to prevent any loss.
- Use caution when modifying the boot order: Modifying the boot order can cause issues with your device, so use caution and ensure that you understand the implications before making any changes.
- Keep your device up-to-date: Ensure that your device is running the latest version of Windows and that the UEFI firmware is up-to-date to prevent any compatibility issues.
By following these tips and recommendations, you can ensure that your Windows tablet is running smoothly and efficiently, and that you can access the boot menu with ease.
What is the Boot Menu and Why Do I Need to Access It?
The Boot Menu is a feature in Windows that allows you to select the device or operating system to boot from when you start your tablet. It’s essential to access the Boot Menu if you want to boot from an external device, such as a USB drive or CD/DVD, or if you need to troubleshoot issues with your tablet’s operating system. By accessing the Boot Menu, you can also change the boot order, which can be helpful if you’re trying to install a new operating system or run a diagnostic test.
Additionally, accessing the Boot Menu can be useful if you’re experiencing issues with your tablet’s boot process, such as a stuck boot screen or a failure to boot. By accessing the Boot Menu, you can try booting in safe mode or accessing the Windows Recovery Environment, which can help you troubleshoot and fix issues with your tablet’s operating system.
How Do I Access the Boot Menu on My Windows Tablet?
To access the Boot Menu on your Windows tablet, you’ll typically need to press a specific key or combination of keys during the boot process. The exact key or combination of keys may vary depending on your tablet’s manufacturer and model. Common keys used to access the Boot Menu include F2, F12, and the Volume Down button. You may need to consult your tablet’s user manual or manufacturer’s website to determine the correct key or combination of keys for your device.
Once you’ve determined the correct key or combination of keys, restart your tablet and press the key or keys immediately after the tablet’s logo appears on the screen. This should bring up the Boot Menu, which will display a list of available boot devices and options. From here, you can use the arrow keys to select the device or option you want to boot from, and then press Enter to confirm your selection.
What Are the Different Boot Options Available in the Boot Menu?
The Boot Menu typically displays a list of available boot devices, including the internal hard drive, external USB drives, and CD/DVD drives. You may also see options for booting in safe mode, accessing the Windows Recovery Environment, or booting from a network device. The exact options available will depend on your tablet’s hardware and software configuration.
In addition to selecting a boot device, the Boot Menu may also allow you to change the boot order, which determines the order in which the tablet checks for boot devices. You can use the arrow keys to move devices up or down in the boot order list, and then press Enter to save your changes. This can be helpful if you need to boot from an external device or if you’re trying to troubleshoot issues with your tablet’s boot process.
How Do I Change the Boot Order in the Boot Menu?
To change the boot order in the Boot Menu, use the arrow keys to select the device you want to move, and then press the + or – key to move it up or down in the list. You can also use the Page Up and Page Down keys to move devices up or down in larger increments. Once you’ve made your changes, press Enter to save the new boot order.
Keep in mind that changing the boot order can affect how your tablet boots, so be careful when making changes. If you’re unsure about how to change the boot order or what the different options mean, it’s a good idea to consult your tablet’s user manual or manufacturer’s website for more information. Additionally, be aware that some tablets may have a separate setting for the boot order, which can be accessed through the UEFI firmware settings.
What Is UEFI Firmware and How Does It Relate to the Boot Menu?
UEFI (Unified Extensible Firmware Interface) firmware is a type of firmware that replaces the traditional BIOS (Basic Input/Output System) firmware found in older computers. UEFI firmware provides a more modern and flexible way of configuring your tablet’s hardware and boot settings. The Boot Menu is typically accessed through the UEFI firmware settings, which can be accessed by pressing a specific key or combination of keys during the boot process.
UEFI firmware settings can be used to configure a wide range of settings, including the boot order, boot devices, and security settings. You can also use the UEFI firmware settings to update the firmware, which can help improve the performance and stability of your tablet. However, be careful when making changes to the UEFI firmware settings, as incorrect settings can prevent your tablet from booting properly.
Can I Access the Boot Menu on My Windows Tablet If I’m Using a Keyboard Dock or External Keyboard?
Yes, you can access the Boot Menu on your Windows tablet even if you’re using a keyboard dock or external keyboard. However, you may need to use a specific key or combination of keys on the keyboard to access the Boot Menu. The exact key or combination of keys may vary depending on your tablet’s manufacturer and model, so be sure to consult your tablet’s user manual or manufacturer’s website for more information.
Additionally, if you’re using a keyboard dock or external keyboard, you may need to ensure that it’s properly connected to your tablet before trying to access the Boot Menu. This can help ensure that the keyboard is recognized by the tablet and that you can use it to access the Boot Menu.
What Should I Do If I’m Having Trouble Accessing the Boot Menu on My Windows Tablet?
If you’re having trouble accessing the Boot Menu on your Windows tablet, try restarting your tablet and pressing the key or combination of keys again. You can also try pressing the key or combination of keys at different times during the boot process to see if it makes a difference. If you’re still having trouble, consult your tablet’s user manual or manufacturer’s website for more information on how to access the Boot Menu.
Additionally, if you’re experiencing issues with your tablet’s boot process or are unable to access the Boot Menu, you may want to try booting in safe mode or accessing the Windows Recovery Environment. These options can help you troubleshoot and fix issues with your tablet’s operating system, and may provide additional options for accessing the Boot Menu.
Как войти в бут меню? — Войти в boot menu довольно просто – для этого достаточно лишь нажать на определенную клавишу во время загрузки, точно так же, как вы это делаете для того, чтобы войти в BIOS Setup. Обычно разные производители назначают для этого разные клавиши. Это может быть и клавиша и F8, и F11, и F12, и Esc.
Как зайти в Boot Menu на планшете?
При выключении планшета, т.е. при нажатии и удерживании кнопки выключения выпадает меню, в котором необходимо выбрать перезагрузка в Recovery, в случае, если его нет, то выключаем планшет одновременным нажатием кнопки выключения и кнопки громкости в положении «+», при этом устройство загрузится в инженерное меню.
Как зайти в БИОС на планшете Huawei?
Поддерживаемые продукты: HUAWEI MateStation X,PC,Desktop Поддерживаемые продукты:
Переход на экран настроек BIOS Во время запуска или после перезагрузки компьютера нажмите F2 (или во время выключения HUAWEI MateBook или HUAWEI MateBook E одновременно нажмите кнопку питания и кнопку увеличения громкости), чтобы перейти на экран настроек BIOS, и выполните настройку BIOS.
Информация была полезна? Да Нет Отправить Спасибо за Ваш комментарий.
Как войти в БИОС на планшете Windows 8?
Shift + Перезагрузка — Еще один способ — нажать по кнопке выключения компьютера в боковой панели или на начальном экране (начиная с Windows 8.1 Update 1) и затем, удерживая клавишу Shift нажать «Перезагрузка». Это также вызовет появление особых вариантов загрузки системы.
Как зайти в БИОС?
Какой кнопкой воспользоваться? — Для входа необходимо нажимать соответствующую кнопку после включения компьютера до появления биос либо дождаться появления логотипа производителя материнской платы или компьютера. Общие клавиши для входа в BIOS — это F1, F2, F10, Delete, Esc, а также комбинации клавиш, такие как Ctrl + Alt + Esc или Ctrl + Alt + Delete, хотя они чаще встречаются в старых компьютерах.
Как зайти в Boot Menu на Андроиде?
Google —
- Выключите смартфон. Нажмите и удерживайте кнопки питания и уменьшения громкости до тех пор, пока не откроется меню. Выберите пункт Recovery Mode, используя кнопки громкости для навигации, а затем подтвердите действие, нажав на кнопку питания. На экране появится изображение перевёрнутого «андроида» с восклицательным знаком на спине. Зажмите кнопку питания вместе с увеличением громкости, через несколько секунд отпустите кнопку громкости, но продолжайте при этом удерживать кнопку питания.
Как вызвать БИОС на андроид?
— А на Андроид вы можете зайти в некое Recovery Menu (Рекавери Меню – в разговоре), которое может решить вышеприведенные вопросы. Универсального способа, который подходил бы для всех без исключения девайсов, не существует. Обычно, тем кто желает зайти в стандартное рекавери-меню, советуют при включении телефона зажать кнопку повышения громкости, а потом уже нажимать кнопку питания.
Как сделать полный сброс на планшете Huawei?
Первый метод: Используйте кнопки регулировки громкости, чтобы перейти к ‘wipe data/factory reset ‘ и подтвердить эту опцию с помощью кнопки питания. Еще раз выберите ‘wipe data/factory reset ‘ из меню и подтвердите выбор ‘wipe data/factory reset ‘ кнопки питания.
Как зайти в рекавери на планшете Номи?
Нажмите клавишу увеличения громкости + питания, чтобы открыть режим восстановления. Теперь выберите стирание данных / сброс настроек. Используйте клавиши громкости для навигации и кнопку питания, чтобы подтвердить это.
Как зайти в БИОС и переустановить винду?
Вход в БИОС при включении компьютера — Есть и традиционный, всем известный метод войти в БИОС (подходит и для UEFI) — нажать клавишу Delete (для большинства ПК) или F2 (для большинства ноутбуков) сразу при включении компьютера, еще до начала загрузки ОС.
- Как правило, на экране загрузки внизу отображается надпись: Press Название_Клавиши to enter setup.
- Если такой надписи нет, вы можете ознакомиться с документацией к материнской плате или ноутбуку, там должна присутствовать такая информация.
- Для Windows 10 вход в БИОС этим способом это осложняется тем, что загрузка компьютера происходит действительно быстро, и не всегда эту клавишу можно успеть нажать (или даже увидеть сообщение о том, какую именно).
Для решения этой проблемы, вы можете: отключить функцию быстрой загрузки. Для этого, в Windows 10 кликните правой кнопкой мыши по кнопке «Пуск», выберите в меню «Панель управления», а в панели управления — электропитание. Слева кликните «Действия кнопок питания», а на следующем экране — «Изменение параметров, которые сейчас недоступны». Внизу, в разделе «Параметры завершения работы» уберите отметку «Включить быстрый запуск» и сохраните изменения. После этого, выключите или перезагрузите компьютер и попробуйте войти в БИОС с помощью необходимой клавиши. Примечание: в некоторых случаях, когда монитор подключен к дискретной видеокарте, вы можете не увидеть экран БИОС, а также информацию о клавишах для входа в него. В этом случае может помочь его переподключение к интегрированному графическому адаптеру (выходы HDMI, DVI, VGA на самой материнской плате).
Как войти в БИОС на планшете престижио?
BIOS — Как автор ни старался активировать поворот экрана, этого не произошло, поэтому скриншоты прилагаются в вертикальной ориентации. Для доступа в БИОС необходимо при начальной загрузке нажать на кнопку Esc. Рассмотрим меню начальной загрузки, которое содержим следующие варианты:
- Continue – продолжить загрузку;Boot Manager – выбор между оболочками (стандартная или EFI);Device Management – выбор первичного видеоадаптера;Boot from File – используется для запуска загрузчика Windows EFI с носителя;Secure Boot Option – данный пункт позволяет выполнить сброс к заводским настройкам или вовсе очистить устройство удалив все текущие разделы на диске;SCU – вход в основное меню БИОС.
Остановимся и поподробнее рассмотрим последний вариант загрузки SCU, который открывает нам доступ к основному меню БИОС. Main – в данной вкладке можно выбрать язык или установить дату и число. Advanced – содержит в себе различные подразделы с множеством настроек и дополнительной информацией. Security – возможность установки пароля при загрузке устройства. Power – расширенные настройки для процессора, здесь можно задать уровень производительности для экономии заряда батареи. Boot – здесь вы найдете такие опции, как включение быстрой загрузки или же активация загрузки со съёмных носителей. Exit – предоставляет доступ к сохранению настроек, загрузке оптимальных параметров, создание заготовки со своими параметрами и т.д.
Как зайти в безопасный режим Windows 8 через БИОС?
Используйте F8 или Shift + F8 (не работает, когда используется UEFI BIOS и SSD) В случае с Windows 7 достаточно нажать на F8 перед самым началом запуска операционной системы, чтобы попасть в меню с дополнительными вариантами загрузки, откуда уже можно загрузить операционную систему в безопасном режиме.
Как зайти в загрузочное меню?
Как зайти в BIOS и загрузиться с USB на Windows-планшетах (на примере TECLAST X80 и TECLAST X16 )
Как попасть в загрузочное меню — Прежде всего, не стоит забывать о том, что порядок загрузочных устройств можно установить в меню программы BIOS Setup. Об этой возможности стоит помнить еще и потому, что у некоторых системных плат, особенно на старых компьютерах, просто нет загрузочного меню.
- Обычно список загрузочных устройств можно найти в разделе Boot, где можно установить их приоритет, то есть, расположить устройства в таком порядке, чтобы система поочередно искала бы операционную систему на каждом из них.
- Но предположим, что вы не можете по каким-то причинам зайти в BIOS и установить там нужное устройство или просто не хотите тратить на это время.
Тогда у вас есть возможность выбрать загрузочное устройство прямо во время загрузки компьютера. Войти в boot menu довольно просто – для этого достаточно лишь нажать на определенную клавишу во время загрузки, точно так же, как вы это делаете для того, чтобы войти в BIOS Setup.
- Обычно разные производители назначают для этого разные клавиши.
- Это может быть и клавиша и F8, и F11, и F12, и Esc.
- Все зависит от конкретного производителя материнской платы, а также BIOS.
- Поэтому лучше всего посмотреть в документацию по определенной системной плате или ноутбуку.
- Или посмотреть нужную клавишу во время загрузки BIOS на экране.
Но подобный способ вряд ли сработает в том случае ноутбука, ведь экран загрузочный экран на ноутбуке мелькает очень быстро, и пользователь, как правило, не успевает заметить, что там написано. Единственное, что можно посоветовать в данном случае, это то, что на ноутбуках, как правило, используется клавиша F12.
- Так что по возможности попробуйте сначала F12, а затем другие функциональные клавиши.
- Имейте также в виду, что в разных системах boot menu обозначается по-разному – оно может называться BBS Popup, MultiBoot Menu, Boot Agent или как-то иначе.
- Ниже мы приведем список основных клавиш, используемых для вызова загрузочного меню в зависимости от производителя системной платы и BIOS.
Десктопы
- MSI(материнская плата) – AMI (BIOS) – F11 Gigabyte – Award – F12 BioStar — Phoenix-Award – F9 Asus – AMI – F8 Intel — Phoenix-Award — Esc AsRock — AMI — F11 ChainTech – отсутствует ECS – AMI – F11 FoxConn – Esc GigaByte – F12
Ноутбуки
- Asus — Esc Acer — F12 Asus AMI – Esc Asus Phoenix-Award – F8 Dell — F12 Fujitsu – F12 HP — Esc, затем F9 Lenovo — F12 MSI – F11 Samsung – Esc (примечание – нажимать только 1 раз во время появления загрузочного экрана!) Sony — F11 Toshiba — F12
Что делать если не заходит в БИОС?
Попробуйте сбросить настройки BIOS, вытащив литиевую батарейку из материнской платы, замкнув контакты или использовав специальную кнопку. Выбор способа зависит от модели ноутбука, поэтому вам нужно найти руководство по эксплуатации и почитать в нем информацию, относящуюся к сбросу CMOS.
Почему не открывается БИОС?
1.3. Черный экран и отсутствие звуковых сигналов —
Если компьютер включается, но «черный экран» при этом не сопровождается какими-либо звуковыми сигналами, то можно предположить, что что-то не в порядке с системой питания. Например, вышел из строя блок питания и по этой причине не подает нужное напряжение на системную плату.
Are you having trouble accessing the boot menu on your Windows 10 tablet? Don’t worry, you’re not alone. Many users have reported difficulties in accessing this crucial feature, which can be frustrating, especially when you need to troubleshoot or repair your device. In this article, we’ll take you through a comprehensive guide on how to get to the boot menu on your Windows 10 tablet.
Understanding The Boot Menu
Before we dive into the steps, let’s first understand what the boot menu is and why it’s essential. The boot menu, also known as the boot options menu, is a feature that allows you to select the device or operating system you want to boot from. This menu is usually accessed during the boot process, and it provides options to boot from different devices, such as the hard drive, USB drive, or CD/DVD drive.
On a Windows 10 tablet, the boot menu is crucial for troubleshooting and repairing issues. For example, if your device is not booting properly, you can use the boot menu to boot from a USB drive or CD/DVD drive to access the Windows Recovery Environment (WinRE). From there, you can perform various troubleshooting tasks, such as running a system restore, checking for disk errors, or reinstalling Windows.
Why Can’t I Access The Boot Menu On My Windows 10 Tablet?
There are several reasons why you may not be able to access the boot menu on your Windows 10 tablet. Here are a few possible causes:
- Fast Startup: Windows 10 has a feature called Fast Startup, which allows your device to boot faster by saving the system state to a file. However, this feature can sometimes prevent the boot menu from appearing.
- UEFI Firmware Settings: The UEFI firmware settings on your tablet may be configured to boot directly to Windows, bypassing the boot menu.
- Boot Order: The boot order on your tablet may be set to prioritize the internal hard drive or solid-state drive (SSD) over other devices, such as USB drives or CD/DVD drives.
Method 1: Accessing The Boot Menu Using The Windows Settings App
One way to access the boot menu on your Windows 10 tablet is through the Windows Settings app. Here’s how:
- Go to the Start menu and click on the Settings app.
- Click on the “Update & Security” option.
- Click on the “Recovery” option from the left menu.
- Under the “Advanced startup” section, click on the “Restart now” button.
- Your device will restart, and you’ll see the boot menu appear.
Note that this method only works if you’re able to access the Windows desktop. If your device is not booting properly, you’ll need to use a different method.
Method 2: Accessing The Boot Menu Using The Windows + X Menu
Another way to access the boot menu on your Windows 10 tablet is by using the Windows + X menu. Here’s how:
- Press the Windows key + X on your keyboard.
- Click on the “Shut down or sign out” option.
- Click on the “Restart” option while holding down the Shift key.
- Your device will restart, and you’ll see the boot menu appear.
Method 3: Accessing The Boot Menu Using The UEFI Firmware Settings
If the above methods don’t work, you can try accessing the boot menu through the UEFI firmware settings. Here’s how:
- Restart your device and immediately start pressing the F2 key repeatedly (or the key specified by your tablet manufacturer).
- This will take you to the UEFI firmware settings.
- Navigate to the “Boot” or “Boot Order” section.
- Look for the “Boot Menu” or “Boot Options” option and select it.
- Save your changes and exit the UEFI firmware settings.
- Your device will restart, and you’ll see the boot menu appear.
Method 4: Accessing The Boot Menu Using A USB Drive
If you’re unable to access the boot menu using the above methods, you can try creating a bootable USB drive. Here’s how:
- Create a bootable USB drive using a tool like Rufus or the Windows Media Creation Tool.
- Insert the USB drive into your tablet.
- Restart your device and immediately start pressing the F12 key repeatedly (or the key specified by your tablet manufacturer).
- This will take you to the boot menu.
- Select the USB drive as the boot device.
Troubleshooting Tips
If you’re still having trouble accessing the boot menu on your Windows 10 tablet, here are some troubleshooting tips to try:
- Disable Fast Startup: Go to the Power Options in the Control Panel and disable Fast Startup.
- Check the Boot Order: Go to the UEFI firmware settings and check the boot order. Make sure that the USB drive or CD/DVD drive is set as the first boot device.
- Use a Different USB Port: If you’re using a USB drive, try using a different USB port on your tablet.
Conclusion
Accessing the boot menu on a Windows 10 tablet can be a challenge, but it’s not impossible. By following the methods outlined in this article, you should be able to access the boot menu and troubleshoot any issues with your device. Remember to always be careful when working with the boot menu, as incorrect settings can cause problems with your device. If you’re still having trouble, don’t hesitate to seek help from a professional.
What Is The Boot Menu And Why Do I Need To Access It?
The Boot Menu is a feature in Windows 10 that allows you to boot your device from a USB drive, CD/DVD, or other external devices. It also provides options for troubleshooting and repairing your device. You may need to access the Boot Menu to install a new operating system, run a diagnostic test, or boot from a recovery drive.
Accessing the Boot Menu can be useful in various situations, such as when your device is not booting properly or when you need to perform a clean install of Windows 10. By accessing the Boot Menu, you can take control of the boot process and make necessary changes to get your device up and running smoothly.
How Do I Access The Boot Menu On My Windows 10 Tablet?
To access the Boot Menu on your Windows 10 tablet, you can use the Settings app or the Windows + X keyboard shortcut. Go to Settings > Update & Security > Recovery, and click on the “Restart now” button under Advanced startup. Alternatively, press the Windows + X keys and select “Shut down or sign out” > “Restart” while holding the Shift key.
Once your device restarts, you will see the Boot Menu options. Use the arrow keys to select the desired option, such as booting from a USB drive or accessing the UEFI settings. Follow the on-screen instructions to complete the desired action.
What Are The Different Boot Menu Options Available On Windows 10?
The Boot Menu on Windows 10 provides several options, including booting from a USB drive, CD/DVD, or network. You can also access the UEFI settings, run a diagnostic test, or boot from a recovery drive. Additionally, you can select the “Troubleshoot” option to access advanced troubleshooting tools, such as System Restore and System Image Recovery.
The Boot Menu options may vary depending on your device’s hardware and configuration. For example, if your device has a UEFI firmware, you may see additional options for configuring the UEFI settings. Familiarize yourself with the available options to make the most of the Boot Menu.
Can I Access The Boot Menu On My Windows 10 Tablet Using A Keyboard Shortcut?
Yes, you can access the Boot Menu on your Windows 10 tablet using the Windows + X keyboard shortcut. Press the Windows + X keys and select “Shut down or sign out” > “Restart” while holding the Shift key. This will restart your device and take you directly to the Boot Menu.
Alternatively, you can also use the Windows + I keyboard shortcut to open the Settings app and navigate to the Recovery section to access the Boot Menu. However, the Windows + X method is quicker and more convenient.
How Do I Boot From A USB Drive Using The Boot Menu On My Windows 10 Tablet?
To boot from a USB drive using the Boot Menu on your Windows 10 tablet, insert the USB drive into your device and restart it. Access the Boot Menu using the Windows + X keyboard shortcut or the Settings app. Select the “Use a device” option and choose the USB drive from the list of available devices.
Once you select the USB drive, your device will boot from it. Make sure the USB drive is properly configured and contains the necessary files for booting. If you’re trying to install a new operating system, ensure that the USB drive is bootable and contains the installation files.
Can I Access The UEFI Settings From The Boot Menu On My Windows 10 Tablet?
Yes, you can access the UEFI settings from the Boot Menu on your Windows 10 tablet. To do so, access the Boot Menu using the Windows + X keyboard shortcut or the Settings app. Select the “UEFI Firmware Settings” option and follow the on-screen instructions to enter the UEFI settings.
In the UEFI settings, you can configure various options, such as the boot order, secure boot settings, and device settings. Be cautious when making changes to the UEFI settings, as incorrect configurations can cause boot issues or other problems.
What Should I Do If I’m Unable To Access The Boot Menu On My Windows 10 Tablet?
If you’re unable to access the Boot Menu on your Windows 10 tablet, try restarting your device and pressing the Volume Down button simultaneously. This may take you directly to the Boot Menu. Alternatively, you can try pressing the Windows + B keys to access the Boot Menu.
If you’re still unable to access the Boot Menu, ensure that your device is properly configured and that the Boot Menu is enabled in the UEFI settings. You can also try resetting your device to its default settings or seeking assistance from the manufacturer’s support team.
Содержание статьи:
- Справочная: «горячие» клавиши
- Модель мат. платы (ноутбука) и пр.
- Таблица №1: для компьютеров (по производителю мат. платы)
- Таблица №2: для ноутбуков (BIOS + Boot Menu, и пр.)
- Таблица №3: восстановление из скрытого раздела (для ноутбуков)
- 📌 PS: если не получилось зайти в BIOS
- Вопросы и ответы: 12
Доброго всем дня!
При установке Windows (например), очень часто необходимо выбрать загрузочный носитель, отличный от жесткого диска. Сделать это можно двумя путями:
- 👉 зайти в BIOS и изменить очередь загрузки (т.е. поставить в очередь загрузки флешку перед HDD — таким образом ПК будет сначала проверять флешку на наличие загрузочных записей, а только потом жесткий диск);
- 👉 вызвать Boot Menu и в нем выбрать конкретный носитель для загрузки в данный момент. На мой взгляд, этот вариант даже лучше первого: быстрее и не нужно заходить туда-сюда в BIOS менять очередь загрузки.
*
Чтобы войти в BIOS (вызвать Boot Menu) в большинстве случаев используется клавиши: F2, Del, Esc, F12 (в зависимости от производителя устройства). Кнопку нажимать нужно сразу же после включения компьютера (можно несколько раз, чтобы не пропустить нужный момент.
Кстати, если приглядеться на первый экран, который виден сразу после включения компьютера, то на нем часто пишут кнопку для входа в нужные настройки (вызова меню). Пример на скрине ниже. 👇
👉 Важно!
Войти в UEFI (BIOS) можно из интерфейса Windows 11, 10, 8 (без использования спец. клавиш F2, Del и др.)!
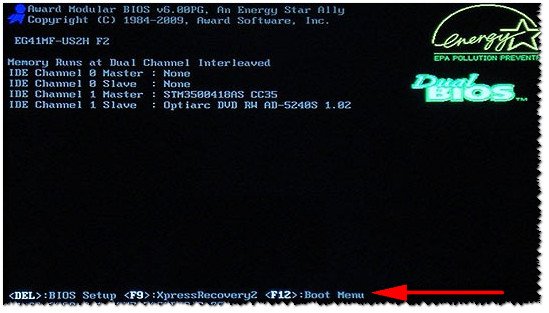
Рис. 1. Dual Bios. Кнопка DEL — вход в настройки BIOS, кнопка F12 — Вызов Boot Menu.
*
Справочная: «горячие» клавиши
Модель мат. платы (ноутбука) и пр.
Чтобы пользоваться таблицами ниже — Вам необходимо точно знать какая у вас материнская плата (модель ноутбука). Узнать это можно несколькими путями, приведу самые быстрые:
- воспользоваться 👉 документацией, которая шла к вашему ПК/ноутбуку (если она еще сохранилась 😉);
- воспользоваться какой-нибудь спец. утилитой 👉 для определения характеристик компьютера. Порекомендую Speccy…
- прочитать мои примеры по определению 👉 модели мат. платы // 👉 модели ноутбука.
*
Speccy
Официальный сайт: https://www.piriform.com/speccy
Простая бесплатная программа, которая расскажет о вашем железе довольно много. Например, можно узнать информацию о: процессоре (CPU), оперативной памяти (Ram), материнской плате (Motherboard), видеокарте (Graphics), накопителях HDD, SSD (Storage) и пр.
Кроме этого, можно узнать и контролировать в режиме онлайн температуру основных компонентов: жесткого диска, видеокарты, процессора.
Скриншот работы данной утилиты показан на рис. 2. 👇
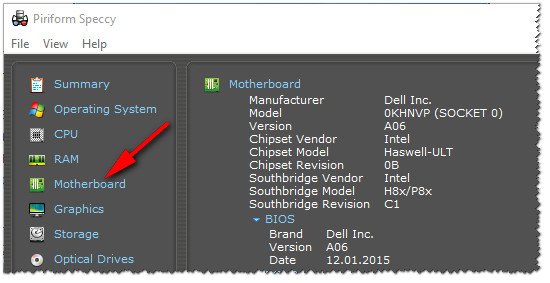
Рис. 2. Speccy — получение информации о материнской плате
*
Таблица №1: для компьютеров (по производителю мат. платы)
| Материнская плата | Версия BIOS | Горячая клавиша | Какое меню будет открыто |
|---|---|---|---|
| Acer | Del | Enter Setup | |
| F12 | Boot Menu | ||
| ASRock | AMI | F2 or DEL | run Setup |
| F6 | Instant Flash | ||
| F11 | Boot Menu | ||
| TAB | switch Screen | ||
| Asus | Phoenix-Award | DEL | BIOS Setup |
| TAB | Display BIOS POST Message | ||
| F8 | Boot Menu | ||
| Alt + F2 | Asus EZ Flash 2 | ||
| F4 | Asus Core Unlocker | ||
| BioStar | Phoenix-Award | F8 | Enable System Configuration |
| F9 | Select Booting Device after POST | ||
| DEL | Enter SETUP | ||
| ChainTech | Award | DEL | Enter SETUP |
| ALT+F2 | Enter AWDFLASH | ||
| ECS (EliteGrour) | AMI | DEL | Enter SETUP |
| F11 | BBS POPUP | ||
| FoxConn (WinFast) | TAB | POST Screen | |
| DEL | SETUP | ||
| ESC | Boot Menu | ||
| GigaByte | Award | ESC | Skip memory test |
| DEL | Enter SETUP/Q-Flash | ||
| F9 | Xpress Recovery Xpress Recovery 2 | ||
| F12 | Boot Menu | ||
| Intel | AMI | F2 | Enter SETUP |
| MSI | F2, Del (реже F1) | Enter Setup | |
| F11 | Boot Menu |
*
Примечание: на современных ноутбуках также работает комбинация клавиш в Windows: зажать кнопку SHIFT + выбрать мышкой кнопку перезагрузки.
Boot Menu представляет из себя небольшое окно, в котором при помощи мышки (стрелок на клавиатуре) вы сможете выбрать устройство, с которого произвести загрузку. Пример такого меню показан на рис. 3. 👇
В зависимости от производителя вашего устройства — меню может несколько отличаться, но принцип работы везде одинаков. 😉
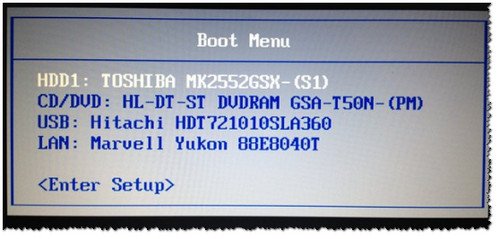
Рис. 3. Классическое Boot Menu (Ноутбук Toshiba)
*
Таблица №2
| Производитель ноутбука | Версия BIOS | Горячая клавиша | Функция / вызов меню |
|---|---|---|---|
| Acer (инструкция) | Phoenix | F2 | Enter Setup |
| F12 | Boot Menu (Change Boot Device,Multi Boot Selection Menu) | ||
| Alt+F10 | D2D Recovery (disk-to-disk system recovery) | ||
| Asus (инструкция) | AMI | F2 | Enter Setup |
| ESC | Popup Menu | ||
| F4 | Easy Flash | ||
| Phoenix-Award | DEL | BIOS Setup | |
| F8 | Boot Menu | ||
| Benq | Phoenix | F2 | BIOS Setup |
| Dell [инструкция] | Phoenix,Aptio | F2 | Setup |
| F12 | Boot Menu | ||
| DEXP [инструкция] |
F2 или Del | BIOS | |
| Digma | ESC (нажимать лучше до вкл. устройства) | BIOS Setup | |
| eMachines (Acer) | Phoenix | F12 | Boot Menu |
| Fujitsu Siemens | AMI | F2 | BIOS Setup |
| F12 | Boot Menu | ||
| Gateway (Acer) | Phoenix | Click mouse or Enter | Menu |
| F2 | BIOS Settings | ||
| F10 | Boot Menu | ||
| F12 | PXE Boot | ||
| Irbis | F2 (ESC) | BIOS Settings | |
| HP (Hewlett-Packard)/ Compaq
[инструкция] |
Insyde | ESC | Startup Menu |
| F1 | System Information | ||
| F2 | System Diagnostics | ||
| F9 | Boot Device Options | ||
| F10 | BIOS Setup | ||
| F11 | System Recovery | ||
| Enter | Continue Startup | ||
| HONOR [инструкция] | F2 (лучше зажать до вкл. устройства) | BIOS Setup | |
| F12 | Boot Device | Menu | ||
| HUAWEI
[инструкция] |
F2 | BIOS Setup | |
| F12 | Boot Device | Menu | ||
| HUAWEI MateBook
[инструкция] |
Кнопка питания и кнопка увел. громкости. | BIOS Setup | |
| Next | F1 | Вызов Boot-Menu | |
| F2 | Настройка BIOS | ||
| Lenovo (IBM)
[инструкция] |
Phoenix SecureCore Tiano | F2 | Setup |
| F12 | MultiBoot Menu | ||
| Клавиша Recovery на корпусе | MultiBoot Menu | ||
| LG (Gram) | Phoenix | F2 | BIOS |
| MSI [инструкция] | *** | DEL (F2 реже) | Setup |
| F11 | Boot Menu | ||
| TAB | Show POST screen | ||
| F3 | Recovery | ||
| Packard Bell (Acer) | Phoenix | F2 | Setup |
| F12 | Boot Menu | ||
| PRESTIGIO | AMI | ESC (нажимать перед включением) | BIOS |
| Tecno [инструкция] | ESC (или F2 на моделях младше 2024г.) | BIOS | |
| F7 | Boot Menu | ||
| Toshiba | Phoenix | Esc,F1,F2 | Enter Setup |
| Toshiba Satellite A300 | F12 | Bios |
*
Таблица №3: восстановление из скрытого раздела (для ноутбуков)
В большинстве современных ноутбуков встроен специальный скрытый раздел с возможностью восстановления ОС Windows с помощью «пары» клавиш (нет необходимости подготавливать загрузочную флешку, скачивать ISO образы с Windows и пр.).
Как правило, чтобы запустить функцию восстановления — после включения ноутбука достаточно нажать одну клавишу (F9, например, на ноутбуках Asus). Далее появиться окно, в котором нужно следовать указанию мастера восстановления.
Примечание: при восстановлении информации, системный диск «C:\» часто форматируется и вся информация с него удаляется. Сделайте заранее копию важных данных с него.
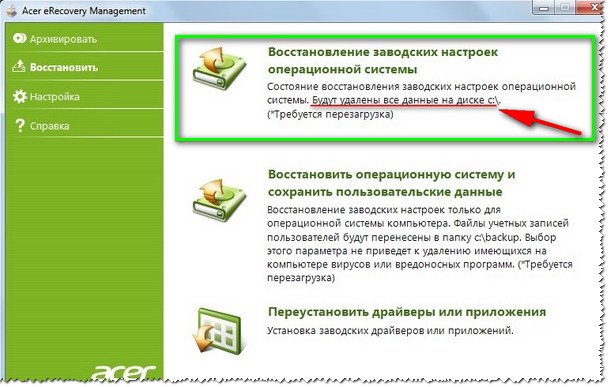
Рис. 4. Ноутбук ACER — сервисная утилита восстановления
Таблица №3
| Производитель ноутбука | Сочетание кнопок | Примечание |
|---|---|---|
| Acer | Alt+F10 | Сначала необходимо войти в Bios ноутбука, и включить функцию D2D Recovery. В системе восстановления, по умолчанию, установлен пароль: 000000 или AIM1R8. |
| Asus | F9 | |
| Dell Inspiron | Ctrl + F11 | |
| Fujitsu Siemens | F8 | |
| HP | F10, F11 | |
| LG | F11 | |
| Lenovo ThinkPad | F11 | |
| MSI | F3 | |
| Packard Bell | F10 | |
| RoverBook | Alt | |
| Samsung | F4 | |
| Sony VAIO | F10 | |
| Tecno | F9 | Recovery Menu |
| Toshiba | F8, F11 |
*
📌 PS: если не получилось зайти в BIOS
Рекомендую ознакомиться с руководством (спецификацией) вашего устройства на его офиц. сайте. Также можете посм. одну мою предыдущую инструкцию: в ней я разобрал основные варианты проблем + привел рекомендации. Ссылочка ниже. 👇
https://ocomp.info/ne-mogu-voyti-v-bios.html
Кстати, таблицы будут пополняться (со временем 😉). За дополнения по теме статьи — заранее большое вам мерси!
Всем удачи!
👋
Первая публикация: 04.11.2016
Корректировка: 31.10.2024
The Windows 8 Start Settings Boot Menu allows users to change the way Windows 8 starts up. This provides users with the ability to enable Safe Mode with or without Command Prompt, Enable Boot Logging, Enable Debugging and much more. Access to the Setup Settings Boot Menu is provided through the Advanced Startup Options Menu as described in detail below. Alternatively users can use the following command in the Run prompt to restart and boot directly into the Advanced Startup Options Menu:
shutdown /r /o /t 0
While not enabled by default, users can use the F8 key to enter Safe Mode when booting into the operating system, just as all previous Windows versions. To learn more on this, read our How to Start Windows 8 and 8.1 in Safe Mode – Enabling F8 Safe Mode article.
Enabling the Windows 8 Startup Settings Boot Menu via GUI
Start with the Windows 8 Start screen. Type the world advanced directly, which will bring up the items you can search. You may also slide in from the right edge, tap/click on the Search Icon and type advanced into the resulting dialog box. Within the Search items listed, tap/click on Settings:
Figure 1. Search Settings
Windows will now show you the Advanced Startup Options within a dialog box as shown below:

Figure 2. Advanced Settings Search Result
Tapping or clicking within the dialog box will take you to the PC Settings screen. Tap/click on the General Button and scroll down the menu on the right hand side until you come to Advanced Startup. Directly underneath is the Restart Now button:

Figure 3. PC Settings
Tapping/clicking on the Restart Now button will let Windows offer its Options screen:
Figure 4. Choose Options
On the Options screen, tap/click on the Troubleshoot button to bring up the Troubleshoot menu:
Figure 5. Troubleshoot Menu
From here tap/click on the Advanced Options button to get to the Advanced Options menu:

Figure 6. Advanced Options Menu
From the Advanced Options Menu, tap/click on the Startup Settings button. This brings you to the Startup Settings screen showing the various startup settings of Windows 8 that you will be able to change when you Restart. To move ahead, tap/click on the Restart button on the lower right corner of the screen:

Figure 7. Startup Settings Screen
Windows 8 will now reboot, taking you directly into the Startup Settings Boot Menu. Your mouse pointer will not work here and you must type the number key (or the function key) corresponding to your selection. If you wish to see more options, you can do so by pressing the F10 key:
Figure 8. Startup Settings Boot Menu
To return without making any changes, hit the Enter key on your keyboard; you will need to login once again.
The menu options presented are analysed in detail below.
Windows 8 Startup Settings Boot Menu
The Windows 8 Startup Settings Boot Menu lists all the options from which you can select one to alter the way Windows will boot up next. You must be careful here, as there is no way you can go back on your selection and Windows will directly proceed to boot with the selected option. Each option results in a different functionality, as discussed below:
-
Enable Debugging – Useful only if you have a kernel debugger connected to your computer and you want it to control system execution. This option is usually used by advanced Windows users.
- Enable boot logging – Useful if you want to know what is happening during boot time. This option forces Windows to create a log file at the following path C:\Winodws\Ntbtlog.txt, where you will find detailed information about the boot process. For example, if there is a problem with the starting of a specific driver, you will find the relevant information in the log file. Used normally by intermittent to advanced users.
- Enable low-resolution video – Useful if you are facing trouble with your video graphics card and you are unable to see Windows properly. This option will let Windows start up in a low-resolution mode, from where you can specify the proper video resolution that Windows can use.
- Enable Safe Mode – Useful if you want Windows to bypass the normal video card driver and use the generic VGA.sys driver instead. With this option, Windows will start up in a bare-bones mode and will load only programs as are barely necessary for it to work. Network support is disabled in this mode, so do not expect to connect to the Internet or local network.
- Enable Safe Mode with Networking – This mode offers similar abilities as the previous Enable Safe Mode (Option 4) and provides additional network support, allowing connectivity to the local network or Internet.
- Enable Safe Mode with Command Prompt – Useful when you want Windows online but with only a command prompt to type in commands, rather than the usual Windows GUI desktop. In this mode, Windows will only load the bare necessary programs to allow it to run. In place of the normal video card driver, Windows will operate the VGA.sys driver. However, do not confuse this mode with the Windows 8 Recovery Environment Command Prompt, where Windows operates offline.
- Disable driver signature enforcement – Useful for loading unsigned drivers requiring kernel privileges. Typically, Windows does not allow drivers requiring kernel privileges to load unless it can verify the digital signature of the company that developed the driver. This option must be used very carefully, as you are setting aside the security reasons that normally would prevent malware drivers from sneaking in into your computer.
- Disable early launch anti-malware protection – Useful to prevent driver conflicts that are preventing Windows from starting. A new feature in Windows 8 allows a certified anti-virus to load its drivers before Windows can load any other third-party driver. Therefore, the anti-virus software is available to scan all drivers before they are loaded. If the anti-virus program detects any malware, it blocks that driver. Since this is a great security feature, disable it only when necessary and apply extreme caution.
- Disable automatic restart after failure – Useful when you want to see the crash information because Windows restarts too quickly after a crash making it impossible to read the information. Usually, after a crash, Windows displays an error message before automatically rebooting. You may not be able to read the information displayed if Windows reboots very quickly. This option prevents Windows from rebooting after a crash, allowing you to read the error message and take appropriate action.
- Launch Recovery Environment – Useful for accessing recovery and diagnostic tools. This option is available when you press F10 in the Startup Settings Boot Menu. These options are available under Advanced Options Menu — see Figure 6.
This article covered how enable and use the Startup Settings Boot Menu in Windows 8 and also explained in great detail the Windows 8 Startup Settings Boot Menu. Readers interested in learning how to enable F8 Safe Mode functionality can read the article by clicking here.