
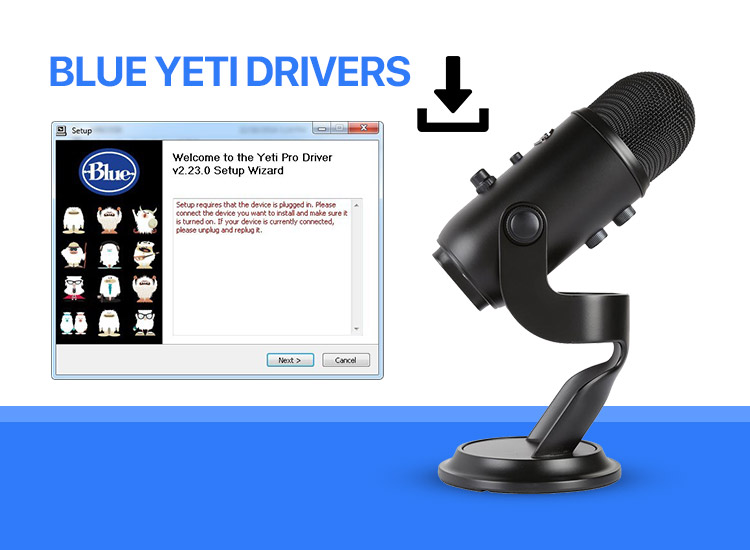
If you wish to download and update the Logitech Blue Yeti drivers on Windows 10/11 devices, take the help of the solutions offered in this guide.
Logitech is one of the best and most trusted electronics brands of all time. The brand offers a plethora of electronic devices including mice, keyboards, headsets, microphones, gaming accessories, and beyond. One such device from the brand is the very popular Blue Yeti microphone.
The performance of Blue Yeti is quite commendable and loved by multiple users globally. The simple plug-and-connect usage and application of the microphone make it easy to use for all. Although the tool is fairly easy to connect and use, sometimes you may face problems in using the microphone.
Issues like glitches in recording and connection can appear with Blue Yeti. Such problems generally appear because of an outdated driver. Hence, to help you fix the problem and protect yourself from future ones, we have curated this guide with multiple ways to execute Blue Yeti drivers download and update.
Methods to Download and Install Blue Yeti Drivers for Windows 10/11
In the coming sections of this guide, we will have a look at some common methods to execute the Blue Yeti drivers download and install for Windows. Multiple methods are listed and explained below for your feasibility. You can use any one of these to install the required drivers. However, we suggest that you follow the automatic one provided right below for ease.
Method 1: Update the Blue Yeti Driver With Win Riser
Other methods for downloading and installing the Blue Yeti microphone driver for Windows 10 are quite complicated and require some technical knowledge. To avoid the hassle, you can use an automatic tool called Win Riser to easily update the microphone and any other device drivers.
Win Riser is an automatic tool that can help you with driver updates, malware removal, registry entry fixing, and junk cleaning. All these services offered by the tool allow you to improve the performance of your system with ease. Apart from the Blue Yeti software download, you can use Win Riser to update all other kinds of drivers. All you need to do is follow the steps provided below:
- Click on the download button below to download the setup for Win Riser.
- Once the download completes, run the setup file and install the tool so that it can run automatically post installation.
- The tool will scan your system deeply and diagnose its issues. Once all the issues are listed, click on the Fix Issues Now button to get rid of all of them. Doing so will also update the Blue Yeti driver.
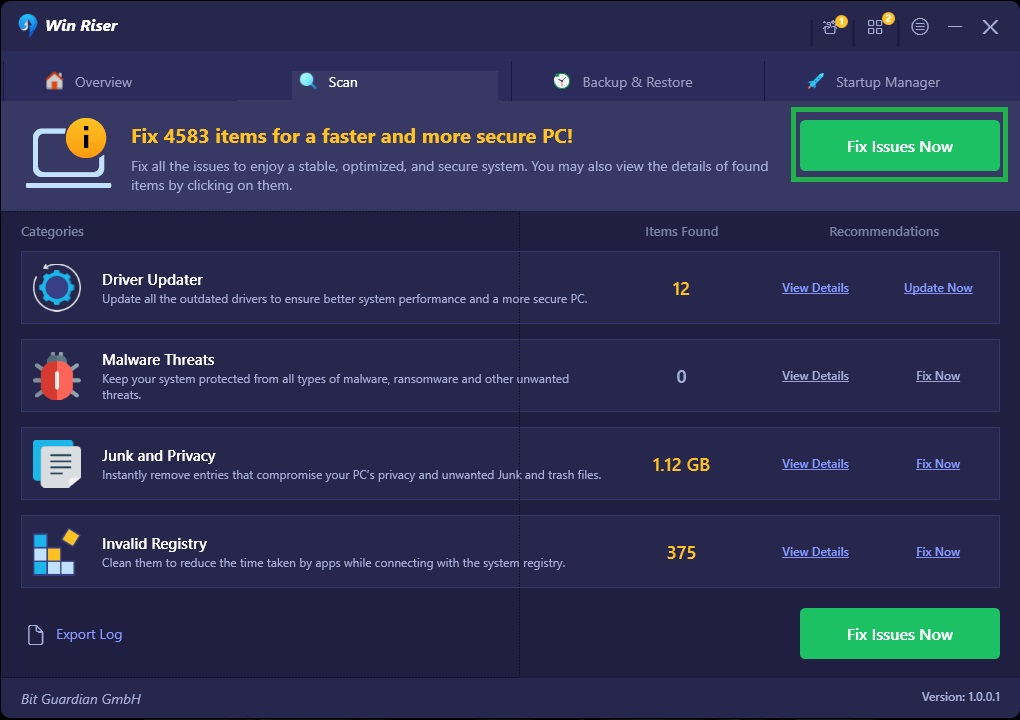
- Wait for the entire procedure to complete and then restart the system.
If you want to give the manual methods a try to download the Blue Yeti microphone driver, follow the ones below.
Also know: How to Install a Network Adapter Driver on Windows 10 without Internet
Method 2: Update the Driver Using Device Manager
Device Manager is a Windows-integrated tool that allows a user to take control of all the connected devices, integrated or otherwise. This tool can also help you with the Blue Yeti drivers update and installation. Follow the steps provided below to how to do this:
- Right-click on the Start button and select the Device Manager from the list.
- From the list, try to find the category of Sound, Video, and Game Controllers and double-click on it.
- Look for the Blue Yeti device, right-click on it, and select the option to Update Driver.
- Select the option to Search for Driver Automatically.
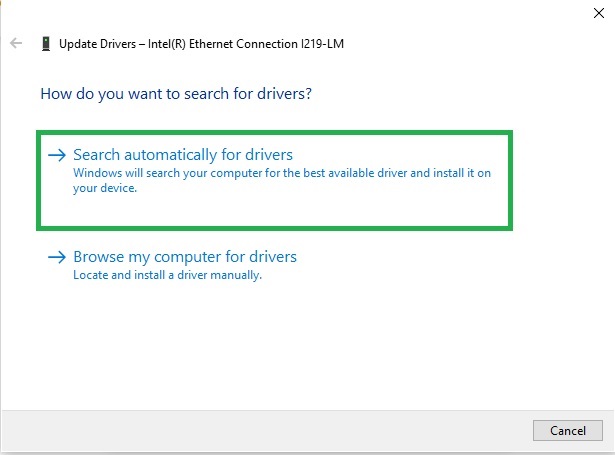
- Follow the on-screen instructions that appear and install the driver.
- Restart the system when the process completes.
There is another manual method that you can try for the Blue Yeti software download. You will find the same below.
Also know: Download Dymo Labelwriter 400 driver for Windows 11, and 10
Method 3: Use the Windows Update Utility
Windows update utility is developed by the OS manufacturers to offer updates for different services and attributes of the OS. The same can also help you get the required Blue Yeti drivers as well. Follow the steps provided below to learn how to use it:
- Press the combination of the Win+S keys, type Check for Updates, and press the Enter key.
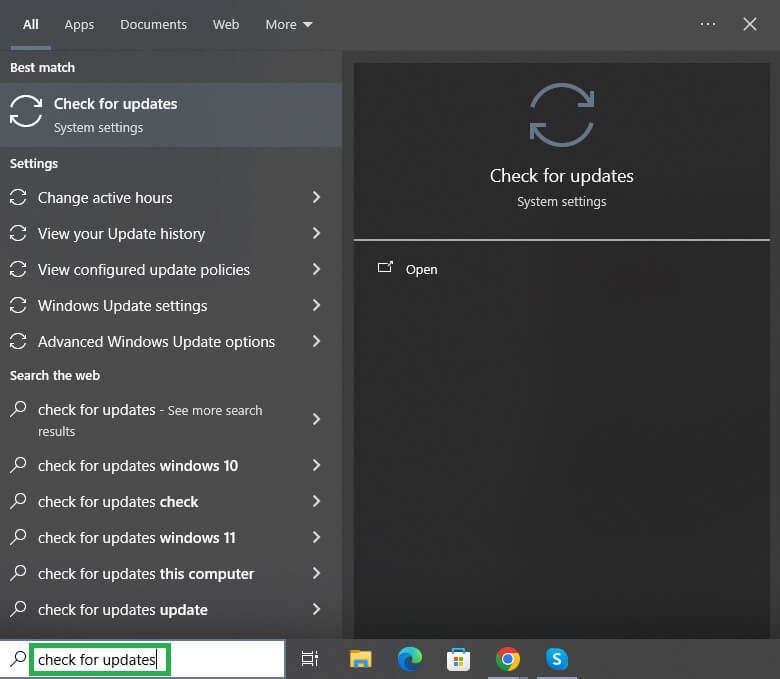
- Wait for the tool to load and click on the Check for Updates button.
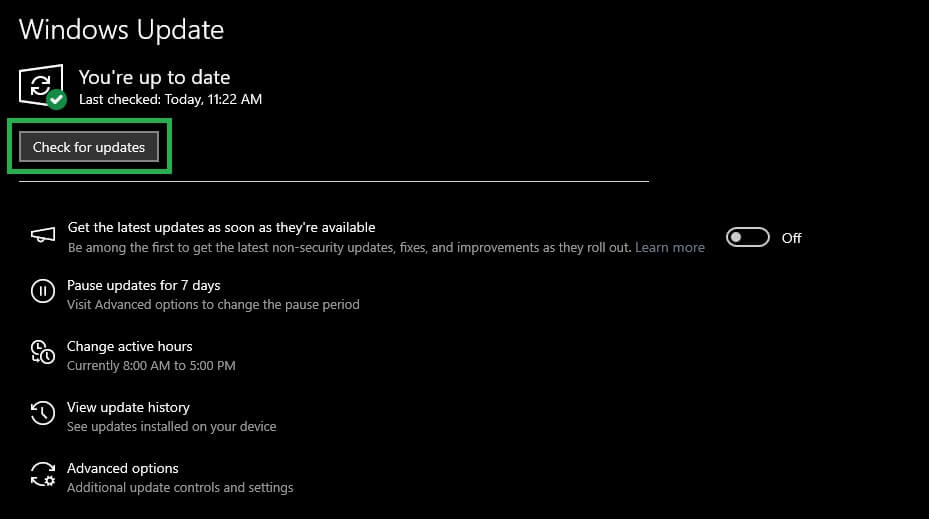
- When the updates appear on the screen, download and install the additional, main, and optional updates of all kinds.
Blue Yeti Drivers: Installed on Windows 10/11
So, in the previous section of this guide, we had a look at some effective ways to download and install the Blue Yeti drivers for Windows 10/11. Downloading the drivers and keeping them up to date on the system allows you to ensure that the device works perfectly on the system and poses no problems to you.
Similarly, when you download the Blue Yeti drivers and install them on your system, you will face zero connection or recording errors. If you need any help with the guide or its methods, you can write to us in the comments section below. If you liked this guide on how to download and install the Blue Yeti drivers for Windows 10/11, don’t forget to subscribe to our newsletter and follow our social media pages.
Author: Tosh Lubek Originally Published: 29th November 2020 Updated: 13th April 2024
DIY Video Studio is supported by its readers who use the affiliate links or ads on this site. As an Amazon Associate, I earn from qualifying purchases. Thank your support if you use any of the links.
When you receive your new Blue Yeti microphone, you’ll notice that and installation disk isn’t included in the box. Nor will will you find installation files on the Blue Microphones website.
The truth is that the Blue Yeti does not need installation drivers for Windows. The Yeti is Plug’n’Play, so use the supplied USB cable to connect the Yeti to your PC. Windows will then automatically recognize and install the microphone as a USB audio input device.
That’s it. No installation files or drivers are necessary. Just plug in your Yeti and after a few seconds you can start using the microphone for online calls, streaming, or recording. But if you need a little more detail, or if things don’t work out automatically (it should) let’s read on.
Connecting a Blue Yeti to your Windows PC
To connect the Yeti to your PC, you’ll need the USB cable that came with your Blue Yeti. Insert the mini-USB plug into the socket on the base of the Yeti.
Then connect the other end, the one with the USB-A plug, into one of the USB ports on your computer. If you are using a more recent computer that only has USB-C ports, you’ll obviously need a mini-USB to USB-C cable.
Once connected to your computer, since the Yeti is a Plug’n’Play device, Windows will detect the microphone and install it as one of your available audio input devices. You probably will now be able to start using your Blue Yeti as your sound input in whatever app you’re going to run, such as Audacity, Adobe Audition, or Zoom.
Setting your Blue Yeti as the default audio input device
Although Windows may automatically set the Blue Yeti as your default input audio device, it may not do that if you have another device already selected, such as the microphone on a webcam. If that’s the case, here’s what to do.
To select the Blue Yeti as your microphone you need to do that in Windows Sound settings. There are two easy ways to open the Sound settings window.
(1) Type “sound settings” in the Windows search bar. Then in the results list that opens, click on Sound Settings.
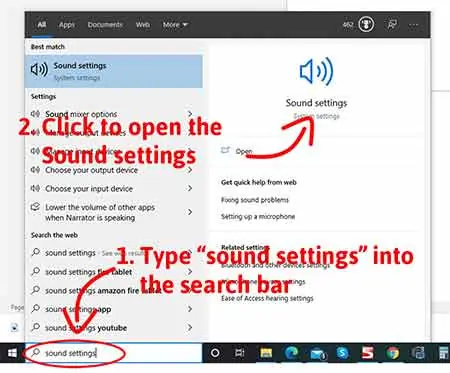
(2) Right-click on the Speaker icon in the bottom right of the Windows 10 task bar. A small panel will open. Then click on “Open Sound settings”.
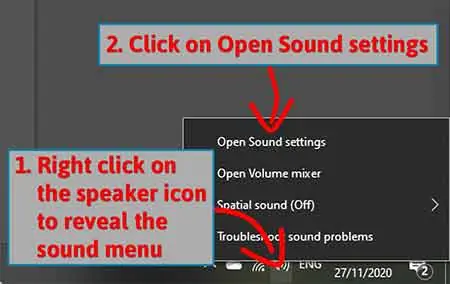
Whichever method you use, you should now see the Sound settings window open.
Under Sound you will first see a section titled Output. Below this there is another section called Input. This is where you can choose your input device.
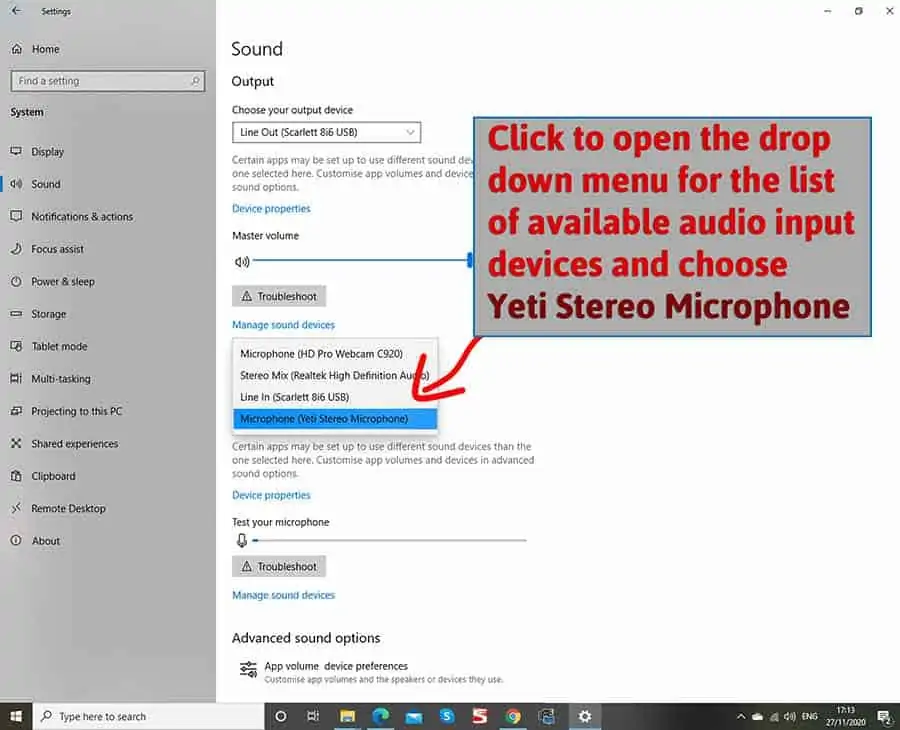
If you already have another microphone installed, perhaps if you have a webcam, it might be set as your default audio input device.
To change to the Yeti, click on the box beneath “Choose your input device”. Then select the Blue Yeti from the drop-down list of available audio input devices.
Once you’ve selected the Yeti as your input device, its entry in the list will turn blue, and you’re done. The Blue Yeti will now be your selected default audio input device.
Blue Yeti USB device not recognized
If your Blue Yeti does not show up Windows, you may need to dive into the Windows Sound System settings and Device Manager, but you can try a few other things first.
If the mic doesn’t appear as an audio device in Windows, before you do anything else, make sure it is plugged into your computer’s USB port. I know, it sounds stupid advice, but I’ve done this myself and found the USB cable is loose.
[i] Check the USB cable
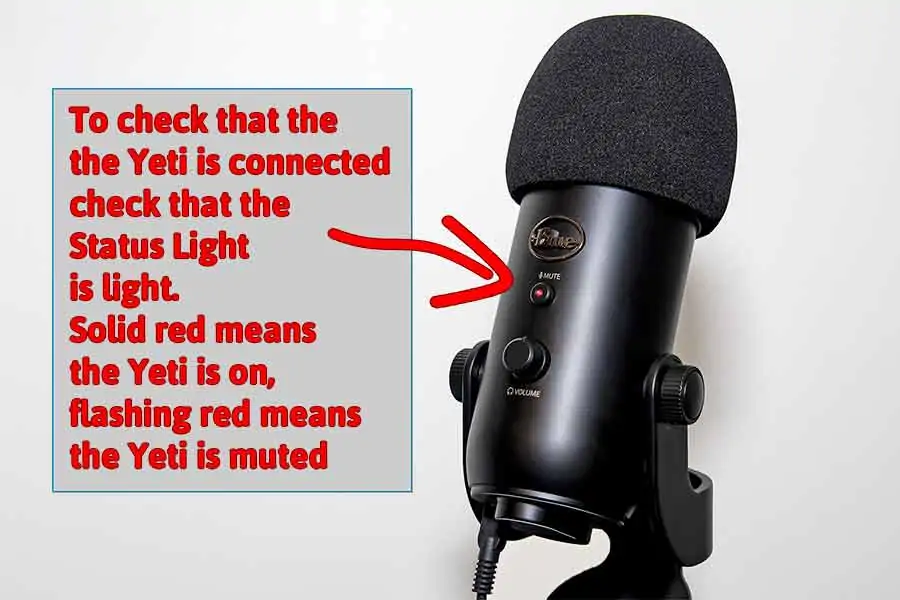
The simplest test of all is to visually check the status light in the middle of the Yeti’s mute button. The microphone does not have an on/off switch, so if the mic is properly plugged connected to your PC the status light will be lit up red. If you have muted the Yeti by pressing the mute button the status light will flash red. Either way, you will know whether the mic is receiving power from your computer.
If the status light does not come on when the mic is connected properly. Is USB cable connector fully inserted? Try unplugging and plugging in again. If the Yeti’s status light still doesn’t light up, try another USB port on your computers or try using a different USB cable that you know works.
[2] Check the Yeti on another computer
Still no luck? Try using the Blue Yeti on another computer.
If the Yeti’s status light comes on and everything appears fine, then the USB socket on your original computer may be faulty. But if the status light doesn’t come on and you have tried a couple of USB cables, then the Yeti may be faulty.
[3] Reinstall your Blue Yeti as an audio device
If the Yeti’s red status light is lit but you’re still getting the “Blue Yeti not recognized” error you can try uninstalling and then reinstalling the Yeti.
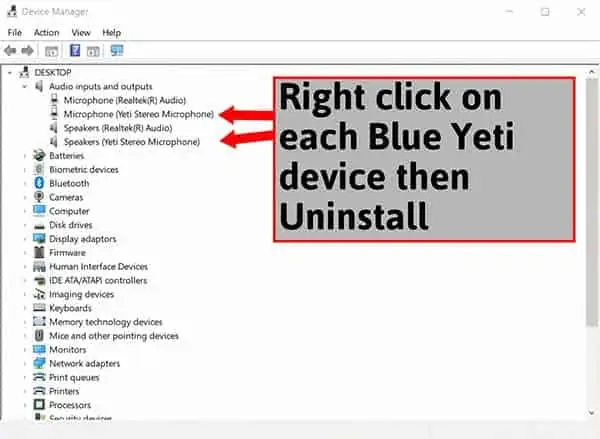
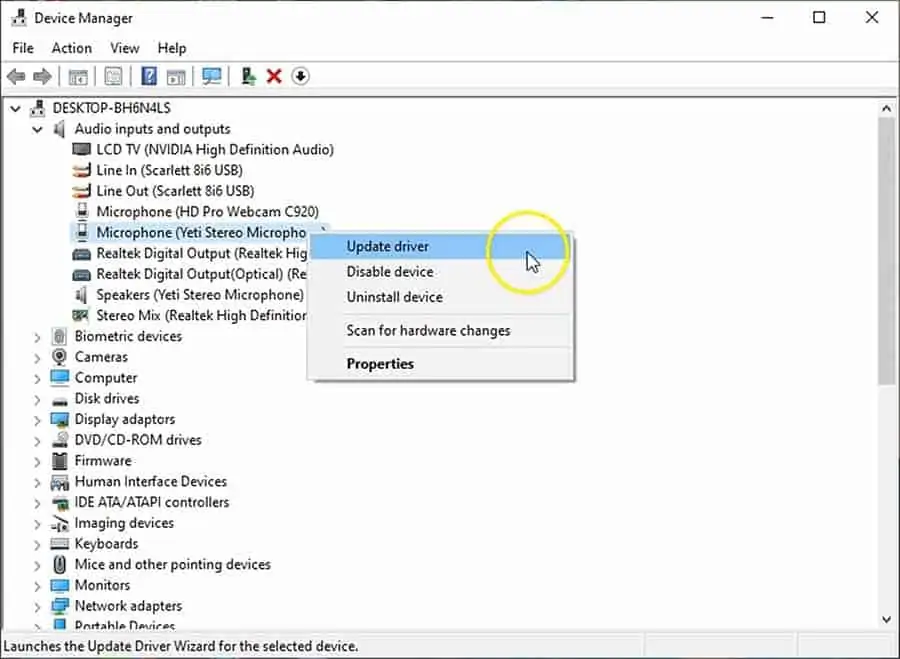
You’ll need to go into your computer’s Device Manager and delete the Blue Yeti as an audio device and then connect the microphone again, so Windows reinstalls it. To do this, follow these steps.
Step 1: Ensure the Blue Yeti is connected to a USB port on your computer. You should see the red LED on the mic’s mute button lit up.
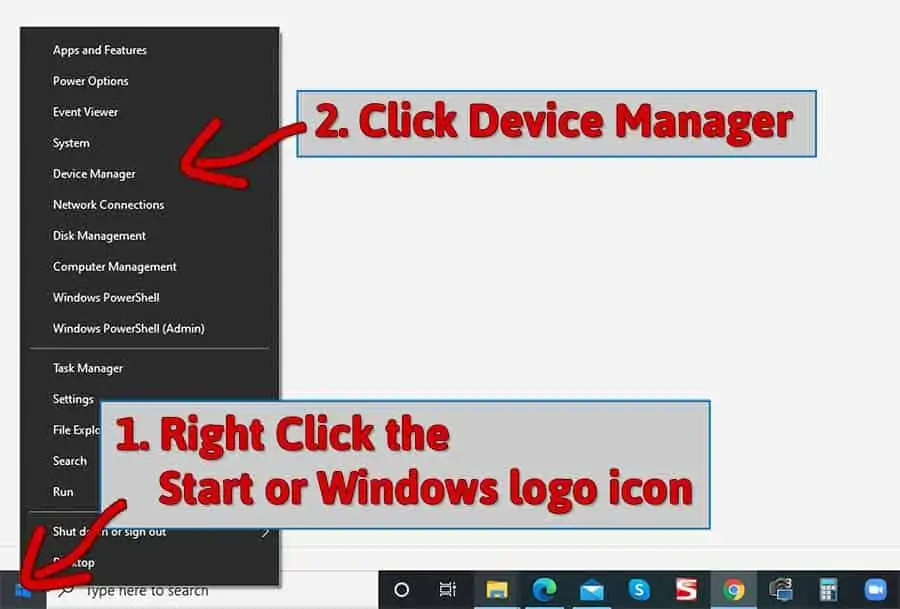
Step 2: Right-click on the Windows logo icon on the left corner of the taskbar to open the pop-up menu. You should see “Device Manager” as approximately the fifth entry from the top. Click on it to open the Device Manager.
Step 3: With the Device Manager open, expand Audio inputs and outputs. You should see Yeti Stereo Microphone listed as both a microphone and speakers. Right-click on each Blue Yeti device and choose “Uninstall”.
Step 4: With the Yeti uninstalled you can now unplug the Yeti’s USB cable from your computer.
Step 5: Reboot the computer. Once the PC has rebooted and you’ve logged back into Windows, connect the Blue Yeti microphone using the USB cable and wait for Windows to install the microphone again.
Hopefully the Yeti will now be detected, and you can go ahead and use it in the app of your choice. But if you’re still experiencing problems you can try updating the Blue Yeti’s drivers.
[4] Update the Blue Yeti microphone driver
If the Yeti is still not being detected it may be that the drivers may have become corrupt and are stopping the microphone from functioning.
You’ll again need to open the Device Manager, so the initial steps are much the same as in uninstalling and reinstalling the Yeti as an audio device.
Step 1: Ensure the Blue Yeti is connected to a USB port on your computer. You should see the red LED on the mic’s mute button lit up.
Step 2: Right click on the Start or Windows logo icon on the left corner of the taskbar to open the pop-up menu.
You should see “Device Manager” as approximately the fifth entry from the top. Click on it to open the Device Manager.
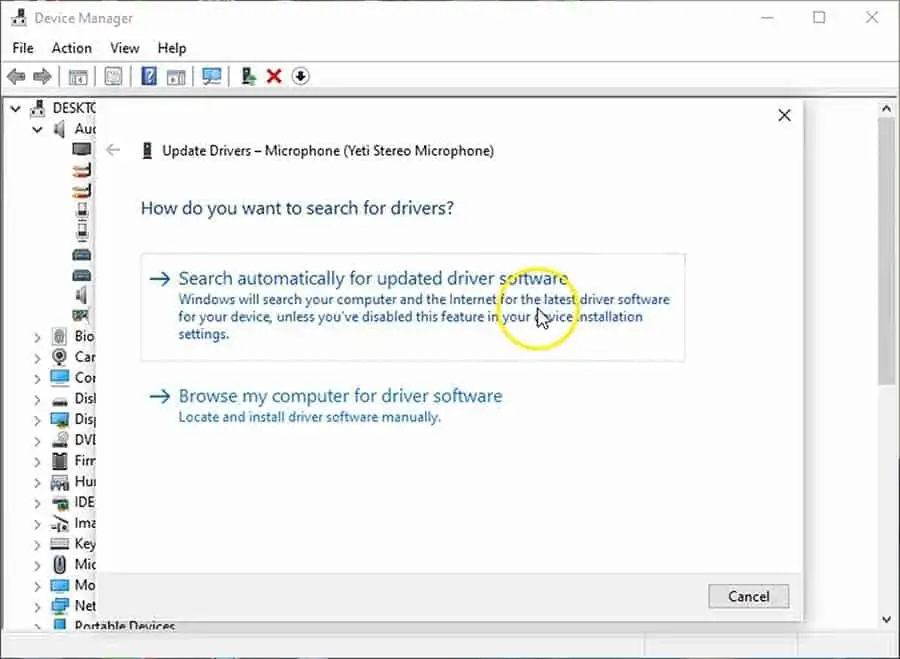
Step 3: With the Device Manager open, expand Audio inputs and outputs. You should see Yeti Stereo Microphone listed as both a microphone and speakers. Right-click on each Blue Yeti device and choose “Update Driver”.
Step 4: Windows will ask you; how do you want to search for drivers? Choose the first option of Search automatically for updated driver software.
Device Manager will search for the required driver and update it, but it may also report that the best driver is already installed.
Step 6: If all went well, restart your computer and log into Windows. Hopefully this will have fixed the problem and you’ll no longer have the problem of “Blue Yeti not recognized Windows 10”.
[5] Avoid using a Blue Yeti with a USB hub
If you use a lot of USB devices, be aware that Blue Microphones does not recommend plugging the Yeti into a USB hub.
Normally, you should not share a USB hub with other high-data throughput devices. This could lead to problems such as the Blue Yeti producing choppy audio, clicks, or stuttering. Using a USB hub may also cause problems with the Yeti not being recognized.
This has not been a problem for me when I’ve tried using a USB. I tried using my Yeti with a USB hub but did not experience any problems. But I know of others who have. If that’s the case for you, try bypassing the USB hub and plugging the Yeti directly into one of your computer’s USB ports.
Tosh Lubek runs an audio and video production business in the UK and has been using the Canon EOS R since it was released in the Autumn of 2018. He has used the camera to shoot TV commercials for Sky TV, promotional business videos, videos of events and functions, and YouTube creator content. He has also won international awards for his advertising and promotional work. You can meet him by visiting his “video booth” at HashTag business events across the country.
One thing that bothers Blue Yeti Microphone buyers is the “Blue Yeti mic not recognized” error on Windows 11/10 or any other version of Windows OS. This issue occurs when the mic’s plug-and-play feature does not work properly due to missing drivers.
Device drivers need to be updated for a device to sync properly with a Windows PC. The same goes for Blue Yeti mics. If the required drivers are unavailable, the error is bound to occur, and users face a lot of trouble. Hence, here, we explain how to fix the Blue Yeti mic issues.
How to Fix Blue Yeti Drivers Not Detected, Recognized, or Available on Windows
Blue Yeti Microphone is one of the most in-demand devices for those starting their journey as creators. The microphone is multipurpose and can be used for voiceovers, podcasts, and even studio-grade vocal recordings for music. The price point of the microphone attracts all beginners, and it gives a top-notch performance.
However, as a user, you might occasionally encounter multiple errors while setting up a Blue Yeti Mic on your PC. The errors can be any of the following –
- Error: Blue Yeti Drivers were not detected
- Error: Drivers not found
- Error: Blue Yeti Microphone drivers unavailable
- Error: Blue Yeti Mic not detect
The errors are self-explanatory as they show that drivers cause the issue that appeared. So, let’s look at ways you can fix the Blue Yeti mic not being recognized.
1. Uninstall & Reinstall the Device on Your PC
You should try to completely remove the device from your system so that when you plug it in again, it automatically installs the drivers.
To do so, simply –
This will help the plug-and-play feature install a fresh driver for the device. Now, try to use the device. The Blue Yeti mic error should be fixed. However, you might need to update the driver if the issue persists.
Must Read: How to Find Existing Driver Versions on Your Windows PC
2. Three Different Ways to Update Blue Yeti Mic Driver
If reinstalling the device driver didn’t help, it’s time to try other fixes. Sometimes the installed device driver is outdated, due to which you face issues. Therefore, to fix the problem, you will need to update your Blue Yeti Mic drivers.
You can update Blue Yeti mic drivers in three different ways.
(a) Download the drivers from their official website
The first thing you can do is look for the official drivers released by Blue for the Yeti mic so that you have the latest driver file.
- Visit https://support.bluemic.com/hc/en-us

- Search for your product or scroll down to locate the product using the categories.
- Look for the Blue Yeti drivers download option.

Note – Blue as a brand has a dedicated utility software called Sherpa that allows you to unlock more of your microphone and regular firmware updates. You can install that and instantly download the latest drivers and firmware on your PC.

(b) Update Drivers Using Windows Driver Updater
Most users find it difficult to use another application to update the drivers. They prefer a default Windows program to update drivers. If you are one of those, this method is for you.
All you have to do is
(c) Automatically finish driver updates with Advanced Driver Updater (Recommended)
Now, the Windows driver update wizard also has a downside: It must be manually triggered. Driver-not-detected issues might occur with any other device as soon as the installed ones become outdated.
The ideal way to handle such situations is to have a dedicated program that tracks obsolete drivers and notifies you at a fixed interval about them. The Advanced Driver Updater is precisely the tool you need.
The tool is easy to work with. Here’s how it works –
The tool works best when you have scheduled scans so the outdated drivers can be updated in a week or 15 days before they become a trouble. You can instantly update the Blue Yeti Mic driver with the tool, and the mic will start working again.
3. Check Default Input Device Settings
If the issue with your Blue Yeti Microphone is not resolved after updating drivers, do not worry; there are other ways to fix it. For instance, you should check if your PC’s default input device or microphone is Blue Yeti. Here are the steps that may help –
- Press Win+I to open the system settings.
- Navigate to Sound settings.


- In Sound Settings, check the input device list.


- If the Blue Yeti mic is listed, select and set it as the default input.
Setting the mic as default will trigger your PC to count the Blue Yeti microphone as the ultimate way to route audio.
4. Restart the Audio Service on Windows
Another crucial step that can help you make the most of your available Blue Yeti Microphone is restarting the audio service. Sometimes, when you are unable to identify the glitch, it is better to restart the core of the issue, i.e., the service related to the process. In this case, the audio service is on Windows.
- Press Win+R to open the run search.
- Use command services.msc in the run search box and hit enter.


- Find Windows Audio in the list of services and double-click on it to open its properties.


- Access the properties and use the Stop button to put the service to a halt.


- After stopping, use the Start button again, and the service will be restarted properly.
Other than these, you can also try some basic fixes that will allow you to handle the error. These preliminary measures include –
- Check the connection of your microphone.
- Make sure the microphone is ON.
- Check for hardware anomalies.
Once you have addressed all the factors and issues, you should be able to use the Blue Yeti Microphone effectively.
Blue Yeti Mic is Now Working- No Issues Recognized!
You can enjoy the high-quality audio recording from your PC and instantly finish the project you have had pending for the longest time! Blue Yeti mic drivers or any other driver errors will not be an issue once you regularly use the Advanced Driver Updater.
These were all the options to fix the Blue Yeti microphone driver not detecting an error on your Windows PC. If you have any other queries, please use the comments section below.
Follow us on social media for more exciting content. Thanks for reading the post. Good luck!
Recommended :
How to Fix Kotion Each G2000 Mic Not Working
How To Fix Logitech G935 Mic Not Working on PC
Read to know about different ways to download, install and update the Blue Yeti microphone driver on Windows 10, 11.
Among users and YouTubers, Blue Yeti mics are very common. It is an excellent piece of gear for recording audio, whether it be music or podcasts. Its excellent price/quality ratio is the main reason for its enormous popularity. Although it is a reliable microphone, several customers have reported unstable connectivity problems or errors like the Blue Yeti mic not being recognized.
Outdated, missing, or corrupt drivers are the prime reason for the Blue Yeti microphone-related issues or errors. However, the good news is that you can easily fix such problems by updating Blue Yeti drivers from time to time. In this article, we’ll go through a few practical and efficient ways to find, download and install the latest drivers for Blue Yeti microphones on Windows 10/11.
Quickest Way to Install Blue Yeti Mic Driver Update on Windows 11, 10
If you are looking for the simplest method then you should use Bit Driver Updater. It is a globally renowned driver updater program that automatically detects your system and quickly provides you with a list of new drivers. Additionally, with the help of this utility, you can perform bulk driver downloads at once. Get Bit Driver Updater for Free from the download link given below.
3 Methods to Download, Install & Update Blue Yeti Microphone Driver on Windows 11/10
The following are non-cumbersome methods that can be used to perform Blue Yeti driver download for Windows 10 and 11. Without further ado, let’s get started!
Method 1: Update Blue Yeti Drivers in Device Manager
If you have adequate time and decent computer skills then you can follow the steps below to manually update Blue Yeti microphone drivers using Windows in-built utility tool named Device Manager:
- Just make sure the Blue Yeti microphone is connected to your computer before starting the process.
- Quickly press the Windows + R keys together to open the Run Dialog box.
- In the run dialog box, type devmgmt.msc and hit the Enter key. You can also click on the Ok option.

- This will open the Device Manager on your computer. Find and double-click the Sound, Video, and Game Controllers option. Now see if your Blue Yeti device is included in the list. If not, then go to the Universal Serial Bus Controllers and double-click on the same to expand its category.
- After that, click right on the USB Composite Device and click on Update Driver Software to proceed.
- From the next prompt, choose Search Automatically for Updated Driver Software option.


Windows now starts looking for the latest drivers and later on installs all the available drivers including the Blue Yeti microphone driver.
Also Read: Blue Snowball Microphone Drivers Download for Windows
Method 2: Use Driver Updating Tool to Automatically Install Blue Yeti Driver (Recommended)
Sometimes, Blue Yeti won’t appear in Device Manager and fails to provide you with the best driver updates. In that scenario, we advise using Bit Driver Updater or another recognized driver updater program.
The Bit Driver Updater automates the entire process of locating and installing the most recent drivers on a Windows computer. Also, the software replaces all out-of-date or missing drivers with just one click of the mouse. It only provides genuine drivers that have passed the WHQL testing process. To update Blue Yeti drivers and fix issues like Blue Yeti drivers not being detected you can use this amazing driver updating tool. Here is how!
- Download Bit Driver Updater from the button provided below.
- Run the downloaded file and follow the on-screen instructions to complete the process.
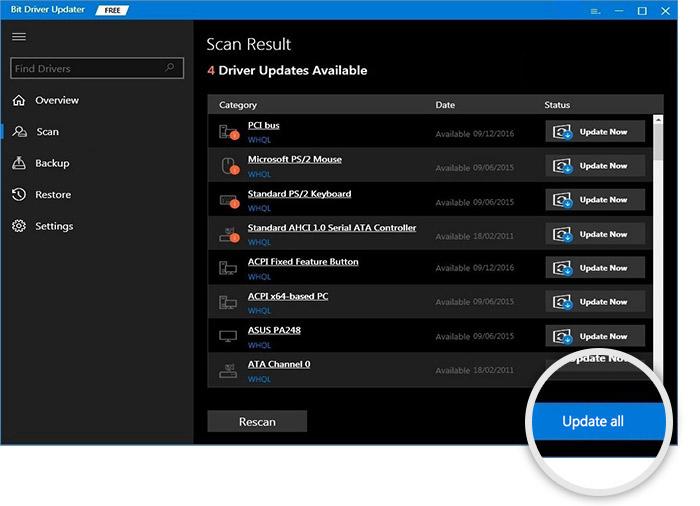
- Launch the driver updater software on your computer and select the Scan option from the left-hand menu.

- Wait for the scanning to be finished. Click the Update Now button next to the Blue Yeti driver.
- Choose the Update All button if you wish to update all out-of-date drivers at once.


See how easy it is to find, download and install the latest version of driver updates using Bit Driver Updater. It is worth noting that the pro version of Bit Driver Updater provides 24/7 technical support and a full money-back guarantee but for a limited time.
Once everything is done, reboot your computer to apply changes.
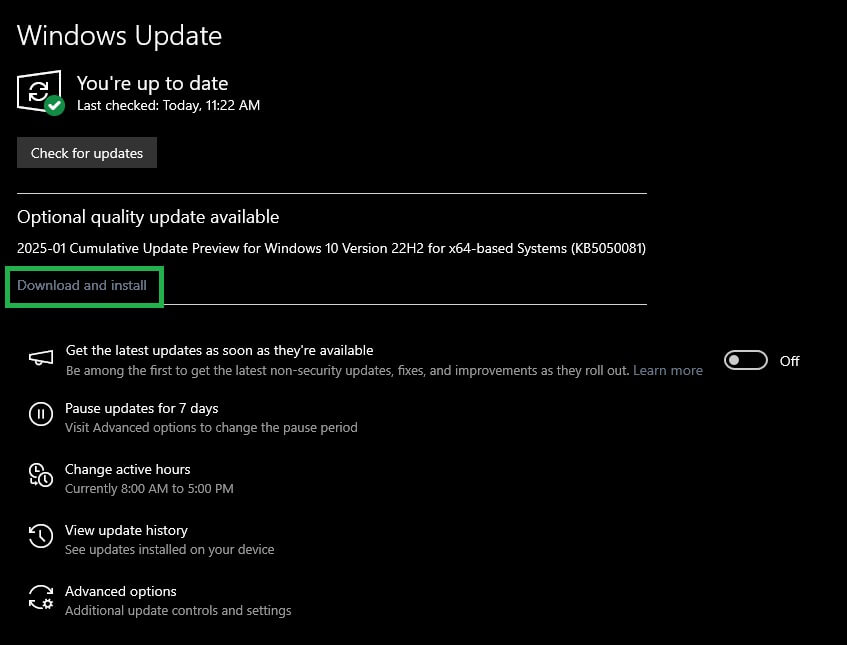
Method 3: Use Windows Update to Install Blue Yeti Mic Drivers
Last but not least, users can also use Windows Update to download all the latest driver updates as well as other system updates to enhance PC’s overall performance. Below is how to do that:
- Altogether press Windows and I keys from your keyboard to open Windows Settings.
- Then, choose the Update & Security option.

- Make sure Windows Update is selected from the left menu pane and then click on Check For Updates.


Now, wait until Windows searches for the latest updates and installs them. Once done, simply start your PC all over again.
Also Read: Download and Update Microphone Driver for Windows 10
How to Download & Update Blue Yeti Drivers on Windows 10/11: Explained
So, the above suggestions were three simple ways that you can use to get the latest Blue Yeti microphone drivers installed on your Windows 11, 10. We hope you find the guide useful. Please feel free to drop your queries in the comments section below.
For more information related to technology or technical issues, follow us on Social Media and subscribe to our Newsletter.
People adore the Blue Yeti microphone, but you won’t dispute that it has a number of issues that are difficult to deal with at times.
In addition, if you encounter any problems with the Blue Yeti Drivers for Windows 10, you can find a solution here!
Today, we’ll teach you about the quickest and most straightforward methods of resolving Blue Yeti Driver issues. Check out the processes we’ve listed and make sure you follow them to get your problems resolved!

IMPORTANT: The Blue Yeti cannot be connected to both your computer and your audio interface or mixer (both of which are analog). When the Yeti is connected to an external analog device, the headphone jack is disabled, and you will need to monitor through a preamp, interface, or mixer to avoid hearing background noise.
In order for the Yeti to function properly, it must be designated as the primary audio device by the operating system. Most programs will allow you to do this through Sound Settings (Windows) or Sound Preferences (Mac OS X) (Mac). Because most streaming and recording software has its own sound settings, you’ll need to make sure that the Yeti is selected as the primary input and output device when using it.
This means that your streaming software or other associated audio software must be aware of the audio device connected to the computer, as well as which input and output streams are being used. Once you’ve linked the Yeti to your computer, you’ll need to alter the sound settings on your Windows or Mac computer, which are detailed below.
Blue Yeti installation on Windows 10
1. From the Windows toolbar, select Sound from the context menu by right-clicking the speaker icon.
2. Select the Playback tab, right-click “Speakers BLUE Yeti,” pick Set as Default Playback Device from the context menu, and then select Set as Default Communication Device from the contextual menu.
3. Then, pick Properties from the context menu of the “Speakers BLUE Yeti.” Then, click on the Advanced tab to continue.
4. Uncheck the “Allow applications…” box located inside the Exclusive Mode section, then click Apply and then OK to complete the process.
5. When you update the sound settings in your software, you’ll also need to access the Advanced box in order to modify the sample rate used.

Blue Yeti configuration for Mac OS X
1. From the Menu bar, select the Apple icon, then System Preferences from the drop-down menu.
2. Select Sound from the drop-down menu.
3. Select your Blue Yeti from the Input and Output tabs on the toolbar.
4. When altering the sound settings in your software, you’ll also need to use the Format dropdown box to select a different sample rate from the list.
Is your Blue Yeti not functioning properly?
The Yeti may not appear when you connect it to your computer; if this is the case, reconnect the microphone by disconnecting it and inserting it back in. If you haven’t already, consider adjusting the USB connections on the Blue Yeti such that it is directly connected to your computer instead of being through a hub. Use a different USB port or cable to see whether the problem is still present. More information on troubleshooting audio device connectivity issues can be found in our Windows and Mac tutorials.
Take a look at these Solutions
- Don’t feel obligated to try them all; simply make your way down the list until you find one that works well for you.
- Attempt using a different USB port or cable.
- Ensure that the microphone driver is up to date.
- Disabled devices should be visible in the settings.
- Make use of the audio troubleshooting tool.
Solution 1: Try using a different USB port or cable.
To rule out a hardware problem, you can first try connecting your USB cable to another USB port and making sure it is correctly attached. Check to see if your microphone has returned to normal operation. Many customers have discovered that switching the USB port from 3.0 to 2.0 solves the problem.
Try using a different USB cord if Blue Yeti is still not showing up on your PC after several attempts. You may easily obtain a replacement cable from Amazon.com. To ensure proper operation, ensure that the status light is illuminated.
Solution 2: Install the most recent version of the microphone driver.
If there’s nothing wrong with your hardware, it’s possible that the problem is with your software. When the driver software for your Blue Yeti microphone becomes corrupted or out of date, your Blue Yeti microphone will no longer be recognized.
There are primarily two approaches available to you for resolving this driver issue:
Option 1 – It will happen automatically (Recommended)
You can use Driver Easy to automatically update device drivers if you aren’t sure in your ability to work with device drivers. Driver Easy will automatically recognize your system and locate the most up-to-date drivers for your sound card and Blue Yeti microphone, which it will then download and install in the proper configuration.
1) Download and install Driver Easy on your computer.
2) Launch Driver Easy and click on the Scan Now icon to begin scanning. After that, Driver Easy will scan your computer and identify any problem drivers.
3) Select Update next to the driver who has been flagged (this is partially manual).
Alternatively, you can click Update all to update all of the drivers at once. This necessitates the purchase of the Pro Version, which includes full support as well as a 30-day money-back guarantee. When you select Update All, you will be prompted to do an update.
4) Restart your computer in order for the modifications to take effect.
Option 2 — Using a Manual
It will take time and patience to manually update the Blue Yei microphone driver, on the other side, so be patient. If you’re up for it, here’s how to go about it:
1) Verify that your Blue Yeti microphone is correctly connected to your computer.
Press the Windows key and the R key together on your keyboard to bring up the Run box.
3) In the Run box, type devmgmt.msc and hit Enter.
If your Blue Yeti device is not mentioned in the Sound, video, and gaming controllers area, expand that category and look for it.
5) If this is the case, right-click it and choose Uninstall. When prompted, select Delete the driver software for this device from the drop-down menu and then click Uninstall. Allow for the completion of the process. It may take a few seconds for this to complete.
(If this is not the case, you can proceed to Step 
6. Right-click the Sound, Video, and Game Controllers and choose Scan for hardware changes from the context menu that appears.
7) The driver software will be reinstalled on its own without any intervention. Now, your Blue Yeti microphone may be effectively identified and used.
If you do not see your Blue Yeti driver listed in the Sound, video, and game controllers section, you may need to unplug your Blur Yeti microphone before proceeding.
9 ) Disconnect the Blue Yeti microphone from the Universal Serial Bus controllers and reconnect it thereafter. You will see that there is an additional USB Composite Device listed in the Device Manager.
10) Right-click the device and select Update driver from the context menu.
11) Select the option to search for drivers automatically.
12) Your Blue Yeti will become visible once the update has been completed. By now, your microphone should have been detected.
Solution 3: Install the latest version of Device Manager.
The procedure outlined below should be followed in order to update drivers using the Device Manager tool.
1. First and foremost, you must look at the taskbar at the bottom of the screen. Now, navigate to the Windows logo that may be seen there.
2. You must first perform a right-click on it.
3. Following that, you will be presented with a number of options. The Device Manager must be selected from the drop-down menu.

You will see the faulty Blue Yeti Mic in the Device Manager, as seen in Figure 4. Navigate to the microphone and right-click on it. This will lead you to the Update Driver menu option, which you may select.
The Device Manager will assist you in searching for the most recent driver available online. 5. Select the Update driver option and then you must wait. Simple as clicking on Search Automatically for Updated Driver Software, and your job is done for the day!
Driver Updates Done Manually
However, if you do not want the Device Manager to perform its functions on your behalf, you can manually do the driver update procedure.
To begin, go to the manufacturer’s website and fill out the necessary information. You’ll be able to find the necessary software on that page. All that is required is that you download and install it on your computer.
Please keep in mind that this process necessitates your full attention and caution. It is essential that you do not install the incorrect driver on your computer. In any other case, it will result in a malfunction of your system.
Solution 3: Install the most recent audio driver.
However, even if there is no dedicated driver for the Blue Yeti Microphone, it is reasonable to assume that you should download the most recent driver for your USB and audio devices. In this case, your Blue Yeti Microphone would not be detected by Windows 10 if the audio driver is out of date or corrupted, for whatever reason.
It is, therefore, appropriate to begin the process of updating the audio or USB driver for your PC in conjunction with the Blue Yeti Microphone at this time.
First and foremost, Driver Booster may be used to automatically upgrade the audio driver for the Blue Yeti.
In addition to having a 3 million driver database, Driver Booster can be a very useful tool when there is no driver for Blue Yeti on Windows 10. If no driver for Blue Yeti is available on Windows 10, Driver Booster can locate and update the missing or outdated audio driver for you automatically to the Blue Yeti pro driver. Driver Booster, in addition to being the greatest driver update application available, can also assist you in resolving the Blue Yeti device not recognized error by utilizing its Fix No Sound feature.
Driver Booster should be downloaded, installed, and launched on Windows 10 with an undetectable Blue Yeti driver.
2. Select Scan to allow Driver Booster to look for a corrupted or out-of-date driver for the Blue Yeti microphone.
Install the latest Blue Yeti driver for Windows 10 by searching for it in the Sound, Video, and Game Controllers section of the Control Panel.
Then Driver Booster will download and install the most recent version of the audio driver for the Blue Yeti device. After that, if the Blue Yeti is still not detected, you should try using Driver Booster to resolve the sound problem.
4. In the Driver Booster’s left-hand window, select the Tools icon and then select the Fix No Sound option.
Perhaps Driver Booster will be able to determine what is causing the Blue Yeti microphone USB not to be recognized or to be detected but not to be recorded on Windows 10 and then assist in resolving the issue if at all possible.
If you prefer to have the most up-to-date Yeti driver within Windows 10, you may update the device drivers through Device Manager.
In some ways, Device Manager can help you identify the Blue Yeti driver you’re looking for, and this can help you resolve the problem of Windows 10 not recognizing the Blue Yeti microphone driver.
1. Launch the Device Manager application.
2. In Device Manager, expand Audio inputs and outputs and right-click the audio driver to select Update driver from the context menu that appears.
3. Select the option to automatically search for and install updated driver software.
When you click on this, Device Manager will automatically download and install the most recent audio or USB driver for you on Windows 10. Alternatively, you can go to the Blue Yeti Mic’s official website and download the driver from there.
Our Final Thoughts
So, if you ever have a problem with Blue Yeti Drivers for Windows 10, you may easily resolve it without any difficulty! Check out the simple methods and give them a shot in your house. There are a variety of alternative options for dealing with the Blue Yeti problem.
Please tell us which one you are following! Also, please leave a comment below describing the issue you are having with Blue Yeti.
Frequently Ask Questions
What is causing my microphone to not appear to be working?
Check to see that your USB cable is correctly connected to the USB port on your computer’s keyboard. Check to see if the status light is illuminated as well. Open the audio options on your computer and make sure that the Blue Microphones Yeti is the sound source that is being used.
There is feedback from my speakers when I put my yeti in. Why is this?
Any time you utilize a microphone in conjunction with live speakers or open-back headphones, there is the possibility of feedback being generated. The speakers should not be oriented directly at the microphone when utilizing a microphone in conjunction with live speakers or open-back headphones, since this can cause feedback to the microphone. Additionally, you should ensure that the volume of your speaker or headphones is not too loud so that it is picked up by the microphone.
The phenomenon known as a feedback loop occurs when your speakers/headphones are producing the sound from a microphone and the sound from the microphone is returned to the same speaker/headphones. In order to avoid a potential feedback loop while connecting your Yeti, make sure that the speaker/headphone volume is set down and that your speakers are placed far enough away from the microphone to avoid a feedback loop. Once you’ve connected the microphone and created a signal, you can change the volume of your speaker or headphones to the desired level.
What is causing the distortion in my microphone?
Reduce the microphone gain by turning the microphone gain knob counterclockwise, or try increasing the distance between your Yeti and the sound source to see if that helps.
Originally posted on January 25, 2022 @ 5:11 pm
-
I’m a multi-faceted artist that loves exploring the creative side of life. Writing, photography, and music are my passions. From captivating stories to unique perspectives through photos, I’m always looking for ways to create meaningful content.
View all posts