
Ранее на сайте рассматривалось, как повернуть экран ПК или ноутбука с помощью комбинации клавиш на клавиатуре и другими способами. На некоторых устройствах с Windows: например, планшетах или ноутбуках-трансформерах предусмотрен автоповорот при изменении ориентации.
В этой инструкции подробно о способах отключить автоматический поворот экрана на устройствах с Windows 11 и 10, если он вам не требуется или работает неправильно. Те же действия, но выполненные «наоборот» позволят включить его, если он поддерживается на вашем ноутбуке или планшете.
Блокировка поворота в меню действий и Параметрах
Основной способ отключения автоповорота — использование предусмотренной для этого настройки в ОС. Скриншоты и пути приведены для Windows 11, но в Windows 10 действия отличаются незначительно.
- Для отключения поворота экрана в меню быстрых действий (панели быстрых настроек) нажмите по области со значками Wi-Fi, динамика и батареи в правом нижнем углу экрана, а затем — по кнопке «Блокировка вращения».
- Второй вариант — использовать параметры дисплея: нажмите правой кнопкой мыши по рабочему столу (или перейдите в Параметры — Система — Дисплей), включите опцию «Блокировка вращения».


Некоторые нюансы, которые следует при этом учитывать:
Редактор реестра
Есть возможность полной блокировки автоматического вращения экрана при изменении ориентации устройства в реестре:
- Нажмите клавиши Win+R на клавиатуре, введите regedit и нажмите Enter.
- В редакторе реестра перейдите к разделу
HKEY_LOCAL_MACHINE\SOFTWARE\Microsoft\Windows\CurrentVersion\AutoRotation
- Дважды нажмите по параметру с именем Enable и установите значение 0 для него.

- Примените настройки и перезапустите проводник или перезагрузите ваше устройство.

После выполненных действий автоповорот будет отключен.
Отключение датчика
Вы можете отключить датчик, определяющий ориентацию вашего планшета или ноутбука с помощью диспетчера устройств:
- Нажмите правой кнопкой мыши по кнопке «Пуск» и выберите «Диспетчер устройств».
- В диспетчере устройств раскройте пункт «Датчики».
- Нажмите правой кнопкой мыши по нужному датчику, выберите «Отключить» и подтвердите отключение.
Здесь возможна проблема: список датчиков может содержать более одного устройства, при этом не ясно, какой и за что отвечает. В этом случае вы можете отключать их по одному, проверяя, при отключении какого из них автоматический поворот перестанет работать (остальные датчики при этом лучше оставить включенными).
Если по какой-то причине приведённые выше способы вам не подошли, ещё одна возможность: на некоторых устройствах может быть предусмотрена аппаратная кнопка блокировки вращения экрана, либо соответствующая опция в фирменном ПО.
Readers help support Windows Report. We may get a commission if you buy through our links.
Read our disclosure page to find out how can you help Windows Report sustain the editorial team. Read more
Is your Windows 11 rotation lock greyed out? Here is all you should know.
One of the new features in Windows 11 is the ability to rotate your screen, which can be helpful when using your device in tablet mode or with a 2-in-1 laptop.
However, some users have reported that the rotation lock option is grayed out, which prevents them from using this feature. So, if you’re experiencing this issue, don’t worry – there are a few quick fixes to get your rotation lock working again.
Why is my rotation lock grayed out in Windows 11?
There are a few reasons why the rotation lock option might be grayed out in Windows 11. Some of the most common causes include:
- Your device doesn’t support screen rotation – Not all devices can rotate their screens. So, if your device doesn’t have a sensor detecting the screen’s orientation, the rotation lock option will be grayed out.
- The device driver is not installed – Some devices require a specific driver to use the rotation lock feature. So if the driver is not installed or is outdated, the option will be grayed out.
- Third-party software is blocking the feature – Some software can block certain features in Windows, including the rotation lock. Hence, if you suspect this might be the case, try disabling any unnecessary software and see if that resolves the issue.
So, if your Windows 11 rotation lock is greyed out, below are some solutions users have found very effective. Note that users on Windows 10 also experience this problem, and some of these fixes may apply.
What can I do if the rotation lock is greyed out in Windows 11?
Firstly, before jumping into any complex fixes, we encourage you to check your device’s specifications. This way, you ensure that your device can rotate its screen. If it’s not, the rotation lock option will be grayed out.
Also, You may try a reboot because a restart can force complex processes to end and solve simple PC problems.
1. Install the latest device drivers
- Right-click on the Start menu and select Device Manager.

- Expand any driver category with outdated drivers, right-click on the driver, and select Update driver.

- Select Search automatically for drivers.
- Finally, wait for the search to complete and follow the prompt accordingly.


Make sure that you have the latest drivers for your device installed. You can usually find the latest drivers on the manufacturer’s website.
Alternatively, you may use any auto driver updating tools, as they would save you a lot of time by scanning your computer and immediately finding the latest updates.
2. Update screen settings
- Press Windows + I to open the Settings app.
- Navigate to System and click Display.

- Lastly, under the Scale & Layout section, ensure the Rotation lock is turned on.


3. Use the keyboard shortcut
If the option is greyed out, you should try using the Keyboard shortcut Windows Key + O to toggle screen rotation.
Some users have found this effective in resolving the problem.
- Recent Windows 11 update lets you disable profanity filter in voice typing
- Microsoft wants Windows 10 users to upgrade to Windows 11 or Copilot + PCs
- Windows 11 KB5055627 update makes File Explorer more fluid
- A few keyboard settings are moving from Control Panel to Settings app in Windows 11
- Details of Windows 11 25H2 spotted in the wild; likely to be a smaller update
4. Uninstall third-party software
- Press Windows + R, type control panel, and hit Enter.

- Click on Uninstall a program.

- Click on a suspected program from the program list and select the Uninstall option.
- Finally, follow the wizard to complete the uninstallation.


So, if you suspect third-party software is blocking the rotation lock feature, try uninstalling any unnecessary software to see if that resolves the issue.
In conclusion, you must note that these solutions will not work for everyone. Hence, trying what you feel is most relevant to you is advisable.
However, your Windows 11 screen rotation lock greyed-out issues should be solved if you have gone through the entire guide.
Lastly, tell us what worked for you in the comments below.
Afam Onyimadu
Windows Software Expert
Afam is a geek and the go-to among his peers for computer solutions. He has a wealth of experience with Windows operating systems, dating back to his introduction to Windows 98. He is passionate about technology amongst many other fields. Aside from putting pen to paper, he is a passionate soccer lover, a dog breeder, and enjoys playing the guitar and piano.
Are you frustrated with your Windows 11 rotation lock being greyed out? It can be a perplexing issue, especially when you’re trying to switch your display orientation. But fear not, as there are solutions to this problem that can help you regain control over your rotation settings.
The greyed-out rotation lock is a common issue faced by many Windows 11 users. It occurs when the option to enable or disable the rotation lock is unresponsive, preventing users from adjusting their device’s display orientation. This issue can be caused by various factors, such as outdated display drivers, incorrect settings, or conflicts with other software. To resolve this, you can try updating your display drivers, checking the device’s settings, or performing a system restart. These troubleshooting steps can often solve the greyed-out rotation lock problem and restore your control over the display orientation on Windows 11.
If you’re experiencing the issue of the rotation lock being greyed out on Windows 11, there are a few potential solutions. Firstly, ensure that your device has the latest Windows updates installed. If that doesn’t work, try restarting your device. You can also check if the rotation lock option is enabled in the display settings. In some cases, updating your device’s graphics drivers might resolve the issue. If none of these methods work, you can try performing a system reset or contacting technical support for further assistance.

Understanding Windows 11 Rotation Lock Greyed Out Issue
The rotation lock feature in Windows 11 allows users to control whether the screen orientation on their device should automatically rotate when the device is turned. However, some users have reported encountering an issue where the rotation lock option is greyed out, preventing them from accessing or changing the setting. This can be frustrating, especially for users who rely on the rotation lock feature for specific tasks or preferences. In this article, we will delve into the possible causes of the rotation lock greyed out problem in Windows 11 and discuss potential solutions to resolve it.
Possible Causes of Rotation Lock Greyed Out in Windows 11
There are several factors that may contribute to the rotation lock option being greyed out in Windows 11. Let’s explore some of the potential causes:
- Driver Issues: Outdated or incompatible display drivers can interfere with the rotation lock functionality and lead to the greyed-out option.
- System Compatibility: In some cases, certain devices may not meet the system requirements for rotation lock, causing it to be disabled.
- Software Glitch: Like any software, Windows 11 is not immune to glitches or bugs that may affect specific functionalities, including rotation lock.
Now that we understand some of the potential causes, let’s move on to explore possible solutions to the rotation lock greyed out issue in Windows 11.
Solutions to Fix Rotation Lock Greyed Out in Windows 11
1. Update Display Drivers
One of the first steps to take when encountering the rotation lock greyed out problem is to update the display drivers on your Windows 11 device. Outdated or incompatible display drivers can cause conflicts with the rotation lock functionality. Here’s how you can update the display drivers:
- Press the Windows key + X on your keyboard to open the Power User Menu.
- Select Device Manager from the list.
- Expand the Display adapters category.
- Right-click on your display adapter and select Update driver.
- Follow the on-screen instructions to update the driver.
After updating the display drivers, check if the rotation lock option is still greyed out. If the issue persists, move on to the next solution.
2. Check System Compatibility
If your device does not meet the system requirements for rotation lock, the option may be greyed out. Ensure that your device meets the following criteria:
- Your device has an accelerometer sensor.
- The necessary drivers and software are installed.
- Your device is compatible with Windows 11.
If your device meets these requirements and the rotation lock is still greyed out, proceed to the next solution.
3. Run Windows Troubleshooter
Windows 11 comes equipped with a built-in Troubleshooter tool that can help identify and resolve common issues, including problems with rotation lock. Here’s how to run the troubleshooter:
- Open the Settings app by pressing the Windows key + I on your keyboard.
- Select System and then Troubleshoot from the left-hand menu.
- Under Find and fix other problems, click on Additional troubleshooters.
- Scroll down and click on Hardware and Devices.
- Click on Run the troubleshooter and follow the on-screen instructions to complete the process.
Once the troubleshooter has finished scanning and fixing any issues, check if the rotation lock option is now accessible. If not, proceed to the next solution.
4. Reset Windows 11
If all else fails, you can try resetting your Windows 11 device to its default settings. This can help resolve any underlying software glitches or conflicts that may be causing the rotation lock greyed out problem. Keep in mind that resetting your device will remove all your files and applications, so it’s essential to back up any important data beforehand. To reset your Windows 11 device:
- Open the Settings app by pressing the Windows key + I on your keyboard.
- Select System and then Recovery from the left-hand menu.
- Under Reset this PC, click on Get started.
- Choose either the Keep my files or Remove everything option, depending on your preference.
- Follow the on-screen instructions to complete the reset process.
After the reset is complete, check if the rotation lock option is now enabled. If the problem still persists, it may be necessary to contact Microsoft support for further assistance.
Exploring Additional Dimensions of Rotation Lock Greyed Out in Windows 11
In addition to the previously discussed causes and solutions, there are a few more dimensions worth exploring to address the rotation lock greyed out issue in Windows 11.
Check Group Policy Settings
In some cases, the rotation lock option may be disabled or greyed out due to specific Group Policy settings applied to the device. Group Policy is a feature in Windows that allows administrators to manage and customize settings for multiple devices in a network. To check if any Group Policy settings are affecting the rotation lock:
- Press the Windows key + R on your keyboard to open the Run dialog box.
- Type «gpedit.msc» (without quotes) and press Enter.
- Navigate to Computer Configuration > Administrative Templates > Control Panel > Display.
- Check if any enabled policies are related to rotation lock.
- If you find any relevant policies, double-click on them, set them to «Not Configured» or «Disabled,» and click Apply.
After modifying the Group Policy settings, restart your computer and check if the rotation lock is now accessible.
Perform System File Check
System file corruption can sometimes cause issues with specific features in Windows 11, including the rotation lock option. Performing a system file check can help identify and repair any corrupted system files. Here’s how to run the system file checker:
- Open the Command Prompt as an administrator. (Press Windows key + X and select «Command Prompt (Admin)»).
- Type «sfc /scannow» (without quotes) and press Enter.
- Wait for the scan to complete, and let the system file checker repair any issues it finds.
- Once the scan is finished, restart your computer and check if the rotation lock option is now enabled.
Check for Third-Party Software Interference
Some third-party software applications or utilities can interfere with certain features in Windows 11, including rotation lock. If you have recently installed any new software, try uninstalling it to see if it resolves the issue. Additionally, you can perform a clean boot to start the system with a minimal set of drivers and startup programs, eliminating potential software conflicts. Here’s how to perform a clean boot:
- Press the Windows key + R on your keyboard to open the Run dialog box.
- Type «msconfig» (without quotes) and press Enter.
- In the System Configuration window, go to the Services tab and check the box that says «Hide all Microsoft services.»
- Click on «Disable all» to disable all non-Microsoft services.
- Go to the Startup tab and click on «Open Task Manager.»
- In the Task Manager, disable all startup programs by right-clicking on each and selecting «Disable.»
- Close the Task Manager and click OK on the System Configuration window.
- Restart your computer and check if the rotation lock option is now accessible.
If the rotation lock is still greyed out, you may need to seek further assistance from the software developer or contact Microsoft support.
In conclusion, the rotation lock greyed out issue in Windows 11 can be caused by various factors such as outdated drivers, system compatibility issues, software glitches, Group Policy settings, system file corruption, and third-party software interference. By following the solutions provided in this article, you can troubleshoot and resolve the rotation lock greyed out problem in Windows 11, ensuring smooth screen orientation control on your device.

Troubleshooting Windows 11 Rotation Lock Greyed Out Issue
If you are facing the problem of the Rotation Lock option being greyed out on your Windows 11 device, there are several possible solutions you can try:
- Check if Rotation Lock is enabled in the Display Settings. Go to Settings > System > Display, and make sure the «Rotation Lock» option is turned on.
- Update your display drivers. Outdated or incompatible drivers can cause issues with the Rotation Lock feature. Visit your device manufacturer’s website or use Windows Update to download and install the latest drivers.
- Run the Hardware and Devices troubleshooter. Open the Settings app, go to System > Troubleshoot, and select «Hardware and Devices» troubleshooter. Follow the on-screen instructions to detect and fix any hardware-related issues.
- Restart your device. Sometimes, a simple restart can resolve temporary glitches and restore the Rotation Lock functionality.
- Perform a system reset. This should be your last resort as it will reset your device to its default settings, removing all installed apps and files. Go to Settings > System > Recovery, and select «Reset this PC». Choose the option to remove everything and follow the instructions.
Key Takeaways — Windows 11 Rotation Lock Greyed Out
- The rotation lock option in Windows 11 may appear greyed out.
- This issue can occur due to various reasons such as outdated drivers, incorrect settings, or hardware limitations.
- Updating the graphics card driver can often resolve the problem of the rotation lock being greyed out.
- Disabling the auto-rotation feature and then enabling it again may also fix the issue.
- If the rotation lock remains grayed out, it could be due to hardware limitations or compatibility issues.
Frequently Asked Questions
Here are some commonly asked questions about the issue of rotation lock being greyed out in Windows 11.
1. Why is the rotation lock option greyed out in Windows 11?
In Windows 11, the rotation lock option can be greyed out due to several reasons. One possible cause is that your device does not have an accelerometer or gyroscope, which are required for automatic screen rotation. Another reason could be outdated or incompatible graphics drivers. Additionally, certain settings or restrictions imposed by your device’s manufacturer or administrator can also make the rotation lock option unavailable.
If you are using a desktop computer or a laptop that does not support automatic screen rotation, the rotation lock option may be greyed out by default. However, if you have a convertible device or a tablet with the necessary hardware, and the rotation lock option is still disabled, it could indicate a software or configuration issue that needs to be addressed.
2. How can I fix the greyed-out rotation lock in Windows 11?
To resolve the issue of the rotation lock being greyed out in Windows 11, you can try the following troubleshooting steps:
1. Update your graphics drivers: Outdated or incompatible graphics drivers can cause issues with the rotation lock feature. Visit the manufacturer’s website or use a driver update tool to download and install the latest drivers for your graphics card.
2. Check for software updates: Ensure that your Windows 11 operating system is up to date. Microsoft regularly releases updates that address bugs and improve functionality. Go to Settings > Windows Update and click on «Check for updates» to install any available updates.
3. Restart your device: Sometimes, a simple restart can resolve temporary software glitches. Restart your computer or tablet and check if the rotation lock option is now enabled.
4. Check device settings: Go to Settings > System > Display and make sure that the «Rotation lock» toggle is turned on. If it is already enabled and still greyed out, try toggling it off and on again to reset the setting.
3. Can I manually rotate my screen if the rotation lock is greyed out in Windows 11?
If the rotation lock option is greyed out in Windows 11, it means that you cannot manually rotate your screen using the built-in rotation lock feature. However, there are third-party applications available that allow manual screen rotation. You can search for these applications online, download and install them on your device to manually rotate the screen orientation.
4. Why is the rotation lock option available on some devices but not on others?
The availability of the rotation lock option can vary between different devices running Windows 11. Convertible devices, such as 2-in-1 laptops or tablets, are typically equipped with built-in sensors like accelerometers or gyroscopes, which enable automatic screen rotation. As a result, these devices have the rotation lock option available.
On the other hand, desktop computers and certain laptops may not have the necessary hardware for automatic screen rotation. In such cases, the rotation lock option may be disabled by default since manual screen rotation is not supported. Additionally, some manufacturers or administrators may restrict certain settings or features on specific devices, which could explain why the rotation lock option is not available.
5. Can a system update in the future enable the rotation lock on my device?
It is possible that a system update in the future may enable the rotation lock option on your device, depending on the hardware capabilities and software optimizations implemented by the manufacturer and Microsoft. System updates often include bug fixes, performance improvements, and new features, so it is worth keeping your device up to date.
However, if your device does not have the necessary hardware for automatic screen rotation, it is unlikely that a future update will enable the rotation lock option. In such cases, you can explore alternative solutions like third-party applications that allow manual screen rotation.
In conclusion, if you are experiencing the issue of the Rotation Lock option being greyed out on Windows 11, there are a few potential solutions you can try. Firstly, make sure that your device supports screen rotation and that the necessary drivers are up to date. You can check for driver updates in the Device Manager and install any available updates.
If updating the drivers doesn’t fix the issue, you can try resetting the display settings on your device. Go to the Display settings in the Windows Settings app and click on the «Advanced display settings» link. From there, you can click on the «Restore» button to reset the display settings to their default values.
Windows 11 Rotation Lock Greyed Out is a frustrating issue for many users. Imagine wanting to rotate your screen for a better viewing experience, only to find that the option is disabled and greyed out. It can be puzzling and inconvenient, especially if you rely on your device’s rotation feature for tasks like reading documents or watching videos.
To understand this issue, it’s important to delve into the history of Windows 11 and its rotation lock feature. This function allows users to lock the screen orientation in either portrait or landscape mode according to their preference. However, the greyed-out rotation lock option often occurs due to conflicts with graphics drivers or incorrect settings. Despite its prevalence, there isn’t a one-size-fits-all solution, as the cause may vary from one user to another. Nevertheless, troubleshooting steps such as updating graphics drivers or checking for system updates can often resolve this issue and restore the functionality of the rotation lock.
If you find that the rotation lock feature in Windows 11 is greyed out, there are a few potential solutions. First, try updating your display driver by visiting the manufacturer’s website and downloading the latest version. If that doesn’t work, you can try disabling and re-enabling the rotation lock in the Windows settings. Another option is to check if any third-party applications are interfering with the rotation lock feature and temporarily disable them. If none of these solutions work, you may need to troubleshoot further or reach out to Microsoft support for assistance.

Troubleshooting Windows 11 Rotation Lock Greyed Out
If you’re experiencing the issue of the rotation lock being greyed out on your Windows 11 device, it can be quite frustrating, particularly if you prefer using your device in portrait or landscape mode. The rotation lock feature is designed to prevent the screen from automatically rotating when you tilt your device, allowing you to lock it in your preferred orientation. However, sometimes the rotation lock option may become inaccessible or greyed out, making it impossible to enable or disable. In this article, we will explore various troubleshooting methods to fix the rotation lock greyed out problem on Windows 11.
Method 1: Update Display Adapter Drivers
Incompatibility or outdated display adapter drivers can often cause the rotation lock option to appear greyed out on Windows 11. To update the display adapter drivers:
- Press Windows + X on your keyboard and select «Device Manager» from the menu.
- In the Device Manager window, expand the «Display adapters» category.
- Right-click on your display adapter and select «Update driver.»
- Choose the option to automatically search for updated driver software.
- Follow the on-screen instructions to complete the driver update process.
After updating the display adapter drivers, restart your computer and check if the rotation lock option is now accessible.
Method 1.1: Manually Install Display Adapter Drivers
If the automatic driver update does not resolve the rotation lock greyed out issue, you can try manually installing the display adapter drivers by following these steps:
- Visit the manufacturer’s website of your computer or graphics card.
- Search for the latest display adapter drivers compatible with your device.
- Download the driver installation file.
- Right-click on the downloaded file and select «Run as administrator.»
- Follow the on-screen instructions to complete the driver installation.
Once the manual driver installation is complete, restart your computer and check if the rotation lock option is now accessible.
Method 2: Calibrate the Display
Another effective method to fix the rotation lock greyed out issue in Windows 11 is to calibrate the display. Here’s how:
- Right-click on the desktop and select «Display settings» from the context menu.
- In the Display settings window, scroll down to find the «Advanced display settings» link and click on it.
- In the Advanced display settings window, click on the «Color calibration» link.
- Follow the on-screen instructions to calibrate the display colors and settings.
After calibrating the display, restart your computer and check if the rotation lock option is now accessible.
Method 2.1: Update Graphics Card Drivers
If calibrating the display doesn’t resolve the rotation lock greyed out issue, it’s advisable to update the graphics card drivers:
- Press Windows + X on your keyboard and select «Device Manager» from the menu.
- In the Device Manager window, expand the «Display adapters» category.
- Right-click on your graphics card and select «Update driver.»
- Choose the option to automatically search for updated driver software.
- Follow the on-screen instructions to complete the driver update process.
Once the graphics card drivers are updated, restart your computer and check if the rotation lock option is now accessible.
Method 3: Check Rotation Lock Settings in Device Settings
It’s also worth checking the rotation lock settings in the device settings to ensure it is not causing the greyed out issue. Follow these steps:
- Press Windows + I on your keyboard to open the Settings app.
- Click on «System» and select «Display» from the left sidebar.
- Scroll down and click on the «Rotation lock» toggle switch to enable or disable it.
If the rotation lock option was disabled, enabling it should fix the greyed out problem. Conversely, if it was already enabled, you can try disabling and re-enabling it to see if that resolves the issue.
Method 3.1: Reset Device Settings to Default
If adjusting the rotation lock settings doesn’t solve the greyed out issue, you can try resetting the device settings to default:
- Press Windows + I on your keyboard to open the Settings app.
- Click on «System» and select «Recovery» from the left sidebar.
- Under the Reset this PC section, click on the «Get started» button.
- Follow the on-screen instructions to restore your device settings to default.
Note that resetting the device settings will remove any installed applications and files, so it’s essential to back up your data before proceeding with the reset.
Method 4: Run Windows Update
Ensuring your Windows 11 operating system is up to date is crucial for resolving various software-related issues. Running Windows Update can fix any bugs or glitches that may be causing the rotation lock greyed out problem. Here’s how to run Windows Update:
- Press Windows + I on your keyboard to open the Settings app.
- Click on «Windows Update» and select «Check for updates.»
- If any updates are available, click on the «Download and install» button.
- Wait for the updates to be downloaded and installed.
- Restart your computer to apply the updates.
After updating and restarting your computer, check if the rotation lock option is no longer greyed out.
Additional Tips for Fixing Rotation Lock Greyed Out in Windows 11
Check Tablet Mode Settings
If you’re using a 2-in-1 device or a tablet with Windows 11, make sure the Tablet mode settings are correctly configured, as this can affect the rotation lock feature. Follow these steps to check Tablet mode settings:
- Press Windows + I on your keyboard to open the Settings app.
- Click on «System» and select «Tablet» from the left sidebar.
- Ensure the «When I sign in» option is set to «Use tablet mode» if you want to use the rotation lock feature primarily in tablet mode.
- If the «When this device automatically switches tablet mode on or off» option is enabled, ensure the rotation lock feature is accessible according to your preference.
Adjusting the Tablet mode settings can help resolve any conflicts that may be causing the rotation lock to be greyed out.
Perform a System Restore
If none of the above methods work, you can try performing a system restore to revert your Windows 11 device back to a previous state where the rotation lock was functioning correctly. Here’s how:
- Press Windows + R on your keyboard to open the Run dialog box.
- Type «rstrui» and press Enter to open the System Restore window.
- Click on «Next» and select a restore point from a time when the rotation lock was not greyed out.
- Follow the on-screen instructions to restore your system.
- After the system restore process is complete, check if the rotation lock option is accessible.
It’s important to note that system restore will revert any system changes made after the selected restore point, so be cautious if you have installed any new software or made recent changes to your device.
Conclusion
Experiencing the rotation lock option being greyed out in Windows 11 can be frustrating, but there are several troubleshooting methods you can try to resolve the issue. Updating display adapter and graphics card drivers, calibrating the display, checking rotation lock settings, running Windows Update, adjusting Tablet mode settings, and performing a system restore are some effective ways to fix the problem. By following these troubleshooting methods, you can regain control over the rotation lock feature and customize your device’s orientation based on your preferences.
Rotation Lock Greyed Out on Windows 11
The rotation lock feature on Windows 11 allows users to lock the screen rotation on their devices. However, some users have reported that the rotation lock option is greyed out and cannot be enabled or disabled. This can be frustrating, especially for those who frequently switch between portrait and landscape modes on their devices.
There can be several reasons why the rotation lock option is greyed out. One possible cause is that the device’s sensor or accelerometer is not functioning properly. In this case, restarting the device or updating the drivers may help resolve the issue.
Another reason could be that the device’s orientation is locked by a specific app or setting. To fix this, try closing all running apps and check if the rotation lock option becomes available.
If none of the above solutions work, it is recommended to check for any available Windows updates. Microsoft often releases updates that address various issues and bugs, including problems with the rotation lock feature.
If the issue persists, contacting Microsoft support or seeking assistance from a professional technician may be necessary to diagnose and resolve the problem.
Key Takeaways — Windows 11 Rotation Lock Greyed Out
- If the rotation lock option in Windows 11 is greyed out, it indicates that the feature is disabled.
- This issue could be caused by outdated or incompatible graphics drivers.
- Enabling the rotation lock may require updating the graphics drivers to the latest version.
- You can check for driver updates by visiting the manufacturer’s website or using a driver update software.
- Another possible cause for the greyed-out rotation lock is a compatibility issue with the device’s hardware.
Frequently Asked Questions
Here are some common questions related to the issue of Windows 11 rotation lock being greyed out, along with their answers:
1. Why is the rotation lock option greyed out in Windows 11?
There could be several reasons why the rotation lock option is greyed out in Windows 11. One possibility is that your device does not have a built-in gyroscope or the necessary sensors to detect rotation. Another reason could be outdated or incompatible device drivers, which can prevent the rotation lock from functioning properly. Additionally, certain graphics card settings or power management configurations may also cause this issue.
To resolve this problem, ensure that your device has the necessary hardware requirements for rotation, update your device drivers to the latest version, and check your graphics card settings and power management configurations to make sure they are compatible with rotation functionality.
2. How can I enable the rotation lock option in Windows 11?
If the rotation lock option is greyed out in Windows 11, you can try the following methods to enable it:
1. Check if your device has a built-in gyroscope or the necessary sensors for rotation. If not, you may need to use external software or hardware solutions to enable rotation functionality.
2. Update your device drivers to the latest version. This can be done through Windows Update or by manually downloading and installing the drivers from the manufacturer’s website.
3. Adjust your graphics card settings to allow rotation. Open the graphics control panel (e.g., NVIDIA Control Panel or AMD Radeon Settings) and look for options related to rotation or display orientation.
4. Check your power management configurations. Make sure that the power plan you are using allows rotation and that the display is not being automatically turned off or locked.
3. Can I use third-party software to enable rotation lock in Windows 11?
Yes, there are third-party software solutions available that can help you enable rotation lock in Windows 11, even if your device does not have a built-in gyroscope or the necessary sensors. These software programs simulate rotation functionality by using other methods, such as using the device’s accelerometer or detecting changes in screen orientation.
However, it is important to note that using third-party software may not provide the same level of functionality or integration as the built-in rotation lock feature. Additionally, some third-party software programs may require additional configuration or setup.
4. How do I troubleshoot if the rotation lock option is still greyed out after trying the recommended solutions?
If the rotation lock option is still greyed out in Windows 11 after trying the recommended solutions, you can troubleshoot the issue by following these steps:
1. Restart your device to refresh system settings and configurations. Sometimes, a simple restart can resolve the issue.
2. Run the Windows Update troubleshooter to check for any pending updates or system issues that may be causing the problem. You can find the Windows Update troubleshooter in the Windows Settings app under the «Update & Security» section.
3. Reset the rotation lock settings. Go to the Windows Settings app, select «System,» then «Display,» and click on the «Rotation Lock» option. Toggle the switch off and on to reset the settings.
4. Contact the manufacturer or support team of your device for further assistance. They may be able to provide specific troubleshooting steps or firmware updates to resolve the issue.
5. Does the rotation lock issue only occur in Windows 11?
No, the rotation lock issue can occur in other versions of Windows as well, not just Windows 11. If you are experiencing the same problem in an earlier version of Windows, you can follow similar troubleshooting steps to resolve the issue. However, please note that the user interface and settings locations may vary between different Windows versions.
In summary, if you’re experiencing the issue of the Rotation Lock being greyed out on Windows 11, there are a few steps you can take to resolve it. Firstly, make sure that your device supports rotation and that the necessary drivers are installed. Secondly, check the settings in the Control Panel or the Windows Settings app to ensure that rotation is enabled.
If these steps don’t solve the problem, you may need to update your graphics driver or perform a system update to get the latest Windows 11 version. Additionally, checking for any pending Windows updates and installing them can also help address the greyed out Rotation Lock issue. Remember, if you’re still facing difficulties, it’s always best to reach out to Microsoft Support or consult with a technical expert for further assistance.
If you own a convertible Windows laptop or tablet, you can take advantage of the automatic screen rotation feature to switch between portrait and landscape modes quickly. However, as with all things on Windows, the rotation lock feature can occasionally stop working. So, if you’ve found yourself in a situation where the rotation lock option appears grayed out on your Windows computer, we’ve compiled a list of solutions that’ll help.
Before You Begin
When troubleshooting things, you should never rule out classic tricks that apply to almost every problem. Hence, you should start by restarting your PC, if you haven’t already. This should help fix any minor glitches with the system and set things straight.
Next, ensure that your PC is running the most recent version of Windows. This will help rule out any system-level issues caused by known bugs.
If you’re unable to access the screen rotation lock from the Action Center, you can try changing the display orientation manually by navigating to Settings > System > Display to see if that works.

If the issue remains, then you can employ the following troubleshooting tips to fix the screen rotation lock grayed-out issue on Windows.
1. Disconnect Peripherals
If your convertible laptop or tablet is connected to a detachable keyboard, Windows may prevent you from accessing the screen rotation lock. Hence, you should start by disconnecting it.
Further, you should also unplug your laptop from any docking station or external monitor, as well as any other peripherals, to avoid interference from external devices.
After that, check to see if you can access the rotation lock on Windows.
2. Put Device in Tent Mode
Another solution is to put your laptop in Tent Mode and then access the rotation lock toggle. Surprisingly enough, this helped many users fix the issue almost immediately. You can also give it a go.

3. Re-Enable Sensors From Device Manager
Issues with the current sensor drivers on your PC can also cause such anomalies. If it’s just a temporary glitch, simply disabling and re-enabling the sensor driver should resolve the problem.
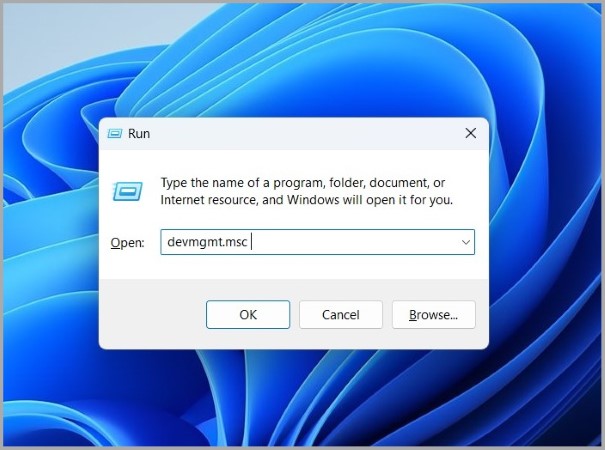
1. Press the Windows key + R to launch the Run dialog box. Type devmgmt.msc in the box and press Enter.
2. Expand Sensors, right-click on your driver and select Disable device. Then, right-click on the sensor driver again and select Enable device.

Check to see if you can access the rotation lock now.
4. Configure Sensor Monitoring Service
Sensor Monitoring Service is a crucial program that needs to run in the background for the screen rotation feature to work correctly. If the service isn’t starting automatically on boot, then you may encounter such issues. Here’s what you can do to fix it.
1. Press the Windows key + R to open Run utility, type in services.msc, and press Enter.

2. Locate and double-click on the Sensor Monitoring Service.

3. Change its Startup type to Automatic and hit Apply.
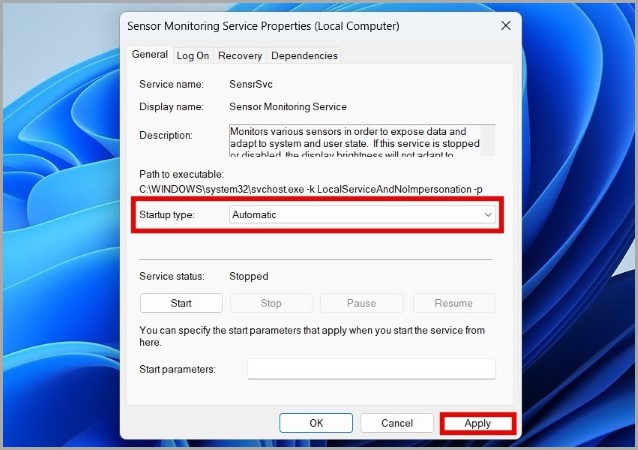
Reboot your PC after this and see if the issue is resolved.
5. Run Sensors Troubleshooter
Microsoft offers a dedicated Sensors troubleshooter that can help you fix issues with the location, motion, and other sensors on your PC. However, the troubleshooter doesn’t come pre-installed on Windows, so you’ll have to download it first.
Once downloaded, double-click the SensorDiagnosticTablet.diagcab and follow the on-screen prompts to run the troubleshooter.
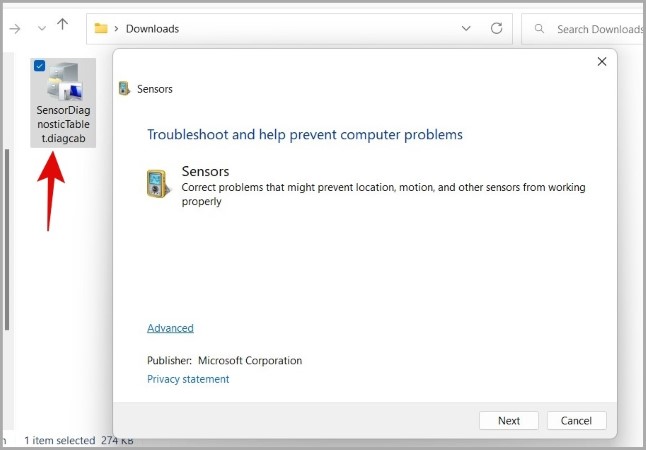
Following that, you should be able to access the screen rotation lock as before.
6. Update Display Drivers
If the display drivers on your PC are outdated or malfunctioning, you may experience such problems with Windows UI elements. To overrule this possibility, you can try updating your PC’s display drivers by following the steps below.
1. Press the Windows key + R to launch the Run dialog box. Type devmgmt.msc in the box and press Enter.
2. Expand Display adapters, right-click on your driver, and select Update driver.

From there, follow the on-screen instructions to finish updating the driver.
7. Tweak Registry Files
If none of the solutions have worked, you can use the following registry trick to force-enable auto rotation on Windows.
Since registry files carry important settings for Windows and its apps, make sure you follow the steps carefully and create a backup of your registry files.
1. Press the Windows key + R to open the Run dialog, type in regedit, and press Enter.

2. In the Registry Editor window, paste the following path in the address bar at the top and press Enter.
HKEY_LOCAL_MACHINE\SOFTWARE\Microsoft\Windows\CurrentVersion\AutoRotation
3. On your right, double-click the Enable DWORD, change its Value data to 1, and hit OK.

4. Next, double-click the LastOrientation DWORD, change its Value data to 0, and hit OK.

5. Lastly, double-click the SensorPresent DWORD and set its Value data to 1. Then, hit OK.
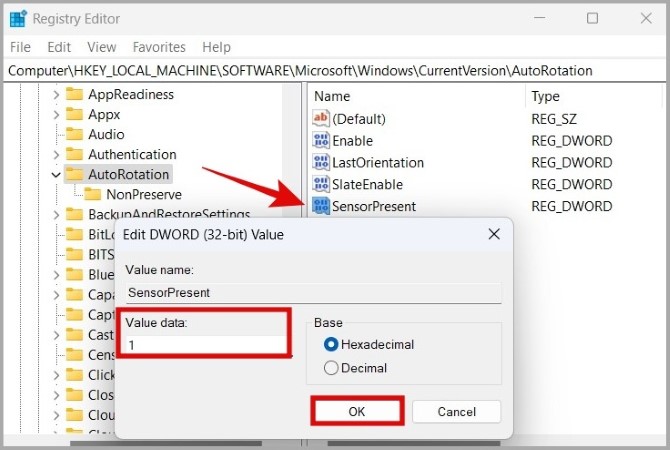
Restart your PC after this, and you should be able to access the rotation lock now.
Portrait or Landscape
Such issues with the auto-rotation feature shouldn’t keep you from using your convertible laptop or tablet to its full potential. Hopefully, one of the above solutions has helped you fix the underlying issue for good and the rotation lock is no longer grayed out on Windows.
Pankil Shah
Pankil is a Civil Engineer by profession who started his journey as a writer back in 2016. He joined TechWiser in March 2021 as a freelance writer to cover buying guides, explainers, and tips & tricks for Android, iOS, Windows, and Web.