
В случае, если вы не хотите, чтобы кто-то мог использовать ваш компьютер, когда вы от него отлучились, в Windows есть возможность вручную настроить время до автоматической блокировки — по истечении этого времени вход в систему потребуется выполнить заново.
В этой инструкции для начинающих подробно о методах автоматической блокировки в Windows 11/10 и настройке времени до неё. Также может быть полезен дополнительный связанный с темой материал: Возможности настройки экрана блокировки Windows в реестре.
Параметры экрана блокировки
Основной метод настройки времени до блокировки компьютера (системы) — использование параметров экрана блокировки. В Windows 11 и 10 шаги будут почти идентичными:
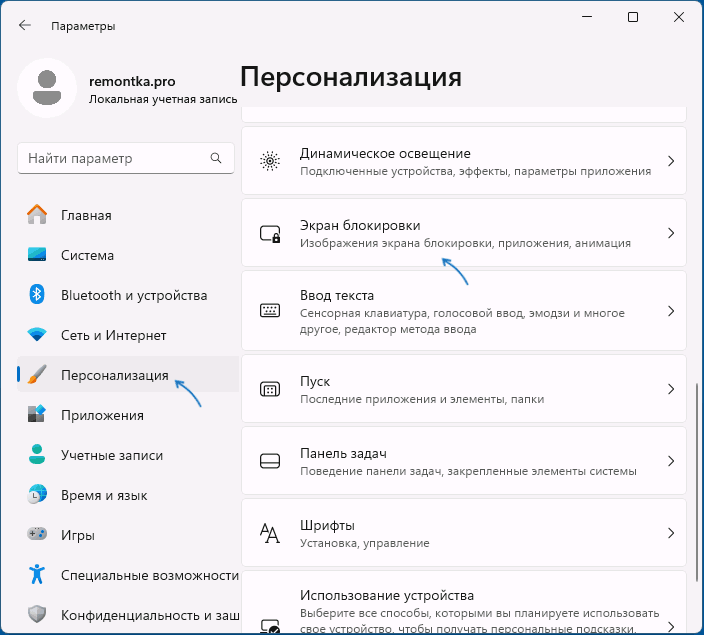
- Откройте «Параметры» (например, через контекстное меню кнопки «Пуск») — Персонализация — Экран блокировки.

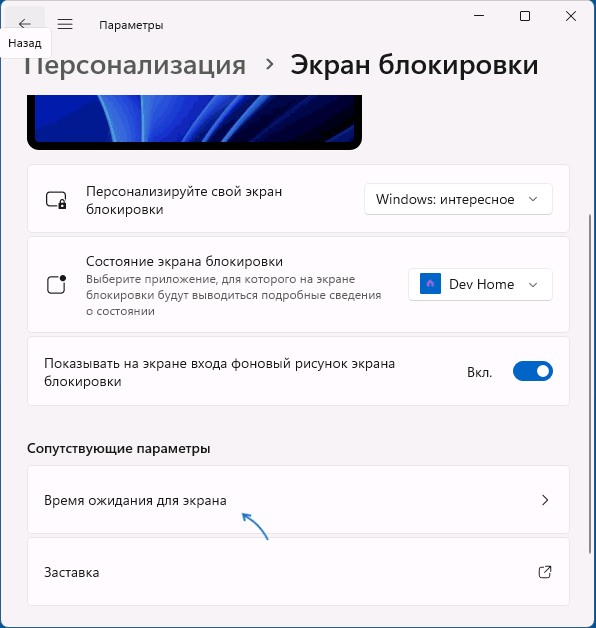
- В Windows 11 нажмите «Время ожидания для экрана» в разделе «Сопутствующие параметры», в Windows 10 — «Параметры времени ожидания для экрана».

- В разделе «Экран и спящий режим» установите время отключения экрана.
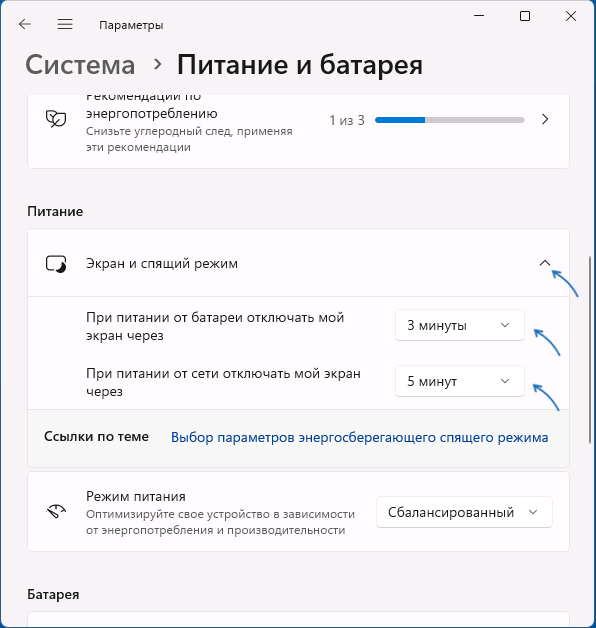
После выполнения этих действий экран ПК или ноутбука будет выключен при бездействии в течение указанного времени, а при последующем его включении по нажатии клавиш или движению мыши пользователь попадет на экран блокировки для входа в систему.
Это основной метод, доступный в системе, однако имеет свои нюансы: например, при его использовании выключается экран, что не всегда является желаемым. В этом случае можно воспользоваться дополнительным вариантом: на 2-м шаге вместо «Время ожидания для экрана» нажмите «Параметры заставки».

Вы попадете в окно настроек экранной заставки (скринсейвера), где можно выбрать заставку, указать время до её включения при бездействии системы и установить отметку «Начинать с экрана входа в систему» — чтобы после заставки потребовалось выполнять вход в систему.
Дополнительная информация
В завершение — несколько дополнительных деталей, касающихся блокировки системы автоматически или вручную:
- Вы можете заблокировать компьютер вручную с помощью сочетания клавиш Win+L или нажав по имени пользователя в меню «Пуск» и выбрав пункт «Блокировка».
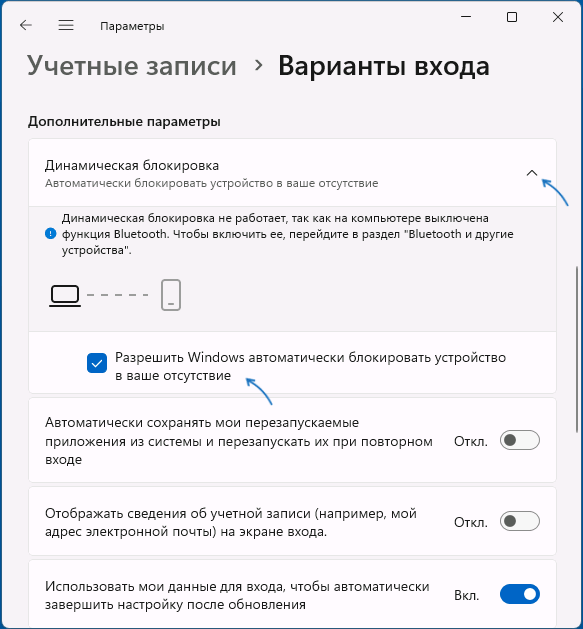
- Если ваш смартфон и компьютер связаны по Bluetooth, вы можете включить опцию «Динамическая блокировка» в разделе Параметров «Учетные записи» — «Варианты входа». В этом случае Windows будет блокироваться, когда связь с вашим мобильным устройством будет теряться.

- При необходимости можно отдельно настроить время выключения экрана на экране блокировки.
Если у вас остаются вопросы по рассмотренной теме, можно задать их в комментариях ниже, я постараюсь помочь.
You may want to change lock screen timeout settings because either the time is set to too low or high for Windows to lock screen when the PC is idle. This is a good feature when you want to secure your PC when you are not using it. So what Windows does is that it locks your screen automatically after your PC is idle for a certain amount of time and it either displays screensaver or turns off the display.

Earlier the Screensavers were used to prevent burn out on CRT monitors, but nowadays it’s more of a security feature. For example, if you are away from your computer for a few hours, the chances are that someone might access your files, passwords etc. if the PC is not locked or turned off by you. But if you have correctly set the lock screen timeout setting, then the display will automatically turn off after the PC is left idle for few minutes and if someone tries to access it, Windows will as for login password.
The only problem with this security feature is that sometimes the lock screen timeout is set to 5 minutes, meaning that the computer will lock screen after the PC is left idle for 5 minutes. Now, this setting annoys a lot of users as their PC can get lock frequently and they have to enter the password every time which waste their lot of time. To prevent this from happening, you need to increase the lock screen timeout setting in Windows 10 to frequently prevent turning off the display.
Table of Contents
Make sure to create a restore point just in case something goes wrong.
Method 1: Increase Screen Timeout Setting from Windows Settings
1.Press Windows Keys + I to open Settings then click on Personalization.

2. From the left-hand menu, choose Lock Screen.
3. Now scroll down till you find Screen timeout settings and once you find it click on it.

4. Set the time setting under Screen to a little higher if you want to avoid turning off the screen every now & than.

5. If you want completely disable the setting then choose Never from the dropdown.
6. Make sure that the sleep time is set higher than the screen turn off time or else the PC will go to sleep, and the screen wouldn’t be locked.
7. It’s preferred if Sleep is disabled or at least set at 30 minutes or more, in this case, you will have a lot of time to get back to your PC; if not, it will go into sleep mode.
8. Reboot your PC to save changes.
Method 2: Change Lock Screen Timeout Setting from Control Panel
Note: This is just an alternative of the above method if you have followed that then skip this step.
1. Press Windows Key + X then select Control Panel.
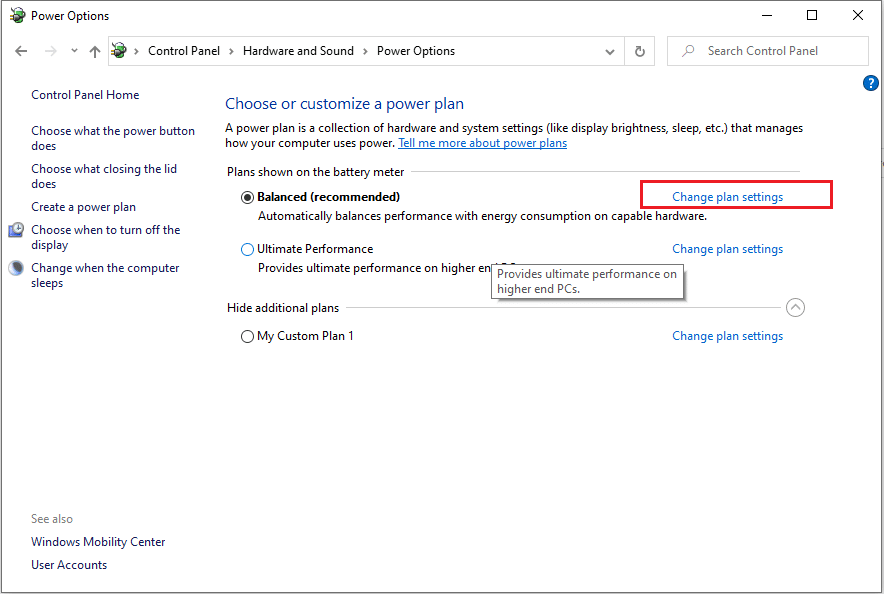
2. Click System and Security then click on Power Options.

3. Now click Change plan settings next to your currently active power plan.
4. Again set the same settings as advice in the previous method.

5. Make sure to set the settings for both batteries and plugged in option.
Method 3: Using Registry
1. Press Windows Key + R then type regedit and hit Enter to open Registry Editor.
2. Navigate to the following path in the Registry:
HKEYLOCAL_MACHINE\SYSTEM\CurrentControlSet\Control\Power\PowerSettings\7516b95f-f776-4464-8c53-06167f40cc99\8EC4B3A5-6868-48c2-BE75-4F3044BE88A7
3. On the right-hand side window, double click on Attributes DWORD.

4. If you can’t find it, you need to create the DWORD, right-click in an empty area in the right-hand side window and select New > DWORD (32-bit) value.
5. Name it as Attributes and double click on it.
6. Now change its value from 1 to 2 and click OK.
7. Reboot your PC to save changes.
8. Now right-click on Power icon on the system tray and select Power Options.
9. Click Change plan settings next to your currently active plan.
10. Then click Change advanced power settings.

11. Scroll down till your see Display, then click on it to expand its settings.
12. Double click on Console lock display off a timeout and then change its value from 1 minute to the time you want.

13. Click Apply, followed by OK.
14. Reboot your PC to save changes.
Method 4: Change Lock screen timeout Settings using Command Prompt
1. Press Windows Key + X then select Command Prompt (Admin).
2. Type the following command and press Enter:
powercfg.exe /SETACVALUEINDEX SCHEME_CURRENT SUB_VIDEO VIDEOCONLOCK 60
powercfg.exe /SETDCVALUEINDEX SCHEME_CURRENT SUB_VIDEO VIDEOCONLOCK 60

Note: You must replace the “60” in the above command with the screen timeout setting you want (in seconds) for example if you want 5 minutes then set it at 300 seconds.
3. Again type the following command and hit Enter:
powercfg.exe /SETACTIVE SCHEME_CURRENT
4. Reboot your PC to save changes.
Recommended:
- Fix DPC_WATCHDOG_VIOLATION Error 0x00000133
- Fix Windows could not automatically detect this network’s proxy settings
- Resolve Windows 10 Freezes Randomly Issue
- Fix There was a problem resetting your PC error
That’s it you have successfully learned How to Change Lock Screen Timeout Setting in Windows 10 but if you still have any questions regarding this post then feel free to ask them in the comment’s section.
Ненадолго покидая рабочее место и не желая выходить из учетной записи пользователя или выключать компьютер, вы можете заблокировать его нажатием Win + L. Независимо от того, отключили вы до этого экран блокировки или нет, войти в систему можно будет только введя пароль, если он, конечно, установлен. Временно закрыть доступ к учетной записи можно также с помощью быстрого ярлыка, в расположение объекта которого прописана специальная команда.
Как включить автоматическую блокировку в Windows 10
В том и другом случае блокировка инициируется пользователем, но вы можете сделать так, что Windows 10 сама станет блокировать доступ к учетной записи по истечении определенного времени. Подойдет этот способ, однако же, не всем пользователям. Если у вас вошло в привычку делать неопределенные по времени перерывы в работе и отлучение от рабочего места для вас вещь ситуативная, используйте лучше ручную блокировку.
Иное дело, когда вы постоянно чем-то заняты, скажем, печатаете, рисуете или просто серфите, а если и делаете перерывы, то хотя бы приблизительно знаете на сколько. Почему так? Потому что описанный ниже способ автоматической блокировки предполагает бездействие пользователя в течении некоего времени. Видит Windows, к примеру, что вы ничем не заняты в течении пяти минут и только тогда блокирует компьютер.
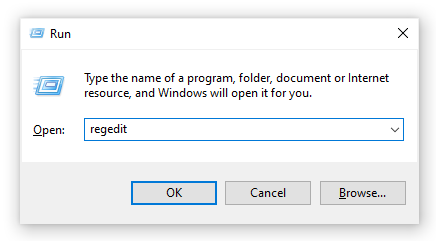
Ну что же, давайте теперь посмотрим, как это реализовать. В Windows 10 предусмотрена специальная политика безопасности «Интерактивный вход в систему», но поскольку оснастка Secpol.msc имеется не во всех редакциях системы, мы предлагаем более универсальный способ ее включения и настройки — через редактор реестра. Запустив оный командой regedit, разверните эту ветку:
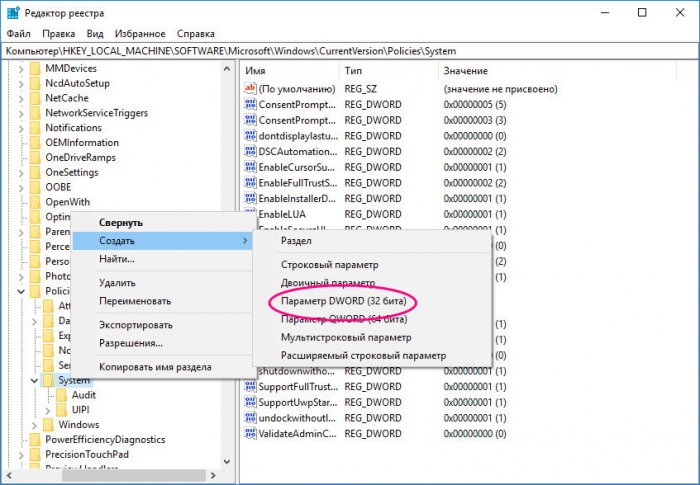
HKLM/SOFTWARE/Microsoft/Windows/CurrentVersion/Policies/System
В правой колонке создайте, если отсутствует, 32-битный параметр типа DWORD, обзовите его именем InactivityTimeoutSecs и установите в качестве его значения число в десятичной системе счисления равное количеству секунд (599940 максимум),
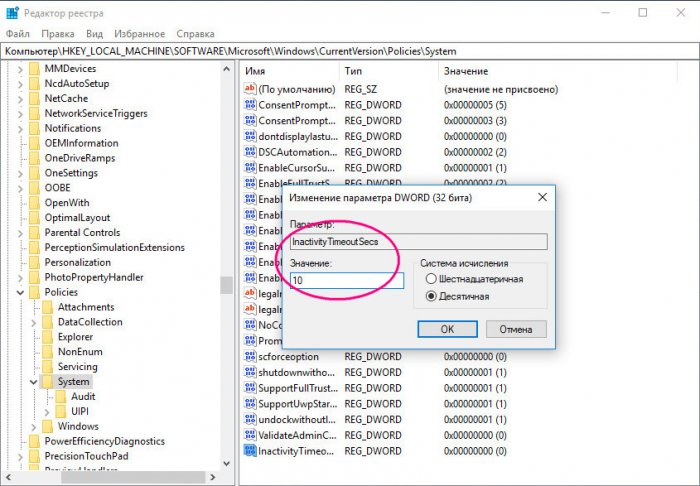
по истечении которых в случае бездействия пользователя компьютер будет автоматически заблокирован. Настройки вступят в силу после перезагрузки компьютера. Чтобы отключить автоблокировку, удалите созданный параметр InactivityTimeoutSecs или измените его значение на 0.
Rick Akura
By default, Windows 10 turns off the on-screen display after a minute when the PC is locked. Learn how to disable the lock screen timeout on Windows 10.
By default, Windows 10 lock screen automatically turns off after you’ve been inactive for over a minute. This is called a timeout, and it’s implemented to save power and battery life, however, some users may be looking to spend more or even less time with the lock screen active
This is something that can be changed quite easily and quickly. All you have to do is read our article and follow the steps described below. You’ll be able to modify or disable the lock screen timeout within minutes!

What is the lock screen timeout?
In Windows 10, the lock screen has become quite advanced and a lot more useful as well. It displays the current time and date, all available local users, and even gives you the option to use Cortana and other Windows utilities. You may also choose to restart or shut down your device straight from the lock screen itself.
With more functionality, more people are looking to extend the amount of time the lock screen remains visible even while the computer is inactive. This can be used to have access to Cortana, display the time and date with the beautiful background images, or simply liven up the atmosphere instead of showing a black screen.
To be able to achieve this, you need to configure the lock screen timeout. By doing that, you’re able to give instructions to Windows 10 to not turn your screen off. It’ll stay shown even if the device is on the lock screen and doesn’t receive input for an extended amount of time.
Guide to change or disable the lock screen timeout
There are multiple ways to go about changing or disabling the lock screen timeout in Windows 10. All of these steps are easy to follow, however, some of them require a bit more time than the others. Do what feels good for you — you can always return to our article and try something else in the future.
Tip: All of these methods can be performed by anybody, as our guides are easy to follow and don’t require any previous Windows 10 experience. If you know anyone who’s experiencing issues with their system, don’t forget to recommend us!
Now, let’s start learning about disabling or modifying the lock screen timeout using a Windows 10 operating system.
Method 1: Manually make changes to the Registry and modify the lock screen timeout
The very first thing we recommend trying is making changes to the Registry. Here’s where you can find Windows’ more advanced settings, often not available elsewhere.
While the Registry seems intimidating at first, it’s actually quite simple to navigate. All you have to keep in mind is to not make any un-instructed changes. A poorly configured Registry may lead to errors on your device!
Warning: Before beginning this guide, we recommend creating a backup of your Registry. If you’re not sure how to create and import Registry backups, watch “Registry Backup, Restore, Import And Export” from Windows Ninja.
Let’s get started!
-
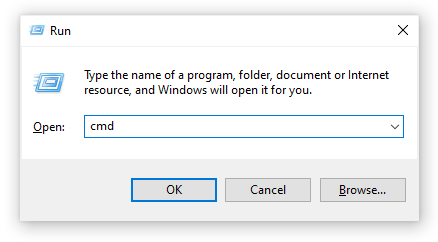
Press the Windows + R keys on your keyboard at the same time to bring up the Run application. Here, simply type in “Regedit” and click OK.

- Navigate the Registry Editor using the arrow icons next to each folder name on the left-side panel. Navigate to the following registry key: HKEYLOCAL_MACHINE\SYSTEM\CurrentControlSet\Control\Power\PowerSettings\7516b95f-f776-4464-8c53-06167f40cc99\8EC4B3A5-6868-48c2-BE75-4F3044BE88A7
- Double-click on the “Attributes” key seen in the right side of the window.
-
Change the value data to 2, then click the OK button. Make sure not to make any other changes!
- Now, you should be able to see the lock screen timeout option when making changes to your Power Options (jump to Method 4).
Method 2: Download the automatic Registry changes
Not confident in using the Registry yourself? No problem! You can simply apply a one-click solution to make the modifications automatically without having to worry about messing something up.
- Click here to download the “Lock Screen Timeout Hacks” file from HowTo Geek. This is a .zip file, meaning that you might need to download an application such as WinRAR or 7-Zip to access the contents.
-
Open the file you just downloaded.
-
Locate “Add Lock Screen Timeout Setting to Power Options” and double-click on it to launch it.
- Now, you should be able to see the lock screen timeout option when making changes to your Power Options (jump to Method 4).

Method 3: Enter a command using Command Prompt to change the lock screen timeout
Another powerful tool used to make more advanced changes and personalization to your device is the Command Prompt. It allows you to directly give commands to your computer via a code language. We can use this to make changes to the Power Options, allowing you to modify the lock screen timeout.
-
Press the Windows + R keys on your keyboard to open up the Run utility. Type in “cmd” and press Ctrl + Shift + Enter to launch the Command Prompt with administrative permissions.
- When the Command Prompt launches, input the following command and press Enter: powercfg.exe /SETACVALUEINDEX SCHEME_CURRENT SUB_VIDEO VIDEOCONLOCK 60.
Make sure to change “60” to the amount of time you want your lock screen to stay active for. This time is in seconds, meaning that by leaving it default, you’ll have 60 seconds before the lock screen goes into a timeout.
- Next, input the following command and press Enter once again: powercfg.exe /SETACTIVE SCHEME_CURRENT
- Close the Command Prompt. You should be able to notice that the lock screen timeout has changed.
Method 4: Use the Power Options to change the lock screen timeout
After enabling the setting with either Method 1 or Method 2, you’ll be able to use the Power Options to modify the lock screen timeout. This is what you need to do:
-
Press the Windows + R keys using your keyboard to bring up the Run utility, then type in “control” and click the OK button. This is going to open the Control Panel.
-
Make sure that your view mode is set to Category. This will allow you to see grouped settings, making navigation easier.
-
Next, click on the Hardware and Sound heading.
-
You should see another list of groups full of different settings. What you need to click on is the Power Options menu.
-
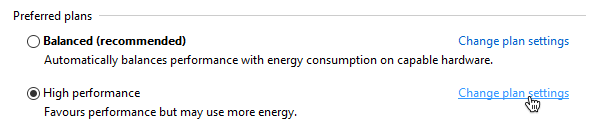
Click on the “Change plan settings” link next to whichever plan you’re using. There’s no need to change your actual plan — all we’ll do is simply modify it.
-
Click on the “Change advanced power settings” link at the bottom of the page. A new window should pop up.
- Scroll down until you see Display, then click on the plus icon to expand the section.
-
Change “Console lock display off timeout” to the number of minutes you want before your lock screen goes into a timeout. If you don’t see this setting, make sure to follow the steps in either Method 1 or Method 2.
- Click the Apply button, then close the window by clicking OK.
- You should be able to see that your lock screen timeout has been increased or decreased.

We hope that this article was able to help you learn how you can change the lock screen time out, or disable it entirely. Get more control over your device and enjoy your lock screen active for exactly as much time as you want it to!
Are you interested in learning more about Windows 10? Do you need help fixing any other Windows 10 errors and issues? You can browse our dedicated blog section and find articles about everything related to Microsoft’s groundbreaking operating system. Click here to proceed.
В данной статье показаны действия, с помощью которых можно включить автоматическую блокировку компьютера через заданное время простоя в операционной системе Windows 10.
В операционной системе Windows имеется параметр безопасности «Интерактивный вход в систему: предел простоя компьютера» с помощью которого Windows определяет простой в рамках сеанса входа в систему, и если длительность такого простоя превышает заданное предельное значение, то включается экран блокировки который блокирует сеанс и тем самым защищает компьютер от несанкционированного использования.
Данный параметр безопасности применяется для всех пользователей (учетных записей) компьютера и по умолчанию отключен.
Чтобы включить автоматическую блокировку компьютера через заданное время простоя, необходимо войти в систему в качестве администратора.
Содержание
- Как включить автоматическую блокировку компьютера используя локальную политику безопасности (secpol.msc)
- Как включить автоматическую блокировку компьютера в редакторе реестра
- Видео-инструкция
Как включить автоматическую блокировку компьютера используя локальную политику безопасности (secpol.msc)
Оснастка «Локальная политика безопасности» доступна в Windows 10 редакций Pro, Enterprise, Education.
Чтобы включить автоматическую блокировку компьютера через заданное время бездействия, откройте оснастку локальной политики безопасности, для этого нажмите сочетание клавиш + R, в открывшемся окне Выполнить введите (скопируйте и вставьте) secpol.msc и нажмите кнопку OK.

В окне «Локальная политика безопасности» разверните следующие элементы списка:
Локальные политики ➯ Параметры безопасности
Далее, в правой части окна дважды щелкните левой кнопкой мыши по политике с названием Интерактивный вход в систему: предел простоя компьютера

В окне «Свойства: Интерактивный вход в систему: предел простоя компьютера», в поле ввода Компьютер будет заблокирован по истечении введите необходимое количество секунд и нажмите кнопку OK.
Вы можете ввести значение в секундах от 0 до 599940. Если вы установите значение 0, то автоматическое блокирование компьютера будет отключено.

Чтобы изменения вступили в силу, перезагрузите компьютер.
Как включить автоматическую блокировку компьютера в редакторе реестра
Данный способ подходит для всех редакций операционной системы Windows, и позволяет включить автоматическую блокировку компьютера через заданное время простоя, с помощью внесения изменений в системный реестр Windows
Прежде чем вносить какие-либо изменения в реестр, настоятельно рекомендуется создать точку восстановления системы
Чтобы включить автоматическую блокировку компьютера через заданное время простоя, откройте редактор реестра, для этого нажмите сочетание клавиш + R, в открывшемся окне Выполнить введите (скопируйте и вставьте) regedit и нажмите кнопку OK.

В открывшемся окне редактора реестра перейдите по следующему пути:
HKEY_LOCAL_MACHINE\\SOFTWARE\\Microsoft\\Windows\\CurrentVersion\\Policies\\System
Затем нажмите правой кнопкой мыши на разделе System и в открывшемся контекстном меню выберите Создать > Параметр DWORD (32-бита), присвойте созданному параметру имя InactivityTimeoutSecs.

Теперь дважды щёлкните левой кнопкой мыши по созданному параметру InactivityTimeoutSecs, в открывшемся окне выберите десятичную систему исчисления и в поле «Значение:» введите необходимое количество секунд по истечении которых компьютер будет заблокирован и нажмите кнопку OK.
Вы можете ввести значение в секундах от 0 до 599940. Если вы установите значение 0, то автоматическое блокирование компьютера будет отключено.

Чтобы изменения вступили в силу, перезагрузите компьютер.
Используя рассмотренные выше действия, можно включить автоматическую блокировку компьютера через заданное время простоя в операционной системе Windows 10.
Видео-инструкция
Также, можно посмотреть нашу видео-инструкцию в которой показано, как включить автоматическую блокировку компьютера Windows 10 и 8.1.