
The documentation on the Azure Storage Blobs are a little fuzzy, as the NuGet packages and the approach have changed over time.
The latest NuGet Package is now called:
- Azure.Storage.Blobs
The concept of blob storages are the same though:
- You use a connectionstring to connect to an Azure Storage Account.
- Blob storage is divided into containers. To access a container you need a BlobContainerClient.
- To access a blob you get a BlobClient from a BlobContainerClient.
- With the BlobClient you can upload and download blobs.
Blobs can be accessed via an URL, like this:
- https://xxxstorage.blob.core.windows.net/container/path/path/blob
ENOUGH TALK, SHOW ME THE CODE:
This is an example of a very simple repository that will read, write and delete blobs:
using Azure.Storage.Blobs;
using Azure.Storage.Blobs.Models;
using System.IO;
using System.Text;
using System.Threading.Tasks;

namespace MyCode
{
  public class BlobRepository
  {
    private BlobContainerClient _client;

    /// <summary>
    /// Create an instance of blob repository
    /// </summary>
    /// <param name="connectionString">The storage account connection string</param>
    /// <param name="containerName">The name of the container</param>
    public BlobRepository(string connectionString, string containerName)
    {
      _client = new BlobContainerClient(connectionString, containerName);
      // Only create the container if it does not exist
      _client.CreateIfNotExists(PublicAccessType.BlobContainer);
    }

    /// <summary>
    /// Upload a local file to the blob container
    /// </summary>
    /// <param name="localFilePath">Full path to the local file</param>
    /// <param name="pathAndFileName">Full path to the container file</param>
    /// <param name="contentType">The content type of the file being created in the container</param>
    public async Task Upload(string localFilePath, string pathAndFileName, string contentType)
    {
      BlobClient blobClient = _client.GetBlobClient(pathAndFileName);

      using FileStream uploadFileStream = File.OpenRead(localFilePath);
      await blobClient.UploadAsync(uploadFileStream, new BlobHttpHeaders { ContentType = contentType });
      uploadFileStream.Close();
    }

    /// <summary>
    /// Download file as a string
    /// </summary>
    /// <param name="pathAndFileName">Full path to the container file</param>
    /// <returns>Contents of file as a string</returns>
    public async Task<string> Download(string pathAndFileName)
    {
      BlobClient blobClient = _client.GetBlobClient(pathAndFileName);
      if (await blobClient.ExistsAsync())
      {
        BlobDownloadInfo download = await blobClient.DownloadAsync();
        byte[] result = new byte[download.ContentLength];
        await download.Content.ReadAsync(result, 0, (int)download.ContentLength);

        return Encoding.UTF8.GetString(result);
      }
      return string.Empty;
    }

    /// <summary>
    /// Delete file in container
    /// </summary>
    /// <param name="pathAndFileName">Full path to the container file</param>
    /// <returns>True if file was deleted</returns>
    public async Task<bool> Delete(string pathAndFileName)
    {
      BlobClient blobClient = _client.GetBlobClient(pathAndFileName);
      return await blobClient.DeleteIfExistsAsync(DeleteSnapshotsOption.IncludeSnapshots);
    }
  }
}
HOW TO USE IT?
// Create a new repository. Enter the connectionstring and the
// container name in the constructor:
BlobRepository rep = new BlobRepository("YOUR_SECRET_CONNECTIONSTRING","test");

// To upload a file, give a file name from the local disk.
// Add the name of the blob file (notice that the path is in the blob filename
// not, the container name), and the content type of the file to be uploaded
await rep.Upload("d:\\test.json", "blobtest/test.json", "application/json")

// To download a file, enter the path and file name of the blob
// (not including the container name) and the contents is returned as a
// string
string jsonFile = await rep.Download("blobtest/test.json");

// Deleting the blob is done by entering the path and file of the blob
await rep.Delete("blobtest/test.json");
In the example above, the URL to the created blob will be:
- https://xxxstorage.blob.core.windows.net/test/blobtest/test.json
This is just a simple example, but it can easily be modified to uploading streams or downloading binary files.
That’s it. Happy coding.
MORE TO READ:
- Introduction to Azure Blob storage from Microsoft
- Azure Storage Blobs client library for .NET – Version 12.9.1 from Microsoft
- Read blob file from Microsoft Azure Storage with .NET Core (the old way) from briancaos
About briancaos
Developer at Pentia A/S since 2003. Have developed Web Applications using Sitecore Since Sitecore 4.1.
This entry was posted in .net, .NET Core, c#, General .NET, Microsoft Azure and tagged Azure, Blob. Bookmark the permalink.
In November 2023, I presented at CHCON «Go by Example: Creating a C2 framework while trolling Microsoft». The recording is available on YouTube if you’d prefer to watch. I’ve written the core points of that presentation into this post.
Background
If you’ve ever talked to me about smart homes and automation or read some of my other blog posts, you’ll have seen that I have a fairly complex internal network architecture.
(I have waaaayyyyyy too many computers, and no time to manage them all.)
Which is why in early 2023, I set myself a «simple» task: I want a unified management portal for my fleet of IoT, so that I don’t have to spend all my free time running around going sudo apt update && sudo apt upgrade -y into everything.
Specifically, I wanted:
- A single agent process that I could load onto all my devices
- A simple microservice backend to coordinate running tasks on the agents
- A simple cli tool that I could use to query and run commands at scale
I could have used any of the countless RMM tools available to do this, I had an idea of how to do it differently. Because, as the title of the talk implies, I had a bit of Microsoft trolling to do 😉.
The Design
In my day job I write a lot of Python, and am quite familiar with using Azure Functions, so my first thought was to simply stick to what I know.
But I’ve recently started reimplementing parts of my home automation stack using Go. Mostly because I enjoy learning new things, and while I’d played around with contributions to other Go projects, I wanted to understand a fully-worked Go example. But also because Go compiles into a neat fully-packaged binary, which is ideal for my use-cases, where I have task-specific software that runs on home automation devices; in addition to having lots of apt updates, I was also tired of python3 -m venv .env && source .env/bin/activate && pip install --upgrade pip && pip install --upgrade -r requirements.build.txt && pip freeze > requirements.txt.
And while I could have used Go to write both the agent and the backend microservice, I decided that the future is truely code-less architectures, and decided to build the server side using Azure Storage Blobs.
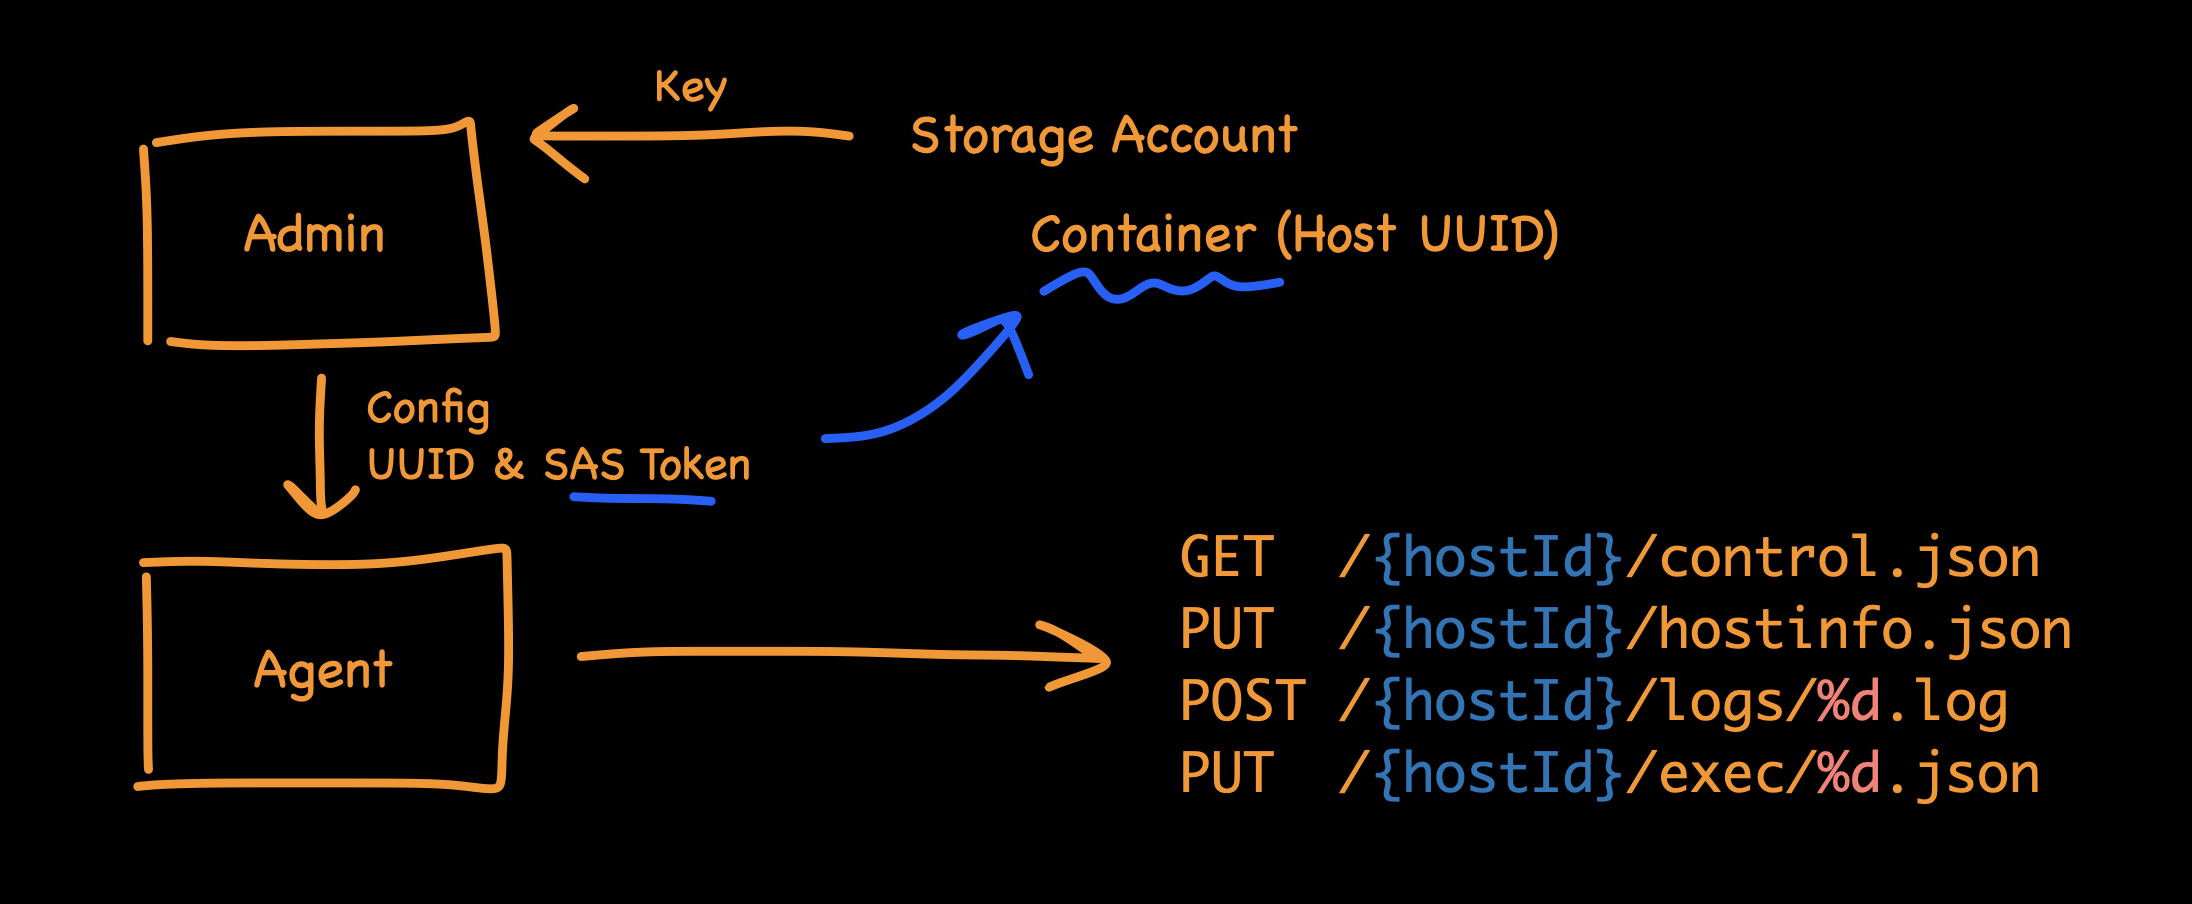
Which… isn’t as crazy as you might first think. If you start by understanding the API design, the agent only needs a couple basic APIs:
- a PUT to report it’s current status
- a GET to fetch instructions (like if it needs to run an update command)
- a PUT to upload results (e.g., if I want to fetch a file remotely)
- a POST to capture logs for diagnostics
All of these can be natively run as storage GET/PUT/POST operations. I can create a single Blob storage Container to hold all the agents, and use SAS tokens to segment each agent, so that a malicious agent can’t interfere with others.
Using a Storage account as an API backend has numerous benefits, including:
- No-code, true server-less; nothing on the backend requires any maintenance whatsoever
- Cloud-native scalability, I can scale from 1 to 1bn devices instantly
- Cost effective, at ~$0.000004 (NZD) per operation!
- Super fast, no waiting for stopped applications to start
- No firewall rules to add
If you’d like to see it in action, go watch the YouTube video. No sorry, I haven’t open-sourced the code. 🙂
No firewall rules to add?
No firewall rules to add, because you’ve already added them.
Remember that Microsoft trolling I promised?
See, Azure Blob Storage is so popular with Microsoft product teams, that just about every Microsoft product asks you to add *.blob.core.windows.net. Seriously, go look at the Microsoft documentation. Some highlights include:
- Office 365
- Windows Delivery Optimisation
- Entra Connect
- Defender for Endpoint, although at least they say: «Don’t exclude the URL *.blob.core.windows.net from any kind of network inspection»
- Defender for Cloud Apps
- Visual Studio
- PowerApps
- Azure Backup
- Azure Site Recovery
Does this count as a vulnerability?
I’ve tried to raise this with Microsoft, including people I know who work there, and have always gotten a lukewarm response.
This is not exactly a new technique. There are documented examples of attackers using Azure services to host phishing sites. I even managed to find an example of someone who tried to report abuse to Microsoft, but gave up, and posted in the Learn forums in frustration. But as far as I can find, I’m the first to use Azure Storage as a RMM / C2.
The point is that each Azure Storage account should be treated like any other website, with all the typical controls that you would expect. Everyone should expect services that are available to anyone to be abused. In particularly risk-adverse organisations, this means accounts (domains) should be checked to see if they’re newly seen, or are hosting content that contains brand impersonations.
But while this is a known issue, Microsoft product teams either aren’t aware, or aren’t taking steps to help reduce the impact Instructing IT teams to explicitly trust every Azure Storage account, by adding *.blob.core.windows.net to security bypass lists, is downright dangerous. Especially in situations where you’re trying to create a strict outbound control list, like when your company is being hit by ransomware, and you’re trying to cut off internet access while still allowing core tools (like EDR, and directory sync) to function.
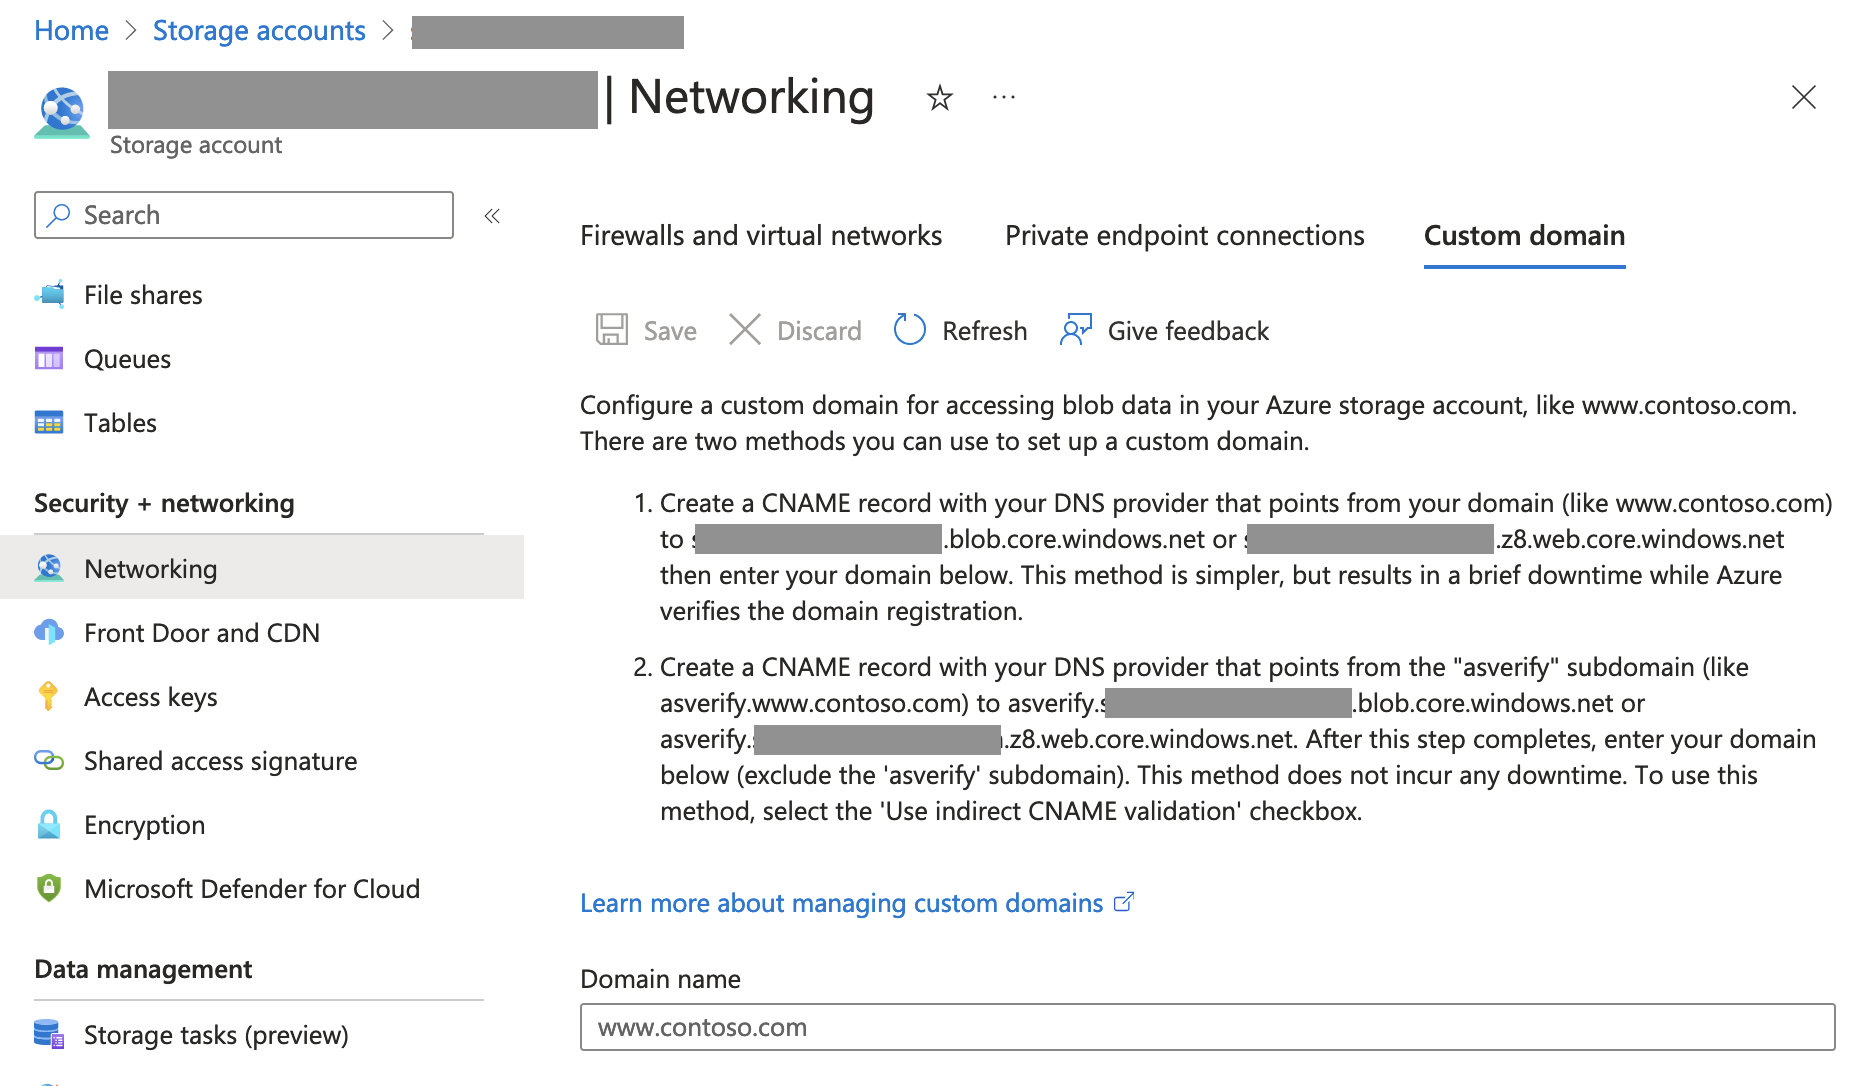
In my opinion, Microsoft need to do a stocktake of their official Azure Storage accounts, and at least put them behind a CNAME of a Microsoft-only domain like *.blob.cloud.microsoft. Storage Accounts support custom domains, and it’s not even very difficult to do:
Epilogue: how many Microsoft official Azure Storage accounts are there?
Spoiler: I don’t know.
I’ve been trying to find out though, and through observing network traffic I’ve found that there are at least 209 Storage accounts used for OneDrive for Business, 34 Storage accounts used for Defender for Endpoint.
Windows Azure has matured nicely over the past few years into a very developer-friendly “Infrastructure-As-A-Service” platform. While many of the recent public announcements have been focused Azure Websites, Deployment from Source Control, and the new general availability of Azure Virtual Machines, one of the core features of the Azure platform remains storage.
Specifically, Azure Blob Storage.
If you are not familiar with Azure blob storage, visit the Azure site, or check out an overview of what it’s all about.
Blobs are Great and All That, but What About Files and Folders?
So far as Azure itself is concerned, a blob represents one or blocks of binary data. Much like data on your local hard drive, the notion of directories, files, and the tree-like hierarchal model so familiar to most users is imposed upon the stored data as an abstraction. In the case of your local hard drive, this model is implemented by the operating system.
Within the Windows Azure storage model, there is no OS to impose such structure. Organization and interpretation of the data structure is left up to the client. It is in this way that we are able to store any type of data on the Blob storage platform, and similarly why blob storage is easily consumed by multiple languages and useable from any platform – the structure of the data is platform agnostic.
It’s All in the Name
The blob storage model and associated APIs establish addressing and naming conventions which serve to identify individual blobs within storage containers. We address blobs via URLs according to the following format:
http://<your-storage-account-name>/blob.core.windows.net/<container-name>/blob-name
In the above, the URL is composed of your Azure Storage Account name, the /blob.core.windows.net/ namespace, followed by the name of the container in which the blob is located, and finally the name of the blob itself. However, as you recall from our overview, blob names can contain any characters, including forward slashes. For example, one could create a blob named Documents/Photos/Graduation Pic.jpg, which, assuming the following details, would be addressed as follows:
Storage Account: mystorageaccount
Container Name: mycontainer
Blob Name: Documents/Photos/Graduation Pic.jpg
The Blob name above implies that within the container mystorageaccount, there is a directory named Documents, containing a subdirectory named Photos, in which a file named Graduation Pic.jpg is located.
Access this blob using:
http://mystorageaccount/blob.core.windows.net/mycontainer/Documents/Photos/Graduation Pic.jpg
In the Azure storage Account view, a virtual hierarchal directory structure might look like this:

In the image above, note the names of the blobs in the ‘Name” column. As far as Azure is concerned, these are simply the blob names. However, much like your operating system, the various SDK implementations afford functionality which can optionally parse these names into a directory structure.
In the above, for example, the blobs File 1.txt, File 2.txt, and File 3.txt can be thought of a being at the root level of the Storage Container, while the blobs named Johns Files/File 1.txt, Johns Files/File 2.txt, and Johns Files/File 3.txt can be thought of as being contained in a directory named Johns Files/. Similarly, We can also see that there is an implied subdirectory within the Johns Files/ directory named Music/, again containing three files.
If we scroll to the right in the Azure browser view above, we see that the same structure is mirrored in the URL for each file, except the file name now conforms to legal URL naming standards:

While Azure storage itself does not recognize the notion of a directory as implied by the delimited blob name, the Azure SDK for your chosen language does, to a certain extent, and assists us in parsing an implied directory structure out of the blob address + name. In this post we will look at the .NET API, however, similar implementations are available for Java, Ruby, Python, and other common platforms.
API Access to the Storage Account and Containers
First we will look at some of the basics involved in accessing an Azure storage account and the containers hosted therein. Using the Azure .NET API, we can create a simple Console application which presents required credentials to the Azure storage account, and then retrieves an IEnumerable <CloudBlobContainer> representing the blob storage containers as follows (note that the various other SDKs and APIs define similar functionality for the appropriate platform/language). To do this, we use the ListContainers() method of the CloudBlobClient class:
// in a real project, one might want to implement some security here:
const string ACCOUNT_NAME = "xiv";
const string ACCOUNT_KEY = "myAccountKey";
const string AZURE_CONNECTION_STRING = ""
    + DefaultEndpointsProtocol=https;AccountName={0};AccountKey={1}";
static void Main(string[] args)
{
    var storageAccount = CloudStorageAccount.Parse(string.Format(AZURE_CONNECTION_STRING,
        ACCOUNT_NAME, ACCOUNT_KEY));
    var client = storageAccount.CreateCloudBlobClient();
    foreach (var container in client.ListContainers())
    {
        Console.WriteLine("Container: " + container.Name);
    }
    // This pauses execution so the console output can be viewed:
    Console.Read();
}
In the above, the code simply iterates over the Enumerable and prints the name for each container to the console output. However, the CloudBlobContainer class exposes a variety of useful methods designed to facilitate blob data access. For the purpose of this post, we are primarily interested in the ListBlobs() method.
The ListBlobs method, and the IListBlobItem Interface
The ListBlobs() method returns an instance of IEnumerable<IListBlobItem> which is essentially a list of the blobs within the container. However, the enumerable also includes representations of the implied directory structure.
Items returned by the Instance of Enumerable will one of two types, both of which implement the interface IListBlobItem. Actual blob data (“files” so to speak) will be returned as instances of CloudBlockBlob. Directories, which are essentially abstractions created by the API based upon the structure implied by blob names delimited with forward-slashes, are returned as instances of CloudBlobDirectory.
The instances of IListBlobItem returned in the enumerable can be cast to either CloudBlobDirectory or CloudBlockBlob. From there, we can access properties of each in order to print representations to the console window. For example, if we want to focus on directories only, we could add a method as follows, which iterates over the enumerable passed as an argument, checks the underlying type of each IListBlobItem, and if the underlying type is CloudBlobDirectory, prints the directory prefix to the console window. We then employ a little recursion and do the same for each CloudBlobDirectory instance:
Define the printCloudDirectories Method:
static void printCloudDirectories(IEnumerable<IListBlobItem> blobList)
{
    foreach (var blobitem in blobList)
    {
        if (blobitem is CloudBlobDirectory)
        {
            var directory = blobitem as CloudBlobDirectory;
            Console.WriteLine(directory.Prefix);
            printCloudDirectories(directory.ListBlobs());
        }
    }
}
Now we can add a line to our Main method as defined in the previous section, and after printing the name of each container, we can pass the output of the ListBlobs() method to our new printCloudDirectories method:
Call printCloudDirectories from Main:
static void Main(string[] args)
{
    var storageAccount = CloudStorageAccount.Parse(string.Format(AZURE_CONNECTION_STRING,
        ACCOUNT_NAME, ACCOUNT_KEY));
    var client = storageAccount.CreateCloudBlobClient();
    foreach (var container in client.ListContainers())
    {
        Console.WriteLine("Container: " + container.Name);
        // ADD A CALL TO printCloudDirectories:
        Program.printCloudDirectories(container.ListBlobs());
    }
    // This pauses execution so the console output can be viewed:
    Console.Read();
}
The output from our little application, if run against the storage account example above, at this point looks like this:

A Simple Console Demonstration
Let’s take this a few steps further, and create an application which iterates over the containers of a storage account, and writes a text representation of the implied directory structure to the console output.
In our Main method, we will authenticate as before by presenting our credentials. We will then get a reference to an instance of CloudBlobClient. From here, though, we will make a few minor modifications. We define a method named writeAzureDirectoriesToConsole which accepts an argument of IEnumerable<CloudBlobContainer>. Similar to our previous method, this iterates over the Enumerable, and writes the container name to the console output. From here, however, the output of the ListBlobs() method is passed as an argument to a method named getContainerDirectories, which returns a string representation of the file structure we are after.Unlike our previous example, the getContainerDirectories method employs a LINQ query to parse directories and blob files separately, and also adds some rudimentary indentation to the output for readability. The indented formatting also suggests the tree-like structure we associate with a hierarchal data structure:
// in a real project, one might want to implement some security here:
const string ACCOUNT_NAME = "xiv";
const string ACCOUNT_KEY = "MyAccountKey";
const string AZURE_CONNECTION_STRING = ""
    + "DefaultEndpointsProtocol=https;AccountName={0};AccountKey={1}";
static void Main(string[] args)
{
    var storageAccount =
        CloudStorageAccount.Parse(string.Format(AZURE_CONNECTION_STRING, ACCOUNT_NAME,
            ACCOUNT_KEY));
    var client = storageAccount.CreateCloudBlobClient();
    writeAzureDirectoriesToConsole(client.ListContainers());
    // This pauses execution so the console output can be viewed:
    Console.Read();
}
static void writeAzureDirectoriesToConsole(IEnumerable<CloudBlobContainer> containers)
{
    foreach (var container in containers)
    {
        string indent = "";
        Console.WriteLine("Container: " + container.Name);
        // Pass Ienumerable to recursive function to get "subdirectories":
        Console.WriteLine(getContainerDirectories(container.ListBlobs(), indent));
    }
}
static string getContainerDirectories(IEnumerable<IListBlobItem> blobList, string indent)
{
    // Indent each item in the output for the current subdirectory:
    indent = indent + "  ";
    StringBuilder sb = new StringBuilder("");
    // First list all the actual FILES within the current blob list. No recursion needed:
    foreach (var item in blobList.Where((blobItem, type) => blobItem is CloudBlockBlob))
    {
        var blobFile = item as CloudBlockBlob;
        sb.AppendLine(indent + blobFile.Name);
    }
    // List all additional subdirectories in the current directory, and call recursively:
    foreach (var item in blobList.Where((blobItem, type) => blobItem is CloudBlobDirectory))
    {
        var directory = item as CloudBlobDirectory;
        sb.AppendLine(indent + directory.Prefix.ToUpper());
        // Call this method recursively to retrieve subdirectories within the current:
        sb.AppendLine(getContainerDirectories(directory.ListBlobs(), indent));
    }
    return sb.ToString();
}
As we can see, once we have successfully authenticated using our storage account name and associated account key, we create an instance of CloubBlobClient using the CreateCloudBlobClient() method of our StorageAccount instance. From there, we pass an IEnumerable<CloudBlobContainer> (from the ListContainers() method of our client object) to our hacked-together method writeAzureDirectoriesToConsole.
The writeAzureDirectoriesToConsole method simply iterates over the containers passed in, writes the name of the container to the console (in uppercase) and passes each container reference to the slightly more complex getContainerDirectories method, along with an empty string as an initial indentation level. The indentation will help visually display our directory structure in the console by indenting subdirectories and their contents.
The getContainerDirectories method adds four spaces to the indent parameter passed in, then uses a LINQ query to return an IEnumerable<IListBlobItem> for which the instances of IListBlobItem can all be cast to type CloudBlockBlob. each instance is so cast, and then written to the StringBuilder instance for console output after pre-pending the indent.
Next, we retrieve an IEnumerable<IListBlobItem> for which each instance can be cast to type CloudBlobDirectory. As we have seen, the “directories” obtained this way do not represent actual files, but rather an API interpretation of the blob names. Again, each “directory” prefix is pre-pended with the indentation, and then appended to the StringBuilder for output to the console. However, at this point, the getContainerDirectories method is then called recursively, and passed the IEnumerable<IListBlobItem> returned from the current directory’s ListBlobs() method, and the result also appended to the StringBuilder for eventual output.
If we run our example against the cloud storage account pictured above, the console output looks something like this:

Simplify the Structure for Display:
We can go a step better here by trimming off the redundant sub-directory paths before we display our tree structure. In the following, I added some lines of code to the which do just that:
static string getContainerDirectories(IEnumerable<IListBlobItem> blobList, string indent)
{
    // Indent each item in the output for the current subdirectory:
    indent = indent + "  ";
    StringBuilder sb = new StringBuilder("");
    // First list all the actual files within the current blob list. No recursion needed:
    foreach (var item in blobList.Where((blobItem, type) => blobItem is CloudBlockBlob))
    {
        var blobFile = item as CloudBlockBlob;
        // If the current blob item is at the root of a container, there
        // will be no parent directory. Use the file name as-is:
        string outputFileName = blobFile.Name;
        // Otherwise, remove the parent directory prefix from the displayed name:
        if (blobFile.Parent != null)
        {
            outputFileName = blobFile.Name.Replace(blobFile.Parent.Prefix, "");
        }
        // append to the output:
        sb.AppendLine(indent + outputFileName);
    }
    // List all additional subdirectories in the current directory, and call recursively:
    foreach (var item in blobList.Where((blobItem, type) => blobItem is CloudBlobDirectory))
    {
        var directory = item as CloudBlobDirectory;
        string directoryName = directory.Prefix;
        if(directory.Parent != null)
        {
            directoryName = directoryName.Replace(directory.Parent.Prefix, "");
        }
        sb.AppendLine(indent + directoryName.ToUpper());
        // Call this method recursively to retrieve subdirectories within the current:
        sb.AppendLine(getContainerDirectories(directory.ListBlobs(), indent));
    }
    return sb.ToString();
}
In the code above, we have simply added some logic to replace the parent directory prefix in the displayed names of subdirectories, using the Parent property of both CloudBlobDirectory and CloudBlockBlob. In both cases, the parent property returns the CloudBlobDirectory which is the parent of the current item. If there is no parent (in other words, if the current item is at the container root level) then the Parent property will return null, so we need to test for this.
After making the above modifications, when we run our code now the console output is a little more readable:

But . . . What Good Is It?
So far, we have taken a very cursory look at the manner in which Windows Azure allows us to impose a directory structure on our blob storage. We can see how we might expand upon these and other aspects of the blob storage API to create a fairly advanced file management application (for example, a desktop or web client) to facilitate management of data, and/or create a stand-alone “cloud drive” type service. As an example, the screenshot below is an early version of a desktop client I am putting together for an upcoming post. Note that it is currently pointed at the same Azure storage account as our console example. Look for this in an upcoming post.
Example of a More Developed Use Case:

The various APIs/SDKs offer a host of properties and methods allowing us to take advantage of Azure Blob Storage features. With the ever-growing cloud-based nature of our daily computer usage, and the nearly ubiquitous, pervasive presence of the internet in our daily lives, the ability for our applications to integrate with scalable, high-availability storage is not going away soon. Services such as Windows Azure, Amazon Web S3, and other API-based cloud storage services will become more and more important in our application architectures.
I will be exploring this topic further in the near future. I hope to shortly have a post discussing implementation of a very basic desktop client application similar to that pictured above. Additionally, I hope to have a similar example of a web-based client which implements at least some basic but effective authorization.
Additional Resources:
- Azure Developer Center (SDK’s/API’s Documentation)
- Understanding Windows Azure Blob Storage (A Quick Overview)
- Deploying an Azure Website from Source Control
- Developing Cloud Applications with Windows Azure Storage
Azure Storage Series
- Azure Storage – Step 1: Create a storage account
- Azure Storage – Step 2: Manage your storage account
- Azure Storage – Step 3: Get started with Azure Blob storage using .NET
Overview
Azure Blob storage is a service that stores unstructured data in the cloud as objects/blobs. Blob storage can store any type of text or binary data, such as a document, media file, or application installer. Blob storage is also referred to as object storage.
What is Blob Storage?
Azure Blob storage is a service for storing large amounts of unstructured object data, such as text or binary data, that can be accessed from anywhere in the world via HTTP or HTTPS. You can use Blob storage to expose data publicly to the world, or to store application data privately.
Common uses of Blob storage include:
- Serving images or documents directly to a browser
- Storing files for distributed access
- Streaming video and audio
- Storing data for backup and restore, disaster recovery, and archiving
- Storing data for analysis by an on-premises or Azure-hosted service
Blob service concepts
The Blob service contains the following components:
- Storage Account: All access to Azure Storage is done through a storage account. This storage account can be a General-purpose storage account or a Blob storage account which is specialized for storing objects/blobs.
- Container: A container provides a grouping of a set of blobs. All blobs must be in a container. An account can contain an unlimited number of containers. A container can store an unlimited number of blobs. Note that the container name must be lowercase.
- Blob: A file of any type and size. Azure Storage offers three types of blobs: block blobs, page blobs, and append blobs.Block blobs are ideal for storing text or binary files, such as documents and media files. Append blobs are similar to block blobs in that they are made up of blocks, but they are optimized for append operations, so they are useful for logging scenarios. A single block blob or append blob can contain up to 50,000 blocks of up to 4 MB each, for a total size of slightly more than 195 GB (4 MB X 50,000).Page blobs can be up to 1 TB in size, and are more efficient for frequent read/write operations. Azure Virtual Machines use page blobs as OS and data disks.
Prerequisites:
- Microsoft Visual Studio
- Azure Storage Client Library for .NET
- Azure Configuration Manager for .NET
- An Azure storage account
Create a Windows console application project
In Visual Studio, create a new Windows console application, as shown:
All of the code examples in this tutorial can be added to the Main() method in program.cs in your console application.
Note that you can use the Azure Storage Client Library from any type of .NET application, including an Azure cloud service, an Azure web app, a desktop application, or a mobile application. In this guide, we use a console application for simplicity.
Use NuGet to install the required packages
There are two packages that you’ll need to install to your project to complete this tutorial:
- Microsoft Azure Storage Client Library for .NET: This package provides programmatic access to data resources in your storage account.
- Microsoft Azure Configuration Manager library for .NET: This package provides a class for parsing a connection string from a configuration file, regardless of where your application is running.
You can use NuGet to obtain both packages. Follow these steps:
- Right-click your project in Solution Explorer and choose Manage NuGet Packages.
- Search online for “WindowsAzure.Storage” and click Install to install the Storage Client Library and its dependencies.
- Search online for “ConfigurationManager” and click Install to install the Azure Configuration Manager.
Note:
The Storage Client Library package is also included in the Azure SDK for .NET. However, we recommend that you also install the Storage Client Library from NuGet to ensure that you always have the latest version of the client library.
Determine your target environment
You have two environment options for running the examples in this guide:
- You can run your code against an Azure Storage account in the cloud.
- You can run your code against the Azure storage emulator. The storage emulator is a local environment that emulates an Azure Storage account in the cloud. The emulator is a free option for testing and debugging your code while your application is under development. The emulator uses a well-known account and key.
If you are targeting a storage account in the cloud, copy the primary access key for your storage account from the Azure Portal.
Note:
You can target the storage emulator to avoid incurring any costs associated with Azure Storage. However, if you do choose to target an Azure storage account in the cloud, costs for performing this tutorial will be negligible.
Configure your storage connection string
The Azure Storage Client Library for .NET supports using a storage connection string to configure endpoints and credentials for accessing storage services. The best way to maintain your storage connection string is in a configuration file.
Note:
Your storage account key is similar to the root password for your storage account. Always be careful to protect your storage account key. Avoid distributing it to other users, hard-coding it, or saving it in a plain-text file that is accessible to others. Regenerate your key using the Azure Portal if you believe it may have been compromised.
To configure your connection string, open the app.config file from Solution Explorer in Visual Studio. Add the contents of the <appSettings> element shown below. Replace account-namewith the name of your storage account, and account-key with your account access key:
<configuration>
    <startup>
        <supportedRuntime version="v4.0" sku=".NETFramework,Version=v4.5.2" />
    </startup>
    <appSettings>
        <add key="StorageConnectionString"
         value="DefaultEndpointsProtocol=https;AccountName=account-name;
         AccountKey=account-key" />
    </appSettings>
</configuration>
For example, your configuration setting will be similar to:
<add key="StorageConnectionString" value="DefaultEndpointsProtocol=https;
AccountName=storagesample;
AccountKey=nYV0gln6fT7mvY+rxu2iWAEyzPKITGkhM88J8HUoyofvK7C6fHcZc2kRZp6cKgYRUM74lHI84L50Iau1+9hPjB==" />
To target the storage emulator, you can use a shortcut that maps to the well-known account name and key. In that case, your connection string setting will be:
<add key="StorageConnectionString" value="UseDevelopmentStorage=true;" />
Add namespace declarations
Add the following using statements to the top of the program.cs file:
using Microsoft.Azure; // Namespace for CloudConfigurationManager
using Microsoft.WindowsAzure.Storage; // Namespace for CloudStorageAccount
using Microsoft.WindowsAzure.Storage.Blob; // Namespace for Blob storage types
Parse the connection string
The Microsoft Azure Configuration Manager Library for .NET provides a class for parsing a connection string from a configuration file. The CloudConfigurationManager class parses configuration settings regardless of whether the client application is running on the desktop, on a mobile device, in an Azure virtual machine, or in an Azure cloud service.
Here’s an example that shows how to use retrieve a connection string from a configuration file:
// Parse the connection string and return a reference to the storage account.
CloudStorageAccount storageAccount = CloudStorageAccount.Parse(
    CloudConfigurationManager.GetSetting("StorageConnectionString"));
Using Azure Configuration Manager is optional.
Create the Blob service client
The CloudBlobClient class enables you to retrieve containers and blobs stored in Blob storage. Here’s one way to create the service client:
CloudBlobClient blobClient = storageAccount.CreateCloudBlobClient();
Now you are ready to write code that reads data from and writes data to Blob storage.
Create a container
Every blob in Azure storage must reside in a container. The container forms part of the blob name. For example, mycontainer is the name of the container in these sample blob URIs:
https://storagesample.blob.core.windows.net/mycontainer/blob1.txt
https://storagesample.blob.core.windows.net/mycontainer/photos/myphoto.jpg
A container name must be a valid DNS name, conforming to the following naming rules:
- Container names must start with a letter or number, and can contain only letters, numbers, and the dash (-) character.
- Every dash (-) character must be immediately preceded and followed by a letter or number; consecutive dashes are not permitted in container names.
- All letters in a container name must be lowercase.
- Container names must be from 3 through 63 characters long.
Important:
Note that the name of a container must always be lowercase. If you include an upper-case letter in a container name, or otherwise violate the container naming rules, you may receive a 400 error (Bad Request).
This example shows how to create a container if it does not already exist:
// Retrieve storage account from connection string.
CloudStorageAccount storageAccount = CloudStorageAccount.Parse(
    CloudConfigurationManager.GetSetting("StorageConnectionString"));

// Create the blob client.
CloudBlobClient blobClient = storageAccount.CreateCloudBlobClient();

// Retrieve a reference to a container.
CloudBlobContainer container = blobClient.GetContainerReference("mycontainer");

// Create the container if it doesn't already exist.
container.CreateIfNotExists();
By default, the new container is private, meaning that you must specify your storage access key to download blobs from this container. If you want to make the files within the container available to everyone, you can set the container to be public using the following code:
container.SetPermissions(
    new BlobContainerPermissions { PublicAccess =
        BlobContainerPublicAccessType.Blob });
Anyone on the Internet can see blobs in a public container, but you can modify or delete them only if you have the appropriate account access key or a shared access signature.
Upload a blob into a container
Azure Blob Storage supports block blobs and page blobs. In the majority of cases, block blob is the recommended type to use.
To upload a file to a block blob, get a container reference and use it to get a block blob reference. Once you have a blob reference, you can upload any stream of data to it by calling the UploadFromStream method. This operation will create the blob if it didn’t previously exist, or overwrite it if it does exist.
The following example shows how to upload a blob into a container and assumes that the container was already created.
// Retrieve storage account from connection string.
CloudStorageAccount storageAccount = CloudStorageAccount.Parse(
    CloudConfigurationManager.GetSetting("StorageConnectionString"));

// Create the blob client.
CloudBlobClient blobClient = storageAccount.CreateCloudBlobClient();

// Retrieve reference to a previously created container.
CloudBlobContainer container = blobClient.GetContainerReference("mycontainer");

// Retrieve reference to a blob named "myblob".
CloudBlockBlob blockBlob = container.GetBlockBlobReference("myblob");

// Create or overwrite the "myblob" blob with contents from a local file.
using (var fileStream = System.IO.File.OpenRead(@"path\myfile"))
{
    blockBlob.UploadFromStream(fileStream);
}
List the blobs in a container
To list the blobs in a container, first get a container reference. You can then use the container’sListBlobs method to retrieve the blobs and/or directories within it. To access the rich set of properties and methods for a returned IListBlobItem, you must cast it to a CloudBlockBlob,CloudPageBlob, or CloudBlobDirectory object. If the type is unknown, you can use a type check to determine which to cast it to. The following code demonstrates how to retrieve and output the URI of each item in the photos container:
// Retrieve storage account from connection string.
CloudStorageAccount storageAccount = CloudStorageAccount.Parse(
    CloudConfigurationManager.GetSetting("StorageConnectionString"));

// Create the blob client.
CloudBlobClient blobClient = storageAccount.CreateCloudBlobClient();

// Retrieve reference to a previously created container.
CloudBlobContainer container = blobClient.GetContainerReference("photos");

// Loop over items within the container and output the length and URI.
foreach (IListBlobItem item in container.ListBlobs(null, false))
{
    if (item.GetType() == typeof(CloudBlockBlob))
    {
        CloudBlockBlob blob = (CloudBlockBlob)item;

        Console.WriteLine("Block blob of length {0}: {1}", blob.Properties.Length,
                               blob.Uri);

    }
    else if (item.GetType() == typeof(CloudPageBlob))
    {
        CloudPageBlob pageBlob = (CloudPageBlob)item;

        Console.WriteLine("Page blob of length {0}: {1}", pageBlob.Properties.
                  Length, pageBlob.Uri);

    }
    else if (item.GetType() == typeof(CloudBlobDirectory))
    {
        CloudBlobDirectory directory = (CloudBlobDirectory)item;

        Console.WriteLine("Directory: {0}", directory.Uri);
    }
}
As shown above, you can name blobs with path information in their names. This creates a virtual directory structure that you can organize and traverse as you would a traditional file system. Note that the directory structure is virtual only – the only resources available in Blob storage are containers and blobs. However, the storage client library offers a CloudBlobDirectory object to refer to a virtual directory and simplify the process of working with blobs that are organized in this way.
For example, consider the following set of block blobs in a container named photos:
photo1.jpg
2010/architecture/description.txt
2010/architecture/photo3.jpg
2010/architecture/photo4.jpg
2011/architecture/photo5.jpg
2011/architecture/photo6.jpg
2011/architecture/description.txt
2011/photo7.jpg
When you call ListBlobs on the ‘photos’ container (as in the above sample), a hierarchical listing is returned. It contains both CloudBlobDirectory and CloudBlockBlob objects, representing the directories and blobs in the container, respectively. The resulting output looks like:
Directory: https://<accountname>.blob.core.windows.net/photos/2010/
Directory: https://<accountname>.blob.core.windows.net/photos/2011/
Block blob of length 505623: https://<accountname>.blob.core.windows.net/photos/photo1.jpg
Optionally, you can set the UseFlatBlobListing parameter of of the ListBlobs method to true. In this case, every blob in the container is returned as a CloudBlockBlob object. The call toListBlobs to return a flat listing looks like this:
// Loop over items within the container and output the length and URI.
foreach (IListBlobItem item in container.ListBlobs(null, true))
{
   ...
}
and the results look like this:
Block blob of length 4: https://<accountname>.blob.core.windows.net/photos/2010/architecture/description.txt
Block blob of length 314618: https://<accountname>.blob.core.windows.net/photos/2010/architecture/photo3.jpg
Block blob of length 522713: https://<accountname>.blob.core.windows.net/photos/2010/architecture/photo4.jpg
Block blob of length 4: https://<accountname>.blob.core.windows.net/photos/2011/architecture/description.txt
Block blob of length 419048: https://<accountname>.blob.core.windows.net/photos/2011/architecture/photo5.jpg
Block blob of length 506388: https://<accountname>.blob.core.windows.net/photos/2011/architecture/photo6.jpg
Block blob of length 399751: https://<accountname>.blob.core.windows.net/photos/2011/photo7.jpg
Block blob of length 505623: https://<accountname>.blob.core.windows.net/photos/photo1.jpg
– More detail at here
In this article, let’s have look at some basic concepts about Azure blobs. We will also see how to use .NET SDK with Blob storage.
What is Blob ?
Blob stands for Binary Large Object. Blob storage can be used for storing the unstructured data.
The unstructured data may include images, video files, audio files, VHDs, or even regular text / Word/ Excel/ PowerPoint files or even PDF files.
But you may have a question now.
When To Prefer Blob Storage over Azure Files ?
Azure Files is a storage service which also allows you to store the files. The file share can be accessed using HTTP / HTTPS REST APIs from anywhere in the world.
You can also store any type of files in Azure blob storage. That also can be accessed over HTTP / HTTPs from anywhere in the world.
So, the obvious query is when to use Azure Blob over Azure Files ?
Azure files also supports SMB protocol and you can mount the File Shre as a drive on your virtual machine or on premises machines.
If your application DOES NEED to access files/fas a network drive, then I guess it would make sense to use Azure Files than blob. But if it is ok to always access files on HTTP / HTTPs then you may want to choose blob storage.
Blob Storage Resources
There are three important terms here: storage account, blob containers and blobs.
Storage accounts provide unique namespace and domain name for your blob.
Inside a storage account, you can create blob containers to hold the blob data. A container organizes a set of blobs, similar to a directory in a file system. It is the top level directory for all its contents.
A storage account can include an unlimited number of containers, and a container can store an unlimited number of blobs.
Types of blobs
There are three types of blobs”
- Block Blob: the blob type which can hold either text or binary data. Each blob is like a block and it can be managed independently.
- Append Blob: This is similar to block blob, except it is further optimized for appending scenarios. Every blob consists of multiple blocks and append operation can append further blocks. This type is ideal for logging scenarios.
- Page Blob: This is to store random access files. It is mainly used for storing VHD files of virtual machines.
Create Blob Storage
You need to create a storage account before creating a blob storage instance. We already have seen how to create the storage account instance in one of my previous blogs.
Creating blob storage is as easy as creating the folder.
If you are logged in to Azure Portal, you can navigate to the Azure Storage account and then select blob service. The right side panel will show a button to add containers.
When you click on + Container button, a popup will be shown for adding new container. In that popup, you can provide the blob container name and the access level.
Access level can be
- Private – no anonymous access meaning you cannot access blob and cannot list container items anonymously. You must be a valid user to perform these operations. This is the default access level.
- Blob – anonymous read access for blobs only meaning you can read the blob anonymously, but you cannot list the contents of blob container anonymously.
- Container – anonymous read access for containers and blobs meaning you can list the contents of container or read the blob anonymously
Let’s keep the default access level for this demo. Provide “firstcontainer” as the name of container and click on OK. The container would be created instantly.

Blob Operations using Azure CLI
Below code shows a sample script to create the container using Azure CLI and some basic operations on blob storage.
# TO create storage account
az storage account create      \
    --name storageaccountname  \
    --resource-group SamplesRG \
    --location WestEurope      \
    --sku Standard_ZRS         \
    --encryption blob

# To export the environment variables
export AZURE_STORAGE_ACCOUNT="<account-name>"
export AZURE_STORAGE_KEY="<account-key>"

# To create the blob container
az storage container create --name sample-container

# To upload a file
az storage blob upload              \
    --container-name firstcontainer \
    --name firstfile                    \
    --file firstfile.txt

# To List contents of container
az storage blob list \
    --container-name firstcontainer \
    --output table

# To download the blob contents
az storage blob download \
    --container-name sample-container \
    --name firstfile\
    --file destination-path

# AzCopy utility to upload data to storage
azcopy --source /mnt/myfiles \
    --destination https://<account>.blob.core.windows.net/firstcontainer \
    --dest-key <account-key> \
    --include "firstfile.txt"
Blob Operations Using .NET SDK
.NET SDK is available in two versions as of now – v11 and v12. Below steps are useful if you want to use v12 SDK.
The steps for v11 are also almost same, the package name is different. It is Microsoft.Azure.Storage.Blob.
Below are the important classes which we are going to use in this section:
Use the following .NET classes to interact with these resources:
- BlobServiceClient: to manage Azure storage resources and containers.
- BlobContainerClient: to manipulate Azure Storage containers and their blobs.
- BlobClient: to manipulate Azure Storage blobs.
- BlobDownloadInfo: represents the properties and content returned from downloading a blob.
For using .NET SDK, below are the steps:
- Get connection string of Azure blob
- Create the .NET project / solution
- Add reference to NuGet package Azure.Storage.Blobs
- Perform operations like create container, upload/download blob, etc.
Get Connection String
Sign in to Azure Portal and navigate to storage account. In the Settings section of the storage account overview, select Access keys.
Here, you can view the account keys and the complete connection string for each key. Find the connection string under any key (let’s say Key 1).
Add NuGet Package
For installing NuGet package, you can add reference to the NuGet package using Add Reference.
Alternatively, you can execute below command on NuGet Package Manager console.
Install-Package Azure.Storage.Blobs
C# Code
The BlobServiceClient object can be used to connect with Blob service. Below code calls CreateBlobContainerAsync method to create a new container with specified name.
var blobServiceClient = new BlobServiceClient(connectionString);
var containerName = "<some-unique-name>";
var containerClient = await blobServiceClient.CreateBlobContainerAsync(containerName);
You can get reference to new container by using GetBlobClient method of BlobContainerClient. Then you can use stream to upload the file to the blob container as shown in below code.
// Get a reference to a blob
BlobClient blobClient = containerClient.GetBlobClient(fileName);

// Open the file and upload its data
using FileStream uploadFileStream = File.OpenRead(fileName);

// Upload the file
await blobClient.UploadAsync(uploadFileStream);

// Close the stream
uploadFileStream.Close();
Below code is to list all blobs from the container.
// List all blobs in container
await foreach (BlobItem blobItem in containerClient.GetBlobsAsync())
{
    Console.WriteLine("\t" + blobItem.Name);
}
The BlobDownloadInfo can be used to download the file as shown in below code.
// Download the blob's contents and save it to a file
var download = await blobClient.DownloadAsync();

using FileStream downloadFileStream = File.OpenWrite(downloadFilePath);
await download.Content.CopyToAsync(downloadFileStream);
downloadFileStream.Close();
To delete the container, you can just call delete method on the blob container.
await containerClient.DeleteAsync();
I hope this helps to get started on Azure Blob storage. Let me know your thoughts.