
If you notice extra or too much brightness or whiteness in the display of your Windows 10 or Windows 11 device, this article will help you in fixing the issue and reducing the whiteness level in your PC monitor or laptop screen.
NOTE: The methods given in this article will work in all Windows versions including Windows 7, 8, Windows 10 and Windows 11.
Table of Contents
- Too Much Whiteness in Display on Monitor or Laptop Screen
- Reason Behind Extra Level of Whiteness or Brightness on Display
- STEP 1: Opening Calibrate Display Tool in Windows
- STEP 2: Using Calibrate Display Tool in Windows
- Restoring Default Display Profile If Required
- TIP: Use Your Graphics Card Control Panel to Adjust Display Settings
Too Much Whiteness in Display on Monitor or Laptop Screen
I have noticed this issue lots of times after installing Windows 11 in my Dell PC as well as laptops. After installation, when the Desktop is loaded, everything including the Taskbar looks extra white. When I open File Explorer or Settings app, the separators, toolbars and light colors are not visible at all.
Following image will give you an idea what issue I’m talking about:

As you can see in the above image, the background color in Settings app looks very light, almost White. The increased level of Whiteness starts hurting eyes.
PS: Decreasing the brightness level using the buttons given on the monitor or hotkeys present on the keyboard will not fix the issue. It’ll only decrease the brightness i.e. dim the display but it’ll not modify the whiteness level which is the main culprit.
If you are also facing similar issues with your desktop PC or laptop, following solutions will help you.
It happens due to the default display profile applied to your monitor or laptop display. When we install Windows operating system, it automatically installs and applies a built-in profile for the attached monitor or laptop screen.
Most of the times, the applied profile works perfectly but sometimes users may face incorrect colors and brightness issues as mentioned above.
Sometimes the default display profile uses high GAMMA level which causes the increased level of whiteness on computer screens.
To fix these kind of issues, Windows comes with a very useful feature called “Calibrate Display” which helps users in calibrating their computer display to fix the color and brightness issues.
Once you calibrate the display, everything looks perfect without extra whiteness on your computer screen.
Following steps will help you in calibrating the display and fixing colors and brightness issues in Windows 11 as well as older Windows versions:
STEP 1: Opening Calibrate Display Tool in Windows
There are multiple ways to launch the Calibrate Display tool in Windows. You can use any of following options:
OPTION 1: Open Start Menu or click on the Search button or Search box present on the Taskbar. Now type calibrate and Windows will automatically show “Calibrate display color” option in search results. Click on the option and it’ll open the calibration tool.
OPTION 2: Press WIN+R keys together to launch RUN dialog box. Now type dccw in the RUN box and press Enter. It’ll direct launch calibration tool.
OPTION 3: Press WIN+R keys together to launch RUN dialog box. Now type colorcpl in RUN box and press Enter. It’ll launch Color Management window. Go to Advanced tab and click on “Calibrate display” button. It’ll launch the calibration tool.
STEP 2: Using Calibrate Display Tool in Windows
After opening the calibration tool, click on Next button a few times until you see a vertical slider to change GAMMA level as shown in following screenshot:

Click and hold on the slider and move it down i.e. reduce the gamma level. You’ll immediately notice that the Whiteness has been decreased on your computer screen.
Click on Next button. Now the wizard will ask you to adjust the brightness and contrast levels on your computer. You can click on Next button to adjust them or you can click on “Skip brightness and contrast adjustment” button to skip the test.
Click on Next button and you’ll be asked to adjust color levels on your monitor screen. You don’t need to change them, click on Next button.
At last click on Finish button and it’ll fix the extra whiteness and gamma level issues in your computer.
Now Windows will allow you to use ClearType tuner to adjust how the text or fonts display on your computer screen. It’ll help you in making the text sharp and clear on your monitor or laptop screen.
Following article contains details about ClearType Tuner tool:
[Guide] How to Use Built-in ClearType Text Tuner in Windows?
Restoring Default Display Profile If Required
In future, if you decide to restore default display profile which was installed by default, you can follow the SOLUTION 1 or SOLUTION 2 provided in following tutorial:
[Fix] Windows Photo Viewer Takes Too Much Time in Opening Images
TIP: Use Your Graphics Card Control Panel to Adjust Display Settings
When you install drivers for your graphics card manually or using Windows Updates, it also installs a tool to modify several display settings. You can launch the tool to manually change brightness, contrast and gamma levels as shown in following screenshot:

You can find the tool in Start Menu Programs list or Control Panel.
Also Check:
[DPI Scaling Fix] Bold, Blurry or Hard to Read Font Problem in Windows 8.1 / 10
You are here: Home » Troubleshooting Guides » [Fix] Too Much Brightness, Whiteness and Gamma Level in Windows 10 and 11 Display
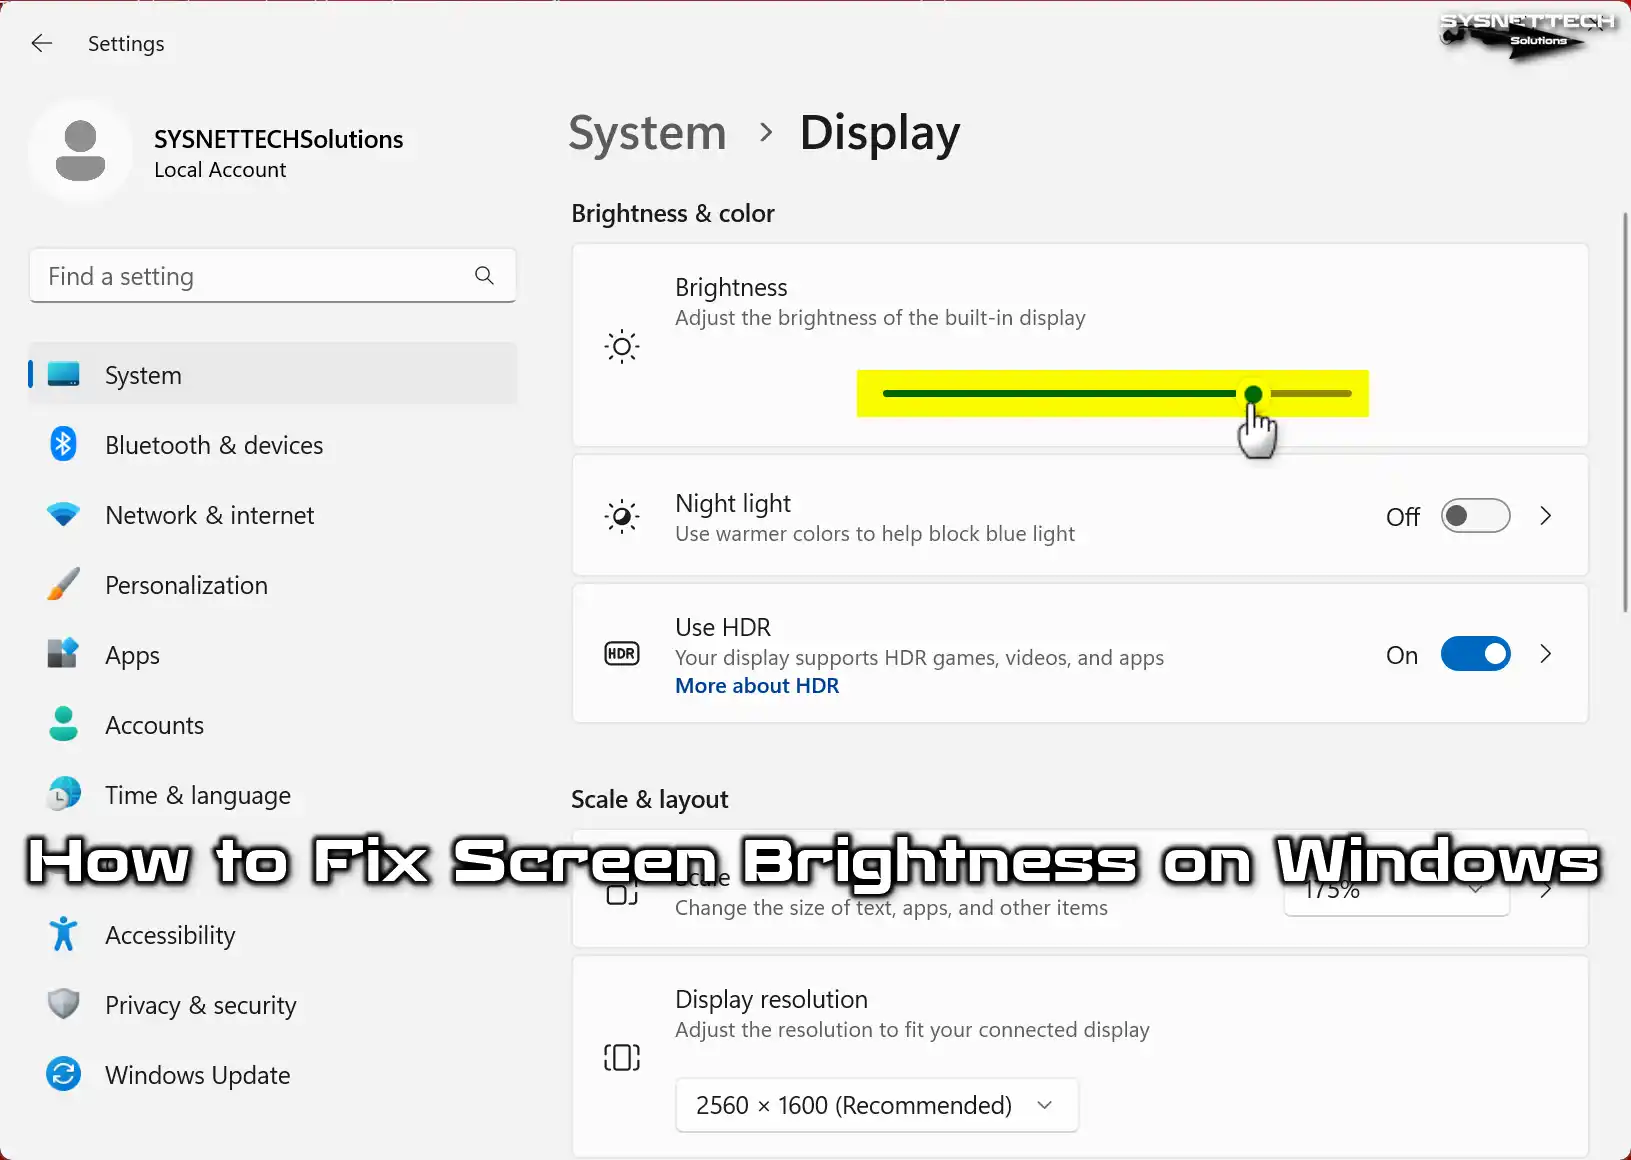
If you are a Microsoft Windows 11 or 10 user and are encountering screen brightness issues on your computer, you are not alone. Many users face problems when trying to adjust the screen brightness on their systems, experiencing issues where it doesn’t work. The source of this problem is typically a graphics card driver, but sometimes, it can also arise from OS settings.
If you’re unable to change the brightness or light of your PC’s screen, we have prepared this guide as a solution. This way, you can adjust the LCD luminosity level on your PC.
Why Does Screen Brightness Error Occur in Windows Systems?
If you are running Windows 11, 10, or 8 on your computer, there are several reasons why you may not be able to adjust the brightness. Firstly, one of the reasons is, of course, outdated or incompatible graphics drivers. If you have recently formatted your PC, you need to install the latest driver for the GPU card. In other words, if you have installed a very old one, you may experience monitor luminosity issues.
Another reason is that you have not set your computer’s power settings correctly. This can happen if you’ve made a mistake with these settings or if you’re using another program to manage power. This is because a third-party program that monitors your system’s power settings may not allow you to adjust the brightness of your monitor.
Also, if you have another program installed, its settings can mess with how bright or dim your screen is. So, you might not be able to make your monitor brighter or dimmer using Windows 11 or 10. In short, your actions may not produce any response, and the illumination level remains unchanged.
Laptop users use the FN + brightness Up / Down keys to adjust screen brightness. However, if this method is not working, we will resolve the issue of the display illumination not changing in this article.
How to Fix Windows 10/11 Screen Brightness Doesn’t Change Problem
1. Method: Update the Video Card Driver via Windows Update
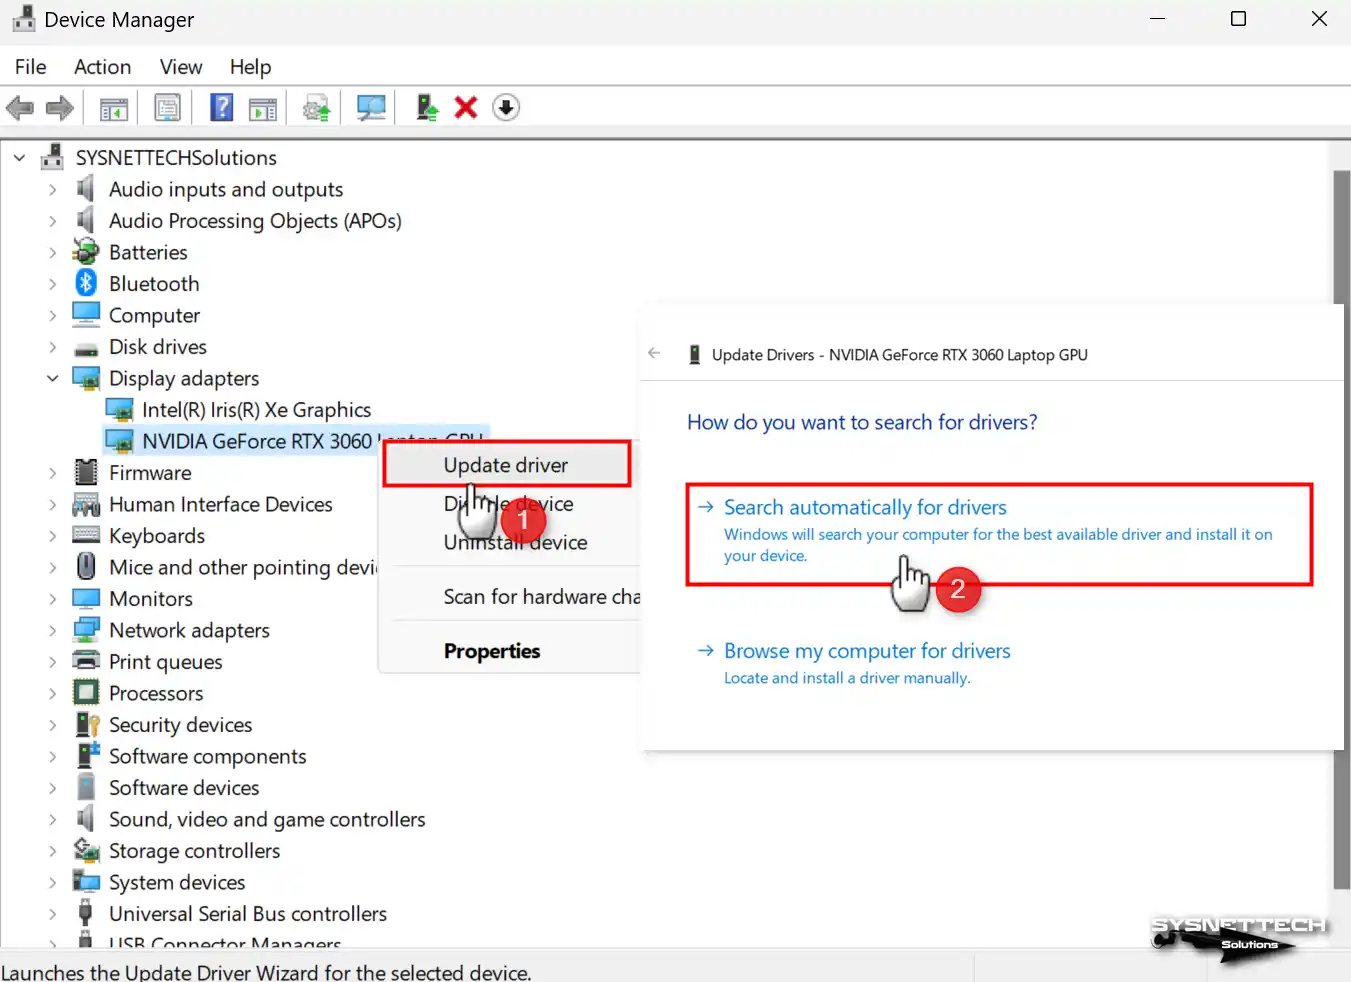
The first thing you need to do is update your PC’s display software to the latest version. If you don’t know your GPU model, you can renew it through Windows Update. To do this, you need to utilize Device Manager.
In simple terms, do these steps to make sure your graphics drivers are up-to-date and work well:
- Press the Windows key & X at the same time. Then, choose Device Manager from the options that pop up.
- Hit on the section that says Display Adapters in the list of hardware.
- Hit the right mouse button, switch on your external or internal graphics card, then choose Update Driver.
- After some time, install the newest software for your GPU using Windows Update.
- After updating your GPU, restart your PC to check if the illumination has changed.
NOTE: If you need help seeing a new driver for your built-in graphics card, go to the maker’s website. If you’re using something from AMD or NVIDIA, look for the one that fits your model. Then, put in the package you downloaded on your computer with administrative privileges.
So, to wrap it up, the first way to fix the Windows screen brightness error is by getting the correct driver for your graphics card. When you install the newest one, it can often solve problems where things don’t work well together and make your computer work better.
2. Method: Turn off Automatic Brightness Control from Power Plan Options
If you’ve fixed the GPU driver but the problem persists, examine the power settings. To adjust the monitor power settings on your Windows 10 or 11 PC:
- First, press the Win key and the letter X on your keyboard. Then, choose Power Options.
- Once you have opened Power Options, click the Change Plan Settings option next to your current Power plan.
- Then, hit the option that says Change advanced power settings.
- After you open the Display option, find Enable Adaptive Brightness and open that too.
- Set both “On battery” and “Plugged in” choices to Off. Then, hit Apply > OK to make the changes.

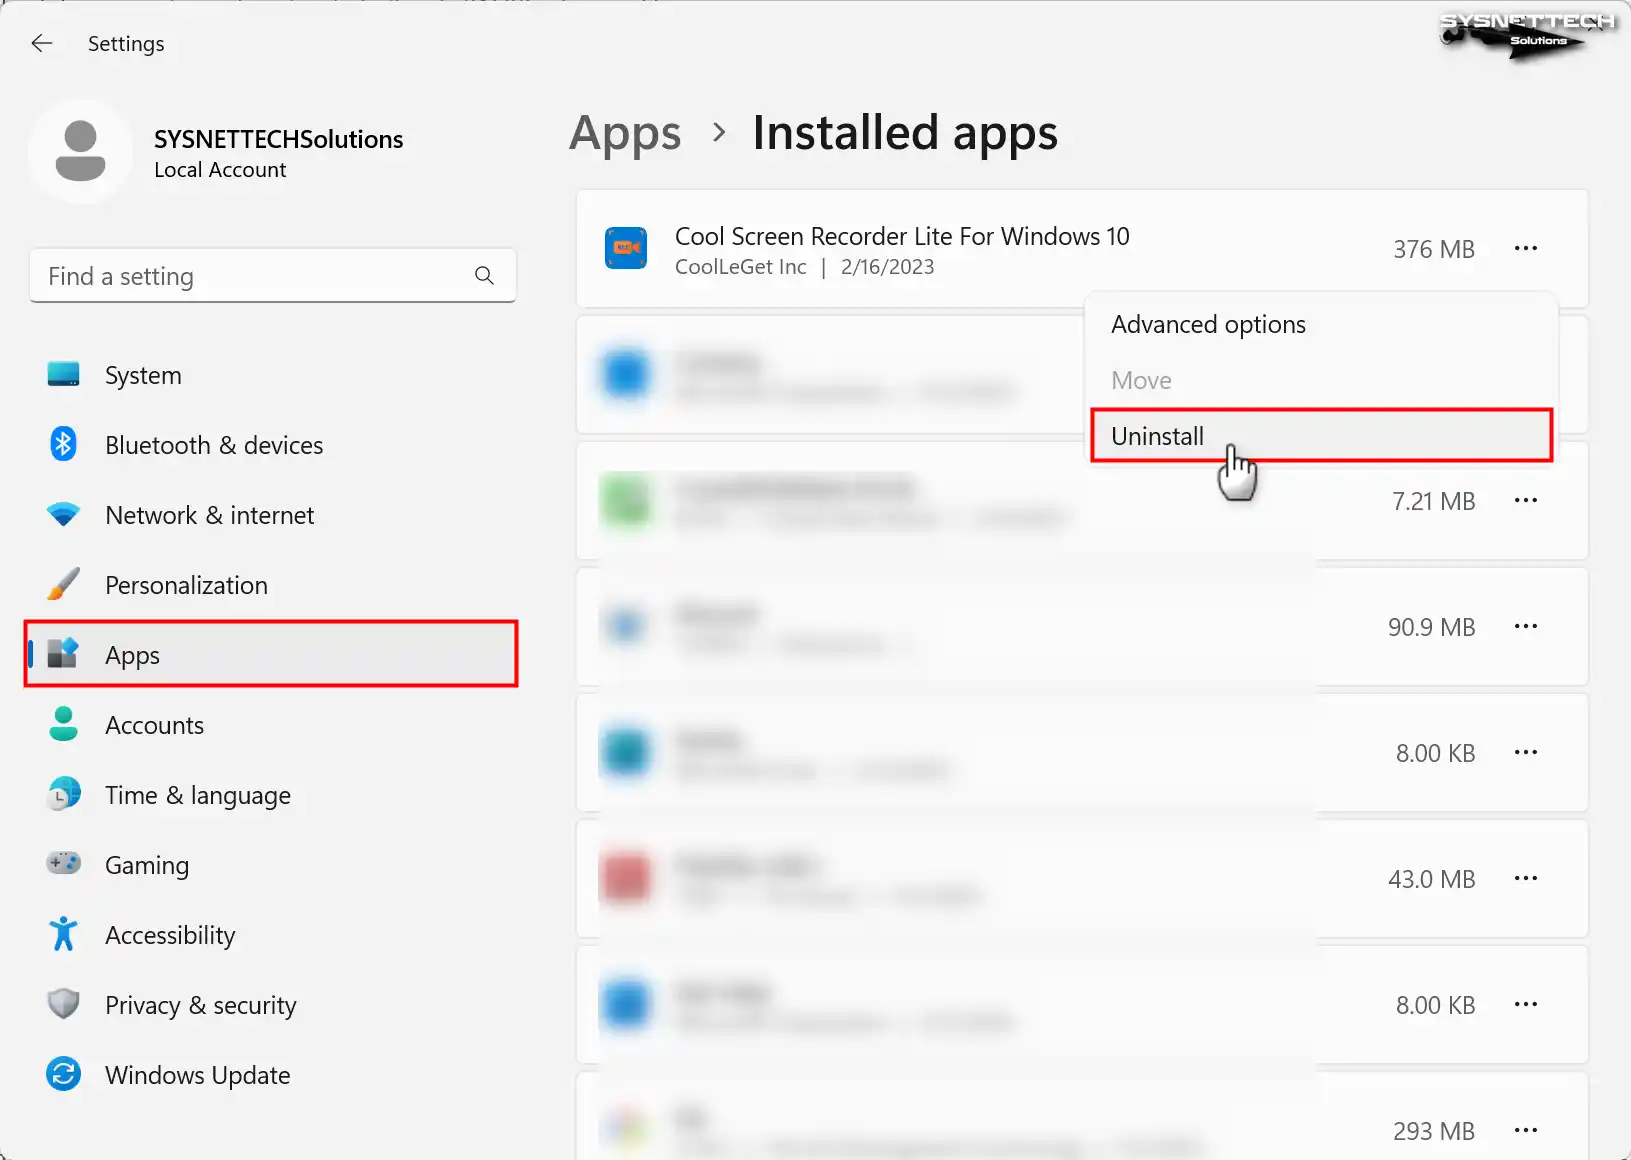
3. Method: Uninstall Recently Installed or Suspicious Programs
If you can’t change how bright your PC screen is, it might be because of software problems. In particular, some programs may interfere with screen settings. As a result, conflicts in specific OS settings may lead to such issues.
In simple terms, this problem started after you put in a new app. If that’s the case, fix the screen problem by getting rid of the software.
- Open the Control Panel by typing “control” into the Run dialog box. You can also search, locate, and open it from the Start menu. In Windows 11, you can type Windows Tools and find it from the listed shortcuts.
- Then, open the removal tool by clicking on Programs and Features.
- See if you can get rid of or fix the program you think is causing the problem, or the one you installed last.
4. Method: Restore Your System to a Previous State
If none of the above explanations work, you can use System Restore. This way, you can revert your system to a date when the screen brightness issue did not exist.
- To get to the System Restore tool, type and run SystemPropertiesProtection.
- Once you have opened System Properties, click on System Restore.
- In the wizard called System Files and Settings, hit Next. And then, pick the date you want to go back to.
- Next, proceed, and in the final step, press Finish to confirm the restore point.
- Please wait for your computer to restart. Meanwhile, the wizard will restore your system to its previous state.

5. Method: Update Internal Intel HD Graphics or Rollback to the Previous Driver
Not being able to change the screen brightness can happen with the built-in graphics card. The main thing to do is update the driver for your Intel (R) HD Graphics 4000 or whatever model you have.
To update the Intel HD Graphics device, follow the steps below in order:
Step 1
Press Windows + X and pick Device Manager. In the Device Manager tool that pops up, open Display Adapters. After that, right-click or double-click on the Intel Graphics thing to see its properties.
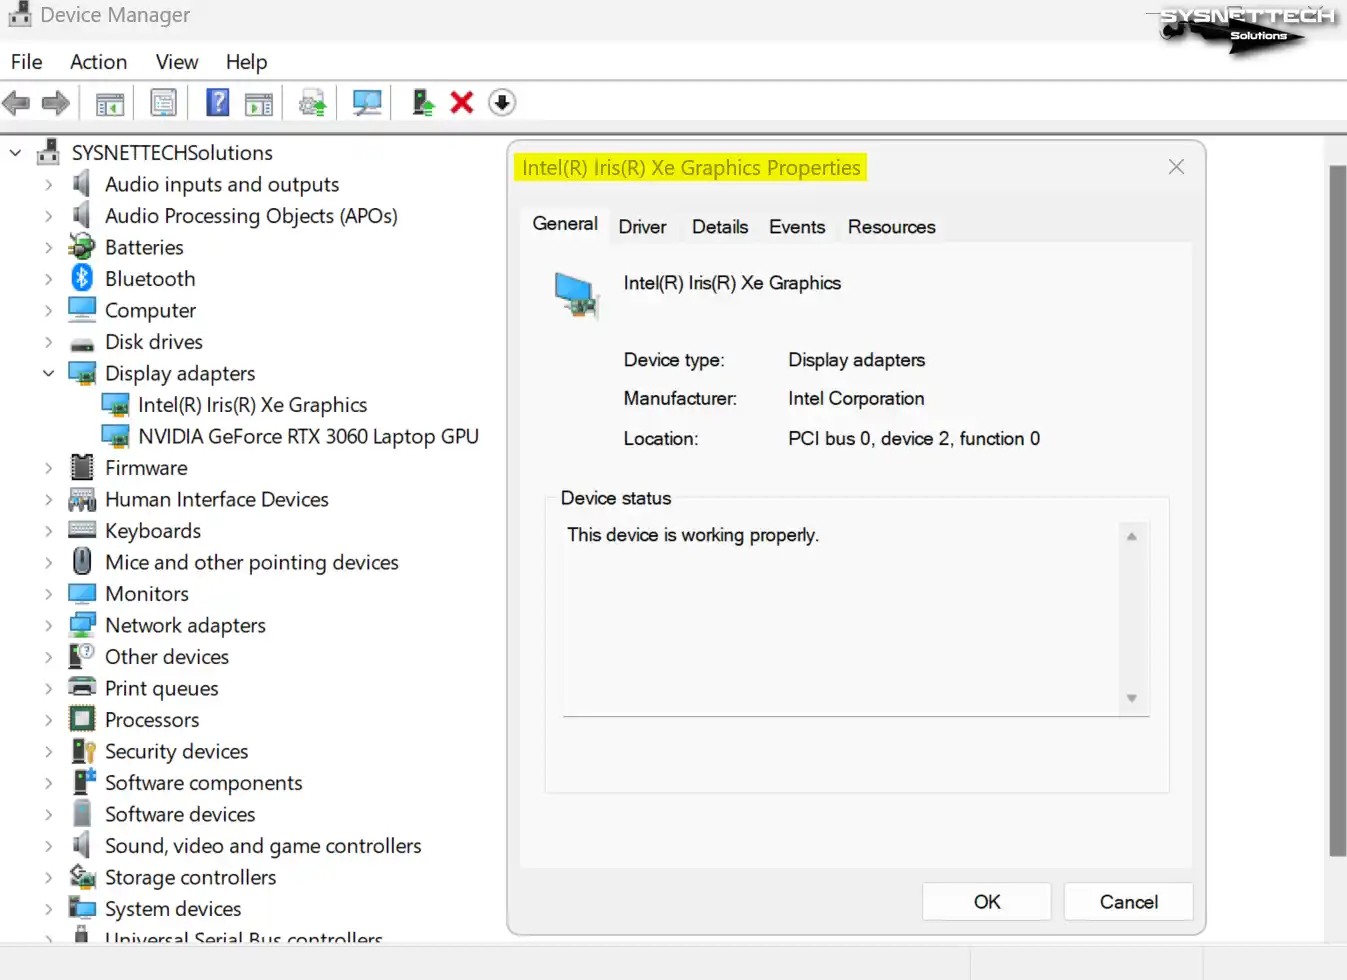
Step 2
Click on the Driver tab in the Intel Graphics properties. Next, in the window containing graphics card information, click Update Driver. In this case, if the Windows service is active, it will update the software for you.
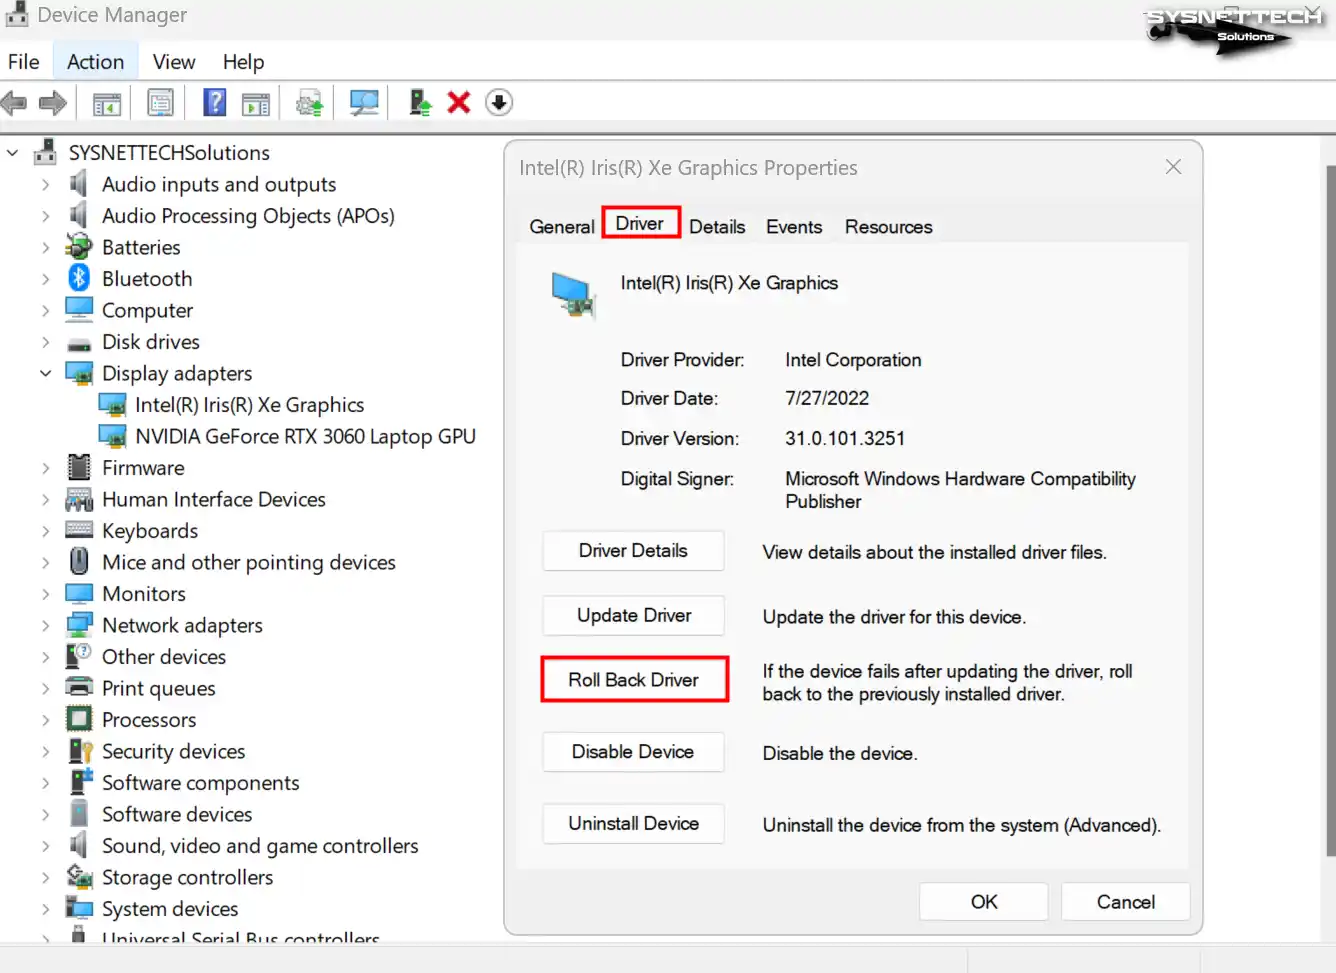
Step 3
After you update the graphics card program, please turn off your computer and start it again. See if you can change the display brightness. If it still doesn’t work, click on Roll Back Driver. This time, install the old one for the built-in graphics card.
In the Roll Back Driver window, select the My apps that don’t work with this driver. Then, press Yes to install the earlier software package.

After this, adjust the screen luminosity, though the driver may not be the latest. So, to make it even better, install the newest packages from the maker’s website.
6. Method: Edit the Registry for Windows Screen Brightness Doesn’t Change the Issue
If none of the five fixes work, change things in the system’s Registry Editor (Regedit).
- Open the Run toolbox, type regedit in it, and click OK.
- When you open the Registry Editor, click on HKEY_LOCAL_MACHINE.
- From the options that appear, this time, click on the SYSTEM option. Then, click on ControlSet001 in it.
- In ControlSet001, go to Control > Class.
- Under Class, click on 0001 in the {4d36e968-e325-11ce-bfc1-08002be10318} record.
- Lastly, find the FeatureTestControl option in the right-hand list and double-click on it.
- In the DWORD value editing window that opens, select the Decimal option.
- After you pick the Decimal, change the number 61440 to 61512 in the Value.
- After entering the value 61512, click the OK button.
- Please turn off your computer and restart it after you change FeatureTestControl. This should fix the problem.

In addition, a pre-made reg file can be used to fix the monitor luminosity issue quickly. Download the prepared Reg file to your PC using the button below. However, be sure to back up Regedit before running the file!
REG File Download
NOTE: There are two directories in the Regedit settings at {4d36e968-e325-11ce-bfc1-08002be10318}. These are 0001 and 0000. If the problem is the same, change the 0000 value from 0001 for FeatureTestControl.
Alternative Solution: Troubleshooting Display Hardware Issues
If the software-based solutions I mentioned do not fix your problem, then you should consider hardware issues.
- Check Display Cables and Connections
First, make sure that all the cables you have connected to your monitor are secure. Remember, a damaged or loose cable can cause intermittent display issues. In short, I recommend that you try using a different cable or port.
- Monitor Settings and Controls
Most monitors have built-in menus where you can control settings such as brightness and contrast. Open your monitor’s menu to check these settings. If the brightness control is not working, there may be a problem with your monitor’s hardware.
- Check the GPU and Video Card
Check your GPU and video card for damage or overheating. In fact, overheating can also cause display issues. So, make sure that the card is seated correctly on the motherboard. On the other hand, if your PC is a laptop, check that you are not experiencing any momentary freezing or crashing.
- Test with Alternative Hardware
Try connecting your PC to a different monitor to identify the source of the problem. This will help you quickly determine if the problem is with the monitor or the computer.
- Monitor Software or Driver Updates
Update the monitor software or drivers from the manufacturer’s website. Also, if you are using a portable monitor and are connecting via USB, verify that you have installed the latest drivers.
- Get Professional Help
If all these steps do not work, contact a professional technician. As a result, components such as the GPU or monitor may require a more in-depth review.
FAQ on Troubleshooting Windows Brightness Issues
- Why is my screen so dark at the top brightness setting?
When you make your screen really bright, it might seem oddly dark. So, in low light, your watch could look too dim. First, ensure that you set up your PC monitor correctly. Then, update your external or internal graphics card. Also, do a system update using Windows Update.
- How do I get my screen back to average brightness?
Your screen might be too dim. Make sure the special keys on your laptop keyboard actually make the brightness go to the highest level. If you’re using a desktop computer, look into your monitor’s menu. Also, in the Windows system, you can type “brightness” to find settings. This helps you check your hardware and manage system settings.
- Why is my Windows stuck on low brightness?
Your Windows might be stuck with a low brightness or backlight. In these situations, look into the power options for settings that save battery. If you’re skilled, you can take apart your device and do hardware checks. If the light on the screen panel is OK, your hardware is fine. Also, try starting your OS with a clean external memory to manage the screen brightness.
- How do I fix my Windows auto brightness?
Windows has an adaptive brightness feature that modifies the brightness based on the ambient light. But if this feature bothers you, you can turn it off. This way, you can reduce eye stress and work more comfortably.
Conclusion
In summary, dealing with the screen brightness issue in Windows 10 & 11 can be annoying. But you can fix it by updating the GPU driver.
You can also remove recently added programs. Another option is to go back to a time when it worked fine. The most helpful solution online is tweaking the Regedit value. Still, some users might fix it with straightforward update steps.
In this article, we have fixed some issues with registry settings. Let’s say you are having problems with the new Photos app on your Windows 10 or 11 PC. In this case, you can enable the old Windows Photo Viewer using the Regedit settings. In this article, you can restore the old functionality and access a smoother viewing experience.
Как увеличить яркость экрана ноутбука и компьютера
Дисплеи в мобильных устройствах и на современных мониторах могут автоматически менять яркость в зависимости от условий освещения. Но не всегда автомат выставляет комфортный уровень яркости. Поэтому мы расскажем, как правильно настроить яркость экрана.
Экран ноутбука
Экран компьютера
Рекомендации
Вопросы и ответы
Экран ноутбука
Экран компьютера
Рекомендации
Вопросы и ответы
Яркость экрана на компьютере или телефоне влияет на восприятие картинки человеком. Возможность изменить этот параметр придумали для того, чтобы можно было адаптировать картинку для разных условий освещения. Но нужно знать, как увеличить яркость экрана или снизить ее до комфортных показателей. Мы рассмотрим варианты для разных операционных систем.
Изменение яркости экрана ноутбука
В лэптопах встроенный экран, поэтому в большинстве операционных систем настройки яркости можно найти на самом видном месте. Некоторые модели и вовсе оснащены датчиком света, чтобы подстраивать яркость экрана под окружающее освещение в автоматическом режиме. Но даже если этот датчик есть, не вредно будет узнать, как увеличить яркость на ноутбуке или уменьшить ее.
На платформе Windows
Платформа Windows является более универсальной, чем Linux или macOS, поэтому в ней гораздо больше возможностей изменить яркость на встроенном экране ноутбука. Стоит рассмотреть их подробнее.
1. Через параметры
Первый вариант — обратиться к настройкам ОС. В последних версиях ОС Windows появилось весьма удобное меню настроек, которое существенно отличается от привычной всем панели управления. Сама инструкция не особенно сложная.
-
Зажмите на клавиатуре одновременно кнопки «Win+I», в появившемся окне выберите раздел «Система».

-
Затем щелкните по пункту «Дисплей».

-
Отрегулируйте яркость при помощи соответствующего ползунка.

Такой способ является одним из самых простых и логичных. Но в отличие от других вариантов, он требует достаточно много времени. Поэтому если нужно изменить яркость экрана быстро, стоит рассмотреть другие методы.
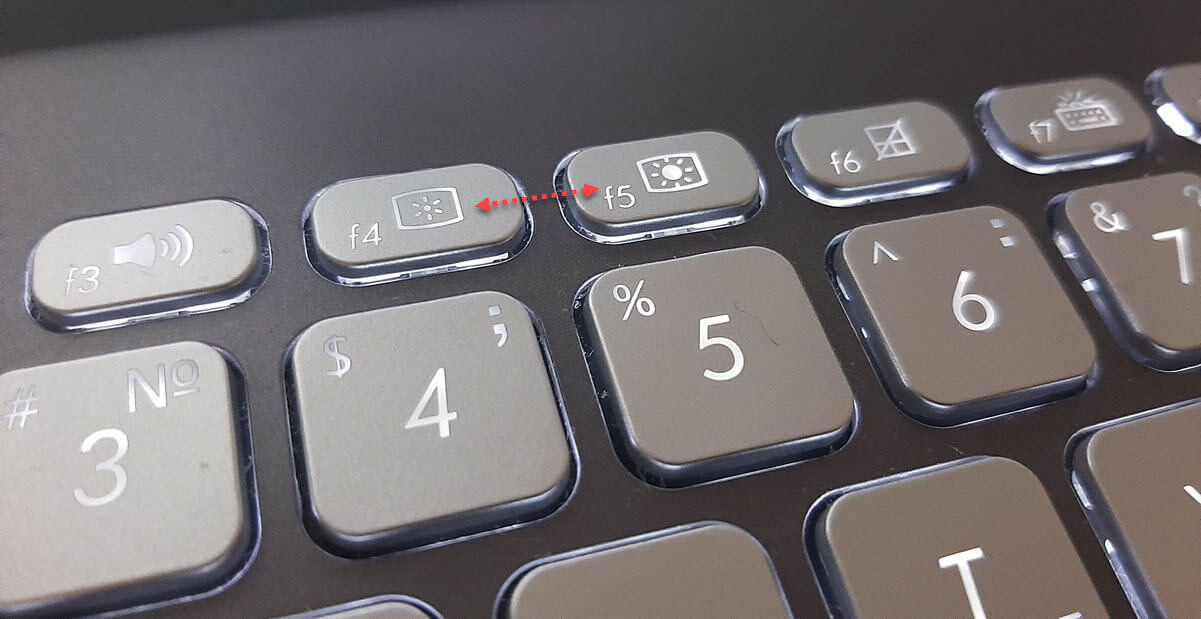
2. С помощью горячих клавиш
Практически все современные лэптопы имеют функциональную клавишу, которая позволяет выполнять различные действия, одновременно зажав «Fn» и одну из кнопок ряда «F» (F1−12). Расположение клавиш изменения яркости зависит от конкретного производителя и модели ноутбука. Требуется просто найти нужную пиктограмму и нажать соответствующую кнопку.

3. Через индикатор батареи
Еще один относительно быстрый способ — использование области с индикатором батареи в системном трее Windows. В этом случае нужно будет выполнить всего пару кликов. Сначала щелкнуть по требуемой зоне значков в трее, а затем отрегулировать яркость при помощи нужного ползунка в появившемся меню.

На платформе macOS
Ноутбуки MacBook от Apple с операционной системой macOS на борту имеют датчики света для автоматической регулировки яркости. Но иногда приходится настраивать ее вручную. Для этого также есть несколько возможных вариантов как в Windows.
1. Системные настройки
Наиболее очевидный вариант — использовать для изменения яркости системные настройки macOS. Это несколько медленнее, чем другие варианты, но в некоторых случаях надежнее. Например, если отказали функциональные кнопки на клавиатуре.
-
Щелкните по иконке яблока в верхней панели, выберите «Системные настройки».

-
В левом столбце выберите «Дисплей» и отрегулируйте яркость при помощи соответствующего ползунка.

В этом же меню можно активировать функцию автоматической настройки яркости в зависимости от условий освещения. Лучше включить ее, поскольку датчик освещенности в Макбуках работает корректно, в отличие от многих аналогов на Windows.
2. Горячие клавиши
В большинстве моделей MacBook кнопки регулировки яркости — F1 и F2. Для их активации нужно дополнительно зажать функциональную кнопку «Fn». Если ноутбук оснащен тачбаром, то при нажатии кнопки «Fn» необходимые функциональные клавиши появляются на верхней сенсорной панели. Так менять яркость гораздо быстрее.

3. Центр управления
Еще проще изменить яркость при помощи центра управления macOS. Для этого достаточно нажать на соответствующую иконку в верхней панели и в появившемся меню отрегулировать яркость до комфортного уровня. Из этого же меню можно отрегулировать громкость, включить или выключить Wi-Fi и Bluetooth и так далее.

На платформе Linux
Для ноутбуков, работающих под управлением ОС Linux, можно использовать практически такие же способы, как и для Windows. Но во многом процесс регулировки яркости зависит от используемого дистрибутива и установленного рабочего окружения. Мы рассмотрим пример с классической Ubuntu с оболочкой Gnome.
1. Системные настройки
Для изменения яркости встроенного экрана ноутбука можно использовать системные настройки Ubuntu. Для их запуска потребуется щелкнуть по иконке с шестеренкой, которую можно найти в боковой панели быстрого запуска. В появившемся окне выбрать «Настройки экранов» и уже в этом разделе отрегулировать яркость при помощи соответствующего ползунка.
2. Горячие клавиши
Для изменения яркости встроенного экрана лэптопа также можно использовать стандартные горячие клавиши. Но в случае с Linux нужно учесть, что горячие клавиши могут и не поддерживаться. Здесь все зависит от производителя ноутбука: если он не выпустил драйверы для своего устройства под Linux, то рассчитывать на нормальную работоспособность не стоит.
3. Центр управления в строке состояния
В Ubuntu есть собственный центр управления. Он почти такой же, как в macOS. Для доступа к нему достаточно щелкнуть по иконке с Wi-Fi в верхней панели. Откроется меню с соответствующими плитками. В числе прочего там будет располагаться ползунок, при помощи которого регулируется яркость встроенного экрана в ноутбуке.
Изменение яркости экрана монитора компьютера
С мониторами все не так просто, как с экранами ноутбуков. Некоторые модели не позволяют программно менять яркость подсветки и приходится использовать для этого возможности самого монитора. Известно, что в старых моделях и вовсе нельзя отрегулировать яркость, но такие древние устройства встречаются все реже.
На платформе Windows
Для изменения яркости подключенного монитора в ОС Windows можно использовать те же варианты, что и для ноутбуков (кроме горячих клавиш). Но только в том случае, если монитор позволяет программно менять яркость подсветки. Использовать же горячие клавиши не получится, поскольку большинство ПК-клавиатур не имеют соответствующих кнопок.
На платформе macOS
Здесь все точно так же, как в случае со встроенными экранами Макбуков. И точно так же, как в Windows — доступны только варианты с системными настройками и центром управления. Горячие клавиши в этом случае функционировать не будут. Главное, чтобы монитор позволял менять яркость подсветки.
На платформе Linux
В случае с ОС Linux можно все так же использовать системные настройки или центр управления. Однако в некоторых случаях даже с этими настройками могут возникнуть проблемы. Поэтому иногда придется использовать программное обеспечение, которое устанавливается вместе с драйверами видеокарты.
Рекомендации по настройке яркости
Существуют определенные рекомендации, которые позволят настроить яркость монитора или встроенного экрана ноутбука правильно. Мы рассмотрим наиболее полезные из них.
- Не выставляйте очень высокую яркость. Так картинка кажется сочнее и реалистичнее, но воздействие яркого света в течение длительного времени вредит глазам. Усталость глаз накопится очень быстро.
- Если в комнате мало света, будет достаточно 50% яркости. Ведь получается, что монитор будет единственным источником света, поэтому он не должен бить по глазам. Если комната хорошо освещена, то можно выставлять высокую яркость.
- Регулируйте яркость в зависимости от контента. Некоторые игры имеют весьма тусклую и темную цветовую гамму, что сделано для достижения нужного хоррор-эффекта. При стандартной яркости монитора картинка будет слишком темной. Для исправления ситуации ее лучше увеличить.
Вопросы и ответы
Обычно при попытке регулировки яркости монитора или встроенного экрана ноутбука у пользователей возникает ряд вопросов касательно процесса настройки. Мы отобрали те вопросы, которые встречаются чаще всего, и попытались на них исчерпывающе ответить.
Что делать, если дисплей телефона самопроизвольно меняет яркость?
Это значит, что на устройстве активирована функция автояркости. Выключить ее очень просто: нужно опустить шторку уведомлений для того, чтобы попасть в центр управления и в нем тапнуть по плитке с буквой «А». Именно она отвечает за работу автоматической яркости. Также найти нужный пункт можно в разделе «Экран» в системных настройках Android или iOS.
Что делать, если яркость экрана не увеличивается?
Если яркость экрана не увеличивается, то объяснений этому феномену может быть несколько: были достигнуты максимальные значения яркости или же возник системный сбой. С первой проблемой что-либо сделать нельзя, но для исправления системного сбоя можно попробовать перезагрузить ОС или переустановить ее в случае необходимости.
Что делать, если полностью потух монитор экрана?
В этом случае важно понять, почему именно он потух. Возможно, проблема имеет аппаратный характер — вышла из строя светодиодная подсветка или вздулись конденсаторы. В этом случае придется нести монитор в ремонт. Для проверки можно подключить его к другому компьютеру. Если картинка есть, нужно будет сбрасывать настройки системы или переустанавливать ее.
Правильная настройка яркости экрана очень важна. Если вы много работаете за компьютером, неправильный уровень яркости экрана может негативно влиять на глаза или быстро разрядить аккумулятор устройства, если он не работает от сети.
К счастью, Windows 10 предлагает несколько простых способов быстрой настройки яркости экрана, в отличие от предыдущих версий Windows. Давайте рассмотрим их
Изменение яркости экрана Windows 10 в приложении Параметры
Параметры — это современная замена панели управления, чтобы изменить яркость экрана в Windows 10, выполните следующие действия.
- Откройте Параметры Windows, нажав сочетание клавиш Win + I, или нажмите на значок шестеренки в меню Пуск.
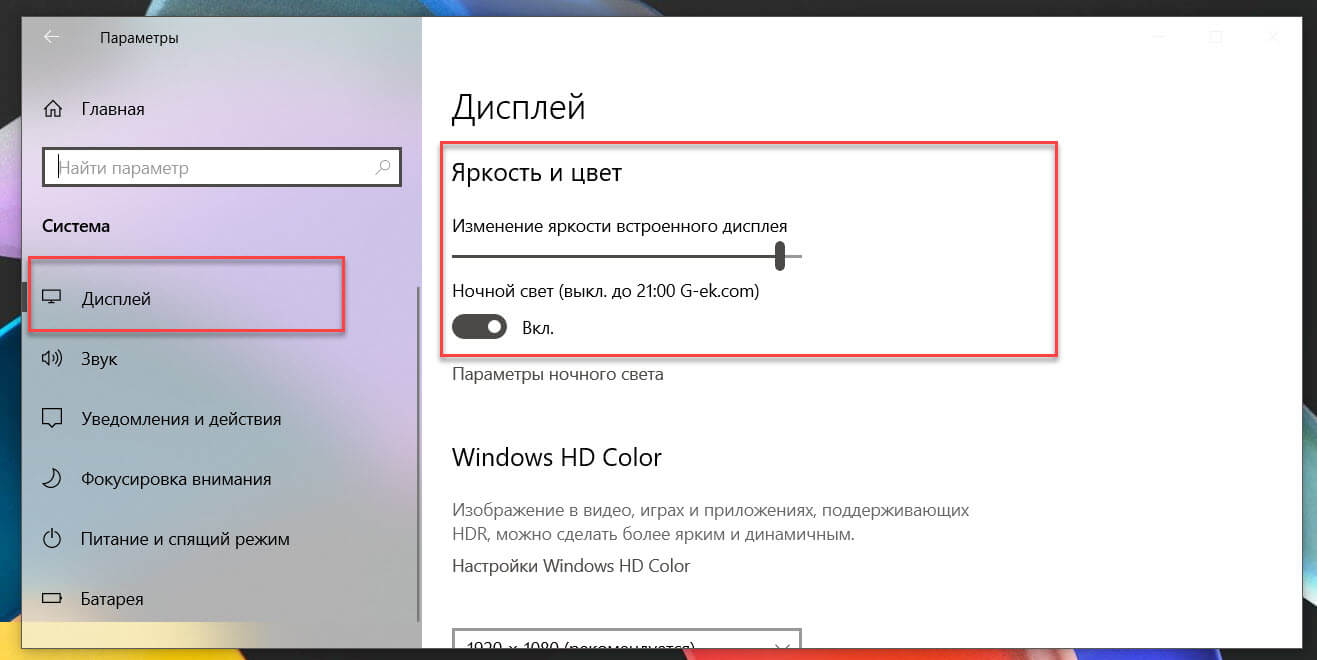
- Перейдите «Система» → «Дисплей».
- С права, отрегулируйте положение ползунка «Изменение яркости», чтобы установить желаемый уровень подсветки экрана.
Изменение яркости экрана в Windows 10 с помощью горячих клавиш.
Некоторые устройства оснащены функциональными клавишами клавиатуры, которые позволяют пользователю настраивать яркость дисплея. Например, если вы используете ноутбук, он может иметь клавишу Fn, которая вместе с другими кнопками клавиатуры может использоваться для настройки яркости экрана.
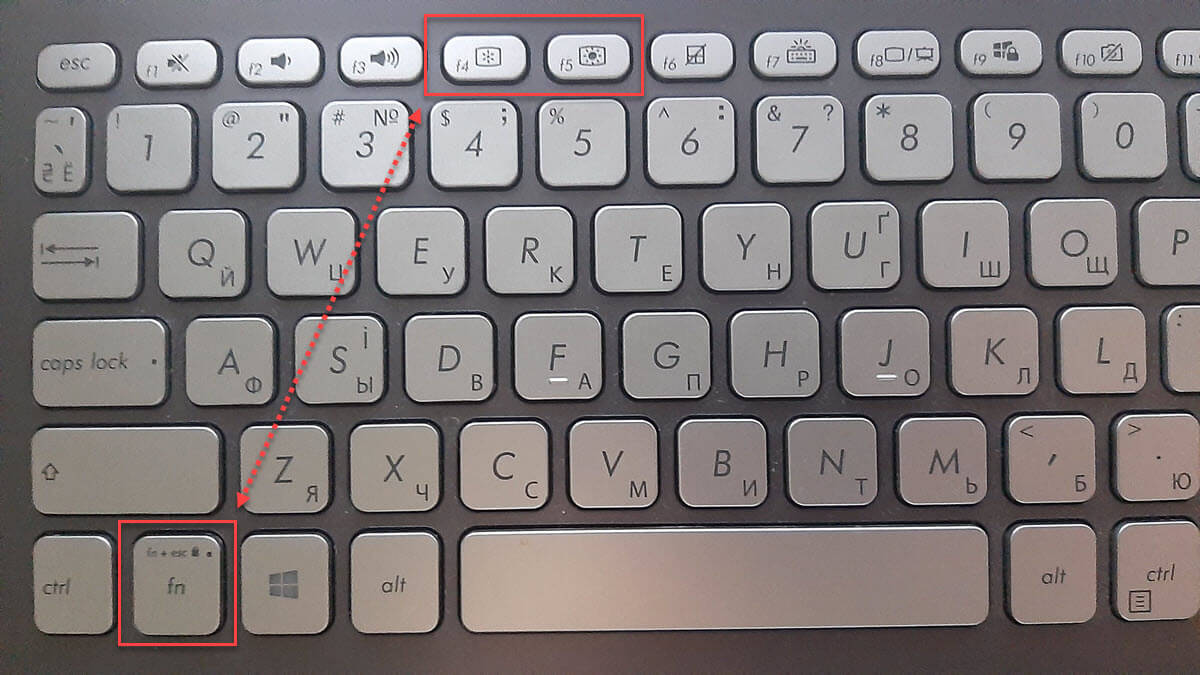
Посмотрите на клавиатуру, чтобы увидеть символ яркости на функциональных клавишах.
И если горячие клавиши для регулировки яркости не работают, убедитесь, что установлены необходимые драйверы дисплея и клавиатуры.
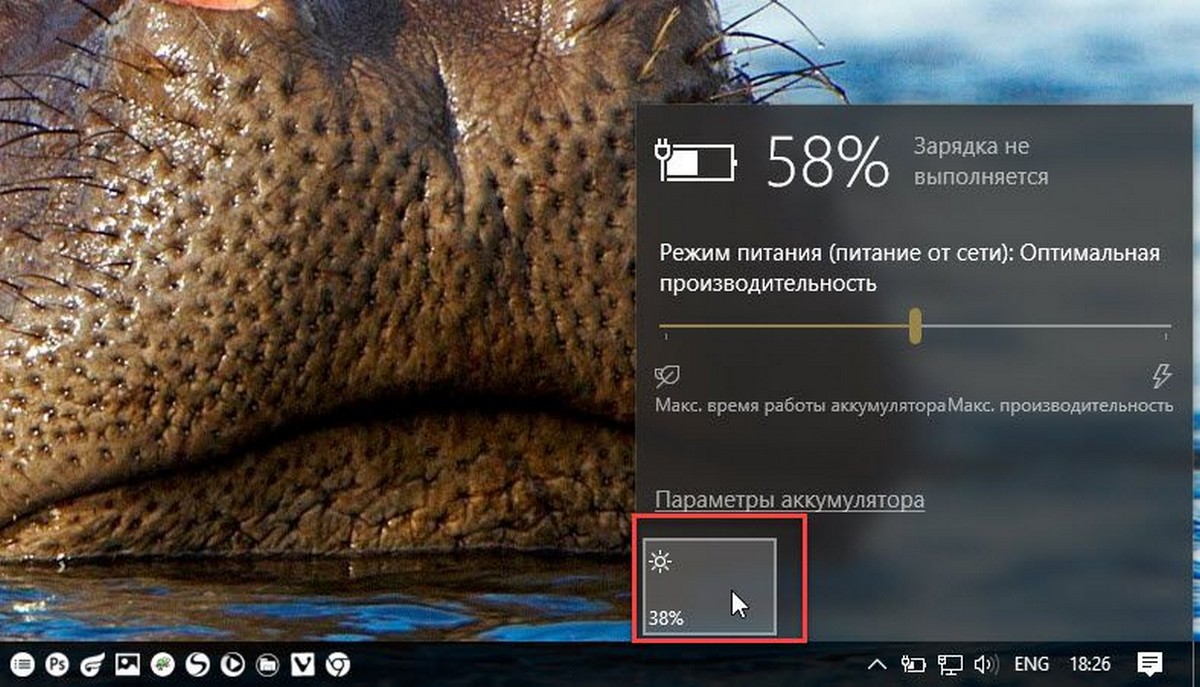
Изменение яркости экрана в Windows 10 с помощью индикатора батареи
На поддерживаемых устройствах в старых сборках Windows 10, вы можете использовать «Всплывающее меню батареи», чтобы изменить яркость экрана.
- Нажмите на значок аккумулятора в области уведомлений панели задач, чтобы открыть всплывающее окно батареи. Это выглядит следующим образом.
- Здесь вы найдете кнопку регулировки яркости. Нажмите ее, чтобы изменить уровень яркости на желаемое значение.
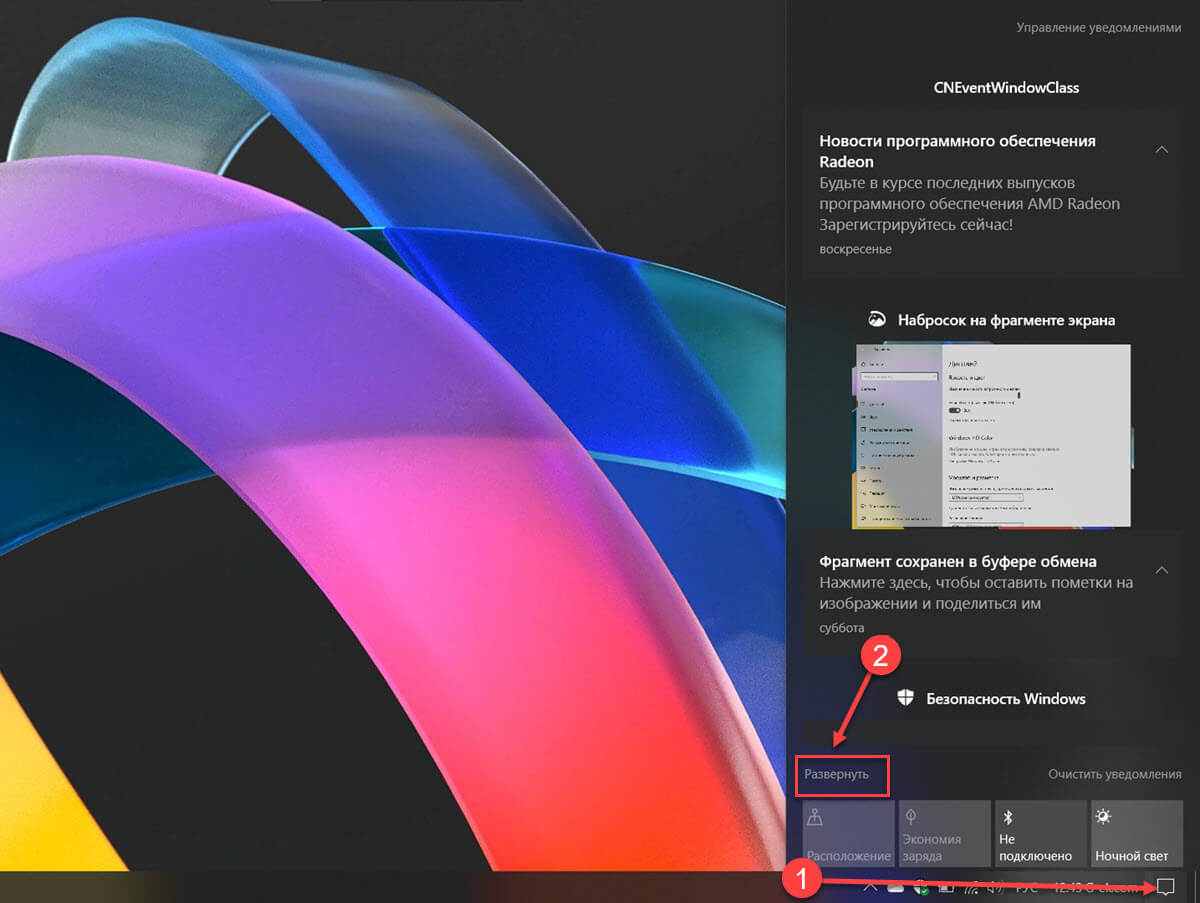
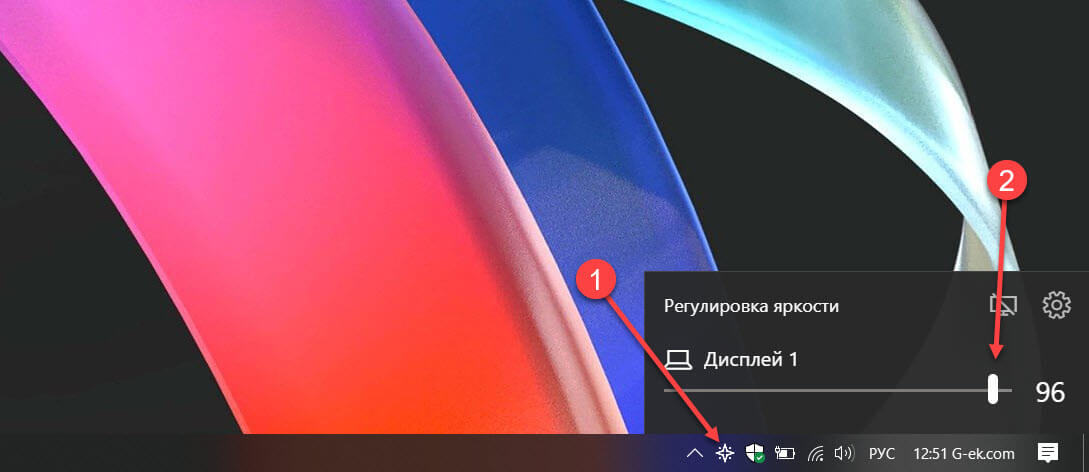
Использовать Центр действий для изменения яркости в Windows 10.
- Нажмите значок «Центра действий и уведомлений» на панели задач.
- В «Центре действий и уведомлений» нажмите на ссылку «Развернуть».
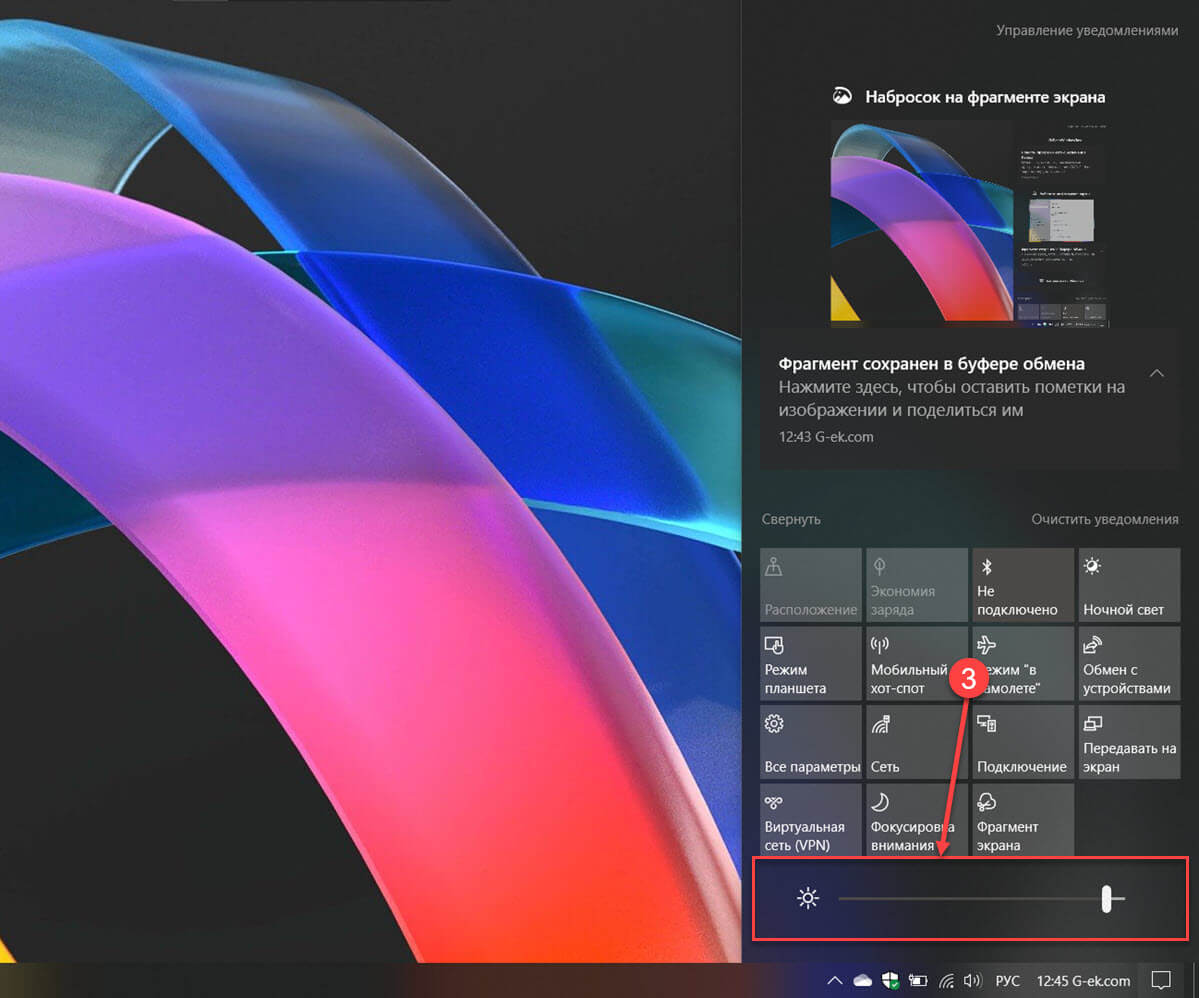
- В разделе «Быстрые действия», найдите ползунок яркость, передвиньте его чтобы увеличить / уменьшить подсветку дисплея.
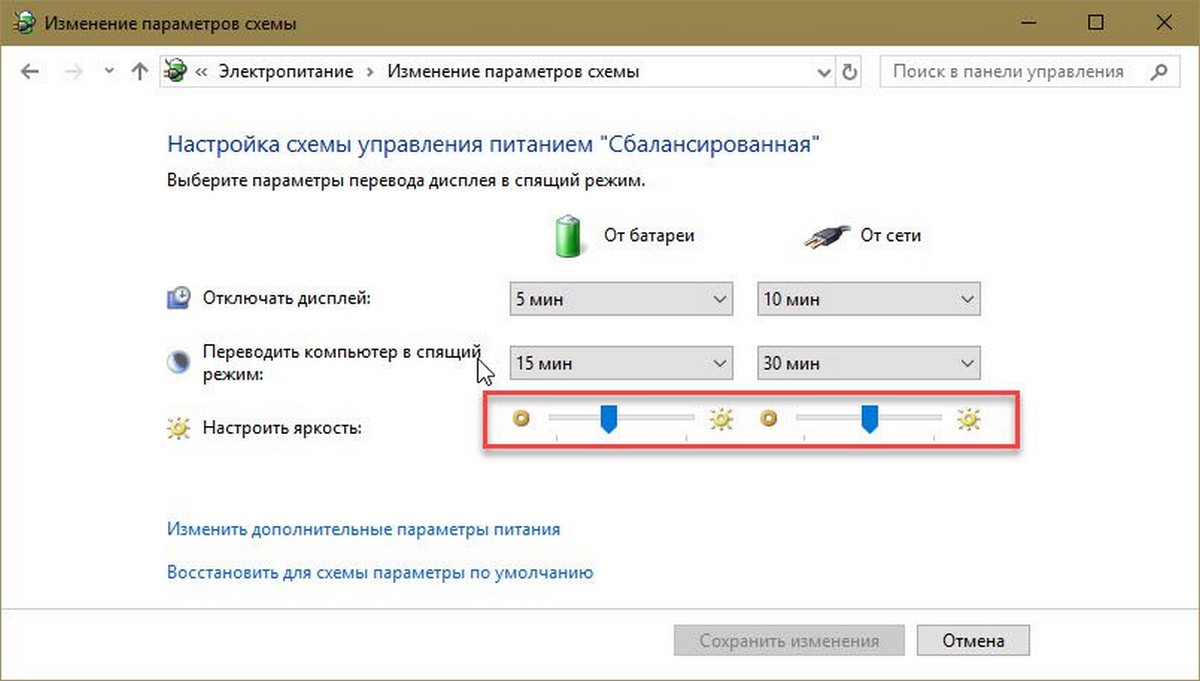
Изменение яркости экрана настройках питания.
- Откройте классическую «Панель управления» и перейдите по следующему пути:
- «Панель управления» → «Оборудование и звук» → «Электропитание»
- В правом нижнем углу отрегулируйте положение ползунка яркости экрана.
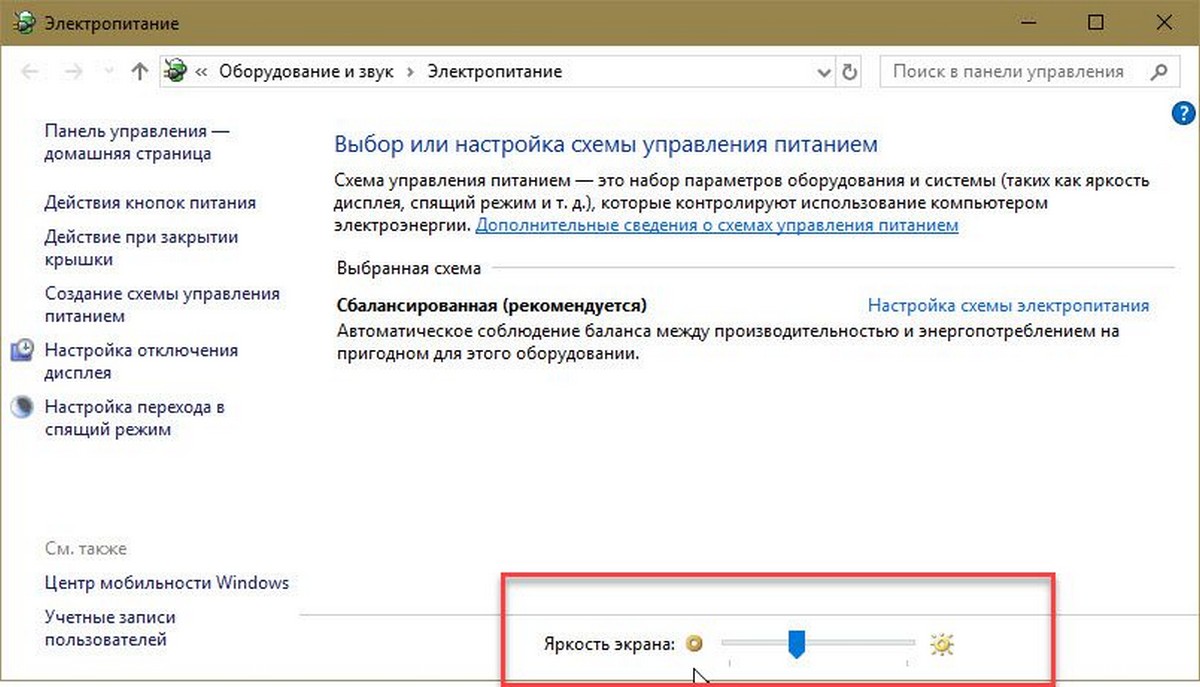
Если вы нажмете ссылку «Настройка схемы электропитания», вы сможете индивидуально настроить уровень яркости как для режима «От Батареи», так и «От Сети».
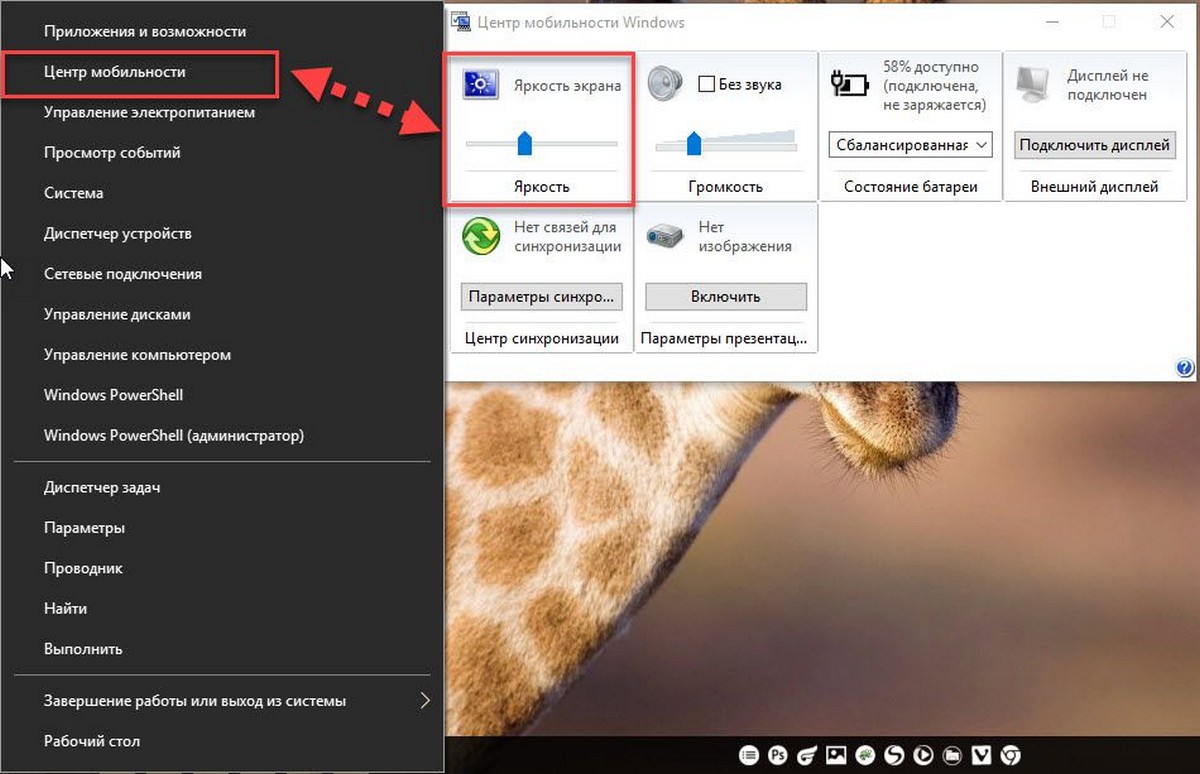
Изменение яркости экрана с помощью Центра мобильности.
- Нажмите сочетание клавиш Win + X
- В открывшимся меню выберите «Центр мобильности» Windows.
- Теперь с помощью ползунка, отвечающего за яркость, установите нужный уровень яркости экрана.
Изменение яркости экрана с помощью PowerShell.
Вы можете использовать PowerShell для изменения уровня яркости дисплея в Windows 10. Вот как это сделать.
- Откройте PowerShell.
- Введите или скопируйте следующую команду:
(Get-WmiObject -Namespace root/WMI -Class WmiMonitorBrightnessMethods).WmiSetBrightness(1,BRIGHTNESS_LEVEL)
Примечание: В приведенной выше команде замените часть BRIGHTNESS_LEVEL на процентное значение от 0 до 100. Например, команда ниже, устанавливает яркость экрана 100%:
(Get-WmiObject -Namespace root/WMI -Class WmiMonitorBrightnessMethods).WmiSetBrightness(1,100)
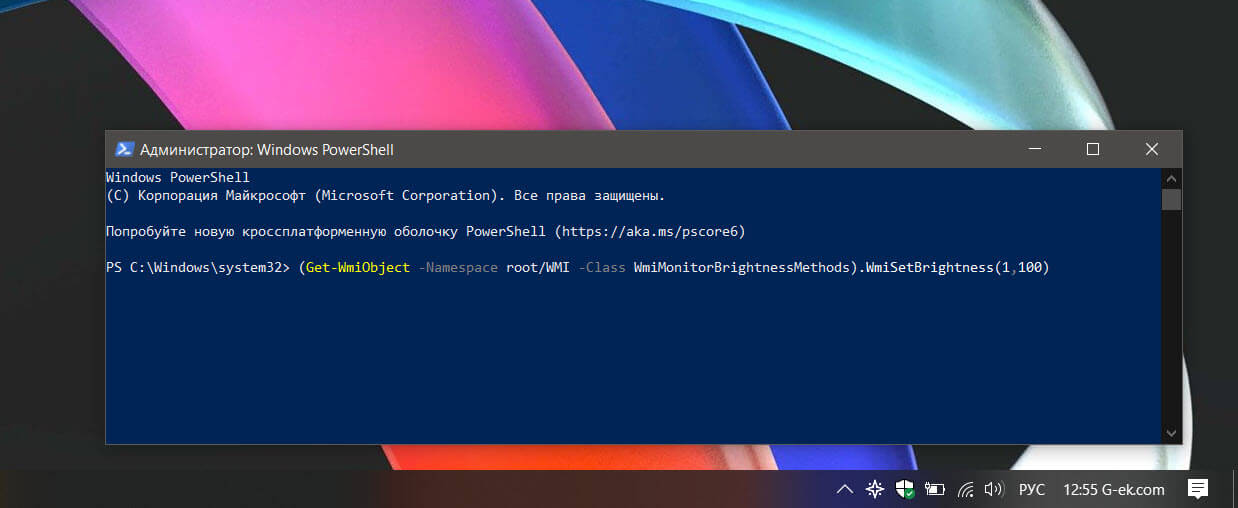
- Нажмите клавишу Enter, готово.
С помощью приложения Twinkle Tray.
Хотя все эти методы хороши, было бы неплохо, если бы был способ настроить яркость дисплея вашего ПК с внешним монитором или ноутбука прямо из панели задач так же, как мы регулируем громкость?
По умолчанию Windows 10. не поддерживает настройку яркости внешнего монитора. Но теперь есть небольшой инструмент Twinkle Tray, который позволяет вашей Windows 10 регулировать яркость экрана, как в ноутбуке. Twinkle Tray использует DDC / CI и WMI для синхронизации яркости с дисплеем. Большинство мониторов обеспечивают совместимость с DDC / CI. Убедитесь, что соответствующая опция включена в вашем мониторе.
Это бесплатный инструмент для регулировки яркости дисплея. Для установки приложения перейдите по ссылке в Магазин Microsoft Store.
Особенности:
- Добавляет ползунки яркости в системный трей, аналогично встроенной панели громкости Windows 10.
- Возможность управления яркостью нескольких мониторов
- Нормализует подсветку на разных мониторах.
- Может автоматически изменять яркость монитора в зависимости от времени суток.
- Безупречно сочетается с Windows 10. Использует ваши параметры персонализации, чтобы соответствовать вашей теме.
- Запускается с Windows.
После загрузки и запуска значок приложения — появится в меню «Пуск» и в области уведомлений на панели задач.
Вот и все.
Если ни один из вариантов регулировки яркости вам не помог, ознакомьтесь с нашей статьей: Как Восстановить яркость на ноутбуке Windows 10.