
Одним из новшеств версии Hyper-V, представленной в Windows Server 2016, является поддержка шифрования дисков внутри виртуальных машин с помощью BitLocker . Тем самым данные на виртуальных дисках могут быть защищены от администратора хоста Hyper-V, который не сможет получить доступ к информации на vhdx диске, подключив его к другой ВМ. Данная возможность особенно актуальна при размещении ВМ в частном или публичном облаке IaaS.
Шифрование дисков в ВМ с помощью BitLocker можно использовать как само по себе, так и в рамках технологии Shielded VM (поговорим о ней в следующей статье). Возможно шифрование дисков как для первого, так и для второго поколения виртуальных машин Hyper-V. Однако реализуется оно по разному, в первом случае используется Key Storage Drive, во втором – виртуальный модуль Trusted Platform Module (vTPM).
Содержание:
- Активация vTPM для поддержки BitLocker на ВМ 2-го поколения
- Использование BitLocker на ВМ Hyper-V первого поколения
Активация vTPM для поддержки BitLocker на ВМ 2-го поколения
В виртуальных машинах Hyper-V Gen-2 для шифрования дисков с помощью BitLocker необходимо использовать виртуальное устройство — криптопроцессор TPM 2.0 (Trusted Platform Module), которое может использоваться ВМ для шифрования дисков.
В качестве гостевой ОС может выступать Windows Server 2012 R2, Windows Server 2016 или различные дистрибутивы Linux (с поддержкой dm-crypt).
TPM включается индивидуально для каждой ВМ. Проверить, включена ли поддержка vTPM для ВМ, выполните команду PowerShell:
Get-VMSecurity VM01
Чтобы включить vTPM, выполните команду:
Enable-VMTPM -vm VM01

Совет. Для отключения используется команда
Disable-VMTPM -VM VM01
Включить/отключить vTPM можно и с помощью консоли Hyper-V Manager в настройках ВМ в разделе Security(Enable Trusted Platform Module).
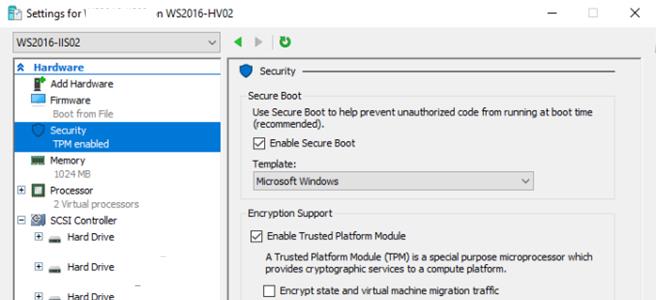
Как вы видите, здесь же можно включить использования TPM для шифрования состояния ВМ и трафика миграции/репликации. С помощью PoSh эта функция включается так:
Set-VMSecurity -vm VM01 -EncryptStateAndVmMigrationTraffic $true
После этого в гостевой ОС в разделе Security devices диспетчера устройств появится устройство с именем Trusted Platform Module 2.0. Данное TPM устройство является виртуальным, оно не привязано к хосту Hyper-V и при миграции ВМ на другой хост продолжает функционировать.

После этого можно установить компонент BitLocker
Install-WindowsFeature -Name BitLocker -IncludeAllSubFeature –IncludeManagementTools -Restart
Затем с помощью BitLocker можно зашифровать диск с данными и системный диск.
Использование BitLocker на ВМ Hyper-V первого поколения
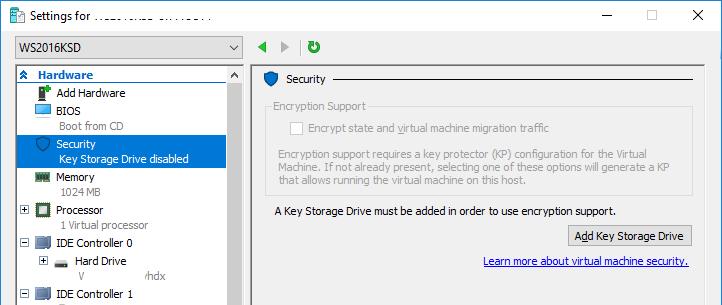
Для виртуальных машин Gen1, которые по разным причинам не могут быть мигрированы на Gen2 (например, для гостевых ОС, которые не поддерживают UEFI), Microsoft разработала функцию Key Storage Drive (KSD). KSD по сути представляет собой виртуальный аналог USB флешки на которой хранятся ключи шифрования BitLocker. Для включения KSD, выключите ВМ, поскольку предполагается добавление IDE устройства и в разделе Security настроек ВМ нажмите кнопку Add Key Storage Drive.
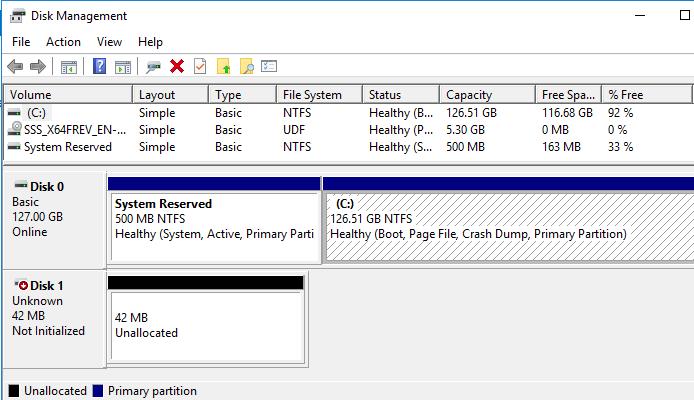
Включите ВМ, откройте консоль управления дисками (Disk Management) и убедитесь, что появился новый диск размером 42 Мб.
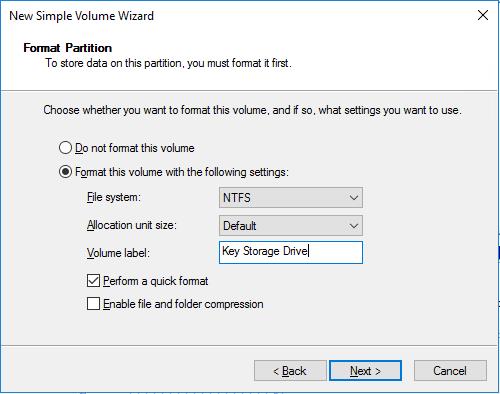
Инициализируйте и отформатируйте данный диск в NTFS с помощью консоли Disk Management или Diskpart.
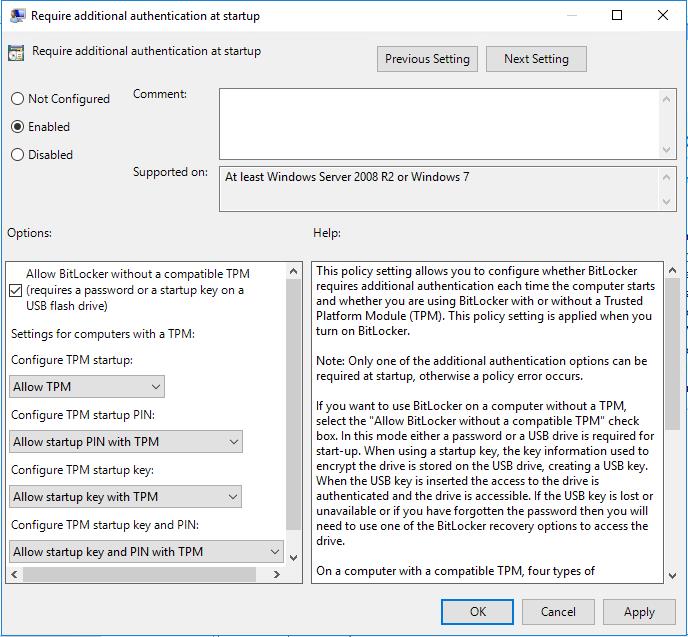
Т.к. по умлочанию BitLocker требует наличия чипа TPM, нужно с помощью групповой политики включить возможнсть шифрования BitLocker без наличия чипа TPM. Для этого откройте редактор локальной групповой политики (gpedit.msc) и перейдите в раздел Computer Configuration->Administrative Templates->Windows Components -> BitLocker Drive Encryption. Включите политику Require Additional Authentication At Startup со следующими настройками:
- Allow BitLocker without a compatible TPM (requires a password or a startup key on a USB flash drive) = Включить
- Configure TPM startup: Allow TPM
- Configure TPM startup PIN: Allow startup PIN with TPM
- Configure TPM startup key: Allow startup key with TPM
- Configure TPM startup key and PIN: Allow startup key and PIN with TPM
Осталось установить компонент BitLocker в гостевой ОС:
Install-WindowsFeature BitLocker -IncludeAllSubFeature -IncludeManagementTools -Restart
Зашифруем диск C: (диск K: в данном случае – адрес диска Key Storage Drive):
Enable-BitLocker C: -StartupKeyProtector -StartupKeyPath K:
или так
Manage-bde -on C: -StartupKey K:\ -UsedSpaceOnly -SkipHardwareTest
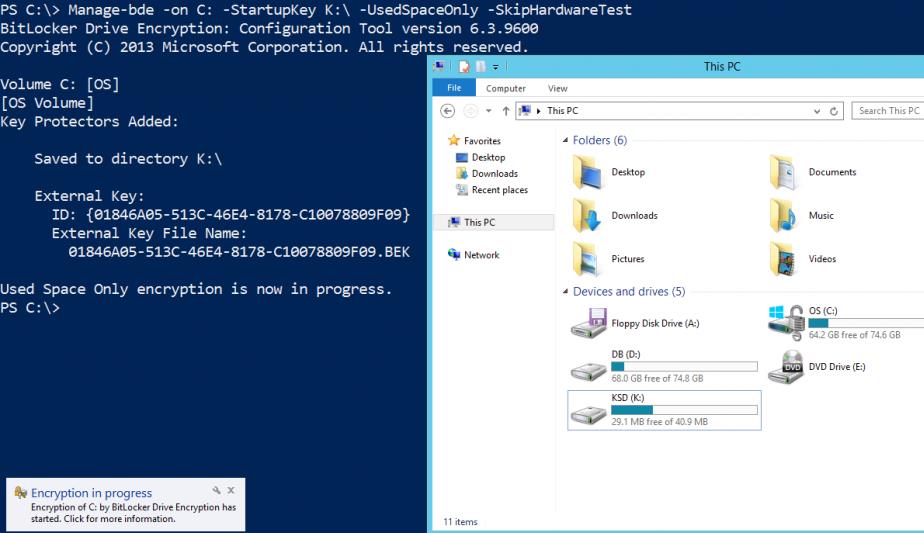
Можно зашифровать и другие разделы:
Enable-BitLocker E: -StartupKeyProtector -StartupKeyPath K: -UsedSpaceOnly
Важно. После включения шифрования тома с помощью BitLocker, не удаляете Key Storage Drive в настройках ВМ, т.к. вы не сможете загрузить ОС или получить доступ к данным на vhdx диске.
Текущий статус процесса шифрования диска можно получить с помощью команды:
Get-BitLockerVolume
The confidentiality and protection of the user’s data is fundamental in any system. In addition, this section is very important when working with Windows Server. Since the fall of sensitive files into the wrong hands can cause serious damage. For this reason, it is highly recommended encrypting the data present on the hard disk. Fortunately, Windows Server has its own data encryption infrastructure. This technology is called BitLocker, BDE-BitLocker Drive Encryption. Consequently, it is possible to encrypt entire volumes. This way, if you lose access to the device, the data will remain encrypted. For this reason, today we will see how to enable BitLocker in Windows Server 2019/2016.
BitLocker. The Windows Encryption Technology.
BitLocker makes use of the Reliable Platform Module technology which allows for greater security in case of an external attack. It is used to validate the booting of the server. In addition, it guarantees that the hard disk is in optimal security and operation conditions. BitLocker uses 5 operational modes in its operation:
- TPM + PIN + Password: The system encrypts the information with TPM. Additionally, the administrator must enter his or her PIN and password to gain access.
- TPM+Password: The system encrypts the information with TPM and the administrator must provide a password.
- TPM + PIN: The system encrypts the information with TPM and the administrator must provide his access ID.
- Password: The administrator must provide the password to access management.
- TPM: No action is required from the administrator.
How to Install BitLocker on Windows Server 2019/2016
The first thing you have to do is open the Server Manager. Once there, click on add roles and features.

Then select Role-based and features-based installation:

As usual in this type of installation, select the server.

Please skip the window referring to Roles. Then, in the Features window, scroll down to get BitLocker Drive Encryption

When you click on the corresponding box, a window with the necessary features for the installation will be displayed.

Back to the previous window, press next to continue the installation.

Below you will see a summary of the installation. Please press Install.

After a few moments, the installation will be completed. Please note that you must reboot the server to complete the process.


Finally, in this simple way we have seen how to enable BitLocker in Windows Server 2019/2016. In addition, it is our intention to increase the security of your server. All right, that’s it for today. I can’t say goodbye without inviting you to see our post about importing and exporting the security policy in Windows Server 2019/2016. Goodbye
— Advertisement —
Everything Linux, A.I, IT News, DataOps, Open Source and more delivered right to you.
Subscribe
«The best Linux newsletter on the web»
Windows Server 2016 and 2012 R2 – Setup and Manage Bitlocker (With and Without TPM)
Having full system and drive encryption is an important part of an organization when it comes to protecting their data and computer security. Even in some parts of the world such is a legal requirment. So, this video shows how to setup Bitlocker Drive Encryption in server 2016 and it is also valid for 2012 R2. This video shows the PowerShell way and also talks about the control panel method.
For more visit:
http://www.windows10.ninja
http://www.servers2016.com
Transcript (machine generated so it contains errors)
Hi in this video, let’s have a quick look that arm how to set a BitLocker on windows server 2016, or in windows server 2012 R2, et cetera the first thing is are we doing in the TPM method, which is the trusted platform module is a chip on your motherboard that will basically store passwords et cetera or are we doing a without it, so we need to check and see if we have a TPM December, click okay, let’s go there just typing TPM.MSC. Click on that that brings up this okay if basically, this is empty and it Sayers there’s no TPM fine okay if the TPM is thereby has not been prepared and like setup. Click on per TPM the restart and then last you are like, except that the TPM will be initialised and press, I think is and button press F10. It reboots and then it comes up and it shows this again pass word is created for you TPM where you can back it up a you do get a first arm message when you first boot up, after setting up the TPM and you can also basically, shall we say storage again okay I or change passwords et cetera a clear the TPM reset TPM. All these things can be done okay, let’s turn that off now so were using the TPM in this instance, the next thing is to basically go ServerManager which is part of their click ServerManager comes up with a larger add roles and features. Next next next. It’s a feature and its BitLocker drive encryption
add these features you will need to restart, so make sure about arm when you doing this you not running any mission-critical are applications and services et cetera in the background that need to take a hard worker.
This last letter restart at the end of this very quickly. It will take a few minutes to set up and then reboot with the we should return to it in a few minutes. Now, were on our basically show you how to do with basically had can I garden let’s turn on BitLocker, we’ve enabled Wales install BitLocker again, the feature now will give you the two options, one that assume you don’t have a TPM chip okay. Basically, you need to get a group policy okay, which says GP edit.MSC okay. Click on that it will bring our this window, and then you need to go all the way to basically computer configuration, administrative templates, windows components BitLocker drive encryption operating system drives and then require additional authentication at start-up. Now when you click enabled. If you don’t have a TPM chip. Make sure that one is checked. Okay, everything else is fine, and add new click okay. Restart your computer and then you need to run some commands with a TPM chip on this, so we won’t enable the group policy, but we will show you what needs to be done okay. Your open our windows PowerShell. Okay, make sure it’s run as admin okay, and type in managed – BDE space – protectors – add CEO case for the C drive and then the start-up key were saving it to basically we have a USB stick. Okay, which is the okay press enter. Okay, and then you will need to restart your computer. Okay, and when you restart it checks to see that the key USB stick is installed and that the key is all functional and then when it boots up at the start encrypting your drive. Okay, okay, now let’s assume you have a TPM chip. All you really need to do is type and manage BDE and then turn it on for the C drive okay, and that’s that. Okay, there we go. So basically it now is a restart okay, and once the restart happens it will check to see whether a TPM is functioning with the key, et cetera and it can be used. Okay, so we’ll just click on restart now that when it restarts, you will see this little thing here which says encryption of the drama leave by BitLocker is in progress. If you go over there and Nessus. Click on this PC you will see you now have this a lot. Then once it’s fully encrypted, everything gets locked down okay and you should be able to do it in Control Panel in 2012 R2 2016. In its current arm version hasn’t quite sorted out yet, but basically what you would have been to was get locker, just type under their okay and it would have gone to a Control Panel option okay taking us to Control Panel. There we go over there all Control Panel items and you should see some were over a year BitLocker okay. It’s not quite set up being windows server 2016. Yet both ones it is it’s fairly straightforward as a window with all…
source
windows server 2012
Posted by
on May 26, 2017
BitLocker and Secure Boot are important features for a secured Windows operating system to defend against boot and offline attacks. This post will show you how to enable BitLocker to use secure boot for platform and BCD integrity validation.
During the boot process BitLocker will check that the security sensitive boot configuration data (BCD) settings have not been changed since BitLocker was enabled, recovered, or resumed.
This post is part of our Microsoft 70-744 Securing Windows Server 2016 exam study guide series. For more related posts and information check out our full 70-744 study guide.
BitLocker and Secure Boot
A computer with UEFI firmware is able to use Secure Boot to provide advanced boot security. Secure Boot restricts the system so that it may only execute signed binaries from a specific authority, preventing the execution of unknown code.
When BitLocker uses Secure Boot for platform and BCD integrity validation it will ensure that the computers pre-boot environment only loads firmware that is signed by authorized publishers. Secure Boot will also provide more flexibility for managing pre-boot configuration compared to the legacy BitLocker integrity checks.
The BCD is stored on the 500MB System Reserved partition, the Windows boot manager reads this during boot.
To enable Secure Boot for platform and BCD integrity validation, we must either allow or not configure the “Allow Secure Boot for integrity validation” group policy item, which can be found in Computer Configuration > Policies > Administrative Templates > Windows Components > BitLocker Drive Encryption > Operating System Drives.

Setting it explicitly to enabled, or otherwise not configuring it at all (this is the default), BitLocker will use Secure Boot for platform integrity if the platform is capable of Secure Boot based integrity validation. Secure Boot ensures that the computers pre-boot environment will only load firmware that has been digitally signed by authorized publishers.
Alternatively if you disable this policy setting, BitLocker will use legacy platform integrity validation, even on systems capable of Secure Boot-based integrity validation.
A benefit of using Secure Boot is that it can fix BCD settings during system boot without needing to trigger a recovery event. Secure Boot enforces the same BCD settings as BitLocker. Secure Boot BCD enforcement is not configurable from within the operating system.
In Windows 7 / Server 2008 R2, BitLocker validated almost all BCD settings that have the winload, winresume, or memtest prefixes. This high level of integrity validation caused BitLocker to go into recovery mode for benign setting changes, which to be honest is just annoying as you’d have to enter the BitLocker recovery key during system boot more often to proceed.
As of Windows 8 / Server 2012 and later however, BitLocker has narrowed the set of BCD settings validated to reduce the chance of benign changes causing a BCD validation problem.
Summary
We have shown you how to use group policy to enable BitLocker to use Secure Boot for platform and BCD integrity validation in Windows Server 2016.
This post is part of our Microsoft 70-744 Securing Windows Server 2016 exam study guide series. For more related posts and information check out our full 70-744 study guide.