
Если вам необходима удобная и функциональная ОС для работы и бизнеса, то вы можете купить Windows 7, редакции Максимальная или Корпоративная. Эта система имеет приемлемые требования по характеристикам ПК или ноутбука, поддерживает все актуальное ПО и стандарты. И поэтому отлично подходит для работы. Причем по многим вопросам. Например, вам нужно обеспечить дополнительную безопасность для файлов, используемых в работе. Для этого в системе есть встроенная (проприетарная) технология — Битлокер Windows 7. Она используется для шифрования дисков, что позволяет полностью защитить важные данные от вмешательства со стороны: корпоративные документы, личные фотографии и пр.

Важные нюансы
Технология Bitlocker позволяет шифровать диски, установленные в ПК, в том числе и USB-носители и SD карты, посредством нескольких алгоритмов:
- AES 128;
- AES 256 и др.
Важно отметить, что при включении защиты и шифровании диска получить доступ к данным можно только с помощью пароля или специального ключа. При этом это актуально не только на том компьютере, где был использован модуль, но и на любом другом. То есть даже при подключении диска в другой ПК защита останется. Сам модуль встроен в систему, поэтому нет необходимости скачать Bitlocker Windows 7 – его нужно только включить.
Еще необходимо отметить, что шифрование затрагивает том, а не сам физический диск. То есть можно зашифровать только часть диска или том, состоящий из нескольких ЖД. Для работы модуля потребуются NTFSтома и не менее 1.5 Гб свободного пространства. Для расшифровки и получения доступа к данным существует три механизма:
- Прозрачный. Основан на возможностях TPM обеспечения, что обеспечивает стандартный режим работы для пользователей. Ключ для шифровки встроен в чип TPM и активируется при загрузке ОС;
- Проверка подлинности. Доступ пользователь может получить только при прохождении аутентификации – ввода PIN кода в момент загрузки системы;
- USB-ключ. На внешний носитель в виде USB устройства записывается ключ запуска. Для получения доступа в защищенную среду необходимо вставить носитель в USB порт для считывания кода. Для работы этого режима в BIOS должна быть включена функция чтения USB в загрузочной среде.
Теперь вы знаете, что такое Bitlocker Windows 7. Следует отметить, что функция может работать только при условии, что на материнской плате компьютера есть модуль TPM. Однако такое требование не совсем верно, поскольку шифрование можно включить и без него при определенных настройках.
Как включить Битлокер
Мы разобрались в том, что в системе есть встроенная функция шифрования дисков для обеспечения безопасности и сохранности данных, чтобы к ним имели доступ только вы. Теперь нужно понять, как включить Bitlocker в Windows 7. Для этого необходимо сделать следующее:
- Откройте меню «Пуск» и выберите пункт «Выполнить». Также получить к нему доступ можно, нажав комбинацию Win + R;
- Введите в строку «gpedit.msc». Нажмите Ок или кнопку Enter на клавиатуре. Перед вами появится окно для редактирования настроек групповой политики;
- В левом меню экрана найдите строку «Конфигурация компьютера» и в подменю выделите «Административные шаблоны»;
- Перейдите в пункт «Компоненты Windows»;
- В правом меню выберите пункт «Шифрование дисков Bitlocker» и активируйте его;
- В новом окне найдите строку для работы с дисками ОС. Активируйте ее;
- Откройте и раскройте параметр для настройки дополнительной проверки;
- Нажмите «Включить» для активации функции;
- Поставьте галочку напротив пункта, который отвечает за используемый модуль. Если ваша материнская плата поддерживает чип TPM, то используйте соответствующий чекбокс. Если же нет, то найдите и активируйте пункт для использования Bitlocker без этого модуля.
Готово. Теперь нужно в Панели управления найти строку про Битлокер, перейти по ней и включать функцию.
How to enable Bitlocker is our next topic for the followers of Get IT Solutions, in today’s article. Also we are going to explain how to use TPM+PIN combination of authentication mechanism and how Bitlocker works.
What is BitLocker and how bitlocker works
BitLocker Drive Encryption works by encrypting contents of your chosen disk and then creating an encryption key. Without this key, access to the encrypted disk cannot be given. This is particularly useful for laptop owners who keep sensitive information on their computer. BitLocker is Microsoft’s easy-to-use, proprietary encryption program for Windows. Encrypting your entire drive can help protect against unauthorized changes to your system such as firmware-level malware. It is designed to protect data by providing encryption for entire volumes. By default, it uses the AES encryption algorithm in cipher block chaining (CBC) or XTS mode with a 128-bit or 256-bit key. CBC is not used over the whole disk; it is applied to each individual sector
BitLocker is used in conjunction with a hardware component called a Trusted Platform Module (TPM). The TPM is a smartcard-like module on the motherboard that is installed in many newer computers by the computer manufacturer. BitLocker stores its recovery key in the TPM (version 1.2 or higher). The following combinations of the above authentication mechanisms are supported, all with an optional escrow recovery key:
- TPM only
- TPM + PIN
- TPM + PIN + USB Key
- TPM + USB Key
- USB Key
- Password only
Requirements
BitLocker could not be enabled for Windows 7 Professional and it cannot be downloaded and installed. You can turn on bitlocker for Windows 7 Ultimate and Windows 7 Enterprise editions. The computers without TPMs also can use BitLocker. Computers without TPMs will not be able to use the system integrity verification that BitLocker can also provide. To use BitLocker, your computer must satisfy certain requirements. Supported operating systems:
-
- Windows 10 – Education, Pro, or Enterprise edition
- Windows 8 — Professional or Enterprise edition
- Windows 7 — Enterprise or Ultimate edition
- For Windows 7, the Trusted Platform Module (TPM) version 1.2 or higher must be installed. It must also be enabled and activated (or turned on).
Additional requirements:
- You must be logged in as an administrator.
- You must have access to a printer to print the recovery key.
TPM module bitlocker
If your computer meets the Windows version and TPM requirements, the process for enabling BitLocker is as follows:
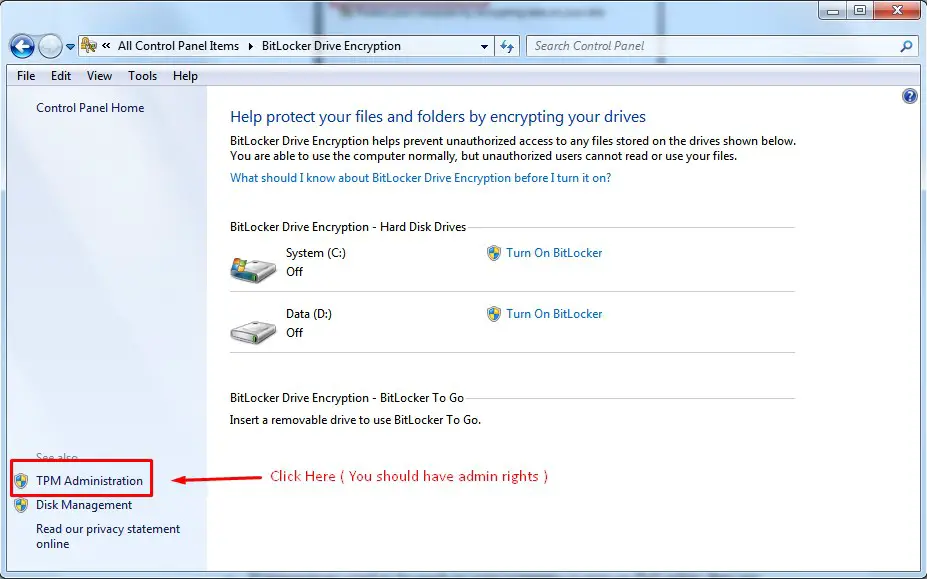
Step1. Click Start, and in search bar start typing BitLocker Drive Encryption
Search for bitlocker on control panel
Step2. Click TPM Administration (You should have admin rights)
TPM module bitlocker
Step3. Start Initializing TPM by clicking Initialize TPM, in the right panel
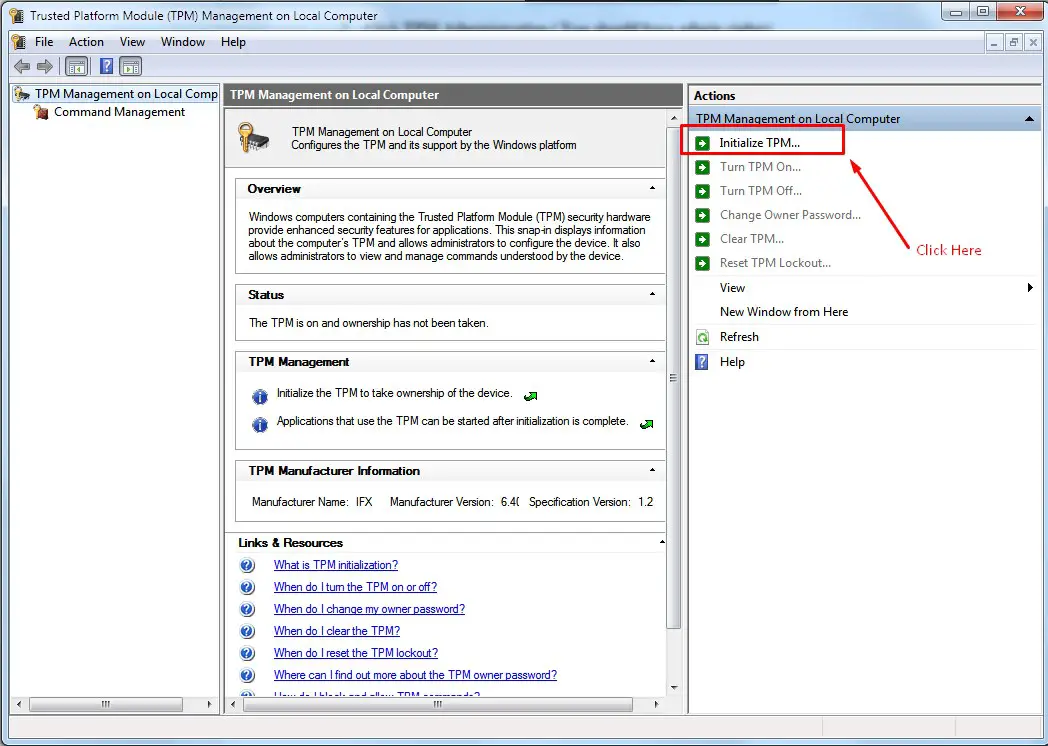
Start TPM module bitlocker
- You need to restart your computer.
- Save the recovery key of TPM in a USB key.
- Restart your computer again
Enable bitlocker Windows 7 & Windows 10
These is the TPM+PIN combination of authentication mechanism
Step1. Open Local Group Policy Editor by typing Run and gpedit.msc
gpedit.msc
Step2. Go to Operating System Drives by following these path:
Computer Configuration > Administrative Templates > Windows Components > Bitlocker drive Encryption > Operating System Drives
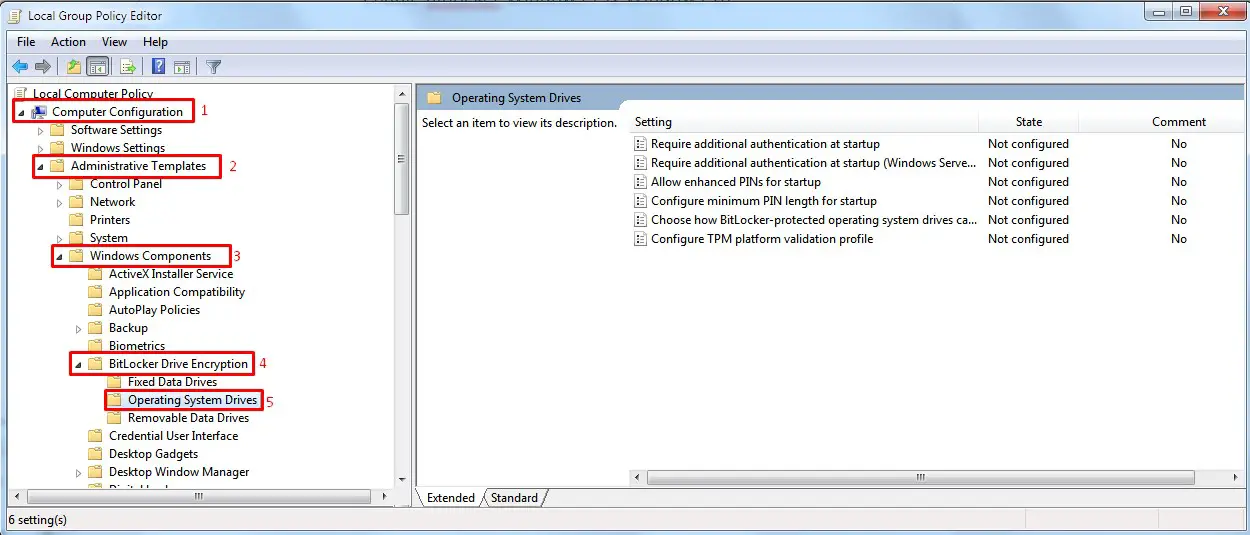
Enable bitlocker gpedit
Step3. Enable Require additional authentication at startup and do the following configurations. After that click OK
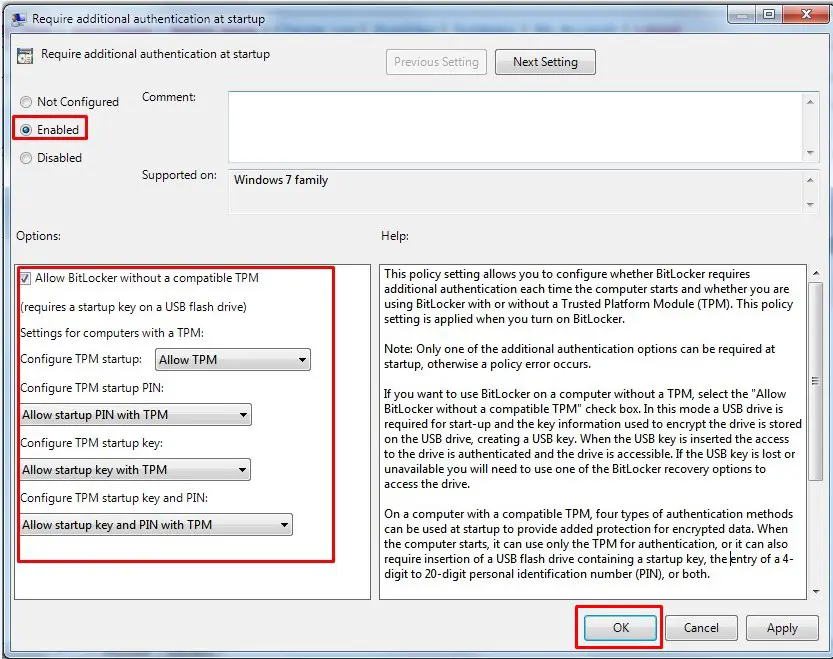
Require additional authenticcation at startup
Step4. Enable Allow enhanced PINs for startup. Click OK.
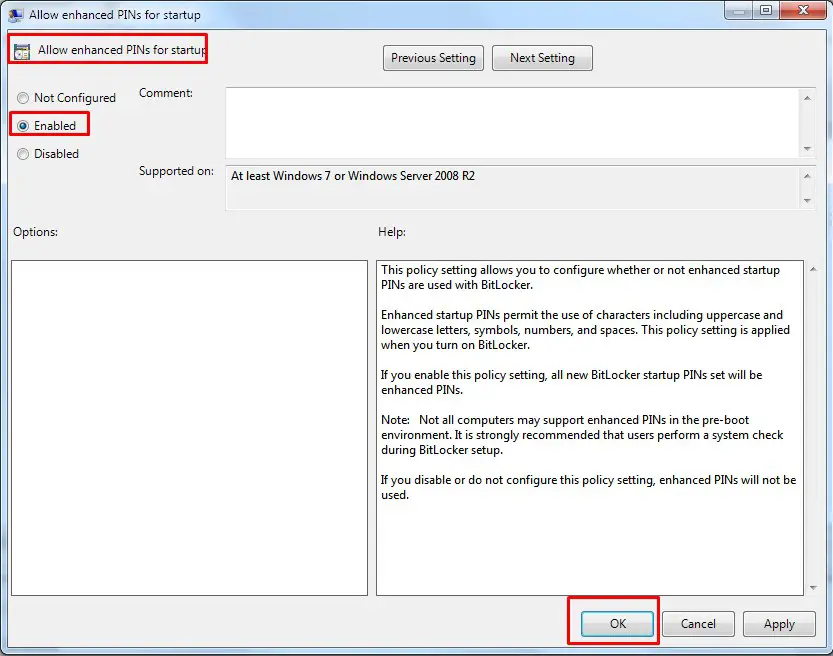
Allow enhanced PINs for startup
Step5. Open command prompt and type: gpupdate /force. After that restart or log off
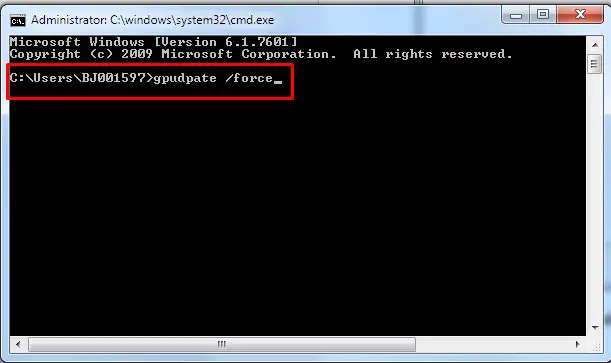
gpupdate
How to encrypt Windows 7 and Windows 10
Step1. Click Start, and in the search bar start typing BitLocker Drive Encryption. Start by encrypting System C or Data D by clicking Turn On Bitlocker
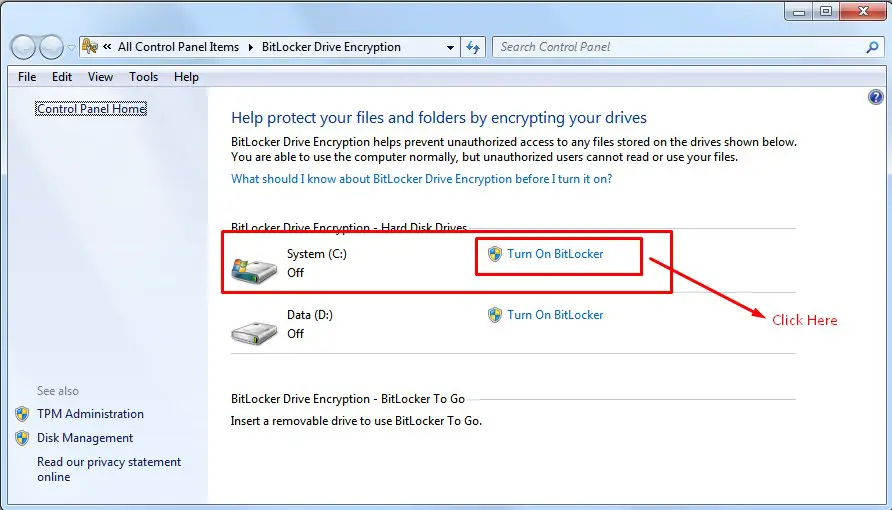
How to encrypt windows 7 and window 10
BitLocker scans your computer to verify that it meets the system requirements. If your computer meets the system requirements, the setup wizard continues. Click Next
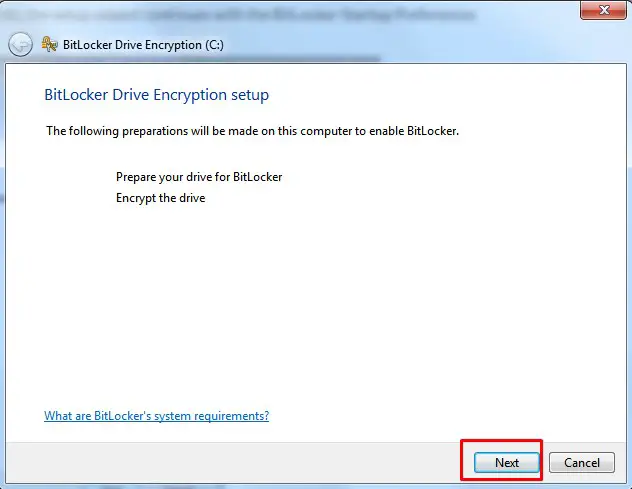
Encrypt the drive
Step 2. When the BitLocker startup preferences page is displayed, click Require a PIN at every startup.
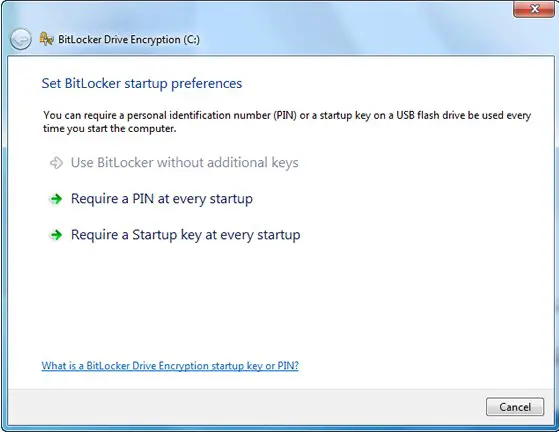
Require a PIN at every startup
Enter a PIN from 8 to 20 characters long and then enter it again in the Confirm PIN field. Click Set PIN. Note: You will need to enter your PIN each time you start your computer.
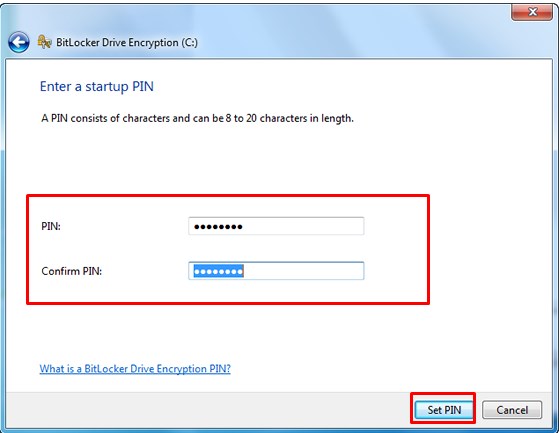
Enter a PIN at every startup
You can store your recovery key in a USB, or select Print the recovery key to print it. And then click Next. Note: Make sure your computer is connected to a printer.
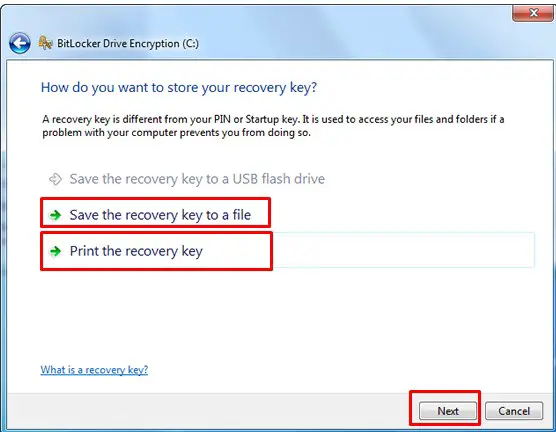
Print the recovery key
You will be prompted to restart your computer to start the encryption process. Your computer can be used while your drive is being encrypted. If you want to enable Bitlocker and encrypt even the Drive D of your PC just follow the same steps (in the section How to encrypt Windows 7 and Windows 10)
Logging in
Enabling BitLocker will change the way you log in to your system. You need to enter your PIN at every startup, prior to entering your password. This is designed to provide an additional layer of security for your data.
Published: March 30, 2010
Updated: April 21, 2020
Tags:
Windows Configuration/Setup
Windows BitLocker Drive Encryption is a security feature that provides better data protection by encrypting all data stored on the Windows operating system volume. For the sake of this article, a volume consists of one or more partitions on one or more hard disks. BitLocker works with simple volumes, where one volume is one partition. A volume usually has a drive letter assigned, such as C:
A Trusted Platform Module (TPM), as found on a CyberMed NB24k, is a microchip that is built into a computer. It is used to store cryptographic information, such as encryption keys. Information stored on the TPM can be more secure from external software attacks and physical theft. A TPM is a microchip designed to provide basic security-related functions, primarily involving encryption keys. The TPM is usually installed on the motherboard of a desktop or portable computer, and communicates with the rest of the system by using a hardware bus. Computers that incorporate a TPM have the ability to create cryptographic keys and encrypt them so that they can be decrypted only by the TPM. This process, often called «wrapping» or «binding» a key, can help protect the key from disclosure. Each TPM has a master wrapping key, called the Storage Root Key (SRK), which is stored within the TPM itself. The private portion of a key created in a TPM is never exposed to any other component, software, process, or person. Computers that incorporate a TPM can also create a key that has not only been wrapped, but is also tied to specific hardware or software conditions. This is called «sealing» a key. When a sealed key is first created, the TPM records a snapshot of configuration values and file hashes. A sealed key is only «unsealed» or released when those current system values match the ones in the snapshot. BitLocker uses sealed keys to detect attacks against the integrity of the Windows operating system. With a TPM, private portions of key pairs are kept separated from the memory controlled by the operating system. Because the TPM uses its own internal firmware and logic circuits for processing instructions, it does not rely upon the operating system and is not exposed to external software vulnerabilities.
BitLocker uses the TPM to help protect the Windows operating system and user data and helps to ensure that a computer is not tampered with, even if it is left unattended, lost, or stolen. BitLocker can also be used without a TPM. To use BitLocker on a computer without a TPM, change the default behavior of the BitLocker setup wizard by using Group Policy, or configure BitLocker by using a script. When BitLocker is used without a TPM the required encryption keys are stored on a USB flash drive. This flash drive must be presented (plugged in) to unlock the data stored on a volume.
The data is protected by encrypting the entire Windows operating system volume. If the computer is equipped with a compatible TPM, BitLocker uses the TPM to lock the encryption keys that protect the data. As a result, the keys cannot be accessed until the TPM has verified the state of the computer. Encrypting the entire volume protects all of the data, including the operating system itself, the Windows registry, temporary files, and the hibernation file. Because the keys needed to decrypt data remain locked by the TPM, an attacker cannot read the data just by removing the hard disk and installing it in another computer. During the startup process, the TPM releases the key that unlocks the encrypted partition only after comparing a hash of important operating system configuration values with a snapshot taken earlier. This verifies the integrity of the Windows startup process. The key is not released if the TPM detects that the Windows installation has been tampered with. By default, the BitLocker setup wizard is configured to work seamlessly with the TPM. An administrator can use Group Policy or a script to enable additional features and options. For enhanced security, combine the use of a TPM with either a PIN entered by the user or a startup key stored on a USB flash drive. On computers without a compatible TPM, BitLocker can provide encryption, but not the added security of locking keys with the TPM. In this case, the user is required to create a startup key that is stored on a USB flash drive.
The remainder of this article will assist in initializing TPM successfully in Windows 7 environments so that Bitlocker can be turned on. Errors in doing so are most likely due to incorrect permissions for the SELF account in AD for ms-TPMOwnerInformation attribute.
When trying to turn on Bitlocker on a Windows 7 Hard Drive, an Access Denied Error message may be encountered while initializing TPM.

Additionally, when opening the TPM Management Console and attempting to initialize TPM, error message 0x80070005 will appear.
Solution:
Follow the instruction below to set the correct permissions:
1. Open Active Directory Users and Computers.
2. Select the OU for all computers which will have Bitlocker turned ON.
3. Right Click on the OU and click Delegate Control.
4. Click Next, then Add.
5. Type SELF as the Object Name.

6. Select create a custom task to delegate.

7. From the object in the folder, select Computer Objects.

8. Select the 3 checkboxes under show these permissions.

9. Scroll through the permissions and select Write msTPM-OwnerInformation.

10. Click Finish.
After completing these steps, TPM can be successfully initialized.
Additional References
Windows BitLocker™ Drive Encryption Step by Step Guide (https://docs.microsoft.com/en-us/previous-versions/windows/it-pro/windows-vista/cc766295(v=ws.10))
Backing Up BitLocker and TPM Recovery Information to AD DS (https://docs.microsoft.com/en-us/previous-versions/windows/it-pro/windows-7/dd875529(v=ws.10))
Copilot is your AI companion
Always by your side, ready to support you whenever and wherever you need it.

BitLocker Drive Encryption protects the data on your computer by preventing unauthorized access to the hard disk drive. BitLocker allows access to the data on the protected hard disk only after you have typed in a PIN and logged on to Windows Vista on your computer. This guide covers how to protect your machine with BitLocker.
Important! Selecting a language below will dynamically change the complete page content to that language.
-
File Name:
2569_ProtectYourDatawithBitLocker_GS_Windows7_External.docx
BitLocker Drive Encryption protects the data on your computer by preventing unauthorized access to the hard disk drive. BitLocker allows access to the data on the protected hard disk only after you have typed in a PIN and logged on to Windows 7 on your computer. This guide covers how to protect your machine with BitLocker.
-
Supported Operating Systems
Windows 7
n/a
Ok, this goes in the «and Beyond…» category because this post is not specific to .NET, but about setting up full disk encryption using a product by Microsoft named BitLocker. BitLocker is included is some of the premium Windows Vista and Windows 7 editions; specifically this post speaks of how to set up full disk encryption on Windows 7 Ultimate Edition.
There are several reasons for using full disk encryption; sometimes it is a requirement of the company you work for, or maybe you have sensitive information that needs to be secured in the event of your computer being lost or stolen. While traditionally you may think of using BitLocker just for laptops because of their portability which brings an increased risk of loss or theft, this could be done on a desktop with the appropriate hardware required as well.
I will preface these directions with some cautions and warnings. The process although not rocket science, is a series of steps that must be followed quite closely with no variations. I myself have had some unsuccessful attempts at setting up the encryption, which caused an OS failure, and the need to reformat and reinstall the OS again. That being said… «BACK UP EVERYTHING IMPORTANT BEFORE SETTING UP ENCRYPTION!» Ideally, you would do this initially upon getting a new laptop with Windows 7, or after doing a fresh install. That way if you run into any major issues, you can re-image the machine to its default configuration and start over again. I do believe that encryption overall makes the hard drive a tad bit more volatile, so regardless of the success of encrypting your disk, I recommend backing up important files from time to time after encryption is complete.
There are a few prerequisites to using BitLocker and full disk encryption. 1st, you need to have Administrative rights on the machine. The 2nd I already spoke of and that is needing Windows 7 Ultimate. The 3rd is a device that is imbedded in the laptop or machine called a TPM or «Trusted Platform Module». The TPM is responsible for generating and storing a keyset used for the drive encryption and for integrity checks of the system boot files. This results in securing the system volume with encryption and integrity checking the system boot files to ensure that nothing has been tampered with and the system drive is located in the original computer. Only then is decryption preformed. While there are software only solution for full drive encryption, they are more susceptible to hackers than BitLocker used with a TPM. Microsoft has published a wealth of detail on the underlying workings of BitLocker and the TPM, so I will not repeat it here. If you are interested, check out either of the following sites:
BitLocker Drive Encryption Team Blog
TechNet: BitLocker Drive Encryption
Alright now to the meat and potatoes of this project. Remember, try to follow each step as closely as possible without deviation for the nest results.
Step # 1: Backup all important files. Let me say again… Back up all important files. Just in case you have any issue with setting up BitLocker, you will not have lost all of your important data.
Step # 2: Update the BIOS for your machine to the most up to date version. Each motherboard or machine is going to have their own website for instructions and downloading and updating the BIOS. For example Dell has a site for its updates, ASUS has a site for their motherboard updates, etc. Oh, and if you are reading this and not sure what the BIOS is… I recommend to halt this procedure and not continue. Just my advice.
Step # 3: Log into Windows after the BIOS is updated and go to the following: Start -> Control Panel -> BitLocker Encryption. Find your Hard Drive and select «Turn BitLocker On». It should probably not work giving you the message below stating a TPM could not be found. If for some reason the BitLocker process begins because your TPM was already configured, should cancel the process and do the 2nd part of Step # 4: Configuring the boot sequence from the BIOS.
Step # 4: Enter the BIOS on boot and Enable the TPM and configure the boot sequence. 1st, enter the BIOS and find the TPM settings. They are probably under a ‘Security’ heading or something similar. All BIOS menus are different, so I don’t have the specific directions for each one, but navigate around until you find it. Once you do, select the option to enable it. 2nd, reconfigure the boot sequence. Make sure that any option for USB or Flash drives boot AFTER the Hard Drive. This sort of undocumented step caused me a lot of failed encryptions in later steps. The reason is that upon doing the BitLocker System Check, the system reboots and checks to make sure the generated keys placed on your USB Flash Drive actually work properly, prior to actually doing the encryption. Well if the USB is ordered to boot prior to the hard drive, the machine thinks you are using the USB as a boot device and forfeits the BitLocker check. You need to have the hard drive boot prior to the USB drive. No worries, though, if you ever need to boot from a DVD or flash, just go back in and switch the order to do whatever processing you need and then switch it back. Save your changes and exit the BIOS.
Step # 5: Set up BitLocker and the TPM. Log all the way back into Windows (do not shut down in-between) and go back to the BitLocker Encryption option in the Control Panel. Press «Turn On BitLocker» again. This time the BitLocker process will recognize a TPM enabled and being the process. You should see screens such as the following below:
Press ‘Next’ to begin BitLocker preparations:
Press ‘Next’ to begin the allocation of space for BitLocker:
Press ‘Restart Now’ and allow the machine to reboot as displayed below:
Upon logging back into Windows, BitLocker will continue the process automatically, so do not attempt to open anything else. You will see the screen below, and to continue the process press ‘Next’:
Upon completing the steps above, you will be prompted to reboot the computer so that the TPM can be configures. Press ‘Restart’ as directed. Upon rebooting, you will see a basic MS-DOS old school looking screen informing you that the TPM has been modified and do you want to allow the modification. Allow the modification and follow the directions to press the appropriate button. In my case I selected the ‘Modify’ (not the ‘Ignore’) so that the TPM configuration could be modified. Upon completion, the machine will reboot. Log all the way back into Windows. The BitLocker process will proceed automatically again. You should see a screen like below:
One the TPM hardware has been configured you will see a screen like below; press ‘Next’ to continue the process:
At this point you will be prompted to save off the recovery keys. These are the keys that are stored in the TPM, and are only needed in the event of system tampering or breech. I recommend doing all (3) options, and storing the keys to a USB drive, printing them off, and saving them off to a location OTHER THAN the system drive (secure network share, etc.). Obviously I should not need to explains too much here that the keys regardless of type (paper, USB, file) need to be locked away. Don’t leave the USB on the desk next to the laptop, or the paper with the keys folded under the machine. That is like leaving the keys to the car in the door lock. Continuing on…press each option in the screen below to save off the keys:
Step # 6: Run the BitLocker Check (USB with keys saved from Step # 5 required for this step). After saving the keys from above, press ‘Next. You will see the screen below asking if you want to run the BitLocker check. While not required, I recommend doing it. You don’t want to encrypt the drive until you have tested that the generated keys actually work. Check the box to run the BitLocker check and make sure that the USB drive IS INSERTED in the machine. Press ‘Next’ and the following reminder and reboot screens will be displayed:
Step # 7: Full drive encryption. Upon a successful reboot and USB keys check, the BitLocker process will automatically being the encryption process of the system volume. This will take several hours depending on the size of the drive, but you can continue to work in the background if needed. However, do not reboot or shut down during the encryption process. You can lock your machine if needed. The encryption dialog (shown below) will display the progress.
Step # 8: Configure the machine policy to require a pre boot PIN + TPM (Optional). Once the encryption is complete, you are technically done. The drive is encrypted and secure. You will notice upon reboot you are never prompted for the keys or a password. That’s normal. The TPM has the keys, and if there was any breech or integrity failure, you would be prompted for the keys. Otherwise the authentication occurs in the background and is seamless.
However, to strengthen your security you may want to configure a pre boot PIN that works separately but in conjunction with the TPM. To accomplish this, follow Step # 8 and Step # 9 and Step # 10.
We need to open the Group Policy editor for the machine. Goto Start -> and type in gpedit.msc and press ‘Enter’. Then Goto: Local Computer Policy > Computer Configuration > Administrative Templates > Windows Components > BitLocker Drive Encryption > Operating System Drives and right click the option «Require additional authentication at startup» and select «Edit». The screen is displayed below:
Select «Enabled» and then select «Require startup PIN with TPM» under the «Configure TPM startup PIN:» dropdown. Click «Apply, «OK» then close the dialog and Group Policy editor. This now allows us to configure the pre boot PIN from the command prompt.
Step # 9: Goto Start and type in cmd but do NOT press enter. Once the cmd application displays in the start menu, right click it and state «Run as Administrator». Click «Yes» on any security dialogs that may appear. To configure the pin we need to use the manage-bde.exe tool. To configure the PIN, enter the following and then press ‘Enter’:
manage-bde -protectors -add %systemdrive% -tpmandpin
You will be prompted to enter a PIN. (Note: I did notice if you still have the USB with the keys inserted into the machine, this process does not work — the command prompt never asks you to enter the PIN; make sure to remove it before doing this process). The PIN by default can only be numeric. There is an option in the group policy editor from Step # 7, to allow complex PINs for this process, but wars not all systems support it. Since you may not find that out until reboot, and not be able to log back in, I suggest just using a numeric PIN. You will be prompted to enter it twice, and upon success, see a screen like the one below:
Step # 10: Reboot and test the PIN. Upon rebooting, after the quick flash of your system manufacture screen, you should receive an old MS-DOS style screen prompting you for your PIN. It tells you the function keys can be used to represent numbers, but I always just use the keypad and it works fine. If needed, the option is there. Upon entering the correct PIN the machine will continue booting into Windows. One note on the pre-boot PIN: I have found that if you have your USB containing the keys inserted upon boot, it assumes you are validated and skips the prompting of the PIN. Since your USB drive should be locked away, you will be prompted for the PIN, but again, another nice option if needed.
And that is it! Hopefully your encryption process went well and you are complete at this point. I have done this process on 7 different machines with success, so I know it works when followed as directed. Your drive will now be secure with BitLocker.