
Applies ToWindows 11 Windows 10
Шифрование диска BitLocker позволяет вручную зашифровать определенный диск или диски на устройстве под управлением Windows Pro, Enterprise или Education Edition.
Для устройств, управляемых организацией, шифрованием диска BitLocker обычно управляет ИТ-отдел, так как шифрование может потребоваться политиками организации.
Совет: Если вы ИТ-специалист ищете дополнительные сведения, см. документацию по восстановлению BitLocker.
В этой статье описывается, как управлять шифрованием диска BitLocker с помощью панели управления.
Доступ к шифрованию диска BitLocker
Ниже описано, как получить доступ к шифрованию диска BitLocker.
-
Вход в Windows с учетной записью администратора
-
В меню Пуск введите BitLocker и выберите Управление BitLocker в списке результатов.
Примечание: Шифрование диска BitLocker доступно только на устройствах с выпусками Windows Pro, Enterprise или Education. Она не поддерживается в выпуске Windows Домашняя. Если управление BitLocker отсутствует в списке, это означает, что у вас нет правильного выпуска Windows.
-
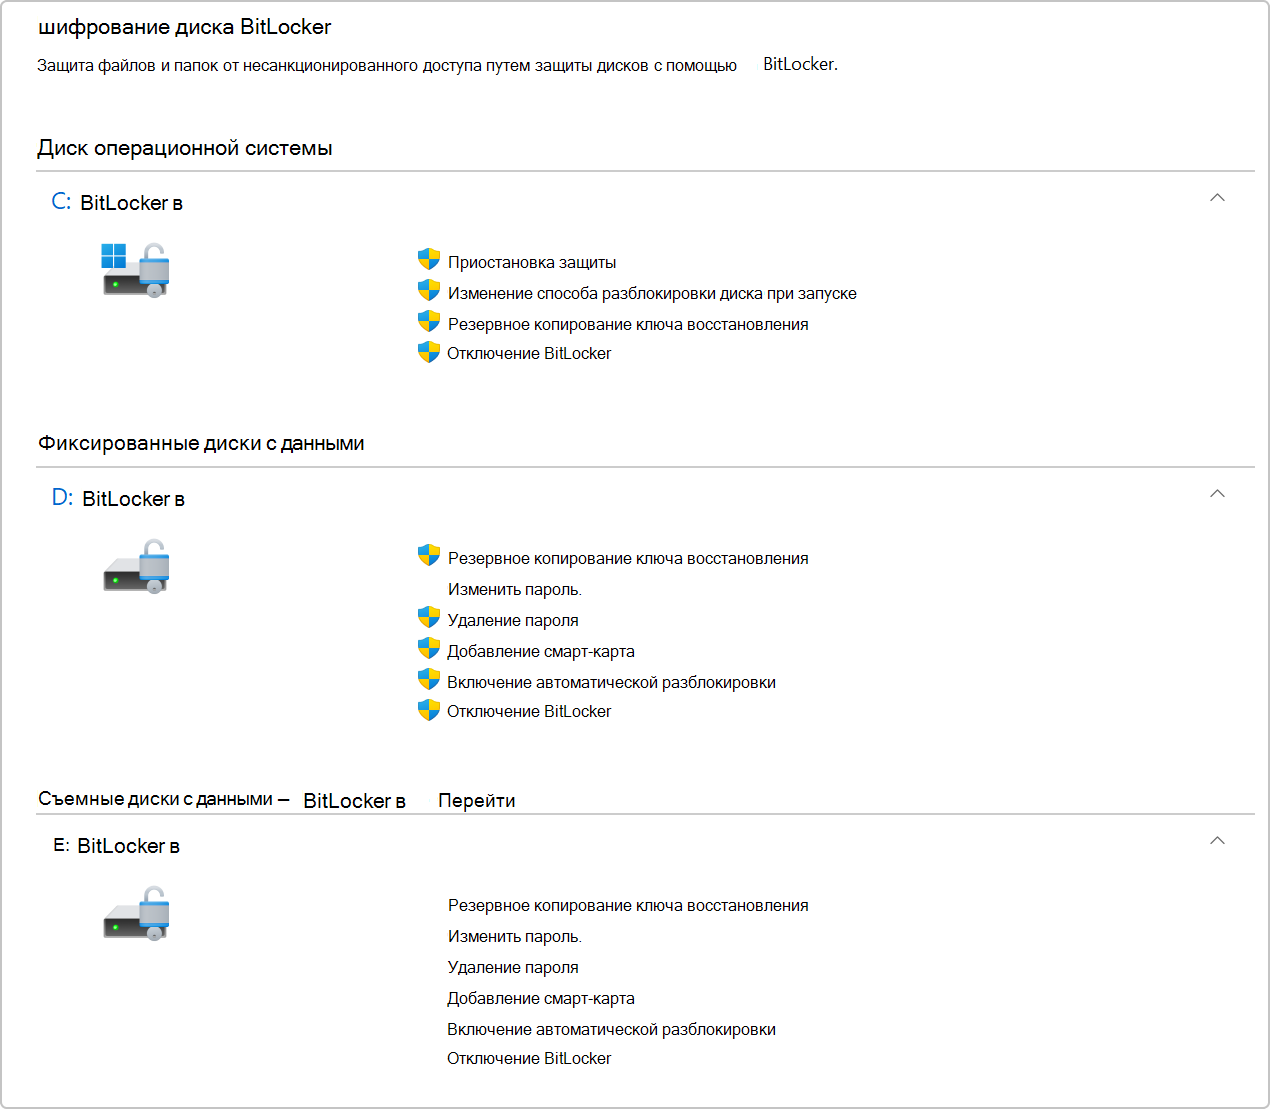
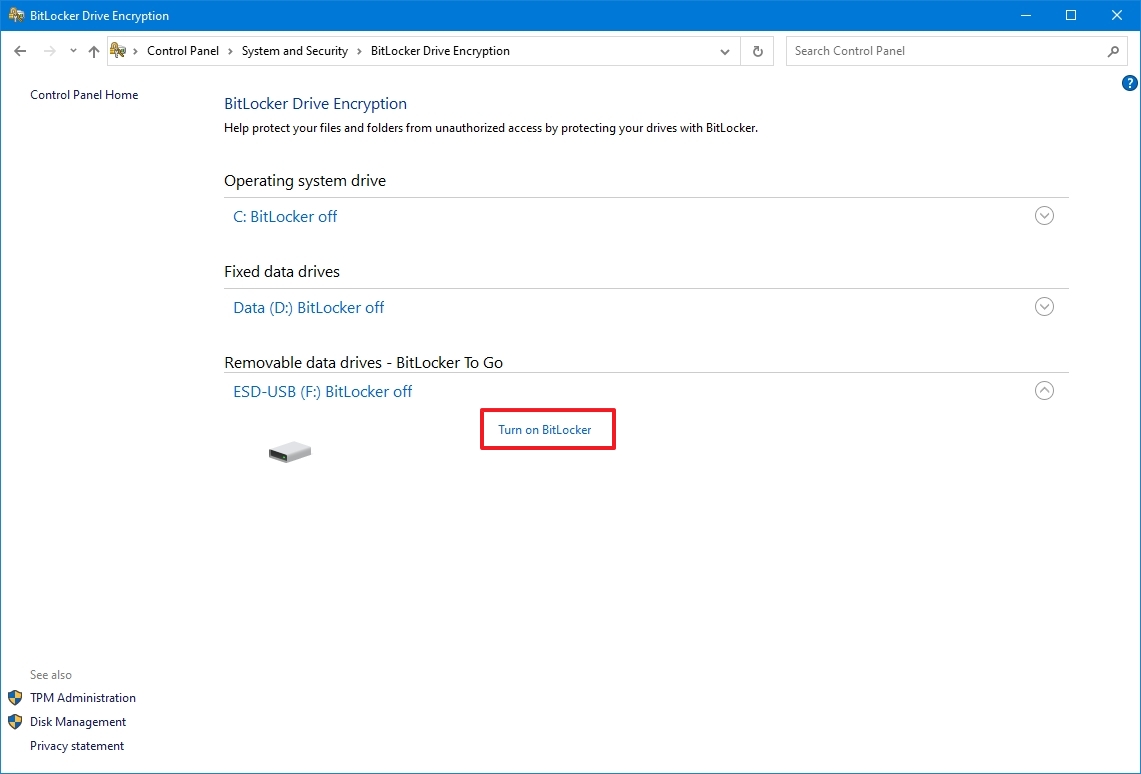
В апплете Шифрования дисков BitLocker перечислены все диски, подключенные к устройству с Windows:
-
Диск операционной системы — это диск, на котором установлена Windows.
-
Дополнительные диски перечислены в разделе Фиксированные диски с данными.
-
Съемные диски, такие как USB-накопители, перечислены в разделе Съемные накопители с данными — BitLocker To Go
Шифрование диска вручную
Чтобы зашифровать диск вручную, выполните приведенные далее действия.
-
Открытие шифрования диска BitLocker
-
Рядом с каждым диском есть список разрешенных операций. Чтобы включить шифрование, выберите параметр Включить BitLocker.
-
Выберите вариант разблокировки и создайте резервную копию ключа восстановления.
-
Диск начнет процесс шифрования. Это может занять некоторое время, но вы можете продолжать использовать устройство во время его выполнения.
Нужна дополнительная помощь?
Нужны дополнительные параметры?
Изучите преимущества подписки, просмотрите учебные курсы, узнайте, как защитить свое устройство и т. д.
,
This tutorial contains detailed instructions on how to lock your entire computer contents on Windows 10 Pro or Enterprise Editions, by using the BitLocker encryption program. By enabling the BitLocker encryption on your computer, you will protect your sensitive data from unauthorized access, in case your computer becomes stolen or lost.

If you lock (encrypt) your Windows PC (operating system drive and it’s contents) with the BitLocker program, will be impossible to others to unlock your computer, because there is no way to bypass the BitLocker protection (Pre-boot authentication) and to access the contents on your computer. *
* Note: The most important preventive measure to protect your personal data, is to always have a backup of them, on a separate device (like on an external USB drive), and to keep this device in a safe place and unplugged from your computer, in order to avoid the damage of your data after a malware attack. To accomplish this task, you can follow the instructions from these articles:
- How to Backup and Restore your Personal Files with Windows Backup.
- How to Backup Personal Files with SyncBack (Free) Backup Utility.
How to Encrypt your Windows PC with BitLocker (Windows 10/11 Pro & Enterprise).
BitLocker System Requirements:
1. Windows 11, 10, 8, 8.1 Pro or Windows 10 Enterprise & Windows 7 Ultimate. *
2. To enhance the BitLocker protection your device must own a Trusted Platform Module (TPM)** 1.2 or higher and Trusted Computing Group (TCG)-compliant BIOS or UEFI. If your device doesn’t have a TPM module then you can buy one (if your motherboard supports it) or you can use BitLocker without TPM by disabling the TPM requirement in Group Policy (see Step-2 for instructions).
Notes:
1. If you don’t own Windows 10 Pro or Enterprise edition, then read the following article to encrypt your Windows computer: How to Encrypt your PC with VeraCrypt in Windows (All Versions)
2. The TPM is a hardware component, commonly installed on modern devices (computers, laptops, etc.) and provides hardware based security through integrated cryptographic keys. In fact, a TPM chip is a crypto-processor which is designed to carry out cryptographic operations and includes multiple physical security mechanisms in order to make it tamper resistant and even a malicious software is unable to tamper with the security functions of the TPM.
How to Enable BitLocker Encryption on Windows 10.
Step 1. Check if your computer has a TPM chip.
First of all, check if you computer contains a TPM module. To do that:
1. Simultaneously press the Windows + R keys to open run command box.
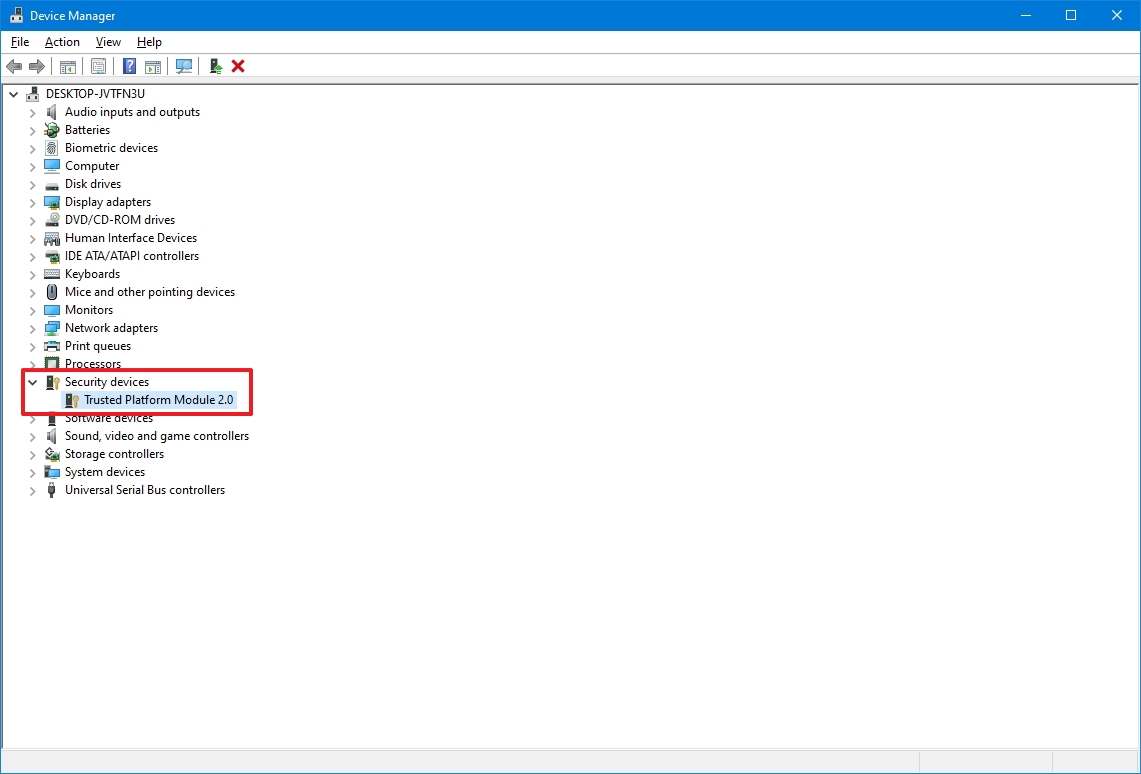
2. Type devmgmt.msc and press Enter.

3. If your computer has a TPM chip, then you should see under Security Devices, a Trusted Platform Module device with it’s version number.

4. If you computer contains a TPM chip, then continue to step-3, otherwise continue to step-2 below.
Step 2. Disable the TPM requirement through Group Policy Editor.
If you computer doesn’t contain a TMP chip, then disable the TPM authentication for BitLocker.
1. Simultaneously press the Windows + R keys to open the run command box.
2. Type gpedit.msc & Press Enter.
3. In Group Policy Editor navigate to the following path:
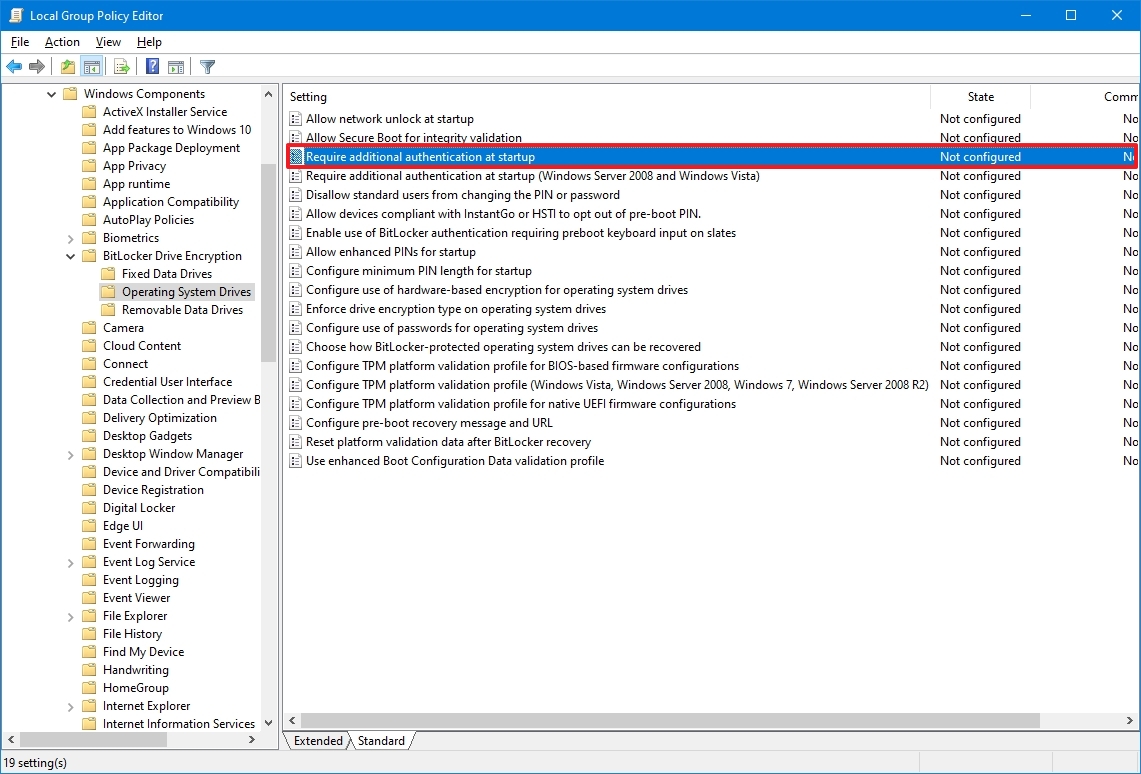
- Computer Configuration -> Administrative Templates -> Windows Components -> BitLocker Drive Encryption -> Operating System Drives
4. At the right pane, double click at Require additional authentication at startup.

5. Choose Enabled, then check the Allow BitLocker without a compatible TPM (requires a password or a startup key on a USB flash drive) option and then click OK.

6. Close Group Policy Editor and continue to the next step.
Step 3. Turn On BitLocker Encryption on Drive C:
To enable the BitLocker protection on your Windows 10/11 PC (on System Drive C: & its contents):
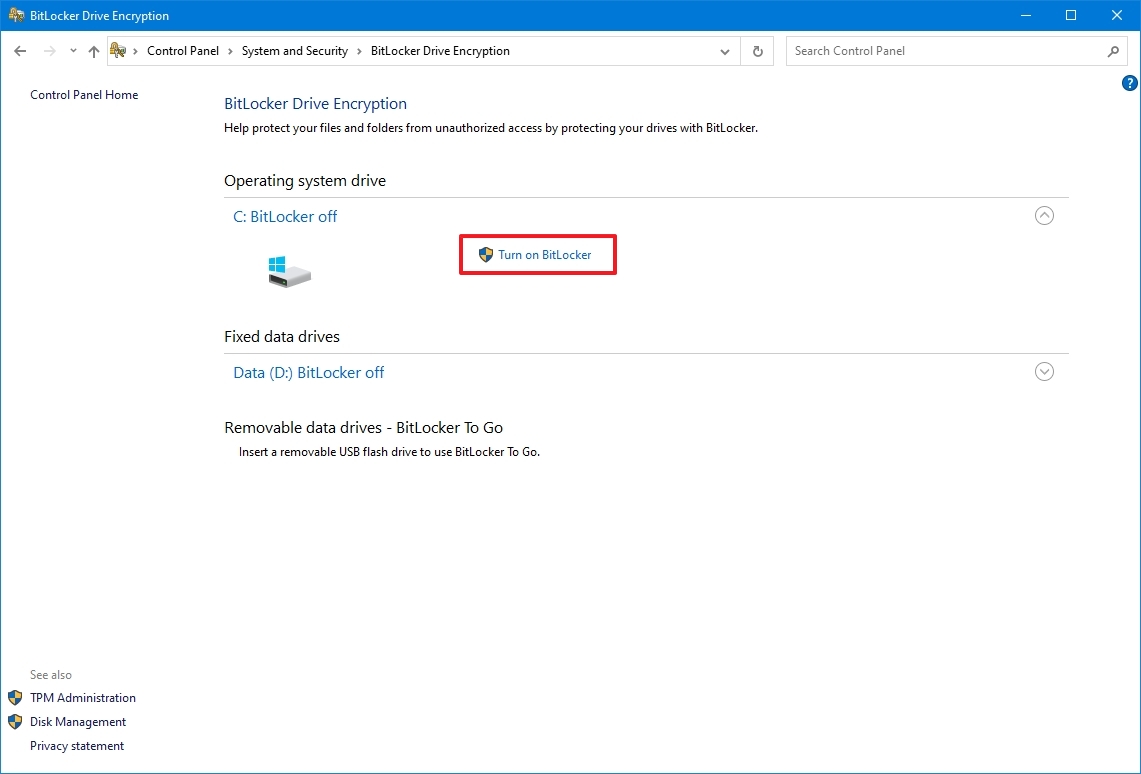
1. Navigate to Windows Control Panel (small icons) and open BitLocker Drive Encryption.

2. Then, click Turn on BitLocker to enable the encryption on the drive C:

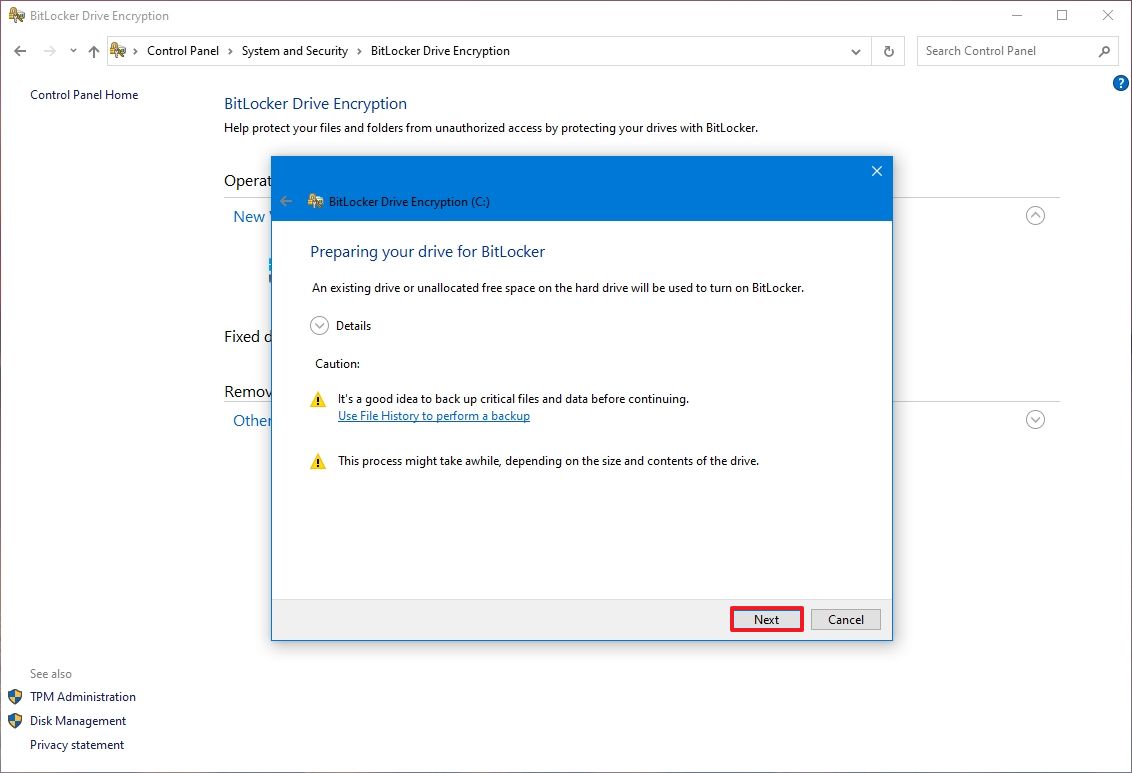
3. Press Next at the first three (3) screens.

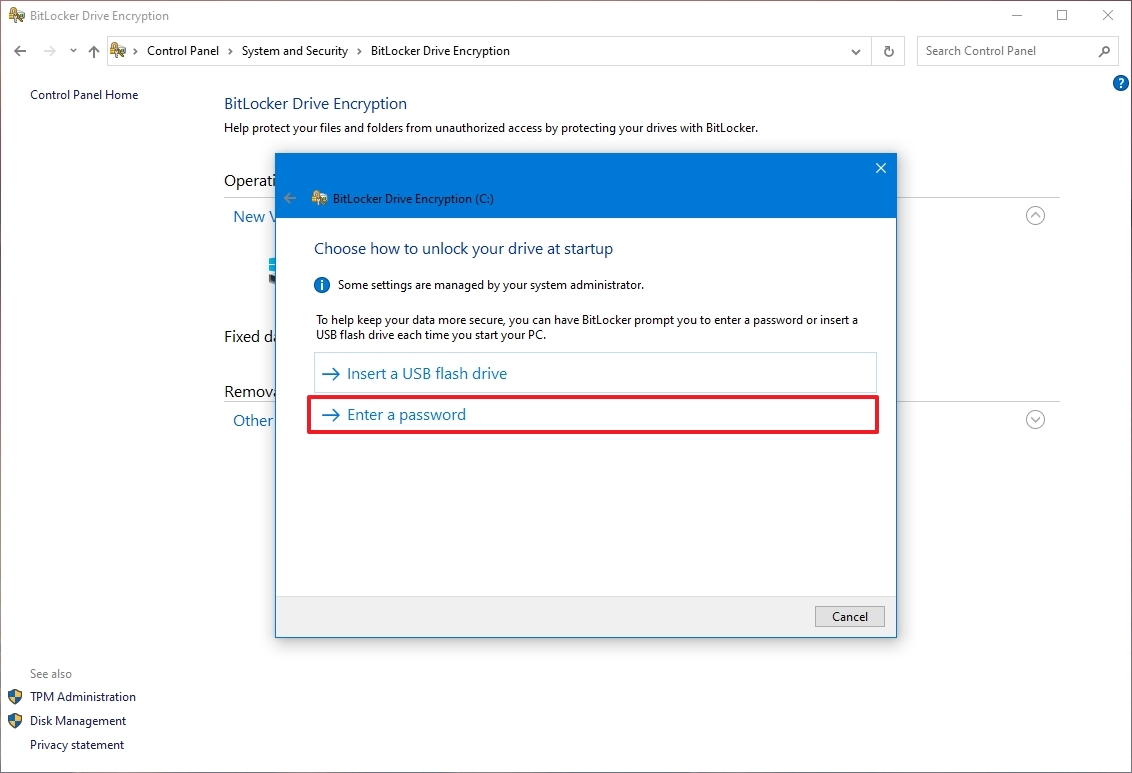
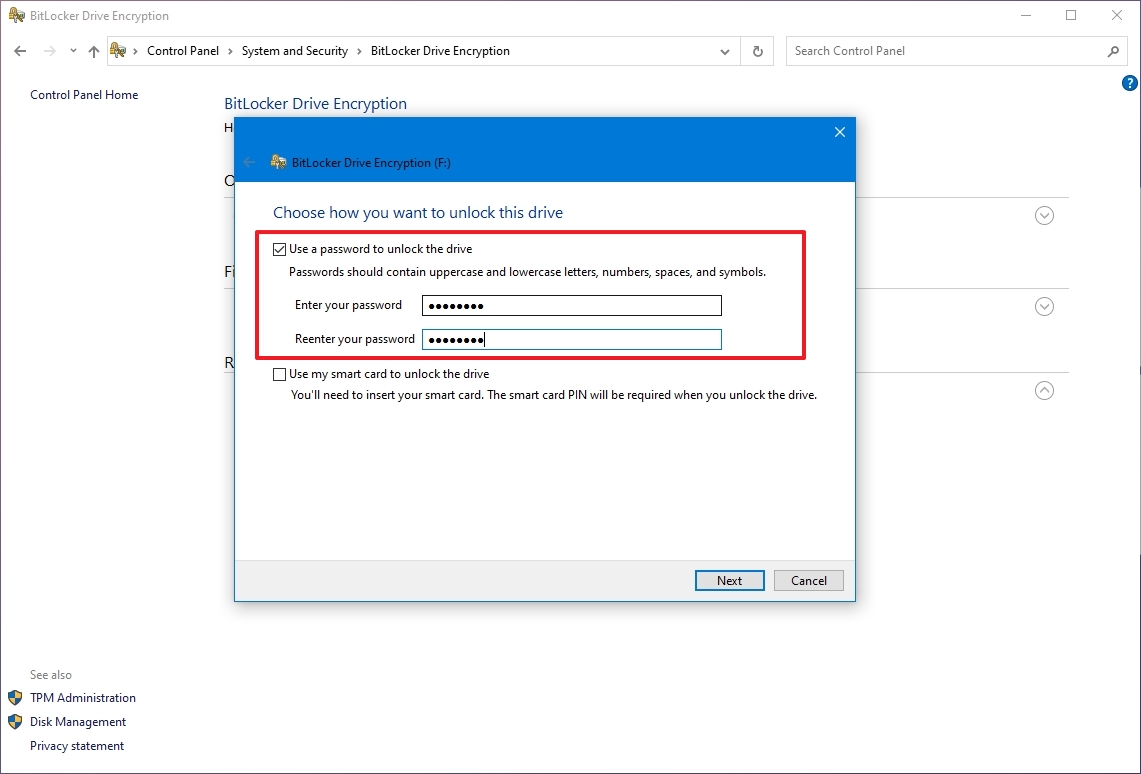
4. At the next screen select how you want to unlock your drive at startup:
- Insert a USB drive: If you want to unlock your computer by using a USB flash drive then plug an empty USB drive on your PC and select this option to continue.
- Enter a password: Click this option if you want to unlock your PC, by typing a password (like in this example).

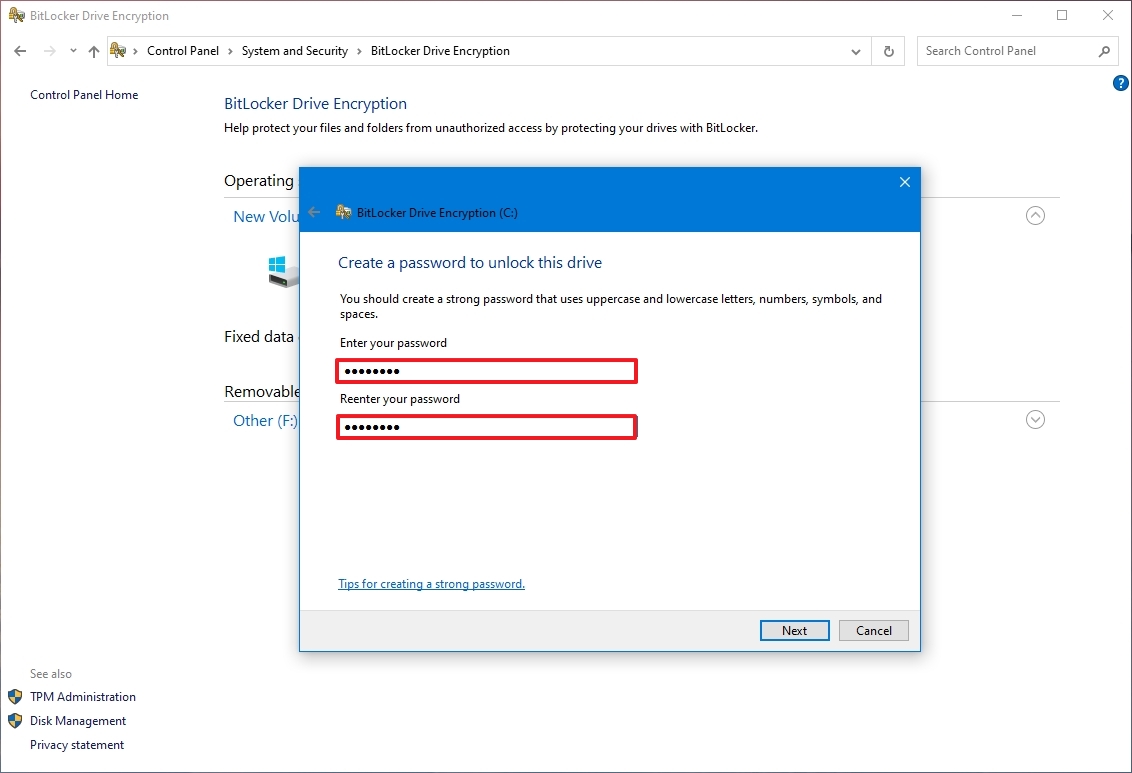
5. Now type a strong password and click Next.

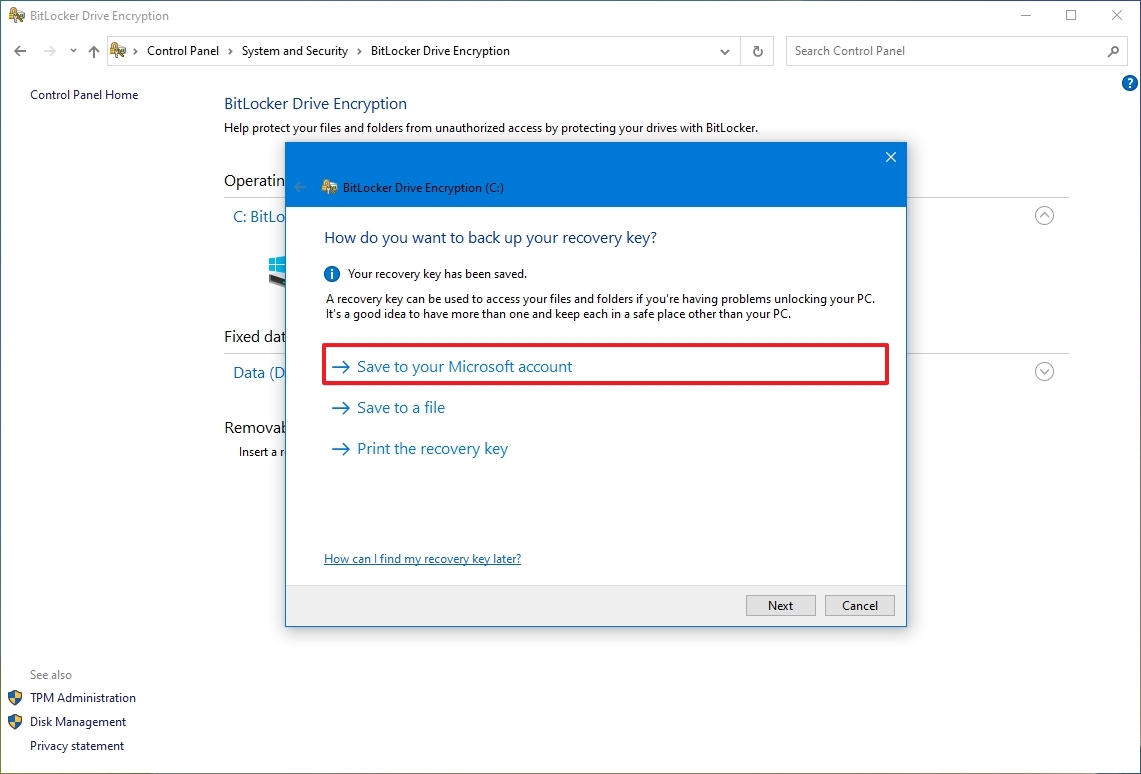
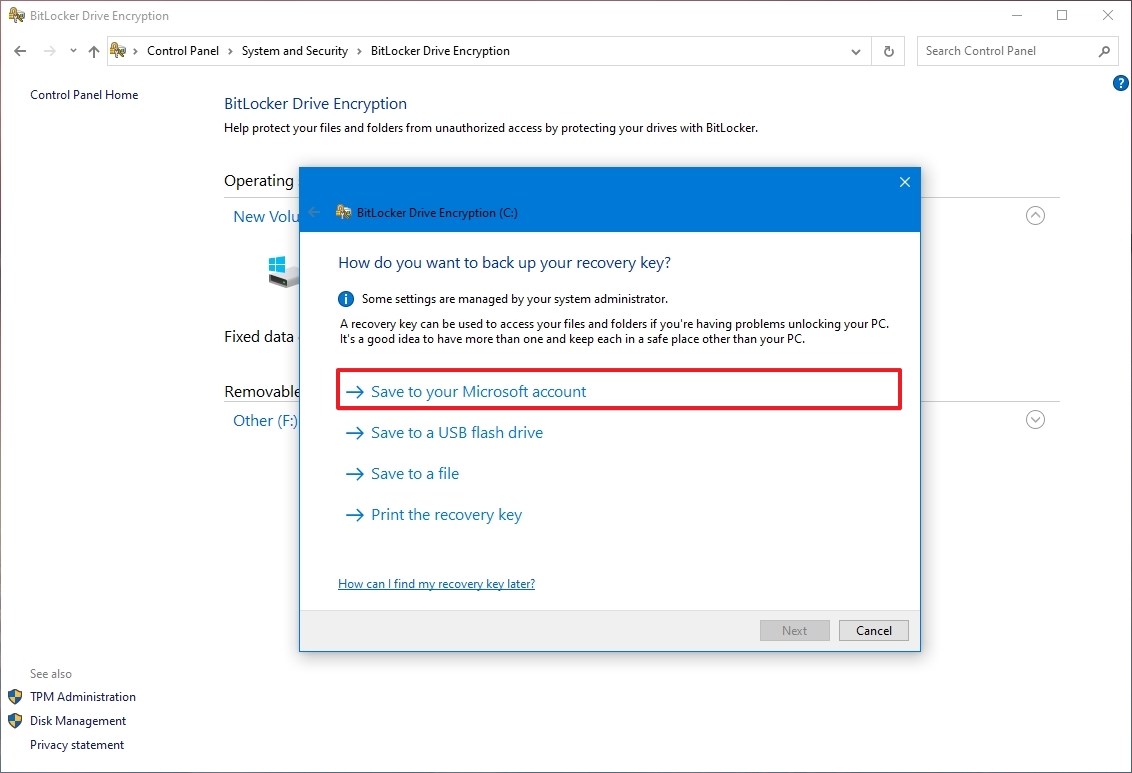
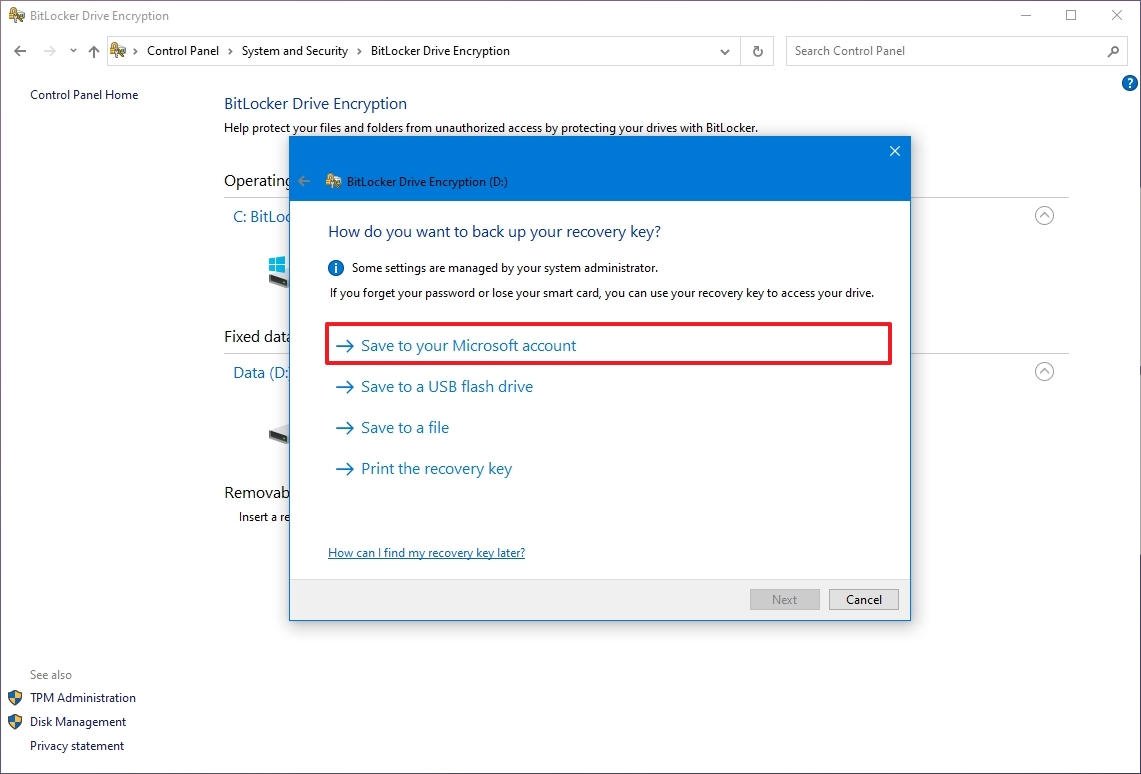
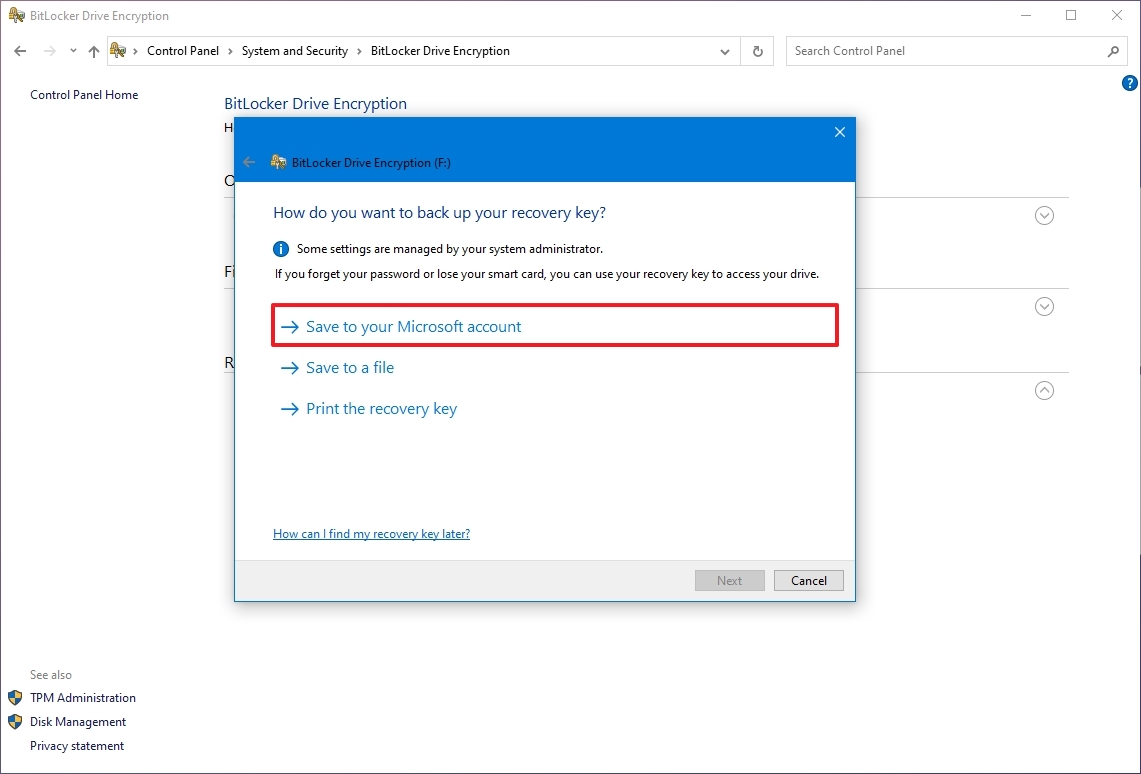
6. At the next screen select where do you want to save the recovery key, in case you have problems unblocking your PC, and then click Next. At this step, you have the following options:
- Save to your Microsoft account: By selecting this option you ‘ll able to get your recovery key after signing with your Microsoft Account at https://onedrive.live.com/recoverykey
- Save to a USB flash drive. If you select this option plug an empty USB drive on the PC and follow the instructions to create the BitLocker recovery drive. If you having problems unlocking the computer (in the future), then plug the USB flash drive in to your locked PC and follow the instructions to unlock it.
- Save to a file: If you want to save the recovery key to a file, then plug a USB drive on the PC and then save the recovery key on the USB. If you can’t unlock your PC in the future, then read the saved text file from another computer in order to find out the recovery key to unlock your computer.
- Print the recovery key and save the printed document to a safe place.

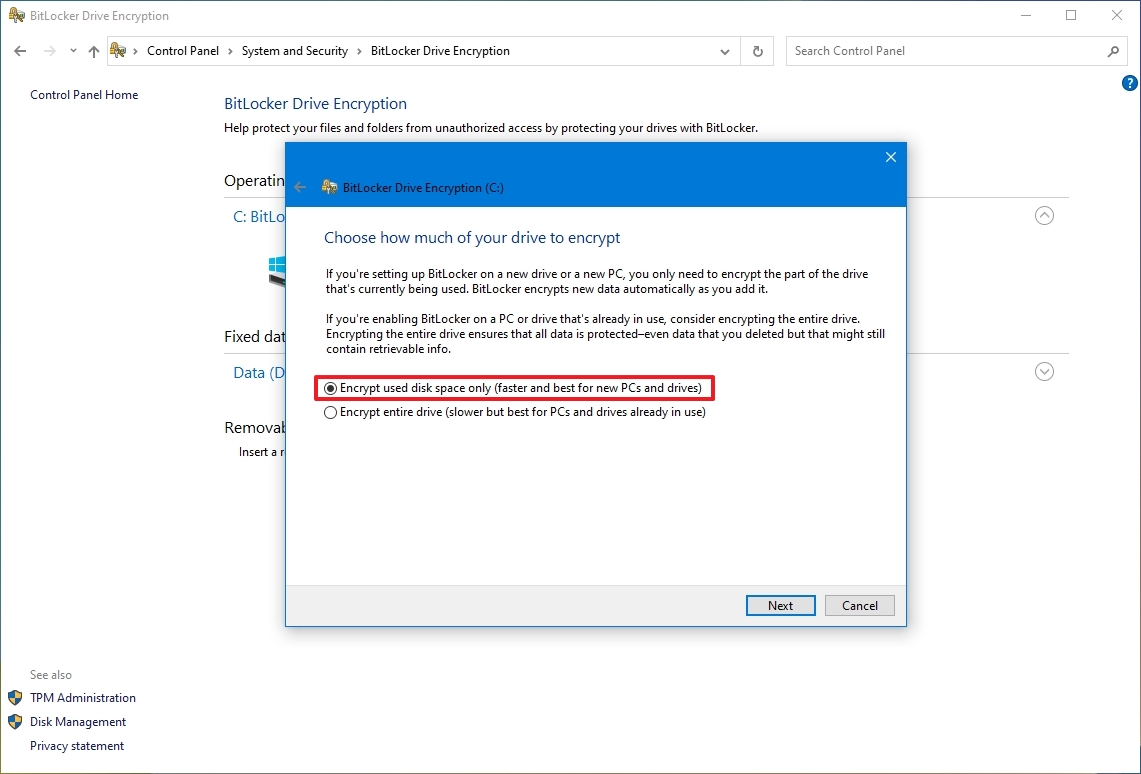
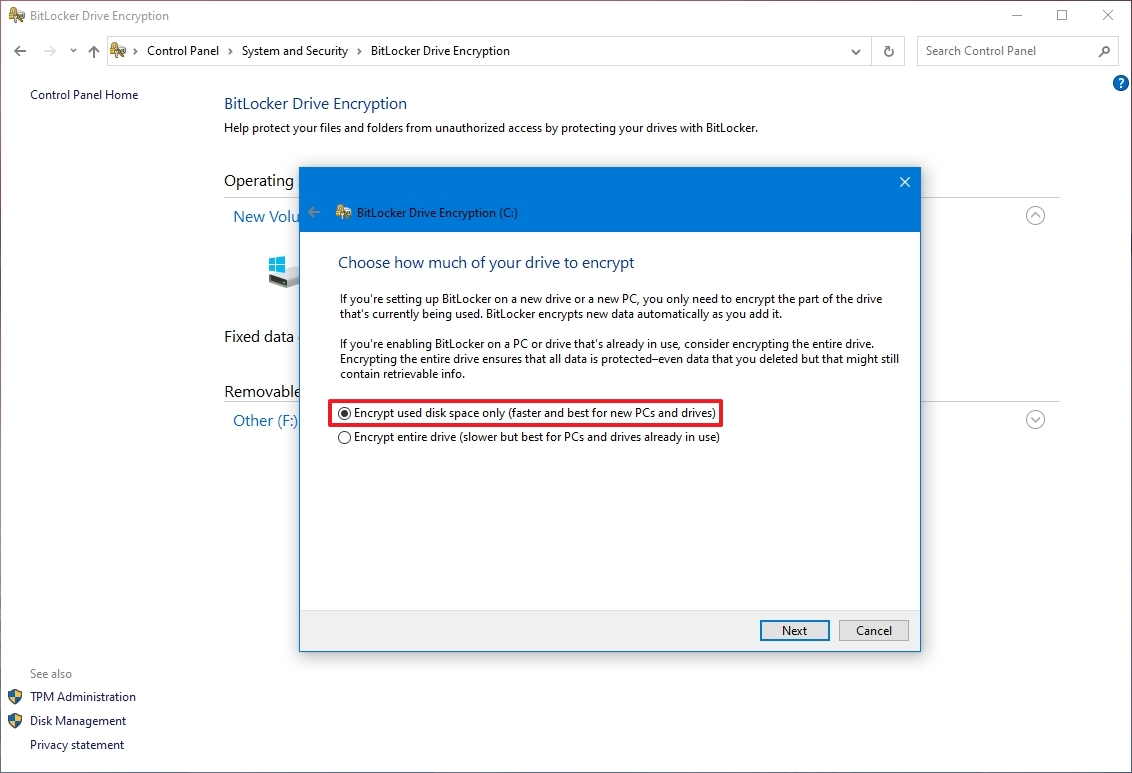
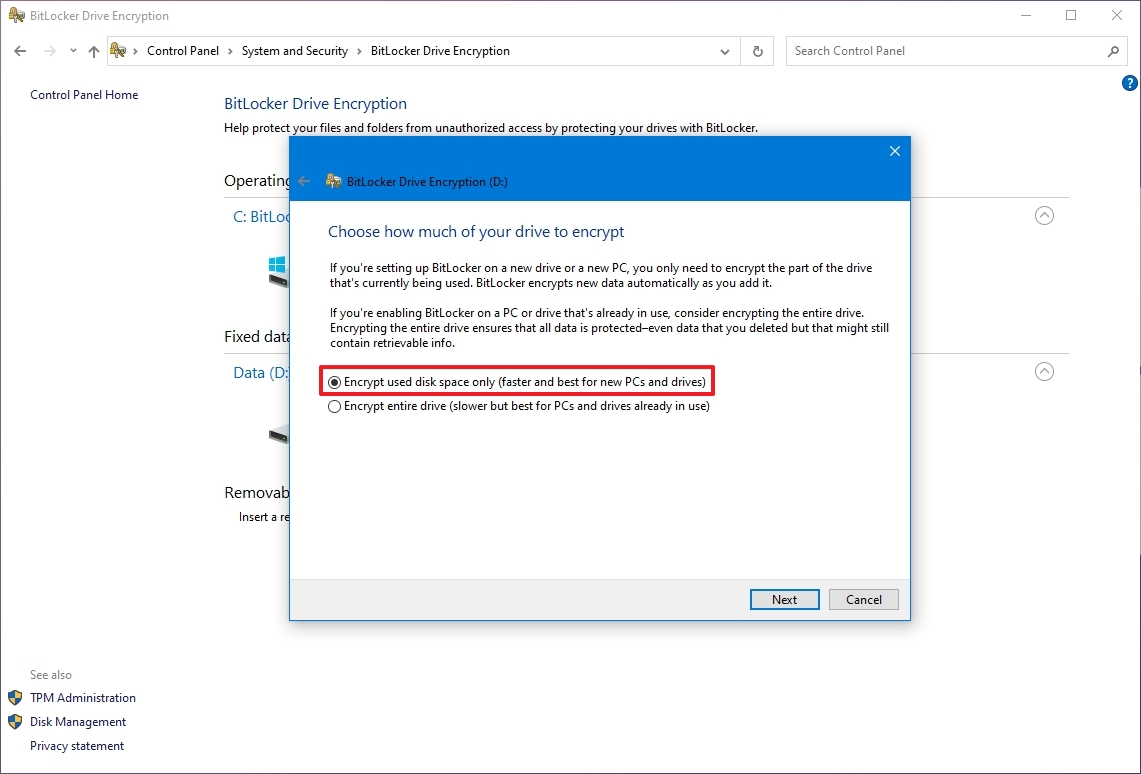
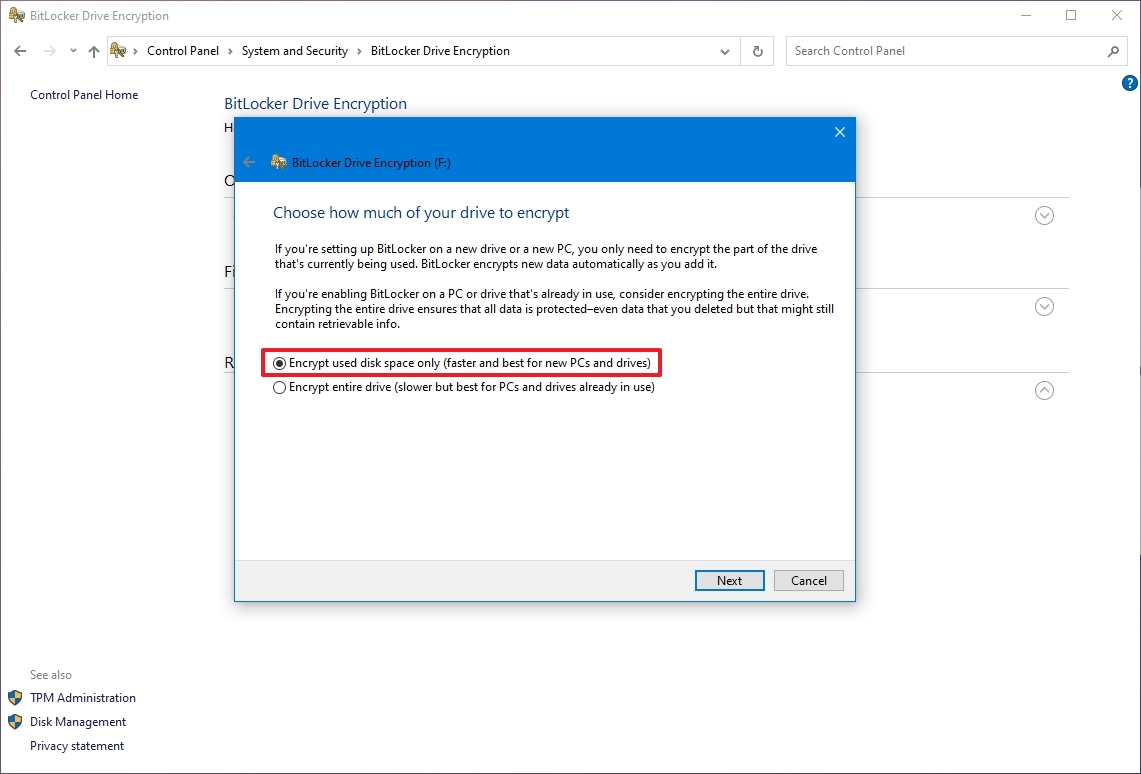
7. Now, according your case, select one of the following encryption options and click Next.
- Encrypt used disk space only (faster and best for new PCs and drives)
- Encrypt entire drive (slower but best for PCs and drives already in use)

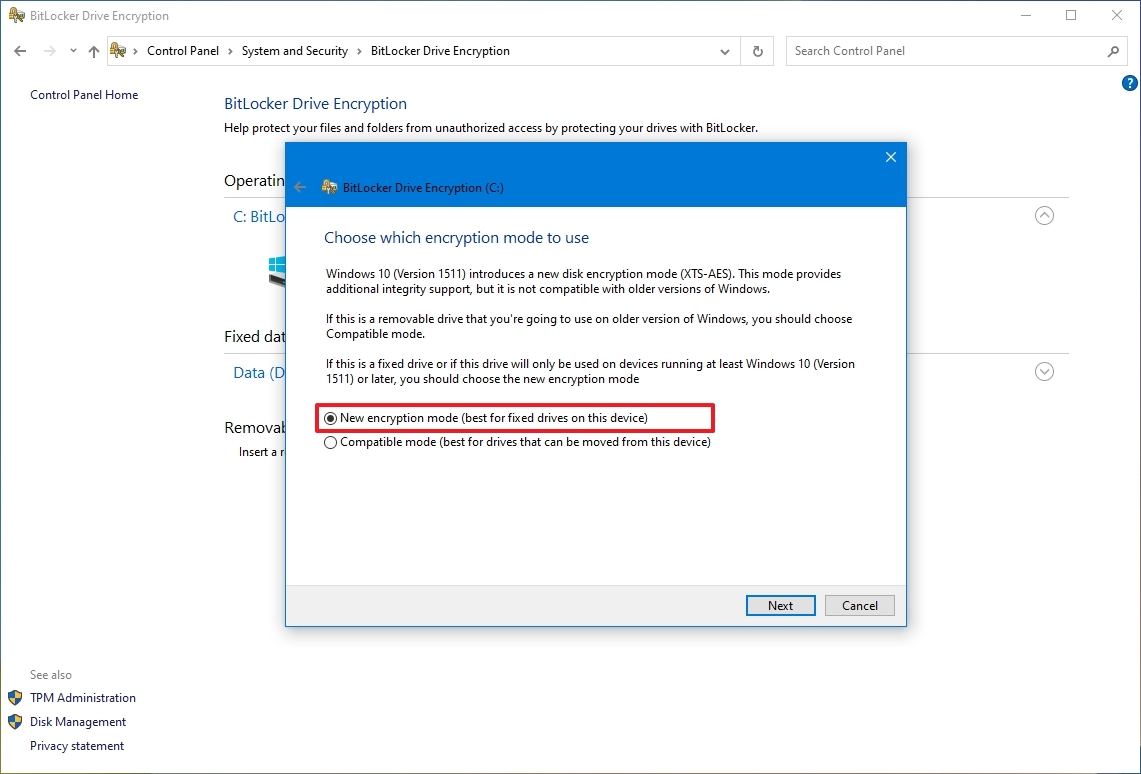
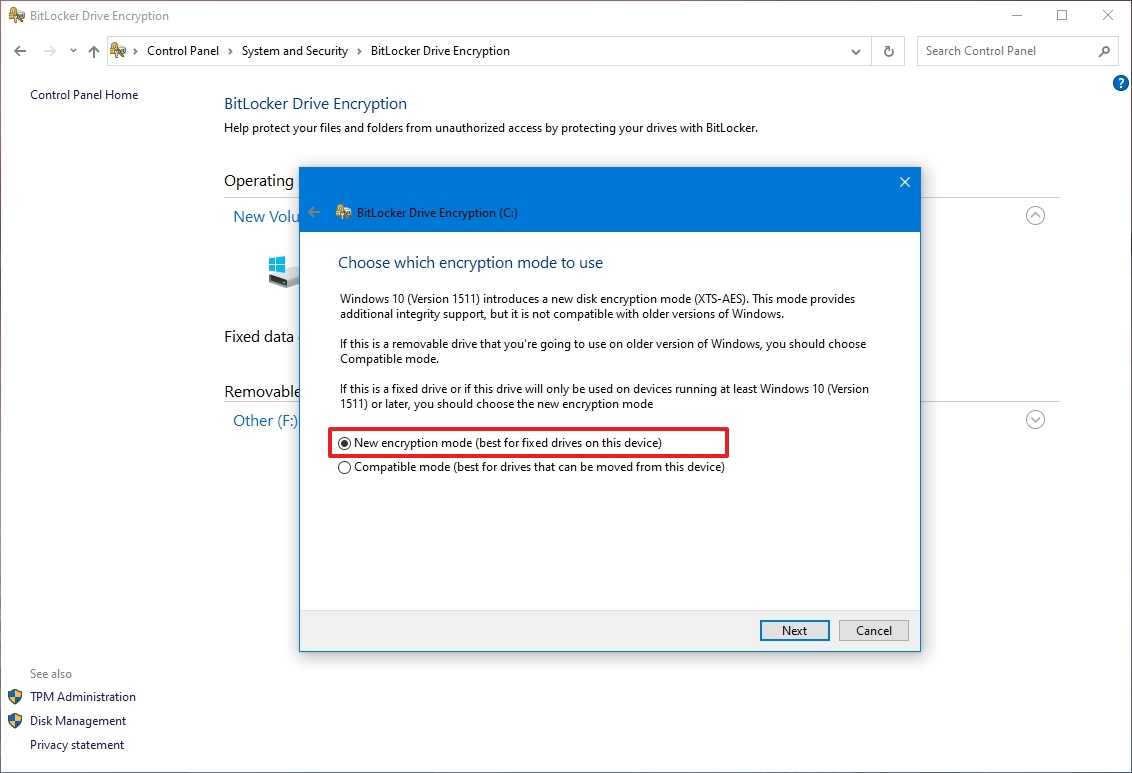
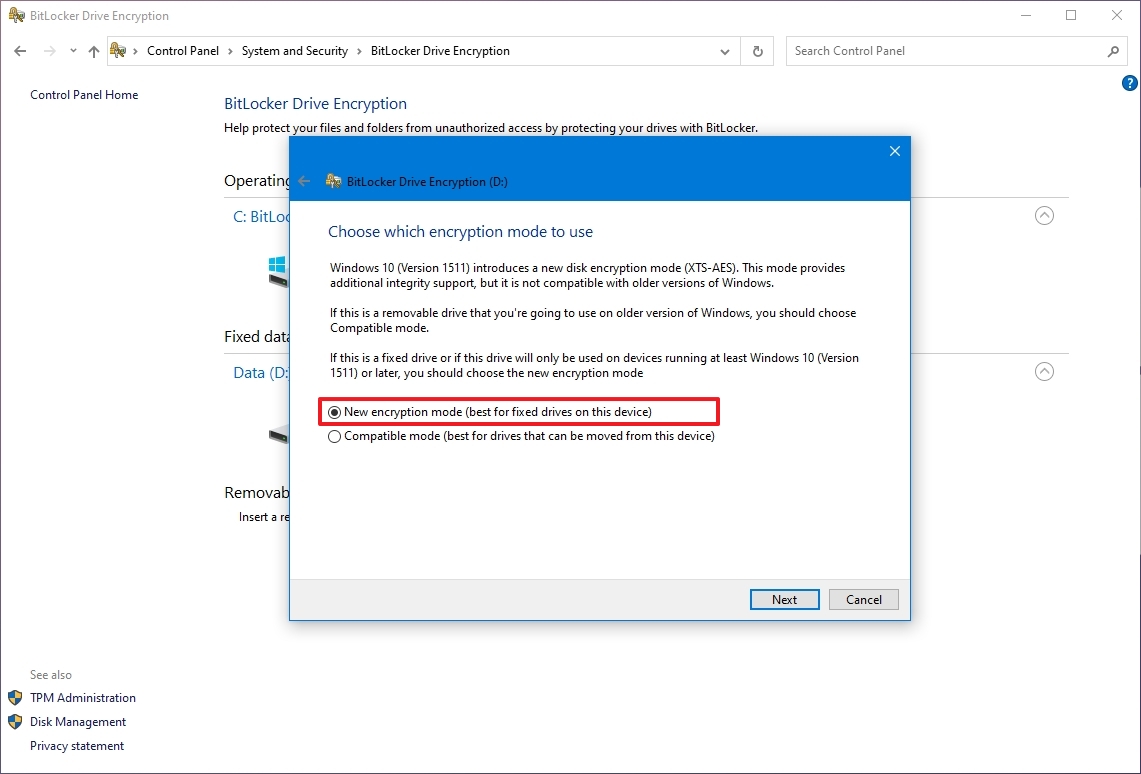
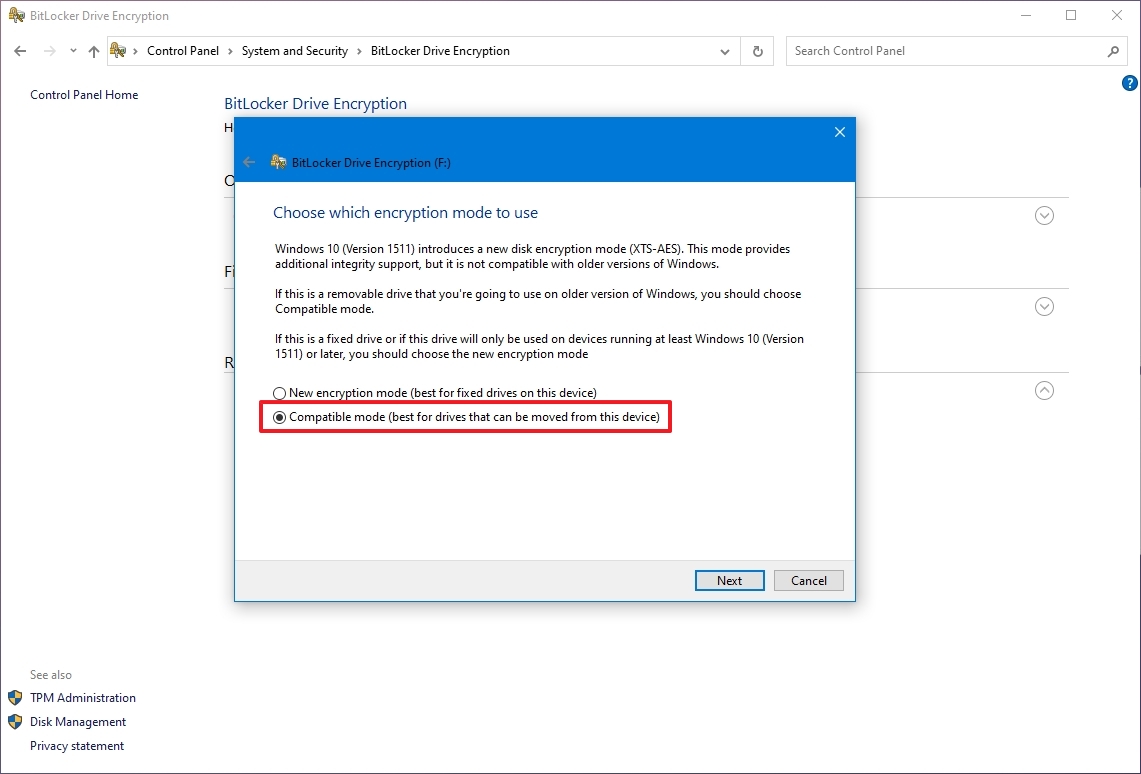
8. Then select the encryption mode according your needs and click Next.
- New encryption mode (best for fixed drives on this device)
- Compatible mode (best for drives that can be moved from this device)

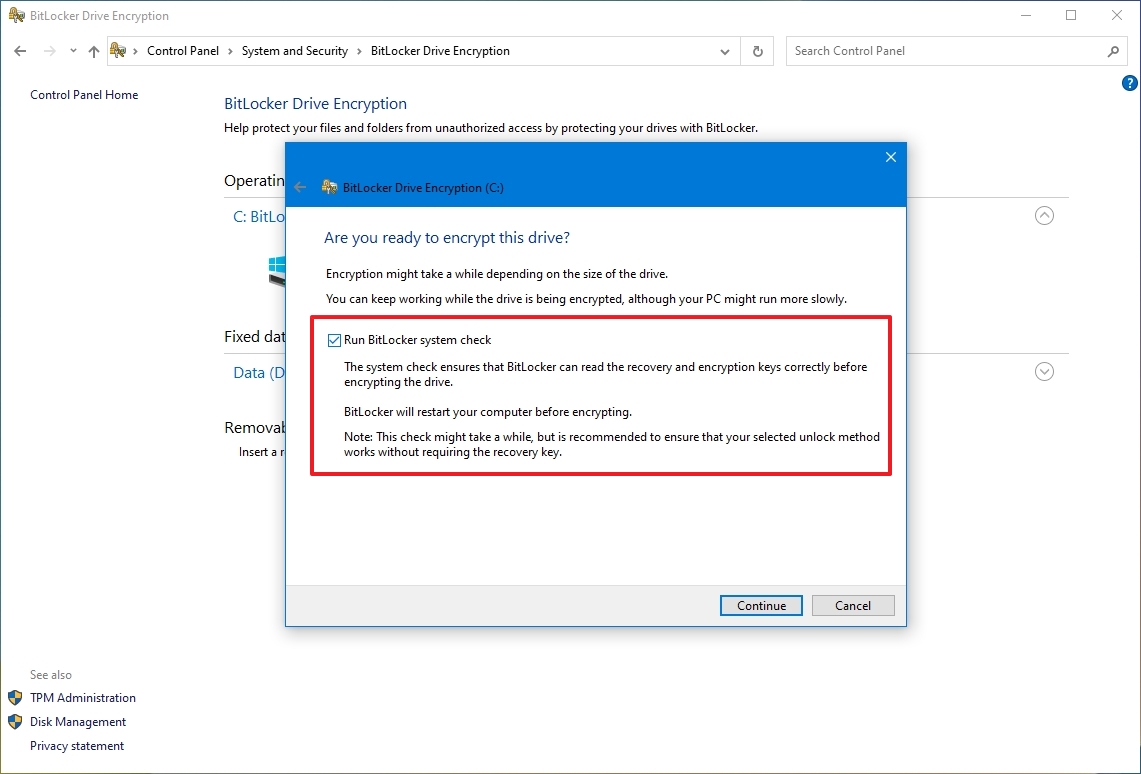
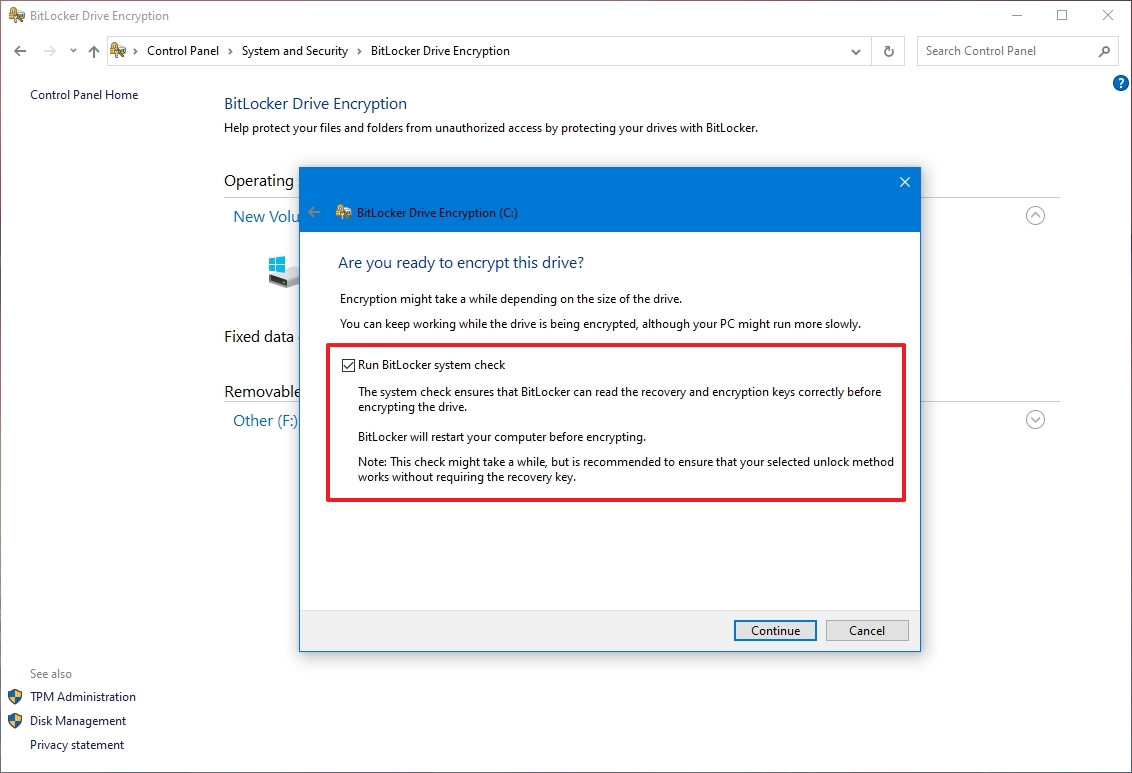
9. Leave the Run BitLocker system check option checked and click Continue.

10. Finally restart your PC to run the BitLocker system check.
11. At restart, type the BitLocker password to unlock the drive and press Enter to continue. *
* Note: If you forget the password then press ESC to access the BitLocker recovery options.

12. After restart double click at the BitLocker Drive Encryption icon in the taskbar or go to Control Panel > BitLocker Drive Encryption, to see the encryption status. *
* Notes:
1. The encryption time varies according the encryption method you selected before and the size of the hard drive.
2. You can work at your computer during the encryption process.

Available Options in BitLocker Drive Encryption program.
After enabling the BitLocker Drive Encryption on your PC, you can:
- Suspend Protection: Use this option if you want to pause the protection on your system in cases that you want to upgrade Windows 10 or to change the hardware on your PC.
- Change Password: Use this option if you want to change the password to Unlock your PC. (BitLocker password)
- Remove Password: Use this option if you want to use another method to unlock your PC. (e.g. instead of using a password, you want to use a flash drive).
- Turn Off Blocker Protection: By selecting this option, you will remove the BitLocker protection (encryption).
Additionally from BitLocker’s menu, you can turn on the encryption for any other fixed drive on your PC or you can use the BitLocker to Go option to encrypt any Removable Drive (e.g. you USB flash Disk).

That’s it! Let me know if this guide has helped you by leaving your comment about your experience. Please like and share this guide to help others.
If this article was useful for you, please consider supporting us by making a donation. Even $1 can a make a huge difference for us in our effort to continue to help others while keeping this site free:
- Author
- Recent Posts
Konstantinos is the founder and administrator of Wintips.org. Since 1995 he works and provides IT support as a computer and network expert to individuals and large companies. He is specialized in solving problems related to Windows or other Microsoft products (Windows Server, Office, Microsoft 365, etc.).
Windows 10 редакций Профессиональная и Корпоративная имеют встроенную утилиту BitLocker, позволяющую надежно зашифровать содержимое диска (в том числе системного) или внешнего накопителя (об этом в отдельной инструкции: Как поставить пароль на флешку и зашифровать её содержимое). Конечно, для этого можно использовать и сторонние средства, например, VeraCrypt, но в большинстве случаев можно рекомендовать встроенную утилиту шифрования.
В этой инструкции о том, как зашифровать диск с помощью BitLocker. Пример приводится для системного раздела диска, но суть остается неизменной и при необходимости шифрования других дисков. Вы также можете создать виртуальный жесткий диск и зашифровать его — таким образом вы получите защищенный файловый контейнер с возможностью его резервного копирования в облаке и на различных накопителях, переноса на другие компьютеры. Также может быть интересным: Шифрование BitLocker в Windows 10 Домашняя.
Процесс шифрования SSD или жесткого диска с помощью BitLocker
Процедура шифрования дисков с помощью BitLocker — не слишком сложная задача, потребуется выполнить следующие простые шаги:
- В проводнике выберите диск, который требуется зашифровать, нажмите по нему правой кнопкой мыши и выберите пункт «Включить BitLocker».

- Если вы увидите сообщение о том, что «Это устройство не может использовать доверенный платформенный модуль TPM», значит вы хотите зашифровать системный диск, а модуль TPM на компьютере отсутствует или отключен. Проблема решаема, об этом здесь: Как включить BitLocker без TPM.
- После короткой проверки дисков вы увидите предложение настроить тип разблокировки: вставить USB-устройство флэш-памяти (обычную флешку) или ввести пароль. Я в своей практике использую пункт «Введите пароль». Предложение с вводом пароля может не появиться, в этом случае обратите внимание на инструкцию Как включить пароль BitLocker на ноутбуках и компьютерах с TPM.

- Если вы также будете использовать разблокировку с помощью пароля, введите и подтвердите ваш пароль. Настоятельно рекомендую записать его, если есть вероятность забыть заданный пароль (в противном случае вы можете полностью потерять доступ к данным). Нажмите «Далее».
- Вам будет предложено сохранить ключ для восстановления доступа к диску, зашифрованному BitLocker. Вы можете сохранить ключ в различные расположения на своё усмотрение. Вне зависимости от того, какой вариант вы выберите, настоятельно рекомендую серьезно отнестись к этому шагу (и не сохранять ключ на тот же диск, который шифруется): сбои питания, ошибки файловой системы могут приводить к проблемам с доступом к зашифрованному диску просто по паролю и ключ восстановления действительно помогает получить доступ к данным. Я лично на своем основном компьютере столкнулся с таким дважды за последние 5 лет и был очень благодарен сам себе за то, что у меня есть ключ восстановления — оба раза он помог.
- Следующий этап — выбор, какую часть диска шифровать. Для большинства пользователей подойдет вариант «Шифровать только занятое место на диске» (в этом случае будут зашифрованы все файлы, которые уже есть на диске и автоматически будет шифроваться всё, что в дальнейшем на него записывается). Второй вариант шифрует и свободное пространство. Что это дает? Например, если у вас на этом диске ранее были очень секретные данные, а потом они были удалены, есть вероятность их восстановления с помощью соответствующих программ для восстановления данных. После шифрования свободного пространства восстановить удаленные данные не получится (во всяком случае без разблокировки доступа к диску).
- В последних версиях Windows 10 вам также предложат выбрать режим шифрования. Если вы планируете отключать диск и подключать его в других версиях Windows 10 и 8.1, выберите режим совместимости. Иначе можно оставить «Новый режим шифрования».
- В следующем окне оставьте включенным пункт «Запустить проверку BitLocker» и нажмите «Продолжить».
- Вы увидите уведомление о том, что шифрование диска будет выполнено после перезагрузки компьютера. Выполните перезагрузку.
- В случае, если вы шифровали системный диск, то перед запуском Windows 10 вам нужно будет ввести заданный пароль BitLocker для разблокировки диска (или подключить USB-накопитель, если ключ создавался на нем).

- После запуска Windows 10 будет выполнено шифрование накопителя в соответствии с заданными настройками (в области уведомлений появится соответствующий значок, а при его открытии — окно с прогрессом шифрования). Вы можете пользоваться компьютером пока идет шифрование пространства на диске.
- Если шифровался системный диск, то он сразу будет вам доступен (поскольку пароль был введен на предыдущем шаге). Если шифровался не системный раздел диска или внешний накопитель, при открытии этого диска в проводнике вас попросят ввести пароль для доступа к данным.
- По завершении процесса, продолжительность которого зависит от занятого места на диске и скорости его работы (на HDD медленнее, на SSD быстрее), вы получите зашифрованный диск.


Все данные, которые вы будете на него записывать, шифруются «на лету» и так же расшифровываются. Для не системных дисков вы в любой момент можете использовать контекстное меню для его блокировки (чтобы другой человек за этим же компьютером не мог открыть его содержимого).
Доступ к зашифрованному системному диску есть всегда, пока запущена система (иначе бы она не смогла работать).
Если остались какие-либо вопросы на тему шифрования с помощью BitLocker — спрашивайте в комментариях, я постараюсь ответить.
(Image credit: Future)
On Windows 10, if you keep sensitive files on your device, it is crucial to take the necessary steps to protect them, and this is when BitLocker comes in handy. BitLocker is a feature that has been around for a long time and provides a way to encrypt data on the hard drive to prevent unauthorized access.
In a nutshell, encryption is the process of making any data unreadable without proper authorization. When you use encryption to scramble your data, it will continue to be unreadable even when sharing it with others. Only you, with the correct encryption key, can decrypt the data to make it usable.
If you’ve never used BitLocker, the feature offers two methods of encryption: hardware-based encryption using a Trusted Platform Module (TPM) chip and software-based encryption using a password or USB flash drive to decrypt the drive and continue booting. Also, the feature protects the data on the installation drive, secondary storage, and removable media with «BitLocker To Go.»
This guide will walk you through setting up BitLocker on a computer to protect your sensitive files on Windows 10.
Before getting started with BitLocker
Here are a few details you need to know before using these instructions:
- BitLocker Drive Encryption is available on Windows 10 Pro and Enterprise. Windows 10 Home edition has its version of BitLocker on select devices. You can use these steps to set it up.
- A Trusted Platform Module (TPM) chip is needed for the best result. This is a special chip that enables the device to support advanced security features.
- BitLocker is available without TPM using software-based encryption, but it requires some extra steps for additional authentication.
- Computer firmware must support TPM or USB devices during startup. If the feature isn’t available, check the computer manufacturer for the Basic Input Output System (BIOS) or Unified Extensible Firmware Interface (UEFI) update.
- The computer’s hard drive must have two partitions, including a system partition with the necessary files to start the system and a partition with the Windows 10 installation. If the device does not meet the requirements, BitLocker will create them automatically. Also, the hard drive partitions must be formatted with the NTFS file system.
- The encryption process is not complicated, but it can take a lot of time, depending on the drive’s amount of data and size.
- Keep the computer connected with an uninterrupted power supply (UPS) throughout the process.
Although BitLocker does a good job securing your data, any system change carries risks. Before proceeding with this guide, you should create a complete computer backup.
How to check if device has TPM support to use BitLocker
To check if a computer has TPM on Windows 10, use these steps:
All the latest news, reviews, and guides for Windows and Xbox diehards.
- Open Start.
- Search for Device Manager and click the top result to open the app.
- Expand the Security devices branch.
- Confirm the item that reads «Trusted Platform Module» with the version number.
Quick note: The TPM version must be version 1.2 or later to support BitLocker.
Alternatively, you can check your manufacturer’s support website for details on whether the device includes the security hardware and the instructions to enable the security feature.
If you have a Surface device, it likely includes a Trusted Platform Module with support for BitLocker encryption.
How to enable (hardware) BitLocker on system drive
To enable BitLocker on a device with TPM, use these steps:
- Open Start.
- Search for Control Panel and click the top result to open the app.
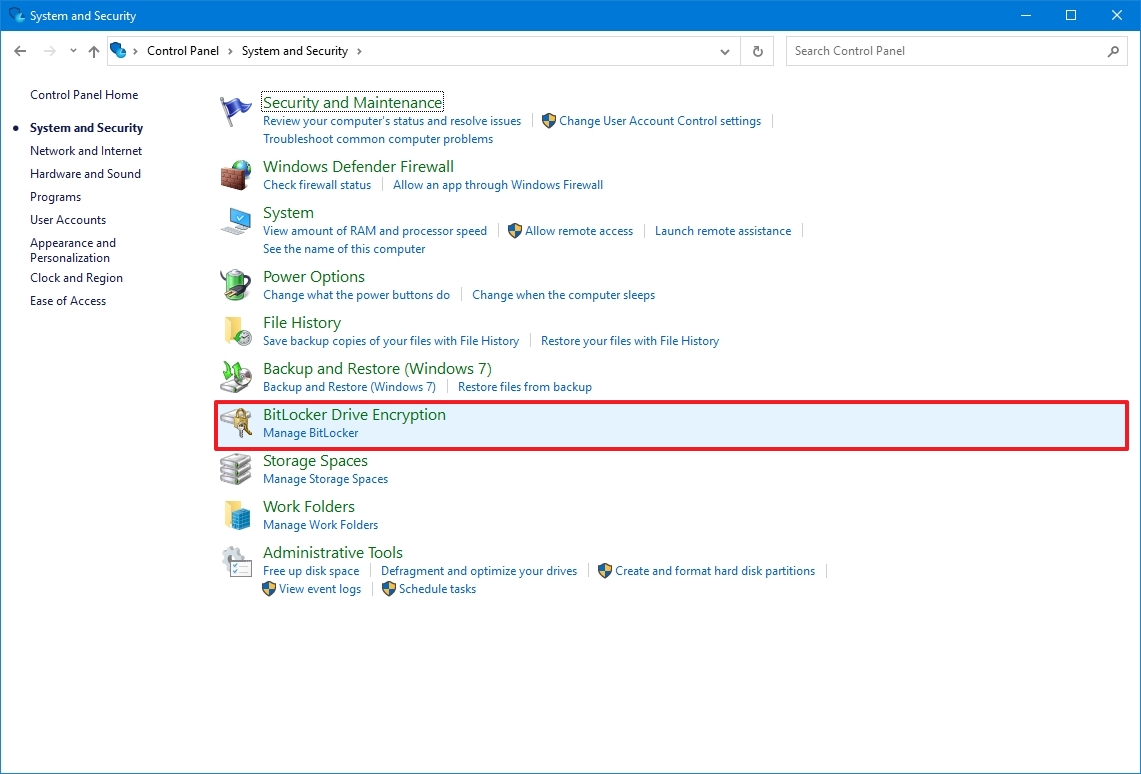
- Click on System and Security.
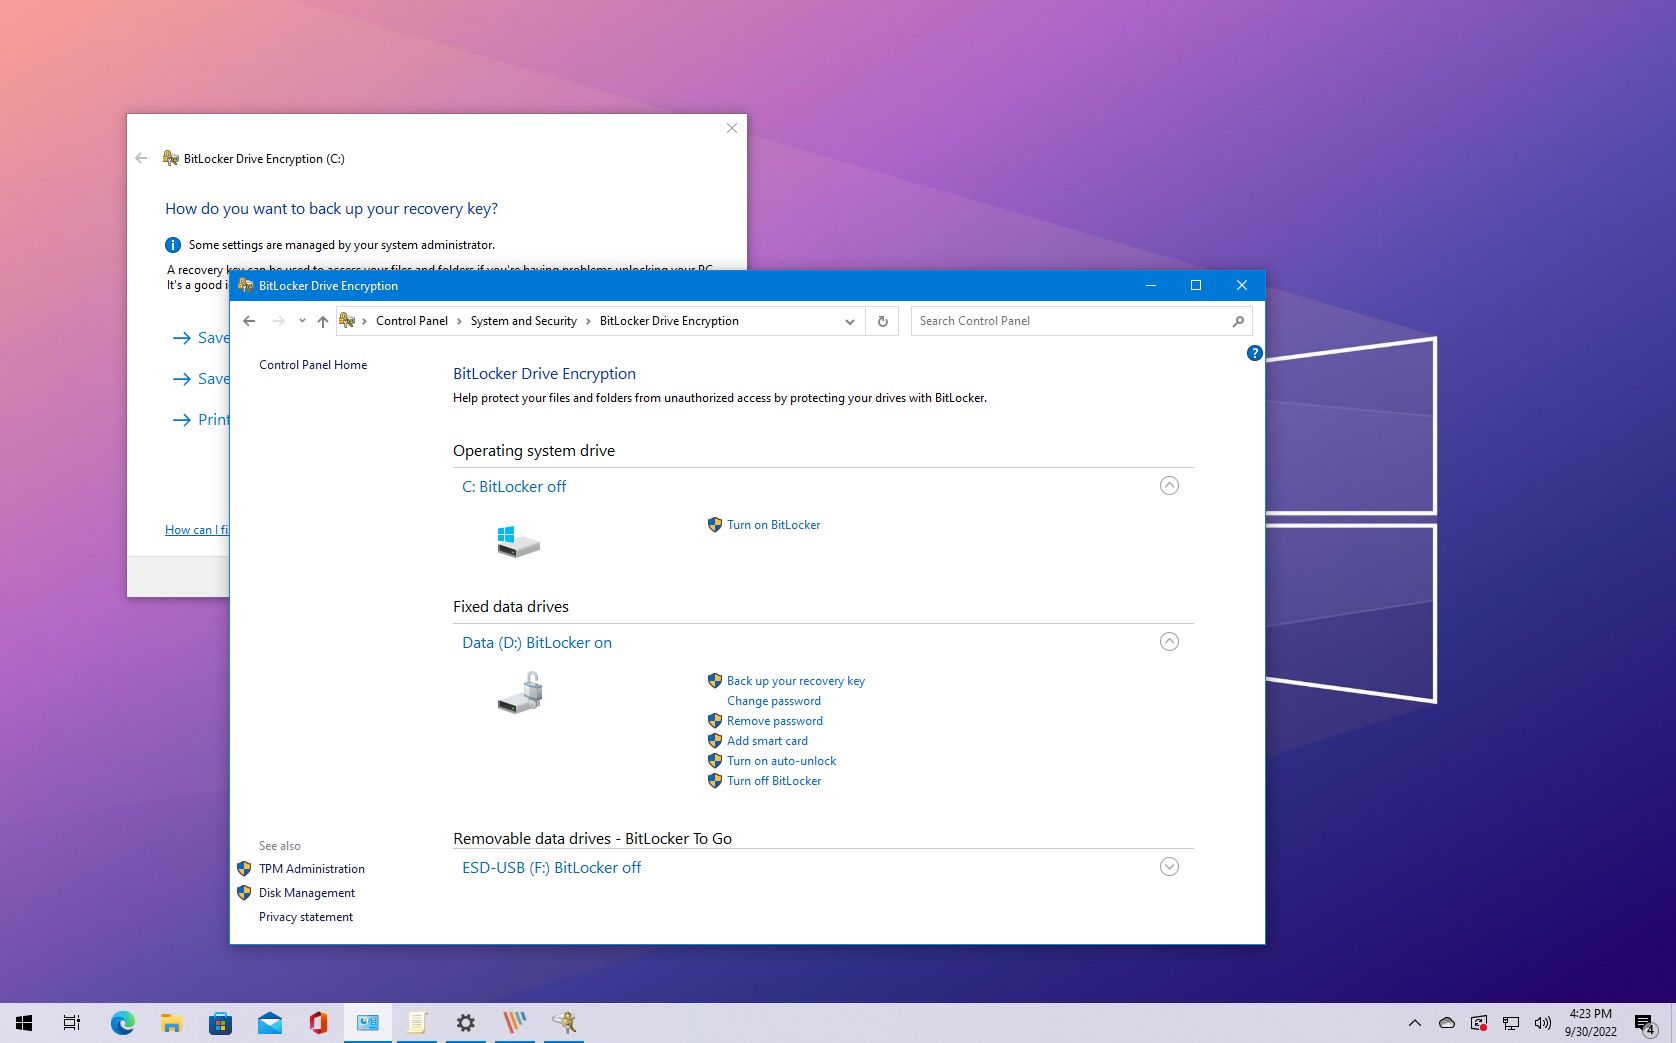
- Click on «BitLocker Drive Encryption.»
- Under the «Operating system drive» section, click the «Turn on BitLocker» option.
- Select the option to save the recovery key:
- Save to your Microsoft account.
- Save to a file.
- Print the recovery.
- Quick tip: If you trust the cloud, save your recovery key in your Microsoft account using the Save to your Microsoft account option. You can always retrieve the encryption key at this OneDrive location.
- Click the Next button.
- Select how much the drive space to encrypt:
- Encrypt used disk space only (faster and best for new PCs and drives).
- Encrypt the entire drive (slower but best for PCs and drives already in use).
- Choose between the two encryption options:
- New encryption mode (best for fixed drives on this device).
- Compatible mode (best for drives that can be moved from this device).
- Click the Next button.
- Check the «Run BitLocker system check» option.
- Click the Continue button.
- Click the Restart now button.
After you complete the steps, the device will restart, BitLocker will enable, and you will not be prompted to enter a decryption password to continue starting Windows 10.
Although the device will boot quite fast, on Control Panel > System and Security > BitLocker Drive Encryption, you will notice that BitLocker will still be encrypting the drive. Depending on the option you selected and the drive size, this process can take a long time, but you can continue to work on the computer.
After the encryption process, the drive will include a lock icon, and the label will read «BitLocker on.»
BitLocker options
Once the drive encryption is enabled, several options will become available, including:
- Suspend protection: This option will stop protecting your files. Usually, you should use this option when upgrading to a new version of Windows 10, firmware, or hardware. If you don’t resume the encryption protection, BitLocker will resume automatically during the next reboot.
- Back up your recovery key: If you lose the recovery key and are still signed into your account, you can use this option to create a new backup of the key with the options mentioned in Step 6.
- Change password: This creates a new encryption password, but you will still need to supply the current password to make the change.
- Remove password: You cannot use BitLocker without a form of authentication. You can remove a password only when you configure a new method of authentication.
- Turn off BitLocker: Decrypts all the files on the drive. Also, decryption may take a long time to complete its process depending on the storage size, but you can still use your computer.
How to enable (software) BitLocker on the operating system drive
If the computer does not have a Trusted Platform Module chip, you won’t be able to configure BitLocker on Windows 10. However, you can still use encryption if you use the Local Group Policy Editor to enable additional authentication at startup. Once the feature is enabled, you will need to provide a password or USB flash drive with the recovery key to unlock the drive and continue with the computer startup process.
Enable policy without TPM support
To configure BitLocker on devices without a TPM chip, use these steps.
- Open Start.
- Search for gpedit and click the top result to open the Local Group Policy Editor.
- Browse the following path: Computer Configuration > Administrative Templates > Windows Components > BitLocker Drive Encryption > Operating System Drives
- On the right side, double-click the «Require additional authentication at startup» policy.
- Select the Enabled option.
- Check the «Allow BitLocker without a compatible TPM (requires a password or a startup key on a USB flash drive)» option.
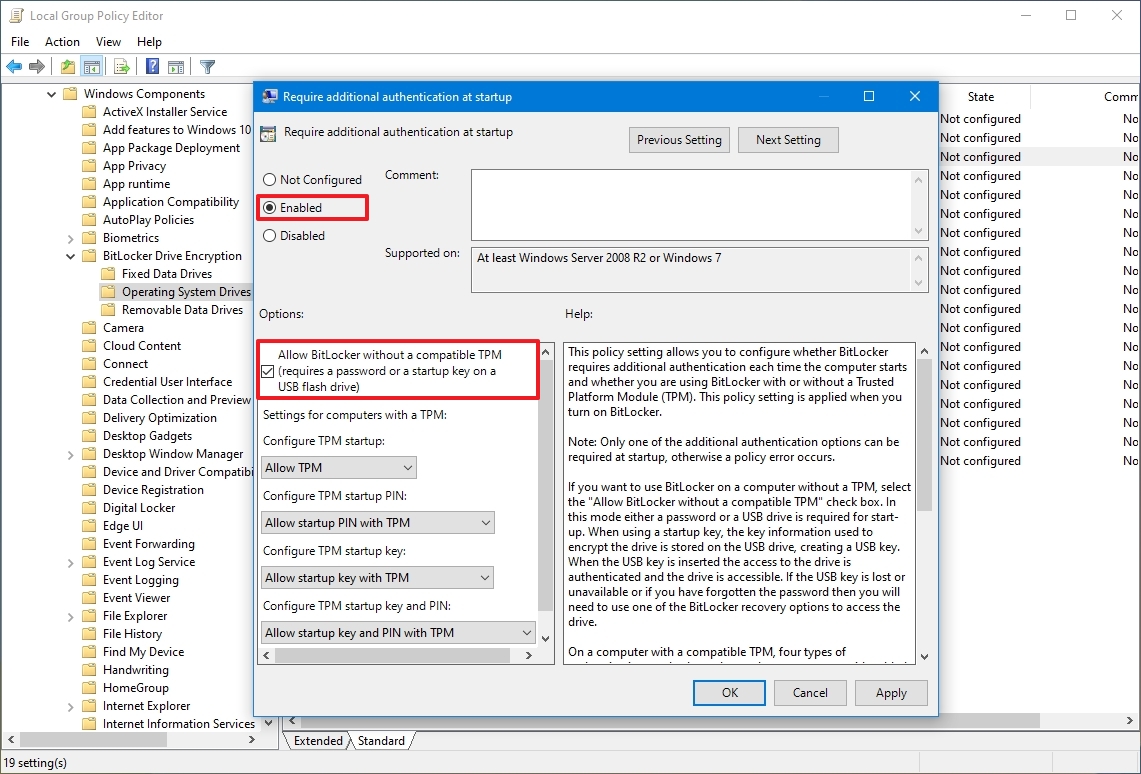
- Click the Apply button.
- Click the OK button.
Once you complete the steps, BitLocker can be configured on the computer to protect your data.
Enable BitLocker
To enable BitLocker on your device, use these steps:
- Open Start.
- Search for Control Panel and click the top result to open the app.
- Click on System and Security.
- Click on «BitLocker Drive Encryption.»
- Under the «Operating system drive» section, click the «Turn on BitLocker» option.
- Click the Next button.
- Click the Next button again.
- Click the Restart now button.
- Click the Next button. (The process should restart automatically.)
- Select the encryption to unlock method:
- Insert a USB flash drive — requires a flash drive to unlock the device and boot into Windows 10.
- Enter a password — requires a password before booting into Windows 10 (recommended).
- Create and confirm the password to unlock BitLocker and access your device.
- Click the Next button.
- Select the option to save the recovery key:
- Save to your Microsoft account.
- Save to a USB flash drive.
- Save to a file.
- Print the recovery.
- Click the Next button.
- Select how much the drive space to encrypt:
- Encrypt used disk space only (faster and best for new PCs and drives).
- Encrypt the entire drive (slower but best for PCs and drives already in use).
- Choose between the two encryption options:
- New encryption mode (best for fixed drives on this device).
- Compatible mode (best for drives that can be moved from this device).
- Click the Next button.
- Check the «Run BitLocker system check» option.
- Click the Continue button.
- Click the Restart now button.
After you complete the steps, the computer will restart, and BitLocker will prompt you to enter your encryption password to unlock the drive.
How to enable BitLocker on fixed data drives
To configure BitLocker on a secondary drive, use these steps:
- Open Start.
- Search for Control Panel and click the top result to open the app.
- Click on System and Security.
- Click on «BitLocker Drive Encryption.»
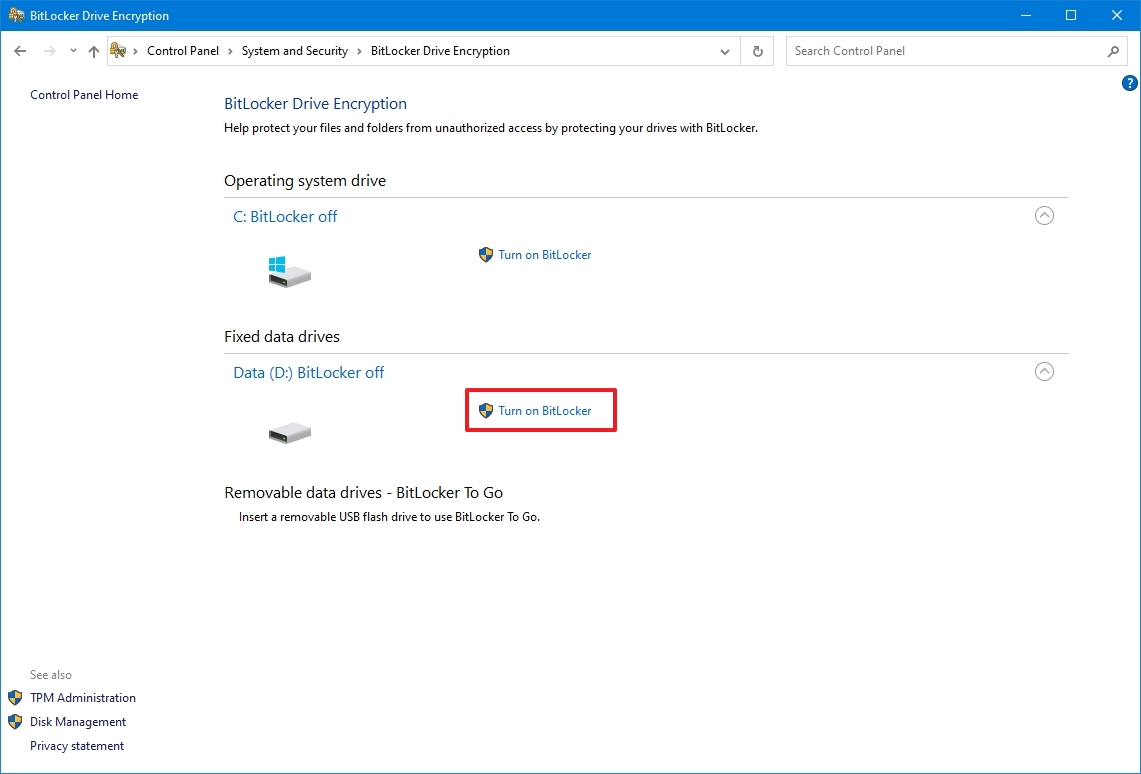
- Under the «Fixed data drives» section, click the «Turn on BitLocker» option for the secondary drive.
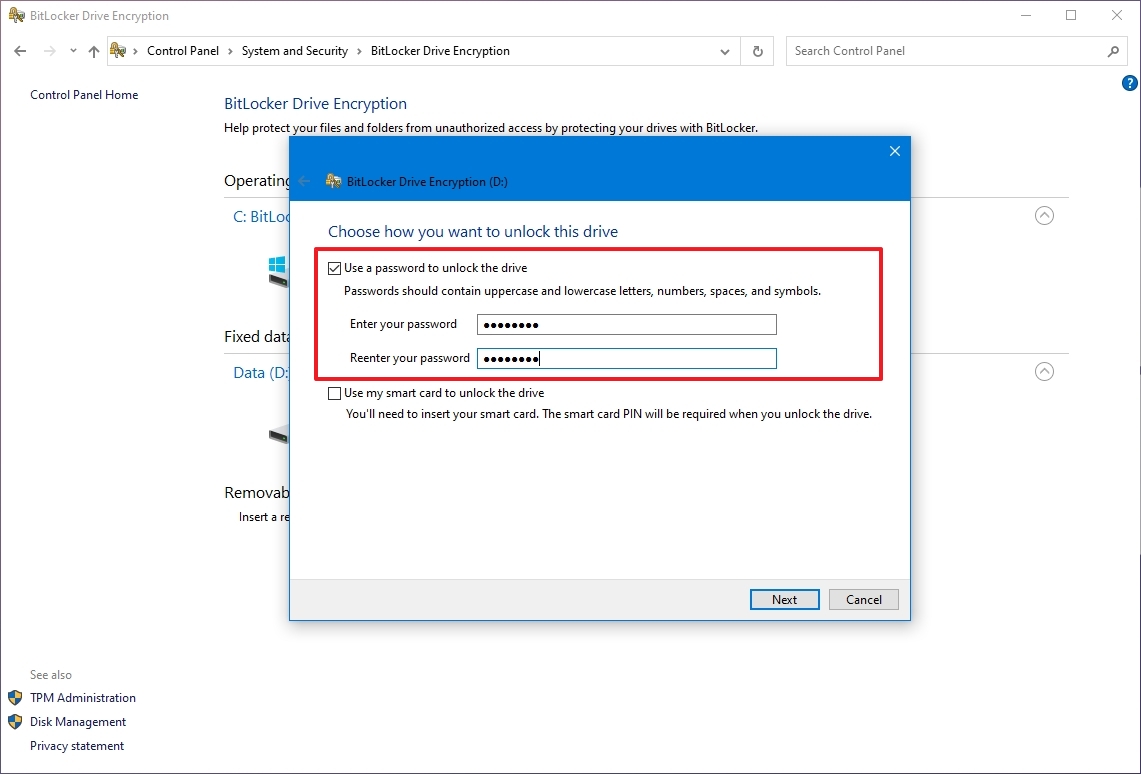
- Check the «Use a password to unlock the drive» option.
- Quick note: You can also use the «Use my smart card to unlock the drive» option, which is uncommon.
- Create and confirm the password to unlock BitLocker and access your device.
- Click the Next button.
- Select the option to save the recovery key:
- Save to your Microsoft account.
- Save to a USB flash drive.
- Save to a file.
- Print the recovery.
- Click the Next button.
- Select how much the drive space to encrypt:
- Encrypt used disk space only (faster and best for new PCs and drives).
- Encrypt the entire drive (slower but best for PCs and drives already in use).
- Choose between the two encryption options:
- New encryption mode (best for fixed drives on this device).
- Compatible mode (best for drives that can be moved from this device).
- Click the Next button.
- Click the Start encrypting button.
- Click the Close button.
Once you complete the steps, the drive will start using encryption. If the drive already had data, the process could take a long time to complete.
How to enable BitLocker To Go on removable drives
Alternatively, you can use the «BitLocker To Go» feature to encrypt removable drives (such as USB flash and external drives) connected to your computer.
To set up BitLocker To Go on a removable drive, use these steps:
- Connect the USB drive to the device.
- Open Start.
- Search for Control Panel and click the top result to open the legacy app.
- Click System and Security.
- Click «BitLocker Drive Encryption.»
- Under the «BitLocker To Go» section, select the removable drive you want to encrypt.
- Click the «Turn on BitLocker» option.
- Check the «Use a password to unlock the drive» option.
- Create a password to unlock the drive.
- Click Next to continue.
- Select the option to save the recovery key:
- Save to your Microsoft account.
- Save to a file.
- Print the recovery.
- Click the Next button.
- Select how much the drive space to encrypt:
- Encrypt used disk space only (faster and best for new PCs and drives).
- Encrypt the entire drive (slower but best for PCs and drives already in use).
- Choose between the two encryption options:
- New encryption mode (best for fixed drives on this device).
- Compatible mode (best for drives that can be moved from this device).
- Quick tip: In this case, the Compatibility mode is the recommended option.
- Click the Next button.
- Click the Start encrypting button.
- Click the Close button.
After you complete the steps, the encryption process will begin on the removable drive.
When using encryption, always try to start with an empty drive to speed up the process. Then, the data will encrypt quickly and automatically. In addition, similar to the feature of the operating system drive, you will get the same additional options and a few more, including:
- Add smart card: This option will allow you to configure a smart card to unlock the removable drive.
- Turn on auto-unlock: Instead of typing a password every time you re-connect the removable drive, you can enable auto-unlock to access your encrypted data without entering a password.
How to disable BitLocker on Windows 10
To remove the drive encryption, use these steps:
- Open Start.
- Search for Control Panel and click the top result to open the app.
- Click on System and Security.
- Click on «BitLocker Drive Encryption.»
- Click the Turn off BitLocker option for the drive you want to remove the encryption.
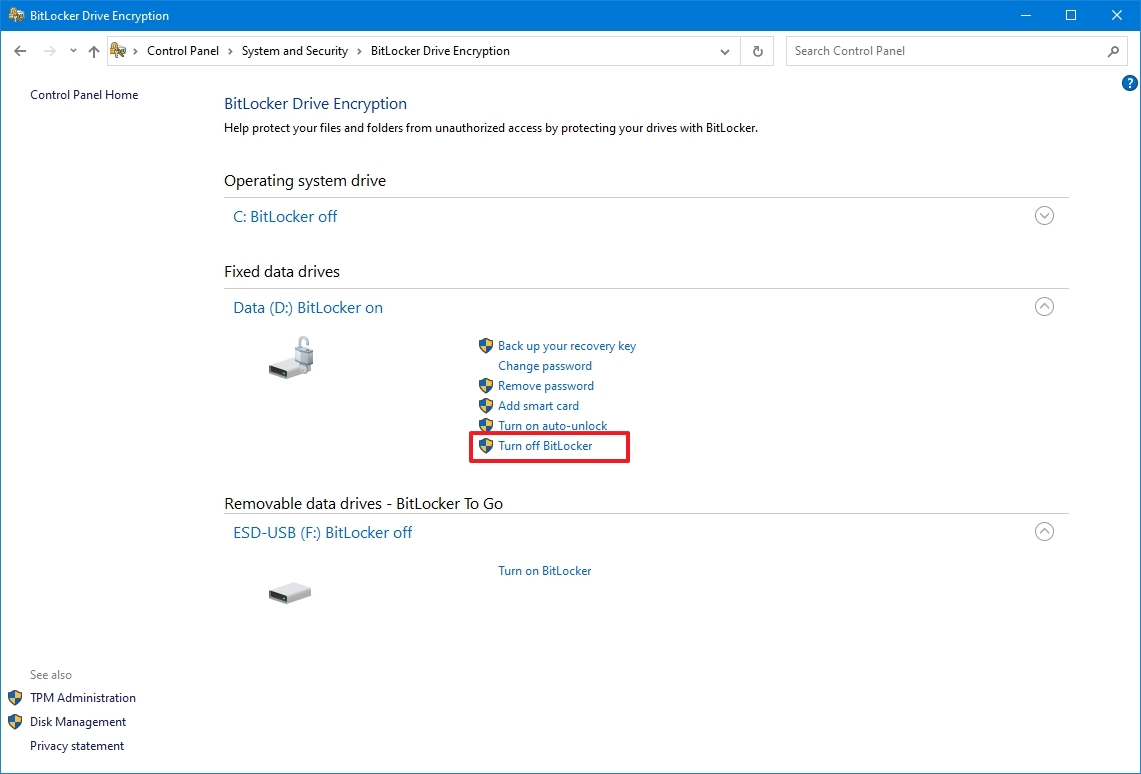
- Click the Yes button.
Once you complete the steps, the decryption process will begin, and it will take some time to complete depending on the amount of data.
More resources
For more helpful articles, coverage, and answers to common questions about Windows 10, visit the following resources:
- Windows 10 on Windows Central — All you need to know
- Windows 10 forums on Windows Central
Mauro Huculak has been a Windows How-To Expert contributor for WindowsCentral.com for nearly a decade and has over 15 years of experience writing comprehensive guides. He also has an IT background and has achieved different professional certifications from Microsoft, Cisco, VMware, and CompTIA. He has been recognized as a Microsoft MVP for many years.
BitLocker — это встроенная функция Microsoft, которая обеспечивает безопасность данных с помощью полнообъемного шифрования, защищая корпоративные данные на утерянных, украденных или выведенных из эксплуатации устройствах. Используя алгоритм шифрования AES с 128- или 256-битным ключом, BitLocker защищает диски устройств от несанкционированного доступа, даже в автономном режиме. В то время как решения MDM защищают устройства в режиме онлайн, BitLocker защищает данные в автономном режиме, обеспечивая комплексную безопасность.

Этот блог представляет собой пошаговое руководство, которое поможет вам понять различные методы включения BitLocker на устройствах Windows.
Почему следует включить BitLocker на устройствах Windows 10 и 11
BitLocker — это встроенный инструмент шифрования в Windows, который обеспечивает надежную защиту данных для личных и деловых пользователей. Включив BitLocker в Windows, вы можете защитить свои конфиденциальные данные, предотвратить несанкционированный доступ и соблюдать отраслевые правила. Ниже приведены основные причины, по которым включение шифрования BitLocker в Windows 10 и Windows 11 необходимо для безопасности данных.
1. Защищает от кражи данных
Ноутбуки, настольные компьютеры и внешние диски очень уязвимы для кражи, что делает безопасность данных главным приоритетом. Когда вы включаете BitLocker в Windows, весь диск шифруется, гарантируя, что неавторизованные пользователи не смогут получить доступ к файлам, даже если они попытаются извлечь жесткий диск и подключить его к другой системе.
2. Повышает безопасность бизнеса
Для организаций, работающих с конфиденциальными бизнес-данными, шифрование диска BitLocker добавляет дополнительный уровень защиты. Оно предотвращает несанкционированный доступ к записям клиентов, финансовым данным и конфиденциальным файлам, помогая компаниям поддерживать целостность и безопасность данных на всех устройствах.
3. Предотвращает несанкционированный доступ.
Шифрование BitLocker в Windows 10 и Windows 11 использует чип TPM (Trusted Platform Module), PIN-код или пароль для защиты зашифрованных дисков. Даже если кто-то получит физический доступ к устройству, он не сможет получить доступ к сохраненным данным без правильного ключа дешифрования.
4. Обеспечивает соблюдение законов о защите данных
Многие отрасли, включая здравоохранение, финансы и юридические услуги, требуют шифрования для соответствия нормам GDPR, HIPAA и PCI DSS. Включив шифрование BitLocker, компании могут выполнить эти юридические требования, избежать штрафов и усилить свои стратегии защиты данных.
5. Защищает данные от вредоносных программ и программ-вымогателей
Шифрование диска BitLocker помогает предотвратить несанкционированные изменения системных файлов, снижая риск вредоносных программ, программ-вымогателей и кибератак. Если хакеры пытаются изменить загрузочные файлы или внедрить вредоносное ПО, BitLocker обнаруживает эти изменения и блокирует несанкционированный доступ.
6. Защита внешних дисков с помощью BitLocker To Go
BitLocker не только для внутреннего хранилища — он также поддерживает BitLocker To Go, позволяя шифровать USB-накопители, внешние жесткие диски и портативные устройства хранения. Это гарантирует, что конфиденциальные файлы останутся защищенными, даже если съемный носитель будет утерян или украден.
Какие требования необходимы для включения BitLocker на устройствах Windows?
BitLocker работает синхронно с компьютерами, на которых установлена технология TPM (Trusted Platform Module) версии 1.2 или более поздней. Его также можно включить на компьютерах, на которых нет TPM 1.2 или более поздней версии, но процесс включения должен быть инициирован путем вставки USB-ключа запуска для запуска компьютера или выхода из спящего режима.
Не все компьютеры или зашифрованные диски совместимы с BitLocker. В настоящее время Windows поддерживает BitLocker в следующих операционных системах:
- Windows Vista и Windows 7: Версии Ultimate и Enterprise (требуется Trusted Platform Module (TPM) версии 1.2 или выше, который должен быть установлен, включен и активирован).
- Windows 8 и 8.1: Редакции Pro и Enterprise.
- Windows 10: Pro, Enterprise и Education.
- Сервер Windows: Версии 2008 и более поздние.
Способы включения BitLocker на устройствах Windows?
BitLocker — это мощная функция шифрования в Windows, которая защищает данные, шифруя диски и предотвращая несанкционированный доступ. Включение BitLocker может различаться в зависимости от вашего устройства и операционной системы. Вот различные методы настройки BitLocker в Windows:
Метод 1: включение BitLocker через Панель управления
Шаг 1: Откройте Панель управления и перейдите в раздел «Система и безопасность».
Шаг 2: Нажмите «Шифрование диска BitLocker».
Шаг 3: Выберите диск, который вы хотите зашифровать, и нажмите «Включить BitLocker».
Шаг 4: Следуйте инструкциям на экране, чтобы установить пароль или использовать смарт-карту для разблокировки накопителя.
Шаг 5: Сохраните ключ восстановления в безопасном месте и начните процесс шифрования.
Метод 2: включение BitLocker через настройки (Windows 10 и более поздние версии)
Шаг 1: Перейдите в «Настройки» и выберите «Обновление и безопасность».
Шаг 2: Найдите «Управление Bitlocker»
Шаг 3: Нажмите «Включить», чтобы включить BitLocker.
Примечание: для некоторых редакций может потребоваться обновление до версии, поддерживающей BitLocker, например Windows 10 Pro.
Метод 3. Включение BitLocker через командную строку
Шаг 1: Откройте командную строку с правами администратора.
Шаг 2: Используйте следующую команду, чтобы включить BitLocker на определенном диске:
управлять-bde-on :
Шаг 3: Следуйте инструкциям, чтобы настроить параметры шифрования, например, выбрать метод ключа восстановления.
Метод 4: включение BitLocker через групповую политику
Шаг 1: Откройте редактор групповой политики (gpedit.msc).
Шаг 2: Перейдите в раздел «Конфигурация компьютера > Административные шаблоны > Компоненты Windows > Шифрование диска BitLocker».
Шаг 3: Настройте соответствующие политики, например, включение BitLocker для фиксированных дисков с данными, дисков операционной системы или съемных дисков.
Шаг 4: Примените изменения и приступайте к активации BitLocker через Панель управления или Командную строку.
Метод 5. Включение BitLocker на Windows Server
Шаг 1: Откройте панель управления диспетчера серверов.
Шаг 2: Используйте «Мастер добавления ролей и компонентов», чтобы добавить функцию «Шифрование диска BitLocker».
Шаг 3: Перезапустите сервер, если будет предложено.
Шаг 4: После установки используйте Панель управления или Командную строку, чтобы включить BitLocker на нужных дисках.
Метод 6. Включение BitLocker для съемных дисков
Шаг 1: Подключите съемный диск к вашей системе.
Шаг 2: Откройте «Этот компьютер», щелкните правой кнопкой мыши съемный диск и выберите «Включить BitLocker».
Шаг 3: Выберите метод разблокировки (пароль или смарт-карта) и следуйте инструкциям по шифрованию диска.
Примечание: Хотя эти методы предоставляют различные способы включения BitLocker, управление шифрованием на нескольких устройствах может стать трудоемким и фрагментированным. Более эффективным и унифицированным подходом является включение BitLocker с помощью Windows МДМ решение, оптимизирующее процесс на единой платформе.
Как включить BitLocker на устройствах Windows с помощью Scalefusion MDM?
Scalefusion MDM позволяет вам настраивать различные Шифрование BitLocker настройки с одной панели и позволяет вам отправлять на несколько устройств с одной централизованной панели. Вот как это работает:
Шаг 1: Войдите в панель управления Scalefusion.

Шаг 2: Перейдите в раздел «Профили и политики устройств» на панели управления.

Шаг 3: Нажмите на вкладку «Профили устройств». Теперь выберите или создайте новый профиль устройства для Windows. В случае существующего профиля Windows нажмите на кнопку «Изменить».

Шаг 4: Теперь нажмите на вкладку «Настройки» на панели слева. Перейдите в «Настройки безопасности». Включите «Запрашивать шифрование устройства», чтобы включить BitLocker.

Шаг 5: Настройте различные параметры BitLocker в соответствии с вашими требованиями:
а. Базовые настройки: Выберите агент шифрования, метод и параметры для устройств, присоединенных к Azure AD.

б) Параметры аутентификации при запуске: Для компьютеров без TPM включите опцию «разрешить BitLocker на ПК без Trusted Platform Module(TPM)». Установите метод аутентификации и минимальную длину PIN-кода для запуска.

в. Варианты восстановления или системные диски: Установите политики для восстановления, установите ключ восстановления и настройте сообщение о восстановлении перед загрузкой. Вы можете проверить весь список доступных настроек здесь.

г. Варианты восстановления для фиксированных дисков: Эти параметры аналогичны системным дискам, но они устанавливаются для разделов несистемных дисков.

е. Настройки доступа для записи: Отключите доступ на запись к дискам, пока они не будут зашифрованы, что предотвратит чтение/получение доступа к данным на ваших дисках любым вредоносным ПО.

е. Настройки на основе агента Scalefusion MDM: Настройте эти параметры, если вы включили BitLocker через Scalefusion MDM Agent.

Шаг 6: После полной настройки BitLocker нажмите кнопку «Обновить профиль» в правом верхнем углу экрана.

Шаг 7: Вы будете перенаправлены на страницу «Профили устройств». Нажмите «Применить», чтобы распространить профиль устройства на различные группы устройств, группы пользователей и отдельные устройства.

Это позволяет использовать шифрование BitLocker на управляемых устройствах и серверах Windows.
Как отключить BitLocker в Windows: пошаговое руководство
Если вы зашифровали свой компьютер Windows и теперь хотите отключить BitLocker в Windows, выполните следующие простые действия:
- Press Win + R чтобы открыть диалоговое окно «Выполнить», введите «Панель управления» и нажмите Enter.
- На панели управления перейдите к Система и безопасность > Шифрование диска BitLocker.
- Выберите диск, на котором вы хотите отключить шифрование BitLocker.
- Нажмите Отключите BitLocker опцию.
Испытайте современное управление Windows с помощью Scalefusion MDM
Scalefusion MDM упрощает управление шифрованием BitLocker на вашем устройстве и серверах Windows. Он предлагает централизованную и эффективную платформу для современное управление устройствами. Благодаря организованной панели управления и надежным настройкам безопасности Scalefusion обеспечивает защиту данных и упрощает администрирование.
Дайте своему бизнесу возможность поддерживать высокий уровень безопасности и производительности с помощью Scalefusion MDM, предлагая бесперебойную работу Управление устройствами Windows.
Свяжитесь с нашими экспертами по продуктам, чтобы подробно изучить Scalefusion UEM. Запланируйте персонализированную демонстрацию или начните 14-дневная бесплатная пробная версия для практического опыта уже сегодня!
Часто задаваемые вопросы
1. Безопасен ли BitLocker для Windows 10?
Да, BitLocker обычно считается безопасным для Windows 10. Он обеспечивает шифрование ваших данных, защищая их от несанкционированного доступа. Однако, как и в случае любой другой меры безопасности, важно использовать надежные пароли и постоянно обновлять систему, чтобы минимизировать потенциальные уязвимости.
2. Какова основная цель включения шифрования BitLocker в Windows?
Шифрование BitLocker в первую очередь направлено на повышение безопасности данных путем шифрования целых дисков и защиты их от несанкционированного доступа. Оно защищает конфиденциальную информацию на компьютерах и съемных дисках, обеспечивая конфиденциальность и целостность данных, что особенно полезно для предприятий и частных лиц, обеспокоенных конфиденциальностью и безопасностью данных.
3. Как навсегда отключить BitLocker в Windows?
Чтобы отключить BitLocker в Windows навсегда, перейдите в Панель управления → Шифрование диска BitLocker, выберите диск и нажмите «Отключить BitLocker». Это расшифрует ваш диск и удалит шифрование. После отключения BitLocker не сможет защитить ваши данные, если не будет включен повторно.
4. Как проверить, включен ли BitLocker на моем компьютере?
Чтобы проверить, включен ли BitLocker, перейдите в Панель управления → Шифрование диска BitLocker и посмотрите статус каждого диска. Если там написано «BitLocker включен», шифрование активно. Вы также можете проверить, открыв Проводник, щелкнув правой кнопкой мыши диск и выбрав Свойства.
5. Замедляет ли включение BitLocker работу моего ПК?
Нет, включение шифрования диска BitLocker оказывает минимальное влияние на производительность системы. Современные процессоры с аппаратным ускорением шифрования обеспечивают бесперебойную работу. Однако первоначальное шифрование может занять некоторое время в зависимости от размера и скорости диска.