
Установка Windows 7 на новый ноутбук или компьютер с интерфейсом UEFI вместо BIOS. Интеграция драйверов USB 3.0 и NVMe в дистрибутив Windows 7. Конвертация SSD из GPT в MBR и наоборот MBR в GPT
Привет друзья! В данном разделе, находятся статьи, описывающие процесс установки Windows 7 на новые ноутбуки и компьютеры с интерфейсом UEFI вместо простого BIOS. Сложность в том, что Windows 7 из коробки не поддерживает UEFI и для установки семёрки на новый ноутбук нам нужно включать в БИОСе совместимый режим CSM или Legacy и отключить Secure Boot. А что делать, если в вашем БИОСе не отключается Secure Boot, а режимов CSM или Legacy просто нет, а есть только UEFI? Ещё на новых ноутбуках установлены жёсткие диски стандарта GPT, а не MBR. И вообще, вместо HDD на вашем ноуте может быть SSD-накопитель, а они существуют обычного форм-фактора 2.5 интерфейса SATA AHCI, а могут M.2 SATA, поддерживающие интерфейс M2 PCI-E 3.0×4 с протоколом передачи данных NVMe. Короче, весь этот ультрасовременный зоопарк не поддерживает старушка Windows 7 и нам на сайте постоянно задают вопросы на эту тему, как сделать это или то, но всё-таки «заинсталить семёру» на новый ноут. Поэтому мы и создали данный раздел со статьями, в которых всё понятно объяснено. Конечно мы написали не про всё, что вас интересует, поэтому задавайте ваши вопросы в комментариях и мы на них ответим.
- Как установить на ноутбук с Windows 10 или 8.1 (БИОС UEFI) вторую операционную систему Windows 7 не конвертируя жёсткий диск в MBR или как создать диспетчер загрузки на флешке
- Как установить Windows 7 на новый ноутбук, на котором присутствуют только порты USB 3.0 и отсутствует оптический привод! Как после установки системы скачать и установить драйвера, ведь сетевой адаптер и порты USB 3.0 работать у вас не будут
- Как установить Windows 7 на компьютер с UEFI без поддержки CSM с помощью FlashBoot или интеграция драйверов USB 3.0, NVMe и AHCI/RAID в дистрибутив Windows 7 при помощи Dism
- Как установить Windows 7 на ПК с GPT-диском и включенным UEFI (самый старый способ)
- Сборки Windows 7 All in One с интегрированными драйверами USB 3.0/3.1 и NVMe от Sergei Strelec
- Как установить Windows 7 вместо Windows 10, 8.1 на новом ноутбуке
- Как установить Windows 7 второй системой на ноутбук ASUS с Windows 8.1, 10
- Как установить на новый ноутбук HP ENVY и БИОСом UEFI вторую операционную систему Windows 7 на диск GPT
- Как установить Windows 7 на новый ноутбук Acer с предустановленной Windows 10 или 8.1
- Создание установочной флешки UEFI с Windows 7 программой WinSetupFromUSB
- Создание загрузочной флешки UEFI тремя способами
- Создание загрузочной флешки UEFI с Windows 7, Windows 8, а также Windows 10
- Установка Windows 7 и Windows 8.1 на диск GUID (GPT) компьютера с материнской платой GIGABYTE с включённым UEFI
- Как переустановить Windows 8.1 на ноутбуке
- Как отключить Secure Boot на новом ноутбуке с интерфейсом UEFI
- Интеграция драйверов USB 3.0 в дистрибутив Windows 7 при помощи Dism
- Интеграция драйверов USB 3.0-3.1 в дистрибутив Windows 7 при помощи Win7USB3
- Как создать загрузочную флешку и для UEFI, и для BIOS Legacy с поддержкой файлов размером больше 4 Гб
- Как создать установочную UEFI флешку NTFS и установить с неё Windows 8.1 на диск GPT и ещё на диск MBR
- Создание мультизагрузочной UEFI флешки с файловой системой NTFS
- БИОС UEFI
- Установка Windows на данный диск невозможна. Выбранный диск имеют стиль разделов GPT
- Установка Windows на данный диск невозможна. На данном диске находится таблица MBR-разделов
Друзья! Если на вашем ноутбуке установлена Windows 10 или 8.1, то вы можете преобразовать ваш жёсткий диск или SSD из GPT в MBR без потери данных. После этого Windows 10 будет загружаться, активация не слетит, все программы останутся работоспособными, затем вы сможете установить Windows 7 второй или даже первой системой.
- Как преобразовать GPT в MBR без потери данных или как произвести конвертацию ноутбука с БИОСом UEFI из GPT в MBR и чтобы операционная система Windows 8.1 осталась работоспособной
- Как преобразовать GPT в MBR
- Как преобразовать GPT в MBR (и наоборот) без удаления данных бесплатной программой AOMEI Partition Assistant Standard Edition
- Как преобразовать жёсткий диск GPT в MBR, с установленной Windows 10 при помощи бесплатной программы AOMEI Partition Assistant. На первый взгляд это невозможно, ведь в этом случае нужна профессиональная версия программы — AOMEI Partition Assistant Professional
- Как преобразовать MBR в GPT без потери данных или как произвести конвертацию ноутбука с БИОСом UEFI из MBR в GPT и чтобы операционная система Windows 8.1 осталась работоспособной
- Самый простой способ конвертации жёсткого диска вместе с установленной Windows 10 из MBR в GPT! Процесс происходит прямо в работающей ОС за считанные секунды. Работоспособность операционной системы при этом сохраняется
Рекомендуем другие статьи по данной теме
Заметили ошибку
Выделите и нажмите Ctrl+Enter
Комментарии (16)
You have a PC with UEFI Bios, you can install Windows 7 in two ways. You want to take advantage of the benefits of the UEFI Bios, it is not enough for a simple Installation. We will show you how to do it.
Windows 7 on UEFI-Bios install
- Most of the computers from the year 2011 have the UEFI Bios. The biggest advantage of UEFI is the fast Start of the computer.
- You install Windows in the usual way, is not observed, the UEFI.
- You will also need the 64-Bit Version of Windows 7. Only this contains the customized boot loader with the UEFI compatible. The 32-Bit Version of Windows 7 is not suitable, unfortunately.

Install Windows 7 on UEFI

Windows 7 USB/DVD Download Tool
Step 2: Windows 7 on UEFI-Bios install
Instead of the normal Installation of Windows 7, you need to load the UEFI Bootloader. Only now he’s doing a UEFI compatible Installation possible.
- Insert the DVD with Windows 7 in your Computer and restart it.
- Instead of booting from the CD, you need to select the UEFI. Press during startup, repeatedly press the «Esc», «F11» and «F12». Also possible F1″, «F2», «F8» and «Delete «are».
- If you do not get at the first try into the UEFI and the Windows 7 Installation starts, turn off the PC again and try it again.
- You have made it into the UEFI, you will be asked which disk you want to boot from. This is not the case, navigate to the category of «Boot order».
- You will see your DVD drive twice in the display. Select the entry for the drive, in front of the «UEFI» stands for. This is achieved simply by pressing the «Enter»button.
- Then the Installation of Windows 7 starts on the UEFI Bios. Just follow the wizard until Windows is fully installed.
Step 3: UEFI-Installation check
- Simultaneously press the keys «Windows» and «R», so the command «Run» will open.
- Type diskmgmt here «.msc» and confirm with «OK». Then the «disk management»opens.
- Select the hard drive with the Windows Installation. Click with the right mouse button on the hard drive and then go to the «properties».
- Under the «Volumes» tab, the «partition style».
- This is «GUID partition table (GPT)», achieved the Installation.
UEFI-Installation check
What exactly is behind the terms UEFI and GPT is hidden, we can tell you in the next two practice tips.
Все способы:
- Как установить Windows 7 на ноутбук с UEFI
- Шаг 1: Настройка UEFI
- Шаг 2: Установка Windows
- Шаг 3: Установка драйверов и необходимого софта
- Вопросы и ответы: 6
Без операционной системы ноутбук не может работать, поэтому ее устанавливают сразу же после приобретения устройства. Сейчас некоторые модели распространяются уже с установленной Windows, однако если у вас чистый ноутбук, то все действия необходимо осуществить вручную. В этом нет ничего сложного, потребуется только следовать инструкции, приведенной ниже.
Как установить Windows 7 на ноутбук с UEFI
На замену BIOS пришел UEFI, и сейчас во многих ноутбуках используется именно этот интерфейс. С помощью UEFI осуществляется управление функциями оборудования и загрузка операционной системы. Процесс установки ОС на ноутбуки с данным интерфейсом немного отличается. Давайте разберем каждый шаг подробно.
Шаг 1: Настройка UEFI
Дисководы в новых ноутбуках встречаются все реже, а установка операционной системы производится с использованием флешки. В случае если вы собираетесь ставить Windows 7 с диска, то настройку UEFI осуществлять не нужно. Просто вставьте DVD в дисковод и включите устройство, после чего можно сразу переходить ко второму шагу. Тем пользователям, кто использует загрузочную флешку, потребуется выполнить несколько простых действий:
Читайте также:
Инструкция по созданию загрузочной флешки на Windows
Как создать загрузочную флешку Windows 7 в Rufus
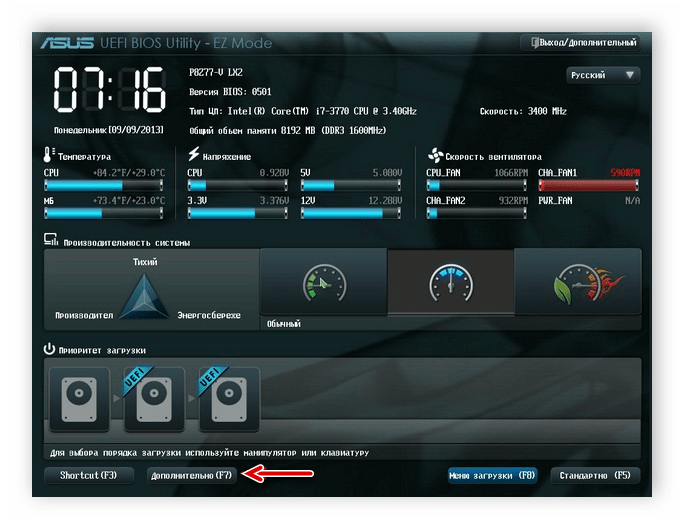
- Запустив устройство, вы сразу же попадете в интерфейс. В нем нужно перейти в раздел «Дополнительно», нажав на соответствующую клавишу на клавиатуре или выбрав его мышкой.
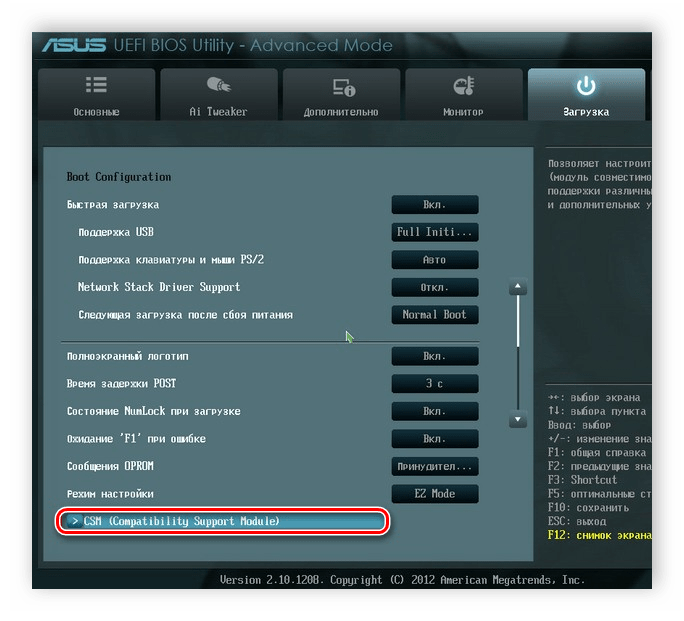
- Перейдите во вкладку «Загрузка» и напротив пункта «Поддержка USB» поставьте параметр «Full Initialization».
- В этом же окне опуститесь в самый низ и перейдите в раздел «CSM».
- Здесь будет присутствовать параметр «Запуск CSM», необходимо перевести его в состояние «Enabled».
- Теперь отобразятся дополнительные настройки, где вас интересует «Параметры загрузочных устройств». Откройте всплывающее меню напротив данной строки и выберите «Только UEFI».
- Осталось возле строки «Загрузка с устройств хранения» активировать пункт «Both, UEFI First». Далее вернитесь в предыдущее меню.
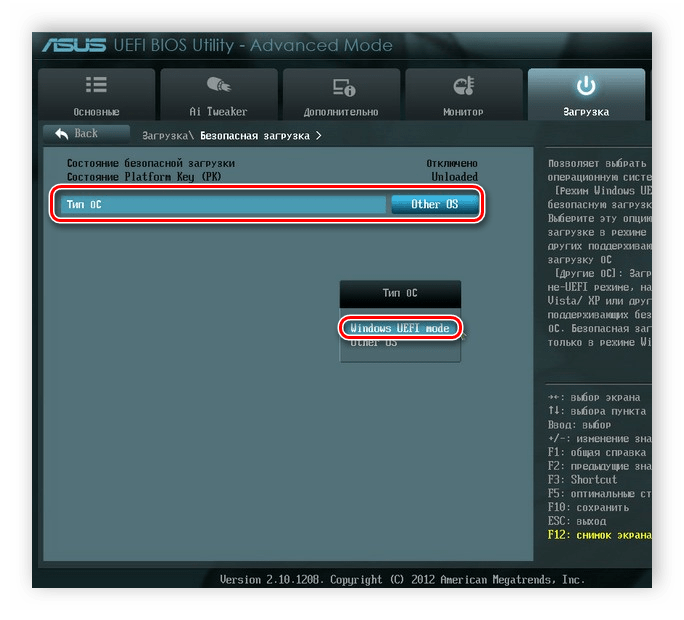
- Здесь появился раздел «Безопасная загрузка». Перейдите в него.
- Напротив «Тип ОС» укажите «Windows UEFI Mode». После вернитесь в предыдущее меню.
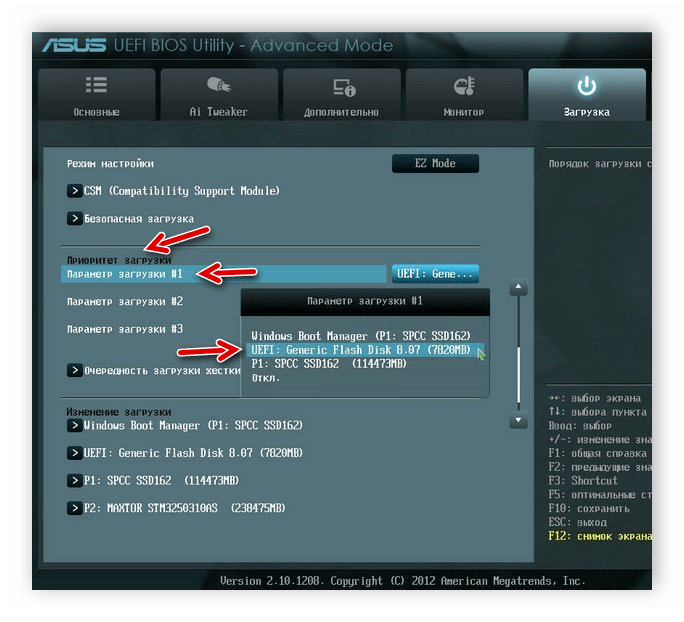
- Все еще находясь во вкладке «Загрузка», опуститесь в самый низ окна и найдите раздел «Приоритет загрузки». Здесь напротив «Параметр загрузки #1» укажите вашу флешку. Если не можете запомнить ее название, то просто обратите внимание на ее объем, он будет указан в этой строке.
- Нажмите F10, чтобы сохранить настройки. На этом процесс редактирования интерфейса UEFI окончен. Переходите к следующему шагу.


Шаг 2: Установка Windows
Теперь вставьте загрузочную флешку в разъем или DVD в дисковод и запустите ноутбук. Диск автоматически выбирается первым в приоритете, а вот благодаря выполненным ранее настройкам теперь и USB-флешка будет запускаться первой. Процесс установки не сложен и требует от пользователя выполнить всего несколько простых действий:
- В первом окне укажите удобный для вас язык интерфейса, формат времени, денежных единиц и раскладку клавиатуры. После выбора нажмите «Далее».
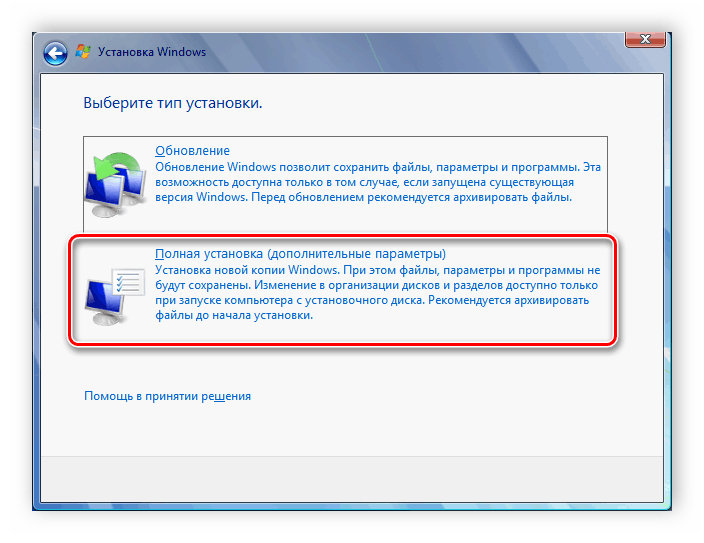
- В окне «Тип установки» выберите «Полная установка» и переходите к следующему меню.
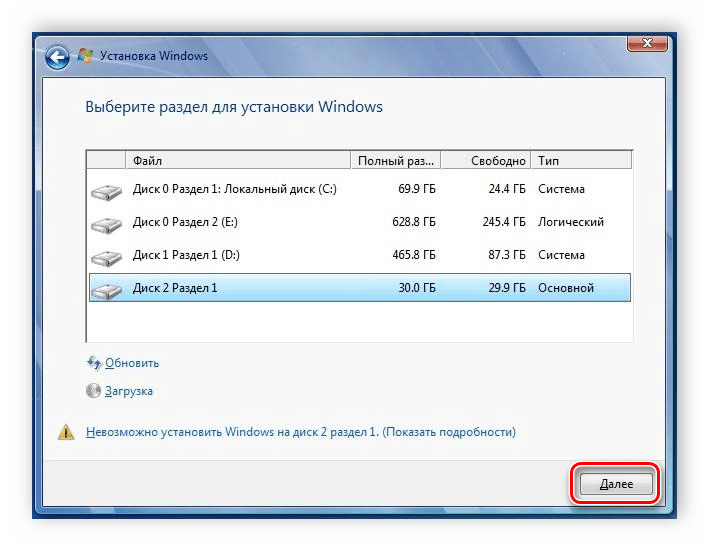
- Выберите необходимый раздел для установки ОС. В случае надобности вы можете его форматировать, удалив при этом все файлы предыдущей операционной системы. Отметьте подходящий раздел и нажмите «Далее».
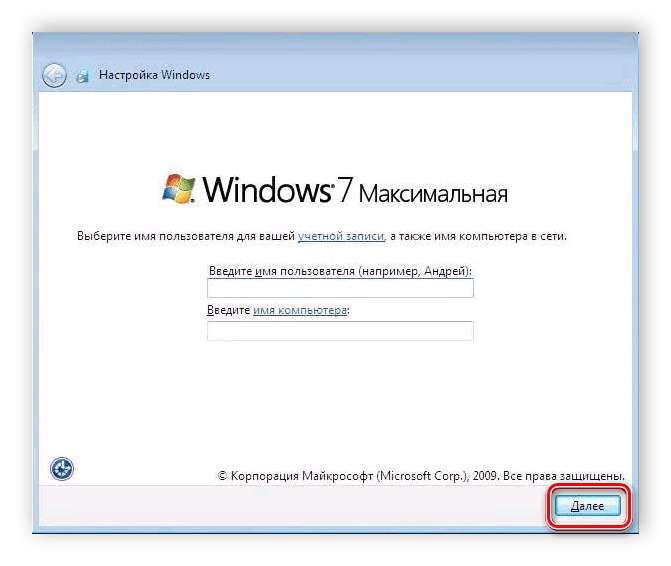
- Укажите имя пользователя и имя компьютера. Данная информация будет крайне полезной, если вы захотите создать локальную сеть.
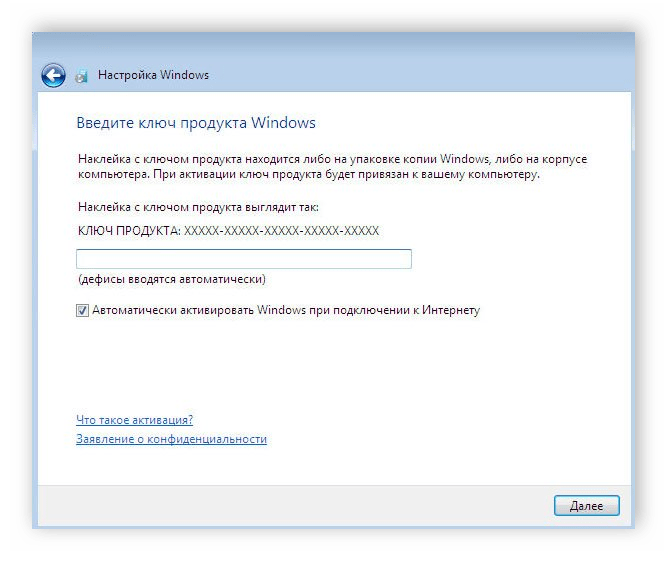
- Осталось только ввести ключ продукта Windows, чтобы подтвердить его подлинность. Он находится на коробке с диском или флешкой. Если ключа на данный момент не имеется, то доступно включение пункта «Автоматически активировать Windows при подключении к интернету».

Читайте также: Подключение и настройка локальной сети на Windows 7
Теперь начнется установка ОС. Она продлится некоторое время, на экране будет отображаться весь прогресс. Обратите внимание, что ноутбук будет перезагружен несколько раз, после чего процесс автоматически продолжится. В конце произведется настройка рабочего стола, и вы запустится Windows 7. Вам останется установить самые необходимые программы и драйвера.
Шаг 3: Установка драйверов и необходимого софта
Хоть операционная система и установлена, однако ноутбук еще не может полноценно функционировать. Устройствам не хватает драйверов, а для удобства пользования также требуется наличие нескольких программ. Давайте разберем все по порядку:
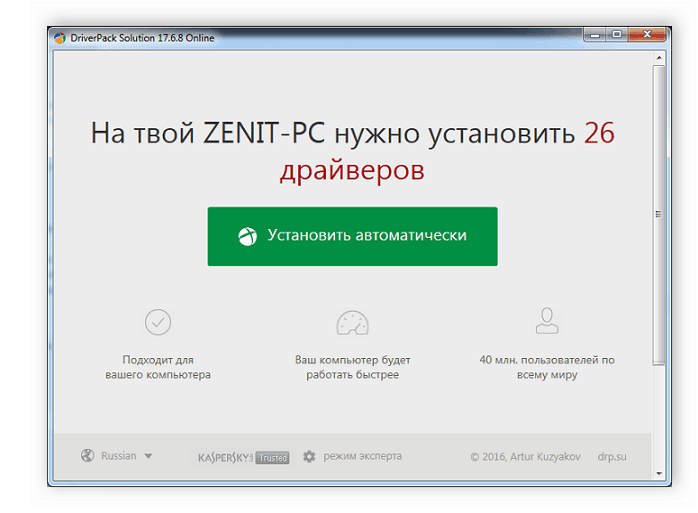
- Установка драйверов. Если ноутбук имеет дисковод, то чаще всего в комплекте идет диск с официальными драйверами от разработчиков. Просто запустите его и произведите установку. В случае отсутствия DVD можно заранее скачать на накопитель офлайн-версию Driver Pack Solution или любой другой удобной программы для установки драйверов. Альтернативный метод — ручная установка: вам достаточно поставить только сетевой драйвер, а все остальное можно загрузить с официальных сайтов. Выбирайте любой удобный вам способ.
- Загрузка браузера. Поскольку Internet Explorer не пользуется популярностью и не очень удобный, то большинство пользователей сразу же загружают другой браузер: Google Chrome, Opera, Mozilla Firefox или Яндекс.Браузер. Через них уже происходит скачивание и установка необходимых программ для работы с различными файлами.
- Установка антивируса. Ноутбук нельзя оставить без защиты от вредоносных файлов, поэтому мы настоятельно рекомендуем выбрать для себя наиболее подходящий.
Подробнее:
Лучшие программы для установки драйверов
Поиск и инсталляция драйвера для сетевой карты
Читайте также:
Программы для прослушивания музыки на компьютере
Как установить Adobe Flash Player на компьютер

Подробнее:
Выбор антивируса для слабого ноутбука
Теперь, когда на ноутбуке стоит операционная система Windows 7 и все необходимые важные программы, можно смело приступать к комфортному пользованию. После завершения установки достаточно перейти обратно в UEFI и изменить приоритет загрузки на жесткий диск или оставить все как есть, но вставлять флешку только после старта ОС, чтобы запуск прошел корректно.
Наша группа в TelegramПолезные советы и помощь
Windows 7 (and possibly Vista, Server 2008 and Server 2008 R2) UEFI-mode installation instructions
Introduction (Skip reading this if you know what you’re doing.) :
There are two basic protocol standards that most personal computers use to run the process of loading the operating system. One is called «Legacy BIOS boot mode», and is what was the de facto standard since the 1980s and MS-DOS/ the earliest of Windows versions. The other one, introduced in the late 2000s and which has been the default protocol used in almost all computers manufactured since 2012, is the «EFI/UEFI boot mode». These two differ in two fundamental ways: the way in which the software loads the drivers necessary for interaction with the computer’s various hardware features, and the style of partitioning of the computer’s internal hard drive that they use. Legacy BIOS boot mode needs the hard drive formatted to the Master Boot Record (MBR) «partition table format» (partition table format being the way in which file systems on the drive are defined), which UEFI boot mode uses the hard drive formatted to the newer GUID Partition Table (GPT) partition table format. GPT has multiple advantages over MBR, including the capacity for drives larger than 2 terabytes, the ability to have more than 4 «partitions» on the drive, and less vulnerability to viruses that install themselves to the «boot sector», which is the section of the hard drive where the file systems are defined. And the UEFI boot mode itself has multiple advantages over legacy BIOS boot mode, including better power management on some computers. For these reasons, UEFI boot mode has now become the default mode used by almost all computers made since 2012, with systems from large companies like Dell and HP having this capability in computers made since 2010-11. Apple Macintosh computers have had this feature since the 2009 year models. As for operating systems, it is supported by Windows versions 8 and newer, Apple’s MacOS, and most Linux variants.
Windows 7, however, released in 2009, has only partial support for it — the operating system itself is capable of using UEFI boot mode, but the operating system’s bootloader (the small set of files responsible for loading the operating system when the computer is started) does not, due to the way in which it loads the video controller and display drivers. But there are reasons why you may need to install this version of Windows in UEFI boot mode — the most common of which being to run it as a secondary operating system on a computer already using a different operating system installed using UEFI boot mode (as you can’t have an OS that uses UEFI mode and an OS that uses legacy BIOS mode together on the same hard drive).
That is what this guide is for — installing Windows 7 in UEFI boot mode. To fix the issue that the Windows 7 bootloader has with UEFI boot mode, there is a compatibility layer software called «UEFISeven» that is available that adapts the Windows 7 bootloader to something that is fully UEFI boot mode capable. This guide shows you how to install and use the UEFISeven compatibility bootloader tool. UEFISeven is what is known as a «chainloader» — which is a software that is loaded by the computer first instead of the standard Windows bootloader, that applies certain patches before then loading the same standard Windows bootloader itself. It does not modify the Windows bootloader itself or any of the Windows system files — it is loaded by the computer before any of the operating system is loaded and applies its patches at that level, leaving the operating system itself untouched. This is the best way of applying any operating system patches, as against modifying the operating system’s code itself, since when you do that you introduce more places and times when something can error out and stop working.
Let’s get started, enough talk already.
Materials Needed:
-
either another Windows computer or another functional Windows version on the computer you’re installing Windows 7 on
-
some form of rewritable media 4 or more GB in size — can be a flash drive, hard drive on a USB tail, or whatever — just no DVDs since you need write access to it and DVDs are read-only after the first write (maybe DVD+RW disks would work? IDK)
-
some basic computer disk partitioning and file swapping skills, and patience
-
Prerequisite Step : Make sure your target computer’s hard drive is either blank (or has no important data or other operating systems on it, so that you can make it blank in the Windows installer), or is formatted to have a GPT style partition table. You can use tools like AOMEI Partition Assistant in Windows or Linux’s built in Disks tool to find out. If you already have another operating system installed on the computer in UEFI mode (like Apple MacOS, Windows 8.x, 10 or 11, or Linux) then partitioning will already be in the correct format. If the drive is blank, then the Windows installer will automatically set the proper partition table. If the hard disk has data that you want to preserve, but is formatted to MBR partition table style instead of GPT, you will need to convert it to GPT first — there are tools available to do this (my personal favorite being AOMEI Partition Assistant, on Windows, or gdisk on Linux). Once you convert it (or if it already has a UEFI mode operating system on it), make sure there is enough free space on the hard drive to install your new setup of Windows (the minimum is about 40-50GB). You may have to resize/shrink existing partitions to achieve this.
-
Step 1: Get an installer ISO of the Windows version you want to install. Must be 64 bit; the 32 bit version does not support UEFI (afaik). No Windows 7 Starter, sadly, for this reason.
-
Step 2: (You’ll need access to another Windows computer for this step, for now until a different tool is discovered) Download Rufus from https://rufus.ie/en/ and open the application
-
Step 3: Use Rufus to write the installer ISO to what will be your installation media (USB or whatever you got from earlier), by selecting your Windows ISO image and the right disk to put it on. If you’re using a hard drive on a USB tail then you have to select «List USB Hard Drives» under «Show advanced drive properties». Make sure that «Partition Scheme» is set to GPT and Target System is set to UEFI (without CSM).
-
Step 4: Download the UEFISeven software from https://github.com/manatails/uefiseven/releases/download/1.24/UefiSeven_1.24.zip and extract the zip archive
-
Step 5: Install the UEFISeven bootloader patch. Navigate to your newly made Windows installer in a file manager, and go to the EFI\Boot folder. Here, you need to find the file called «bootx64.efi», and rename it to «bootx64.original.efi». Now go back to the folder where you extracted the UEFI7 archive, copy the bootx64.efi file from there, and paste it into the folder on the installer drive where you just did the file rename. If you did it right, you should have a 600-ish KB file called bootx64.original.efi and a sub 100KB file called bootx64.efi in the \EFI\Boot folder on the installer drive. You can see here how the concept of a chainloader works — by putting itself (UEFISeven) in place of the original Windows bootloader (which was the bootx64.efi file that you renamed to .original…) so that it is loaded first, runs its patching code, and then hands over control to the original Windows bootloader, which is now at a new «location» — the renamed file.
-
Step 5.1: If you are installing this to a 2009-2010 year model Apple Macintosh computer with an NVidia GeForce 9400M, 9600M, or 320M graphics processor, additional steps apply in order for UEFI mode Windows to boot properly. See end of this post for details.
-
Step 6: Restart the target computer with the USB drive plugged in. Open the computer’s boot options menu while it’s starting back up and select the USB drive that you just put files on.
Press Enter at the yellow text screen if it asks you, in order to proceed.
-
Step 7: Go through the Windows installer as normal. This is where the GPT partition table style requirement applies — if you’re installing Windows 7 as the only OS on the computer’s hard drive and there are no files on the drive you want to save, then just delete all the existing partitions on the drive when the installer prompts you for partitioning and install Windows to «unallocated space» and it will take care of the partitioning for you. If you already have another operating system installed on the computer in UEFI mode or converted the drive in the prerequisite step, then partitioning will already be in the correct format — just select a blank partition (if you created one) or Unallocated Space and proceed.
-
Step 8: wait for the Windows installer to do its thing. The Windows installer has several stages, with a reboot in between them — but in this case, after the first reboot, Windows 7 won’t be able to bootup to complete the installation — since when we installed the UEFISeven chainloader in the earlier step, we only applied the patch to the bootloader on the installer USB, not the computer’s internal hard drive. So when your computer reboots to finish the installation, it can’t boot Windows 7, since it switches to using the bootloader on the internal hard drive instead of the installer drive where we applied the patch.
-
Step 9: this is where you need either the computer to be able to boot another operating system or the ability to remove the hard drive from the computer and access it from another computer. Do one of those — reboot the computer to another working operating system, or remove the hard drive and plug it into another working computer. You need to get access to what is called the «EFI partition» on the hard drive, which is where the operating system bootloaders for operating systems installed in EFI mode are stored. In Linux, this can be done by using the Disks tool and «mounting» the EFI partition, which is the small partition at the very beginning of the drive. In Windows, you will need a 3rd party tool to do this (I believe Explorer++ is one such tool). In Apple MacOS, you can use either the terminal command line or a third party tool to do this.
-
Step 10: Once you have access to that, you have to apply the UEFISeven bootloader patch. To do so, navigate to the Boot folder on the EFI partition, then the Microsoft folder under that. Find the file called «bootmgfw.efi» and rename it to «bootmgfw.original.efi». Now take the bootx64.efi file from the UEFISeven download you had for Step 5 and copy it to that Microsoft folder, and rename it to «bootmgfw.efi». This step is a repeat of Step 5, just on a different drive and with slightly different file names.
-
Step 10a: If you’re doing this on an Apple Macintosh computer, additional steps may apply. See bottom of this post for those steps.
-
Step 11: Reboot the target computer (put the hard drive back in if you removed it). Boot to the internal hard drive (should be the default), you don’t need the installer disk (USB or whatever) anymore. If you already had a version of Windows on the hard drive, you will be presented with a selection screen to pick that version or Windows 7. Pick Windows 7 so that it can finish the installation process.
-
Step 12: Go through the Windows 7 installation process’ final stages as you would do on any normal computer. Since UEFI boot mode uses a different method of the computer loading hardware device driver software, depending on your computer’s hardware you may find that some hardware features don’t work properly or work in an odd way. Since this is a hardware-specific issue, I can’t explain what to do here — but there are guides available on the internet; just do a search. This is especially true of Apple Macintosh computers — but for those, tools are available that automatically modify the hardware driver configuration so that it works properly with Windows in UEFI mode.
Congratulations, you are done!
-
Home
-
Partition Magic
- 2 Ways to Install Windows 7 in UEFI Mode Easily
By Linda | Follow |
Last Updated
Do you have problem in installing Windows 7 on GPT disk and booting it from UEFI mode? If so, read this article to get a step-by-step tutorial. In addition, if you still fail, you can use MiniTool Partition Wizard to solve this problem.
Can I install Windows 7 in UEFI? I just use ISO2Disc to burn Windows 7 ISO file to a USB flash drive with GPT, take the USB drive to boot off my UEFI-based PC, it still fails to boot. What step is missing? Or which edition of Windows 7 should I use for UEFI compatibility? Please help! — www.sevenforums.com
Nowadays, large-capacity disks are becoming more popular. When a hard drive has a capacity more than 2 TB, you may need to install Windows in UEFI mode to use the space beyond the 2 TB.
Here are two articles you may be interested in:
However, when you install Windows 7 in UEFI mode, you may encounter some problems because you don’t know the correct Win 7 installation process. Therefore, your computer may not boot up after the incorrect Win 7 UEFI install. This post will provide you two ways to install Windows 7 in UEFI mode safely.
Note: Windows 7 UEFI boot needs the support of mainboard. Please check in firmware first whether your computer has UEFI boot option. If not, your Windows 7 will never boot up in UEFI mode. Last but not least, 32-bit Windows 7 can’t be installed on the GPT disk.
Method 1. Common Method for Win 7 UEFI Install
This method is the common one because it is more complicated and may cause data loss.
Here is the tutorial.
Step 1: Click here to download Windows 7 ISO files and make a Windows 7 installation media.
As for the detailed steps, you can refer to the following article:
Step 2: Back up the important files on your PC to an external hard drive.
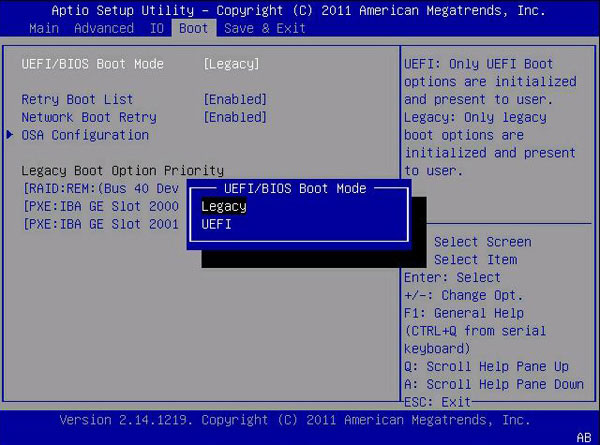
Step 3: Connect the Windows 7 installation media to your computer and restart it. Please set in firmware to change the legacy boot mode to UEFI boot mode and make the computer boot from the bootable disk.
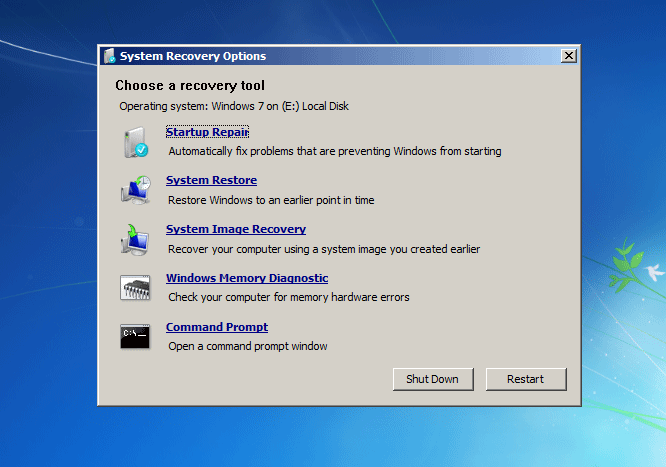
Step 4: Click Repair your computer to enter WinPE.
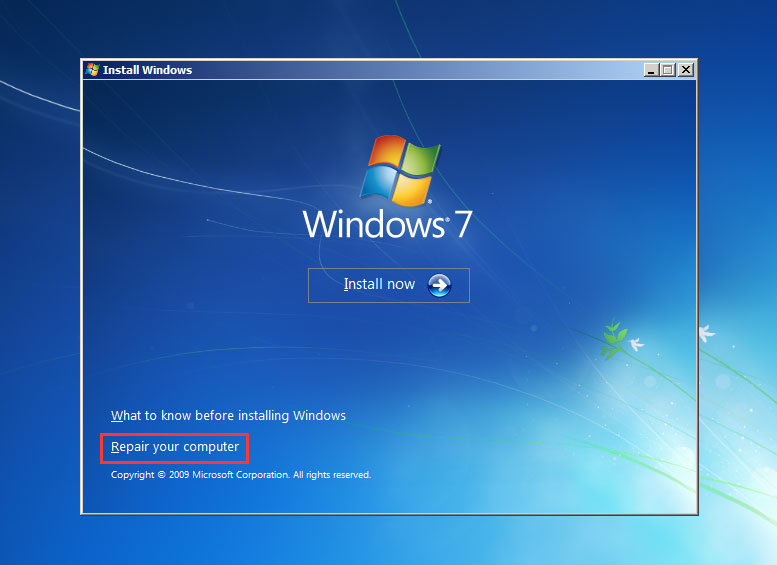
Step 5: Navigate to System Recovery Options and choose Command Prompt.
Step 6: Enter the following commands one by one to convert your disk to GPT disk.
- Diskpart
- List disk
- Select disk 0
- Clean
- Convert gpt
Tip: When the commands touch upon number and the equal sign, you should refer to your condition.

Step 7: Exit Command Prompt and close the System Recovery Option. Then, install Windows 7 on the GPT disk.
As for the installation process, you can refer to the following article:
Step 8: Reboot your computer from the hard drive.
This method allows you boot Windows 7 in UEFI mode easily. If the first method fails, you can try this method.
Here is the tutorial.
Step 1: Make a Windows 7 installation media.
Step 2: Back up the important files.
Step 3: Change the legacy boot mode to UEFI boot mode and boot your computer from the Windows 7 installation media and install Windows 7 directly.
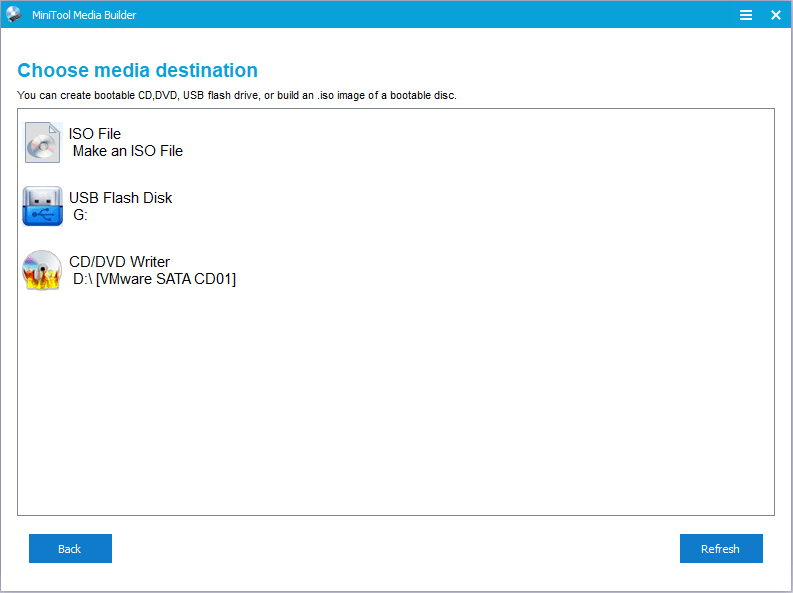
Step 4: Make a bootable disk of MiniTool Partition Wizard.
- Connect a USB flash drive to a normal running computer.
- Buy MiniTool Partition Wizard and launch it on the normal running computer.
- Click Bootable Media after registering your account.
- Click WinPE-based media with MiniTool plug-in.
- Choose USB Flash Drive.
Step 5: Boot your computer from the MiniTool Partition Wizard bootable disk. Wait minutes without any operations until the MiniTool Partition Wizard opens automatically.
Step 6: Right-click the system disk and choose Convert MBR Disk to GPT Disk. Then, click Apply Button.
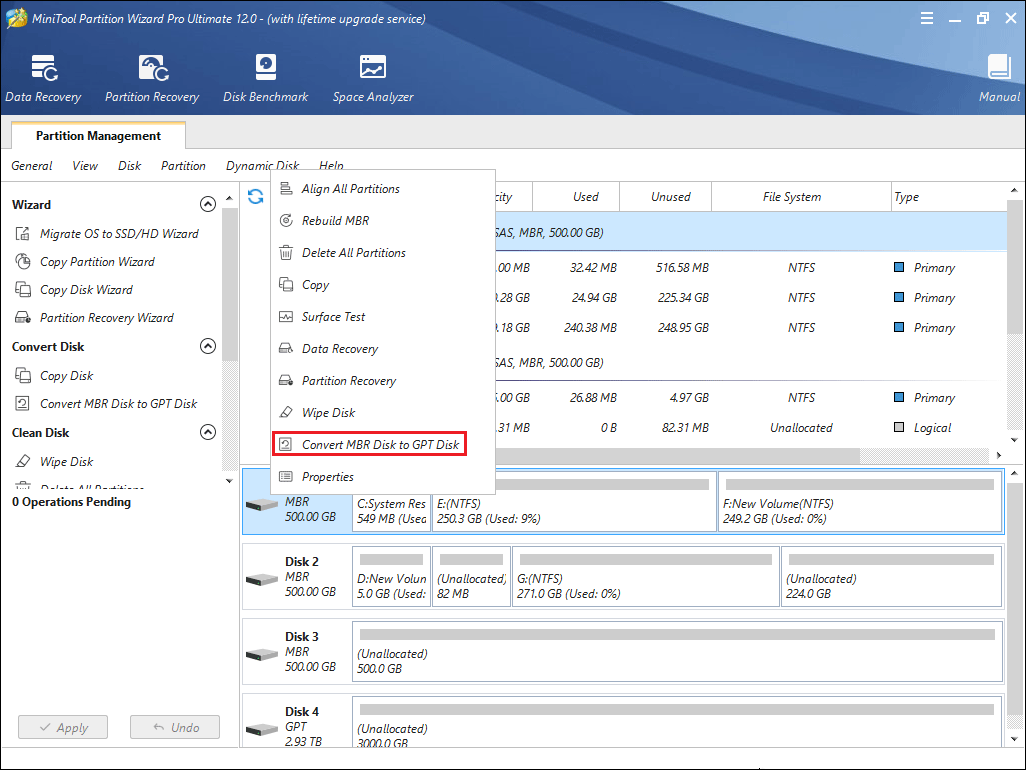
Step 7: Reboot your computer from the hard drive.
Here are two ways to install Windows 7 in UEFI mode. Following these guides, you will not encounter Windows 7 UEFI boot problem.Click to Tweet
Bottom Line
Is this article helpful to you? Do you have any other ideas about Windows 7 UEFI install? Please leave a comment below. Of course, if you have problems with Win 7 UEFI installation, also leave a comment or email at [email protected]. We will reply to you as soon as possible.
About The Author
Position: Columnist
Linda has been working as an editor at MiniTool for 5 years. She is always curious about computer knowledge and learns it crazily. Her articles are simple and easy to understand. Even people who do not understand computer can gain something. By the way, her special focuses are disk management, data recovery and PDF editing.