
Download Article
Learn to reset your BIOS from within Windows or by accessing the motherboard
Download Article
- Resetting from within BIOS
- Removing and Replacing the CMOS Battery
- Resetting the Jumper
- Video
- Expert Q&A
- Tips
- Warnings
|
|
|
|
|
|
If you want to switch back to your original BIOS version after a bad update, it’s easy to reset your PC’s BIOS. This procedure can also be helpful if you need to reset your BIOS password. We’ll show you how to reset your BIOS from within the BIOS utility itself, or by removing and reseating the CMOS battery on the motherboard. If you can’t access the CMOS battery, you can also reset the BIOS by resetting the jumper near the battery.
Things You Should Know
- You may be able to reset your BIOS by restarting in the BIOS utility and selecting “Setup Defaults” or something similar.
- If you can’t start your computer up properly, try removing and replacing the CMOS battery in your motherboard.
- Resetting the motherboard jumper is a good option if you can’t access the CMOS battery.
-

Open Start

, click the power icon
, and click Restart.[1]
- If your computer is locked, click the lock screen, then click the power icon in the bottom-right corner of the screen and click Restart.
- If your computer is already off, press your computer’s «On» switch.
-
Once the startup screen appears, you’ll have a very limited window in which you can press the setup key.[2]
- If you see «Press [key] to enter setup» or something similar flash across the bottom of the screen and then disappear, you’ll need to restart and try again.
Tip: It’s best to start pressing the setup key as soon as the computer begins to restart.
Advertisement
-
The key you’re prompted to press might also be different; if so, use that key instead.[3]
- If Del or F2 don’t work, try F8, F10, Esc, or Tab ↹. Some computers running Windows 10 or later require you to press and hold ⇧ Shift instead.
- For some computers, you’ll need to press and hold the appropriate key rather than tapping it.
- You’ll typically use the «F» keys to access the BIOS. These are at the top of your keyboard, though you may have to locate and hold the Fn key while pressing the proper «F» key.
- You can look at your computer model’s manual or online support page to confirm your computer’s BIOS key.
-
If you have Windows 10 or 11 on your computer, you can also enter the BIOS utility via your computer’s Settings menu. To do it:[4]
- Open the Start menu and select Settings, then Update & Security.
- Select Recovery from the sidebar on the left.
- Click Restart now under the Advanced Setup header.
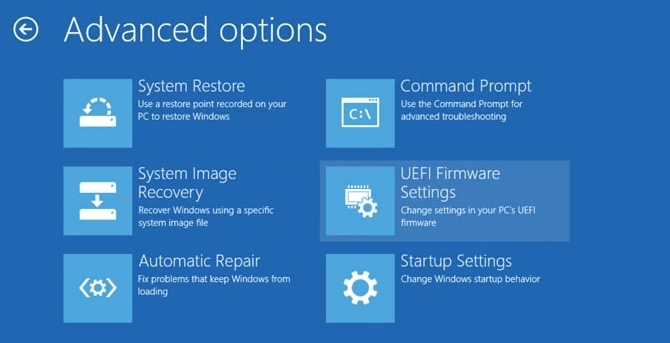
- When your computer boots up, you’ll see a blue troubleshooting screen. Select Troubleshoot > Advanced Options > UEFI Firmware Settings > Restart.
-
After successfully hitting the setup key, the BIOS will load. This should only take a few moments. When the loading is complete, you will be taken to the BIOS settings menu.
- If you cannot access your BIOS because you are locked out with a password or it has been corrupted, use one of the other methods in this article.
-

The location and wording of this option varies for every different BIOS, but it will typically be called «Reset to Default», «Factory Default», «Setup Defaults», or something similar. It may be located in one of the tabs or it may be an option listed near the navigation buttons.
- If your BIOS does not have this option, use one of the other methods following this section.
-
Use the arrow keys to select it; pressing ↵ Enter will usually begin resetting your BIOS immediately.
- Again, the wording of the option you select will likely differ for each BIOS.
- A dialog box might pop up asking you to confirm the reset. If this happens, select OK or Yes.
-
This will often be combined with the process of exiting a BIOS. Your computer will automatically reboot. If you need to change your BIOS settings once your BIOS resets, you may need to reboot your computer again and enter the BIOS to change them.
- The process of saving and exiting may vary from one computer to another. For example, you may need to press Esc and then select Save and exit or something similar.


Advertisement
-
Either use the Start menu to shut down, or press and hold your computer’s power button until the computer shuts down.
- If you’re using a desktop computer, you can usually turn the CPU entirely off by pressing a switch on the back of the CPU box.
-
This includes power cables for desktop computers and charging cables for laptops.
- Also remove anything else that might be plugged into your computer, such as external storage devices, monitors, and other accessories.
- Some desktop computers have a CMOS reset button that you can press after you power down your computer in order to reset the BIOS without having to actually open your computer. If this is the case for your computer, you can simply use the reset button and skip the rest of the steps.
- For instance, check the back of your ASUS computer for a CLR_CMOS button or something similar. Follow the instructions in your computer’s manual to use it correctly.
-
If you’re using a laptop (or a desktop with a backup battery), remove the battery before continuing.[5]
- Not all laptops have a removable battery. In these situations, your computer may have some other process built in for physically resetting the BIOS.
- For instance, several models of Dell laptop have an RTC (Real Time Clock) reset function that also resets the BIOS. You can read about the process here.
- Not all laptops have a removable battery. In these situations, your computer may have some other process built in for physically resetting the BIOS.
-
Touch a nonpainted metal surface to get rid of any static electricity before you start taking apart your computer. Touching the motherboard or other internal computer components while not properly grounded can permanently damage your computer.
-
You will need to be able to access the motherboard of your computer. Be very careful when working on the inside of your computer, as electrostatic discharge can easily destroy sensitive components.
- For many laptops, you can access the CMOS battery from a removable panel on the bottom of the laptop. If there is no panel available, you will most likely need to disassemble the laptop to access it.
- Your computer’s manual should have information about how to remove the cover and access the motherboard.
-
The battery is typically located near your PCI slots, but it may be in different locations depending on the manufacturer of your motherboard. It may be hidden by expansion cards and cables. The battery is usually a standard 3V, round, flat watch battery (CR2032).[6]
Tip: The CMOS battery isn’t always removable. If the battery won’t budge, don’t force it; instead, try resetting your motherboard’s jumper.
-
Hold down the power button on your computer for about 10-15 seconds to discharge any remaining power stored in the capacitors. By discharging the power, the CMOS memory will reset, thereby resetting your BIOS.
-
Carefully reinsert the CMOS battery back into its housing. Make sure that you have put the battery in the right direction. The slightly smaller side should be facing down.[7]
-
Do so carefully, and remember to ground yourself periodically.
-
If you unplugged the computer from the wall and/or removed the battery, plug it back in and/or replace the battery.
-
Depending on your computer, you may have to access the BIOS and reconfigure some of the options, including the default boot option or the date and time.[8]


Advertisement
-
Either use the Start menu to shut down, or press and hold your computer’s power button until the computer shuts down.
- If you’re using a desktop computer, you can usually turn the CPU entirely off by pressing a switch on the back of the CPU box.
- The jumper method mostly applies to desktop PCs, although you may be able to do it on some laptops. Check your computer’s manual to find out if this method is supported.
-
This includes power cables for desktop computers and charging cables for laptops.
-
If you’re using a laptop (or a desktop with a backup battery), remove the battery before continuing.
- If your laptop doesn’t have a removable battery, you may need to use a different method, such as resetting the BIOS internally (or doing an RTC reset on some Dell models).
-
Touch a nonpainted metal surface to get rid of any static electricity before you start taking apart your computer. Touching the motherboard or other internal computer components while not properly grounded can permanently damage your computer.
-
You will need to be able to access the motherboard of your computer. Be very careful when working on the inside of your computer, as electrostatic discharge can easily destroy sensitive components.
-
Locate the three-pin jumper on your motherboard that controls the BIOS. It will usually be located near the CMOS battery. The jumper will be covering two of the three pins.[9]
Note: The jumper may be labeled CLEAR, CLR, CLEAR CMOS, PSSWRD, or a variety of other labels. Refer to your motherboard’s documentation to find the correct jumper.
-
For example, if the jumper is covering the first and second pins, move it so that it is covering the second and third pins. Be sure to pull the jumper straight up to remove it so that you don’t bend the pins.[10]
- With some motherboard models, you can simply touch a metal object, such as the head of a screwdriver, to the pins and hold it there for 5-10 seconds to reset the pins.[11]
Consult your user manual to figure out which method is correct for your computer.
- With some motherboard models, you can simply touch a metal object, such as the head of a screwdriver, to the pins and hold it there for 5-10 seconds to reset the pins.[11]
-
Press and hold the power button on your computer for about 10-15 seconds to discharge any remaining power stored in the capacitors. This will make the BIOS reset.
-
Put the jumper back on the pins that it was originally on. This will allow you to access your BIOS when you start your computer up.
-
Do so carefully, and remember to ground yourself periodically.
-
If you unplugged the computer from the wall and/or removed the battery, plug it back in and/or replace the battery.
-
Depending on your computer, you may have to access the BIOS and reconfigure some of the options, including the default boot option or the date and time.


Advertisement
Add New Question
-
Question
How do I reset my BIOS settings?
Luigi Oppido is the Owner and Operator of Pleasure Point Computers in Santa Cruz, California. Luigi has over 25 years of experience in general computer repair, data recovery, virus removal, and upgrades. He is also the host of the Computer Man Show! broadcasted on KSQD covering central California for over two years.
Computer & Tech Specialist
Expert Answer
You can do this by accessing the BIOS menu. To do so, you’ll need to restart your computer by turning it off and turning it back on. Before the computer has fully turned on again, press and hold the F1, F2, F10, F12, or Delete button. This should take you to the BIOS menu. From there, follow the onscreen prompts to restore your BIOS settings.
-
Question
How do you flash your BIOS?
This answer was written by one of our trained team of researchers who validated it for accuracy and comprehensiveness.
wikiHow Staff Editor
Staff Answer
Flashing the BIOS basically means you are updating the BIOS to a newer version. This is a bit too complicated to explain here, and works differently on different computers, but you should be able to find what you need on How to Update Your Computer’s BIOS.
-
Question
I disabled my monitor on BIOS, and now the BIOS cannot be shown. How do I fix this?
Take out the CMOS battery, wait 10 seconds, and reinsert it into the same spot that you found it. (The CMOS battery looks like a silver coin on the motherboard.)
See more answers
Ask a Question
200 characters left
Include your email address to get a message when this question is answered.
Submit
Advertisement
Video
-
Without any custom configuration, most systems should still function adequately with their default BIOS settings.
Thanks for submitting a tip for review!
Advertisement
-
Ground yourself before handling any components inside a PC to reduce the risk of electrostatic discharge from damaging your PC.
Advertisement
About This Article
Thanks to all authors for creating a page that has been read 18,729,298 times.
Is this article up to date?
Обновлено 02 апреля 2025, 15:34
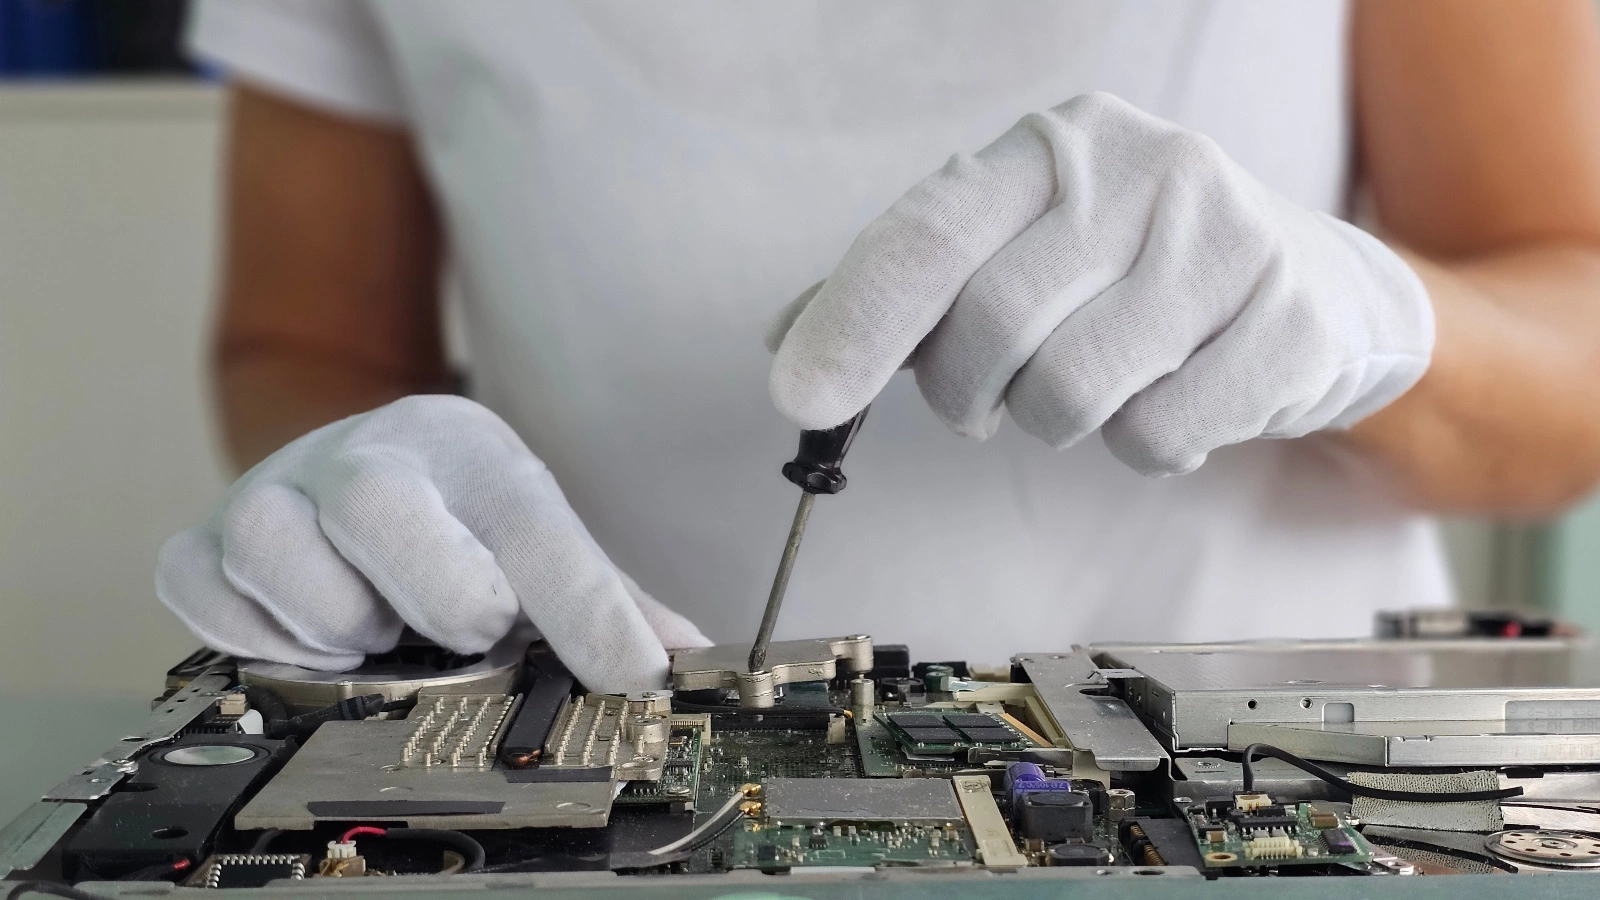
Фото: NMK-Studio / Shuttersock / FOTODOM
Если ваш компьютер ведет себя странно — зависает, не запускается или не видит жесткий диск, — вполне возможно, проблема в настройках BIOS. К счастью, их можно быстро сбросить до заводских, даже без специальных знаний. Рассказываем, зачем это нужно, что произойдет после сброса BIOS и как сделать это разными способами — от программного до ручного с батарейкой.
Зачем сбрасывать BIOS
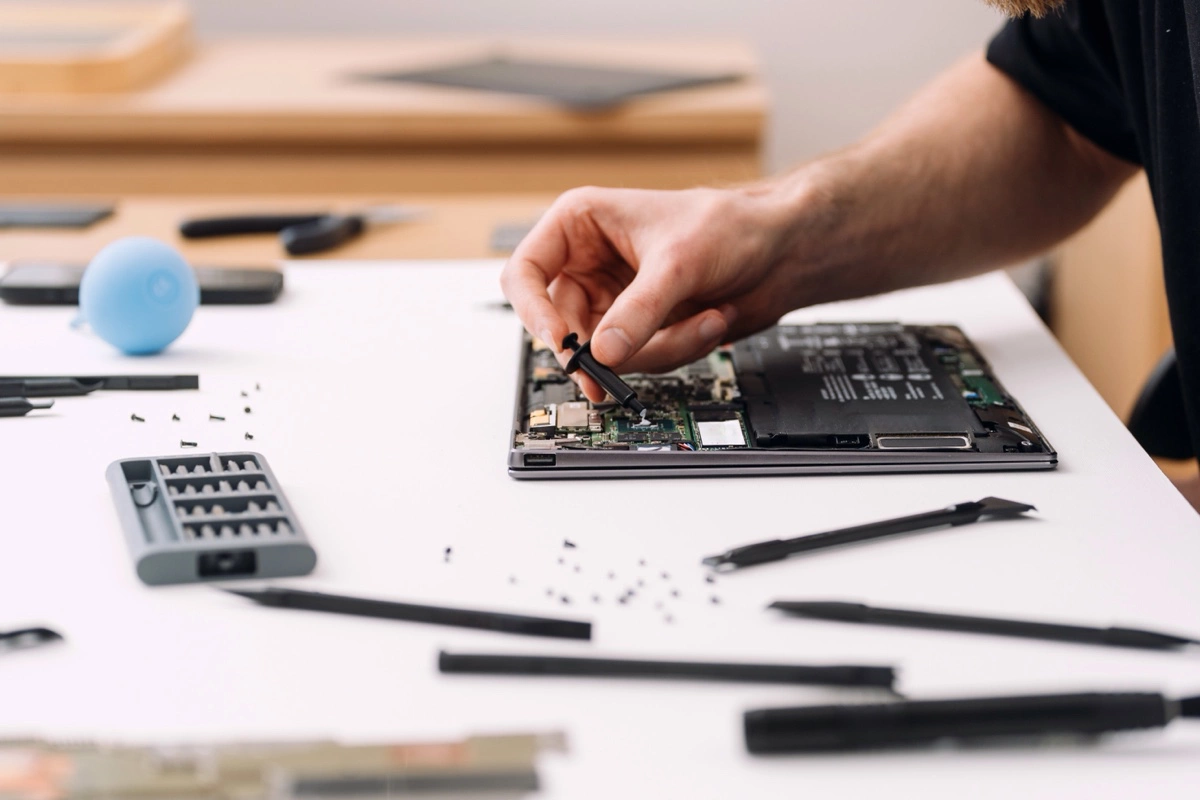
Фото: brizmaker / Shuttersock / FOTODOM
Обнулить компьютер довольно просто, но в некоторых случаях может потребоваться отвертка
BIOS (сокращение от Basic Input/Output System) — это предустановленное ПО, которое запускается первым и отдает команды операционной системе на включение [1]. Его главная задача — запустить «железо» и передать управление операционной системе, например Windows, Linux или другой.
BIOS есть на всех современных компьютерах и ноутбуках, вне зависимости от установленной на компьютере операционной системы. Но в последние годы активно используют его аналог UEFI.
Сброс BIOS (или UEFI) до заводских настроек — это способ вернуть базовую конфигурацию компьютера, которую задал производитель. Это может понадобиться в разных ситуациях [1]:
- после неудачного изменения параметров BIOS;
- при сбое в работе оборудования (например, если не распознается жесткий диск или система не запускается);
- когда компьютер стал нестабильно работать или зависать;
- если вы забыли пароль BIOS;
- при покупке подержанного компьютера, чтобы вернуть настройки к стандартным.
Сброс — это, по сути, обнуление системных параметров. Безопасная процедура помогает устранить множество распространенных проблем без обращения в сервис.
Что будет, если сбросить BIOS
Не стоит бояться сброса BIOS — данные на ПК сохранятся. Но будьте готовы, что часть настроек слетит и изменится. Что будет после сброса BIOS:
- все пользовательские настройки BIOS будут удалены — например, измененный порядок загрузки, разгон процессора, отключенные порты;
- дата и время сбросятся — их нужно будет вручную установить заново;
- система будет загружаться с заводскими параметрами, что может помочь устранить сбои;
- данные на жестком диске или SSD останутся в сохранности, как и все программы, документы, Windows и другие операционные системы.
Если вы раньше что-то меняли в BIOS (например, выставляли загрузку с флешки или настраивали работу вентиляторов), эти настройки нужно будет применить повторно.
Как сбросить BIOS: 3 способа
Сбросить BIOS можно тремя путями — все довольно простые, особенно если следовать инструкции [2].
1. Через программный интерфейс BIOS/UEFI
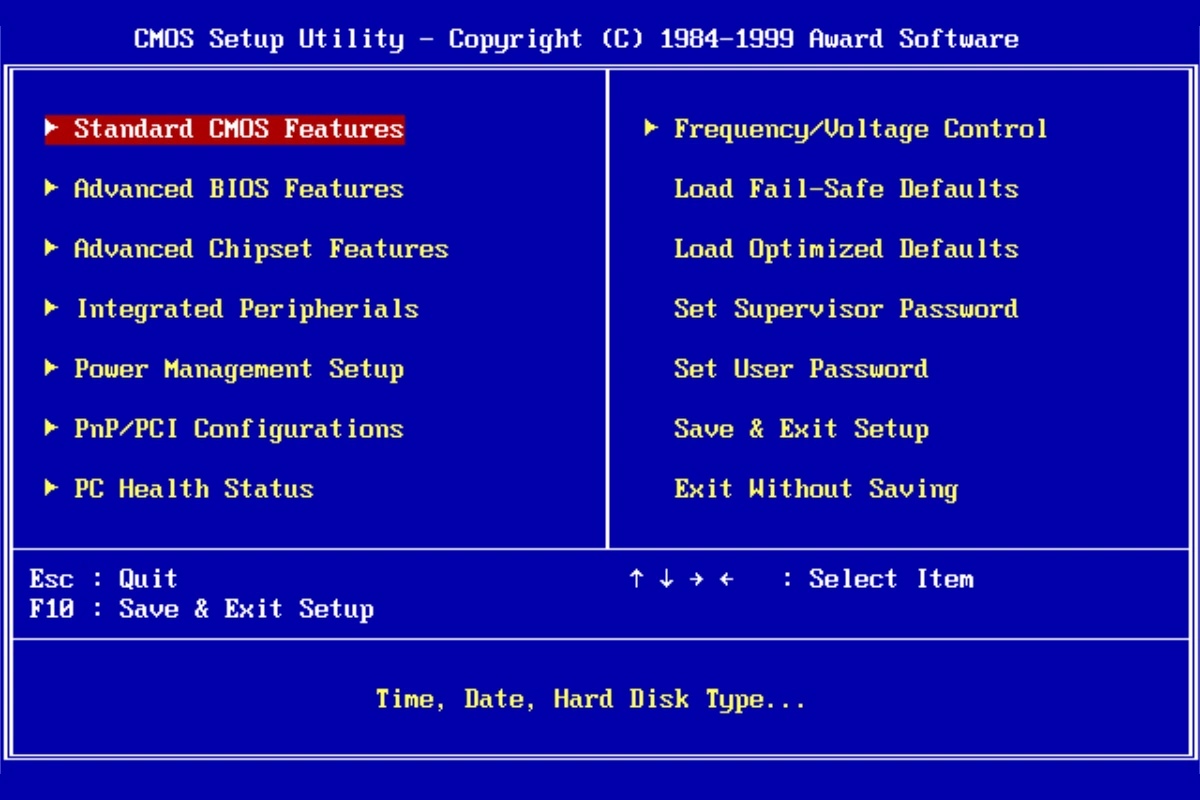
Фото: Award Software Inc. / Public Domain / Wikipedia
Меню BIOS фирмы Award
Это самый простой и безопасный способ. Пошаговая инструкция:
- Выключите компьютер и снова включите его.
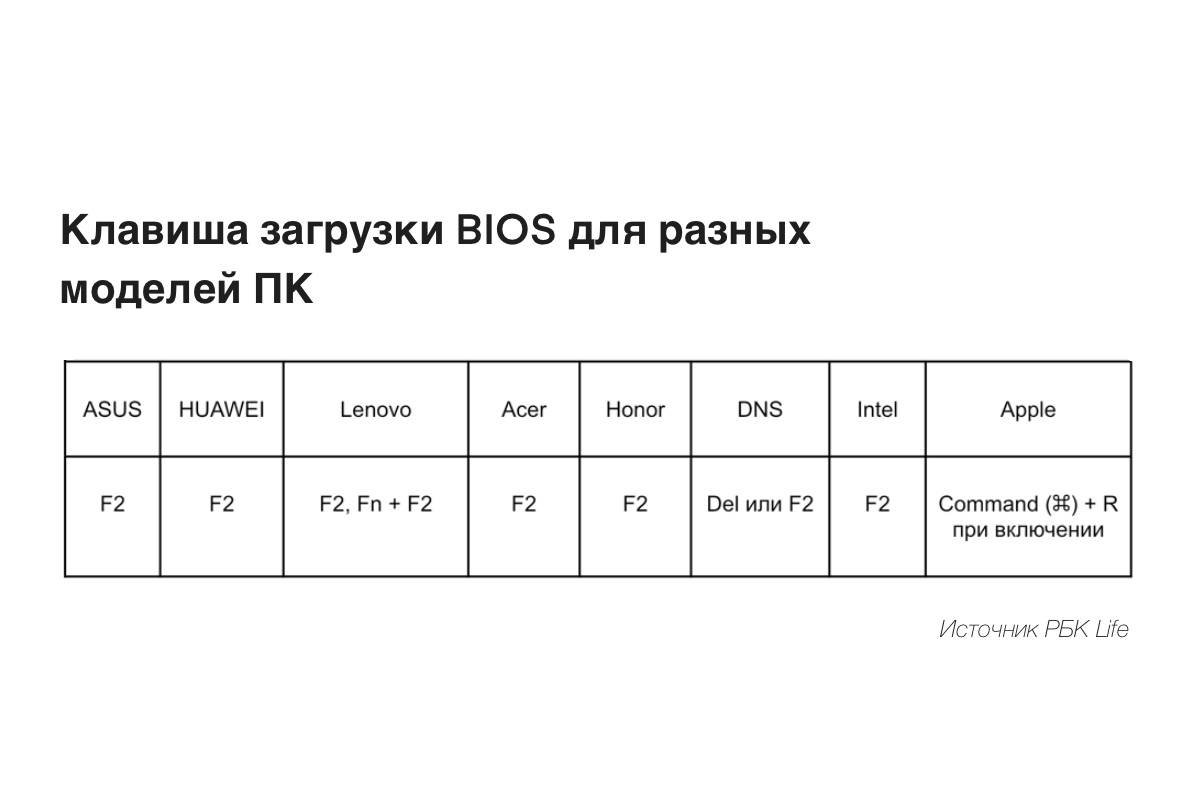
- Во время запуска нажмите клавишу для входа в BIOS. Это может быть Del, F2, F10, Esc — зависит от модели ПК. Обычно нужная клавиша кратко указывается на экране при старте.
- После входа в BIOS найдите пункт Load Setup Defaults, Load Optimized Defaults или Reset to Default. Он может находиться во вкладке Exit, Save & Exit или Setup — все зависит от версии BIOS.
- Согласитесь — обычно нужно выбрать Yes.
- Сохранитесь и выйдите — пункт Save and Exit, затем Yes.
- Компьютер перезагрузится с заводскими настройками BIOS.
Перед сбросом запомните или сфотографируйте текущие настройки BIOS — это может пригодиться.

Сброс BIOS / rutube.ru / Комплектующие и Апгрейды для Компьютера
2. Через сброс батарейки CMOS
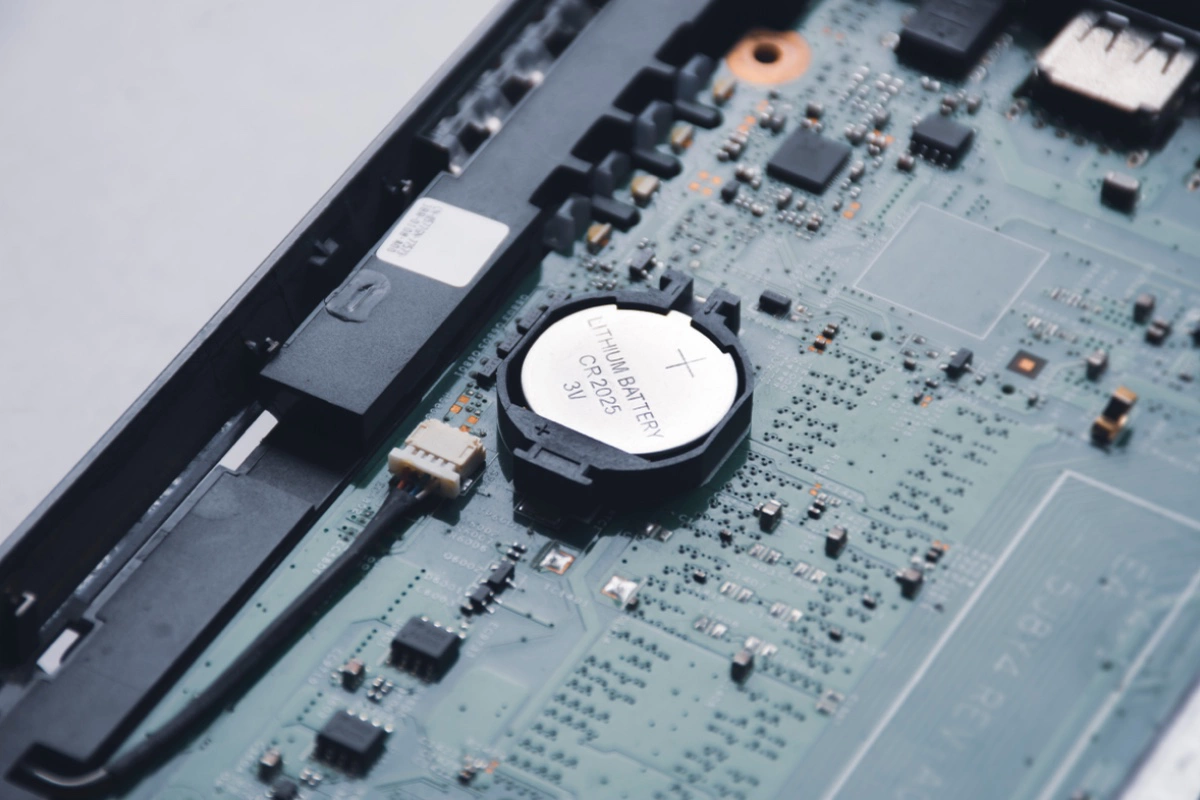
Фото: BLKstudio / Shuttersock / FOTODOM
Если компьютер не включается или вы не можете попасть в BIOS, можно воспользоваться «аппаратным» способом и буквально отключить батарейку CMOS, которая хранит память, а потом ее включить.
CMOS — это небольшой элемент в компьютере, который сохраняет настройки BIOS, даже когда вы выключаете питание или вынимаете аккумулятор. Он расположен на материнской плате и работает от круглой батарейки типа CR2032, которая похожа на большую монету [3]. Ее легко заметить, если открыть корпус настольного компьютера и найти элемент на матплате. На ноутбуках батарея CMOS может располагаться иначе: например, с нижней стороны матплаты либо отсутствует вовсе, как у некоторых устройств Mac. В таком случае лучше обратиться в сервис.
Если батарейка CMOS есть, то, чтобы до нее добраться, потребуется крестовая отвертка. Порядок действий:
- Выключите компьютер и отключите его от розетки.
- Откройте корпус (если это ПК) или крышку ноутбука (если позволяет конструкция).
- Найдите батарейку CMOS — это круглая серебристая таблетка (обычно CR2032), расположенная на материнской плате.
- Аккуратно извлеките батарейку.
- Подождите 5–10 минут для надежного сброса настроек.
- Вставьте батарейку обратно.
- Закройте корпус, подключите питание и включите компьютер.
После этого BIOS будет сброшен к заводским параметрам. Дата и время сбросятся, их нужно будет настроить заново.
3. Механически с помощью перемычки Clear CMOS Jumper
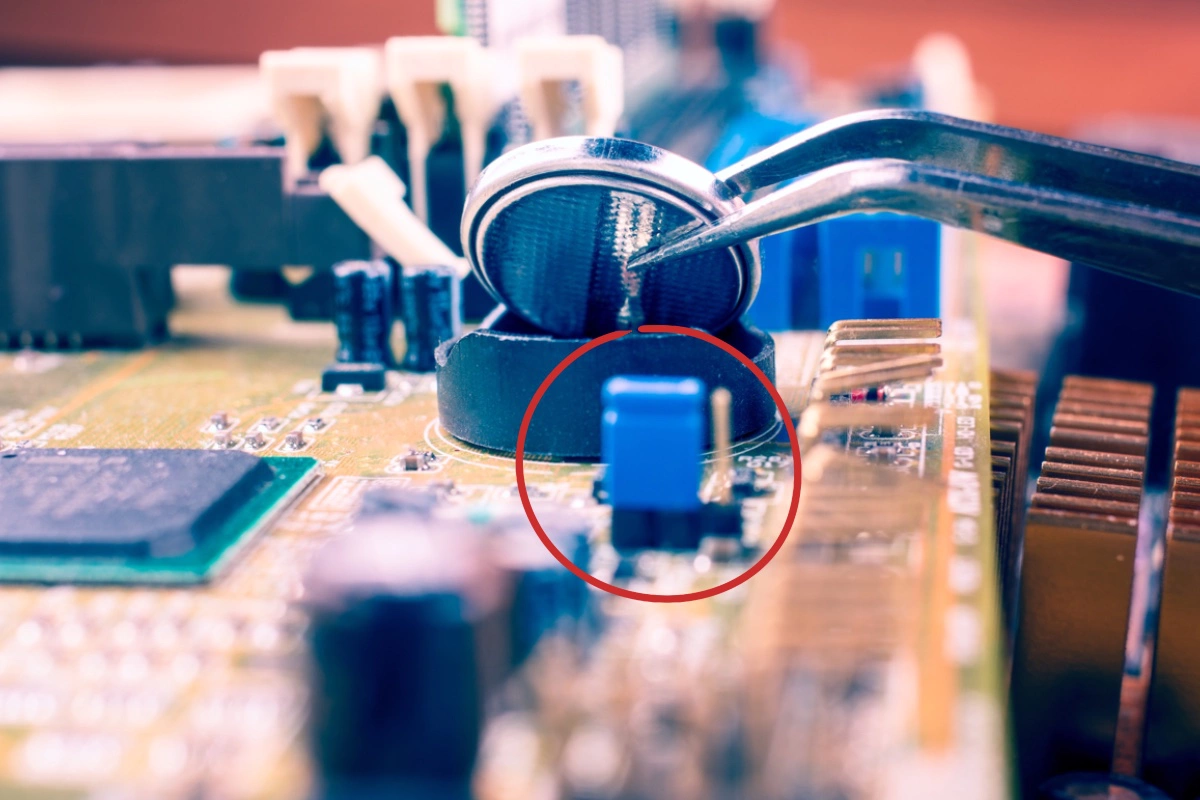
Фото: Balakleypb / Shuttersock / FOTODOM
На большинстве материнских плат есть специальная перемычка Clear CMOS, которая позволяет сбросить BIOS. Обычно она находится рядом с батарейкой CMOS. Тем не менее заранее уточните ее расположение в инструкции к вашей материнской плате — точное нахождение и метод сброса могут отличаться. Как сбросить BIOS с помощью перемычки Clear CMOS:
- Выключите компьютер и отсоедините питание от сети.
- Найдите на материнской плате перемычку с надписью CLR_CMOS, CLEAR, JBAT1 или похожей. Обычно она находится рядом с батарейкой.
- Сдвиньте перемычку на соседние контакты (например, с позиций 1-2 на 2-3) на 5–10 секунд.
- Верните перемычку в исходное положение.
- Включите питание и запустите компьютер.
Что делать после сброса BIOS
После сброса BIOS сделайте следующее:
- проверьте правильность даты и времени;
- при необходимости выставьте порядок загрузки (например, сначала жесткий диск, потом флешка);
- если раньше были изменены параметры (например, включен режим AHCI для диска), их нужно настроить заново;
- проверьте стабильность работы компьютера — как правило, после сброса все возвращается в норму.
-
Home
-
News
- How to Reset BIOS/CMOS in Windows 10 – 3 Steps
By Alisa |
Last Updated
Guide on how to reset BIOS to default settings in Windows 10 computer. If you want to try to reset BIOS to factory settings for you laptop or PC to repair Windows 10 issues like a boot error or troubleshoot PC startup problems, you can check the 3 steps below to easily reset BIOS/CMOS Windows 10.
BIOS is short for Basic Input Output System. It exists in computer’s motherboard, and controls computer startup process. Generally you can enter BIOS in Windows 10/8/7 to change the computer boot device and order. Newer computers uses UEFI to replace BIOS.
If your laptop won’t turn on, you can create a Windows 10 repair/recovery disk or USB drive to boot your computer and access the BIOS settings window.
You can reset BIOS to fix a boot error of your computer, or boot your computer from USB flash drive to further troubleshoot Windows PC problems with Startup Repair, Reset this PC, System Restore, Command Prompt and other Windows built-in troubleshooting utilities.
This tutorial mainly introduces how to reset BIOS in Windows 10 to default factory settings. Check the detailed 3 steps below.
3 Steps to Reset BIOS Windows 10
Step 1. Open BIOS Menu
To reset BIOS to default settings, you need to access BIOS menu and find the Default Settings option first.
Windows 10 users can access advanced startup options Windows 10 and get into BIOS menu. You can click Start -> Power, press and hold Shift key, and click Restart button to reboot Windows into Windows Recovery Environment. Then click Troubleshoot -> Advanced Options -> UEFI Firmware Settings, and click Restart to enter into BIOS settings screen.
Alternatively, you can also restart your computer normally and press the required key in startup screen to boot into BIOS settings window. The hotkey is varied from different computer manufacturers, and it could be F12, Del, Esc, F8, F2, etc.
Step 2. Find the Setup Defaults Option
The name and location of “Setup Defaults” option may be different from various computers. It generally calls like: Load Default, Load Setup Defaults, Load Default Settings, Load BIOS Defaults, Load Optimal Defaults, etc.
Use the arrow keys on computer keyboard to find the BIOS setup default option in BIOS settings screen. You may find it in one of the BIOS tabs.
Step 3. Reset BIOS Windows 10
After you find the Load Setup Defaults option, you can select it and press Enter button to start resetting BIOS to factory default settings in Windows 10.
At last, you can press F10 to save and exit BIOS. Your computer will automatically reboot.
If you need to change BIOS settings again in future, you can follow the same instructions to access BIOS again to change it.
Tip: There are two other ways to reset BIOS/CMOS in Windows 10: one is resetting the motherboard’s jumper, another is to remove and reinsert the CMOS batter. For the detailed guide, you can visit: How to Reset Your BIOS – wikiHow.
How to Recover Lost Data from Windows 10 PC
Here we also offer a free, easy and professional way to help you recover lost data or wrongly deleted files from your Windows 10/8/7 computer.
MiniTool Power Data Recovery, the best free data recovery software, allows you to recover deleted files and lost data from computer local hard drive, external hard drive, USB (pen drive data recovery), SD card, etc. in 3 simple steps. 100% clean and extremely easy-to-use.
About The Author
Position: Columnist
Alisa is a professional English editor with 4-year experience. She loves writing and focuses on sharing detailed solutions and thoughts for computer problems, data recovery & backup, digital gadgets, tech news, etc. Through her articles, users can always easily get related problems solved and find what they want. In spare time, she likes basketball, badminton, tennis, cycling, running, and singing. She is very funny and energetic in life, and always brings friends lots of laughs.
Please provide the English content you would like translated, and I will do my best to translate it into Chinese.
Workable Solutions
Step-by-Step Troubleshooting
| Workable Solutions | Step-by-Step Troubleshooting |
|---|---|
| Method 1. Perform a Reset from BIOS | You can directly reset the BIOS settings in the BIOS screen. Follow these steps…Full Steps |
| Method 2. Clear CMOS | If you have forgotten the password or the BIOS is corrupted, preventing access to the BIOS screen, you can remove the CMOS battery or reset the motherboard jumper…Full Steps |
BIOS is the first program that runs when you power up your computer, and it assists with basic operations and manages commands between your computer and the operating system installed on it. Like any other program, if you encounter BIOS issues while starting up your computer or adding new hardware, you may need to reset it to its factory settings. This means all BIOS settings will revert to their original state from when the computer was manufactured, ensuring optimal performance.
So, how to factory reset Windows 11 from BIOS on a computer? This post will show you some ways. Actually, it’s quite a straightforward process, so you don’t need to worry.

When is it necessary to perform a factory reset from BIOS?
When changes you made to the BIOS cause hardware issues, like your computer’s GPU, CPU, or RAM not working correctly, the only way to fix it is by resetting the BIOS to default. This is also particularly useful if your PC is having trouble booting up.
Another instance where you might need to reset your BIOS to factory settings is after installing new hardware on your computer. This is because the BIOS settings you modified for your old hardware may conflict with the new one, and a reset is recommended.
Moreover, performing a BIOS factory reset can help revert system modifications to default settings, which might be necessary when selling or buying a used computer. Additionally, if you’ve forgotten the BIOS password and cannot boot your PC, executing a BIOS factory reset can resolve this issue.
Here are some reasons why you might need to reset your BIOS to its factory settings:
- Boot Issues
- Hardware Problems
- New Hardware Installed
- Bought a Used Computer
- Forgotten BIOS Password
- Resetting Overclocking Settings
How to Factory Reset Your BIOS on a Windows Computer
Do you need to perform a factory reset in BIOS? As mentioned, there are three basic methods to execute a factory reset in BIOS, and they’re quite straightforward. Choose the one that best suits your needs:
Method 1: Reset from the BIOS
You can reset the BIOS settings directly from the BIOS screen by doing the following:
Step 1: First, restart your computer. As it’s booting back up, repeatedly press Del, F1, or F2. The key you need to press to enter the BIOS will depend on your motherboard’s make. If Del or F1 doesn’t work, consult your motherboard manual or the manufacturer’s website.
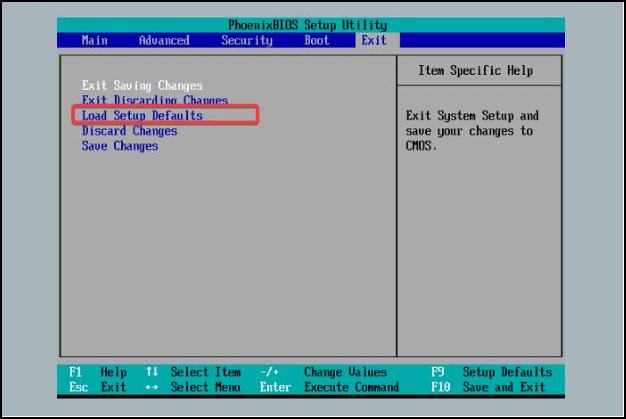
Step 2: Once in BIOS, use the arrow keys to select the “Exit” menu, then choose “Load Setup Defaults.” Depending on your motherboard, you may see an option like “Reset to Defaults,” “Load Optimal Defaults,” or “Restore Settings.”

You can use the arrow keys to navigate to this option and press Enter to select it.
Step 3: Select Yes to confirm, and the BIOS will reset immediately.
Step 4: In the «Exit» tab, select «Save Changes and Exit,» then click «Yes.» Alternatively, you can press F10 to save your settings and exit the BIOS.
Method 2: Clear the CMOS
If you can’t access the BIOS due to a forgotten password or a problem with the BIOS, you can remove the CMOS battery or reset the motherboard jumper. This involves opening your computer and touching the motherboard. Here’s how:
Step 1: Turn off the computer and unplug it from any power source. If you’re working with a laptop, remove the battery after shutting down.
2. Touch a metal surface before turning on your computer to discharge any static electricity.
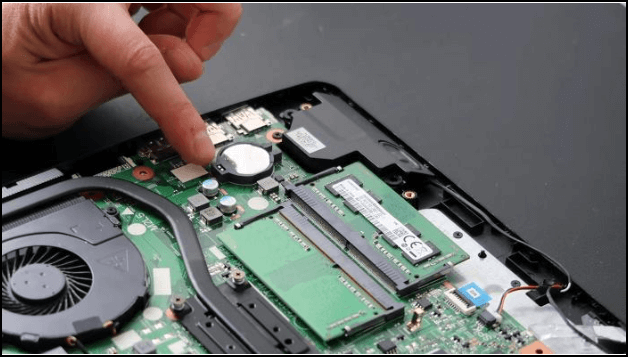
Step 3 Open up your laptop and locate the motherboard. Find the CMOS battery (a small silver battery); on some motherboards, it may be located underneath the GPU, while on others it will be near the PCI slots. Gently prise it out.
«Locating the CMOS battery»
Step 4. Hold down your computer’s power button for 10 to 15 seconds to drain the computer of power. This will reset the CMOS memory, which will in turn reset the BIOS.
Step 5: Now, reinsert the CMOS battery and reconnect your computer.
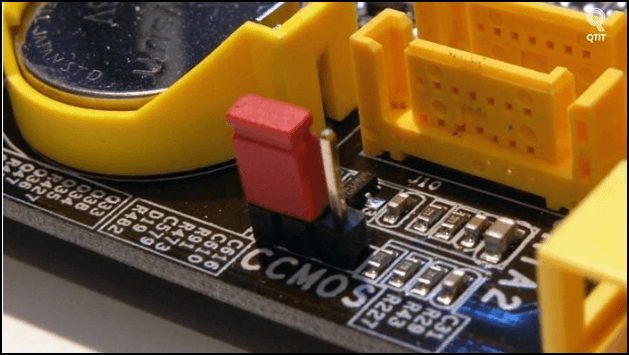
If your motherboard doesn’t have a CMOS battery, you can use the CMOS jumper, which is usually labeled CLEAR, CLEAR CMOS, CLR, PSSWRD, or another label on the motherboard. To locate the CMOS jumper, check the manufacturer’s website or the manual that came with your motherboard.

Once you’ve located the CMOS jumper, remove it and place it over the other two pins. If the jumper was previously on the first two pins, it should now be on the last two. This will reset the CMOS and, by extension, the BIOS.
If you’d like to reset your Windows PC another way, read this article for more information:
Conclusion
Use one of the above methods to reset your BIOS to default if necessary. This will restore the BIOS settings without affecting any data on your computer. Be sure to follow the steps as closely as possible, however, since mistakes can cause issues with your computer.
Frequently Asked Questions about Factory Reset from BIOS
Here, we also tackle issues related to resetting the factory settings in BIOS. If you’re interested, feel free to continue reading and learn the answers:
1. Is it safe to reset BIOS to factory settings?
Resetting your BIOS to factory settings is usually done to resolve issues with your computer. It simply involves restoring your computer’s BIOS settings to default. As such, resetting your BIOS is perfectly safe.
2. Does resetting the BIOS delete data?
A BIOS reset is not the same as a Windows factory reset. A Windows factory reset, performed through the Settings app, will erase data from your computer, whereas a BIOS reset has nothing to do with your PC’s data. In short, a BIOS factory reset won’t delete any data from your computer; it will only revert the BIOS settings to their default values.
| Workable Solutions | Step-by-step Troubleshooting |
|---|---|
| Method 1. Perform the Reset from BIOS | You can directly reset BIOS settings from the BIOS page, and here is how to do it…Full steps |
| Method 2. Clear CMOS | You can either remove the CMOS battery or reset the motherboard jumper if you can’t access the BIOS page because you’ve forgotten the password or it’s corrupted…Full steps |
The BIOS, the first program to launch when your computer is turned on, assists with some basic computer operations and manages commands between your computer and the OS that is installed on it. Just like any other program, the BIOS may need to be reset to factory settings if you encounter a problem with it when booting your computer or if you’ve added new hardware to your computer. Doing so implies that all BIOS settings will be restored to their original state at the time the computer was manufactured, ensuring optimum performance.
How can you perform a Windows 11 factory reset from BIOS on your computer, then? There are a few approaches to doing this, which will be covered in this article. Meanwhile, this is actually a fairly simple task, so you don’t have to worry.
When Do You Need a Factory Reset from BIOS
When changes you’ve made to the BIOS are to blame for hardware problems, such as your computer’s GPU, CPU, or RAM not functioning, the only way to remedy the issue is to factory reset the BIOS. This is also applicable, particularly if your computer is having trouble loading up.
Another scenario that may require you to factory reset from BIOS is when you’ve installed new hardware on your PC. It would be advised for you to do a BIOS reset since the BIOS settings you modified for the old hardware may conflict with the new hardware.
Moreover, performing a factory reset from the BIOS will assist in returning system modifications to their default settings, and this may be required when selling or buying a used computer. Furthermore, performing a BIOS factory reset will solve your problem if you are having trouble booting up your PC because you lost your BIOS password.
Here are the just-mentioned reasons why you might need to execute a BIOS factory reset:
- Boot problem
- Hardware problem
- Installed new hardware
- Purchased a used computer
- Forgot BIOS password
- Reset overclock settings
How to Factory Reset from BIOS on a Windows PC
Do you need to execute a factory reset from the BIOS? Just as mentioned earlier, there are three basic methods to perform a factory reset from the BIOS and they are pretty easy to do. Depending on which approach best suits your needs, you can choose between the two:
Method 1. Perform the Reset from BIOS
You can directly reset BIOS settings from the BIOS page, and here is how to do it:
Step 1. First, restart your computer. While the computer is rebooting, repeatedly hit Del, F1, or F2; the key to press in order to enter BIOS on your computer will depend on your motherboard. So if the Del or F1 didn’t work, you can refer to your MOBO manual or check the manufacturer’s website.
Step 2. After the BIOS page opens, use the arrow key to switch to the Exit section and select «Load Setup Defaults». The option may differ depending on your motherboard; you may see an option like «Reset to Default», «Load Optimal Defaults», or «Restore Settings».
You can select this option by using the arrow keys to navigate to it and pressing Enter.
Step 3. Select «Yes» to confirm your action, and your BIOS reset will start immediately.
Step 4. Under the Exit section, navigate to «Exit Saving Changes» and select «Yes». Better still, you press F10 to Save settings and exit BIOS.
Method 2. Clear CMOS
You can either remove the CMOS battery or reset the motherboard jumper if you can’t access the BIOS page because you’ve forgotten the password or it’s corrupted. To use this approach, you’ll need to open up your computer and access the motherboard. Here’s how to do it:
Step 1. Power off your computer and unplug it from any power source. If you are using a laptop, you should also remove the battery after it powers off.
Step 2. Touch a metal surface to get rid of static electricity before you start opening your computer.
Step 3. Open up your laptop to access the motherboard. Now look for the CMOS battery ( a silver-colored battery), which may be under the GPU for some boards or near the PCI slots, and remove it gently.
Step 4. Press and hold your computer’s power button for 10 to 15 seconds to discharge power from it. Doing this will reset the CMOS memory, and, consequently, reset the BIOS.
Step 5. Now, reinsert the CMOS and couple your computer.
You can use the CMOS jumper, frequently labeled CLEAR, CLEAR CMOS, CLR, PSSWRD, or any other tag on your motherboard if your motherboard is missing a CMOS battery. To find the CMOS jumper, you can also check the manufacturer’s website or the manual that came with your motherboard.
After locating the CMOS jumper, you should take it off and switch it to the other two jumper pins. The jumper should now be put on the last two pins if it was previously on the first two pins. By doing this, the CMOS and, subsequently, the BIOS will be reset.
If you want to factory reset your Windows PC in other ways, you can read this article to learn more:
2022 Ultimate Guide: How to Factory Reset PC
Factory resetting a PC is usually the operation users will choose to make when they decide to give away or sell the computer. The factory resetting aims to erase all personal settings and data from the target computer.
Conclusion
When required, you can perform a factory reset from BIOS using either of the methods above. Doing that will take your BIOS settings to their defaults without affecting any data on your computer. However, you should try as much as possible to follow the steps carefully, as doing the wrong thing may cause an issue on your computer.
FAQs about Factory Resetting from BIOS
Here in this part, we also covered some hot questions related to factory resetting from BIOS. If you are interested, follow and learn the answers here:
1. Is factory reset from BIOS safe?
Performing factory resetting from BIOS is most time in a bid to resolve issues with a computer. And what it simply does is revert the BIOS settings on your computer to their defaults. Hence, it’s absolutely safe to factory reset from BIOS.
2. Does resetting the BIOS erase data?
BIOS factory reset and Windows factory reset are two entirely different things. While performing a Windows factory reset through Windows settings would erase data on your computer, resetting the BIOS doesn’t have anything to do with your PC data. In short, a BIOS factory reset doesn’t erase data on your computer; it only restores BIOS settings to their defaults.