
Modern days laptop and PC comes with a built-in face or fingerprint scanner. Windows Biometric Service or WbioSrvc is used to manage this feature and allow client applications to capture, compare, manipulate, as well as store biometric data. The service doesn’t need to gain direct access to any biometric hardware or samples for this. The service is hosted in a privileged SVCHOST process and Enabling this will allow the system to run this data.
Though the service is often useful, some people don’t use it much so they want to keep it disabled. Also, the service sometimes found to cause high CPU along with disk usage. Path to this executable is C:\WINDOWS\system32\svchost.exe -k WbioSvcGroup.
Enable/disable Windows Biometric Service in Windows 10 or 11
Here is how to How to Enable / disable Windows Biometric Service in Windows 11 or 10 –
- Press – Windows + S.
- Type in – services.
- Hit – Enter.
- From the available list, find – Windows Biometric Service.
- Double-click the same.
Enable
- Click the drop-down for – Startup type.
- Choose – Automatic.
- Hit – Start.
Disable
- Again, click the dropdown beside – Startup type.
- Select – Disabled.
- Click – Stop.
- Lastly, hit Apply followed by OK.
That’s all!!
Многие современные ноутбуки имеют встроенный сканер отпечатков пальцев, а Windows 10, в свою очередь — встроенную поддержку входа в систему по отпечатку. Обычно, первоначальная настройка осуществляется после первого входа в систему на новом устройстве, но, если вы переустановили Windows, вход по отпечатку перестал работать после обновления или вам потребовалось добавить дополнительные отпечатки, сделать это можно в соответствующих параметрах системы.
В этой простой инструкции подробно о том, как настроить вход по отпечатку пальца, добавить отпечатки и о возможных проблемах, с которыми можно столкнуться в процессе.
- Настройка входа по отпечатку пальца
- Как добавить отпечаток пальца Windows 10
- Что делать, если перестал работать сканер отпечатка пальца
Настройка входа по отпечатку пальца в Windows 10
Внимание: далее предполагается, что сканер отпечатков пальцев исправно работает, а в Windows 10 уже настроен ПИН-код (настраивается в Параметры — Учетные записи — Варианты входа), он необходим для использования входа с помощью биометрических датчиков в Windows 10.
Если ранее вы не настраивали вход с использованием отпечатка пальца, то выполнить первоначальную настройку (при условии, что сканер работает), можно с помощью следующих шагов:
- Зайдите в «Параметры» (можно нажать клавиши Win+I) и откройте пункт «Учетные записи».
- В параметрах учетных записей откройте пункт «Варианты входа».
- Нажмите по пункту «Распознавание отпечатков пальцев Windows Hello», а затем — по кнопке «Настройка».

- Откроется мастер настройки Windows Hello, в котором следует нажать «Начать», затем ввести ПИН-код для входа в Windows 10, а далее следовать указанием мастера настройки отпечатков пальцев — касаясь его, пока процесс не будет завершен.

- По завершении вы увидите окно, сообщающее о возможности использования отпечатка пальца для разблокировки компьютера в дальнейшем, и предлагающее добавить еще один палец (это можно сделать и позже).


Готово, теперь, если всё работает исправно, при входе в систему вы можете просто приложить палец (для которого выполнялась настройка) к соответствующему сканеру на ноутбуке.
Как добавить отпечаток пальца Windows 10
Добавление альтернативных отпечатков предлагается выполнить сразу после первоначальной настройки их распознавания, но сделать это можно и позже:
- Зайдите в Параметры — Учетные записи — Варианты входа.
- Откройте пункт «Распознавание отпечатков пальцев Windows Hello» и нажмите кнопку «Добавить ещё».

- Введите ваш ПИН-код и выполните настройку нового отпечатка пальца для входа в систему.


Перестал работать вход по отпечатку или сканер отпечатка пальца в Windows 10
Как и при использовании других функций Windows 10, при входе по отпечатку могут возникать проблемы, по порядку рассмотрим наиболее распространенные:
- Сканер отпечатков пальцев работает (в диспетчере устройств отображается без ошибок), но вход не происходит: никакой реакции на прикладывание пальца. Случается после обновлений Windows Если попробовать добавить отпечатки снова, сообщается, что они очень похожи на уже имеющиеся и зарегистрированные. Решение: в Параметры — Учетные записи — Варианты входа в разделе настройки отпечатков пальцев нажать кнопку «Удалить», а затем снова добавить нужные отпечатки. Если этот вариант не подошел, обратите внимание на дополнительное решение, которое будет описано в конце статьи.
- Аналогично тому, что вы можете наблюдать на смартфонах, влажные руки или загрязнение сканера могут быть причиной того, что сканер отпечатков пальцев ноутбука не срабатывает.
- Если при попытке настроить отпечаток пальца вы видите сообщение «Не удалось найти сканер отпечатков пальцев, совместимый с функцией Распознавание отпечатков пальцев Windows Hello», причина чаще всего в драйверах сканера (не установлены или установлены не те), решение — скачать и установить их вручную с сайта производителя ноутбука для вашей модели (ищем драйвер для Fingerprint Sensor или аналогичный). В некоторых случаях для старых ноутбуков (изначально выпускавшихся на Windows 7 или
 может оказаться, что датчик действительно не совместим с Windows Hello. В диспетчере устройств сканер отпечатков пальцев находится в разделе «Биометрические устройства».

- Для работы функции должна работать «Биометрическая служба Windows», проверить её статус можно в Win+R — services.msc, тип запуска по умолчанию — «Автоматически».

 может оказаться, что датчик действительно не совместим с Windows Hello. В диспетчере устройств сканер отпечатков пальцев находится в разделе «Биометрические устройства».


Дополнительный вариант, на случай если есть подозрение на неправильную работу функций входа с использованием биометрии, в том числе по отпечатку пальца (перед этим желательно создать точку восстановления системы и знать свои пароль и ПИН-код для Windows 10):
- В services.msc остановите и отключите биометрическую службу Windows.
- Перенесите файлы из папки C:\Windows\System32\WinBioDatabase в другое расположение (откуда их при необходимости можно будет восстановить), там чтобы их не осталось в указанной папке.
- Запустите и включите тип запуска «Автоматически» для биометрической службы Windows.
- Добавьте отпечатки пальца для входа через Параметры Windows
Надеюсь, инструкция поможет разобраться, а при наличии каких-либо проблем оперативно решить их.
This article explains enabling or disabling Windows Hello Biometrics in Windows 11.
Windows 11 has a Windows Hello feature that provides a more personal and secure way to sign into Windows. With Windows Hello, one can use a PIN, facial recognition, or fingerprint to sign into their devices securely.
Most new Windows devices you purchase today will come with biometrics features. In addition, windows will prompt you to use one biometrics feature to protect your device and enhance your data security.
However, not all Windows devices should use Windows Hello Biometrics. Biometrics may hinder service access in some environments and complicate getting stuff done.
Here’s how to allow or disallow Windows Hello Biometrics in Windows 11.
Turn on the use of Windows Hello Biometrics via the Local Group Policy Editor
As described above, Windows Hello Biometrics features enhance security and data protection. However, not all users can use Windows biometrics features.
Here’s how to enable or disable it.
First, open the Local Group Policy Editor.
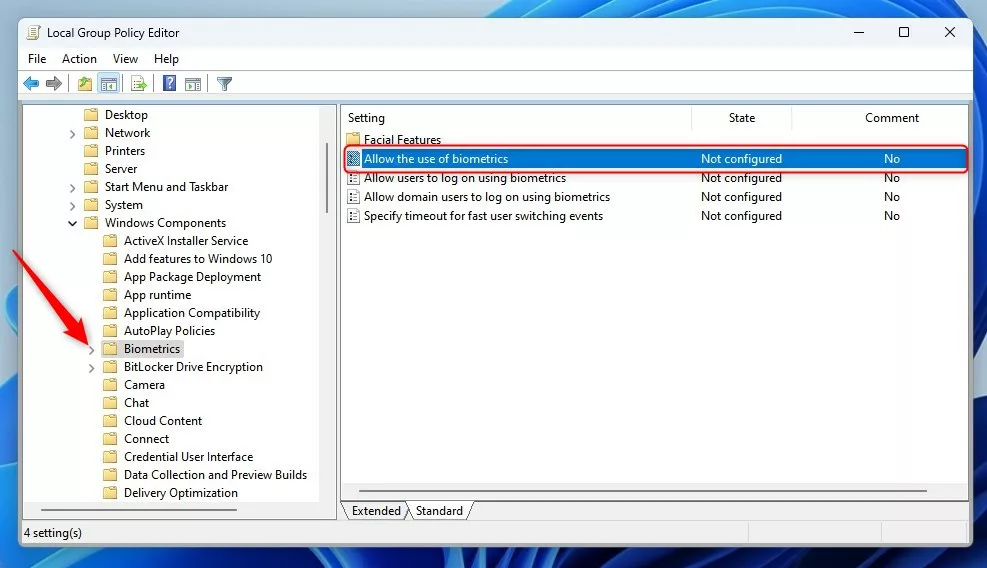
Then expand the following folders Computer Configuration -> Administrative Templates -> Windows Components -> Biometrics.
Computer Configuration -> Administrative Templates -> Windows Components -> Biometrics
Next, click on the Biometrics folder on the left panel, and double-click the setting on the right called “Allow the use of biometrics” to open.
When the setting window opens, select one of the options:
- Not Configured – Same as enabled. The Biometrics service is available.
- Enabled – Windows Hello Biometrics service is available to use.
- Disabled – Windows Hello Biometrics service is unavailable, and users can use Biometrics.
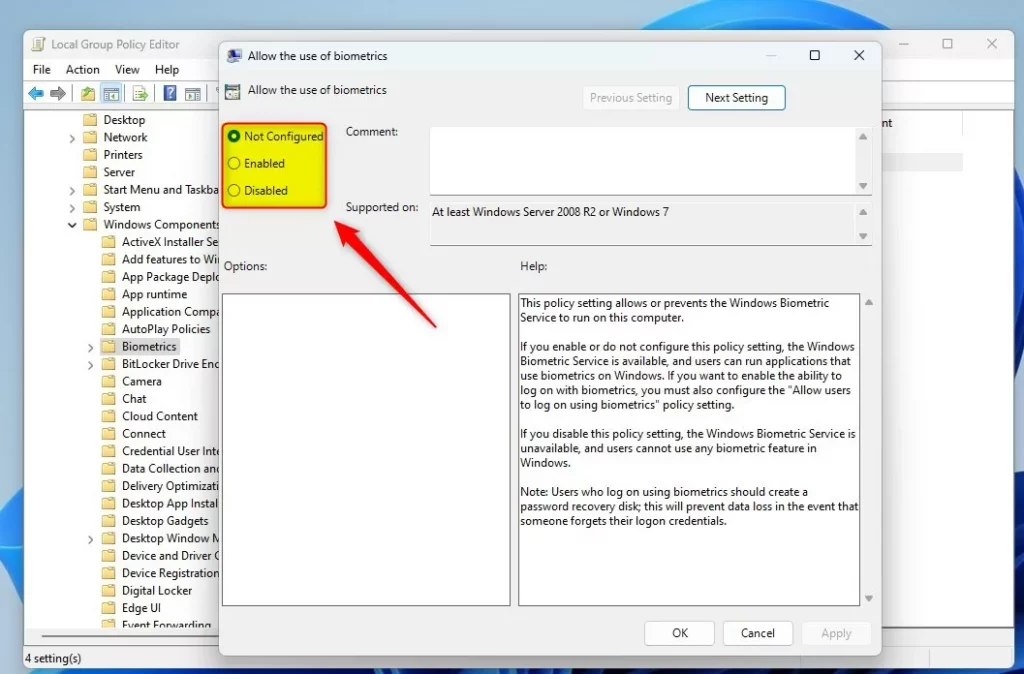
Save your settings and restart your computer for the changes to apply.
Enable or disable the use of Windows Hello Biometrics via Windows Registry Editor
Yet another way to turn on or off Windows Hello Biometrics in Windows is to use the Windows Registry Editor.
If you can’t open the Local Group Policy Editor, use the Windows Registry editor instead.
Open the Windows Registry, and navigate to the folder key path below.
HKEY_LOCAL_MACHINE\SOFTWARE\Policies\Microsoft
If you don’t see the Biometrics folder key, right-click on the Microsoft key, then create the subkey (Biometrics) folders.

Right-click the Biometrics folder key’s right pane and select New -> DWORD (32-bit) Value. Type a new key named Enabled.
Double-click the new key item name (Enabled) and make sure the Base option is Decimal, and then update the Value data, making sure you keep your existing value:
- To turn this feature on. Type 1.
- To turn this feature off. Type 0.
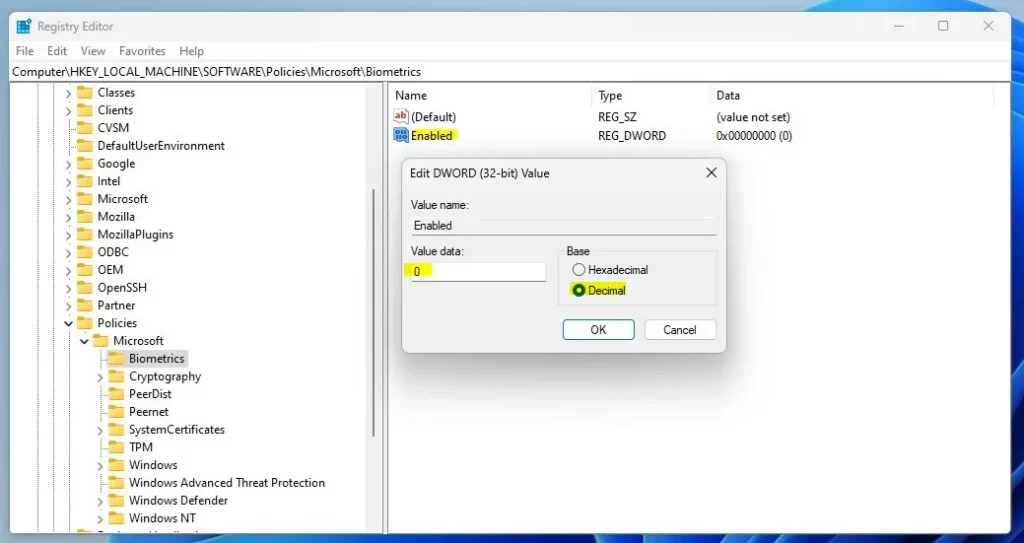
Save your changes and restart your computer.
That should do it!
Conclusion:
- Windows Hello Biometrics provides a more personal and secure way to sign into Windows 11, offering options like PIN, facial recognition, or fingerprint sign-in.
- Enabling or disabling Windows Hello Biometrics can be done via the Local Group Policy Editor or the Windows Registry Editor.
- Remember that while biometrics can enhance security and data protection, it may not be suitable for all environments and could hinder service access. Assessing whether it’s appropriate for your specific use case is important.
- This guide has provided step-by-step instructions for the Group Policy and Registry Editor methods, ensuring you can manage Windows Hello Biometrics according to your needs.
- If you have any feedback or additional insights regarding the process, feel free to share them using the comment form below the article.
Enable or Disable Domain Users Sign in to Windows 10 Using Biometrics: Although Windows 10 is pretty secure as it gives you the option to sign into Windows using a PIN, Password, or Picture Password but you can always add an extra layer of security by enabling the built-in fingerprint reader. But your PC must have come with the fingerprint reader in order for you to take the benefit of this extra layer of security. The benefit of using Biometrics is that your fingerprints are unique so no chance of brute force attack, it’s easier than remembering password etc.

You can use any Biometrics such as your face, iris, or fingerprint to sign in to your device, apps, online services etc provided your device comes with these features built-in by the manufacturer of your device. Anyway, without wasting any time let’s see How to Enable or Disable Domain Users to Sign in to Windows 10 using Biometrics.
Table of Contents
Make sure to create a restore point just in case something goes wrong.
Method 1: Enable or Disable Domain Users Sign in to Windows 10 Using Biometrics in Local Group Policy
Note: This method will not work for Windows 10 Home Edition Users, this method is only for Windows 10 Pro, Education, and Enterprise Edition Users.
1.Press Windows Key + R then type gpedit.msc and hit Enter to open Local Group Policy.

2.Navigate to the following path from the left-hand side pane:
Computer Configuration > Administrative Templates > Windows Components > Biometrics
3.Make sure to select Biometrics then in right window pane double-click on “Allow domain users to log on using biometrics” policy.

4.Now to change the above policy settings according to your choice:
Enable Domain Users Sign in to Windows 10 Using Biometrics: Not Configured or Enabled
Disable Domain Users Sign in to Windows 10 Using Biometrics: Disabled

Note: Not Configured is the default setting.
5.Click Apply followed by OK.
6.Once finished, close everything then reboot your PC to save changes.
Method 2: Enable or Disable Domain Users Sign in to Windows 10 Using Biometrics in Registry Editor
1.Press Windows Key + R then type regedit and hit Enter to open Registry Editor.
2.Navigate to the following registry key:
HKEY_LOCAL_MACHINE\SOFTWARE\Policies\Microsoft\Biometrics\Credential Provider
3.Right-click on Credential Provider then select New > DWORD (32-bit) Value.

4.Name this newly created DWORD as Domain Accounts and hit Enter.

5.Double-click on Domain Accounts DWORD and change its value according to:
0 = Disable Domain Users Sign in to Windows 10 Using Biometrics
1 = Enable Domain Users Sign in to Windows 10 Using Biometrics
6.Once finished, click OK to close the above dialog box then restart your PC.
Recommended:
- Enable or Disable Write Protection for Disk in Windows 10
- How to Change Monitor Refresh Rate in Windows 10
- Enable or Disable Disk Write Caching in Windows 10
- Prevent Hard Disk from going to Sleep in Windows 10
That’s it you have successfully learned How to Enable or Disable Domain Users Sign in to Windows 10 Using Biometrics but if you still have any queries regarding this tutorial then feel free to ask them in the comment’s section.