
After upgrading to Windows 10 Fall Creators (v1709) or Creators Update (v1703), a lot of users are faced with the problem “Microsoft Edge can’t connect securely to this page”. A “Can’t connect securely to this page” error message will appear on the screen, which prevents you from opening a website.

Other than Microsoft Edge, the error also occurs in other browsers including Google Chrome, Firefox and Internet Explorer. This may be caused by outdated or unprotected Transport Layer Security (TLS) settings, network driver problems, or other network settings issues.
Complete Error Message:
“Can’t connect securely to this page
This might be because the site uses outdated or unsafe TLS
security settings. If this keeps happening, try contacting the
website’s owner.”
Possible Reasons for this Error:
A browser relies on TLS handshakes between the browser and the server when it tries to connect to an HTTPS website. Unlike the most common HTTP, HTTPS (Secure Hypertext Transfer Protocol) is a more secure communication method between a web server and a browser because all data circulating on it is encrypted and cannot be read by anyone else. Here are some of the reasons for this Microsoft Edge error.
- The site uses old TLS encryption settings (e.g. 1.0 or 1.1) and you have forced the settings to accept only TLS 1.2 or higher.
- The site only uses TLS 1.2, but you disabled TLS 1.2 in your Internet Options settings, or: You have an old operating system that does not support TLS 1.2.
- The page is in HTTPS, but it also contains HTTP elements (e.g. external images).
- You have disabled the use of weak MD5 and 3DES encryption algorithms.
How to Fix Can’t Connect Securely to this Page on Microsoft Edge
Here are some troubleshooting methods and fixes that worked for most Edge users:
Method 1 – Reset Internet Explorer Settings
Clearing the cache and cookies in Microsoft Edge and restoring Internet Explorer settings is one of the first troubleshooting methods that you must try.
To Clear Cache and Cookies in Microsoft Edge:

- Open Microsoft Edge.
- Click on the three horizontal dots in the top right corner of the window.
- Click Settings.
- In the Clear browsing data section, click Choose what to clear.
- Verify that your browsing history, cookies and saved website data, and cached files and data have been verified, and then click Clear.
To Reset Internet Explorer Settings:

- Open Run by clicking Windows + R.
- In the Run field, type inetcpl.cpl, and then click OK.
- In the Internet Properties section, click the Advanced button.
- In the Reset Internet Explorer section, click Reset.
- Click Reset.
- Close the window and restart your computer.
Method 2 – Enable Mixed Content in Microsoft Edge

Edge blocks multiple pages if mixed content is not enabled. Therefore, activating mixed content surely helps in eliminating the “Can’t connect securely to this page” error. To do this, follow these steps:
- Open the Internet Properties window by typing “Internet Options” in Cortana and selecting Internet Options.
- Then select the Security tab.
- Click the Custom Level option
- First, select Medium from the Reset To drop-down menu.
- Scroll down to Display Mixed Content
- Tap the Enable switch for Show mixed content.
- Click the OK button.
Method 3 – Select the TLS Settings

The “Can’t connect securely to this page” tab indicates that the problem may be related to the TLS settings. So this is an indication of a possible resolution. Some Edge users have fixed the page connection error by selecting the following TLS settings.
- Click the Type here button to open the Cortana search box.
- Enter the keyword “Internet Options” in the search field.
- Select Internet Options.
- Select the Advanced tab.
- Then scroll down and select the SSL and TLS checkboxes.
- Click Apply to apply the settings.
- Click OK to close the window.
One last thing, to solve this issue, TLS 1.2 in Microsoft Edge needs to be enabled.
- In the Windows menu search area, enter Internet options.
- Click the Internet options from the results.
- In the Internet Properties window and the Advanced tab, scroll to the Security section.
- Check off Use TLS 1.1 and Use TLS 1.2 checkboxes.
- Click OK.
- Close the browser and restart the Microsoft Edge browser.
If you can’t find any luck with the methods we have listed above, let us know in the comments section below.
Windows Dispatch is a website supported by its readers & community. Some pages may contain affiliate links which may allow us to earn a little money when you buy through them.
Eddie Mendoza Jr
Eddie has a degree in Information Technology with a natural inclination towards troubleshooting devices. With more than 10 years of blogging experience in different niches, he has found it most satisfying when writing easy-to-follow guides and simplified articles related to computers, smart TVs, mobile devices and Internet-based services.
Quick Tips
- Check the date and time on your PC, and change it if incorrect.
- Clear cache and cookies from Microsoft Edge.
- Always open links that begin with ‘https’ instead of ‘http’. The latter is an outdated, less secure protocol to open websites.
Basic Fixes
- Use the InPrivate window: Click on the three-dots icon at the top right, and open an InPrivate window. This does not record any of your history or store cache, there is a chance that this might prevent you from facing the error message.
- Check date and time: Incorrect date and time on your Windows PC can cause the issue.
- Disable VPN: A low-quality, or faulty VPN can cause issues with opening websites on your PC.
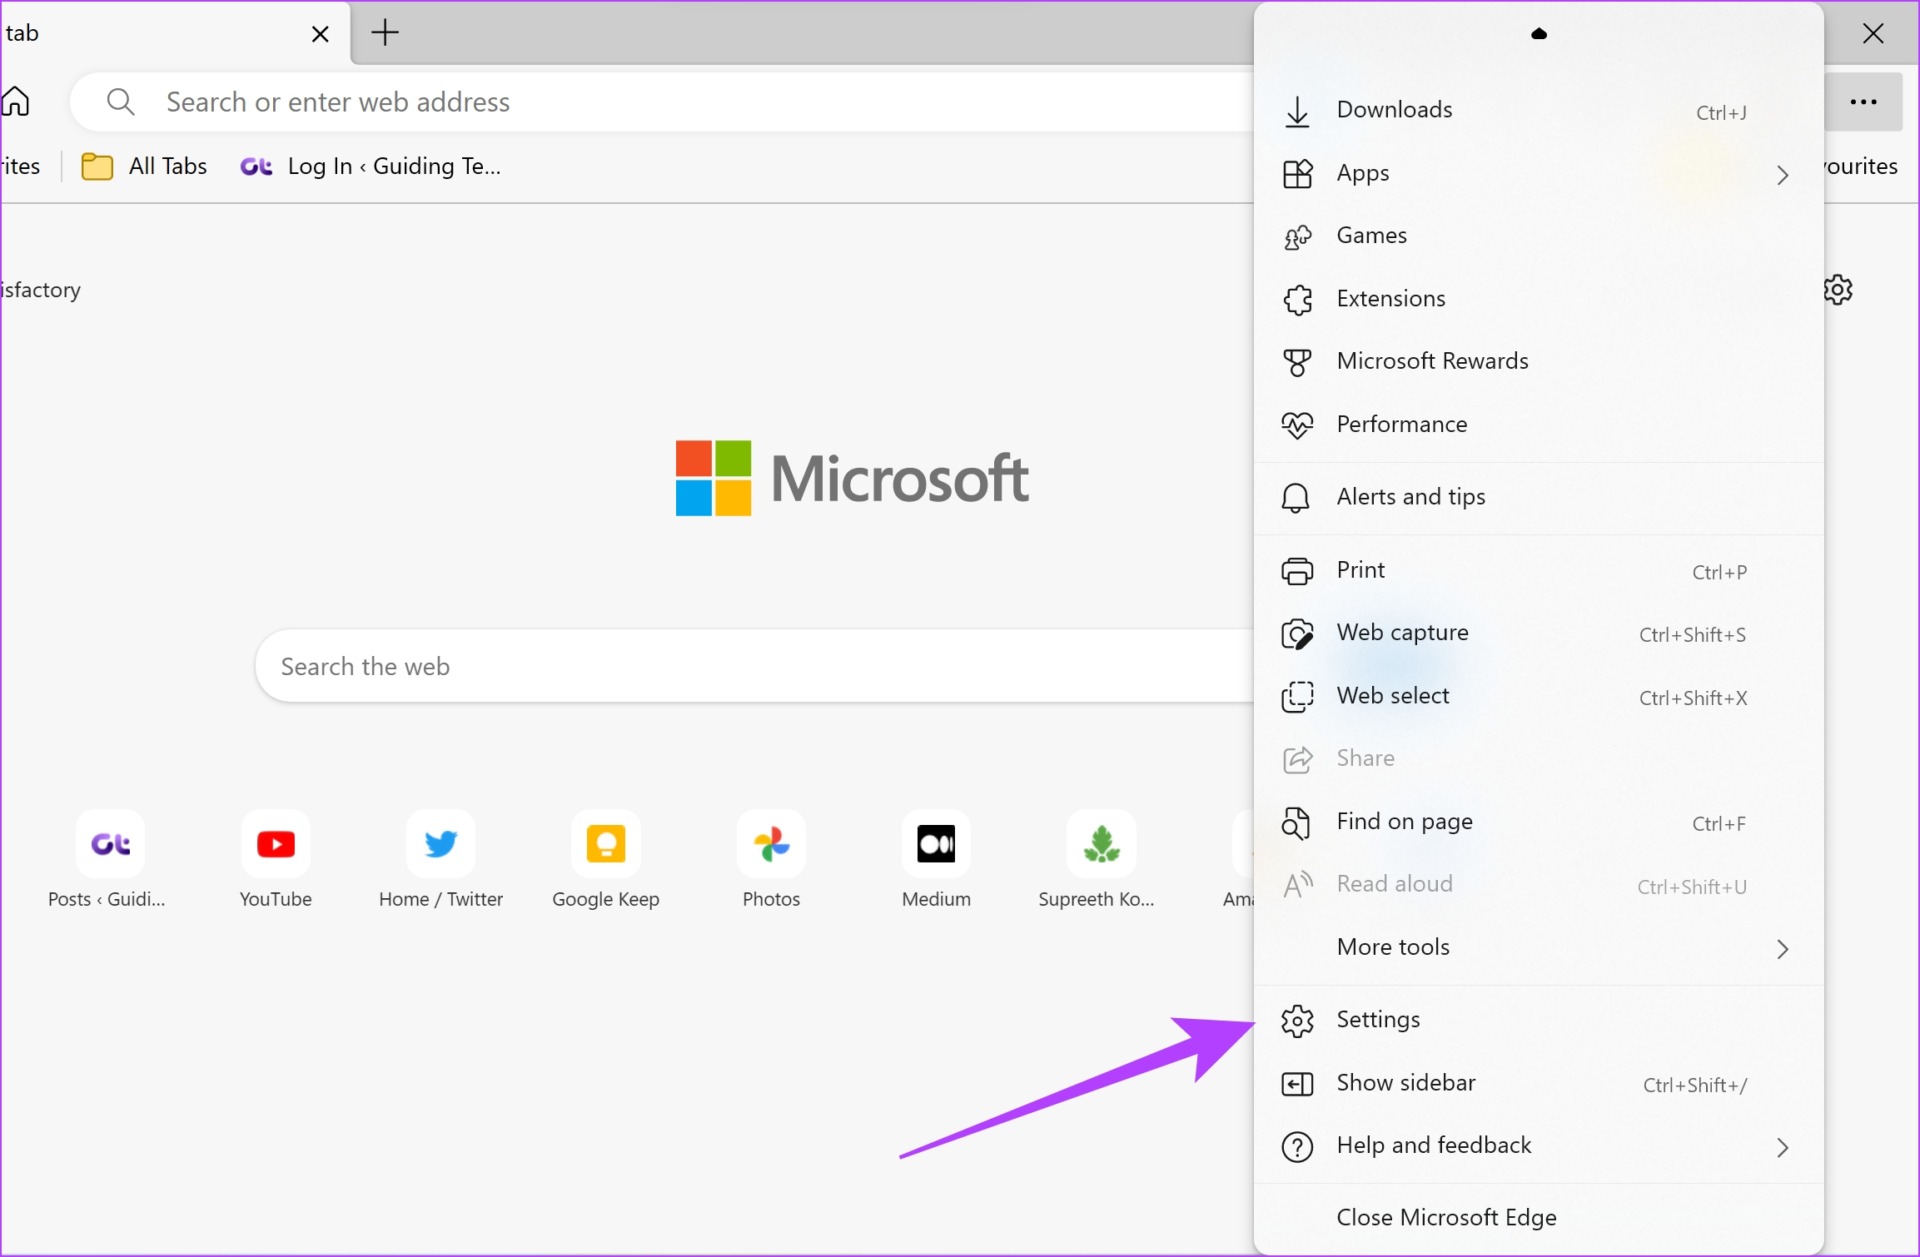
- Update Microsoft Edge: Click on the three dots icon at the top right, go to Help and Feedback > About Microsoft Edge, and check for any available updates.
Fix 1: Use HTTPS Only
If a website is connected using the outdated HTTP protocol, Microsoft Edge will give you a warning that the site is Not Secure, and hence, you might want to open all websites with HTTPS instead. You can enable a flag on Microsoft Edge to do this.
Step 1: Open Microsoft Edge and enter the following URL for the flag in the address bar.
edge://flags/#edge-automatic-https
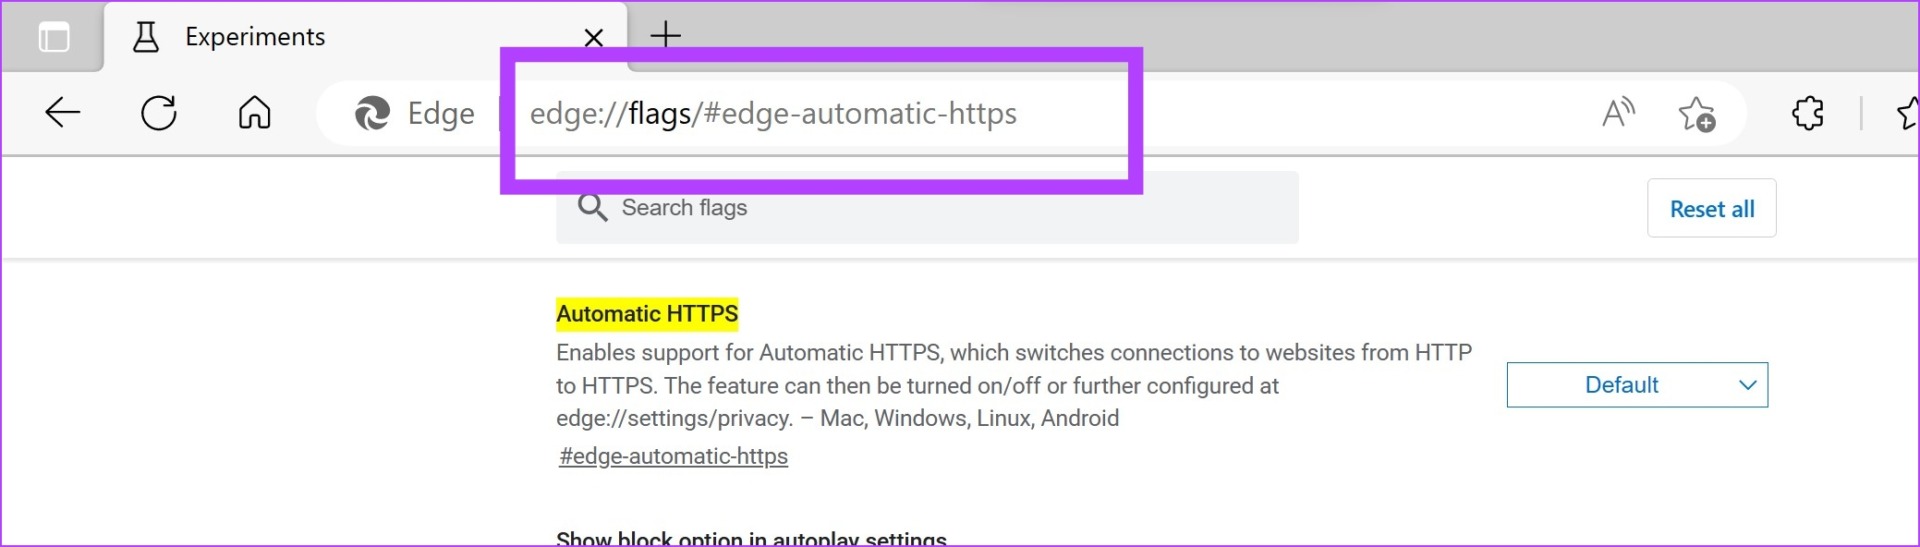
Step 2: The Automatic HTTPS flag will be highlighted. Click on the drop-down menu in front of it and select Enabled.
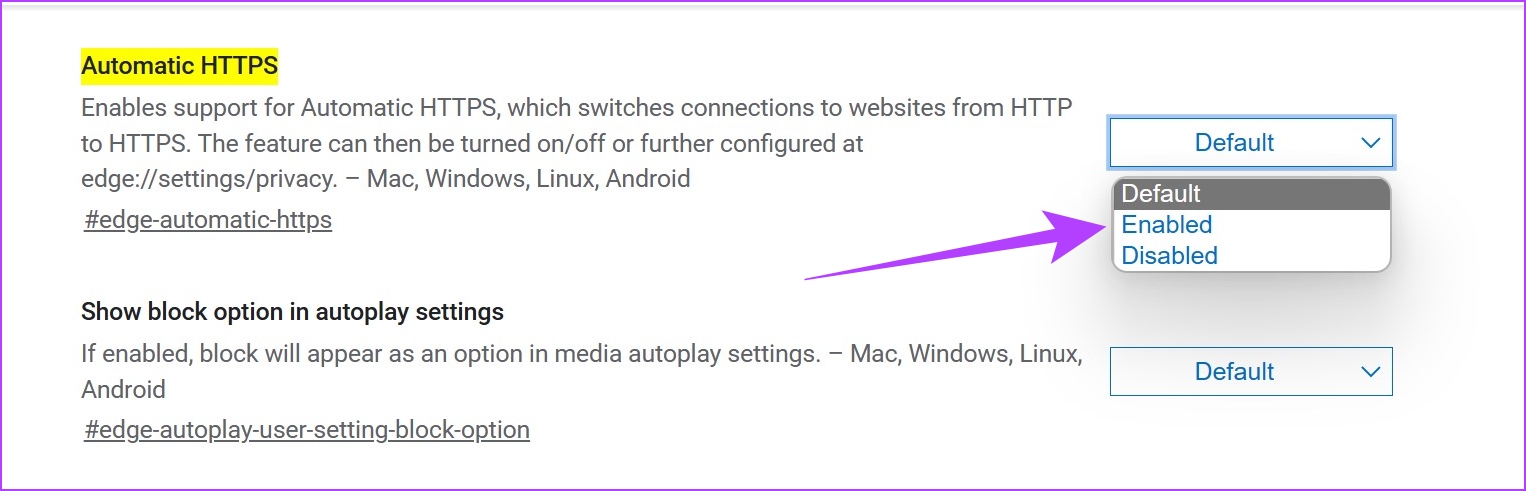
Step 3: You will now be asked to restart Microsoft Edge. Click on the restart button.
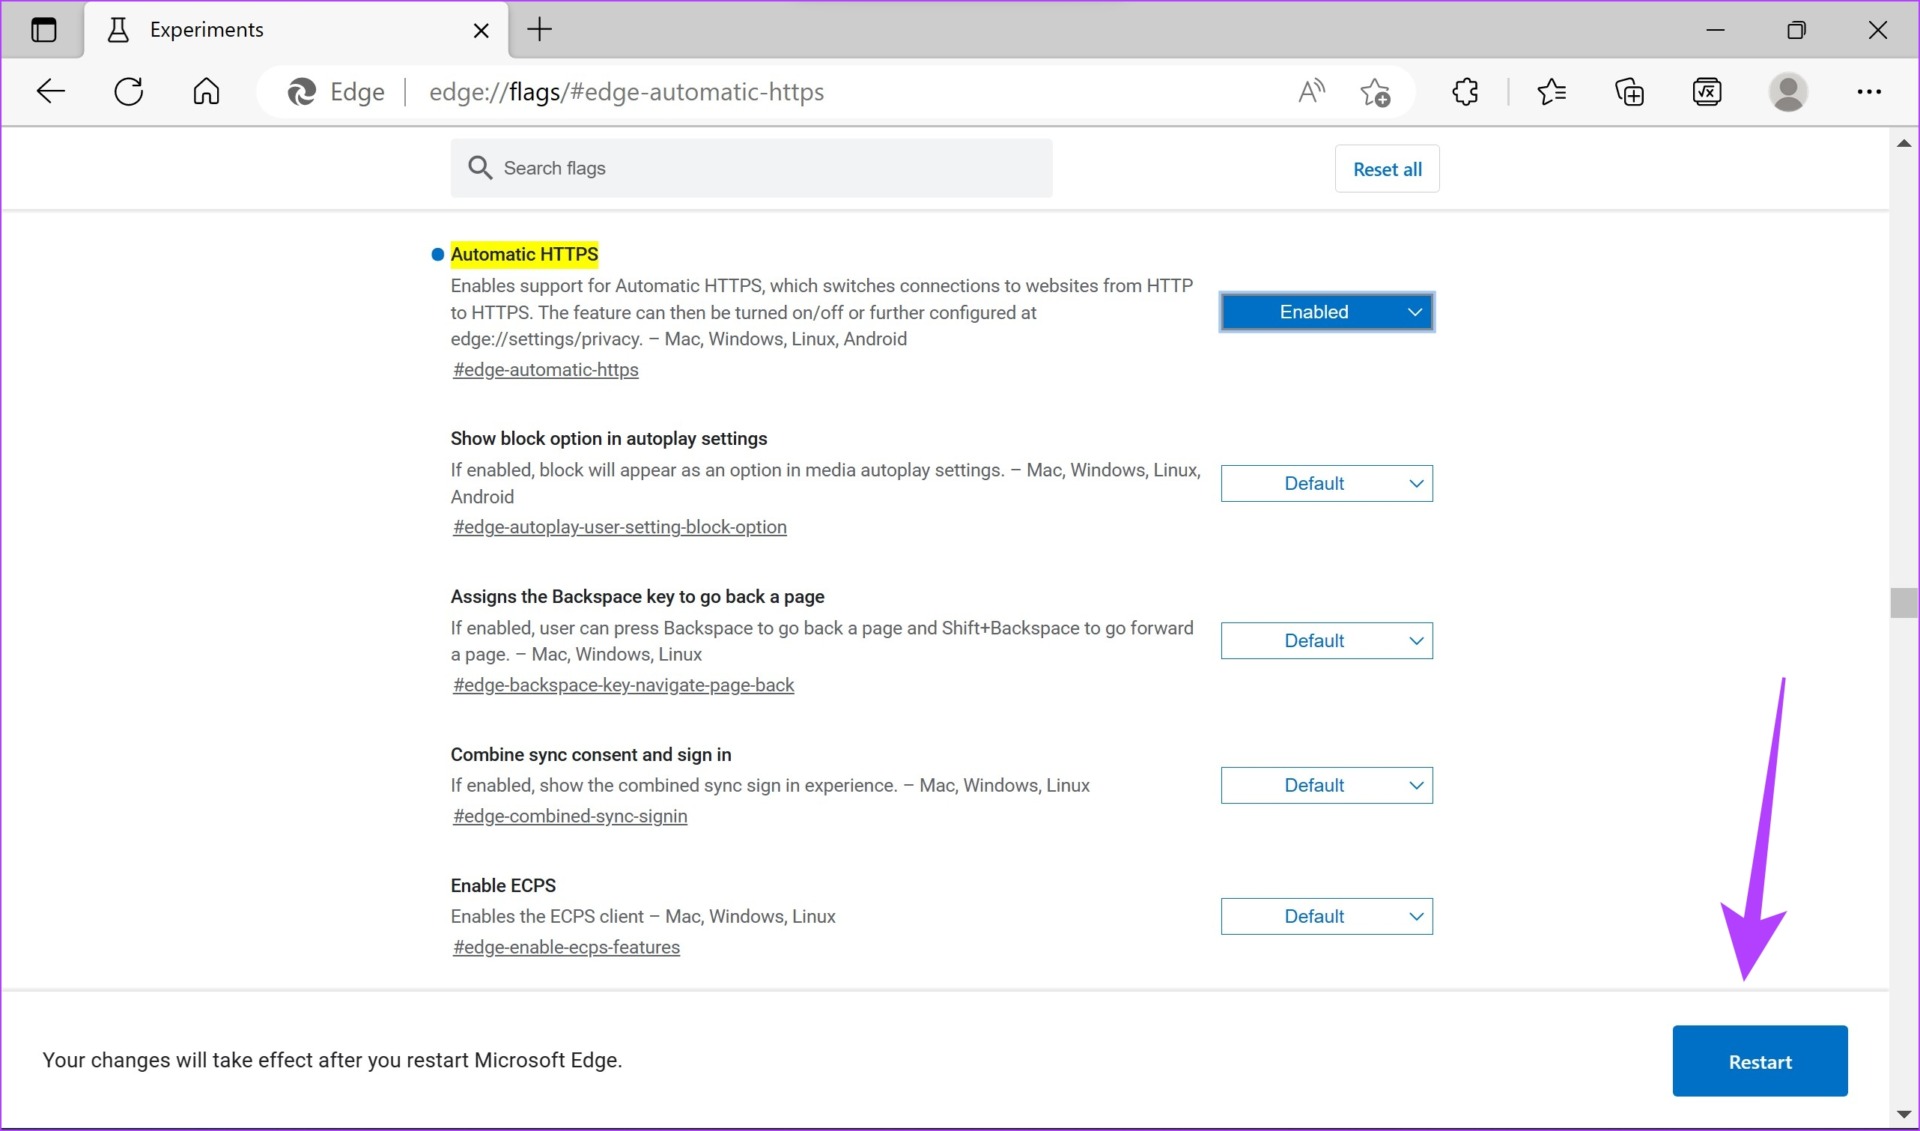
Now, you will be connected to all websites using the HTTPS protocol and this can get rid of the ‘Not Secure’ warning on Microsoft Edge.
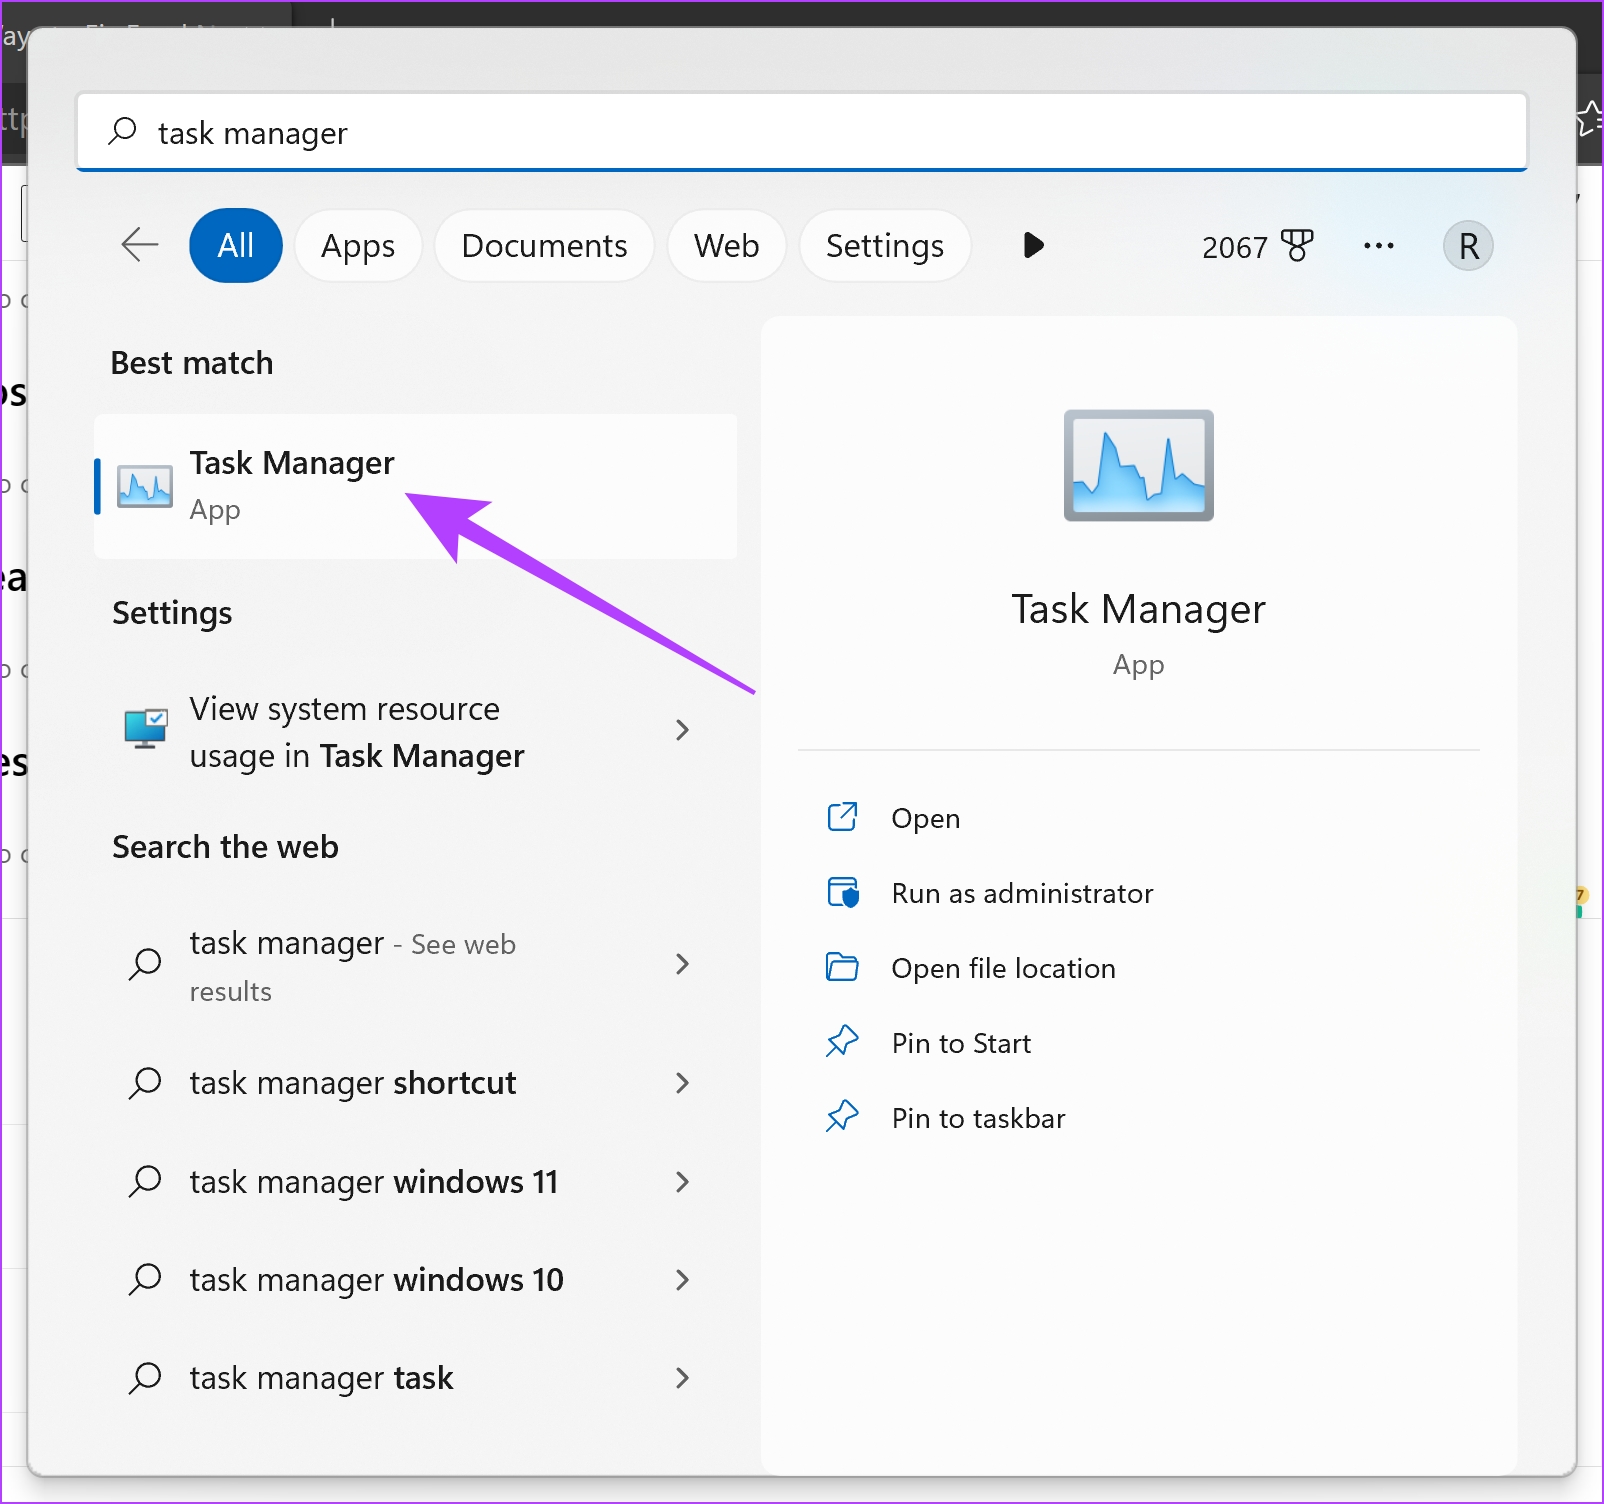
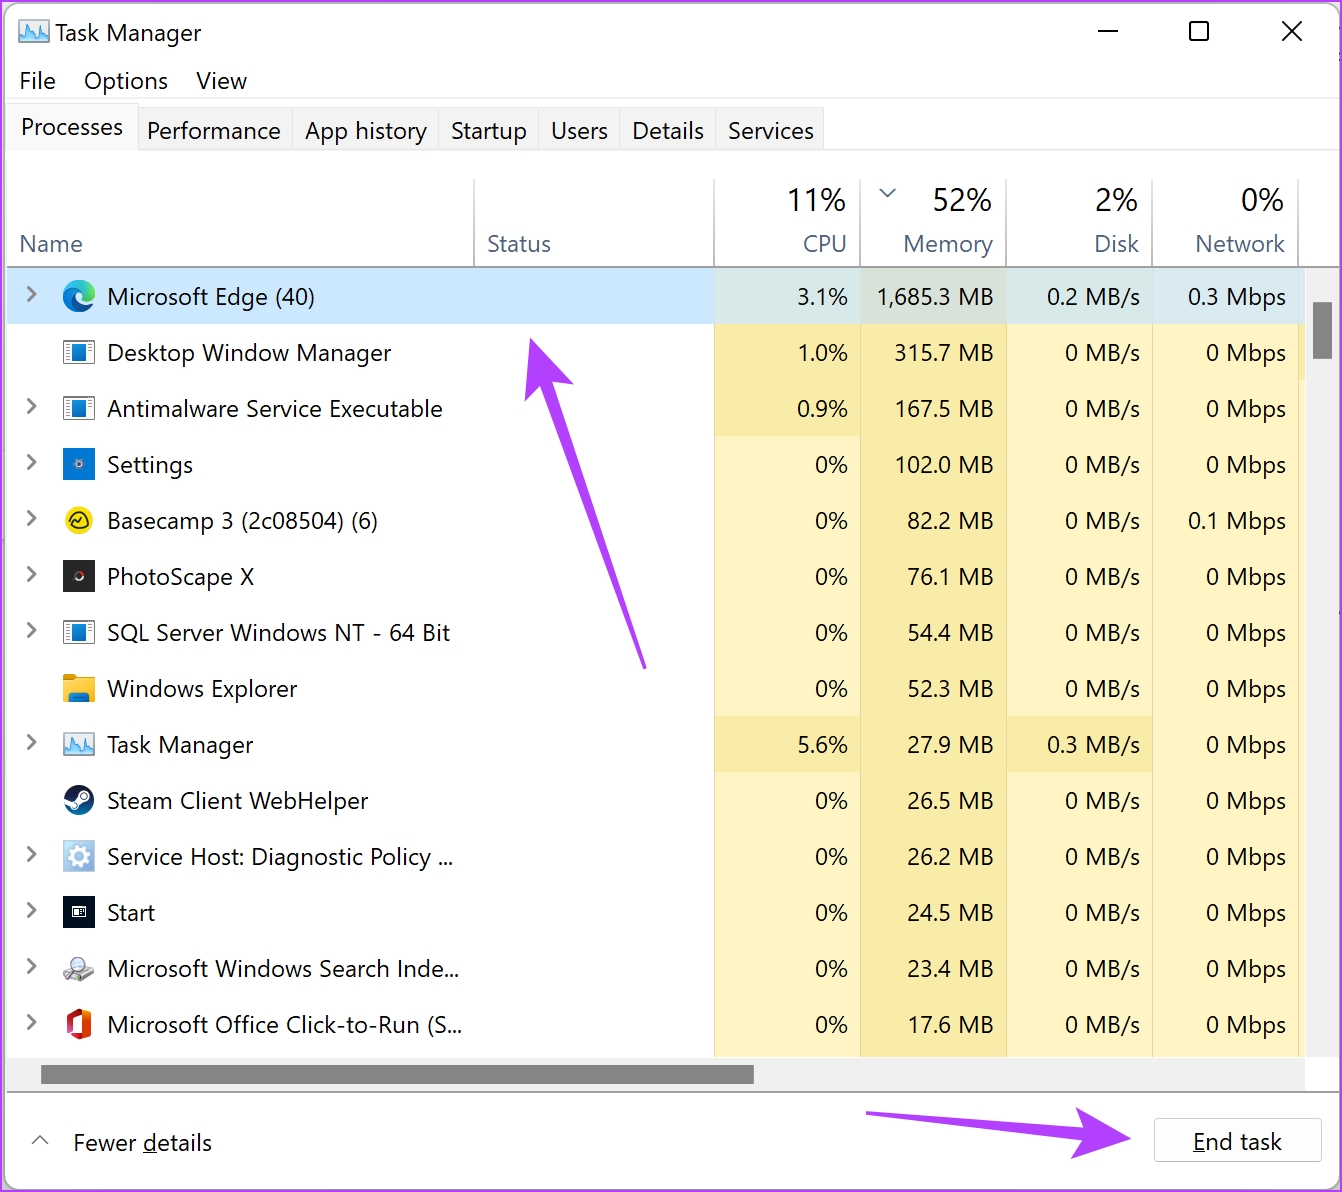
Fix 2: Restart Task Manager
Closing and restarting Microsoft Edge using Task Manager opens a fresh session. This way, the old session and all of its elements, including the bugs, are shut down, and you can browse freshly free from bugs.
Step 1: Open Task Manager from the start menu.
Step 2: Click on Microsoft Edge and select End Task. If you have multiple options of Microsoft Edge listed, select them all and click on End Task one by one.
Step 3: You can now re-open Microsoft Edge and see if the bug still exists.
Fix 3: Clear Browsing Data
A cache is a form of temporary data stored in local storage. It reloads elements of the application quickly instead of downloading them from the internet. However, a lot of cache means a lot of data and junk accumulation which are known to cause issues with an application.
Note: Your browsing and download history, cookies, and cache will be deleted from Microsoft Edge and unless selected, your passwords will not be deleted.
Step 1: Open Edge and click on the three dots icon at the top right corner.
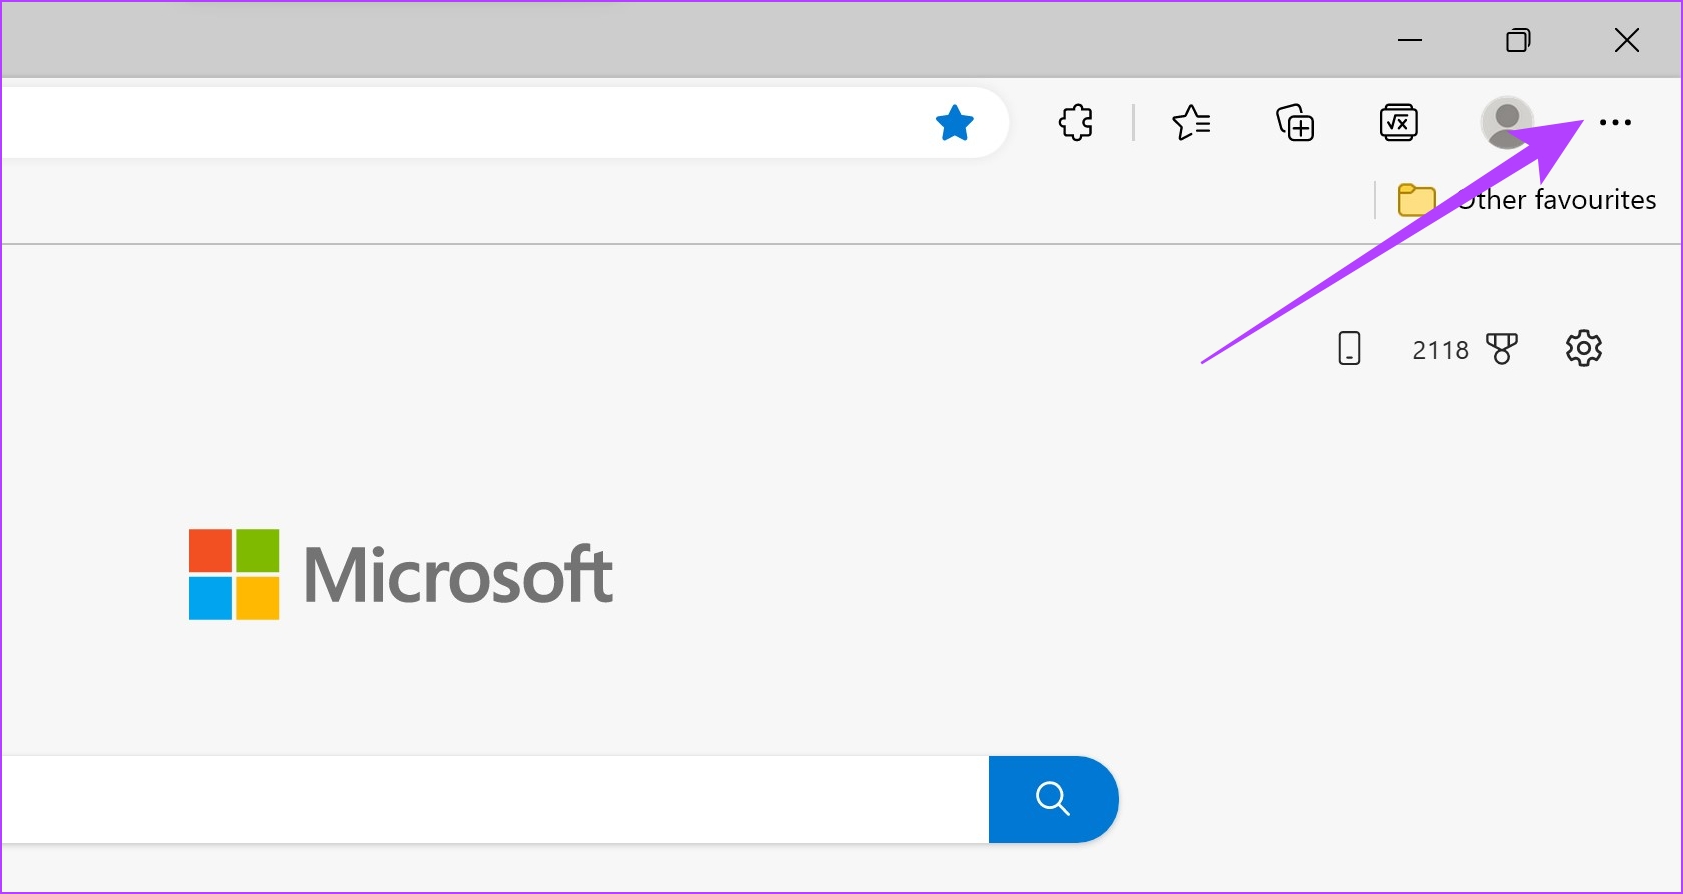
Step 2: Click on Settings.
Step 3: Select Privacy, search, and services in the sidebar.
Step 4: Click on the Choose what to clear option under the ‘Clear browsing data’ menu.
Step 5: You can select a time range from the drop-down menu and click on Clear now.
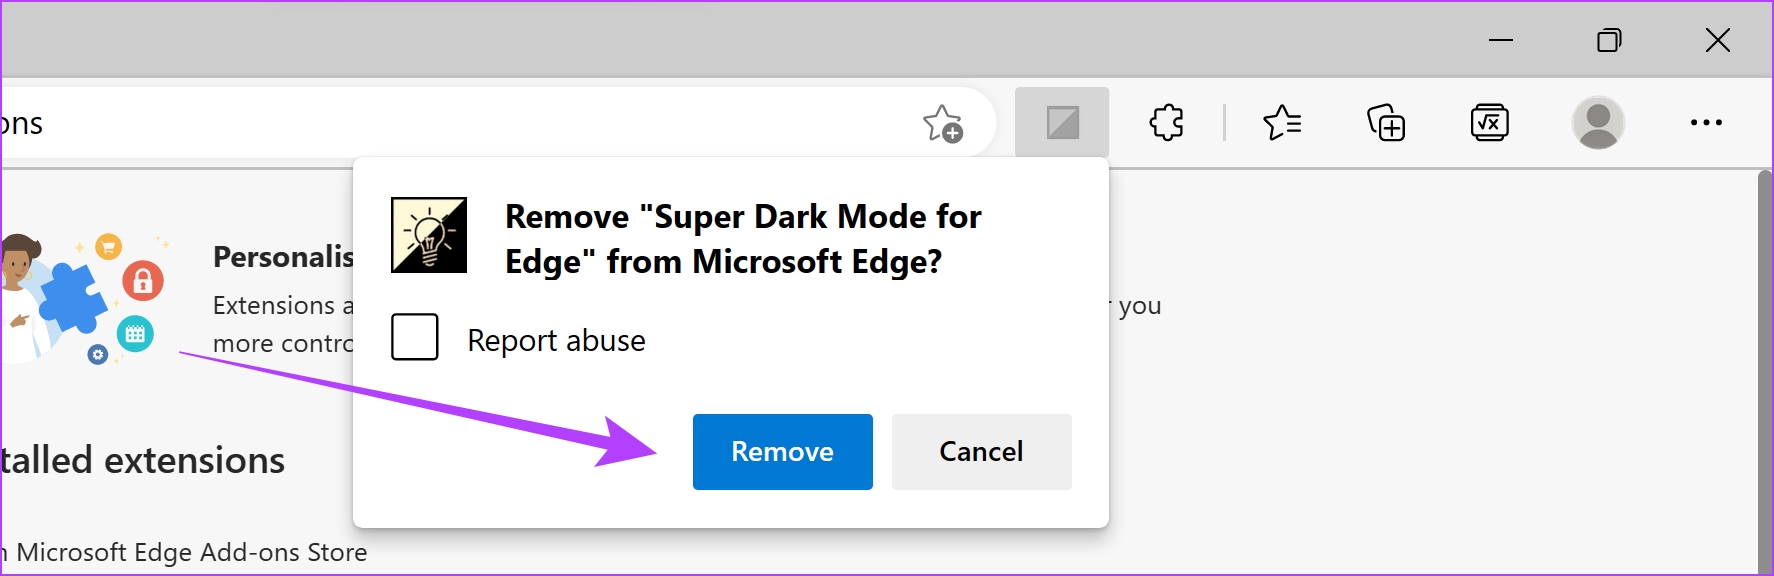
Fix 4: Turn off Extensions
Extensions and browser add-ons might add some extra functionality to your browser but they could cause issues too. They might execute bugs that affect your network connectivity and make certain websites inaccessible.
Therefore, it is recommended to disable unwanted extensions on Microsoft Edge. These include the ones you don’t use or the ones that are probably not from verified developers.
Step 1: Open Edge, click on the Extension icon in the toolbar, and select Manage Extensions.
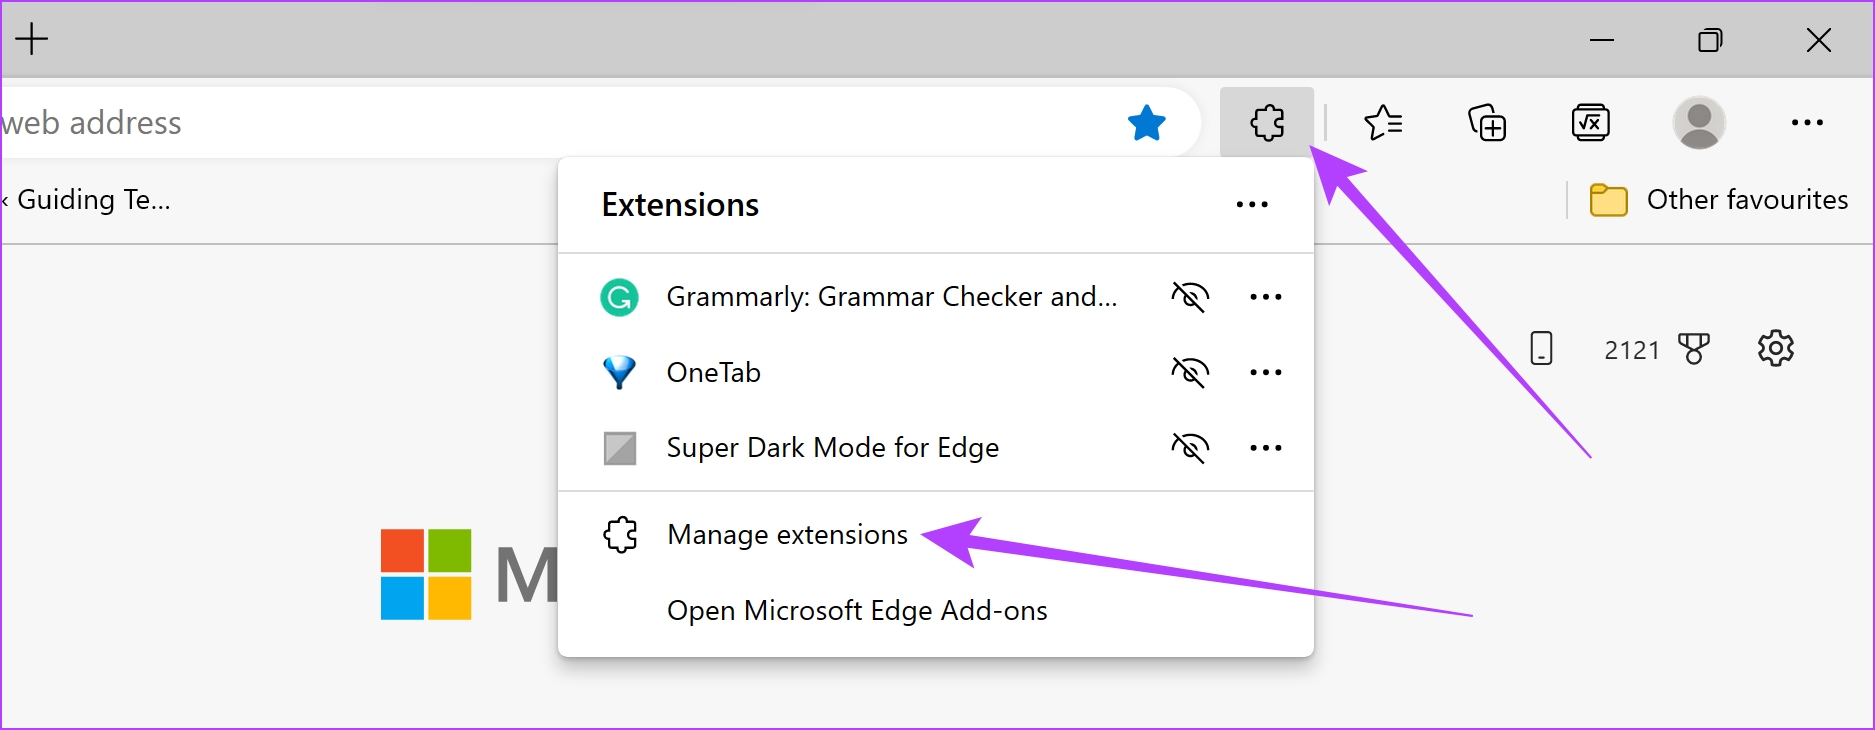
Step 2: Click on Remove.
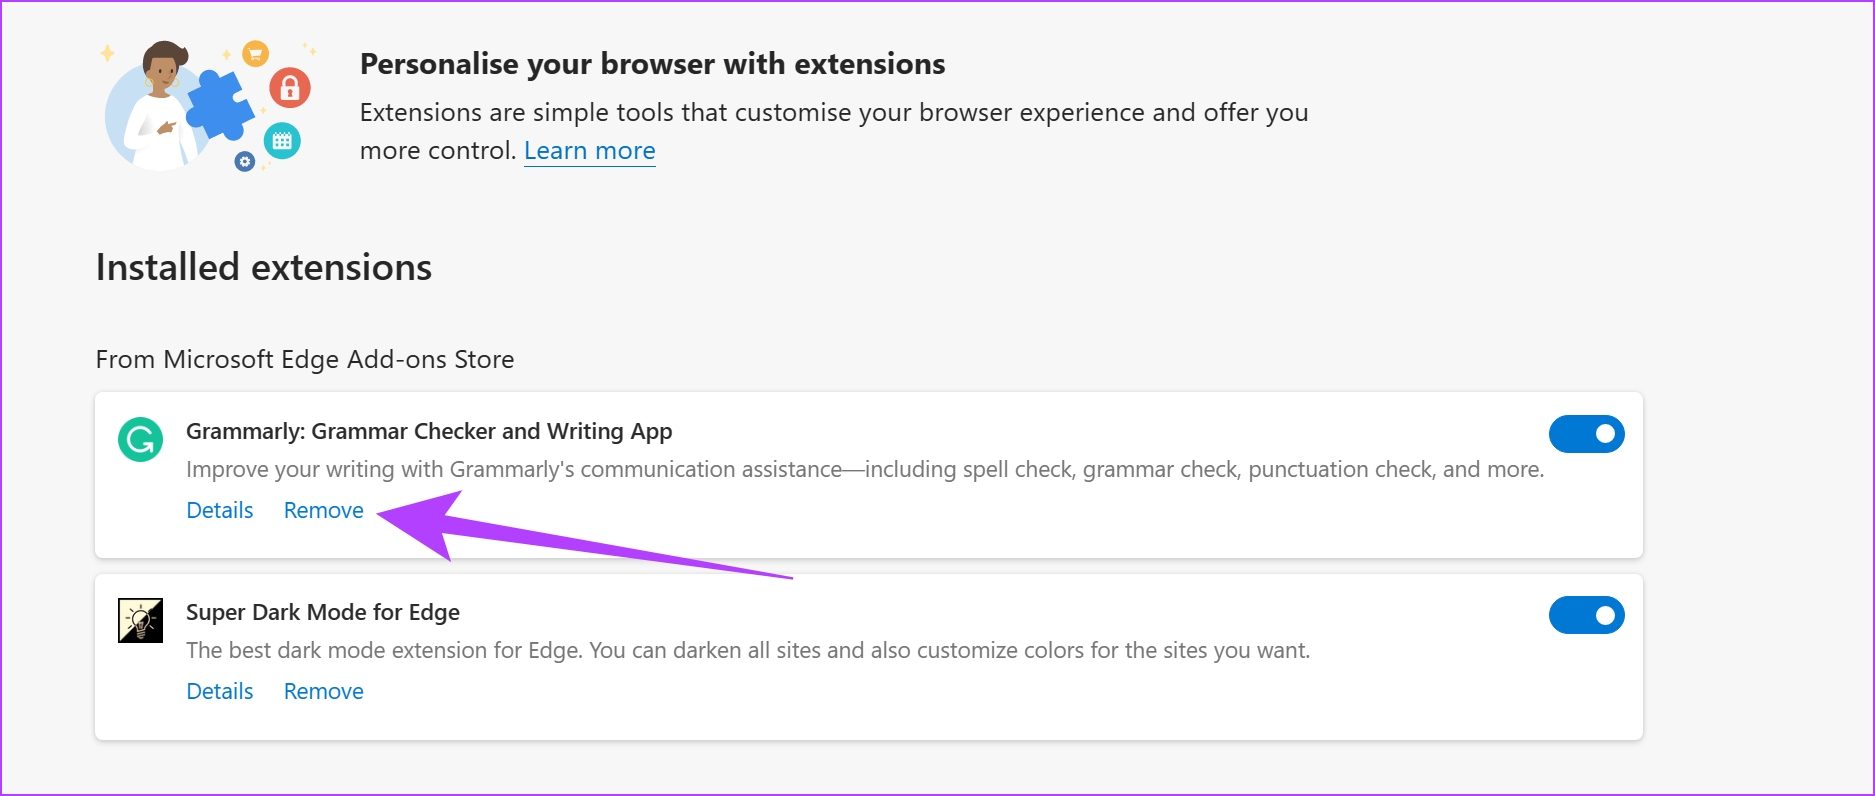
Step 3: Click on Remove again to confirm and delete the extension.
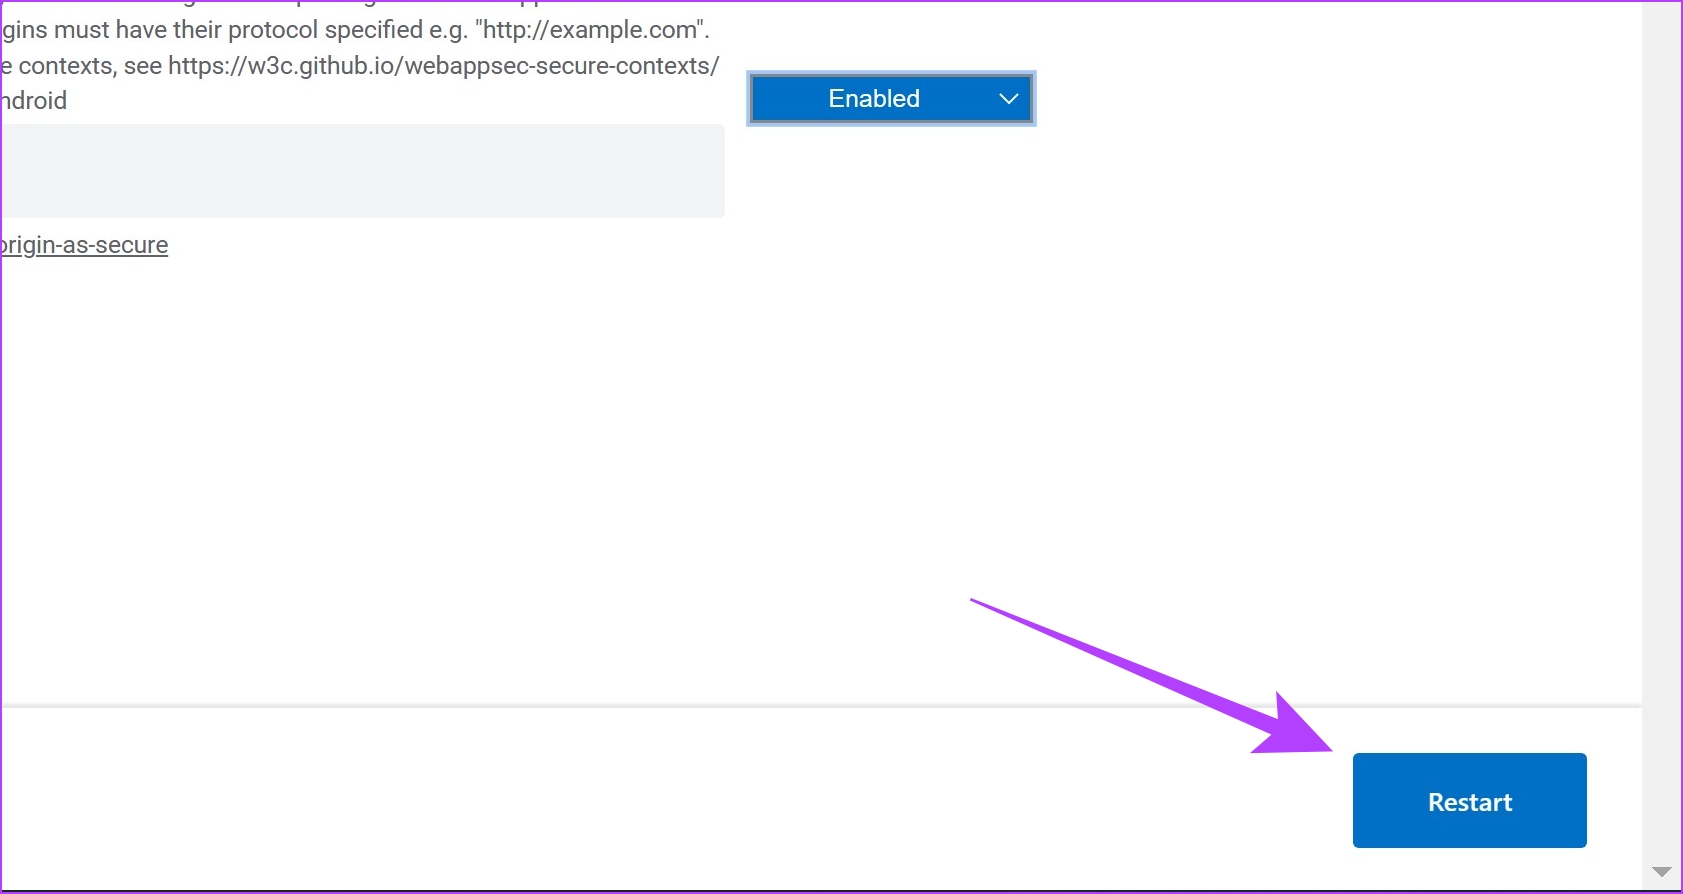
Fix 5: Bypass Error Message
If you are fully sure that the website passes all the checks and is deemed safe, you can bypass the ‘the connection for this site is not secure’ warning. Here’s how:
Step 1: Open Microsoft Edge and type the URL in the address bar.
edge://flags/#unsafely-treat-insecure-origin-as-secure
Yes, you read it right. You are manually forcing Microsoft Edge to ignore and not warn you. So, proceed at your own risk.

Step 2: Click on the drop-down menu next to the highlighted flag.
Step 3: Select Enabled.

Step 4: The flag is now enabled. Restart Microsoft Edge to activate the flag.
Also Read: How to disable autoplay for audio and videos in Microsoft Edge
Was this helpful?
Thanks for your feedback!
The article above may contain affiliate links which help support Guiding Tech. The content remains unbiased and authentic and will never affect our editorial integrity.
-
#2
Добрый день всем, скажите пожалуйста что делать если показывает данное окно?
Как его убрать или обойти? Всё настроено без ошибок, сегодня захожу и такая фигня выходит.
Это не имеет отношения к технической поддержке движка.
Загуглите htaccess basic auth и найдёте ответ на свой вопрос.
P.S. переместил в серверную.
-
#3
Ну, вопрос в другом, если Вы сами не настраивали вторую авторизацию, то не из воздуха она появилась же, либо где-то включили и не обратили внимания, либо кто-то за Вас это сделал.
-
#4
Ну, вопрос в другом, если Вы сами не настраивали вторую авторизацию, то не из воздуха она появилась же, либо где-то включили и не обратили внимания, либо кто-то за Вас это сделал.
А как отключить? В /admin.php, никуда зайти не могу
-
#5
Это не в админке, на хостинге или что там у Вас.
-
#6
Это не в админке, на хостинге или что там у Вас.
Понял, спасибо! Буду решать.
Все способы:
- Чем вызвана ошибка «Подключение к этому сайту не защищено» в Microsoft Edge
- Способ 1: Использование режима InPrivate
- Способ 2: Очистка кеша в Edge
- Способ 3: Проверка системного времени
- Способ 4: Настройка свойств браузера
- Способ 5: Ручной выбор DNS-серверов в Windows
- Способ 6: Удаление подозрительных расширений
- Способ 7: Сброс настроек сети
- Способ 8: Игнорирование ошибок SSL (только для локальных подключений)
- Вопросы и ответы: 0
Чем вызвана ошибка «Подключение к этому сайту не защищено» в Microsoft Edge
Ошибка «Подключение к этому сайту не защищено» в Microsoft Edge указывает на проблемы с безопасностью при установке защищенного соединения с веб-сайтом. Это предупреждение возникает, когда браузер не может подтвердить подлинность SSL-сертификата сайта или установить надежное HTTPS-соединение. Такая ситуация может быть вызвана рядом факторов: от использования устаревших или некорректно настроенных сертификатов до ошибок в настройках безопасности браузера или самого устройства пользователя.
В зависимости от конкретной причины Edge может показывать разные коды ошибок, такие как проблемы с сертификатом, устаревшие версии протоколов или несовместимые параметры шифрования. Хотя эта ошибка может казаться тревожной, в большинстве случаев она указывает на проблему, решаемую как на стороне сайта, так и пользователя. Разобраться в этом помогут представленные далее методы.
Способ 1: Использование режима InPrivate
Если проблема с подключением вызвана вмешательством расширений или сохраненными данными, режим InPrivate в Edge может стать полезным решением. Он отключает работу плагинов и не использует кеш, что помогает выявить, влияет ли на безопасность подключений накопленная информация браузера. Такой метод тестирования позволяет быстро определить, связана ли ошибка с настройками браузера или с самим сайтом.
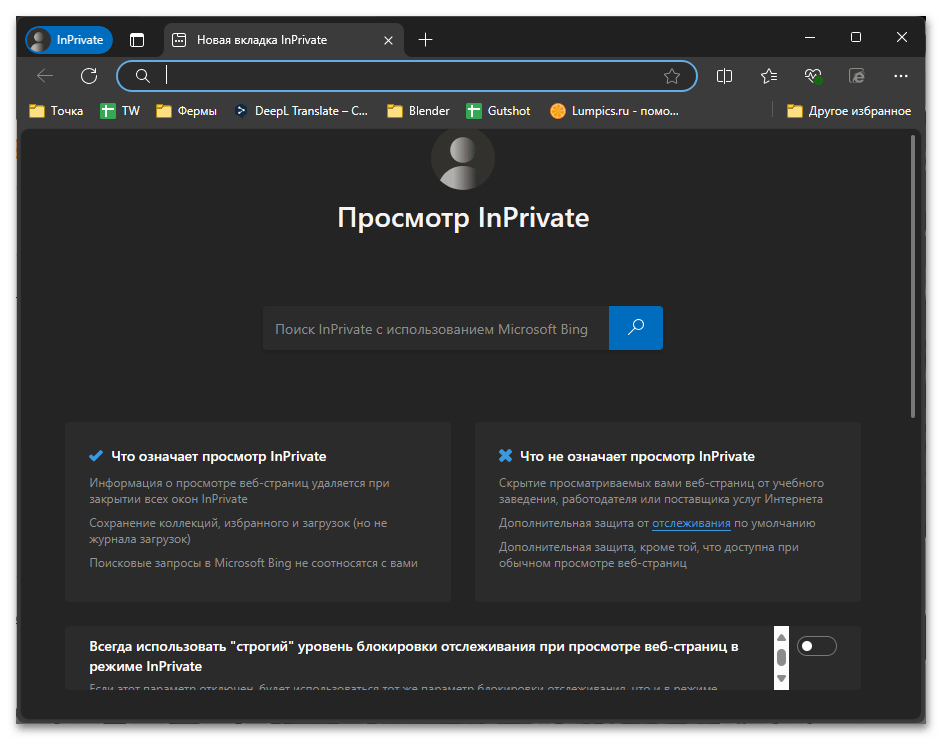
Используйте сочетание Ctrl + Shift + N, чтобы открыть новое окно в режиме инкогнито. Если использование горячей клавиши вам не совсем подходит, вызовите меню браузера и выберите из списка пункт «Новое окно InPrivate». В отобразившемся окне не будет ни одной вкладки, поэтому вам придется перейти на сайт повторно. Если содержимое загрузилось корректно, придется разбираться с проблемами на своей стороне: в первую очередь очистить кеш, а также проверить наличие подозрительных расширений.
Способ 2: Очистка кеша в Edge
Накопление устаревших данных в кеше браузера нередко приводит к проблемам с безопасными соединениями. Старые сертификаты или некорректные копии страниц могут нарушить нормальное функционирование сайтов. Очистка кеша обновляет всю сохраненную информацию, что часто помогает исправить ошибки с SSL-сертификатами и восстановить корректное подключение к сайту. Более детально об этом читайте в другой статье на нашем сайте, перейдя по следующей ссылке.
Подробнее: Как очистить кеш в Microsoft Edge

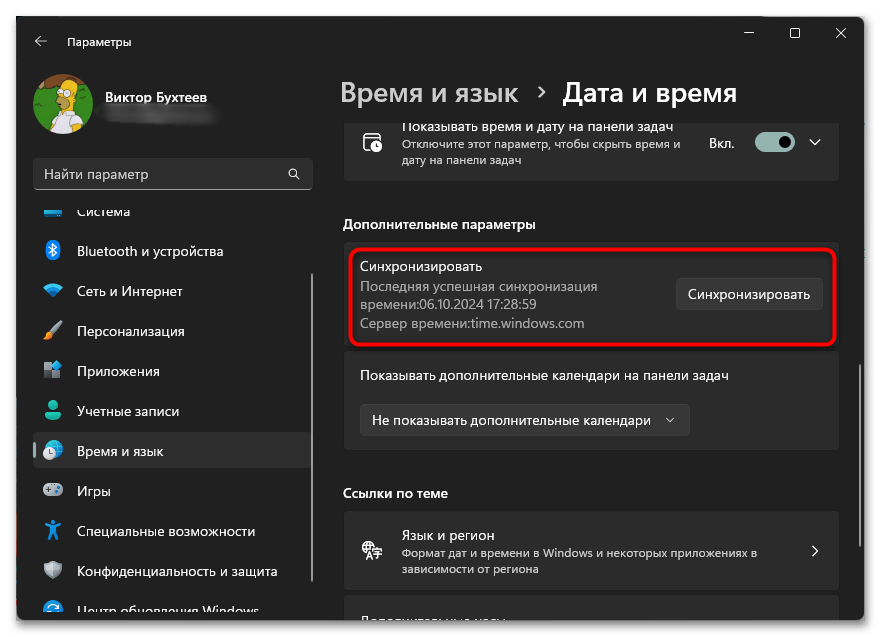
Способ 3: Проверка системного времени
Неправильно настроенное время на компьютере зачастую мешает корректной работе сертификатов SSL, так как их действие строго ограничено временными рамками. Если часы компьютера не синхронизированы с текущим временем, браузер может воспринимать сертификаты как недействительные. Исправление времени на устройстве поможет восстановить доверие к сертификатам и избежать сообщений о небезопасном подключении. Обычно достаточно запустить повторную синхронизацию или активировать автоматическое определение времени по правильному часовому поясу, если этого не было сделано ранее. За настройку отвечает раздел в системных настройках Windows.
Подробнее: Изменение времени в ОС Windows 11
Способ 4: Настройка свойств браузера
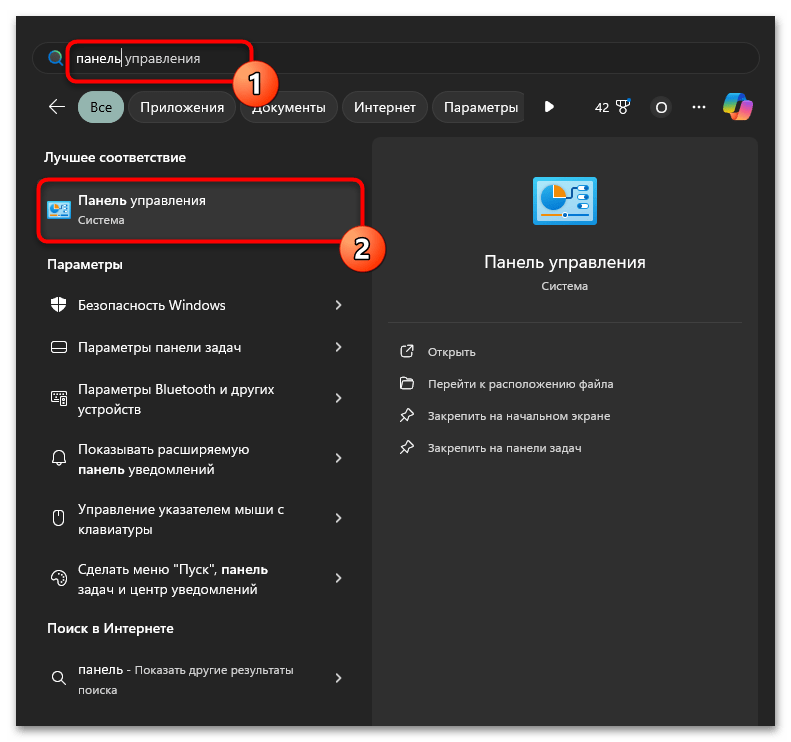
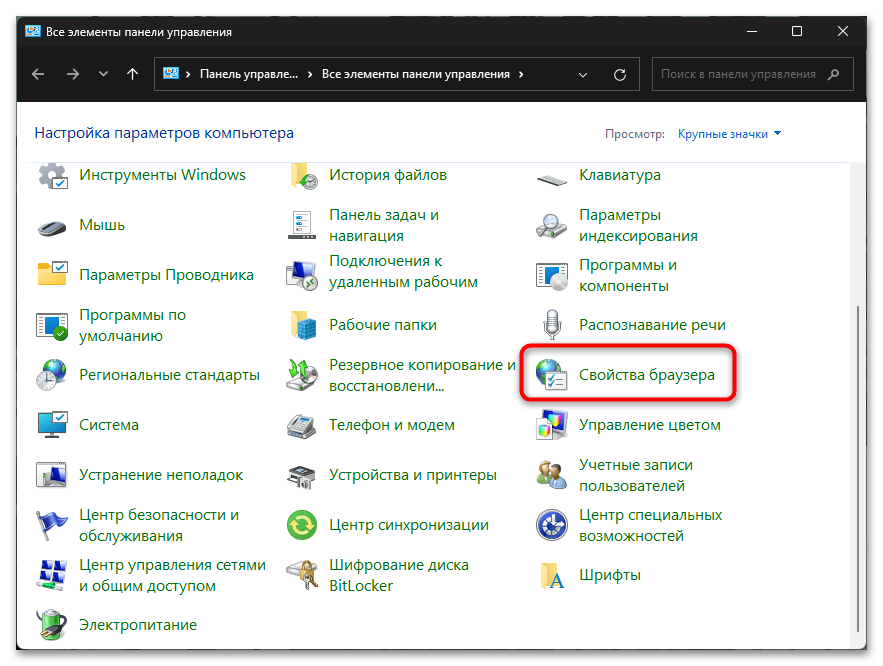
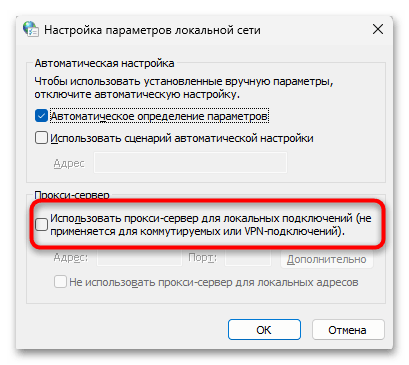
Использование прокси-сервера может нарушить установку безопасного соединения с сайтами, если его параметры неверно настроены или не поддерживают необходимые протоколы. Отключение использования локальных прокси в настройках системы часто помогает устранить проблему с незащищенным подключением, так как оно возвращает нормальные сетевые настройки для браузера, позволяя установить безопасное соединение.
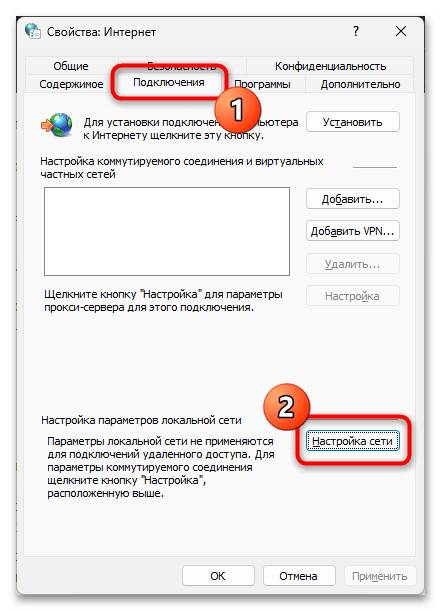
- Для проверки активности упомянутого параметра откройте «Пуск», через поиск отыщите «Панель управления» и запустите данный системный компонент.
- Среди значков выберите «Свойства браузера», кликнув по названию, чтобы отобразить новое окно с нужными настройками.
- В нем перейдите на вкладку «Подключения» и нажмите по кнопке «Настройка сети».
- Тут необходимо убедиться в том, что возле пункта «Использовать прокси-сервер для локальных подключений» отсутствует галочка. Если она есть, снимите, примените изменения и отправьте ПК на перезагрузку.
Способ 5: Ручной выбор DNS-серверов в Windows
Иногда проблема с подключением к сайту вызвана некорректной работой DNS-серверов, через которые проходит запрос. Переход на более надежные DNS-сервисы, к которым можно отнести ДНС от Google или Яндекс, может улучшить стабильность и безопасность соединения. Это решение помогает установить связь с сайтами, избегая ошибок, связанных с нарушением сертификатов или недоступностью серверов. Для ручного назначения DNS снова придется воспользоваться настройками Windows.
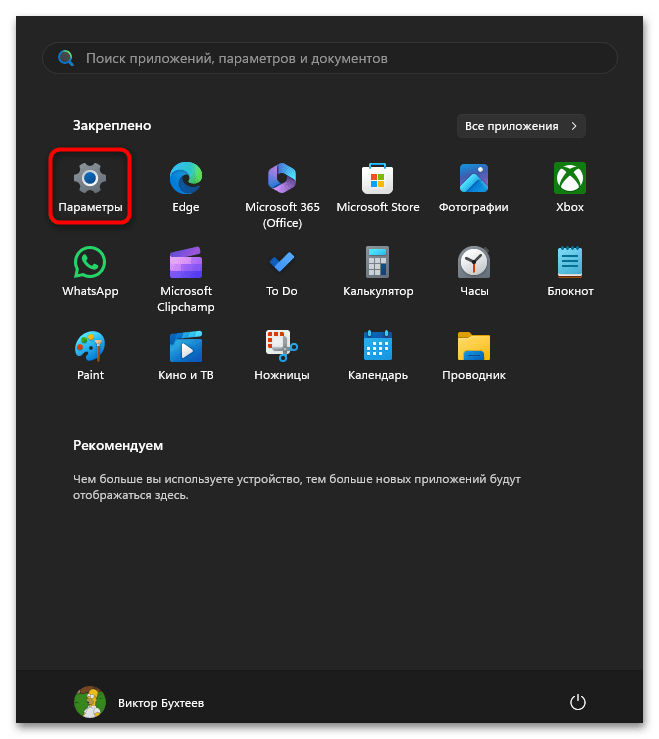
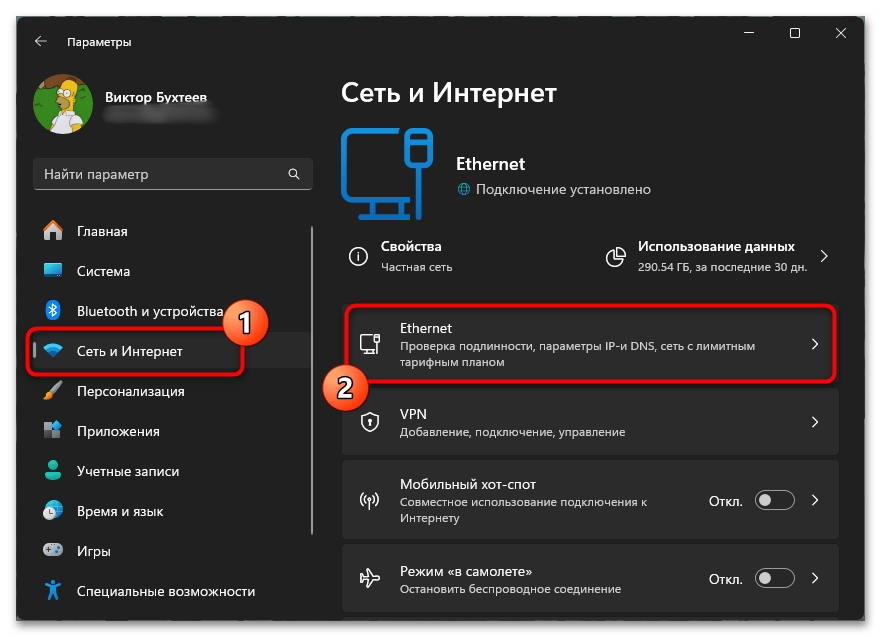
- Откройте «Пуск» и перейдите в «Параметры», кликнув по значку в списке закрепленных.
- Выберите раздел «Сеть и Интернет», затем справа нажмите по плитке, название которой соответствует используемому типу подключения.
- Найдите блок с настройками «Назначение DNS-сервера». Для выбора нужных параметров понадобится щелкнуть по «Изменить».
- Теперь вы можете задать тип настроек «Вручную», затем ввести предпочтительный и дополнительный DNS-сервера. Лучшим вариантом считаются адреса от Google, поэтому введите
8.8.8.8и8.8.4.4соответственно.
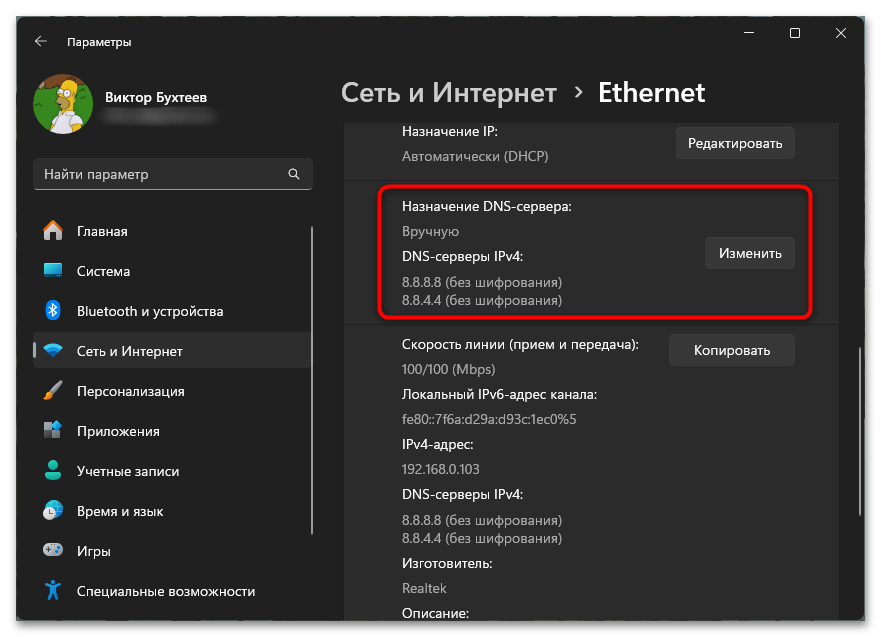
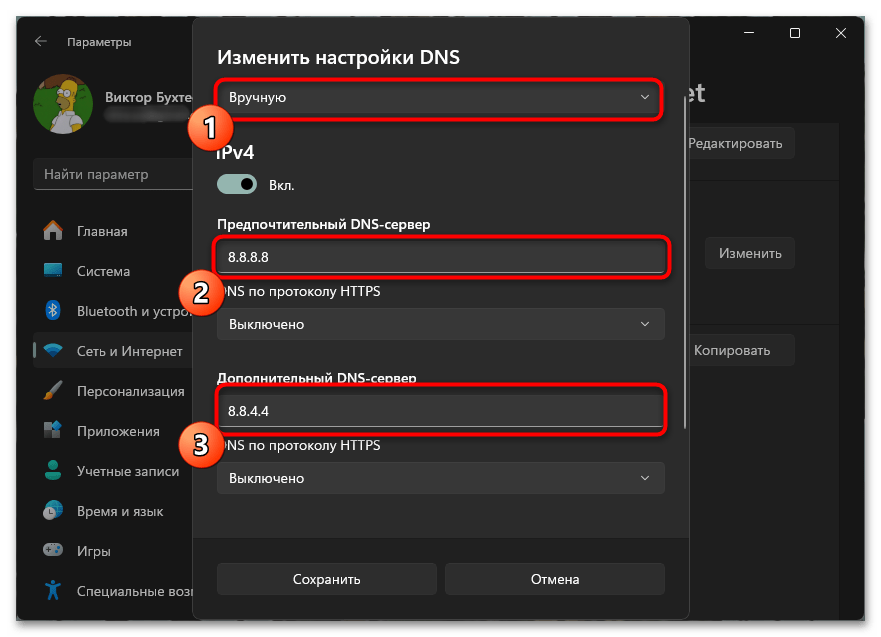
Обычно нужно некоторое время, чтобы новые системные параметры вступили в силу. Ускоряется этот процесс перезагрузкой как Windows, так и самого маршрутизатора.
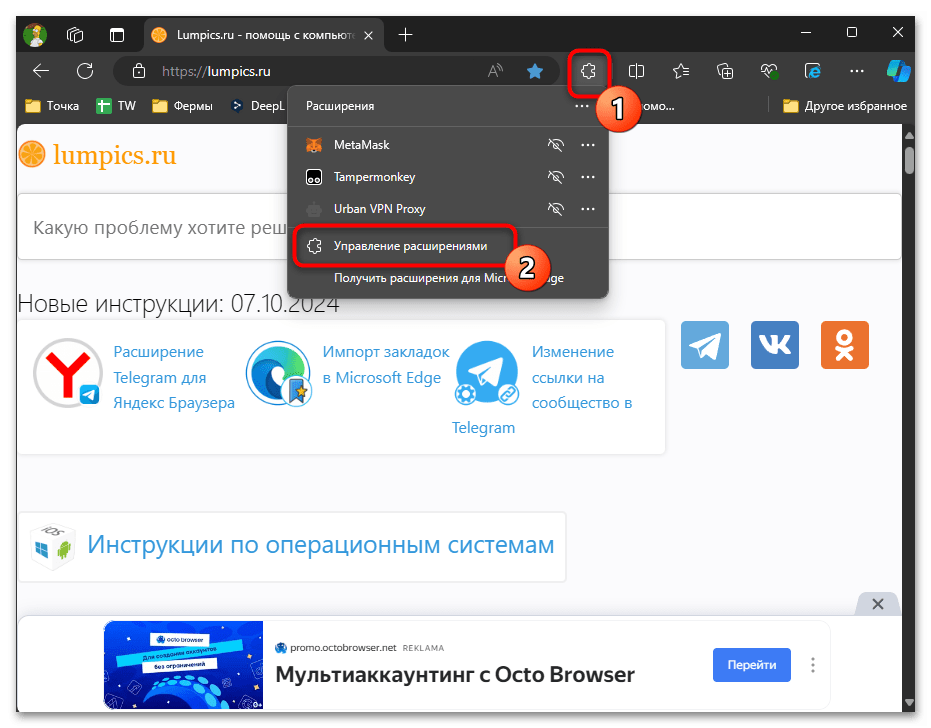
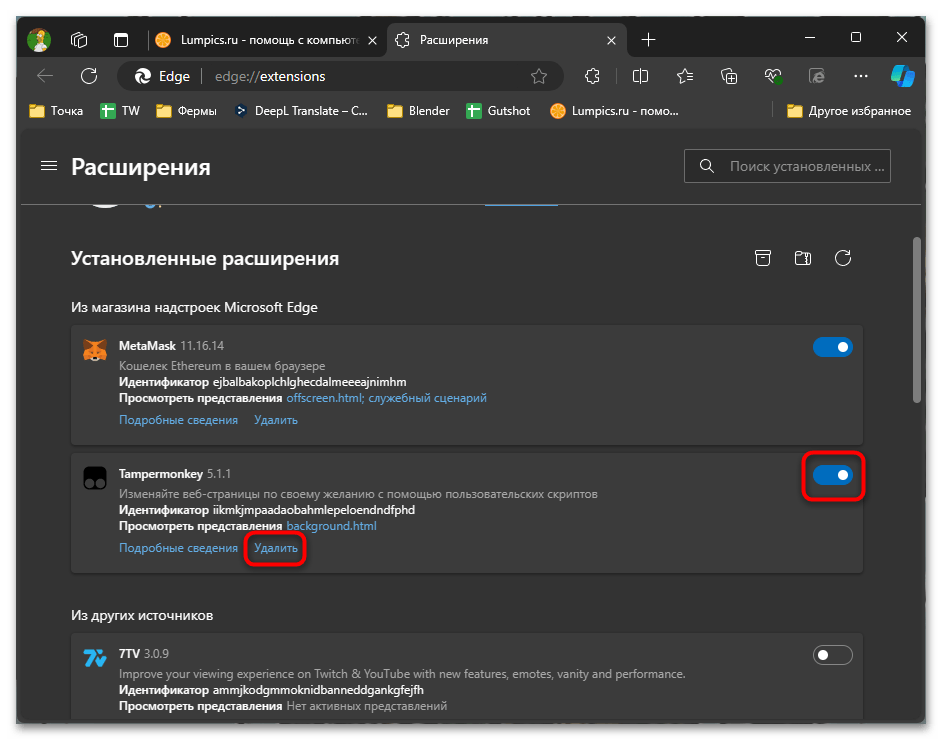
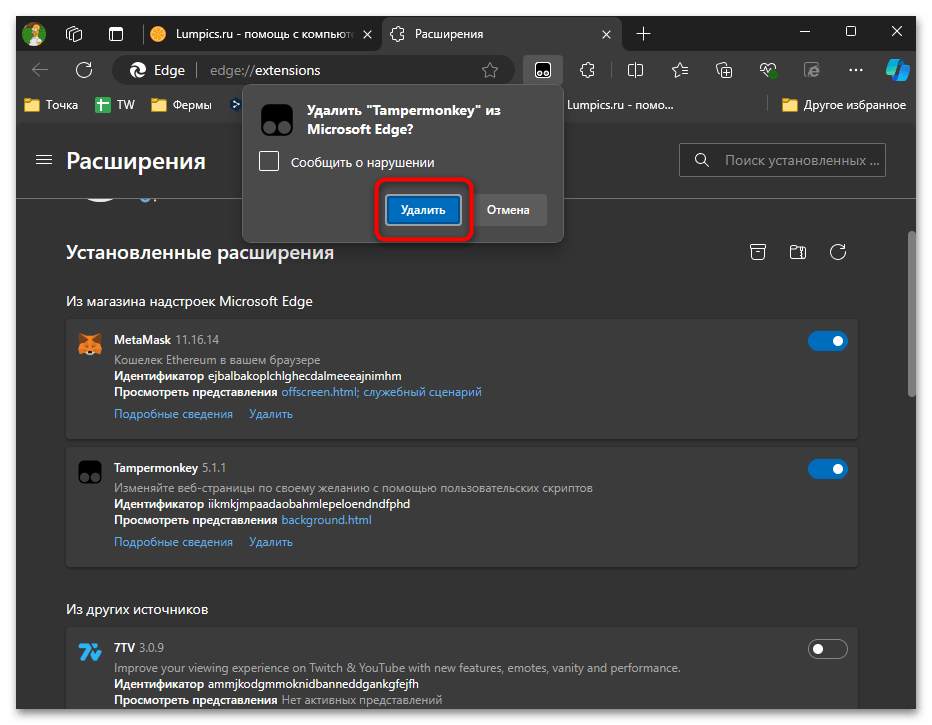
Способ 6: Удаление подозрительных расширений
Вредоносные или плохо совместимые расширения могут блокировать работу сертификатов или вмешиваться в процесс загрузки страниц, что приводит к ошибкам с безопасностью. Отключение или удаление таких расширений поможет браузеру функционировать без внешних помех. Это простой и действенный способ восстановить безопасное подключение, если причиной проблемы стали установленные дополнения.
- Находясь в Microsoft Edge, вызовите меню работы с дополнениями, где щелкните по пункту «Управление расширениями».
- Ознакомьтесь со списком установленных дополнений. Если среди них есть те, которые маскируют местоположение или влияют на загрузку сайтов другими способами, рекомендуется их отключить или удалить. Можно проверить и каждое по очереди, деактивируя расширение и перезагружая проблемную страницу в интернете.
- Если речь идет об удалении найденного проблемного дополнения, после нажатия по кнопке необходимо будет еще раз подтвердить это действие.
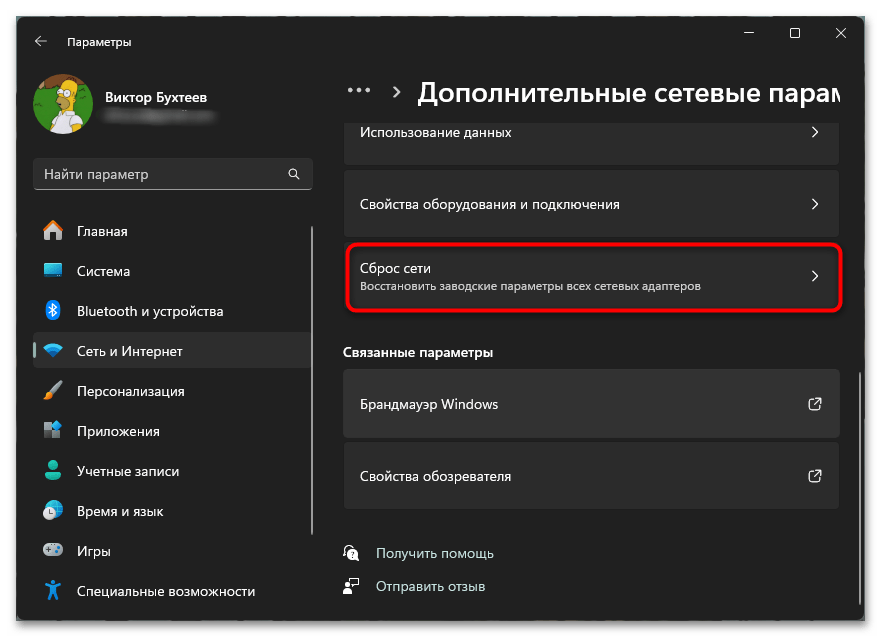
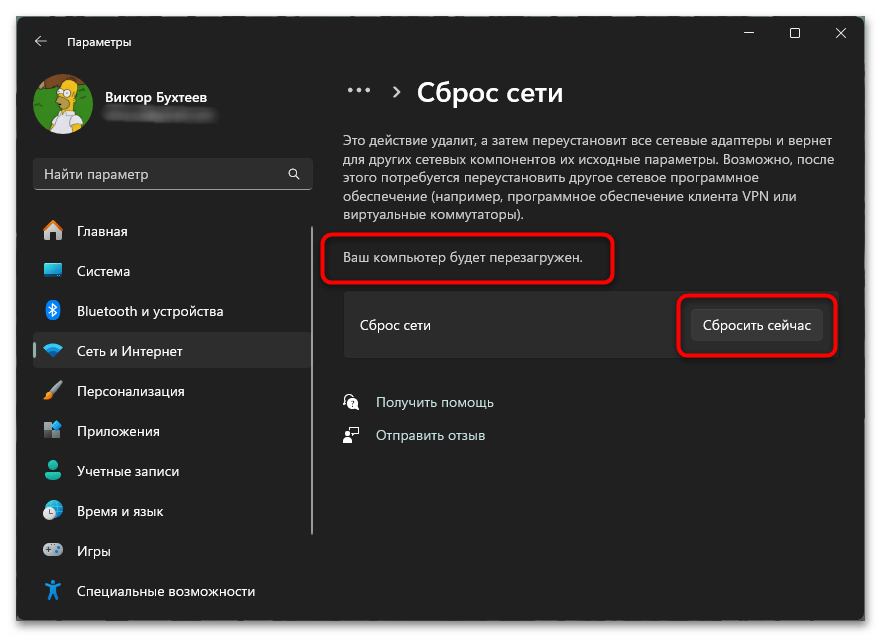
Способ 7: Сброс настроек сети
Поврежденные или конфликтующие сетевые настройки часто становятся причиной проблем с безопасными соединениями. Сброс сетевых параметров в Windows возвращает все настройки к исходным значениям, устраняя возможные конфликты. Важным этапом сброса является и очистка кеша сопоставителя DNS, что часто оказывается действительно рабочим решением в тех случаях, когда SSL-сертификаты сайта были обновлены, но в кеше до сих пор сохранены устаревшие данные.
- Перейдите в «Параметры», где выберите раздел «Сеть и Интернет», затем перейдите в «Дополнительные сетевые параметры».
- Выберите раздел «Сброс сети».
- Прочитайте описание принципа сброса, а также учитывайте, что после ПК отправится на перезагрузку. Подтвердите операцию, щелкнув по «Сбросить сейчас».

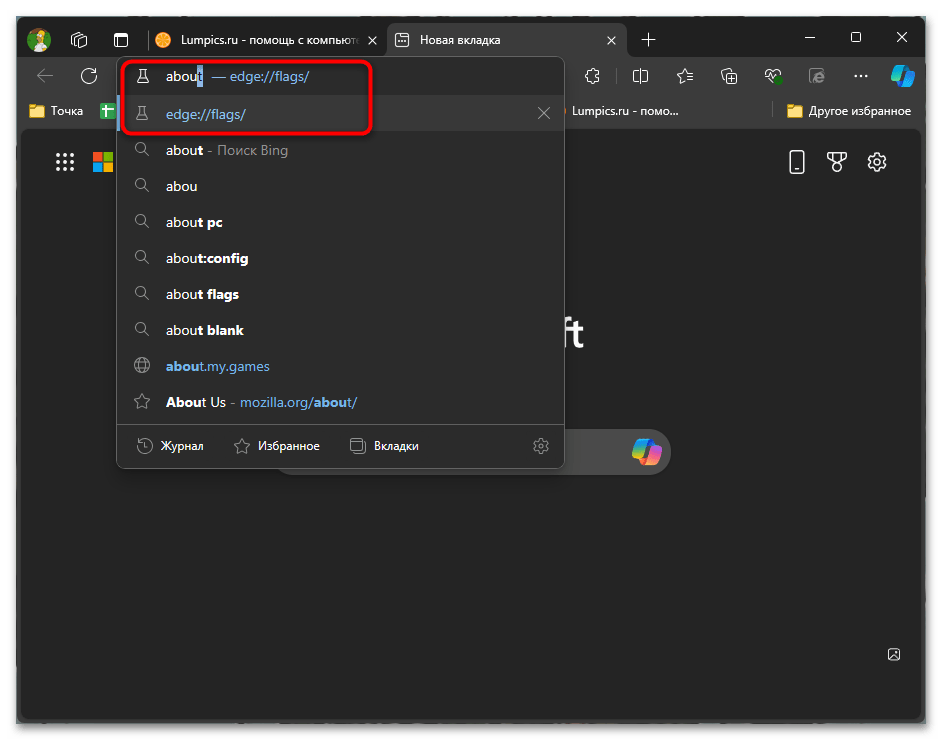
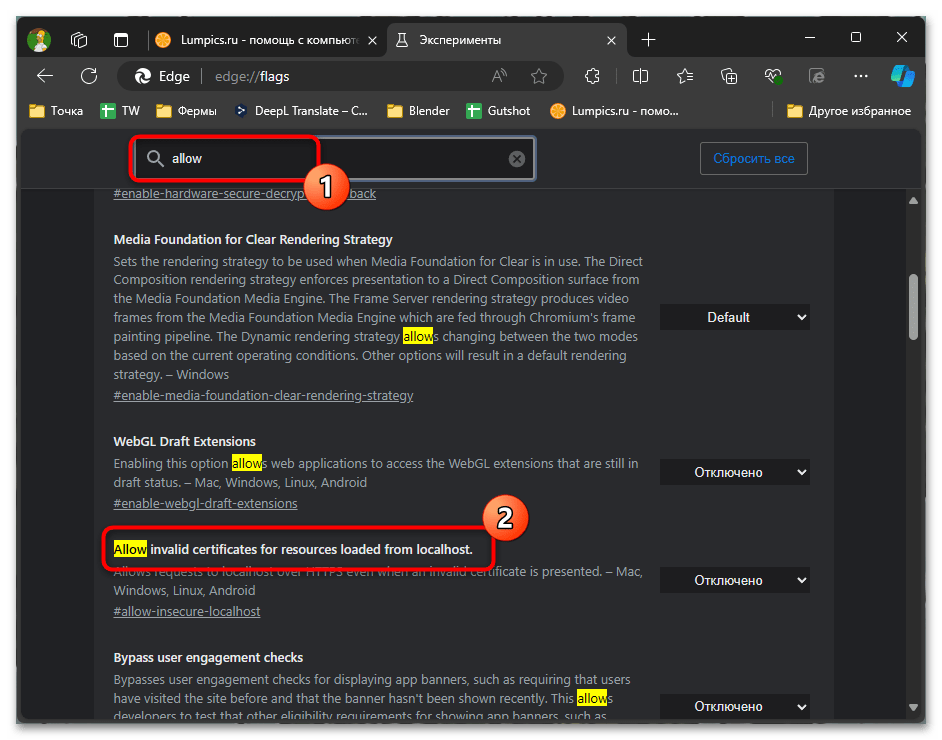
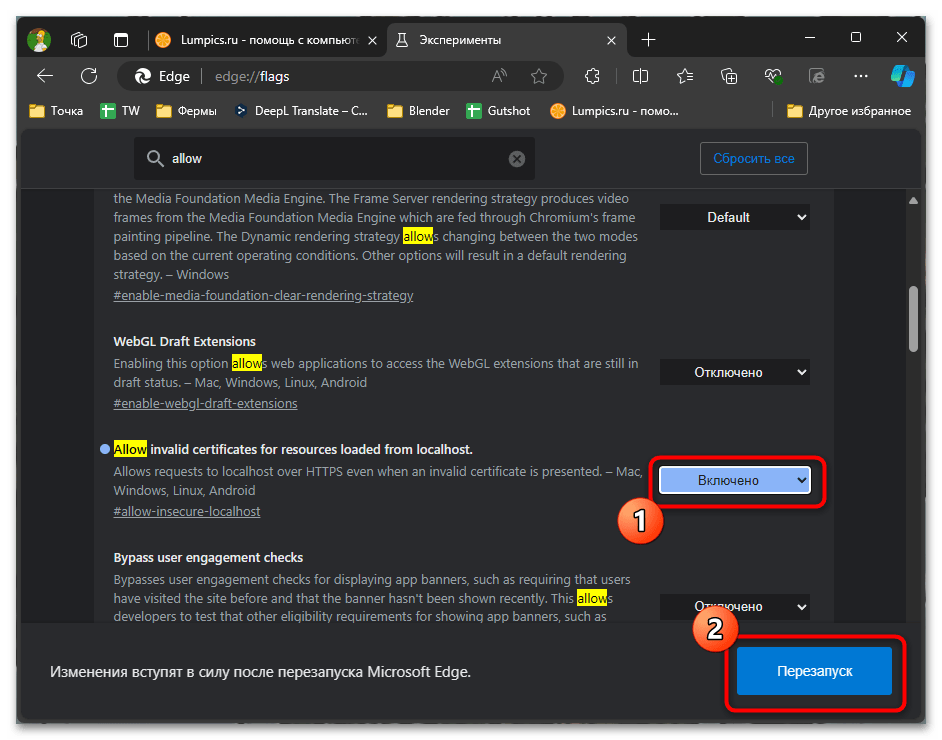
Способ 8: Игнорирование ошибок SSL (только для локальных подключений)
Включение в настройках браузера флага #allow-insecure-localhost иногда помогает решить проблемы с подключением к локальному серверу (localhost) с незащищенным соединением. Этот флаг позволяет браузеру игнорировать ошибки SSL, возникающие при подключении к локальному хосту без действующего SSL-сертификата. Важно отметить, что этот флаг применим только для локальных серверов и не затрагивает обычные сайты в интернете, что делает его полезным именно для целей разработки.
- Для начала необходимо перейти ко скрытым настройкам Microsoft Edge, для чего в адресной строке введите
edge://flagsилиabout://flagsи перейдите по данному адресу. - Воспользуйтесь поиском, чтобы отыскать параметр
#allow-insecure-localhost. - Измените состояние настройки на «Включено» и обязательно отправьте браузер на перезапуск, поскольку изменения будут применены только после этого.
Наша группа в TelegramПолезные советы и помощь
For those who are for any reason facing an error on their system while accessing the Microsoft default Antivirus, here is the solution. You may get some errors like the Virus and threat protection page is not available because your IT administrator has restricted that in Windows 11…
Method 1: Disable Windows Defender UI LockdownMethod 2: Using RegeditMethod 3: Check for Windows UpdatesMethod 4: Reset the Windows Security AppMethod 5: Use Windows PowerShellMethod 6: Perform Windows 11 Repair
I was using Windows 11 which is the latest operating system of Microsoft with the latest security features. But after installing a few software and activating the Windows, a key feature that is built-in security to protect your PC from various threats vanished. One of these features is “Virus and Threat Protection,” which provides real-time protection against malware, viruses, and other security risks. However, somehow I recovered that and there would be other users who may encounter the same issue where the “Virus and Threat Protection” page is not available or inaccessible. So, In this article, I will provide a few ways to resolve it.
Error:
Page not available
Your IT administrator has limited access to some areas of this, and the item you tried to access is not available. Contact the IT helpdesk for more information.

Method 1: Disable Windows Defender UI Lockdown
Maybe because of any reason the User Interface of the Windows Defender that also includes the “Virus and Threat Protection” page is disabled. So, first let’s run a command that can enable it again, if that is the problem.
- For that, open PowerShell as Admin. You can right-click on the Windows start button to select it.
- After that, run the following command in the PowerShell
Set-MpPreference -UILockdown 0- Now, open your Windows Defender or Virus and Threat Protection page.
- Quite good chances that you will have access to your system’s default Antivirus.

Method 2: Using Regedit
If the above method doesn’t work then you can follow the following in which we use Regedit to add a few values.
- Open Regedit. Press Win+R and type – regedit after that press the Enter key.

- Navigate to HKEY_LOCAL_MACHINE\Software\Policies\Microsoft\Windows Defender
- Right-click on the empty area and select New -> DWORD (32-bit ) value

- Give it a name – DisableAntispyware
- Similarly again create a value with the name – DisableRealtimeMonitoring
- Let the value default value 0 as it is. Close the Registry Editor and restart your system.
- Now, check if Windows Defender is available with its apps.
Method 3: Check for Windows Updates
Outdated or missing Windows updates can sometimes cause issues with security features. To ensure that your system is up to date:
- Press
Win+Ito open the Windows Settings. - Click on “Windows Update.”
- Select “Check for updates.” If updates are available, install them.
- Reboot your computer if prompted.
Method 4: Reset the Windows Security App
Sometimes, issues with security services can cause the “Virus and Threat Protection” page to become unavailable. To reset the app:
- Press Win + I and select the Apps.
- Type – windows in the search box window.
- Click the three dots given in front of the Windows Security App and select Advanced options.
- Click on the Repair button first, if after that you don’t have the Virus and Threat page then Reset the App.
- Now, try accessing the “Virus and Threat Protection” page again through Windows Security.


Method 5: Use Windows PowerShell
If the issue persists, you can try using Windows PowerShell to reset the security components:
- Right-click on the Start button and select “Windows Terminal (Admin)” to open an elevated PowerShell window.
- In the PowerShell window, copy and paste the following commands one by one and press Enter after each:
Get-AppXPackage -AllUsers -Name Microsoft.Windows.SecHealthUI | Foreach {Add-AppxPackage -DisableDevelopmentMode -Register "$($_.InstallLocation)\AppXManifest.xml"}Get-AppXPackage -AllUsers -Name Microsoft.Windows.SecHealth | Foreach {Add-AppxPackage -DisableDevelopmentMode -Register "$($_.InstallLocation)\AppXManifest.xml"}Restart your computer after running these commands…
Method 6: Perform Windows 11 Repair
If none of the above methods work, you can try repairing your Windows installation:
- Open the Windows Settings (Win + I).
- Click on “System.”
- Select “Recovery” from the left-hand menu.
- Under “Advanced startup,” click on “Restart now.”
- When your PC restarts, select “Troubleshoot” > “Advanced options” > “Startup Repair.“
- Follow the on-screen instructions to complete the repair process.

Other Articles:
- How to install BetterCap on Windows 11 or 10
- How to download and add new widgets to Windows 11
- Single command to install VMware Workstation on Windows 11
- Install Windows 11 without an internet connection?