
Removing a sign-in verification method
Applies ToMicrosoft account dashboard
Removing verification methods
Important:
-
You don’t need to remove old security information unless there is an account security risk (e.g. someone else has access to your old mailbox).
-
If you do need to replace your security information, make sure you add new information first.
-
If you request removal of all security information in your account, the account is put into a restricted state for 30-days. Your information doesn’t actually change in this time. During the 30-day restriction period, we cannot accept further changes or additions to security settings or billing information. Your account is still open and active, and you can still use your email, Skype, OneDrive and devices as usual. While we understand this 30-day period might be frustrating, this is done to protect and alert you in case the security info was removed by someone who had unauthorized access to your account. Learn more.
-
Sign in to the Advanced security options page of your Microsoft Account.Sign in
-
Expand the verification option and select Remove.
-
Select Remove again to confirm.
See also
Troubleshooting verification code issues
What does «Security info change is still pending» mean?
Need more help?
Can’t sign in?
If you can’t sign into your Microsoft account, most issues can be identified by our sign-in helper tool.Sign-in helper
Contact Support
For technical support, go to Contact Microsoft Support, enter your problem and select Get Help. If you still need help, select Contact Support to be routed to the best support option.
Important: To protect your account and its contents, our support agents are not allowed to send password reset links, or access and change account details.
Need more help?
Want more options?
Explore subscription benefits, browse training courses, learn how to secure your device, and more.
Несколько кликов — и подтверждать свои действия больше не придётся.
Что такое контроль учётных записей в Windows 10 и как он работает
Контроль учётных записей, или UAC (User Account Control), — это встроенный компонент Windows для защиты от изменений, которые могут нанести потенциальный вред компьютеру. Когда пользователь или программа пытаются скорректировать системные файлы и настройки, UAC уведомляет об этом и требует подтверждения действий.
Предусмотрено четыре уровня контроля. При включении самого жёсткого будут отображаться уведомления при изменении параметров пользователем и программами. Второй уровень предусматривает сообщения только при попытке изменений программами. Третий тоже подразумевает слежение за действиями утилит, но без затемнения экрана. А четвёртый — это полное отключение функции.
В целях безопасности по умолчанию включён второй уровень контроля учётных записей. При желании его можно перенастроить или отключить вовсе.
Что будет, если отключить контроль учётных записей в Windows 10
После деактивации UAC больше не нужно будет разрешать действия, которые требуют прав администратора. Соответственно, уведомления об этом перестанут отображаться.
Однако владельцы стандартных учётных записей пользователей — если они есть на компьютере — не смогут внести никаких изменений, требующих права администратора.
Также стоит понимать, что после этого потенциальные злоумышленники смогут корректировать системные настройки на ПК.
Как отключить контроль учётных записей в Windows 10 через панель управления
Самый простой и наглядный способ, который доступен и в Windows 10, и в любых других версиях ОС.

Начните набирать в поиске «контроль» и выберите из подсказок «Изменение параметров контроля учётных записей».

Переместите ползунок в нижнее положение, нажмите OK, а затем «Да» для подтверждения действия.
Как отключить контроль учётных записей в Windows 10 через командную строку
Ещё один вариант, который работает не только в Windows 10, но и в остальных версиях ОС.

Введите в поиске cmd и кликните «Запуск от имени администратора».

Скопируйте и вставьте в открывшееся окно команду reg ADD HKLM\SOFTWARE\Microsoft\Windows\CurrentVersion\Policies\System /v EnableLUA /t REG_DWORD /d 0 /f.
Как отключить контроль учётных записей в Windows 10 через Редактор локальной групповой политики
Если у вас Windows 10 Pro или Enterprise, то вам доступен ещё один вариант.

Нажмите клавиши Win + R для открытия диалогового окна «Выполнить», введите gpedit.msc и кликните OK.

Перейдите с помощью бокового меню в раздел «Конфигурация компьютера» → «Конфигурация Windows» → «Параметры безопасности» → «Локальные политики» → «Параметры безопасности».

Отыщите в списке строку «Контроль учётных записей: все администраторы работают в режиме одобрения администратором». Затем дважды кликните по ней, выберите значение «Отключён» и нажмите OK.
Microsoft’s insistence on sign-ins can be annoying for Windows 11 users. But, there are ways to put a stop to it! Simply follow a few steps and you can avoid Microsoft constantly asking for your credentials. Here’s how:
- Open the Settings app on your Windows 11 device.
- Go to the “Accounts” section and select the “Sign-in options” tab. Here, you’ll find settings related to signing in.
- One method is to toggle off the “Use my sign-in info” setting. This will stop Windows 11 from requesting your credentials repeatedly.
- Alternatively, if you don’t want to disable the sign-in prompts completely, you can enable automatic sign-in with your Microsoft account. Choose the relevant checkbox in the “Sign-in options” tab. Windows 11 will remember your credentials and log you in automatically.
It’s great that we have more control over our sign-in experiences than we did in previous versions of Windows. Technology has come a long way!
Understand the Issue: Explaining why Microsoft keeps asking for sign-in on Windows 11
Microsoft’s frequent requests for signing in on Windows 11 can be irritating. This is to provide a smooth user experience and improved security. Signing in allows Microsoft to offer tailored settings, sync data between devices, and protect against unauthorized access.
These sign-in prompts give access to the operating system’s features and services. After signing in, users can enjoy cloud storage, automatic app updates, and integration with other Microsoft products. This authentication process makes Windows 11 more user-friendly and useful.
This continuous sign-in request is not meant to breach privacy or cause trouble. Instead, it wants to give a unified ecosystem where users can easily switch between devices while keeping their preferences in sync.
To heighten the user experience, Microsoft has included security measures such as Windows Hello facial recognition and PIN requirements. These extra authentication layers guarantee that only authorized persons can get to sensitive data and personal files.
Knowing why this feature exists is enlightening. With the increasing dependence on cloud-based services and connected devices, Microsoft realized the need for a secure and tailored experience for users. So, they came up with these sign-in prompts to make operations smoother and protect user data.
Benefits of Signing In: Discussing the advantages of signing in to Microsoft on Windows 11
Signing into Microsoft on Windows 11 is great! Let’s explore the advantages:
- Personalized settings across devices.
- Sync files and documents.
- Integrate with Microsoft services like Outlook, OneDrive, and Teams.
- Apps from the Microsoft Store, easy to install and update.
- Be part of the Microsoft ecosystem, with innovative solutions.
- Tight security – use Windows Hello or fingerprint authentication.
Moreover, sign-in grants you access to exclusive features. Enjoy the enhanced gaming experience with Direct Storage technology and Auto HDR support. Plus, get cloud-based storage options to back up your files.
Jane, a Windows 11 user, activated sign-in. She experienced convenience – adjusting display preferences, syncing email accounts within Outlook. It was great!
Reasons to Stop Microsoft Sign-In Prompts: Highlighting the reasons why someone may want to stop Microsoft from asking for sign-in
Microsoft Sign-In prompts can be annoying and take up valuable time. Disabling them allows for a smoother user experience.
Privacy and security are improved by opting out of signing in. This is especially important if you share your device or use public networks.
Entering credentials repeatedly is tedious. Disabling the sign-in prompts saves time.
Individuals may not want their usage tracked across Microsoft services. Opting out of the prompts permits autonomy over data.
Microsoft’s decision to implement Sign-In prompts is to strengthen security for users. These messages remind them to protect against unauthorized access.
Method 1: Adjusting Account Settings
Want to stop Microsoft constantly asking for sign-in on Windows 11? Follow this easy guide!
- Open Settings App: Find the Start button on your screen’s bottom left corner. Select the Settings app.
- Navigate to Accounts: In the Settings app, look for “Accounts” and click it.
- Select Sign-in Options: Go to the “Sign-in options” tab in Accounts.
- Adjust Preferences: Look for “Require Windows Hello sign-in for Microsoft accounts”. It’s on by default. Switch it off to stop the prompts.
It’s that easy! Now, enjoy a smooth user experience without annoying interruptions.
Pro Tip: If you still get sign-in prompts, make sure your device has no additional security measures like PIN or fingerprint authentication. They could be triggering it.
Method 2: Local Account Setup
No more incessant sign-in requests from Microsoft on Windows 11! Utilize the Local Account Setup method. Here’s how:
- Open Start menu and select the Settings icon.
- In Settings, choose “Accounts”.
- Go to the “Sign-in options” tab in the left sidebar.
- Click on “Switch to a local account” under the “Account type” section.
- A prompt will appear. Enter your password and click “Next”.
- Input the details for your local account, such as username and password.
Now you can successfully prevent Microsoft from bugging you with sign-ins.
Pro Tip: Ensure your local account credentials are protected. Choose a unique, strong password that is difficult to guess.
Thanks to this simple method, you can stay signed out from Microsoft on Windows 11. Enjoy!
Method 3: Disabling Sign-in Prompts
Say goodbye to annoying sign-in prompts on Windows 11! Here’s how you can get a hassle-free experience with your Microsoft account:
- Click the Windows icon in the bottom left corner of your screen.
- Type “Settings” into the search bar and open the app.
- Select “Accounts” in Settings.
- Pick the “Sign-in options” from the left sidebar.
- Toggle off the button under “Require Windows Hello sign-in for Microsoft accounts” in the right pane.
- Restart your computer to apply the changes.
No more interruptions! With these steps, you can easily disable sign-in prompts on your Windows 11 device.
Pro Tip: Save time and make life easier by disabling sign-in prompts on Windows 11.
Conclusion: Summarizing the methods to stop Microsoft from asking to sign in on Windows 11
- Open the Start menu: Click on the Windows logo in the bottom left corner of your screen.
- Access the Settings app: Select the gear icon from the left-hand menu.
- View Accounts page: Select “Accounts” from the Settings app.
- Uncover Sign-in options: Select “Sign-in options” from the left-hand menu.
- Make your selection: Under “Require Windows Hello sign-in for Microsoft accounts,” switch off this option if it is turned on.
- Doing this will help you steer clear of Microsoft’s sign-in requests and savor a smoother Windows 11 experience. Keep in mind, though, that these methods won’t inhibit access to other Microsoft services connected to your account. If you require more customization or assistance, check out Microsoft support resources.
- Take charge now and bid farewell to those pesky sign-in prompts!
Additional Tips: Providing some additional tips and recommendations for managing Microsoft sign-in prompts effectively
Managing Microsoft sign-in prompts is an important issue for Windows 11 users. Here are some tips to help you out:
- First, adjust your account settings in the Windows Settings. Try different options like facial recognition or PIN instead of passwords.
- Make sure your device has the latest Windows 11 updates. This may fix sign-in prompt issues.
- Check your internet connection. Poor or unstable internet connection can cause frequent sign-in requests.
- If none of these tips work, contact Microsoft’s support team. They have experts who can help.
Remember, finding the best solution requires patience and exploring various options.
Also, regularly maintain your OS by clearing cache files and optimizing performance.
Surprisingly, according to a July 2021 report from StatCounter, 80% of desktop computers still run on Windows OS.
После входа в Windows 10/11 на компьютере, который добавлен в домен Active Directory или Azure AD, пользователь может увидеть всплывающее сообщение в нижнем правом углу:
Операционной системе требуются ваши учетные данные.
Заблокируйте компьютер и разблокируйте его, используя последний пароль или смарт карту.
Windows needs your current credentials.
 Please lock this computer, then unlock it using your most recent password or smart card.
Если заблокировать экран компьютера (Win+L) и ввести пароль/PIN от вашего аккаунта, сообщение опять появляется через некоторое время.
Если проблема возникает при входе на компьютер с помощью учетной записи Microsoft (или Azure AD) с настроенным PIN (через Windows Hello), скорее всего причина в том, что ваш текущий PIN создан с помощью вашего предыдущего пароля. Попробуйте пересоздать PIN для вашего аккаунта.
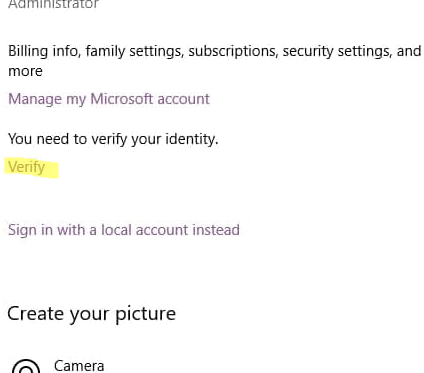
- Перейдите в раздел Settings -> Accounts -> You info (команда быстрого доступа
ms-settings:yourinfo
) и нажмите на кнопку Verify;Опция доступа если вы вошли с учетной записью Microsoft. Если нет, здесь нужно нажать кнопку “Sign in with a Microsoft Account instead”.

- Выполните повторную верификацию и перезагрузите компьютер. После это Windows должна перестать требовать от вас учетные данные.
Если вы вошли на компьютер с учетной запись Azure, а на устройстве есть подключенные сетевые диски с помощью учетной записи локальной Active Directory, Windows может требовать выполнить проверку учетных данных AD. В этом случае нужно удалить все подключенные сетевые диски с помощью команды:
net use * /delete
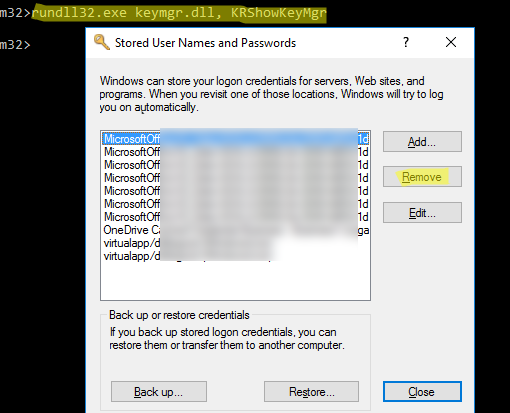
Также рекомендует очистить сохраненные учетные данные в диспетчере паролей Windows. Выполните команду
rundll32.exe keymgr.dll, KRShowKeyMgr
и удалите все записи.
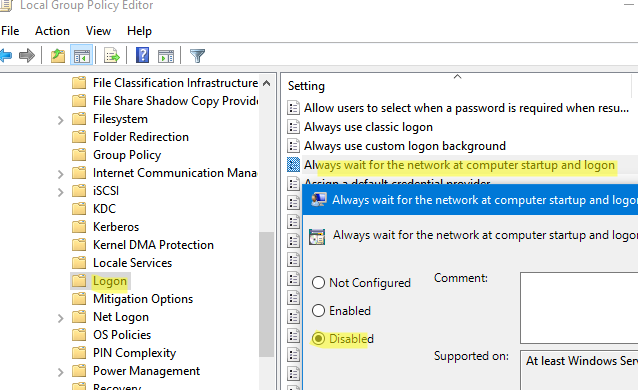
На компьютере в домене Active Directory можно отключить требовать повторный ввод учетных данных (не путать с автоматическим входом в Windows) с помощью параметра GPO.
- Вы можете использовать локальный редактор GPO на компьютере (
gpedit.msc
) или редактор доменных GPO (
gpmc.msc
); - Перейдите в раздел Computer Configuration -> Administrative Templets -> System -> Logon и найдите параметр “Always wait for the network at computer startup and logon”;
- Измените параметр политики на Disable и сохраните изменения.
- Перезагрузите компьютер чтобы применить настройки групповой политики.
Можно настроить этот параметр реестра с помощью PowerShell:
$null = Set-ItemProperty -Path 'Registry::HKEY_LOCAL_MACHINE\SOFTWARE\Policies\Microsoft\Windows NT\CurrentVersion\Winlogon' -Name 'SyncForegroundPolicy' -Value 0 -Type 'DWord'
Также проверьте в настройках учетной записи в AD, что для пользователя не настроено ограничение на часы входа (Logon Hours).
На компьютерах в домене Active Directory уведомление о необходимости повторно ввести учетные данные возникает, когда срок действия билета Kerberos истек. Вы можете вывести информацию о билетах Kerberos пользователя с помощью команды:
klist
Введите пароль чтобы обновить ваш билет Kerberos. В данном случае после блокировки экрана и повторного ввода пароля, ваш билет Kerbero будет обновлен и повторный запрос учетных данных не будет появляться. Вы можете убедиться, что проблема связана с Kerberos, если с помощью редактора атрибутов AD включите в настройках учетной записи пользователя (атрибут userAccountControl) параметр “Do not require Kerberos Preauthentication”. После этого Windows престанет повторно требовать ваши учетные данные (не рекомендуется оставлять этот параметр включенным по соображениям безопасности).
Если в вашей сети используется гибридная аутентификация (AAD и AD), или вы выполняете миграцию в облако, то чтобы избавиться от надоедливого запроса учетных данных на компьютерах в AAD, нужно сменить настройки DNS на компьютерах на внешние DNS сервера вместо локальных DNS серверов Active Directory.
User_A1B2
★★★★★
Здравствуйте! Подскажите, пожалуйста, как отключить подтверждение личности в Windows? Это очень неудобно, постоянно приходится подтверждать свои действия.
Xyz123_Pro
★★★☆☆
Отключение подтверждения личности в Windows зависит от того, какое именно подтверждение вы имеете в виду. Есть несколько вариантов:
- Подтверждение учетной записи Microsoft: Это обычно требуется при входе в систему или установке приложений. Полностью отключить его нельзя, но можно упростить, используя менее строгие методы проверки (например, только код из SMS).
- Контроль учетных записей (UAC): Эта функция запрашивает подтверждение при выполнении действий, которые могут повлиять на систему. Вы можете снизить уровень UAC, но не отключать полностью. Это снизит безопасность системы!
- Подтверждение действий в приложениях: Некоторые приложения запрашивают подтверждение перед выполнением определенных действий (например, удаление файла). В этом случае отключение зависит от настроек конкретного приложения.
Для более точного ответа, пожалуйста, уточните, в каком именно случае вас просят подтвердить личность.
Tech_Guru42
★★★★☆
Согласен с Xyz123_Pro. Отключение подтверждения личности может серьезно снизить безопасность вашей системы и сделать ее уязвимой для вредоносных программ. Перед тем как что-либо отключать, подумайте о последствиях. Если вы имеете в виду UAC, то его можно снизить, но не отключать полностью. Это делается через панель управления.
SecureUser_One
★★★★★
Я бы рекомендовал не отключать полностью никакие меры безопасности. Вместо этого, лучше понять, как работают эти механизмы и настроить их под свои нужды. Например, можно использовать более удобный способ двухфакторной аутентификации, если вас беспокоит неудобство.
Вопрос решён. Тема закрыта.
- Сколько платят за 3 группу инвалидности неработающему человеку?
- Чем отличаются металлокерамика и циркониевые коронки для зубов?
- Как воспитать сотрудника?