
Secure Boot is a safety feature that allows the system to only boot using recognized software that has a digital signature. It ensures that the system does not use unsigned software during boot, preventing malware from hooking into the boot loader.
You need to enable Secure Boot to run several applications, including Windows 11 Installation. You can enable Secure Boot on your MSI Motherboard through the BIOS settings. But, there are a few things to consider before you can access the Secure Boot option.
How to Enable Secure Boot on MSI BIOS?
If you are enabling Secure Boot to clean install Windows 11, you first need to set the drive’s partition style to GPT and change the BIOS mode to UEFI. Otherwise, you may get an error message prompting you to change the disk partition style to GPT.
However, if you just want to enable Secure secure boot to protect your system, you can simply start from Enable Secure Boot section.
Convert Partition Style to GPT
Partition style tells the system how the operating system interprets the partition table. GPT or GUID Partition Table is the latest one and more efficient compared to Master Boot Record.
If you have a disk that uses an MBR partition style, you need to upgrade to a GPT partition to install Windows 11.
First, start by checking your current partition Style.
- Open Run by pressing Windows + R key.
- Type in
diskmgmt.mscand press Enter. The Disk Management window should open. - Right-click on the disk where you want to install the OS.
- Select Properties to open Disk Properties.
- Go to the Volumes tab and check the Partition style.


If the Partition Style is GPT, you can jump to Change BIOS Mode. If the partition style is MBR, you need to change it to GPT.
Note: Changing partition style, deletes all your data in the disk including partitions and volumes. Therefore, make sure that you back up the disk before continuing with the steps below.
- Click on the Start menu and press the Power icon.
- Press Shift and click on Restart.

- Once the system boots into Advanced Startup, navigate to Troubleshoot > Advanced options > Command Prompt.

- Type
diskpartand press Enter. - Type
list diskand press Enter to get the status of all your disk. If you have more than one disk, note the number on the disk whose partition style you want to change. That is Disk 0, Disk 1, or Disk 2. - Type
select Disk Xand press Enter. Replace X with the disk number. - Type
Cleanand press Enter to delete all partitions on the Disk. - Now type
convert GPTand press enter.


Enable Secure Boot
MSI BIOS may not give you the option to access Secure Boot settings by default. First, you need to set the BIOS mode to UEFI. Since Secure Boot is only available for UEFI firmware.
CSM or the Compatibility Support Mode allows your system to run older hardware that is not compatible with newer systems. But the BIOS will not have a setting named Secure Boot if the BIOS mode is set to CSM.
To fix this, you first need to change BIOS mode to UEFI. To check the motherboard’s BIOS mode,
- Open Run.
- Type
msinfo32and press Enter to open System Information. - Click on System Summary on the left panel.
- Now on the right panel, check the value corresponding to BIOS Mode. It should say UEFI.


If your BIOS Mode is CSM, you first need to set it to UEFI. If the BIOS mode is UEFI, you can access Secure Boot options in the BIOS.
- Turn on your system.
- Repeatedly press the BIOS key to enter the BIOS. Usually, the BIOS key for the MSI motherboard is the Delete key. If you are on a laptop the BIOS key could be any of the Function keys as well.
- Press F7 to get into EZ Mode.
- Click on Settings and select Advanced.

- Select Windows OS Configuration.

- Set BIOS UEFI/CSM Mode to UEFI.

- Press F10 and select Yes.
- Restart your PC.


Once you have set BIOS mode to UEFI, you can now access and change the Secure Boot option.
- Enter the BIOS by repeatedly pressing the BIOS key during startup.
- Press F7 to go into EZ mode.
- Navigate to Settings > Advanced > Windows PC Configuration > Secure Boot.

- Here, select Secure Boot and set it to Enabled.

- Press F10 to save changes and exit the BIOS.


If the BIOS displays a message that says System in Setup Mode, you need to be in User mode. To do this, you first need to set Secure Boot Mode to Standard.
- Select Secure Boot Mode and set it to Custom.
- Press F10 to save changes and restart the PC.
- Again, navigate to Settings > Advanced > Windows PC Configuration > Secure Boot.
- Set Secure Boot Mode to Standard.

- Click on Yes if the BIOS asks for confirmation.
- The BIOS will again ask for confirmation that says Reset without saving. Click on No.
- Now, select Secure Boot and set it to Enabled.
- Press F10 to save and exit the BIOS.

How to Check Secure Boot State in Windows?
Once you have enabled Secure Boot in BIOS, you can also check whether the OS detected changes made in the BIOS. You can do this using System Information.
- Open Run.
- Type
msinfo32and press Enter. - On the right panel, check the value corresponding to Secure Boot State.


Если установщик Windows 11, а возможно и какая-то программа или игра (такое тоже возможно) сообщает о том, что его не устраивает состояние безопасной загрузки и её необходимо включить — сделать это сравнительно легко, но возможны нюансы.
В этой инструкции подробно о способах включить безопасную загрузку на вашем компьютере или ноутбуке, при условии, что это возможно. Обратите внимание, если задача — установка Windows 11, существуют возможности запуска установки и без включенной безопасной загрузки (Secure Boot), например — создание загрузочной флешки в Rufus с отключением проверки совместимости при чистой установке, или обновление с обходом требований для установки.
Проверка состояния безопасной загрузки, особенности работы после включения
Прежде чем начать, о том, где вы можете проверить текущее состояние безопасной загрузки в Windows 11 или Windows 10:
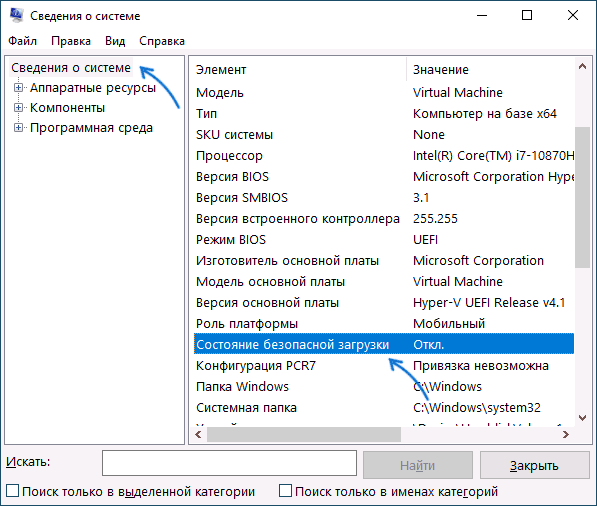
- Нажмите правой кнопкой мыши по кнопке «Пуск», выберите пункт «Выполнить», введите msinfo32 и нажмите Enter. В разделе «Сведения о системе» вы увидите пункт «Состояние безопасной загрузки» с её текущим статусом.

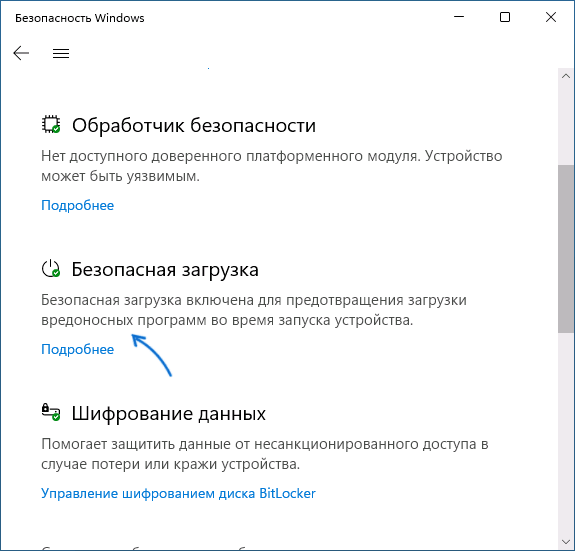
- Можно зайти в окно «Безопасность Windows», например, с помощью значка в области уведомлений и открыть раздел «Безопасность устройства». Если вы наблюдаете там пункт «Безопасная загрузка» с зеленой отметкой, она включена. Иначе — нет.

Ещё один важный момент: загрузка с включенной безопасной загрузкой возможна только для систем, установленных в UEFI-режиме на GPT диск.
Если, к примеру, у вас Windows 10 и установлена в Legacy-режиме на диск MBR, после включения Secure Boot она перестанет загружаться. Возможные варианты действий: конвертировать диск в GPT с помощью mbr2gpt.exe и включить UEFI-загрузку, либо использовать вариант с чистой установкой с флешки и обходом требований Windows 11, как было указано в начале статьи.
Включение безопасной загрузки Secure Boot в БИОС/UEFI
Само включение безопасной загрузки или Secure Boot выполняется не в Windows 11/10, а в БИОС/UEFI вашего компьютера или ноутбука. Для того, чтобы включить её, необходимо:
- Зайти в БИОС при включении/перезагрузке устройства. На ноутбуках для этого обычно используется клавиша F2 (или сочетание Fn+F2), которую необходимо ритмично нажимать сразу после появления заставки производителя (но бывают и другие варианты клавиши), на ПК как правило используется клавиша Delete. Более подробно: Как зайти в БИОС/UEFI на компьютере или ноутбуке.
- Найти раздел БИОС, на котором доступна опция включения (установка в Enabled) функции Secure Boot. Учитывайте, что на очень старых компьютерах такой настройки может и не быть. Как правило, она располагается где-то в разделе Security, Boot, System Configuration, иногда — Advanced Settings. Несколько примеров расположения будут приведены далее.
- Сменить состояние Secure Boot на Enabled (если ранее выполнялась очистка ключей Secure Boot, восстановить их), сохранить настройки БИОС/UEFI (обычно выполняется клавишей F10 или на вкладке Exit) и перезагрузиться обратно в систему.
Примеры расположения опции для включения безопасной загрузки (Secure Boot)
Ниже — несколько примеров, где можно найти опцию включения безопасной загрузки на разных материнских платах и ноутбуках. У вас может отличаться, но логика везде одна и та же.
Ещё раз отмечу: включить безопасную загрузку можно только в случае, если у вас включен режим загрузки UEFI, а режим Legacy/CSM отключен, иначе опция будет недоступна. В некоторых вариантах БИОС переключение в режим загрузки UEFI выполняется путем выбора типа операционной системы (OS Type) между Windows 11/10/8 и «Other OS» (нужно выбрать Windows).
ASUS
На разных версиях материнских плат и ноутбуков включение Secure Boot реализовано слегка по-разному. Обычно пункт «Secure Boot» можно найти на вкладке «Boot» или «Security». При этом для OS Type может потребоваться выставить Windows UEFI Mode (параметр может и отсутствовать).
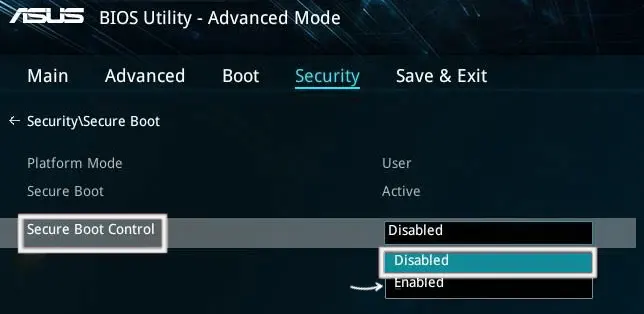
Также, для доступности пункта настройки безопасной загрузки в БИОС может потребоваться перейти в Advanced Mode, обычно — по клавише F7.
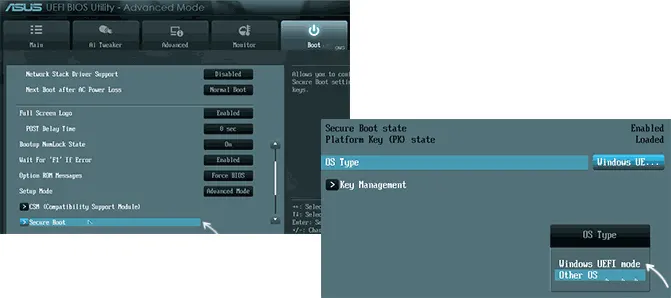
В некоторых случаях может потребоваться восстановление ключей безопасной загрузки, обычно выполняется следующим образом: в Advanced Mode в BIOS на вкладке Boot или в Secure Boot — Key Management выбираем Load Default PK и подтверждаем загрузку ключей по умолчанию.
AsRock
Настройка для включения безопасной загрузки на материнских платах AsRock обычно находится в разделе «Security».

Зайдя в раздел необходимо будет установить значение Secure Boot в Enabled, а если выбор недоступен, включить стандартный Secure Boot Mode и установить ключи по умолчанию (Install default Secure Boot keys).

Acer
Как правило, опция включения Secure Boot на ноутбуках Acer находится либо в разделе Advanced — System Configuration, либо в Boot или Authentication.
Также помните, о том, что должен быть включен режим загрузки UEFI, а не Legacy/CSM для возможности изменения состояния безопасной загрузки на Enabled.
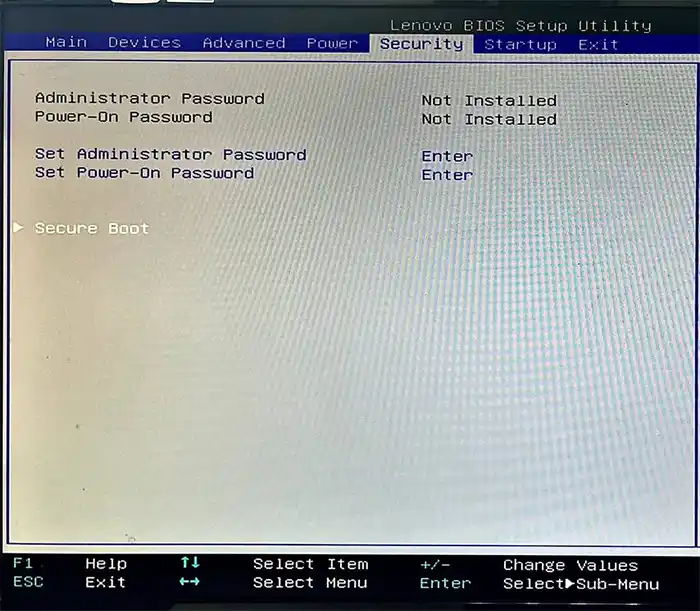
Lenovo
ПК и ноутбуки Lenovo имеют разные варианты интерфейса БИОС, но обычно нужная опция находится на вкладке Security, как на фото ниже:

Ещё один пример с ноутбука Lenovo:
Gigabyte
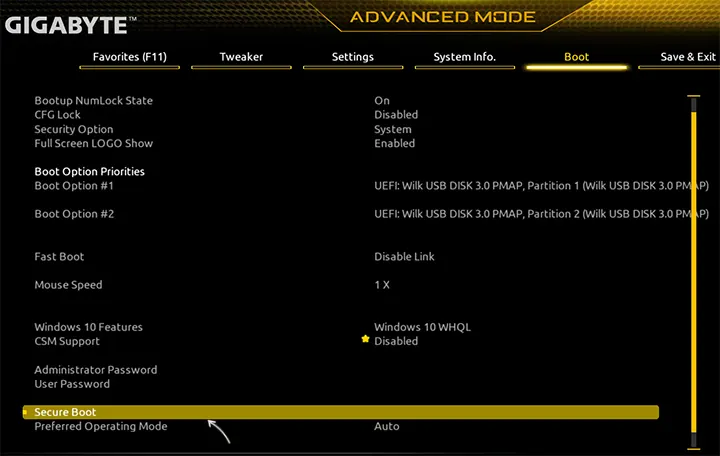
Варианты отключения Secure Boot на материнских платах и ноутбуках Gigabyte могут отличаться, обычно порядок действий следующий:
- На вкладке Boot или BIOS отключить CSM Support, и выбрать тип операционной системы или установить пункт Windows 8/10 Features в, соответственно, Windows 8/10, а не Other OS.
- После этого должен появиться пункт Secure Boot, в который необходимо зайти, чтобы включить безопасную загрузку.
Несколько дополнительных мест расположения опции включения Secure Boot (устанавливаем в Enabled) на старых Dell, Gigabyte, HP:

Также, если в вашем интерфейсе БИОС предусмотрен поиск, можно использовать его:

В случае, если вы не нашли способа включить безопасную загрузку на вашей материнской плате, либо её не удается перевести в Enabled, укажите её марку и модель в комментариях, я постараюсь подсказать, где именно требуется включать этот параметр. Кстати, часто достаточно просто сбросить настройки БИОС (Load Defaults на вкладке Exit), чтобы включить безопасную загрузку, так как на большинстве современных материнских плат она по умолчанию включена.
Для работы новой операционной системы Windows 11 требуется поддержка Безопасной загрузки или Secure Boot. Данная функция проверяет загружаемые операционные системы на наличие цифровой подписи и в случае ее отсутствия блокирует загрузку. Такая проверка позволяет защитить компьютер от некоторых видов вирусов и контролировать список загружаемых операционных систем.
Функция Secure Boot уже давно доступна в настройках BIOS на большинстве компьютеров. В этой статье мы расскажем о том, как включить Secure Boot в BIOS на материнских платах от MSI.
Для работы Secure Boot диск должен быть в формате GPT. Если диск размечен в формате MBR, то его нужно сначала сконвертировать в GPT и только потом включать Secure Boot. Подробнее:
- Как узнать в каком формате жесткий диск MBR или GPT
- Как преобразовать MBR в GPT в Windows 10
Также нужно отметить, что интерфейс BIOS может сильно отличаться в зависимости от модели материнской платы. Поэтому для получения точной информации следует обращаться к инструкции к конкретно вашей материнской плате. В этой статье мы рассмотрим только пример на основе платы MSI MPG Z390 GAMING PLUS.
Итак, для того чтобы включить Secure Boot на плате от MSI нужно открыть настройки BIOS и перейти в раздел «Settings – Boot». Здесь нужно переключить параметр «Boot Mode select» в режим «UEFI». UEFI – это современный способ загрузки операционной системы, который требуется для работы Secure Boot.

После этого нужно перейти в раздел «Settings – Advanced – Windows OS Configuration». Здесь есть параметр «Windows 10 WHQL Support», который также нужно переключить в режим «UEFI».

После этого нужно открыть раздел «Secure Boot» и включить там функцию «Secure Boot Support». Обратите внимание, данный раздел доступен только после переключения «Windows 10 WHQL Support» в режим «UEFI».

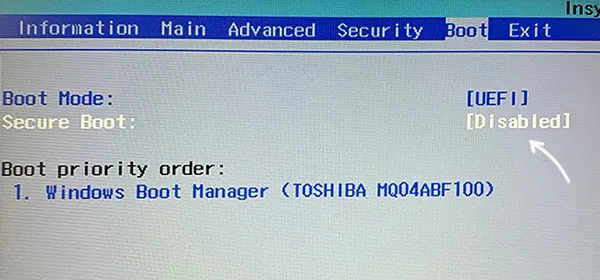
Дальше нужно сохранить настройки BIOS и перезагрузить компьютер. Для того чтобы проверить правильность настройки загрузите Windows 10, нажмите комбинацию клавиш Win-R и выполните команду «msinfo32». В результате появится окно «Сведения о системе», здесь нужно найти строки «Режим BIOS» и «Состояние безопасной загрузки».

Если все правильно настроено, то в строке «Режим BIOS» должно быть указано «UEFI», а в строке «Состояние безопасной загрузки» — «Включено», как на скриншоте вверху.
Возможно вам будет интересно:
- Как включить TPM 2.0 в BIOS на MSI.
Посмотрите также:
- Как проверить совместимость компьютера с Windows 11
- Что такое Secure Boot для Windows 11
- Программа для проверки совместимости с Windows 11
- Запуск Windows 11 на этом компьютере невозможен
- Как включить Secure Boot в BIOS на Gigabyte и AORUS
Автор
Александр Степушин
Создатель сайта comp-security.net, автор более 2000 статей о ремонте компьютеров, работе с программами, настройке операционных систем.
Остались вопросы?
Задайте вопрос в комментариях под статьей или на странице
«Задать вопрос»
и вы обязательно получите ответ.
In this post, we’ll explain how to turn on Secure Boot using the MSI BIOS. Secure Boot is a feature that makes your computer safer because it makes sure that during the boot process, only allowed software can run. Follow our step-by-step guide to Enable Secure Boot in MSI BIOS.
Table of Contents
What is Secure Boot?
Secure Boot is a safety feature built into modern computers’ BIOS software. It makes sure that the boot process can only run signed versions of the operating system and device drivers. This keeps your system safe from malware and changes made by people who shouldn’t have access to it.
Follow the steps below to turn on Safe Boot on your MSI processor. This will make it safer.
Step 1: Accessing the BIOS
To turn on Secure Boot, you have to go into your MSI computer’s BIOS settings. So, here’s how it works:
Start up your computer and look at the screen to see if it tells you to go into the BIOS. Most of the time, the warning message is short and tells you which key to press to get to the BIOS settings.

To get into the BIOS setup tool, press the key shown (like F2, Delete, or F10). Depending on the MSI gear you have, the exact key may be different.
Use your computer’s arrow keys to get to the Security or Boot area once you’re in the BIOS.
Step 2: Enabling Secure Boot
You can turn on Secure Boot once you’re in the BIOS settings:
- Find the Secure Boot choice in the section called Boot or Security. Most of the time, it’s called “Secure Boot Control” or something close.
- Choose the choice and press Enter to turn on the Secure Boot feature.
- Depending on the type of hardware you have, you may need to change other Secure Boot settings. You can also enable the secure boot in asus bios, Look at the choices for OS Type, Secure Boot Mode, and Key Management.
- Change the OS Type to the correct one. Choose UEFI OS if you are using a 64-bit version of Windows.
- Choose Other OS if you have a 32-bit version.
-

Choose either Standard or Custom for the Secure Boot Mode. Standard mode is a good balance of security and usability.
- If your motherboard has a Key Management feature, you might need to import and handle safe boot keys. Learn more about how to use safe boot keys by looking at the notes for your motherboard or the manufacturer’s website.
- Save your changes, and then close the BIOS setup tool when you’re done. Most of the time, the screen will show you what key to press to save and leave.

What Are the Benefits of Enabling Secure Boot in MSI?
Turning on Secure Boot in the MSI BIOS makes the computer better in a number of ways. Here are a few of its best features:
Protection Against Malware
Secure Boot makes sure that during the boot process, only software that has been signed correctly can run. Once rootkits and bootkits are up and running, hackers can’t get into the computer.
Operating System Integrity
Secure Boot looks at the digital signature of the operating system to make sure it hasn’t been changed by someone who shouldn’t be able to. It keeps bad people from making changes to the system software and makes it safe.
Driver Verification
Secure Boot checks the digital signatures of drivers to make sure they are safe. This keeps unsigned or dangerous drivers from running, making it less likely that there will be problems with compatibility or security.
Prevention of Unauthorized Firmware/BIOS Modifications
Secure Boot makes sure that software or BIOS updates can only be loaded if they have been accepted. This keeps people from making illegal changes to the system’s software. This keeps the system from being broken.
Enhanced System Trust
By turning on Secure Boot, a “chain of trust” is created in which each part of the boot process is checked against its digital signature. This chain makes sure that only software that is known and has been checked is loaded. This makes it less likely that someone will hack into the system or get in without permission.
Protection Against Boot-Time Attacks
Secure Boot is a way to protect against boot-time risks, which happen when attackers try to take advantage of security holes while the system is starting up. By checking the parts of the boot, it’s much less likely that someone will try to do this.
Compliance with Industry Standards
As part of their security rules, many companies, especially those in regulated businesses, need computers to have Secure Boot turned on. When you use the MSI BIOS to turn on Secure Boot, these rules and standards will be followed.
Even though Secure Boot has a lot of security benefits, it is important to remember that it is only one layer of protection. It should be used with other security measures, like antivirus software, firewalls, and regular software updates, to make a strong defense against different dangers.
Conclusion
Congratulations! Your MSI BIOS is set up correctly for Secure Boot. This extra layer of security makes sure that your computer only starts up known software, keeping it safe from possible threats. By turning on Secure Boot in your MSI BIOS, you can work in a more secure way that keeps your system safe from malware, changes made without your permission, and attacks that happen when your computer starts up. Make sure that your machine is safe and that you can go online safely. Don’t forget to save your changes and leave the BIOS after making them.
In order to enable Secure Boot for MSI, you need to make certain changes to your BIOS. This can be done by entering the Advanced Mode in the BIOS. In the advanced mode, you can change the configurations of Windows 8. You will find this configuration under Windows 8 Configuration. You can select the “UEFI” or “WHQL Support” feature to enable Secure Boot. If you want to disable Secure Boot, you can disable it after POST.
In order to use Secure Boot MSI on your PC, you should first convert your MBR partition to GPT. You can use a boot manager to select the desired OS from a list. This method works on both UEFI systems and legacy BIOS-based systems. It is a good option if you’re using Windows 10 or Windows 11 but don’t want to risk changing the partition style of your PC.
To convert an MBR drive to a GPT, you can either use a command-line tool or a recovery environment. The former is most convenient and easy to do but requires some technical know-how and knowledge. For this task, you need to be logged in as an administrator. Otherwise, you can use the Settings app to enter the recovery environment. The Advanced startup section has a Restart button, which will log you out of your current session and start a fresh session.
Convert MBR To GPT To Enable Secure Boot:
To convert MBR to GPT, you should use a partition manager that supports UEFI. This tool can be found in the Start menu of Windows 10. Select the Disk Management tool and click the Drives tab. This window will show the partition style. Legacy BIOS partitions are called Master Boot Records (MBR), while UEFI devices are known as GUID Partition Table (GPT). Once you’ve successfully converted your MBR partition to GPT, you can choose to install the Windows 10 operating system.
If you’ve purchased a new computer, you should press the F12 key during the POST process to enable Secure Boot for MSI. Your computer will begin the POST process, and you may notice a message that instructs you to press a specific key during the process. The most common keys are F2, DEL, and enter. On Microsoft Surface Tablets, the volume up button is required. How To Enable Sensitive Content On Telegram
Press F12 Key During POST To Enable Secure Boot:
To enable Secure Boot for MSI, you must be in the UEFI-BIOS system. To do this, select the “Boot” tab and choose UEFI or Legacy. Select Secure Boot for MSI, and press Del to save your settings. Then reboot your computer. If the system cannot detect Secure Boot, you must perform a full system restore. Otherwise, you’ll need to reinstall Windows.
On older models, Secure Boot may be under Advanced – Windows OS Configuration – Advanced – Secure Boot – Enable. On Lenovo laptops, press the power button to start the computer. Then, press Fn+F2 or F12 to enter the BIOS. Think brand laptops require you to press the ‘F12’ key during POST to enable Secure Boot for MSI.
To disable Secure Boot for MSI, you can either use the Advanced Startup menu or enter the BIOS using the F12 key during the POST process. If you’re using Windows 7, then you’ll need to choose the UEFI boot option. This is the most common method for disabling Secure Boot. If you’re using a Windows Vista system, you may need to change the BIOS to enable this option.
Unlike the traditional PC BIOS, the UEFI boot framework offers more advanced features. Unlike BIOS, UEFI can support a graphical user interface and mouse support. UEFI also supports more recent security standards, including Secure Boot. Secure Boot prevents malicious code from compromising your PC’s state at boot time. If you’re using a newer PC, you’ll need to enable Secure Boot.
Enabling Secure Boot requires compatible hardware and operating systems. To access the Secure Boot menu, press F1 or F12 while booting your PC. You can also select Restart while holding the Shift key. If you’re using a legacy system, the Secure Boot option is typically available in the Security, Boot, or Authentication tabs of the BIOS. To load the Secure Boot keys, you can use the BIOS or Custom mode.