
Все способы:
- Подробней о процессе
- Способ 1: чистим компьютер от загрязнений
- Способ 2: устранение вирусов
- Способ 3: устранение мелких багов
- Вопросы и ответы: 0
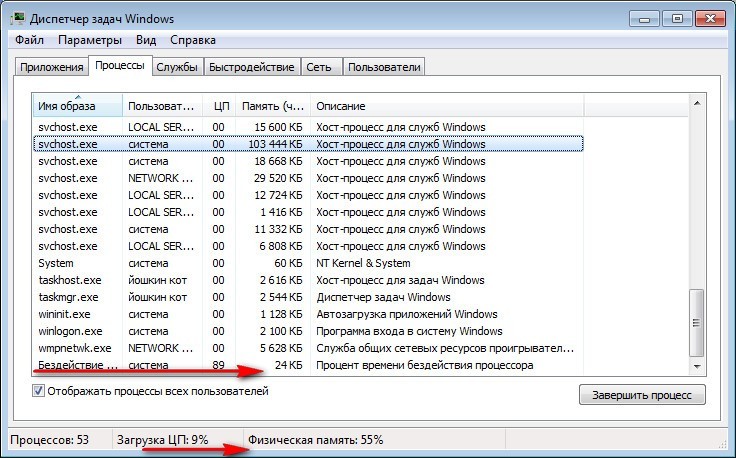
«Бездействие системы» — это стандартный процесс в Windows (начиная с 7-й версии), который в некоторых случаях может сильно нагружать систему. Если заглянуть в «Диспетчер задач», то можно увидеть, что процесс «Бездействие системы» потребляет большое количество ресурсов компьютера.
Несмотря на это, виновником медленной работы ПК «Бездействие системы» является очень редко.
Подробней о процессе
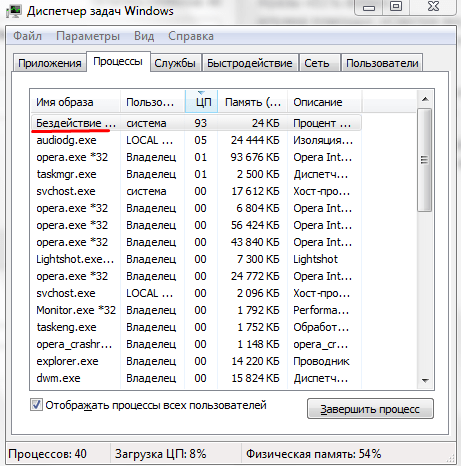
«Бездействие системы» впервые появилось в Windows 7 и оно включается при каждом запуске системы. Если посмотреть в «Диспетчере задач», то этот процесс «съедает» очень много ресурсов компьютера, по 80-90%.
На самом деле, данный процесс является исключением из правил – чем больше он «съедает» мощностей, тем больше свободно ресурсов компьютера. Просто, многие неопытные пользователи думают, если напротив данного процесса написано в графе «ЦП» «90%», то он сильно нагружает компьютер (отчасти это недоработка разработчиков Windows). На самом деле 90% — это свободные ресурсы машины.
Однако, в определённых случаях данный процесс действительно может нагружать систему. Таких случаев всего три:
- Вирусное заражение. Самый распространённый вариант. Для того, чтобы убрать его придётся тщательно прогнать компьютер антивирусной программой;
- «Загрязнение компьютера». Если вы давно не очищали кэш системных программ и не исправляли ошибки в реестре, то система могла «засориться» и дать такой сбой;
- Другой системный сбой. Случается очень редко, чаще всего на пиратских версиях Windows.
Способ 1: чистим компьютер от загрязнений
Чтобы очистить компьютер от системного мусора и исправить ошибки в реестре, можно использовать стороннее ПО, например, CCleaner. Программу можно скачать бесплатно, в ней предусмотрен русский язык (ещё есть платная версия).
Инструкция по очистке системы при помощи CCleaner выглядит так:
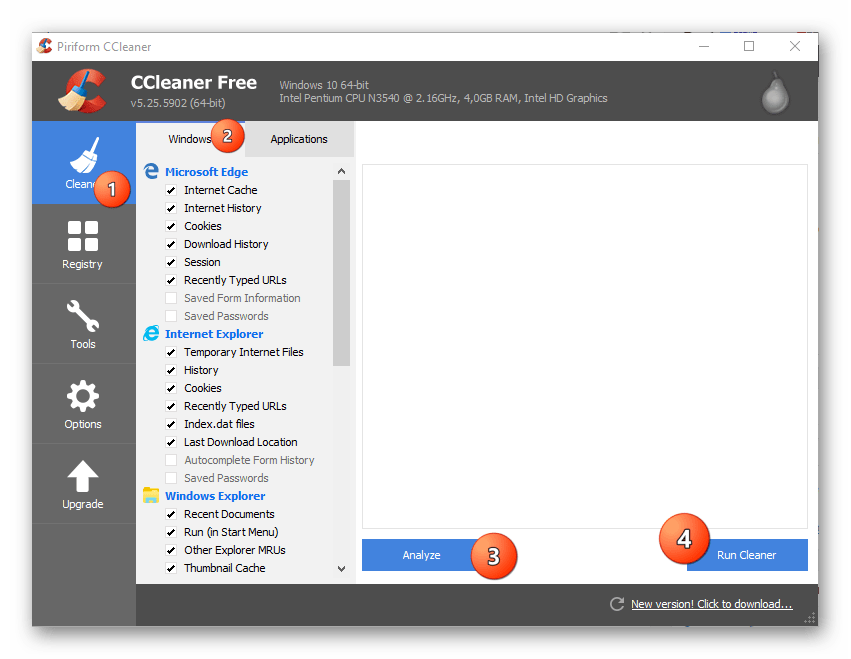
- Откройте программу и перейдите во вкладку «Cleaner», расположенную в правом меню.
- Там выберите «Windows» (находится в верхнем меню) и нажмите на кнопку «Analyze». Дождитесь завершения анализа.
- По завершению процесса нажмите на кнопку «Run Cleaner» и ожидайте, пока программа очистит системный мусор.
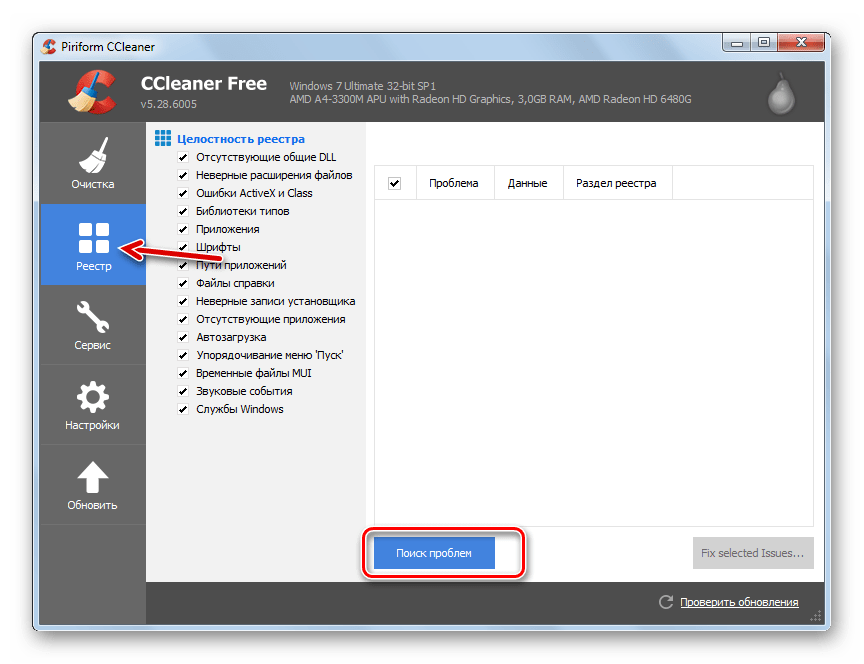
- Теперь с помощью этой же программы исправьте ошибки в реестре. Перейдите в левом меню в пункт «Registry».
- Нажмите на кнопку «Scan for Issues» и дождитесь результатов сканирования.
- После нажмите на кнопку «Fix Issues» (при этом проследите, чтобы все ошибки были отмечены галочками). Программа спросит вас, стоит ли сделать резервную копию. Делайте её на своё усмотрение (ничего страшного, если не сделаете). Дождитесь исправления обнаруженных ошибок (занимает пару минут).
- Закройте программу и перезагрузите систему.
Проводим дефрагментацию и анализ дисков:
- Зайдите в «Мой компьютер» и нажмите правой кнопкой мыши по иконке системного раздела жёсткого диска. В выпадающем меню выберите пункт «Свойства».
- Перейдите во вкладку «Сервис». Изначально обратите внимание на «Проверка на наличие ошибок». Нажмите «Проверка» и дождитесь результатов.
- Если были найдены какие-либо ошибки, то нажмите на пункт «Исправить стандартными средствами Windows». Дождитесь оповещение системы об успешном выполнении процедуры.
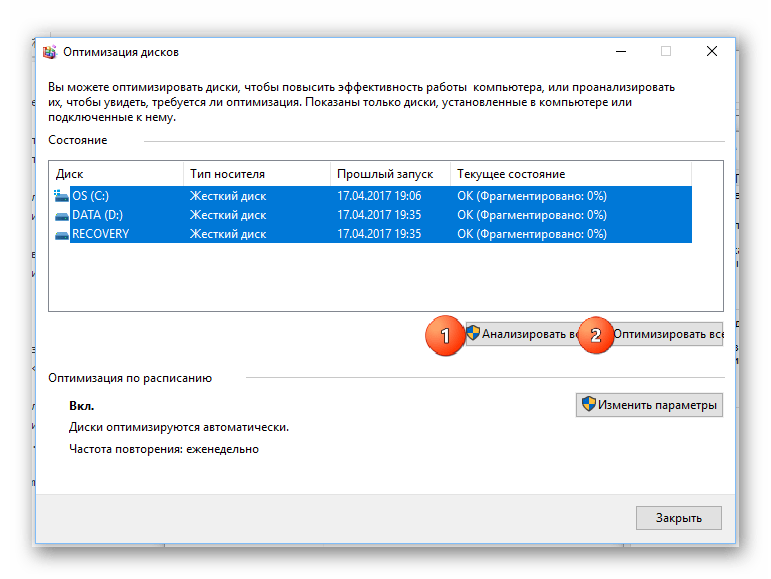
- Теперь вернитесь в «Свойства» и в разделе «Оптимизация и дефрагментация диска» нажмите на «Оптимизировать».
- Теперь зажмите Ctrl и выделите все диски на компьютере, нажимая на каждый мышкой. Нажмите «Анализировать».
- По результатам анализа будет написано напротив названия диска, требуется ли дефрагментация. По аналогии с 5-м пунктом выделите все диски, где та необходима и нажмите на кнопку «Оптимизировать». Дождитесь завершения процесса.
Способ 2: устранение вирусов
Вирус, который маскируется под процесс «Бездействие системы», может серьёзно нагружать компьютер или вовсе нарушить его работу. Если первый способ не помог, то рекомендуется проверить компьютер на наличие вирусов при помощи качественных антивирусных программ, типа Avast, Dr. Web, Kaspersky.
В данном случае рассмотрим, как пользоваться антивирусом Касперского. Данный антивирус имеет несложный интерфейс и является одним из самых лучших на рынке ПО. Распространяется не бесплатно, но имеет пробный период в 30 дней, которого достаточно, чтобы сделать проверку системы.
Пошаговая инструкция выглядит следующим образом:
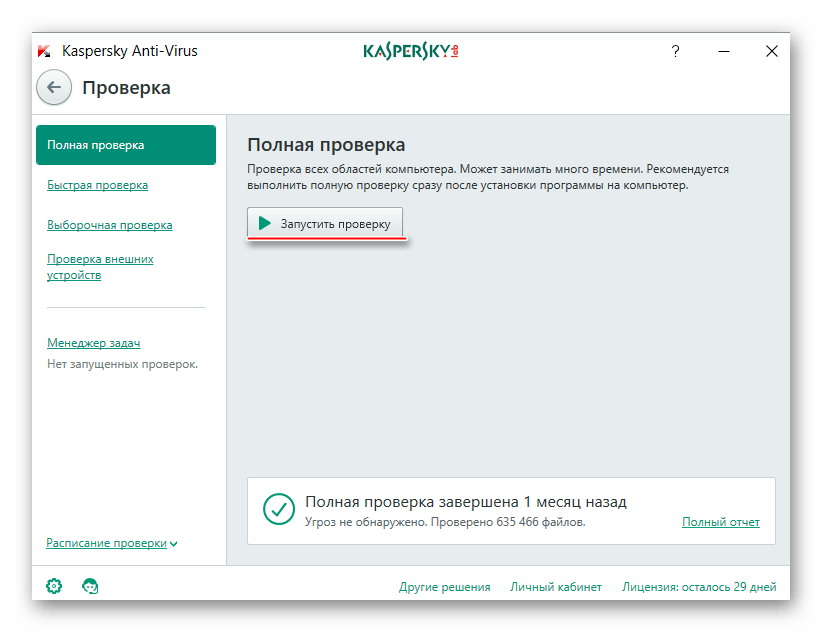
- Откройте антивирусник и выберите пункт «Проверка».
- Далее, в левом меню выберите «Полная проверка» и нажмите «Запустить». Данная процедура может занять несколько часов, зато с вероятностью в 99% будут найдены и обезврежены все опасные и подозрительные файлы и программы.
- По завершению проверки, удалите все найденные подозрительные объекты. Напротив названия файла/программы будет соответствующая кнопка. Вы также можете отправить этот файл в карантин или добавить в «Доверенные». Но если ваш компьютер действительно подвергся вирусному заражению, делать этого не нужно.
Способ 3: устранение мелких багов
Если предыдущие два способа не помогли, то скорее всего глючит сама ОС. В основном, такая проблема встречается на пиратских версиях Windows, реже на лицензионных. Но не стоит переустанавливать систему, достаточно просто выполнить перезагрузку. В половине случаев это помогает.
Также можно перезапустить данный процесс через «Диспетчер задач». Пошаговая инструкция выглядит так:
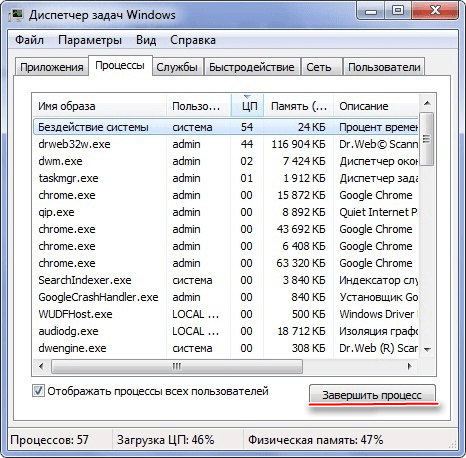
- Перейдите во вкладку «Процессы» и найдите там «Бездействие системы». Чтобы произвести поиск быстрее, воспользуйтесь комбинацией клавиш Ctrl + F.
- Нажмите на данный процесс и кликните по кнопке «Снять задачу» или «Завершить процесс» (зависит от версии ОС).
- Процесс на время исчезнет (буквально на пару секунд) и снова появится, но уже не будет так сильно нагружать систему. Иногда компьютер из-за этого перезагружается, но после перезагрузке всё приходит в норму.
Ни в коем случае ничего не удаляйте в системных папках, т.к. это может повлечь за собой полное уничтожение ОС. Если у вас лицензионная версия Виндовс и ни один из способов не помог, то попробуйте обратиться в службу поддержки Майкрософт, максимально подробно расписав проблему.
Наша группа в TelegramПолезные советы и помощь
Updated May 2025: Stop error messages and fix your computer problem with this tool. Get it now at this link
- Download and install the software.
- It will scan your computer for problems.
- The tool will then fix the issues that were found.
The System Idle Process is one of those things we don’t really think about, but it plays such an integral role in our computers’ operation that it’s worth taking some time to understand what it does and why it exists.
When you start up your computer, there are many processes running in the background. Some are necessary to make sure everything works properly; others are just there to help speed up the booting process. For example, the System Idle Process is responsible for cleaning up files left behind by applications like Chrome and Internet Explorer.
But while the System Idle Process is doing its job, it consumes quite a lot of resources. In fact, it takes up almost 20% of the total CPU usage during normal operations. If you’re having trouble getting your PC to run smoothly, chances are good that the System Idle Process is hogging most of the processor power.
To see how much resource the System Idle Process is consuming, open Task Manager and look under the Performance tab. You’ll notice that the percentage of CPU used by the System Idle Process is listed next to “Idle.”
If you want to find out exactly what program is causing the problem, use the Processes tab to sort by CPU consumption. Look for a program called “system” and you’ll likely find the culprit.
Then uncheck the box labeled “Turn off display screen after”. Click Apply and OK.
What does “System Idle Process” mean?
System Idle Process is a background process that monitors the performance of your system. This process helps you identify issues that could cause your computer to slow down over time.
If your PC seems sluggish, it might be because the System Idle Process is running too often. You can see how much time your computer spends doing nothing by opening Task Manager. In the Performance tab, under the Services section, look at the “Idle Time” column.
The System Idle Process uses up resources like memory and processor cycles. When the System Idle Process runs constantly, it makes your computer run slower.
To fix System Idle Process High Memory Usage, follow our steps.
What’s the point of Windows’s System Idle Process?
Without an IDLE process, it would take ages for your computer to start up again. You might think that the system idle process is just something that keeps the CPU occupied while waiting for programs to finish loading. But what happens when no program needs to load anymore? In fact, without an IDLE process, Windows wouldn’t even boot. Microsoft has always been very careful about how much work it puts into the operating systems it releases. And this one is no exception.
The IDLE process is responsible for keeping the CPU active. If you’re running low on memory, the OS will use the IDLE process to free some RAM. It’s also used to make sure that processes don’t hog too many resources. For example, the IDLE process is used to prevent programs such as Chrome or Firefox from taking over the whole machine.
In short, the IDLE process does everything that makes sure that your computer doesn’t become unresponsive. And it does it well.
Updated: May 2025
We highly recommend that you use this tool for your error. Furthermore, this tool detects and removes common computer errors, protects you from loss of files, malware, and hardware failures, and optimizes your device for maximum performance. This software will help you fix your PC problems and prevent others from happening again:
- Step 1 : Install PC Repair & Optimizer Tool (Windows 11, 10, 8, 7, XP, Vista).
- Step 2 : Click Start Scan to find out what issues are causing PC problems.
- Step 3 : Click on Repair All to correct all issues.
Why is so much CPU being used?
CPU stands for central processing unit. It’s what makes computers work. You might think that since your computer isn’t doing much, it shouldn’t use up too much of your processor power. But sometimes, your computer needs to do something quickly — like load a program or play a game. When it does, it takes over the CPU so that everything else can run smoothly.
But why does it take over the CPU? Well, it’s because the hardware inside your PC is designed to make sure that the CPU gets enough resources to complete whatever task it’s working on. In some cases, the CPU can become overloaded and slow down. To prevent this, the operating system puts limits on how many processes are allowed to run simultaneously.
When you’re watching videos online, playing games, or browsing the web, your browser opens multiple windows and tabs. Each window or tab consumes memory, which slows down the performance of your computer. Because browsers open so many different things at once, they often cause problems for the OS.
So when you see your computer running slowly, check out your browser settings. Make sure that you don’t have too many windows and tabs open. And if you want to speed up your computer again, try closing those extra programs.
Fix-1 Clean Boot your computer-
This article will help you fix the problem of “Your Computer Takes Too Long To Boot”. In fact it will solve the problem permanently. You might think that this article is just another scam, but trust me, it works. I’ve been using it myself and my friends are now using it successfully.
The reason for slow booting is because there is something wrong with the registry. If you don’t know what the registry is, then you’ll find out soon enough. But if you do know what the registry is then read this article.
If you want to learn how to clean up your registry, then you’re reading the right article.
You see, every time you start your computer, it goes through some steps to load programs into memory. These steps include loading drivers, opening files, and starting processes. All of these things take time. And since we use our computers everyday, they tend to run slower over time.
Fix- 2 Disable Startup processes-
Disabling startup programs can help you save some RAM and CPU usage. In Windows 10, there are several startup applications that consume a lot of system resources. So it is recommended to disable those apps. Here we are sharing few steps to disable those apps.
1. Open Settings app.
2. 3. Scroll down and find Startup tab.
4. Select each application one by one and uncheck “Startup”.
5. Restart your computer.
6. Now open Start menu and check whether the startup program is disabled. If yes, then great job done. 🙂
Fix- 3 Run .bat file
The Fix-3 run.bat file is used to fix some common problems in Windows 7/8/10. This batch script is very helpful for beginners because it contains simple commands to solve most of the issues. If you are facing any problem related to Windows 10, follow these steps to resolve such errors.
#1 – Error Code 0x80070002
If you are getting error code 0x80070002 while installing Windows 10, then try to update your system. You can download the latest version of Windows 10 ISO image from Microsoft site. Make sure that you select English language during installation process. After updating your OS, restart your computer. Now open Command Prompt window and type “wusa /updatenow”. Then press Enter key. Your Windows 10 will start downloading the required files. Wait till it completes the process. Once done, reboot your PC.
#2 – Error Code 0x8024401c
If you are unable to install Windows 10 due to error code 0x8024401C, then try to repair your system. Select the option called Erase everything and hit OK button. When prompted, choose Yes to confirm. Now clean up your disk space. Restart your PC and try again.
#3 – Error Code 0x80004005
Error code 0x80004005 occurs when you don’t have enough free space on your hard drive. So, make sure that there is sufficient amount of space left on your hard drive. Also, check whether your partition is damaged or corrupted. In case, format the entire drive and reinstall Windows 10.
Fix-4 Clean the disk with Disk Cleanup-
Running Disk Cleanup cleans out the junk files from your hard drive. If you are running Windows 7, 8, 10, or Server 2008/2012/2016, you can use it to free up space on your hard drive. You can run Disk Cleanup manually or schedule it to clean out the junk automatically.
To find out how much memory the system idle process consumes, open Task Manager and check under the Performance tab. This will show you the amount of RAM being used by each application and the total amount of RAM being used.
The System Idle Process takes up about 2% of the processor resources, so if you notice that the percentage of CPU usage is high, try cleaning out some of the junk files with Disk Cleanup.
Fix-5 Run Disk Fragmentation-
Disk fragmentation happens when files are scattered across different parts of the disk. This makes it difficult for the operating system to find the file quickly. In turn, this slows down the computer. To fix this problem, follow these steps:
1. 2. Click on Tools tab.
3. Select “Check Now”.
4. If you want to check whether the drive is fragmented, go to File Explorer window.
5. Open folder where you store important data.
6. Press CTRL+A keys together to open All Files option.
Fix-6 Update USB drivers on your computer-
Updating the USB drivers on your computer may solve your problem.-Check whether System Idle Process is taking too much CPU usage -or not after updating the USB driver.
Fix-7 Run Driver Verifier on your computer-
Driver Verifier is an application which checks whether your driver is working properly or not. This tool works like a virtual machine and simulates different scenarios on your system. After running the tool, it gives you information about the errors found on your system. If there are no errors, then it says everything is fine. But if there are some problems, then you can fix those problems easily.
You can use this tool to check your driver version, compatibility, performance, etc. You can even run this tool on multiple computers simultaneously. So you don’t need to install the software on each device separately.
RECOMMENATION: Click here for help with Windows errors.
Frequently Asked Questions
Does the WMI Provider Host (WiPrvSE.EXE) use a lot of CPU?
The WMI Provider Host process is part of Windows and helps organizations monitor and troubleshoot a large number of systems. This process runs under the LocalSystem account and is responsible for managing the WMI provider host interface. While this process isn’t normally something that administrators worry about, there are times when it can cause problems. For example, if the system is experiencing a lot of errors, the WMI Provider Host might be consuming too much memory and causing the computer to slow down. In addition, if the WMI Provider Host becomes unresponsive, it could mean that the machine is having trouble communicating with one of its devices.
You can check whether this is happening on your system by opening the Task Manager and looking for the WMI Prvse.exe process. If its CPU usage is high, and you aren’t running any programs that would impact it, the WMI Provider host is probably malfunctioning. To fix this issue, you’ll want to restart the machine.
Are there too many processes running in the background?
A background process is a program running on your PC, whether it’s open or closed. For example, your email client might be downloading messages as you read them, or your browser could be refreshing webpages while you’re reading an article online. These tasks aren’t visible to you—you don’t see them in the taskbar or notice them in your system tray—but they still use up resources.
Windows uses multiple background processes to keep everything running smoothly, but too many can slow down your PC. When you start seeing issues like freezing, lag, or crashing, there’s probably something wrong with one of those apps.
The easiest way to check is to look at the Processes tab in Task Manager. This displays information about every single process running on your machine, including how much memory it’s taking up, what percentage of your processor power it’s consuming, and how long it’s been running. If you find a problem app, close it and see if things improve.
-
Что такое бездействие системы?
-
Пути заражения
-
Как решить проблему?
Не всегда черное является черным, а белое – белым. Пять лет назад я задавал такой же вопрос знакомому сисадмину: почему бездействие системы грузит процессор в Windows 7? После этого он меня назвал «дурилкой картонной» и рассмеялся. Я был уверен, что компьютер работает в разы медленнее, но его ответ меня поразил. Теперь и вам пора узнать правду о процессе «бездействие системы».
Что такое бездействие системы?
Многих этот ответ удивит, но бездействие системы – это стандартная служба, показывающая количество свободных аппаратных ресурсов компьютера. Т.е. «солидные» значения в столбцах «ЦП», «Память» и «Диск» указывают на резерв мощности, а не потребление. В 80% случаев, пользователи накручивают себя на основании увиденных цифр и свято верят в тормоза системы и рисуют в своем воображении разнообразные зависания.
Стоит отметить, что остается 20%, а это существенный показатель. В этих случаях проблема действительно имеет место: под видом процесса бездействия системы в диспетчере задач маскируется потенциально опасное ПО, которое не только загрузит систему, но и повредит личные данные.
Определить, что у вас вирус, можно двумя способами:
- Обратите внимание на место, где отображается процесс: если «быстродействие системы» в конце списка – с высокой долей вероятности ваш ПК заражен.

- Сравните показатели свободного ресурса ЦП в поле процесса со значением в нижней части окна. Если в сумме они равны 100%, то все в порядке, иначе – ищем вирус.

Пути заражения
Однозначного ответа на данный вопрос нет. Это может быть следствием установки бесплатного или зараженного ПО, посещения подозрительных сайтов или использования непроверенных съемных носителей информации. Для предотвращения подобных ситуаций используйте современное антивирусное программное обеспечение и постарайтесь минимизировать потенциально опасные действия в сети.
Как решить проблему?
Стандартными средствами Windows здесь не поможешь. Проверьте свой ПК антивирусным приложением и следуйте дальнейшим инструкциям. Для сканирования рекомендуется Kaspersky Virus Removal Tool.
Внимание! После обнаружения проблемы не затягивайте с ее решением. Вредоносное ПО способно с высокой скоростью повреждать другие файлы, что приведет к выходу из строя Windows!
Теперь вы узнали, что бездействие системы не грузит процессор. Но не теряйте бдительность – под маской безобидного приложения может скрываться мощный троян.
В Windows 10 после 5-минутного бездействия появляются два процесса, которые грузят систему: “system” и “anti malware service executable”. После того как пошевелишь мышкой и т. д., это все пропадает в миг, и опять через 5 минут появляется тоже самое. Что это может быть?
spoiler


-
Вопрос задан
-
322 просмотра
Комментировать
Подписаться
1
Простой
Комментировать
Пригласить эксперта
Ответы на вопрос 2
Сканирование системы антивирусом, настроенное запускаться при простое.
Тут есть решение, более менее подходящее.
Комментировать
Отключи автообновление и антивирус
Ваш ответ на вопрос
Войдите, чтобы написать ответ
Похожие вопросы
-
Показать ещё
Загружается…
Минуточку внимания
Fix High CPU Usage by System Idle Process: If you’re not able to use your computer properly then chances are some processes are taking up all your system resources causing issues such as freezing or lagging etc. In this particular, a process called System Idle Process is the culprit, which is utilizing 99% of your CPU. In some cases, this process also utilizes high memory or disk usage in addition to the CPU.

Why is the System Idle Process taking up so much CPU?
Generally, System Idle process utilizing 99% or 100% CPU is not a problem, because the System Idle Process means that the computer is doing nothing and if it is idle at 99% then this means that the system is 99% at rest. The CPU usage in the case of the system idle process is generally a measure of how much CPU is not being used by other processes. But if you are facing a lag or you feel your computer is slow then this is a problem which needs to be fixed.
What are the possible reasons for the System Idle Process causing Computer slowness:
- Virus or Malware infection
- The hard drive is full, not optimized i.e. no defragmentation
- Unwanted programs or toolbars installed on the system
- Too many unnecessary startup programs running in the background
- More than one Anti-virus installed
- Corrupt or faulty device driver
Can I Kill System Idle Process?
As System Idle Process is a System process, you cannot simply kill it from Task Manager. The real question is why would you want to?
The System Idle Process is just an idling process which is run by the operating system when the computer has absolutely nothing better to do. Now without this process, the system could potentially freeze since, without anything occupying your processor when it’s idle, the processor will simply stop.
So if anything above is true for your PC then chances are you might be facing the high CPU usage by System Idle Process issue which in turn making your PC slow. Anyway, without wasting any time let’s see How to Fix High CPU Usage by System Idle Process with the help of the below-listed troubleshooting guide.
Table of Contents
Make sure to create a restore point just in case something goes wrong.
Method 1: Disable Startup Process
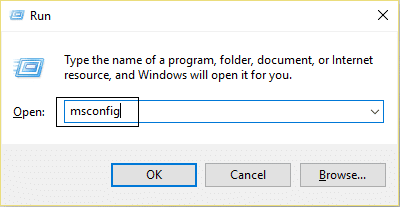
1.Press Windows Key + R then type msconfig and hit Enter.
2.Switch to the Services tab then checkmark “Hide all Microsoft services“.

3.Now click on “Disable all” button and click Apply followed by OK.
4.See if you’re able to Fix the High CPU Usage by System Idle Process issue, if not then continue.
5.Again go to the MSConfig window, then switch to the Startup tab and click on the Open Task Manager link.
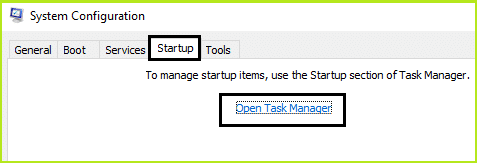
6.Right-click on unnecessary startup items, then select Disable.

7.Repeat the above steps for all items that you don’t need at startup.
8.See if you’re able to Fix High CPU Usage by System Idle Process, if not then try to perform a clean boot to diagnose the issue.
Method 2: Run Driver Verifier
This method is only useful if you can log into your Windows normally not in the safe mode. Run Driver Verifier in order to fix this issue and this would eliminate any conflicting driver issues due which this error can occur.

Method 3: Update Unknown Device Drivers
1.Press Windows key + R then type devmgmt.msc and Enter to open Device Manager.

2.Expand Universal Serial Bus controllers.
4.Right-click on Generic USB Hub and select “Update Driver.”

5.Now select Browse my computer for driver software.

6.Click on Let me pick from a list of drivers on my computer.

7.Select Generic USB Hub from the list of drivers and click Next.

8.Wait for Windows to finish the installation then click Close.
9.Make sure to follow the steps 4 to 8 for all the “Generis USB Hub” present under Universal Serial Bus controllers.
10.If the problem is still not resolved then follow the above steps for all the devices listed under Universal Serial Bus controllers.

This method may be able to Fix High CPU Usage by System Idle Process Issue, if not then continue.
Method 4: Run Disk Cleanup
You need to run Disk Cleanup to delete temporary files, System files, empty Recycle Bin, etc items that you might no longer need and these items can cause the system to work inefficiently. Sometimes these files are infected and cause a various issue with your PC including the High CPU Usage, so let’s see how to use Disk Cleanup to fix this issue.
You can also check out this awesome guide to Free Up Hard Disk Space On Windows 10.
Method 5: Run Disk Defragmentation
Now Disk defragmentation re-arranges all the pieces of data that are spread across your hard drive and stored them together again. When the files are written to disk, it is broken into several pieces as there is not enough contiguous space to store the complete file, hence the files become fragmented.
Defragmentation reduces file fragmentation thus improving the speed by which data is read and written to disk which ultimately increases the performance of your PC. Disk defragmentation also cleans the disk thus increasing the overall storage capacity. So without wasting any time let’s see How to Optimize and Defragment Drives in Windows 10.

Method 6: Run CCleaner and Malwarebytes
Malware can cause tremendous trouble in various services and programs including the High CPU Usage. The possibilities of creating issues by malware are endless. So, it is recommended to download and install applications like Malwarebytes or other anti-malware applications to scan for malware in your system. This may fix the High CPU Usage by System Idle Process issue.
1.Download and install CCleaner & Malwarebytes.
2.Run Malwarebytes and let it scan your system for harmful files.

3.If malware is found it will automatically remove them.
4.Now run CCleaner and in the “Cleaner” section, under the Windows tab, we suggest checking the following selections to be cleaned:
5.Once you’ve made certain the proper points are checked, simply click Run Cleaner, and let CCleaner run its course.
6.To clean your system further select the Registry tab and ensure the following are checked:
7.Select Scan for Issue and allow CCleaner to scan, then click Fix Selected Issues.
8.When CCleaner asks “Do you want backup changes to the registry?” select Yes.
9.Once your backup has completed, select Fix All Selected Issues.
10.Restart your PC to save changes.
Recommended:
- Fix The remote device or resource won’t accept the connection error
- Unblock YouTube When Blocked In Offices, Schools or Colleges?
- What is the Difference Between an Outlook & Hotmail Account?
- How To Open Any ASPX File (Convert ASPX To PDF)
That’s it you have successfully Fix High CPU Usage by System Idle Process but if you still have any questions regarding this post then feel free to ask them in the comment’s section.