
Продолжаем знакомиться с новыми возможностями ОС Windows Server 2012 R2. Ранее мы рассказывали о корпоративном аналоге DropBox в Windows Server 2012 R2 под названием Work Folders. Сегодня речь пойдет о еще одном новшестве новой серверной платформы – функции Web Application Proxy. Web Application Proxy – это новая функция роли Remote Access в Windows 2012 R2, позволяющая публиковать HTTP/ HTTPS приложения, расположенные в периметре корпоративной сети на клиентских устройствах (в первую очередь подразумеваются мобильные устройства) за ее периметром. Благодаря возможности интеграции c AD FS (служба может выступать в качестве ADFS-прокси), возможно обеспечить аутентификацию внешних пользователей, пытающихся получить доступ к опубликованным приложениям.
Web Application Proxy предоставляет такие же возможности публикации приложений, как и Forefront Unified Access Gateway (UAG), однако данная служба также позволяет взаимодействовать с другими серверами и сервисами, обеспечивая тем самым более гибкую и рациональную конфигурацию.
Web Application Proxy по сути выполняет функцию обратного прокси сервера (HTTP reverse proxy), организуя ретрансляцию запросов клиентов из внешней сети на внутренний сервер, и является межсетевым экраном на прикладном уровне.
Сервер со службой Web Application Proxy получает внешний HTTP/HTTPS трафик и терминирует его, после чего от своего имени инициирует новое подключение ко внутреннему приложению (веб-серверу). Т.е. внешние пользователи прямого доступа к внутреннему приложению реально не получают. Любой другой трафик, получаемый Web Application Proxy, отклоняется (в том числе отклоняются HTTP/HTTPS запросы, которые могут быть использованы при DoS, SSL и 0-day атаках).
Требования к организации Web Application Proxy и ключевые особенности:
- Систему можно развернуть на серверах с ОС Windows Server 2012 R2, включенных в домен Active Directory, с ролями AD FS и Web Application Proxy. Эти роли должны быть установлены на разных серверах.
- Необходимо обновить схему Active Directory до Windows Server 2012 R2 (обновлять контроллеры домена до Windows Server 2012 R2 не нужно)
- В качестве клиентских устройств поддерживаются устройства с ОС Windows, IOS (iPad и iPhone). Работы над клиентами для Android и Windows Phone пока еще не окончены
- Аутентификация клиентов осуществляется службой Active Directory Federation Services (ADFS), которая также выполняет функции ADFS – проксирования.
- Типовая схема размещения сервера с ролью Web Application Proxy представлена на рисунке. Данный сервер располагается в выделенной DMZ зоне и отделен от внешней (Интернет) и внутренней сети (Интранет) межсетевыми экранами. В этой конфигурации для работы Web Application Proxy требует наличия двух интерфейсов – внутреннего (Intranet) и внешнего (DMZ)

Установка роли ADFS в Windows Server 2012 R2
Для обеспечения дополнительной безопасности преаутентифкация внешних клиентов выполняется на сервере ADFS, в противном случае используется pass-through аутентификация на конечном сервере приложения (что менее секьюрно). Поэтому первый шаг при настройке Web Application Proxy – установка на отдельном сервере роли Active Directory Federation Services.

При установке ADFS нужно выбрать SSL сертификат, который будет использоваться для шифрования, а также DNS имена, которые будут использоваться клиентами при подключении (соответствующие записи в DNS зоне придется создать самостоятельно).

Затем нужно указать сервисную учетную запись для службы ADFS. Необходимо учесть, что имя ADFS должно быть указано в атрибут Service Principal Name аккаунта. Сделать это можно командой:
setspn –F –S host/adfs.winitpro.ru adfssvc

И, наконец, указать базу данных, в которой будет хранится информация: это может быть встроенная база на этом же сервере (WID — Windows Internal Database) или отдельная база на выделенном SQL-сервере.

Установка службы Web Application Proxy
Следующий этап, настройка самой службы Web Application Proxy. Напомним, что служба Web Application Proxy в Windows Server 2012 R2 является частью роли “Remote Access”. Установите службу Web Application Proxy и запустите мастер ее настройки.

На первом этапе мастер предложит Вам указать имя ADFS сервера и параметры учетной записи, имеющей доступ к данной службе.

Далее нужно указать сертификат (убедитесь, что в альтернативных именах сертификата содержится имя сервера ADFS).

Совет. Проверьте, что ваши DNSзоны настроены корректно: сервер с ролью WAP должен иметь возможность отрезолвить имя сервера ADFS, а он в свою очередь может разрешить имя прокси сервера. Сертификаты на обоих серверах должны включать имя службы федерации.
Публикация приложения через Web Application Proxy
После того, как установлены роли ADFS и Web Application Proxy (которая работает еще и как ADFS Proxy), можно перейти непосредственно к публикации наружу конкретного приложения. Сделать это можно с помощью консоли Remote Access Management Console.

Запустите мастер публикации и укажите, хотите ли вы использовать для преаутентификации службу ADFS (это именно наш вариант).

Затем нужно задать имя публикуемого приложения, используемый сертификат, внешний URL (имеенно его для подключения будут использовать внешние пользователи) и внутрений URL-адрес сервера, на который будут пересылаться запросы.
Совет. Если необходимо перенаправить внешнее приложение на альтернативный порт, необходимо задать его в URL, указаывающем на внутренний сервер. Например, если необходимо перенаправить внешние https запросы (443 порт) на 4443 порт, нужно указать:
Backend server URL: lync.winitpro.local:4443

Завершите работу мастера, и на этом публикация приложений окончена. Теперь, если попытаться с помощью браузера зайти на опубликованный внешний URL-адрес, то браузер сначала будет перенаправлен на службу аутентификации (ADFS Proxy), а после успешной аутентификации пользователь будет отправлен непосредственно на внутренний сайт (веб приложение).

Благодаря новой службе Web Application Proxy в Windows Server 2012 R2 возможно реализовать функционал обратного прокси сервера с целью публикации внутренних служб предприятия наружу без необходимости использования задействовать сторонние файерволы и продукты, в том числе такие, как Forefront и пр.
Setting up a proxy server can be an essential task for improving security, managing internet traffic, and optimizing network performance. For businesses and advanced users working with Windows Server 2012, understanding how to configure a proxy server effectively can lead to enhanced control over network activities. This article provides a detailed guide on how to easily set up a proxy server on Windows Server 2012 using various methods. We’ll cover system settings, browser-specific configurations, and alternative approaches to ensure you have all the tools necessary for optimal proxy server management.
How to Set Up a Proxy in Windows Server 2012 System Settings
To configure it, you will need a proxy server. If you don’t have one, Proxy5.net provides high-quality proxies. They support HTTP, HTTPS and SOCKS5 protocols, which simplifies configuration on Windows Server 2012 and ensures stable connection.
Setting up a proxy server through the system settings of Windows Server 2012 involves several straightforward steps. This method ensures that all network requests from the server are routed through the proxy, providing a unified approach to managing internet traffic. Step-by-Step Instructions:
1. Access the Control Panel
- Click on the Start button and select Control Panel.
2. Navigate to Network and Sharing Center
- In the Control Panel, go to Network and Internet.
- Click on Network and Sharing Center.
3. Open Internet Options
- Within the Network and Sharing Center, click on Internet Options in the bottom left corner.
4. Configure Proxy Settings
- In the Internet Options window, go to the Connections tab.
- Click on LAN settings.
5. Enable Proxy Server
- In the Local Area Network (LAN) Settings window, check the box labeled Use a proxy server for your LAN.
- Enter the IP address and port number of your proxy server in the respective fields.
6. Bypass Proxy for Local Addresses
- Optionally, check the box labeled Bypass proxy server for local addresses if you don’t want the proxy to be used for local network traffic.
7. Save Settings
- Click OK to save your settings in the LAN settings window.
- Click OK again to close the Internet Options window.
8. Restart Network Services
- For the changes to take effect, you may need to restart your network services or the server itself.
How to Set Up a Proxy on Windows Server 2012 Through Mozilla Firefox
Configuring a proxy server specifically for the Mozilla Firefox browser allows you to manage internet traffic for that browser independently from the system-wide settings. This can be particularly useful if you need different proxy settings for different applications. Step-by-Step Instructions:
1. Open Mozilla Firefox
- Launch Mozilla Firefox on your Windows Server 2012 machine.
2. Access Options
- Click on the Menu button (three horizontal lines) in the upper-right corner.
- Select Options from the drop-down menu.
3. Navigate to Network Settings
- In the Options window, scroll down to the Network Settings section.
- Click on Settings.
4. Configure Proxy Settings
- In the Connection Settings window, select Manual proxy configuration.
- Enter the IP address and port number of your proxy server in the HTTP Proxy field.
- If you want the same proxy settings for all protocols, check the box labeled Use this proxy server for all protocols.
5. Bypass Proxy for Specific Hosts
- In the No Proxy for field, enter any addresses that should bypass the proxy. Separate multiple entries with commas.
6. Save Settings
- Click OK to save your proxy settings.
- Close the Options window.
Alternative Methods for Configuring a Proxy on Windows Server 2012
Apart from using system settings and browser-specific configurations, there are several alternative methods to set up a proxy server on Windows Server 2012. These methods can provide additional flexibility and control over network traffic management.
1. Using Group Policy:
- Group Policy allows administrators to configure proxy settings across multiple machines within a network. This method is ideal for large organizations needing a consistent proxy setup.
- To configure proxy settings using Group Policy:
- Open the Group Policy Management Console (GPMC).
- Create or edit a Group Policy Object (GPO).
- Navigate to User Configuration > Policies > Administrative Templates > Windows Components > Internet Explorer.
- Configure the proxy settings under Proxy Settings.
2. Using a PAC File:
- A Proxy Auto-Configuration (PAC) file is a script that automatically configures proxy settings for clients. This method is beneficial for complex network environments where different proxies may be needed for different destinations.
- To use a PAC file:
- Create a PAC file with the necessary proxy configurations.
- Host the PAC file on a web server.
- Configure the clients to use the PAC file URL in their browser or system settings.
3. Using a Third-Party Proxy Software:
- There are various third-party proxy software solutions available that offer advanced features such as caching, filtering, and load balancing.
- Popular third-party proxy software includes Squid, WinGate, and CCProxy.
- These solutions typically involve installing the software on the server and configuring it according to your network requirements.
4. Using Command Line Interface (CLI):
- Advanced users can configure proxy settings using the Command Line Interface (CLI). This method provides a more scriptable approach to proxy configuration.
- To set a proxy using CLI:
- Open the Command Prompt with administrative privileges.
- Use commands like
netshto configure proxy settings.
5. Using PowerShell Scripts:
- PowerShell scripts offer another method for configuring proxy settings, especially useful for automation and batch configurations.
- Example PowerShell script to set a proxy:
netsh winhttp set proxy proxy-server="http=proxy-server-address:port" bypass-list="*.local"
6. Using Network Load Balancers:
- For high-availability and load-balanced proxy configurations, network load balancers can be used.
- Load balancers can distribute network traffic across multiple proxy servers, ensuring better performance and redundancy.
Choosing the best method to set up a proxy server on Windows Server 2012 depends on your specific needs and network environment. For most users, configuring the proxy through system settings or a browser like Mozilla Firefox provides a straightforward solution. However, for larger organizations or more complex requirements, using Group Policy, PAC files, third-party software, CLI, PowerShell scripts, or network load balancers may offer additional benefits. Each method has its advantages, and selecting the right one can significantly enhance your network management capabilities.
Frequently Asked Questions
What is a proxy server and why is it used?
A proxy server acts as an intermediary between a client device and the internet. It is used to improve security, manage internet traffic, and optimize network performance by filtering requests and caching content.
Can I use multiple proxy servers on Windows Server 2012?
Yes, you can configure multiple proxy servers using different methods, such as system settings, browser-specific settings, or using a PAC file that directs traffic to different proxies based on the destination.
Is it necessary to restart the server after configuring a proxy server?
It is recommended to restart network services or the server itself to ensure that the new proxy settings take effect properly.
Can proxy settings be enforced across a large network?
Yes, using Group Policy is an effective way to enforce proxy settings across multiple machines within a large network.
Are there any free third-party proxy software options available?
Yes, there are several free third-party proxy software options such as Squid and CCProxy, which offer robust features for managing proxy servers.
How can I verify that my proxy server configuration is working correctly?
You can verify your proxy configuration by visiting websites that display your IP address, such as whatismyip.com, to check if the IP address matches your proxy server’s IP address.
Microsoft Web Application Proxy [WAP] is a new service added in Windows Server 2012 R2 that allows you to access web applications from outside your network. WAP functions as a reverse proxy and an Active Directory Federation Services [AD FS] proxy to pre-authenticate user access.

vBoring Blog Series:
- How to setup Microsoft Active Directory Federation Services [AD FS]
- How to setup Microsoft Web Application Proxy
Requirements:
- The only hard requirement of WAP is having an AD FS server. Refer to step 1 for setting that up.
- WAP cannot be installed on a server that AD FS is installed on. They must be separate servers.
Installing the Web Application Proxy Server Role:
Open Server Manager and click Manage -> Add Roles and Features:
Click Next:

Role-based or feature-based installation should be selected then click Next:

Select the server you want to install this role on to and then click Next:
Note: Web Application Proxy role and AD FS cannot be installed on the same computer.

Select Remote Access then click Next:

No additional Features are needed. Click Next:

Click Next:

Select Web Application Proxy:

On the pop up click Add Features:

The Web Application Proxy role does not required a reboot. Click Install:

Once complete click Close:

Web Application Proxy is now installed but you need the AD FS certificate to continue.
Export & Import the AD FS Certificate:
You need the certificate from your AD FS server added to your Web Application Proxy server. Login to your AD FS server and open MMC.exe:
Go to File -> Add/Remove Snap-ins -> select Certificates then click Add:

When you click OK you will get the following pop up. Select Computer account then click Next:

On AD FS Server: Drill down to Personal -> Certificates then right click the SSL certificate you used during setup of AD FS. Go to All Tasks -> Export. Save to a location that your Web Application Proxy can access. Ensure you export the Private Key and certificate as a .PFX file.

On Web Application Proxy: Right click on Personal -> Certificates then go to All Tasks -> Import:

This will bring up the Certificate Import Wizard. Click Next:

Browse to the certificate that you exported from your AD FS server and select it. Click Next:

Enter the password for the private key and check the box to make the key exportable. Click Next:

Leave the default certificate store as Personal. Click Next:

Click Finish:

You should now see the certificate from your AD FS servers on your Web Application Proxy server.

Now we are ready to perform the Post Configuration.
Post-Deployment Configuration:
Back on your Web Application Server open Server Manager then click Notifications then the message Open the Web Application Proxy Wizard:
Click Next:

Enter the FQDN of your AD FS name and the Service Account you created during AD FS setup. Click Next:

On the drop down menu select the certificate you imported from your AD FS server. Click Next:

Click Configure:

Once finished click Close:

Remote Access Management Console should open when you clicked Close. On Operations Status you should see all the objects as green.

Publish Web Applications:
Now we are finally ready for the magic. In the Remote Access Management Console click Web Application Proxy then Publish:

Click Next:

Pass-through will let WAP act like a reverse proxy. I will have documentation on setting up AD FS link soon!
Select Pass-through and click Next:

Name: Enter a display name
External URL: Enter the URL that will be coming in your the WAP server externally
External Certificate: The drop down menu will show certificates that are added on the WAP server. Select the same certificate that you used while setting up your application. In my case I used my wildcard certificate.
Backend server URL: Enter the web URL of the server you want the external URL forwarded
Click Next:

Copy the PowerShell command down and with some minor edits you can easily add additional PassThrough applications with ease.
Click Publish:

Click Close to finish:

You will now see the published web application and ready for testing.

You are ready to test the application!
Configure Firewall for 443 Port Forwarding:
Before you can test you need to ensure you have port 443 (HTTPS) being sent to your WAP server. This step does not involve configuration of your WAP environment but on your firewall. Since this can vary greatly I will give you two examples of this step:
For pfSense you would create a NAT: Port Forward Rule:

For DD-WRT you would go to NAT / QOS then Port Forwarding:

Once added you are ready to test!
From outside your network (like on your phone or a PC elsewhere) try to access your web link. You should get your internal web page through your WAP externally! Success!

Coming Soon!! Setting up Microsoft RDS to use AD FS authentication through WAP!
Rebex TLS Proxy is a simple yet powerful TLS server with rich command-line interface.
It makes it possible to easily add TLS 1.3/1.2 encryption to existing servers (using HTTP and other protocols),
or operate as a TLS 1.0/1.1 proxy for legacy client applications or operating systems with no TLS 1.3/1.2 support.
It’s free for commercial and non-commercial use.
Rebex TLS Proxy is built on top of our Rebex TLS library, which is based on our tried-and-tested TLS core that has been powering Rebex FTP since 2004.
On this page:
- Download
- Getting started
- Features
- Example #1 — Add HTTPS encryption to an HTTP server
- Example #2 — Virtual hosting for HTTPS websites
- Example #3 — Act as ‘modern TLS to legacy TLS’ adapter
- Example #4 — Enable modern security in legacy mail clients
- Supported platforms
- License
- Version history
Download
Download Rebex TLS Proxy
Checksums of RebexTlsProxy-v1.10.0.zip file:
 SHA-1:   936bd9dcb578a35e0fa4df2a863f47f2e2b2f6e2
 SHA-256: 01632ecc0f706082eb5a65427aba012652a1d82ce843d4a59182a27981408d43
See here how to verify checksums of the installation package.
- Download the ZIP package.
- Unzip it into the directory of your choice.
- Run
tlsproxy installto install and configure the service. - Run
tlsproxyto show a list of supported commands, or check out an example below. - Configure logging by editing
Config/config.yamlfile. -
Add some tunnels using
tlsproxy tunnel addcommand.
Runtlsproxy tunnel add --helpto display possible options. - After each change, restart the service by running
tlsproxy svc restart. - To run TLS Proxy in interactive mode, execute
tlsproxy run(make sure to stop the service first).
Rebex TLS Proxy features include:
- TLS encryption wrapper mode — adding TLS layer to non-TLS services
- TLS decryption wrapper mode — acting as non-TLS endpoint for TLS services
- TLS adapter wrapper mode — adding TLS layer to TLS services that run a different version of TLS
- TLS 1.3, 1.2, 1.1 and 1.0 on all supported platforms
- Fully asynchronous TLS core
- Unlimited number of connections
- Rich and easy-to-use command line interface
- Self-signed certificate issuer
- Elliptic Curve DSA and Elliptic Curve Diffie-Hellman key exchange
- AES/GCM AEAD symmetric encryption
- SHA-256, SHA-384 and SHA-512 hashing algorithms
- Dozens of modern and legacy TLS ciphers (see Rebex TLS for a list)
- Renegotiation Indication extension (TLS 1.2)
- PSK resumption (all modes) (
pre_shared_keyTLS 1.3 extension) - HelloRetryRequest support (TLS 1.3)
key_shareextension (TLS 1.3)- Middlebox Compatibility Mode support (TLS 1.3)
- Brainpool elliptic curves (TLS 1.2)
secp256r1(NIST P-256),secp384r1(NIST P-384),secp521r1(NIST P-521) andX25519RSASSA-PKCS1-v1_5,RSASSA-PSSandECDSAsignature schemes- Support for deprecated SSL 3.0 protocol (disabled by default)
- Support for SNI (Server Name Indication)
- Support for Client Certificate Authentication
- Certificates hot reload
- HTTP communication parser (insert/modify
Host,X-Real-IP,X-Forwarded-For,X-SSL-CERTrequest headers)
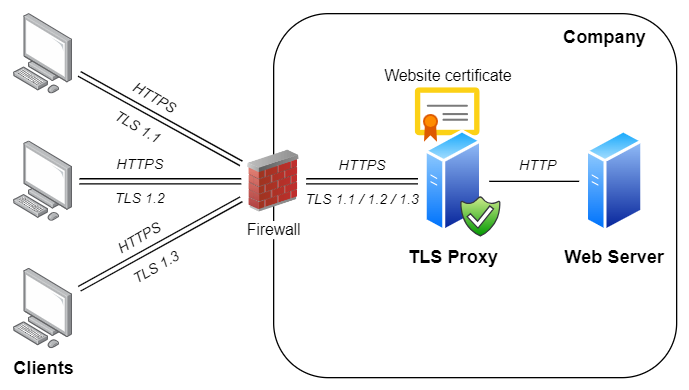
This is the most common usage scenario. Let’s say you have a legacy HTTP server running in your DMZ that only supports
plain HTTP and HTTPS with TLS 1.0, and that your router is configured to make the HTTPS service
accessible to the Internet on port 443.
But TLS 1.0 is rapidly getting deprecated (along with TLS 1.1) by major browsers, and unless you provide TLS 1.3 or TLS 1.2
support, clients will soon be unable to access the legacy HTTP server.
Rebex TLS Proxy can help here — install it either alongside the old server, or onto a separate server in your DMZ,
and configure it to provide a TLS tunnel with TLS 1.3/1.2 support to your old HTTP server (running at 192.168.1.2, for example):
tlsproxy tunnel add --in 0.0.0.0:443 --in-protocol TLS --out 192.168.1.2:80 --certificate cert:/User/My/example.com
This will make Rebex TLS Proxy accept TLS connections using TLS 1.3 and 1.2 on port 443. Once each connection has been accepted
and a secure TLS session negotiated, the proxy will connect to port 80 of 192.168.1.2 (the old HTTP server) and pass all traffic
between the client and the server. Once you configure your router to pass HTTPS connections to Rebex TLS Proxy instead of your
old server, clients that no longer support TLS 1.0 or 1.1 will be able to connect again.
Note: Since TLS encryption is now provided by Rebex TLS Proxy, you also need to make an appropriate certificate available to it.
In the sample above, we used a certificate stored in a .PFX file. In practice, using Windows Certificate Store might be a better option.
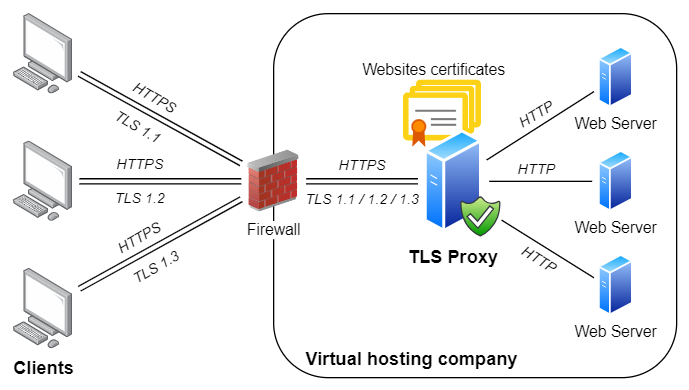
On HTTP servers, several websites can be hosted on the same IP address. The proper «virtual web» is chosen according to Host header in the HTTP request.
A similar technology is also available for TLS (and HTTPS) protocol.
It is provided via Server Name Indication extension (SNI).
If your TLS Proxy runs on one specific IP address, you can easily configure it to provide HTTPS access to several HTTP websites:
tlsproxy tunnel add -i :443 --in-protocol TLS -o 192.168.1.1:80 -c x:\example1.pfx --server-names example1.com,www.example1.com
tlsproxy tunnel add -i :443 --in-protocol TLS -o 192.168.1.2:80 -c x:\example2.pfx --server-names example2.com,www.example2.com
tlsproxy tunnel add -i :443 --in-protocol TLS -o 192.168.1.3:80 -c x:\test.myorg.pfx --server-names test.myorg.com
tlsproxy tunnel add -i :443 --in-protocol TLS -o 192.168.1.3:80 -c x:\help.myorg.pfx --server-names help.myorg.com
tlsproxy tunnel add -i :443 --in-protocol TLS -o 192.168.1.3:80 -c x:\myorg.pfx --server-names *
This is what these commands do:
- Requests for
example1.comandwww.example1.comwill be routed to a website on IP address192.168.1.1. - Similarly, requests for
example2.comandwww.example2.comwill be routed to a website on IP address192.168.1.2. -
Requests for
test.myorg.comandhelp.myorg.comwill be provided with appropriate certificates
and routed to a website on IP address192.168.1.3(where they are going to be handled by separate virtually hosted websites). -
Requests to all other domains will also be routed to a website on IP address
192.168.1.3
and provided with a single certificate.
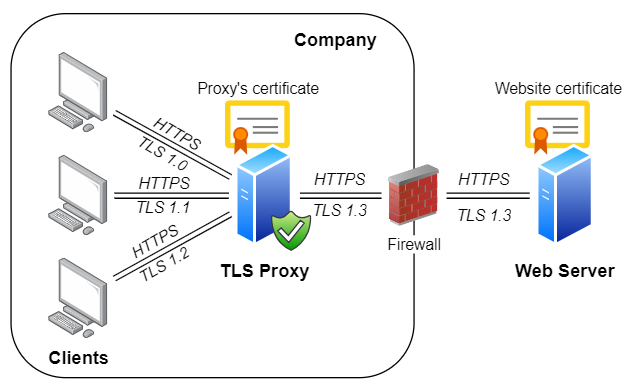
TLS 1.0 and 1.1 are currently being deprecated by major browser vendors, and using them on the Internet
is strongly discouraged. However, many existing legacy systems only support these legacy versions
and often cannot be easily upgraded. And as long as those systems are operated within safe private networks
or DMZs, they don’t pose a security hazard. But these systems usually need to communicate with the outside world
as well, which will become problematic once Internet-facing endpoints disable support for TLS 1.0 and 1.1.
Rebex TLS Proxy can address these situations as well by serving as an adapter that ‘converts’ TLS 1.3/1.2
(used by the servers on the Internet) to TLS 1.0/1.1 (used by legacy systems running on your private network):
tlsproxy tunnel add
  --in 0.0.0.0:443 --in-protocol TLS --in-tls-versions TLS10
  --out test.rebex.net:443 --out-protocol TLS --out-tls-versions TLS13
  --certificate cert:/User/My/test.rebex.net
This will make Rebex TLS Proxy accept TLS 1.0 connections on port 443, and tunnel them to port 443 of test.rebex.net via TLS 1.3.
Note: In order for this to work properly, make sure you are using appropriate host names and certificates. For example, when providing
a private ‘HTTPS with TLS 1.0’ endpoint for a third-party ‘HTTPS with TLS 1.3’ service, you might have to provide your own replacement
certificate signed by a custom certification authority and configure all your legacy HTTPS clients accordingly.
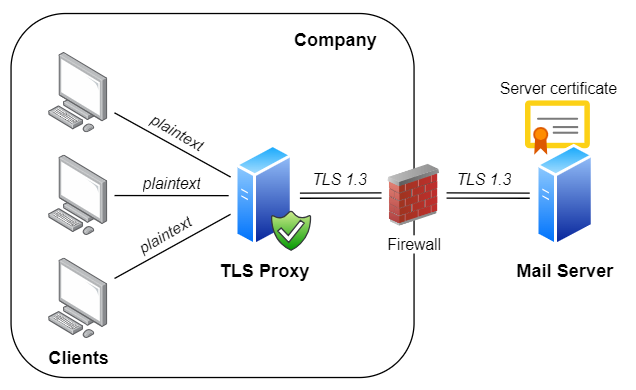
Legacy mail clients lack support for TLS 1.3/1.2 encryption, which is required by contemporary mail servers such as Microsoft Office 365 or Google Gmail.
Legacy mail clients work fine with on-premise legacy servers such as Exchange 2013, but pose a problem when migrating to cloud-based Office 365 or another modern mail server.
More details can be found at Enabling TLS 1.2 in legacy mail clients blog post.
The easiest solution is to leave legacy mail clients to communicate with no encryption and configure Rebex TLS Proxy to protect unencrypted communication with TLS 1.3/1.2:
tlsproxy tunnel add -i 0.0.0.0:143 -o outlook.office365.com:993 --out-protocol TLS
tlsproxy tunnel add -i 0.0.0.0:25 -o smtp.office365.com:587 --out-protocol SMTPE
This will make Rebex TLS Proxy accept plaintext (unencrypted) connections on ports 143 (for IMAP) and 25 (for SMTP), and tunnel them to ports 993 (for IMAP with implicit TLS) and 587 (for SMTP with explicit TLS) of Microsoft Office 365 via TLS 1.3/1.2.
Note: using unencrypted communication can be suitable if TLS Proxy runs on same machine as the mail client, but it can be a security issue if operating on company network.
In such case, enable weak TLS 1.0/1.1 on legacy mail clients (if available) and configure Rebex TLS Proxy as shown in Example #3.
However, this will require an additional step, which is to setup a certificate for TLS Proxy.
Rebex TLS proxy runs on all recent and some not-so-recent Windows platforms:
- Windows 11
- Windows 10 (1607+)
- Windows 8.1
- Windows 7 SP1
- Windows Server 2019
- Windows Server 2016
- Windows Server 2012 R2
Both 32-bit and 64-bit platforms are supported.
For older platforms (such as Windows XP or Windows Server 2003), try Rebex Tiny TLS Proxy
(
download binaries
/
source code on GitHub
).
Rebex TLS Proxy is free for commercial and non-commercial use. See the End User License Agreement (EULA) for details.
1.10.0 (2025-03-10) [download]
- Added support for dynamic targets, selected by SNI (
address: "*"). - Improved
certgento include CN into SAN by default. - Improved config serialization.
-
Upgraded internal TLS library.
Main changes:- Improved X.509 certificates parser.
- Improved errors during TLS negotiation.
1.9.1 (2024-09-23) [download]
- Enabled Brainpool curves in TLS 1.3.
- Fixed possible error in HTTP logging.
1.9.0 (2024-08-30) [download]
- Enabled FFDHE named groups and Ed25519 certificates in TLS 1.3.
- Enabled Brainpool curves in TLS 1.2.
- Added support for ECDSA with Brainpool curves and EDDSA with Ed25519 curve into
certgencommand. - Improved logging: tunnel duration is logged in access log, and more.
-
Upgraded internal TLS library.
Main changes:- Fixed signature scheme selection and curve selection in TLS 1.3.
- Fixed rare wrong final calculation of Poly1305 hash when temporary storage for remaining data is bigger than input block size.
- Fixed potential repeated clean-up of TLS 1.3 extensions that might cause strange exceptions in the following TLS connection.
1.8.1 (2024-06-05) [download]
-
When running in interactive mode (
tlsproxy.exe run) the proxy is stopped when input stream is closed.
This is useful when starting the proxy remotely using SSH command in the background, for example like this:ssh user@host "tlsproxy run" > tlsproxy.log & - Improved certificate loading and hot reloading (proxy ensures that the certificate is usable before using it for TLS handshake).
- Improved logging.
1.8.0 (2024-04-03) [download]
Using new syntax to locate certificates.
Run tlsproxy certinfo --help for syntax details and examples.
-
Deprecating old syntax of the
certificatekey.
If a certificate cannot be located using new syntax aWARNis logged and old syntax is used to locate the certificate. -
Deprecating
certificatePath,certificateKeyPathandcertificatePasswordkeys.
If used aWARNis logged. - Added
certificatesReloadMinutesconfig value to enable certificates hot reload (seeconfig-sample.yamlfor details). - Added
tlsproxy certinfocommand to display info about certificates (and to validate certificate URI syntax). - Added
--out-client-certificateoption to support client certificate authentication on outbound tunnels using TLS. - Improved
SMTPEhandler to support multi-line welcome messages. - Improved logging.
-
Upgraded internal TLS library.
Main changes:- Fixed possible deadlock.
- Reduced memory footprint of CNG API interop layer.
1.7.0 (2023-10-31) [download]
-
Upgraded internal TLS library.
Main changes:- Fixed memory leak for inbound tunnels using TLS.
- Fixed TLS cipher suite and TLS curve selection.
- Disabled client-initiated TLS renegotiation.
- Enabled
Ed25519andChaCha20/Poly1305ciphers.
-
Added support for client certificates:
- Added
--http-x-ssl-certoption to control value of theX-SSL-CERTHTTP request header sent on the outbound tunnel. - Added
--request-client-certificateoption to request client certificate on inbound tunnels using TLS. - Added
--client-certificates-fileoption to configure rules for accepting/rejecting connections based on the provided client certificate.
- Added
-
Improved
tlsproxy certgencommand:- Added support for
MD-5andSHA-1signature hashes. - The
.keyfile is generated as well.
- Added support for
- Proxy is automatically stopped, if no listener could be started.
- Improved HTTP parser: speeded up async core.
- Improved logging.
1.6.1 (2022-11-21) [download]
- Added
--http-host-overrideoption to fully control value of theHostHTTP request header sent on the outbound tunnel.
1.6.0 (2022-11-01) [download]
- Upgraded internal TLS library.
- Improved HTTP parser: request and response parsers are better synchronized.
- Improved tunnel closure routine: waiting for remote end to close the connection politely.
- Improved logging: common errors moved to Warning level, errors during closure moved to Debug level, and more.
1.5.0 (2022-08-17) [download]
- Upgraded software framework to
.NET 6.0. - Upgraded internal TLS library.
- Fixed key usage in certificates generated using the
certgencommand:
the issued certificate cannot be used as a Certificate Authority to issue other certificates now. - Added HTTP capability:
- Added
HTTPandHTTPSprotocols to instruct the TLS Proxy to monitor HTTP traffic. - Added
--http-x-real-ipand--http-x-forwarded-foroptions to insert corresponding HTTP headers into the communication. - The ‘HTTP request’ (method line) and ‘HTTP response’ (status line) are logged into Access log in
Debuglevel.
- Added
- Added
intermediateCertificatesconfiguration value to fully control certificate chain construction on the inbound tunnel. - Added
--certificate-key-pathoption as an alternative to.pfxfiles:
certificate can now be specified by.cerfile +.keyfile. - Added
--sni-overrideoption to fully control SNI used on the outbound tunnel. - Added
--debugoption and changed behavior of--verboseoption: the options determine verbosity of the console logging.
File logging verbosity is now determined by the values specified in theconfig.yamlfile only
(file logging is now unrelated to--verboseand--debugoptions). - Minor improvements in logging:
location of the executable and theconfig.yamlfile is printed to console upon start,
details about loaded certificates is logged upon start,
better tunnel error reporting,
and more.
1.4.0 (2021-07-27) [download]
- Upgraded software framework to
.NET Core 3.1. - Upgraded internal TLS library.
1.3.0 (2020-07-07) [download]
- Improved tunnel closure routine to use less resources.
- Certificate chain sent to the client during TLS negotiation does not include Root certificate now.
- Changed behavior of
certificateconfig value to: Thumbprint or Subject Alternative Name (SAN) or Common Name (CN).
1.2.0 (2020-05-25) [download]
- Fixed bug causing infinite loop when a TLS error occurred.
- Fixed bug causing tunnel closure when client attempted to resume TLS 1.3 session on inbound channel.
- Using Rebex components 2020 R2.
1.1.0 (2020-04-15) [download]
- Added support for TLS virtual hosting via Server Name Indication extension (SNI).
- Improved configuration file validation.
- Improved logging.
1.0.0 (2020-03-17) [download]
- Initial public release.
Contact
Have a feature request or a question? Contact us or ask at Rebex Q&A Forum.
# 3APA3A 3proxy tiny proxy server
(c) 2002-2025 by Vladimir '3APA3A' Dubrovin <3proxy@3proxy.org>


Branches:
Master (stable) branch - 3proxy 0.9
Devel branch - 3proxy 10 (don't use it)


* Download
	Binaries and sources for released (master) versions (Windows, Linux):
	https://github.com/z3APA3A/3proxy/releases

	Docker images:
	https://hub.docker.com/repository/docker/3proxy/3proxy
	Archive of old versions: https://github.com/z3APA3A/3proxy-archive

* Documentation
	Documentation (man pages and HTML) available with download, on https://3proxy.org/
	and in github wiki https://github.com/3proxy/3proxy/wiki

* Windows installation

3proxy --install

	installs and starts proxy as Windows service
	(config file should be located in the same directory)

3proxy --remove

	removes the service (should be stopped before via
	'net stop 3proxy').

* To build in Linux

install git and build-essential packages, use

git clone https://github.com/z3apa3a/3proxy
cd 3proxy
ln -s Makefile.Linux Makefile
make
sudo make install

Default configuration (for Linux/Unix):
3proxy uses 2 configuration files:
/etc/3proxy/3proxy.cfg (before-chroot). This configuration file is executed before chroot and should not be modified.
/usr/local/3proxy/conf/3proxy.cfg symlinked from /etc/3proxy/conf/3proxy.cfg (after-chroot) is a main configuration file. Modify this file, if required.
All paths in /usr/local/3proxy/conf/3proxy.cfg are relative to chroot directory (/usr/local/3proxy). For future versions it's planned to move
3proxy chroot direcory to /var.
Log files are created in /usr/local/3proxy/logs symlinked from /var/log/3proxy.
By default, socks is started on 0.0.0.0:1080 and proxy on 0.0.0.0:3128 with basic auth, no users are added by default.

use /etc/3proxy/conf/add3proxyuser.sh script to add users.

usage: /etc/3proxy/conf/add3proxyuser.sh username password [day_limit] [bandwidth]
        day_limit - traffic limit in MB per day
        bandwidth - bandwith in bits per second 1048576 = 1Mbps

or modify /etc/3proxy/conf/ files directly.

* For MacOS X / FreeBSD / *BSD

git clone https://github.com/z3apa3a/3proxy
cd 3proxy
ln -s Makefile.FreeBSD Makefile
make

(binaries are in bin/ directory)

 Features:
  1. General
	+ IPv6 support for incoming and outgoing connection,
	  can be used as a proxy between IPv4 and IPv6 networks
	  in either direction.
	+ HTTP/1.1 Proxy with keep-alive client and server support,
          transparent proxy support.
	+ HTTPS (CONNECT) proxy (compatible with HTTP/2 / SPDY)
	+ Anonymous and random client IP emulation for HTTP proxy mode
	+ FTP over HTTP support.
	+ DNS caching with built-in resolver
	+ DNS proxy
	+ DNS over TCP support, redirecting DNS traffic via parent
	  proxy
	+ SOCKSv4/4.5 Proxy
	+ SOCKSv5 Proxy
	+ SOCKSv5 UDP and BIND support (fully compatible with
	  SocksCAP/FreeCAP for UDP)
	+ Transparent SOCKS redirection for HTTP, POP3, FTP, SMTP
	+ SNI proxy (based on TLS hostname)
	+ TLS (SSL) server - may be used as https:// type proxy
	+ POP3 Proxy
	+ FTP proxy
	+ TCP port mapper (port forwarding)
	+ UDP port mapper (port forwarding)
	+ SMTP proxy
	+ Threaded application (no child process).
	+ Web administration and statistics
	+ Plugins for functionality extension
	+ Native 32/64 bit application
  2. Proxy chaining and network connections
	+ Can be used as a bridge between client and different proxy type
	  (e.g. convert incoming HTTP proxy request from client to SOCKSv5
	  request to parent server).
	+ Connect back proxy support to bypass firewalls
	+ Parent proxy support for any type of incoming connection
	+ Username/password authentication for parent proxy(s).
	+ HTTPS/SOCKS4/SOCKS5 and ip/port redirection parent support
	+ Random parent selection
	+ Chain building (multihop proxing)
	+ Load balancing between few network connections by choosing network
	  interface
  3. Logging
	+ tuneable log format compatible with any log parser
	+ stdout logging
	+ file logging
	+ syslog logging (Unix)
	+ ODBC logging
	+ RADIUS accounting
	+ log file rotation
	+ automatic log file processing with external archiver (for files)
	+ Character filtering for log files
	+ different log files for different servces are supported
  4. Access control
	+ ACL-driven Access control by username, source IP,
	destination IP/hostname, destination port and destination action
	(POST, PUT, GET, etc), weekday and daytime.
	+ ACL-driven (user/source/destination/protocol/weekday/daytime or
	combined) bandwith limitation for incoming and (!)outgoing trafic.
	+ ACL-driven traffic limitation per day, week or month for incoming and
	outgoing traffic
	+ Connection limitation and ratelimting
	+ User authentication by username / password
	+ RADIUS Authentication and Authorization
	+ User authentication by DNS hostname
	+ Authentication cache with possibility to limit user to single IP address
	+ Access control by username/password for SOCKSv5 and HTTP/HTTPS/FTP
	+ Cleartext or encrypted (crypt/MD5 or NT) passwords.
	+ Connection redirection
	+ Access control by requested action (CONNECT/BIND,
	  HTTP GET/POST/PUT/HEAD/OTHER).
	+ All access control entries now support weekday and time limitations
	+ Hostnames and * templates are supported instead of IP address
  5. Extensions
	+ Regular expression filtering (with PCRE) via PCREPlugin
	+ Authentication with Windows username/password (cleartext only)
	+ SSL/TLS decryptions with certificate spoofing
	+ Transparent redirection support for Linux and *BSD
  6. Configuration
	+ support for configuration files
	+ support for includes in configuration files
	+ interface binding
	+ socket options
	+ running as daemon process
	+ utility for automated networks list building
	+ configuration reload on any file change
     Unix
	+ support for chroot
	+ support for setgid
	+ support for setuid
	+ support for signals (SIGUSR1 to reload configuration)
     Windows
	+ support --install as service
	+ support --remove as service
	+ support for service START, STOP, PAUSE and CONTINUE commands (on
	PAUSE no new connection accepted, but active connections still in
	progress, on CONTINUE configuration is reloaded)
     Windows 95/98/ME
	+ support --install as service
	+ support --remove as service
  6. Compilation
	+ MSVC (static)
	+ OpenWatcom (static)
	+ Intel Windows Compiler (msvcrt.dll)
	+ Windows/gcc (msvcrt.dll)
	+ Cygwin/gcc (cygwin.dll)
	+ Unix/gcc
	+ Unix/ccc
	+ Solaris
	+ Mac OS X, iPhone OS
	+ Linux and derivered systems
	+ Lite version for Windows 95/98/NT/2000/XP/2003
	+ 32 bit and 64 bit versions for Windows Vista and above, Windows 2008 server and above

3proxy    	Combined proxy server may be used as
		executable or service (supports installation and removal).
		It uses config file to read it's configuration (see
		3proxy.cfg.sample for details).
		3proxy.exe is all-in-one, it doesn't require all others .exe
		to work.
		See 3proxy.cfg.sample for examples, see man 3proxy.cfg

proxy    	HTTP proxy server, binds to port 3128
ftppr    	FTP proxy server, binds to port 21
socks    	SOCKS 4/5 proxy server, binds to port 1080
ftppr		FTP proxy server, please do not mess it with FTP over HTTP
		proxy used in browsers
pop3p    	POP3 proxy server, binds to port 110. You must specify
		POP3 username as username@target.host.ip[:port]
		port is 110 by default.
		Exmple: in Username configuration for you e-mail reader
		set someuser@pop.example.org, to obtains mail for someuser
		from pop.somehost.ru via proxy.
smtpp    	SMTP proxy server, binds to port 25. You must specify
		SMTP username as username@target.host.ip[:port]
		port is 25 by default.
		Exmple: in Username configuration for you e-mail reader
		set someuser@mail.example.org, to send mail as someuser
		via mail.somehost.ru via proxy.
tcppm    	TCP port mapping. Maps some TCP port on local machine to
		TCP port on remote host.
tlspr    	TLS proxy (SNI proxy) - sniffs hostname from TLS handshake
udppm    	UDP port mapping. Maps some UDP port on local machine to
		UDP port on remote machine. Only one user simulationeously
		can use UDP mapping, so it cann't be used for public service
		in large networks. It's OK to use it to map to DNS server
		in small network or to map Counter-Strike server for single
		client (you can use few mappings on different ports for
		different clients in last case).
mycrypt    	Program to obtain crypted password fro cleartext. Supports
		both MD5/crypt and NT password.
			mycrypt password
		produces NT password
			mycrypt salt password
		produces MD5/crypt password with salt "salt".


Run utility with --help option for command line reference.

Latest version is available from https://3proxy.org/

Want to donate the project? https://3proxy.org/donations/