
Одна из распространенных проблем пользователей Windows 10 — остановка или невозможность загрузки обновлений через центр обновлений или их установки. При этом в центре обновлений, как правило, отображаются те или иные коды ошибок, которые могут отличаться в зависимости от конкретной ситуации.
В этом материале — о том, что делать и как исправить ситуацию, когда обновления не скачиваются в Windows 10, либо загрузка останавливается на определенном проценте, о возможных причинах проблемы и об альтернативных способах загрузки в обход центра обновлений. Если предложенные ниже способы не сработают, настоятельно рекомендую ознакомиться с дополнительными методами в инструкции Как исправить ошибки Центра обновлений Windows 10, 8.1 и Windows 7.
Утилита устранения неполадок центра обновления Windows
Первое из действий, которое имеет смысл попробовать — использовать официальную утилиту для устранения неполадок при загрузке обновлений Windows 10, к тому же, судя по всему, она стала более эффективной, чем в предыдущих версиях ОС.
Шаги будут следующими:
- Найти необходимое средство устранения неполадок можно в «Панель управления» — «Устранение неполадок» (или «Поиск и исправление проблем», если вы просматриваете панель управления в виде категорий).
- Внизу окна в разделе «Система и безопасность» выберите «Устранение неполадок с помощью Центра обновления Windows».

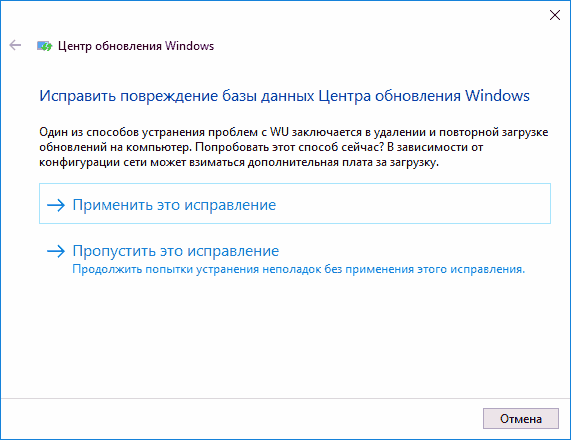
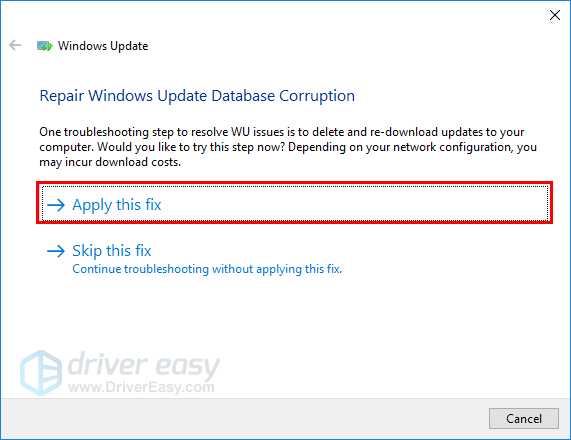
- Запустится утилита для поиска и устранения проблем, мешающих скачиванию и установке обновлений, вам останется лишь нажать кнопку «Далее». Часть исправлений будут применены автоматически, некоторые потребуют подтверждения «Применить это исправление», как на скриншоте ниже.

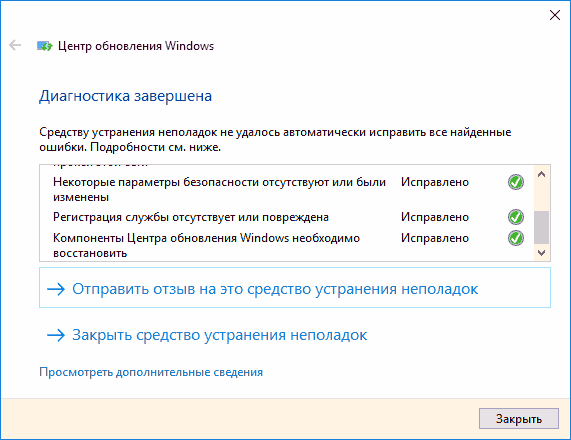
- После окончания проверки, вы увидите отчет о том, какие проблемы были найдены, что было исправлено, а что исправить не удалось. Закройте окно утилиты, перезагрузите компьютер и проверьте, стали ли загружаться обновления.
- Дополнительно: в разделе «Устранение неполадок» в пункте «Все категории» есть также утилита для устранения неполадок «Фоновая интеллектуальная служба передачи BITS». Попробуйте также запустить и её, так как при сбоях указанной службы также возможны проблемы со скачиванием обновлений.

В Windows 10 устранение неполадок можно найти не только в панели управления, но и в Параметры — Обновление и безопасность — Устранение неполадок.
Ручная очистка кэша обновлений Windows 10
Несмотря на то, что действия, которые будут описаны далее, утилита устранения неполадок также пытается выполнить, у нее не всегда это получается. В этом случае можно попробовать очистить кэш обновления самостоятельно.
- Отключитесь от Интернета.
- Запустите командную строку от имени администратора (можно начать набирать в поиске на панели задач «Командная строка», затем нажать по результату правой кнопкой мыши по найденному результату и выбрать «Запустить от имени администратора»). И по порядку введите следующие команды.
- net stop wuauserv (если вы видите сообщение о том, что не удалось остановить службу, попробуйте перезагрузить компьютер и выполнить команду снова)
- net stop bits
- После этого, зайдите в папку C:\Windows\SoftwareDistribution\ и очистите ее содержимое. Затем вернитесь к командной строке и по порядку введите следующие две команды.
- net start bits
- net start wuauserv
Закройте командную строку и попробуйте снова загрузить обновления (не забыв вновь подключиться к Интернету), используя Центр обновлений Windows 10. Примечание: после этих действий выключение компьютера или перезагрузка могут затянуться на более продолжительное, чем обычно, время.
Как скачать автономные обновления Windows 10 для установки
Существует также возможность загрузить обновления не с помощью центра обновлений, а вручную — из каталога обновлений на сайте Microsoft или с помощью сторонних утилит, таких как Windows Update Minitool.
Для того, чтобы зайти в каталог обновлений Windows, откройте страницу https://catalog.update.microsoft.com/ в Internet Explorer (запустить Internet Explorer вы можете, используя поиск в панели задач Windows 10). При первом входе браузер также предложит установить необходимый для работы с каталогом компонент, согласитесь.
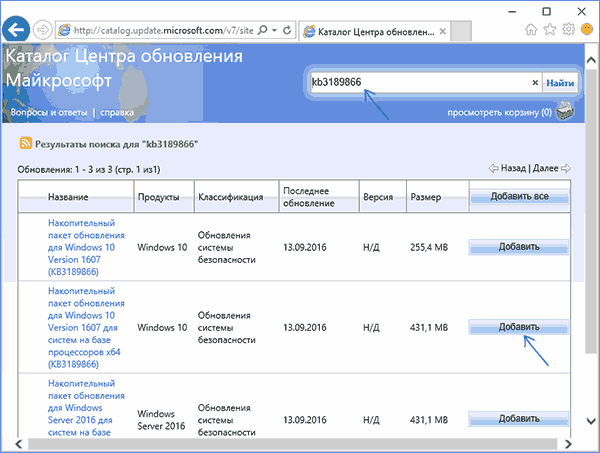
После этого всё, что останется — ввести в поисковую строку номер обновления, которое требуется скачать, нажать «Добавить» (обновления без указания x64 предназначены для x86 систем). После этого нажать «Посмотреть корзину» (в которую можно добавить несколько обновлений).
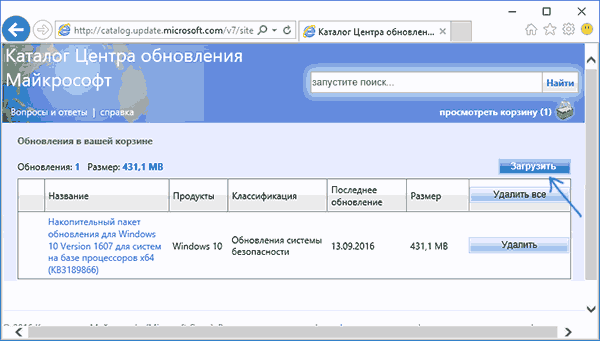
И в завершение останется лишь нажать «Загрузить» и указать папку для загрузки обновлений, которые после этого можно будет установить из этой папки.
Еще одна возможность загрузки обновлений Windows 10 — сторонняя программа Windows Update Minitool или другие программы управления обновлениями Windows 10. Программа не требует установки и при работе использует центр обновлений Windows, предлагая, однако, более широкие возможности.
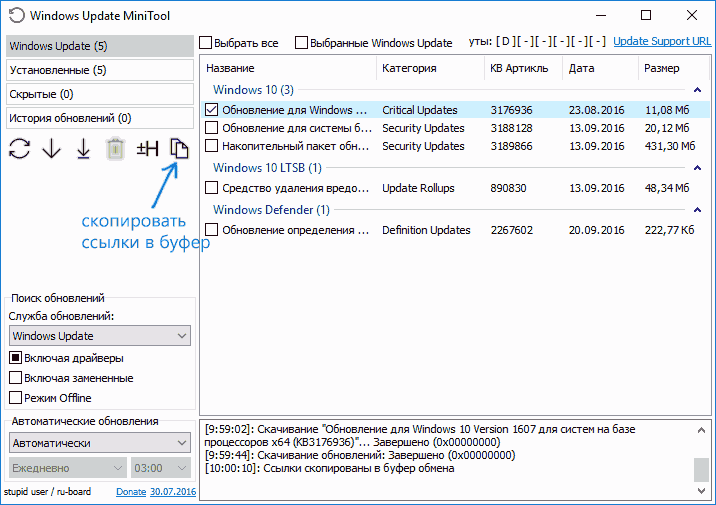
После запуска программы, нажмите кнопку «Обновить» для загрузки информации об установленных и доступных обновлениях.
Далее вы можете:
- Установить выбранные обновления
- Скачать обновления
- И, что интересно, скопировать в буфер обмена прямые ссылки на обновления для последующей простой загрузки .cab файлов обновлений с помощью браузера (в буфер копируется сразу набор ссылок, так что перед вводом его в адресную строку браузера, стоит вставить адреса куда-то в текстовый документ).
Таким образом, даже если загрузка обновлений невозможна с помощью механизмов Центра Обновлений Windows 10, сделать это все равно возможно. Более того, скаченные таким образом автономные установщики обновлений можно также использовать для установки на компьютерах без доступа к Интернету (или с ограниченным доступом).
Дополнительная информация
Помимо вышеописанных моментов, связанных с обновлениями, обратите внимание на следующие нюансы:
- Если у вас установлено «Лимитное подключение» Wi-Fi (в параметрах беспроводной сети) или используется 3G/LTE модем, это может вызывать проблемы с загрузкой обновлений.
- Если вы отключали «шпионские» функции Windows 10, то это могло стать причиной проблем со скачиванием обновлений вследствие блокировки адресов, с которых производится загрузка, например, в файле hosts Windows 10.
- Если вы используете сторонний антивирус или файрволл, попробуйте временно отключить их и проверить, не решилась ли проблема.
Ну и наконец, в теории вы ранее могли выполнить какие-то действия из статьи Как отключить обновления Windows 10, например, сторонние утилиты для отключения, что и привело к ситуации с невозможностью их скачивания. Если использовались сторонние программы, чтобы отключить обновления, попробуйте снова включить их с помощью той же программы.
Если вы видите это сообщение, значит, произошла проблема с загрузкой файлов в стилей (CSS) нашего сайта. Попробуйте сбросить кэш браузера (Ctrl+F5).
Если это не поможет, а вы находитесь в регионе, где возможны ограничения интернет-трафика с российских серверов — воспользуйтесь VPN.
|
Зависание системы при обновлении возможно по многим причинам. Это может быть вызвано разрывом интернет-соединения, сбоем на сервере, сбоем в самом компьютере, недостаточным объемом свободного места на жестком диске. Не исключено и наличие вируса, не разрешающего определенные действия. Вероятно, придется отменить обновление, перезагрузив компьютер с помощью кнопки «резет» или просто отключив питание. Перед повторной попыткой обновления тщательно изучить инструкцию, удостовериться, что никаких проблем нет. Произвести очистку диска, и после этого повторить попытку обновления. Если это опять не удастся, то обратиться в службу поддержки. Разумеется, это возможно при наличии лицензионной версии ОС. система выбрала этот ответ лучшим KONGL 7 лет назад Ждать двое суток в таком случае вовсе не обязательно. Очевидно, что произошел сбой и ваш компьютер завис. Теперь необходимо привести его в порядок. Для этого попробуйте перезагрузить компьютер используя стандартное сочетание клавиш: Ctrl-Alt-Del. (Зажимаете все три клавиши одновременно). Если это не помогает и компьютер не реагирует, то при наличии кнопки «Reset» жмём её. Если такой кнопки нет, щёлкаем выключатель на блоке питания, либо снимаем аккумулятор, если у вас ноутбук. Если после указанных процедур ваш компьютер загрузится корректно, то можно повторить операцию обновления. Если же и в дальнейшем ваш компьютер будет зависать, то вам придется обратиться в службу поддержки. дольф 7 лет назад было у меня дело, зависла система на обновлении, ни одна кнопка не реагировала. Уже давно мне говорили, в подобных случаях, нужно отключить питание ноутбука, нажала на выключение, ноутбук не реагирует. Нашла совет, нужно держать кнопку выключения 10 секунд, и да, ноутбук вырубился. Ждать, что Виндоус сама справится с обновлением не стоит, система затупила и загрузку обновления можно прервать механическим путем. А потом посмотреть загрузки и если это важное обновление, загрузить его с сайта разработчика. Если оно не указано в важных обновлениях, тогда не обязательно, но потом Виндоус может затупить в в воспроизведении видео и тут уж точно надо разбираться с загруженными обновлениями. Если обновление Windows не завершается долгое время, необходимо перезагрузить компьютер. Если компьютер «висит на заставке», надо принудительно выключить его кнопкой питания. Кнопку надо удерживать несколько секунд, пока не погаснет индикатор питания. В случае с ноутбуком иногда приходится снимать аккумуляторную батарею. После этого надо включить компьютер. Если через 30 минут работы картинка на экране не меняется, обновление не завершается, выключайте компьютер еще раз и включайте, удерживая кнопки клавиатуры SHIFT и F8. Появившееся меню подскажет дальнейшие действия. Если все манипуляции ни к чему не привели, вызывайте компьютерного специалиста. [поль 7 лет назад У меня в прошлом году такое же было. Перезагружала раз пять, нажимая на Ctrl+Alt+Del. После этого комп запустился. Я сразу же просканировала его на вирусы двумя антивирусниками и опять перезагрузила. Стараюсь больше не соглашаться на обновления. Peres 7 лет назад Эта проблема очень актуальная у многих пользователей и поэтому вообще нежелательно обновлять комп или другой гаджет через центр обновления. Многие жалуются, что происходит зависание, и он может обновляться не одни сутки. Попробуйте принудительно перезагрузить комп и потом восстановить его до состояния накануне. Это делается через опцию восстановление системы через оставленные точки. И еще так может реагировать антивирусная программа, ее сразу нужно отключать. Есть папка обновлений и ее нужно сразу удалить после того, как вы перезагрузите комп. Далее почистить все куки и потом проверить на вирусы. Иначе можно потерять все данные и потребуется переустановление ОС. snuch 7 лет назад Скорее всего при установке обновления возникла одна из ошибок,каких именно-вам никто скорее всего не скажет(если нет так называемого синего экрана смерти).Выключите компьютер,это сбросит процесс обновления и откатит его.Если при последующих попытках возникнет то же самое-отключите автообновления виндовс.На 10-й они абсолютно бесполезны и весят десятки гигов. Ёжик в туман 7 лет назад Лучше всего не использовать обновление, которое производится через Центр обновления Windows, так как оно бывает не доводит обновления до конца. Помню, ко мне звонит друг и говорит, что компьютер не может закончить обновление системы уже как два дня. После этого случая, я ему посоветовал просто взять и перезагрузить компьютер. Обновление может зависнуть из-за загрузки Центрального Процессора. Такое частенько бывает, потому что при обновлении системы, данная служба потребляет много ресурсов компьютера, из-за чего может зависнуть обновление системы и не отвечать на ваши клики. Время плати 5 лет назад Такое зависание бывает, когда обновления начинают устанавливаться некорректно, то есть возможно пропал интернет и система просто зависла. Тут нужно просто выключить или перезагрузить компьютер с помощью кнопок на Системном блоке. Если после перезагрузки операционная система вернется в прежнее состояние это хорошо, но бывает что после перезагрузки появляется черный экран. Здесь понадобится откат системы. Windows 10 не совсем совершенная операционная система и очень часто обновления приводят к сбоям. Поэтому лучше при возможности пользоваться Windows 7 или Windows 8.1. Вы сами же на свой вопрос и ответили. Здесь ключевое слово «висит». Ну раз компьютер висит, значит его надо перезагружать. Если удастся, то правильными способами, но скорей всего, придется просто грубо отключать компьютер от питания, если ноутбук, то и изъятием батарей. Но а потом как получится, или попытаться продолжить обновление или восстановить систему, до предыдущего состояния. Или крайний вариант — придется переустанавливать систему с потерей всех данных. Хотя при желании большинство данных все же можно будет спасти, если уж очень надо, но это другая тема. storu 7 лет назад Если обновление зависло, то компьютер нужно перезагрузить. Далее служба поддержки Майкрософт рекомендует сделать следующее: 1) Отключите от компьютера все устройства, которые подключены к нему через USB-порты. 2) Удалите антивирус, часто проблемы возникают из-за конфликтов с ним. 3)Удалите содержимое следующей папки «$Windows.~BT». 4) Удалите все программы, которые связаны с изменением интерфейса, тем. 5) Осуществите «чистую загрузку системы» и попытайтесь повторно обновить Windows. Для чистой загрузки винды нужно выполнить следующие действия: А причин зависания может быть несколько. Например, недостаток места, мало памяти. Другая причина — проблема с антивирусом или драйверами. Первое что можно и нужно сделать — перезапустить компьютер, потом можно почистить диск, проверить на вирусы и заново запустить обновление. Знаете ответ? |
Thanks to its user-friendly design and extensive functionality, Windows 10 is a popular operating system all over the globe. However, users often find problems while updating the operating system. One of the most typical issues encountered by Windows 10 users is the Windows 10 update stuck at 100%. This is inconvenient since it prohibits users from accessing their systems and performing their tasks.
This article will explore several practical solutions for fixing Windows 10 Update Stuck at 100. We will also suggest software that helps you recover lost data when dealing with this problem. Let’s get started!
| Workable Solutions | Step-by-step Troubleshooting |
|---|---|
| 1. Ensure Windows 10 Update | Before attempting to resolve the Windows 10 update stopped at 100% problem…Full steps |
| 2. Remove USB Peripherals | When a USB peripheral is attached to a computer, the system recognizes…Full steps |
| 3. Run Windows Troubleshooter | The Windows Update troubleshooter is an in-built utility designed to…Full step |
| 4. Relaunch Windows Update | The Windows Update Service ensures that your machine is operating…Full steps |
| More Fixes | The existence of viruses or malware on your computer might cause…Full steps |
Windows 10 Update Stuck at 100 Overview
The Windows 10 update stuck at 100% is a typical problem many Windows 10 users have when upgrading; other errors like Windows update error code 0x80080005 also puzzle many users in upgrading their computers. When a user boosts their operating system, the process might get stuck at 100%, preventing the user from finishing the update and accessing their machine. This problem can be caused by various factors, including faulty system files, obsolete drivers, or competing apps operating in the background.
The update procedure is critical for keeping your system updated with the most recent security patches, bug fixes, and new features. As a result, it is essential to address the Windows 10 update stuck at 100% problem as soon as possible to guarantee the proper functioning of your system.
How to Solve Windows 10 Update Stuck at 100 [8 Methods]
Fortunately, various efficient methods are available to help you resolve the Windows 10 update stopped at 100% problem. These solutions vary from simple troubleshooting actions to more complex approaches. In this section, we have outlined some of the best solutions. We have tried and tested these methods to ensure they work for you. Let’s look at them in detail here:
1. Make Sure the Windows 10 Update Is Stuck
Before attempting to resolve the Windows 10 update stopped at 100% problem, ensure the update process is stalled. The update process can take longer than usual to finish, and it can seem stuck at 100% when it is not. As a result, it is critical to wait some time to determine whether the updating process continues. Depending on the update size and your machine’s speed, the update process should take around 20-30 minutes.
Inspect your system’s challenging disk activity to see whether the Windows 10 update is stalled. If the hard drive LED is flickering, the update procedure is still in progress, and you should wait for it to finish. If the hard drive LED is not flashing, it might mean that the update process has been stalled. For example, when you use the Windows Update option to upgrade from Windows 10 to 11, the hard drive LED stops flickering; it refers to the Windows 11 installation being stuck.
2. Remove Any USB Peripherals on the Computer
When a USB peripheral is attached to a computer, the system recognizes it as a new device and attempts to install the required drivers. This operation can sometimes interfere with the Windows 10 update process, leading it to get stuck at 100%.
External hard drives, USB flash drives, printers, scanners, and other USB-connected devices are examples of USB peripherals. By eliminating these peripherals, you avoid any conflicts that can develop during the upgrade process, enabling it to run smoothly. As a result, before upgrading your system, you should unplug any USB devices attached to your computer.
3. Fix the Problem with Windows Update Troubleshooter
The Windows Update Troubleshooter is an in-built utility designed to investigate and fix update-related problems. Try running it to test whether the Windows Update Troubleshooter can fix the problem. The procedure is as follows:
Step 1. Press the Windows key and then type Troubleshoot into the search bar that appears.
Step 2. Select «Troubleshoot» from the list of search results.
Step 3. Click the «Other Troubleshoot» button, then pick «Windows Update» in the following box.
Step 4. Once done, click the «Run» tab.
Step 5. Click «Apply» once done.
Step 6. Please refer to the on-screen prompts to resolve this problem.
Note: To test whether the update can be installed, run Windows Update once again.
What to do if Windows Update is not working? The following passage will fix it for you.
4. Relaunch the Windows Update Service on Computer
The Windows Update Service ensures that your machine is operating the most current version of the Windows operating system. This is the responsibility of the user. If you turn off the Windows Update Service on your computer, the machine cannot automatically search for and download the most current operating system update. Therefore, you should attempt to restart the Windows Update Service to prevent the Windows update from being stalled. Here are the steps to do so:
Step 1. Open «Run» by pressing Win + R.
Step 2. Enter services.msc when prompted in Run.
Step 3. Find the Windows Update Service with a right-click on the next window.
Step 4. From the menu that appears, choose «Properties». The «Stop» button can be found in the Properties dialogue. Click it.
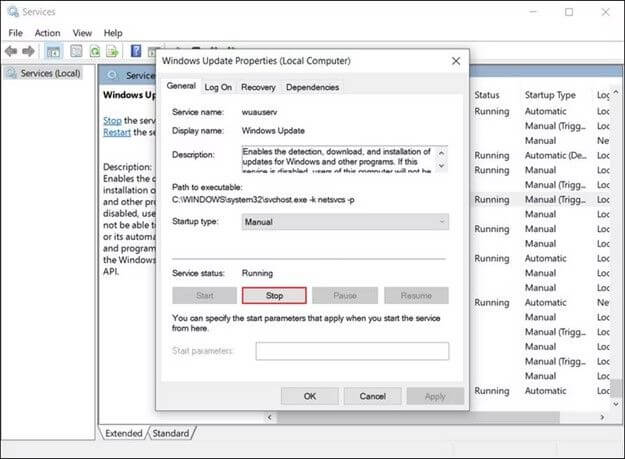
Note: Don’t press the Start button again for a few seconds.
Step 5. Expand the corresponding dropdown menu to choose «Automatic as the Startup type».
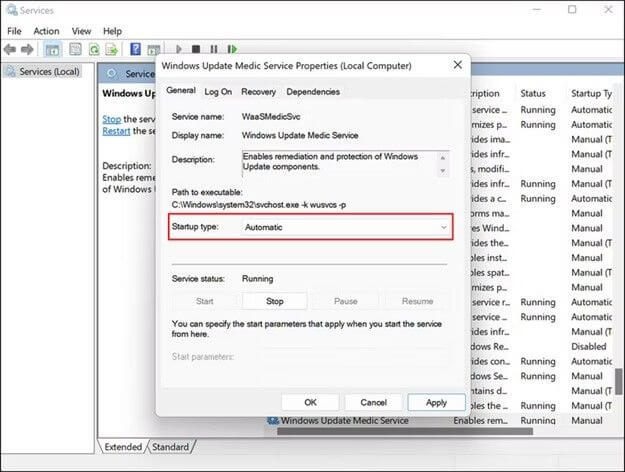
Step 6. To commit your changes, choose «Apply» > «OK».
5. Remove Computer Viruses or Malware
The existence of viruses or malware on your computer might cause the Windows 10 upgrade to get stuck at the 100 percent mark. These malicious applications can potentially interrupt the update process, among other things, and interfere with the system’s regular functioning. As a result, before updating to Windows 10, you should clean your PC of any viruses or malware.
To see whether this is the case, you can use the security software on your computer to do a scan. If you do not have an external security application installed, you can boot the Command Prompt to launch built-in repair tools such as SFC, DISM command, and CHKDSK. If you remove them beforehand, your Windows 10 upgrade will go more efficiently, and your machine will be safer from malware and viruses.
6. Perform a Clean Boot on Windows
A clean boot can start Windows with a bare minimum of drivers and starting apps to minimize software incompatibilities while installing Windows updates. A clean boot requires you to complete the following:
Step 1. In the Run window, type msconfig and hit Enter.
Step 2. Then, click the «Services menu» item. To conceal all Microsoft services, choose this check box.
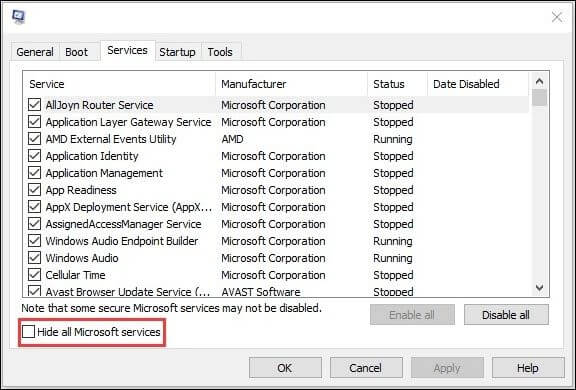
Step 3. To finish, select «Disable all» and «Apply».
Step 4. To access the Task Manager, choose the «Startup» menu item and click «Open».
Step 5. Select the first running program in the Task Manager window, then click «Disable».
Note: Here, you must manually shut down each running program.
Step 6. Click «OK» to exit Task Manager once you’ve disabled all unwanted software.
After that, you can restart your machine and attempt to upgrade to Windows again. If the «working on updates 100% complete» issue does not appear after a clean boot, it was caused by an application.
Suppose you find the solutions above work to fix your problems. In that case, sharing this article with all your friends or colleagues on various social platforms such as Twitter and Instagram is appreciated.
7. Run DISM Command in Safe Mode
Another option is using the DISM command in Safe Mode to repair corrupted files. Here are the steps you should take:
Step 1. In the search bar, enter «CMD,» right-click the first result and choose «Run as administrator.»
Step 2. Enter each of the following instructions after typing it:
Dism /Online /Cleanup-Image /CheckHealth Dism /Online /Cleanup-Image /ScanHealth Dism /Online /Cleanup-Image /RestoreHealth
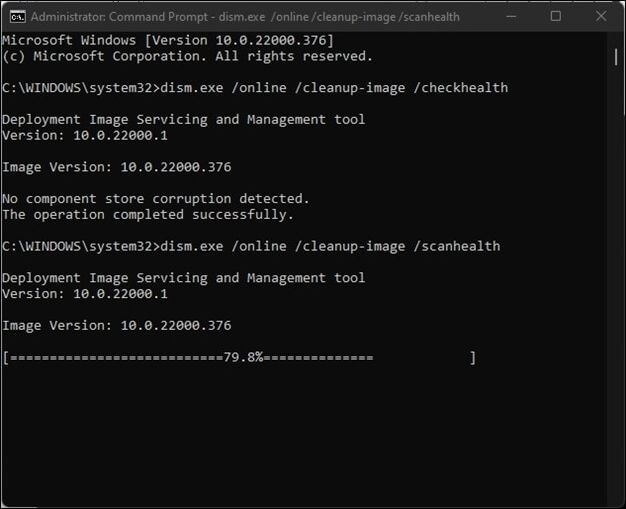
Step 3. Allow the DISM command to run through to completion. Try the following commands if the ones above don’t work:
Dism /Image:C:\offline /Cleanup-Image /RestoreHealth /Source:c:\test\mount\windows Dism /Online /Cleanup-Image /RestoreHealth /Source:c:\test\mount\windows /LimitAccess
Restarting your computer should resolve the «Windows is stuck on updating» problem.
8. Run System Restore in Windows Recovery Environment
System restores can generate restore points automatically whenever you install a new program, driver, or Windows update or manually create a restore point. However, any software, drivers, or updates updated after the restore point was made will be deleted. Follow the steps below:
Step 1. To access the Control Panel (Desktop app), press the Start button, then enter the Control Panel into the search box next to the Start button on the taskbar.
Step 2. Find System Restore in the Control Panel, click on it, and then choose «Recovery», «Open System Restore», and Next.
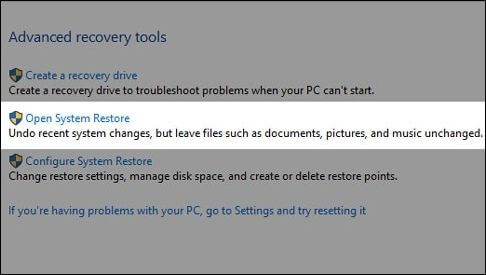
Step 3. Select the backup before installing the faulty software, driver, or update, and then hit «Next» > «Finish».
How to Restore Lost Data When Windows 10 Update Stuck/Failed
Users can be frustrated if they lose data because of a botched or stopped Windows 10 upgrade. Fortunately, data recovery software programs are available to assist you in recovering deleted files on Windows 10 and restoring lost data in various situations. EaseUS Data Recovery Wizard is one such application, a strong and dependable data recovery program that can recover lost data due to failed or blocked Windows 10 updates.
EaseUS Data Recovery Wizard is a user-friendly software that even novices can use. It offers an easy-to-use interface that walks you through the recovery procedure. The program can recover many contents, including images, movies, and documents, from various storage media, including hard disks, USB drives, SD cards, and more.
Sometimes, problems may occur after the update. For example, desktop file folders disappear after Windows 10 upgrade. What’s more, data loss is another problem usually discussed after upgrading. EaseUS software also can help you recover lost files after Windows 10 update.
- Recover deleted files or lost files, documents, photos, audio, music, and emails effectively.
- Support Windows 11/10/8/7 and Windows Server 2022/2019/2016/2012/2008/2003.
- Support data recovery for system crashes and various scenarios, including sudden deletion, formatting, hard drive corruption, and virus attack.
Also, EaseUS software is easy to operate; only three steps to recover the lost data.
Step 1. Select a location and start scanning
Launch EaseUS Data Recovery Wizard and choose the partition where you lost data. Then, click «Search for Lost Data».

Step 2. Filter and preview files
Use the file format filter on the left or upper right corner to find the files you need. If you remember the file name, you can also search in the search box, which is the fastest way to find the target file. Then, you can click the «Preview» button or double-click a file to preview its content.

Step 3. Recover lost data or files
Click the checkbox next to the file and click «Recover» to restore the lost data to your local storage or Cloud drive.
Conclusion
It’s frustrating when the Windows 10 update gets stuck or fails, but there are ways to fix the problem and retrieve any data that has been lost. If you’ve lost files or data due to a Windows 10 upgrade that didn’t go smoothly or got stuck, EaseUS Data Recovery Wizard will help you get it back. EaseUS is an excellent program for recovering deleted files on a computer due to its intuitive design and robust recovery features. You can use EaseUS to recover lost information after a system crash, formatting, or accidental deletion of files.
Some frequently asked questions related to Windows updating:
1. How to fix the Windows update not working?
Try restarting your computer, running the Windows Update Troubleshooter, deleting the Windows Update cache, verifying your internet connection, turning off your antivirus software, or manually downloading and installing updates to see if it fixes the Windows update not working. If none of these suggestions work, contact Microsoft support or a professional for more help.
2. Why is Windows 10 update takes forever?
The Windows 10 update may take a while for various reasons, including a sluggish internet connection, obsolete technology, a lack of available storage, incompatible applications, or a corrupted update file. The size and complexity of the update may also be a factor that will lengthen the installation time.
3. How long will Windows 10 21H2 update take?
The speed of your internet connection, the functionality of your machine, and the size of the update are just a few of the variables that might affect how long it takes to install the Windows 10 21H2 update. However, the installation procedure might take 20 minutes to many hours to finish.
4. How to update Windows from 20H2 to 21H2?
To upgrade your Windows 10 from version 20H2 to version 21H2, utilize the Windows Update function or manually download the update from the Microsoft website. To utilize Windows Update:
- 1. Go to «Settings» > «Update & Security» > «Windows Update».
- 2. Click on «Check» for updates. If an update is available, click the «Download and Install» button.


If you see the message “Working on updates, 100% complete. Don’t turn off your computer” when performing a Windows update, don’t worry!
Although it’s incredibly frustrating, you’re not the only person to experience this issue. Thousands of Windows users have recently reported the very same issue. More importantly, you should be able to fix it pretty easily…
Try these fixes
Here’s a list of fixes that have resolved this problem for other Windows users. You don’t have to try them all. Just work your way through the list until you find the one that does the trick for you.
- Remove any USB peripherals and wait for the update process to finish
- Force restart your PC
- Run Windows Update troubleshooter
- Reset Windows Update components
- Download updates from Microsoft Update Catalog manually
- Pro tip: Want us to fix the problem for you?
Fix 1: Remove any USB peripherals and wait for the update process to finish
If you seldom check for Windows updates, it may take a long time for Windows to complete the update process. Maybe your PC is not “stuck” at Windows update, and Windows is just configuring and installing update packages.
If you temporarily don’t need to use your PC, you can just wait for 2 to 3 hours to see if the update process can be completed. If there are any USB devices (like printers, USB flash drives, etc.) connected to your PC, you can try removing them from your PC. Some Windows users reported that after they disconnect all the USB peripherals from their PCs, the update process completes quickly.
See if this issue persists after you wait for 2 to 3 hours. If it persists, try the next fix below to force restart your PC.
Fix 2: Force restart your PC
If Your PC gets stuck at 100% when you’re performing a Windows update, you need to force restart your PC first. If you don’t know how to do it, you can follow the instructions below:
- Press and keep holding the power button on your computer case until your PC shuts down.
- Disconnect any external power supply or remove the battery from your laptop.
- Hold down the power button for about 15 seconds.
- Wait a few minutes and then plug in your PC or connect the battery to your laptop.
- Press the power button again to reboot your system.
- Select the option to boot normally if you get a notice that the computer shuts down improperly.
If you still cannot access the desktop, you can try starting your PC in safe mode with the network. When you sign into your Windows system in safe mode with the network, try the next fix below to run the Windows Update troubleshooter.
Fix 3: Run Windows Update troubleshooter
Windows Update troubleshooter is a built-in tool that can help you analyze and resolve issues related to Windows updates. Try running Windows Update troubleshooter to see if you can resolve this issue. Here is how to do it:
If you’re on Windows 10:
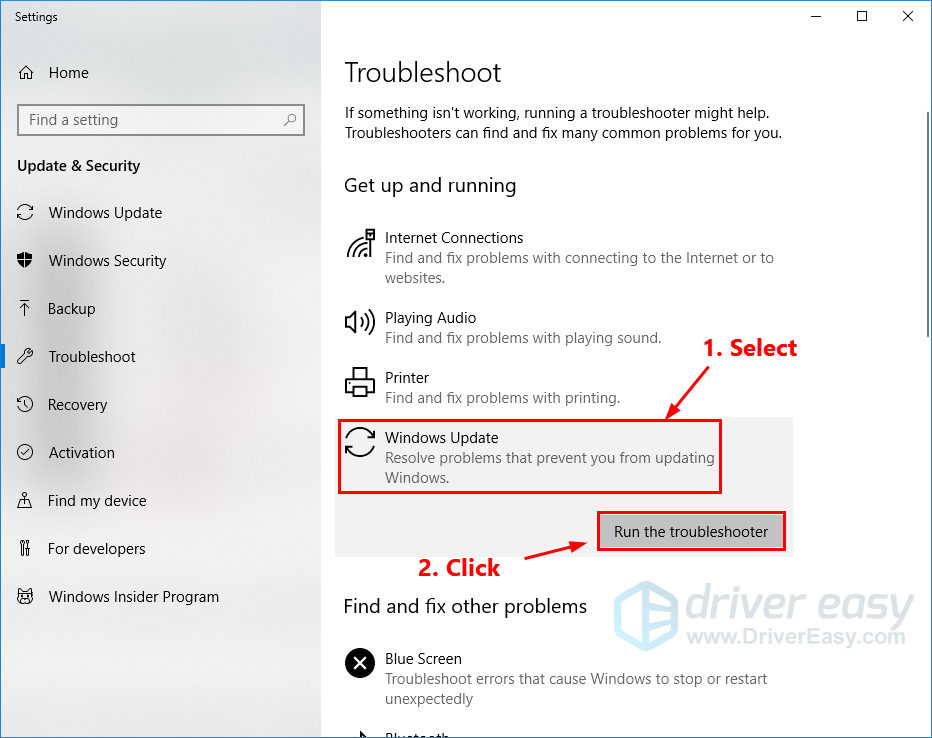
- On your keyboard, press the Windows logo key and type troubleshoot. In the list of search results, select Troubleshoot.
- In the pop-up window, select Windows Update and click Run the troubleshooter. You’ll be prompted for permission. Click Yes to run Windows Update troubleshooter.

- Click Apply this fix to continue.
- Follow the on-screen instructions to troubleshoot this issue.
If you’re using Windows 11:
- On your keyboard, press the Windows logo + I keys simultaneously to open Settings.
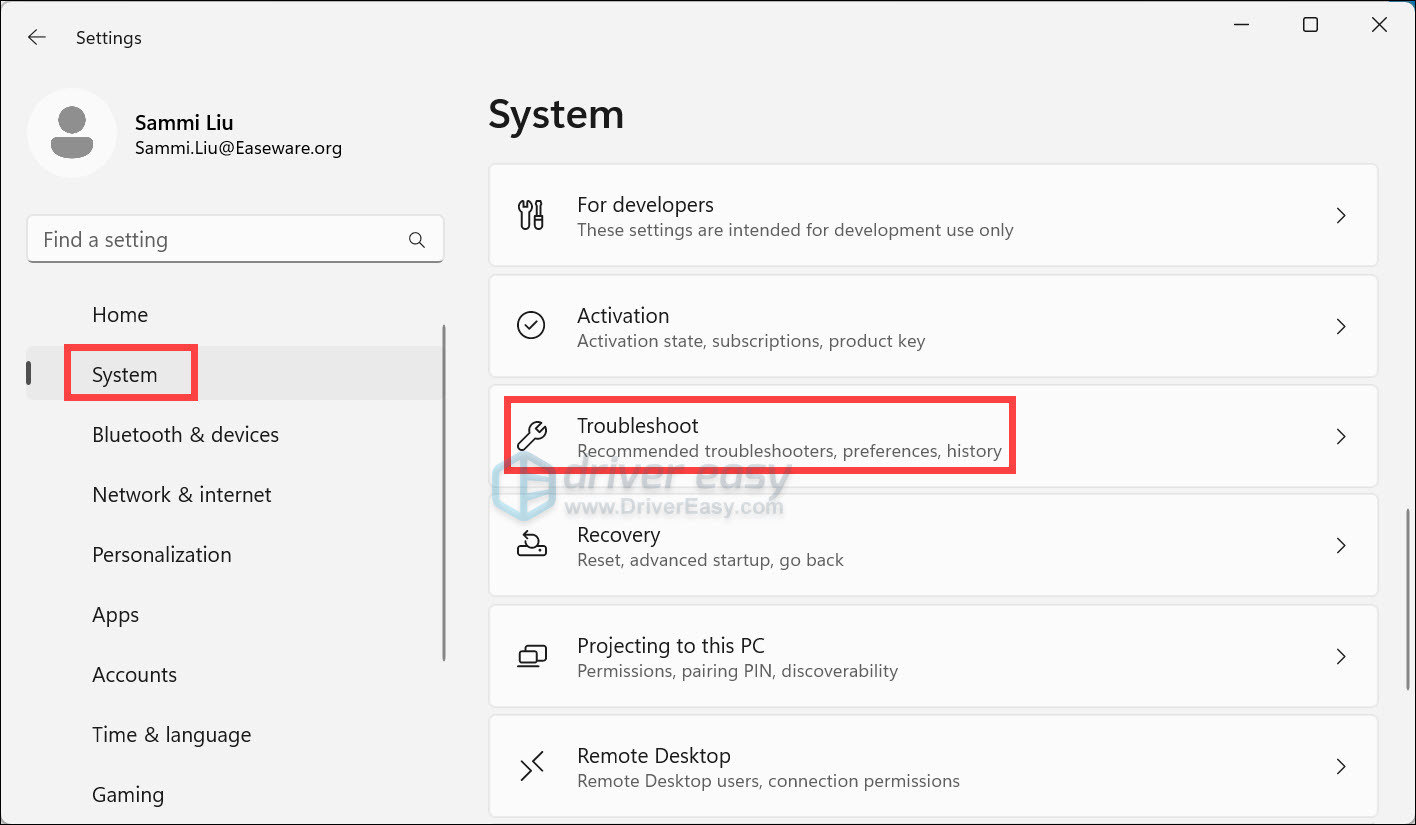
- From the left navigation panel, select System. Find Troubleshoot and click on it.

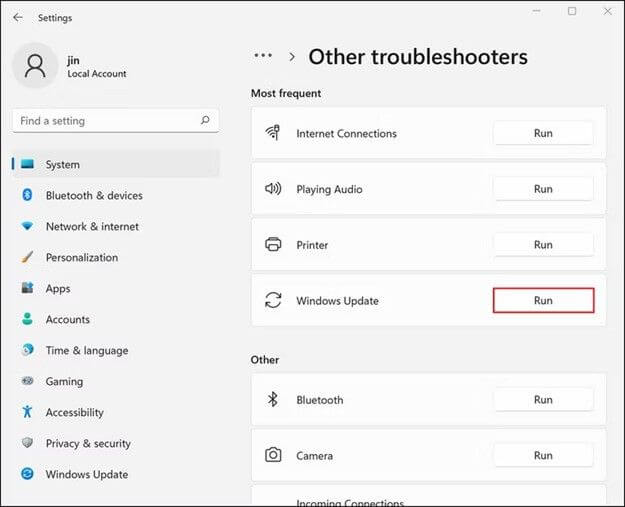
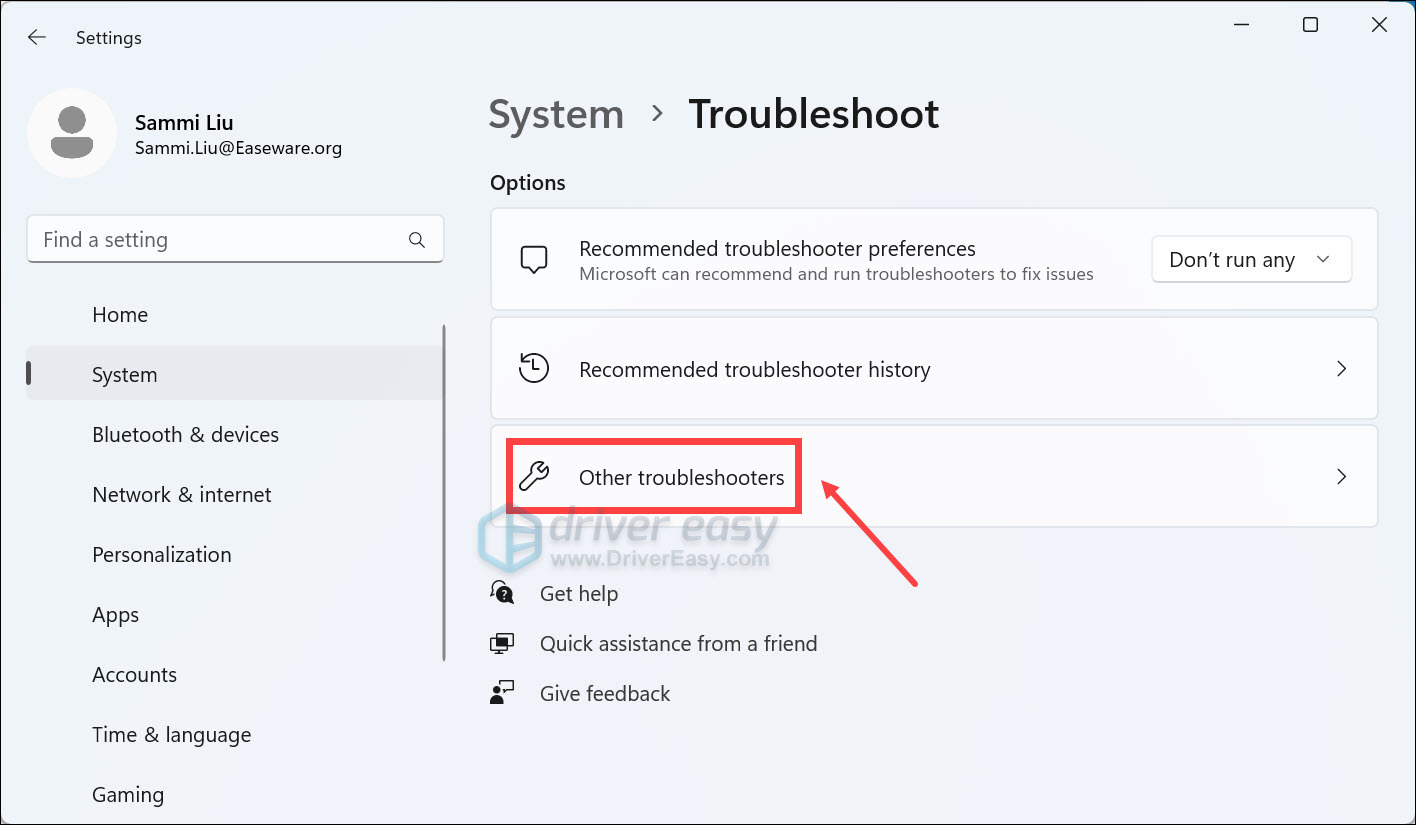
- Click Other troubleshooters.
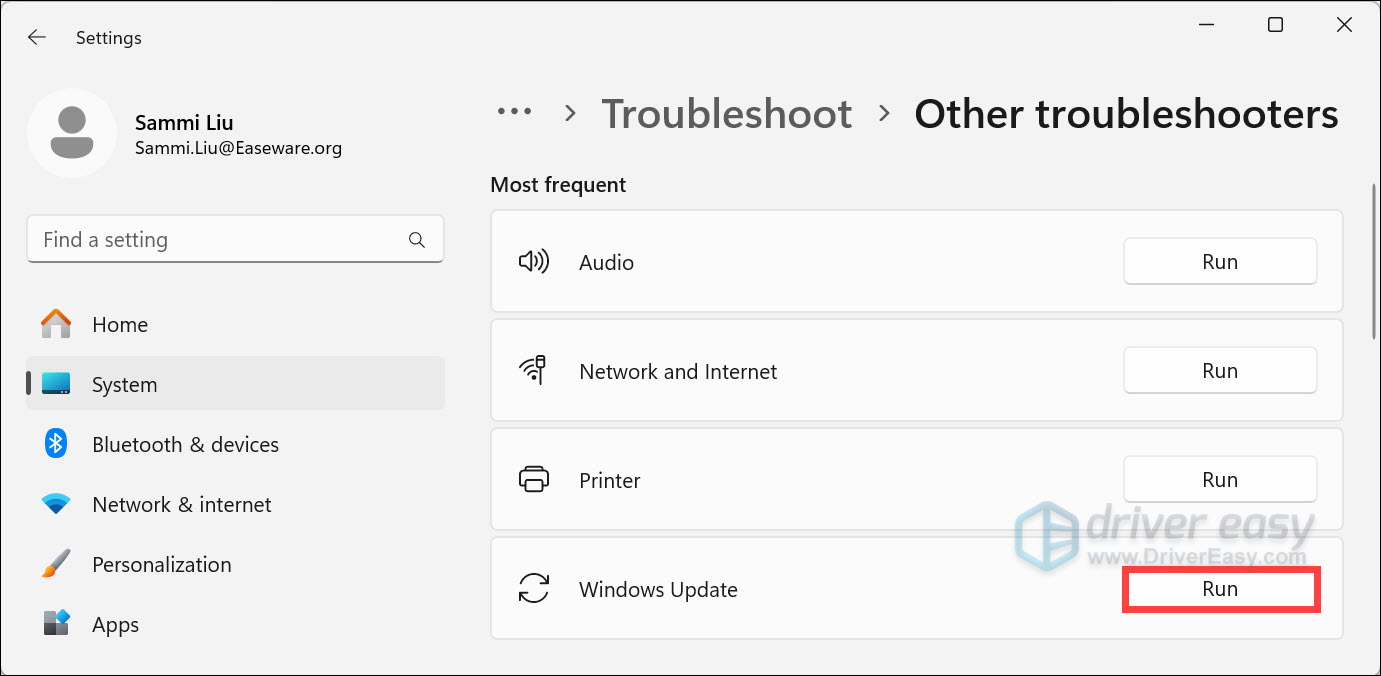
- Click on the Run button next to Windows Update. Then wait for it to troubleshoot your issues.

Perform a Windows update again to see if you can install the update. If this issue reappears, try the next fix, below.
Fix 4: Reset Windows Update components
If Windows Update components are corrupted, Windows Update may not work properly. Maybe that’s the reason behind this issue. To resolve it, try resetting Windows Update components. Here is how to do it:
- On your keyboard, press the Windows logo key and R at the same time to invoke the Run dialog. Type cmd and press Ctrl, Shift and Enter at the same time to run Command Prompt as administrator. You’ll be prompted for permission. Click Yes to open the Command Prompt.
- In Command Prompt, type the command lines below and press Enter on your keyboard after typing each:
net stop bits
net stop wuauserv
net stop appidsvc
net stop cryptsvcNote: The Windows Update-related system services will be stopped after executing the command lines above.
- In Command Prompt, type the following command lines and press Enter after typing each:
ren %systemroot%\SoftwareDistribution SoftwareDistribution.old
ren %systemroot%\system32\catroot2 catroot2.oldNote: You will rename the SoftwareDistribution and catroot2 folder as SoftwareDistribution.old and catroot2.old after you run these two command lines. These two folders are used by Windows Update to save temporary update files.
By renaming these two folders, Windows will think these two folders are missing, and Windows will create new ones to store Windows update files. By doing that, you can avoid many Windows Update issues caused by the old corrupted temporary files in these two folders.
- In Command Prompt, type the following command lines and press Enter after each:
net start bits
net start wuauserv
net start appidsvc
net start cryptsvcNote: After you execute the command lines above, you start the Windows Update-related system services.
Check to see if this resolves your Windows Update problem. Hopefully, it did. But if not, try the next fix, below.
Fix 5: Download updates from Microsoft Update Catalog manually
Microsoft Update Catalog offers updates for Windows 2000 SP3 and later versions of the Windows operating system. You can try downloading the updates you failed to install from the Microsoft Update Catalog and install them manually to see if you can fix this issue.
Before you download updates, you need to check the system type of your Windows OS. If you don’t know how to do it, follow the instructions below to view your system type:
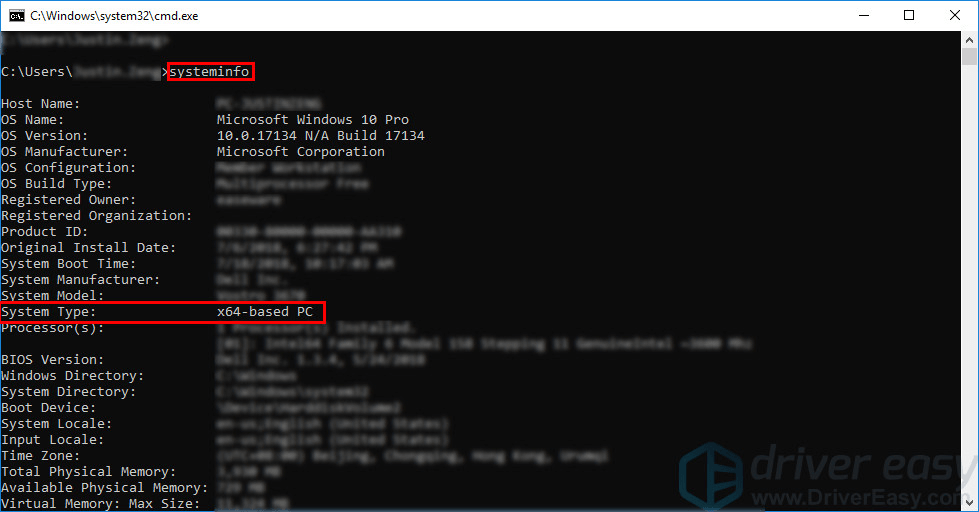
- On your keyboard, press the Windows Logo key and R at the same time to open the Run dialog. Type cmd and press Enter to open Command Prompt.
- Type the command line systeminfo and press Enter to view your system type.

Note: “X64-based PC” indicates that your Windows OS is 64-bit; “X86-based PC” means that your Windows OS is 32-bit.
Now, you can follow the steps below to download Windows updates manually:
- On your keyboard, press the Windows logo key and type windows update, then press Enter to open Windows Update.
- Click View update history to check the updates you failed to install. For example, if you fail to install update KB3006137, you can download that update and install it manually.
- Visit Microsoft Update Catalog.
- Type the update number that you want to download. In this example, type KB3006137 and then click Search.

- In the list of search results, select the correct update for your operating system and click Download.
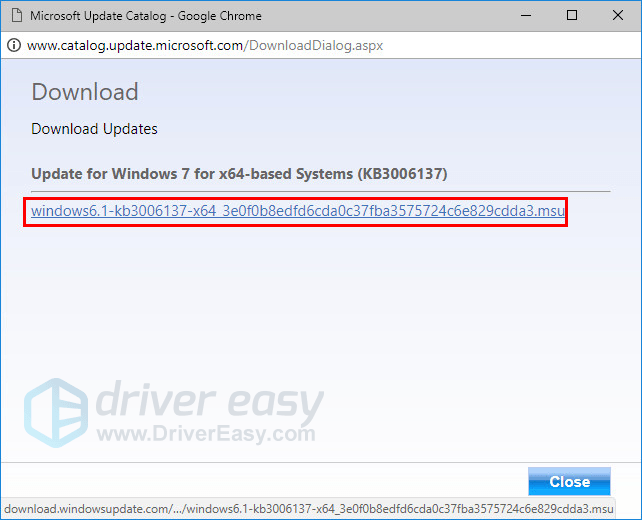
Note: If your Windows OS is 64-bit, you should download the update whose name contains “x64-based”.

- In the pop-up window, click the link to start downloading the updates.

- Double-click the downloaded file and follow the on-screen instructions to install the update.


Restart your PC to see if this issue persists. If not, congratulations! You’ve resolved this annoying issue! But if this issue reappears, you can try the last fix, below.
Pro tip: Want us to fix the problem for you?
If none of the fixes above worked, or you just don’t have the time or confidence to troubleshoot the problem for yourself, get us to fix it for you. All you need to do is buy a 1-year subscription to Driver Easy (just $29.95) and you get free technical support as part of your purchase. This means you can contact our computer technicians directly and explain your problem, and they’ll investigate to see if they can resolve it remotely.
IMPORTANT: Please attach the URL of this article when you contact us, so we can help you resolve the problem ASAP. You can expect us to respond within two working days.
You can contact us easily via the Driver Easy Feedback tool. To learn how to use this tool, please visit this link:
https://www.drivereasy.com/help55/feedback/.
50
50 people found this helpful
Helping millions of people navigate the world of technology.
Quick Tips
- Go to the Services app, right-click, and restart the Windows Update Service.
- If this doesn’t work, you can manually stop and start the wuauserv, cryptSvc, bits, and msiserver services using CMD.
- You can also try deleting the DataStore.edb file from the C:\Windows\SoftwareDistribution\DataStore folder.
Basic Fixes
- Check internet connection: Ensure your PC is connected to a stable Wi-Fi or Ethernet connection.
- Check date and time: An incorrect date and time can cause issues checking Windows Updates.
- Restart PC: Restart your PC to eliminate any temporary bugs causing the problem.
- Perform SFC Scan: Perform an SFC scan on your PC to repair corrupted system files.
Fix 1: Run Windows Update Troubleshooter
The Windows Update Troubleshooter can help your PC detect and fix problems related to Windows Update Services.
Step 1: Open the Settings app on your PC > select System from the sidebar.
Step 2: Select Troubleshoot.
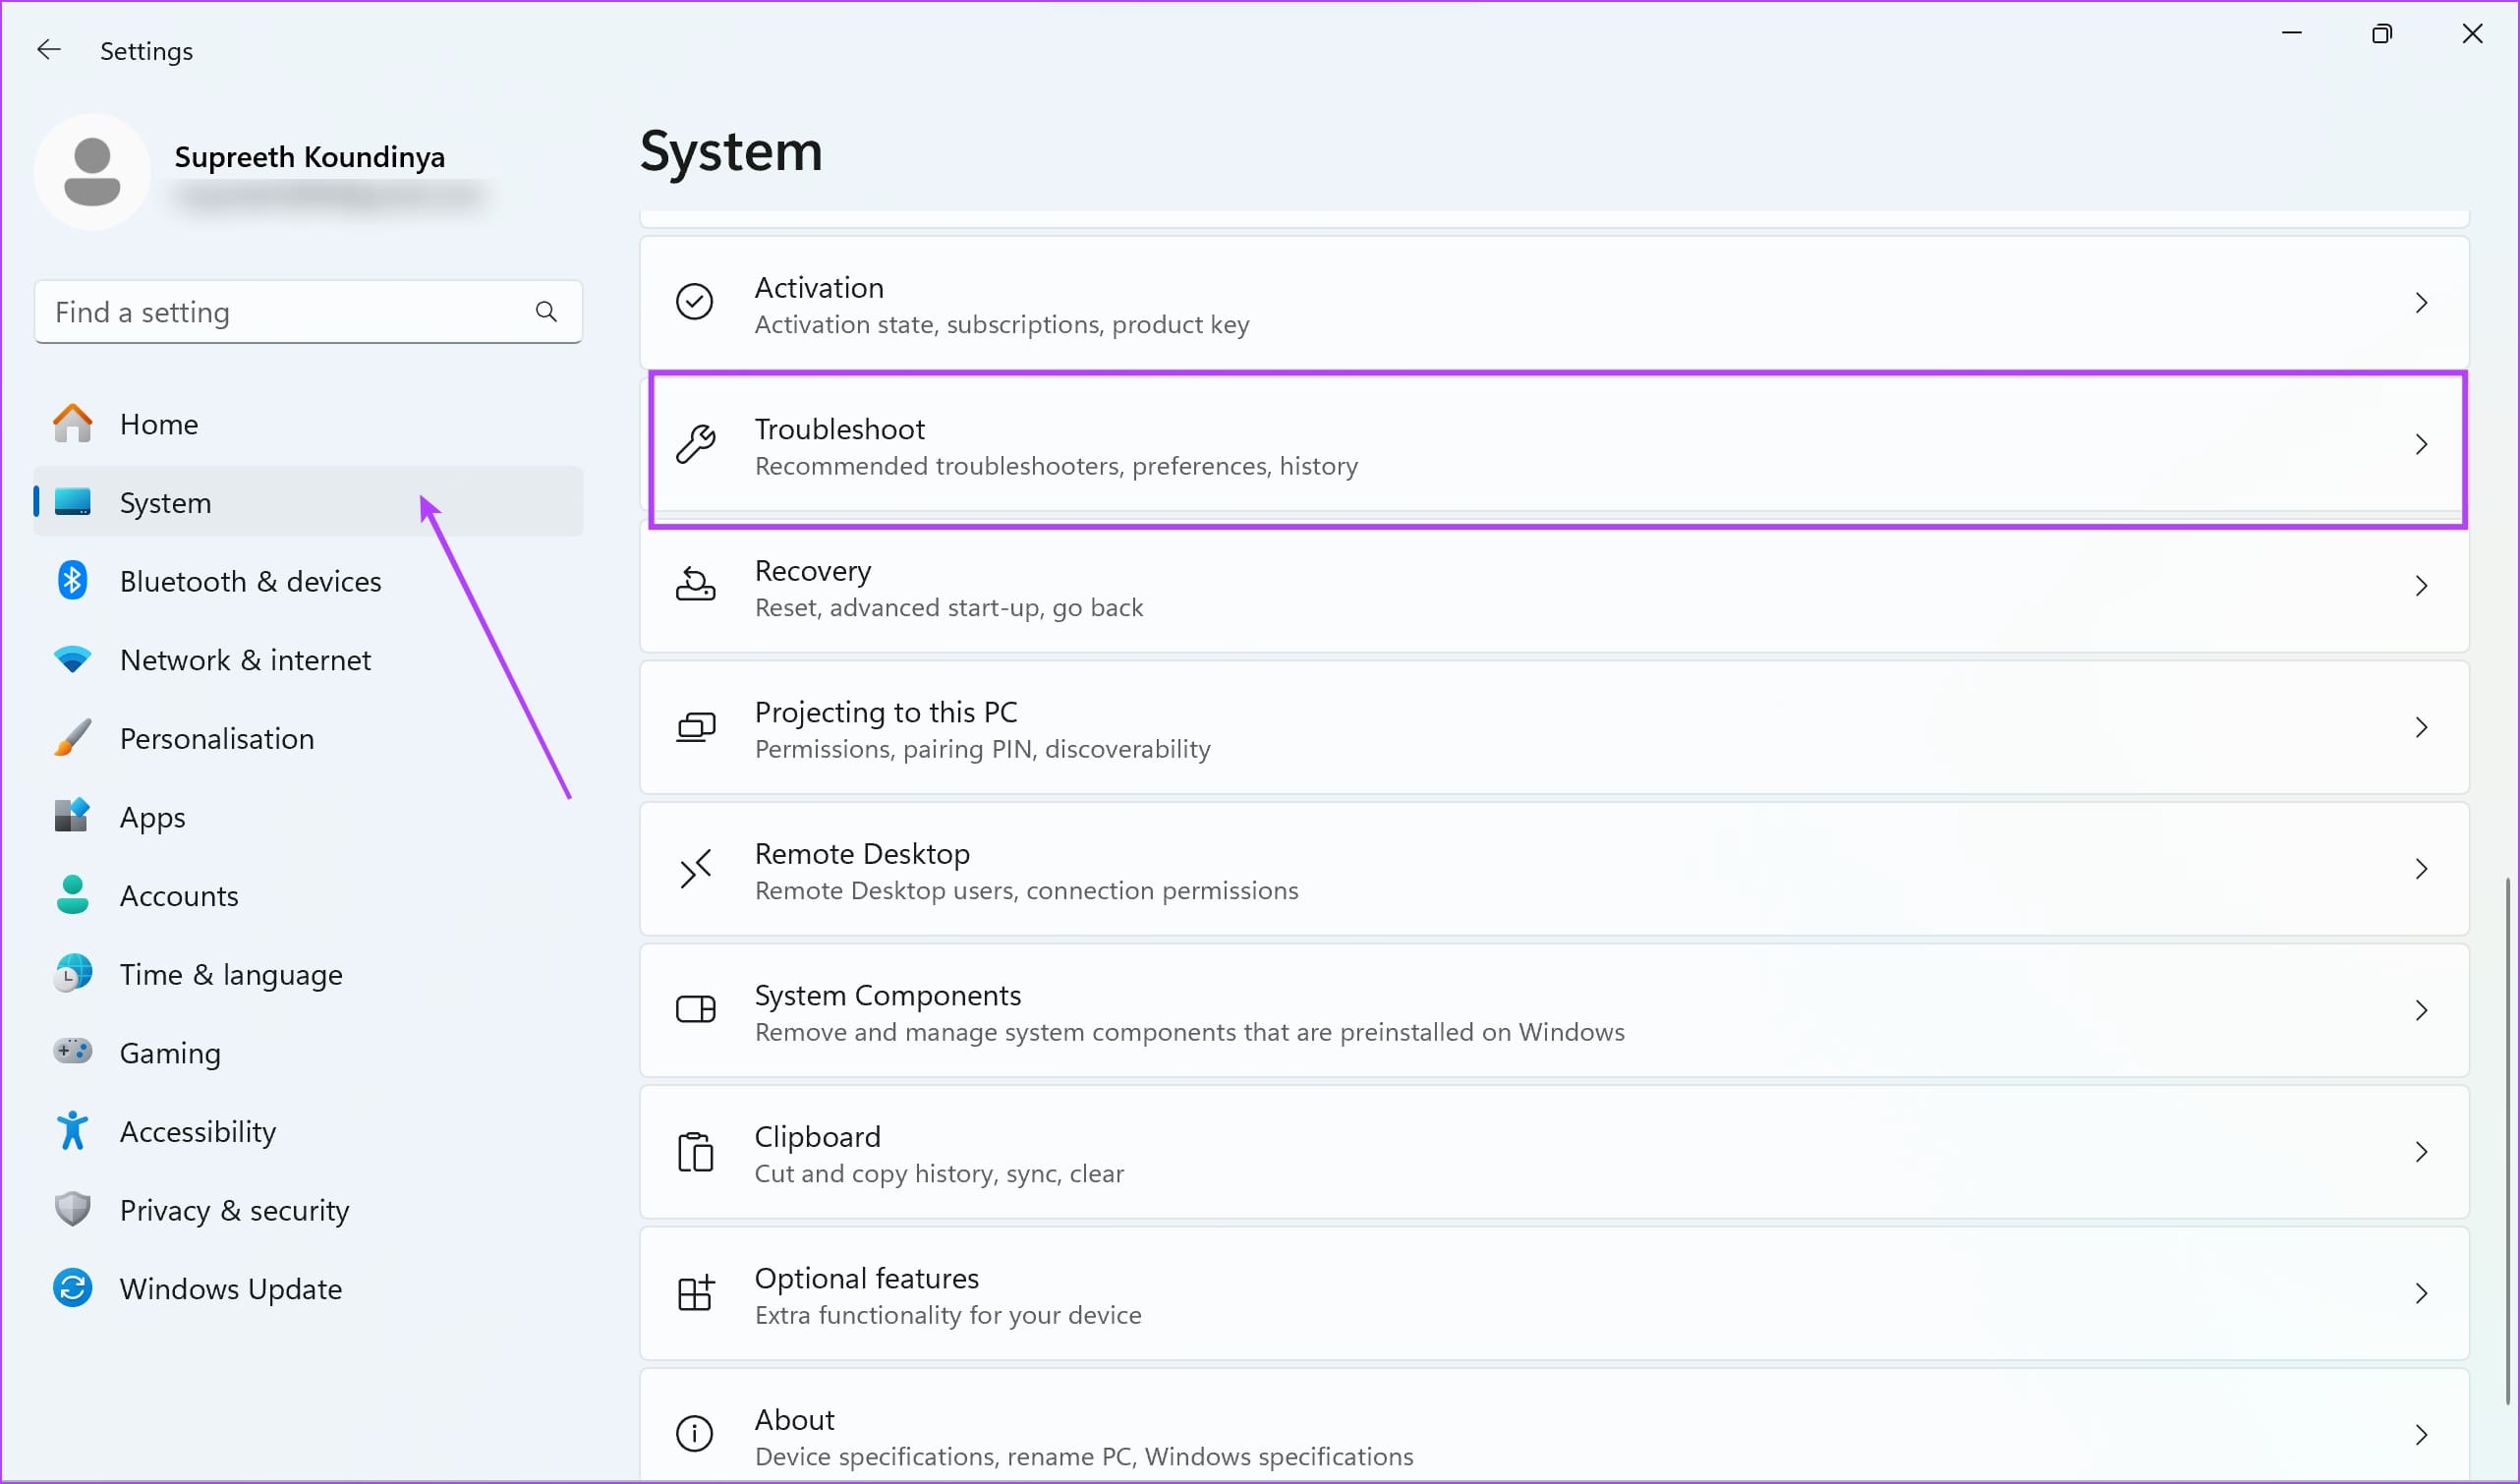
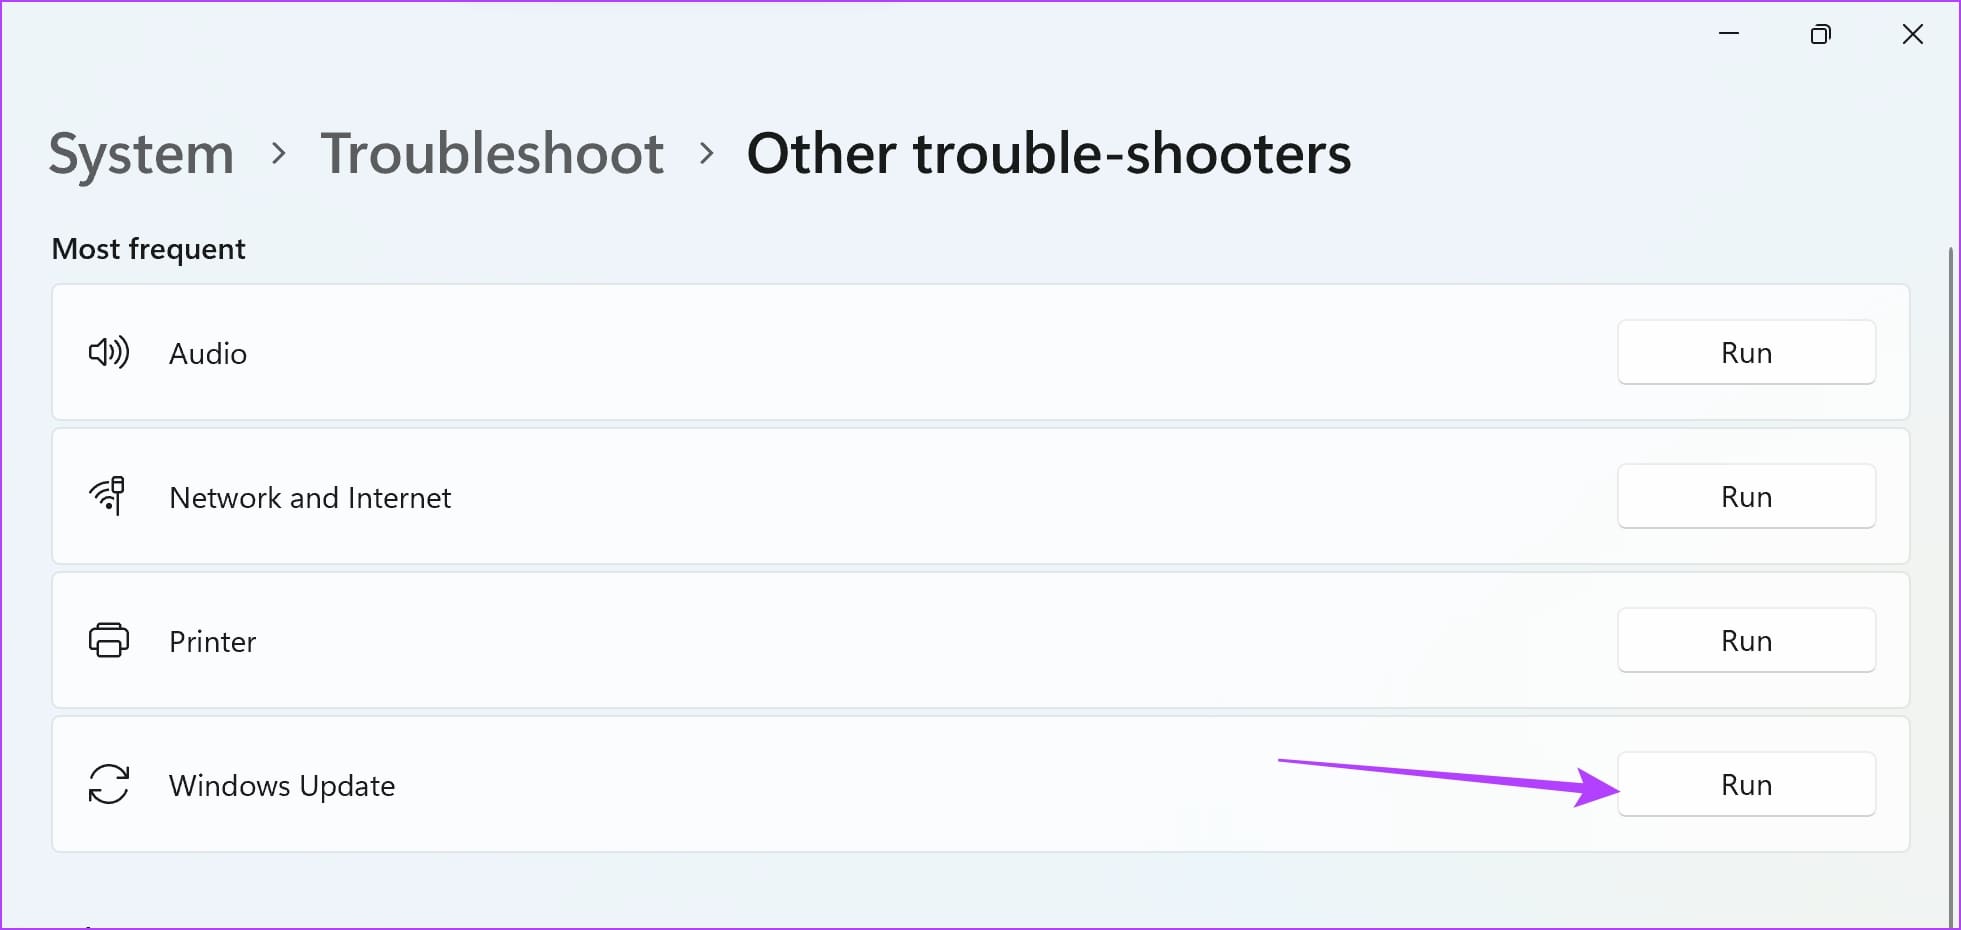
Step 3: Click on Other trouble-shooters.
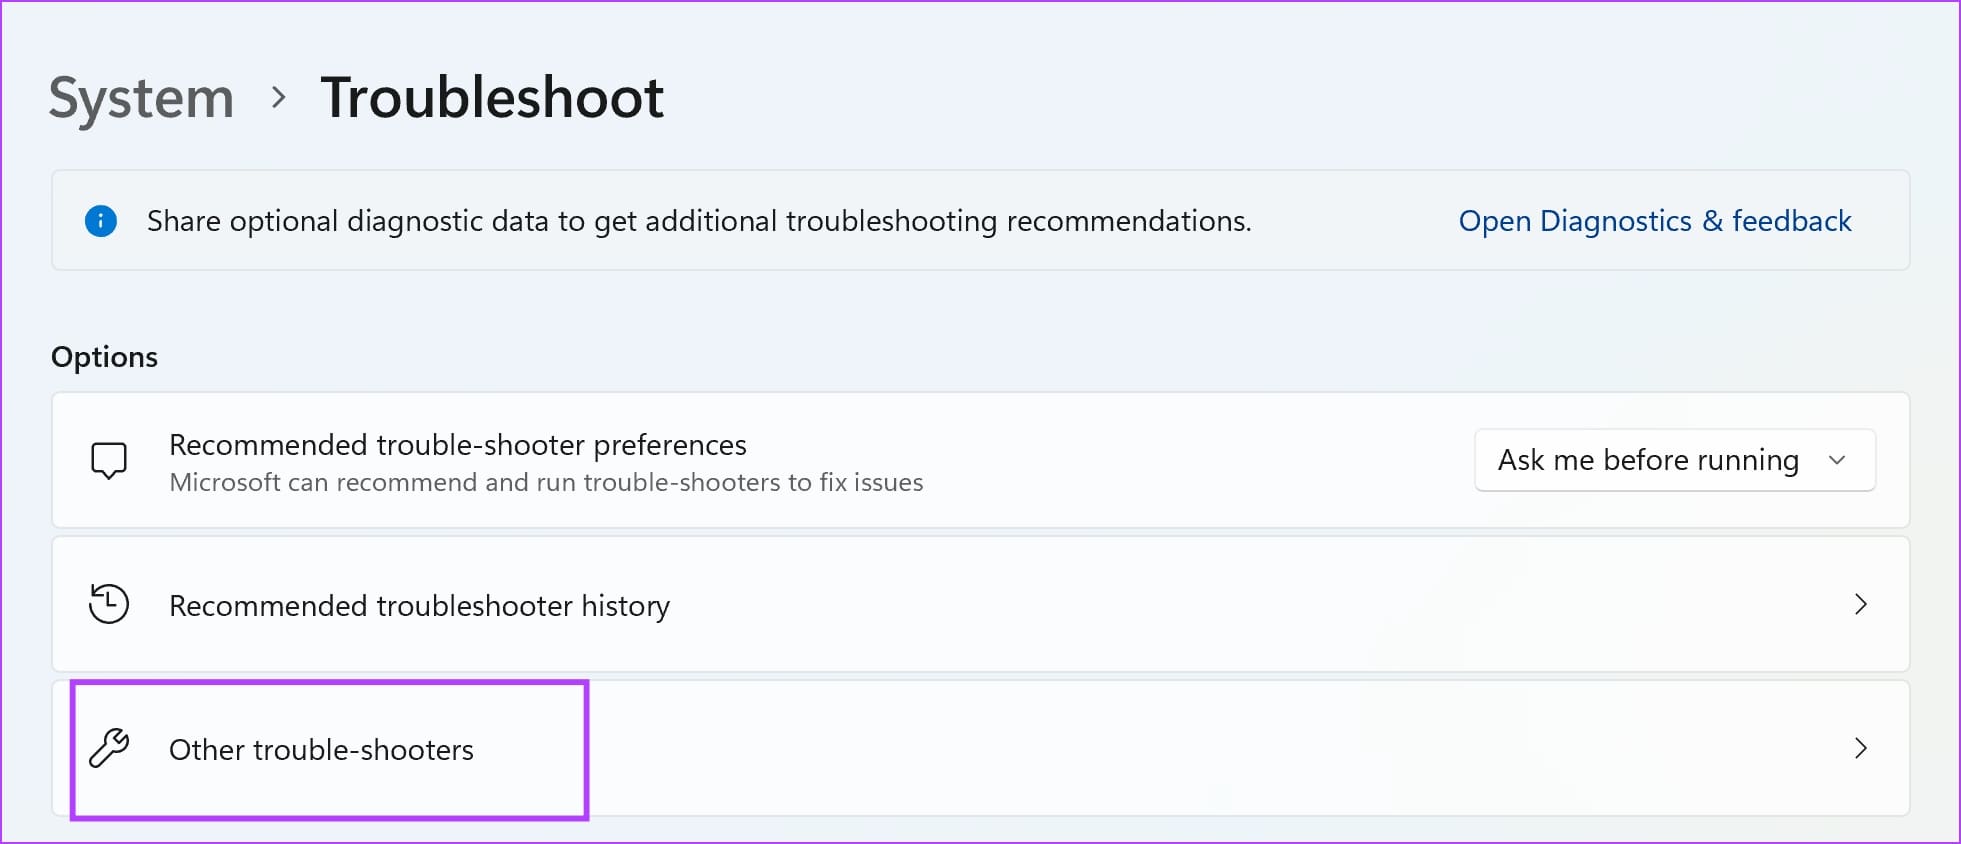
Step 4: Click on Run next to Windows Update. This will open the troubleshooter, and you can follow the on-screen instructions to fix the problem.
Go back to Windows Updates, and check if the above method fixed the issue.
Fix 2: Restart Windows Update Service
Restarting the Windows Update Service on your PC can resolve the issue by eliminating any bugs and corrupted processes.
Step 1: Open the Services app on your PC using the start menu.

Step 2: In the list of services, scroll down and right-click on Windows Update > select Restart.
This will restart the Windows Update service, and you can try checking for an update once again.

Fix 3: Manually Reset Windows Update Service
You can use Command Prompt to restart all the components of the Windows Update Service. This can resolve any temporary bugs and glitches.
Step 1: Open Command Prompt as an administrator.

Step 2: Enter the commands one after the other.
net stop wuauserv
net stop cryptSvc
net stop bits
net stop msiserver
net start wuauserv
net start cryptSvc
net start bits
net start msiserver
Go to Windows Update and check if the problem is solved.

Fix 4: Delete datastore.edb File
Deleting the datastore.edb file can resolve Windows Update issues by removing a corrupted database.
Step 1: Open Command Prompt as an administrator. To safely delete the file later, you must stop the update services first. Run the following commands one after the other:
net stop wuauserv
net stop bits
Step 2: Now, go to the following folder and delete the DataStore.edb file.
C:\Windows\SoftwareDistribution\DataStore

Was this helpful?
Thanks for your feedback!
Last updated on 19 July, 2024
The article above may contain affiliate links which help support Guiding Tech. The content remains unbiased and authentic and will never affect our editorial integrity.