

Бесконечная подготовка автоматического восстановления Windows
Если вы включаете компьютер, а на мониторе вместо привычного экрана загрузки отображается фраза «Готовится автоматическое восстановление», это значит, что операционная система пытается исправить какие-то критические для её работы ошибки. Если так продолжается долго, значит, ей это не удается.
В этой статье мы рассмотрим, почему возникает ошибка подготовки автоматического восстановления Windows 10 и что можно сделать.
Почему так происходит
Причины появления ошибки с циклической подготовкой автовосстановления:
- Некорректное выключение ПК — без использования кнопки «Пуск», нажатием на кнопку выключения на ноутбуке или системном блоке. Сюда же относится сбой питания или сбой в работе операционной системы (ОС). Из-за нештатного выключения могут повредиться файлы, отвечающие за работоспособность ОС, или реестр.
- Повреждение системных файлов или драйверов из-за вирусов, сбоев программ или обновлений. Вредоносный софт изменяет или удаляет важные компоненты Windows 10, блокирует доступ к ним.
- Конфликты между установленными драйверами и обновлениями, приводящие к появлению «черного экрана» или ошибки.
- Мало свободного места в системном разделе диска. Для корректной работы Виндовс 10 требуется не менее трех гигабайт свободного пространства на диске C, где хранятся системные файлы. Если это пространство заканчивается, ОС будет«висеть», работать нестабильно или перестанет загружаться.
В во всех этих случаях операционная система пытается решить проблему самостоятельно, запуская процедуру восстановления в автоматическом режиме. Когда у неё это не получается, необходимо вмешательство пользователя. Расскажем, что можно предпринять.
Загрузка компьютера в безопасном режиме
Когда подготовка автоматического восстановления Windows 10 не завершается благополучно, в первую очередь нужно воспользоваться безопасным режимом.
В этом режиме запускается минимум программ и драйверов: только самые нужные. Это позволяет избежать конфликтов с потенциально проблемными компонентами, проверить и вернуть операционную систему в рабочее состояние даже в случае «чёрного экрана».
Раньше в такой режим можно было зайти, нажав F8 в процессе перезагрузки системы, но в Windows 10 придется использовать более сложный способ, описанный ниже.
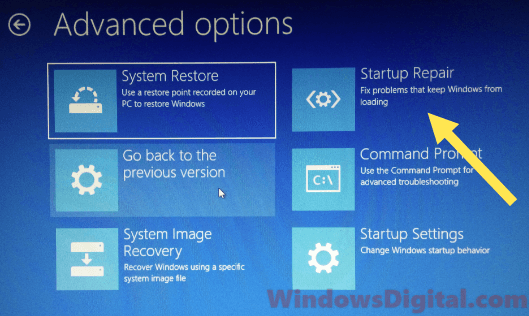
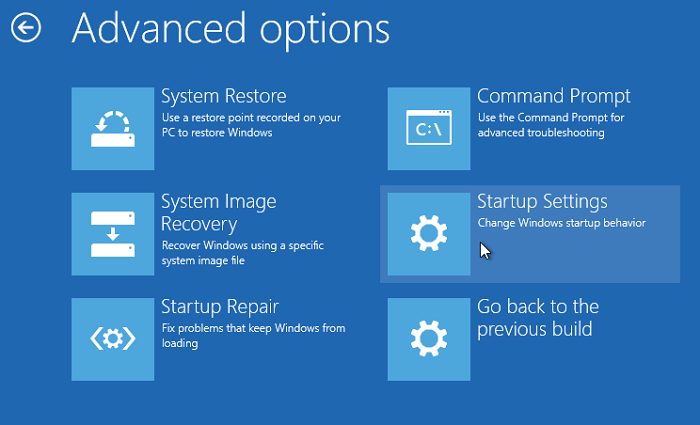
После автоматической диагностики отобразится экран автовосстановления. Нажмите кнопку «Дополнительные параметры»:

Затем перейдите в «Поиск неисправностей» и снова выберите опцию «Дополнительные параметры»:

- Щелкните на «Устранение неполадок»;
- Внутри откройте раздел «Дополнительные параметры»;
- Перейдите в меню «Параметры загрузки»;
- Внутри нажмите «Перезагрузить»;

- После перезагрузки ПК на мониторе отобразятся опции загрузки Windows 10. Чтобы загрузиться в безопасном режиме с поддержкой сети, то есть подключением к интернету, нажмите клавишу F5.

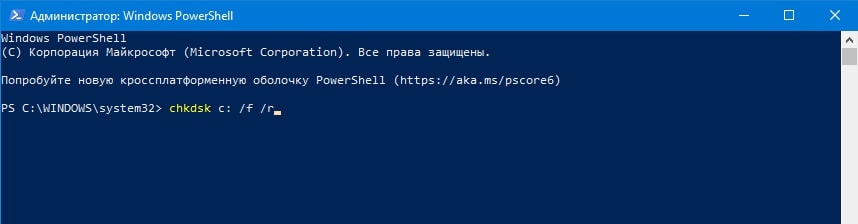
После того, как ваш компьютер включился в этом особом режиме, нужно найти, что пошло не так:
- Запустите утилиту проверки HDD (chkdsk), чтобы проверить, какие ошибки или поврежденные сектора удастся обнаружить. Для этого откройте командную строку (ее можно вызвать просто через поиск на панели управления) и введите в ней команду chkdsk c: /f /r (здесь c: это буква системного раздела, если система установлена на другом диске, то замените букву).
Команда инициирует проверку диска с исправлением ошибок и поиском поврежденных секторов.

- Удалите недавно установленные обновления ОС, из-за которых могли возникнуть конфликты или ошибки. Нажмите «Удалить обновления» и выберите «Удалить последнее обновление компонентов»;
- Проверьте, сколько места есть на диске с системой. Освободите как минимум три гигабайта;
- Перезагрузите ПК, проверьте, загружается ли Windows 10 без ошибок. Если компьютер все еще не включается корректно, попробуйте следующий способ.
Обновление или переустановка драйверов
Еще одна возможная причина бесконечной подготовки автоматического восстановления Windows 10 — некорректная работа драйверов. Так называются небольшие утилиты, обеспечивающие взаимодействие ОС с аппаратной частью ПК.
Если драйверы не подходят к вашей модели устройства или они не совместимы с установленной версией ОС, они может вызывать проблемы при загрузке Windows. Чтобы исправить это, нужно обновить или переустановить драйверы для некоторых устройств:
- Чипсет — набор микросхем на материнской плате , отвечающий за корректную работу шины данных, контроллеров памяти, жёсткого диска. Именно драйвер чипсета обеспечивает правильное распределение ресурсов и оптимизацию работы системы.
- Управление электропитанием — функция ОС и аппаратного обеспечения компьютера или ноутбука, позволяющая экономить энергию за счет перевода устройств в режимы энергосбережения: сна, гибернации или выключения. Драйвер управления электропитанием координирует работу этой функции и предотвращает возможные конфликты при переключении режимов.
- Другие устройства — все остальные компоненты: GPU, CPU, сетевая карта, клавиатура, мышь. Для корректного распознавания этих устройств тоже нужны драйверы.
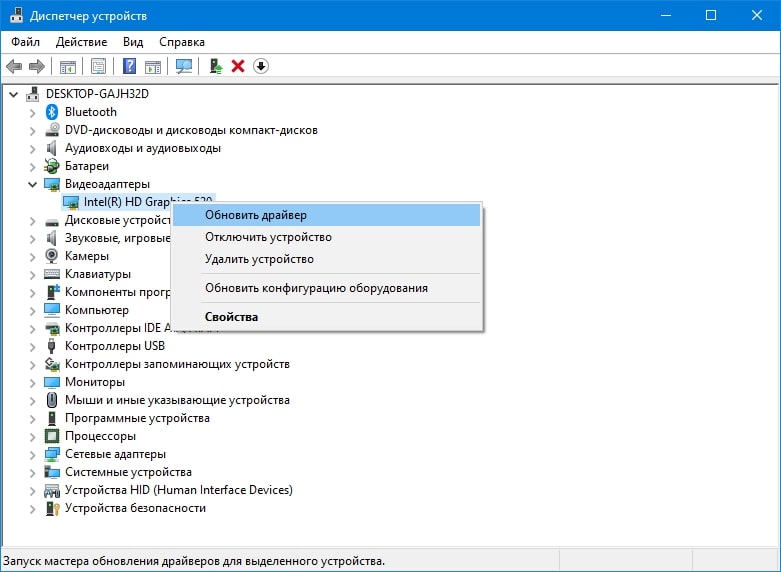
Чтобы исправить возможные проблемы с драйверами::
- В панели «Пуск» найдите диспетчер устройств.
- Правой кнопкой мыши кликните по нужному устройству.
- Нажмите «Обновить драйвер», а дальше следуйте подсказкам. Можно доверить ОС найти и скачать его самой или указать путь к скачанному вами драйверу. Рекомендуем не загружать драйвера со сторонних сайтов, лучше скачать их напрямую с официального сайта производителя (например, Леново, Асус, HP).

- Если вы хотите не обновить существующий, а заново установить драйвер, нажмите «Удалить», подтвердите действие и перезагрузите компьютер. После перезагрузки ОС сама найдет и поставит нужный драйвер.
Снова перезагрузите компьютер и проверьте, загружается ли он теперь корректно.
Отключение быстрого запуска
Особенности работы этой функции — еще одна возможная причина, почему висит подготовка автоматического восстановления.
Быстрый запуск в «десятке» включен по умолчанию. Это помогает уменьшить время, за которое загружается система, благодаря тому, что часть системных данных сохраняется в специальном файле, который называется «hiberfil.sys». Когда компьютер включается, эти данные сразу подгружаются в оперативную память и восстанавливают состояние ОС.
Функция может приводить к конфликтам в том случае, когда компьютер выходит из режима гибернации, а в системе или подключенном оборудовании произошли изменения. Так получается потому что в таком случае данные больше не соответствуют тем, что сохранены в специальном файле.
Для решения проблемы нужно отключить быстрый запуск. Это можно сделать двумя способами.
Через настройки питания
- Перейдите в панель управления (нажмите левой клавишей мыши на кнопку «Пуск», а потом на «Панель управления»);
- Выберите «Система и безопасность»;
- Дальше вам нужен пункт «Питание»;
- Потом кликните на опцию «Действия кнопок»;
- Нажмите на «Редактирование параметров, недоступных сейчас»;
- Кликните на отметку «Деактивировать быстрый запуск»;
- Выберите «Сохранить изменения».
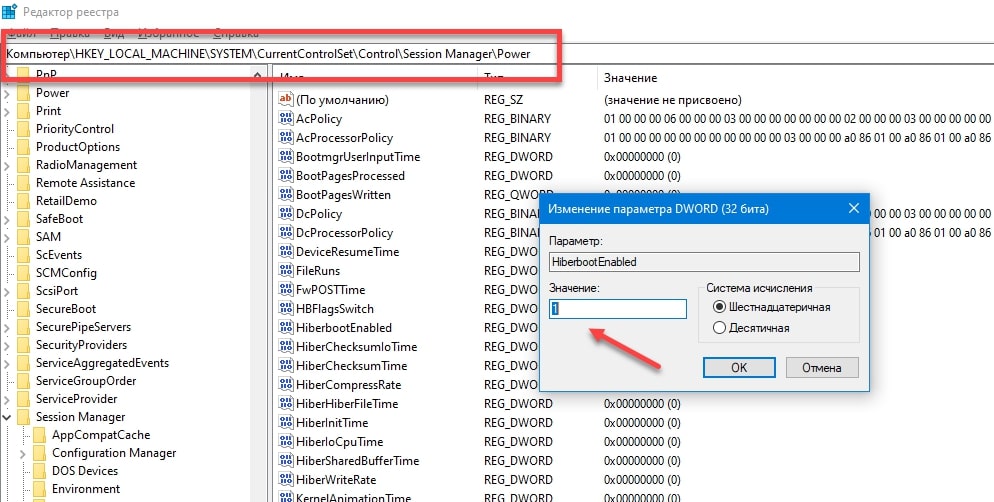
Через реестр
- Нажмите комбинацию «горячих» клавиш «Win + R», введите команду regedit;

- Откройте ветку HKEY_LOCAL_MACHINE\SYSTEM\CurrentControlSet\Control\Session Manager\Power;
- Выберите HiberbootEnabled и дважды кликните по нему;;
- Измените значение параметра на 0 вместо 1, подтвердите, нажав «ОК».

Перезагрузите ПК и проверьте, загружается ли Windows 10 нормально.
Системные средства автоматического восстановления
Эти функции проверяют состояние аппаратной части ПК, помогают восстановить поврежденные или утерянные системные файлы из резервной копии, позволяют сбросить систему до заводских настроек.
- При появлении экрана «Автоматическое восстановление» выберите опцию «Дополнительные параметры»;
- Затем нажмите на «Устранение неполадок».
Отобразятся варианты действий:
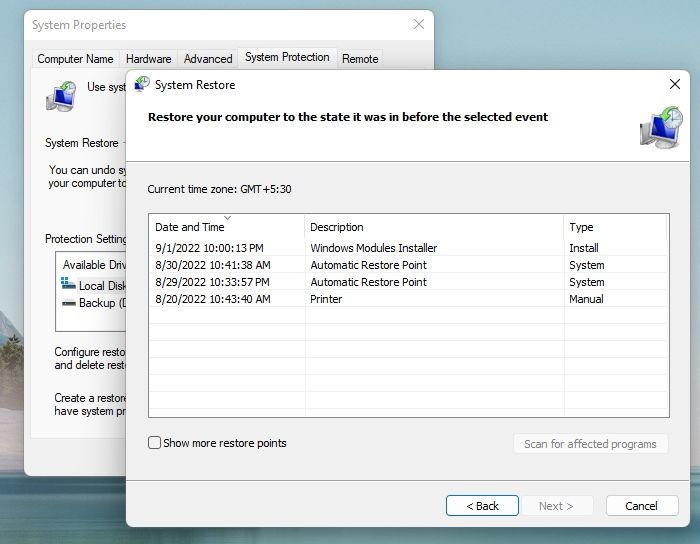
- Точка восстановления — эта функция «откатывает» все изменения в системе к тому состоянию, которое было на определенную дату. Актуально в тех случаях, когда проблемы с загрузкой возникли в результате установки каких-то программ или обновлений, которые повлияли на работу системы.
Для восстановления выберите соответствующий пункт, укажите одну из доступных точек по дате и описанию. Подтвердите начало процесса восстановления, дождитесь его завершения.
- Сброс системы до заводских настроек — функция, которая полностью очистит HDD от всей информации и установит заново операционную систему. Эту опцию можно использовать, если не получается убрать проблему с загрузкой ОС рассмотренными выше способами.
Для сброса нужно выбрать соответствующий пункт. Далее один из двух вариантов: «Сохранить мои файлы» или «Удалить все». Первый способ позволит сохранить личные файлы (документы, фотографии, музыку и т.д.), но удалит программы и настройки. Второй приведет к полной очистке жесткого диска и установке чистой копии операционной системы.
После использования одного из инструментов автоматического восстановления перезагрузите ПК и проверьте работоспособность системы.
Кратко о том, что делать, когда компьютер по кругу пытается восстановить Windows
- Попробуйте загрузить систему в безопасном режиме. Далее: выполните проверку HDD на ошибки, удалите последние установленные обновления, проверьте, достаточно ли места на жёстком диске;;
- Обновите, либо заново переустановите драйверы для CPU, управления электропитанием, GPU;
- Отключите функцию быстрого запуска, приводящую к конфликтам при восстановлении из режима гибернации;
- Используйте средства автоматического восстановления, предлагаемые ОС: сброс системы до заводских настроек или восстановление из образа системы.
Техническое обслуживание HYPERPC
Компания HYPERPC специализируется на профессиональном обслуживании ПК и ноутбуков. Мы делаем ремонт качественно и быстро, так что ваша техника будет находиться в надежных руках. Сервис-центр HYPERPC.
If you’re dealing with a boot error or other problem that requires you to reset your Windows 11 or Windows 10 PC, you might also bump into another issue where the “Resetting this PC” process gets stuck at a certain percentages, such as (specifically) 1%, 99%, 64%, 34%, 35%, 42%, 43%, or 12%. In many cases, you might also see an extra error message that says “There was a problem resetting your PC“. In this guide, we’ll show you what you can do to fix the problem.
Also see: Windows 11/10 “Diagnosing your PC” Startup Repair Loop
Reasons for Windows 10 or 11 factory reset stuck
The Windows factory reset process can get stuck due to several reasons. One of the most common causes is corrupted system files. This can happen at any percentage of the reset process, but it is more likely to occur at 1% and 99%, and sometimes in the middle of the process, such as 64%. A lot of users from all over have had this problem.
How to fix windows 11 or 10 reset stuck issues
The below are some solutions you can try to fix the issue of Windows factory reset getting stuck at various percentages, such as 1%, 99%, or others.
Wait for the process to complete
Sometimes, it might look like nothing is happening, but the reset is still going on in the background. So, first try waiting for a couple of hours to see if it finishes on its own. If it’s taking too long, then try the other methods below.
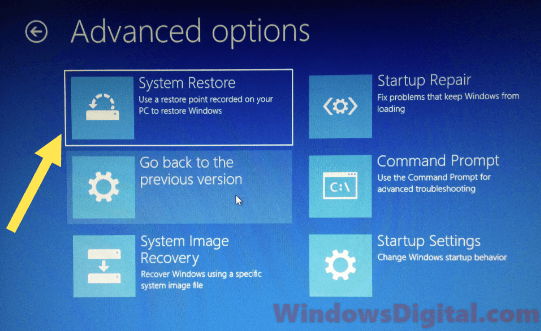
System restore your Windows 10 or 11
If you have a system restore point or image saved previously, you can use it to restore your PC to an earlier date. This assumes that your computer was working properly when the system image was created. To do this, you need to boot into Windows Recovery Environment, since you can’t boot into Windows now. Here are the steps:
- Hold and press the power button of your computer to force it to shut down.
- Switch it on again. As soon as it gets past the BIOS screen, force another shut down.
- Repeat this for 3 times. When Windows detects unusual startup, it will boot into Windows Recovery automatically.
In the Windows Recovery, navigate to Troubleshoot > Advanced Options > System Restore. Follow the on-screen instructions to restore your PC to an earlier date. See also: How to System Restore Windows 11 or 10 to a Previous Date.
While you are at the Windows Recovery screen, you may also want to try re-running the Windows reset from there.
Run startup repair
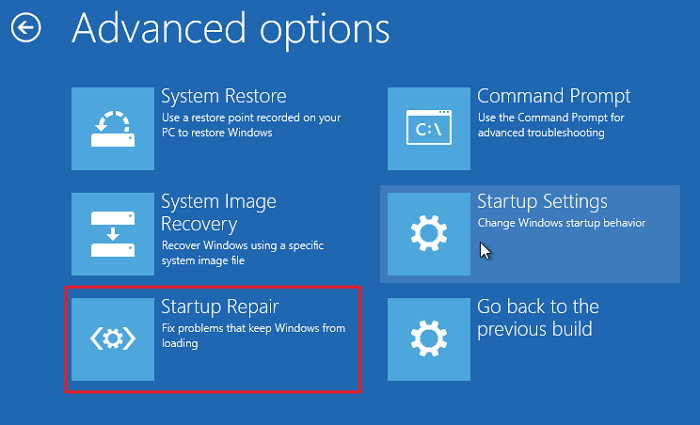
If you don’t have a restore point to revert to, try running startup repair for your Windows 10 or Windows 11. This has solved the Windows factory reset stuck issue for many users. If you have a bootable Windows installation disk, insert it into your computer and set your BIOS to boot the disk first. When it’s booted up, choose “Repair your computer” from the Windows installation interface. Next, navigate to Troubleshoot > Advanced Options > Startup Repair.
If you don’t have a Windows installation disc, you can still run the startup repair from Windows Recovery Environment. Follow the steps outlined in the first solution above to boot into Windows Recovery, and then navigate to Troubleshoot > Advanced Options > Startup Repair. Follow the on-screen instructions to complete the startup repair.
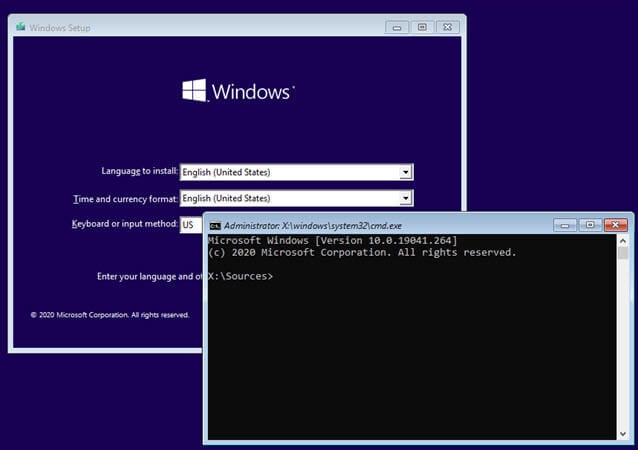
You may also want to try running command line repair tools such as SFC, DISM or CHKDSK using the Command Prompt via Windows RE. For detailed guide on how to do this, see: How to startup repair Windows 11 or 10 using Command Prompt.
Clean install Windows
If nothing works to fix the Windows factory reset stuck issue, the last resort is to reinstall your Windows. Doing this will lose all your files and data on the previous Windows installation, so make sure to backup your important files first.
There are several methods and tools to backup your files when you can’t boot into Windows. The easiest and cost-free method would be to remove the hard disk drives from the problem computer and put them into another working computer. This will allow another Windows PC to read and copy the files in the HDD.
To clean install Windows, you need to first create a bootable Windows 11 or 10 installation media. After that, insert the installation disc into your computer and set your BIOS to boot from the disk first. Once you’re on the “Install Windows” screen, just follow the on-screen instructions to complete the process. Note that this will include formatting your existing hard disk drives.
System Restore is frequently regarded as the most proper troubleshooting technique when a significant error occurs and alternative remedies don’t seem to be working. You have a Windows 10 backup on an external hard drive, but we have come across many people complaining that the Windows 10/11 system restore is taking a long time.
There is no need to worry, though. This post will help and walk you through the working solutions that aren’t too time-consuming to successfully get rid of the Windows 10/11 system restore taking a long time error.
However, before we start, you should know this.
System Restore takes a maximum of an hour to restore. If it has only been a few minutes after restoring the system, I suggest you give the procedure at least an hour to run undisturbed.
However, if it still fails, the system files, the restore point, or background applications incompatible with System Restore are the most likely culprits when Windows System Restore is stuck.
It is normal as it depends on the amount of data and PC configuration. Technically speaking, a System Restore could take up to two hours. Stopping a System Restore once it has been started puts your system at considerable risk of damage. So, it is essential to note that the number of files stored in your hard drive affects how long it takes to restore Windows 10 or 11. Other reasons for the extended time taken for System Restore are given as follows.
- 1. System restore gets interrupted
- 2. Hard drive is full
- 3. Old backup is too big
- 4. System crash
System restore gets interrupted
Interruptions like the System Restore freezing up, or Windows 10/11 Reset taking a long time can make the user feel obliged to force the system to shut down. It can result in not being able to boot the system back. Internal procedures are present in both System Restore and Windows 11/10 Reset. Some of these are important, and failing to perform them could leave Windows unusable.
Hard drive is full
System Restore operates by creating a copy of everything it saves in a pre-designated location on the hard drive. When this space is full, the oldest restore points are deleted to make way for new ones. It can happen every time a restore is created or when it’s running low on the amount of storage allocated to System Restore.
If your primary storage is running low on storage space, System restore will not have enough temporary space to manage everything. Too much data on your hard drive might slow down your computer and cause the system to freeze and crash.
The following article may help you if you want to learn more about hard drive cloning:
Old backup is too big
System Restore takes up a substantial amount of storage on your hard drive. So, you might want to delete some of your old backed-up data, plus you might want to reduce the amount of data the process creates when the space on your device is low. Create a System Restore Point before significantly modifying your Windows 10/11 system.
System crash
The restoration of the system files or registry backup may not be complete if the system crashes during the ongoing process. It might again lead to longer hours of Windows taking time for System Restore.
How Do I Know If System Restore Is Stuck or Not
Sometimes you may meet such an issue of the System Restore not working. Or One of the more frequent issues that may arise during the system restore process is when one tries to interrupt the process, causing the System Restore to get stuck. Let the process do its job and not interrupt it is always essential.
How long does the restoration process take? It usually takes 30 to 45 minutes for the process to complete. If it takes more than the given time frame, refer to the solutions below to fasten the System Restore process.
- Method 1: Implement System Restore in Safe Mode
- Method 2: Implement Startup Repair
- Method 3: Run SFC
Method 1: Implement System Restore in Safe Mode
The first thing to do if your system is stuck on the starting screen or file recovery is to wait, particularly if the restore point holds a lot of data (So it is necessary to know how to backup files in safe mode Windows 10 early). If Windows 10 System Restore hangs for longer than an hour, try forcing a shutdown. Restart your computer and you are back in the account, boot the computer in Safe mode, and then perform a restore.
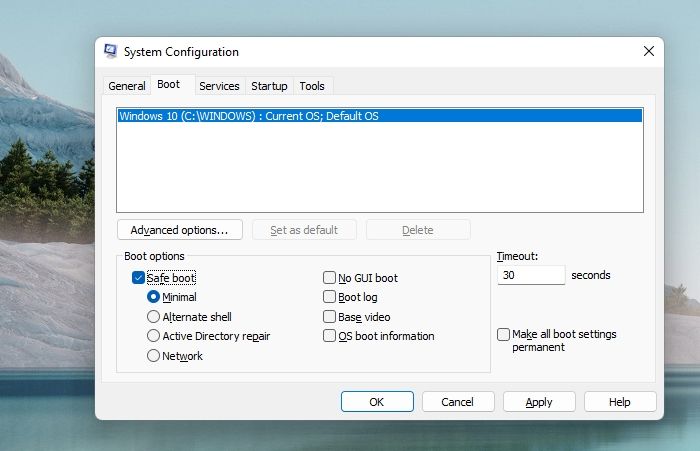
- Press the Windows logo key + R.
- Type msconfig in the Open box and then select OK.
- Select the Boot tab.
- Under Boot options, check the Safe bootcheckbox.
- Apply and Restart.
Method 2: Implement Startup Repair
The boot manager’s malfunction is one of the potential causes. You can easily fix it in this situation using Startup Repair. Go to Advanced Recovery, select Startup Repair under Choose an option > Troubleshoot > Advanced Options > Startup Repair. If this doesn’t solve the problem, try the next one.
Method 3: Run SFC
The Windows System File Check (SFC.exe) program allows you to check for system file corruption. Any corrupted files identified will attempt to be restored. There may be some damaged files if System Restore takes way longer than expected.

Fix Windows 10/11 System Restore Taking a Long Time Issue
Below are the solutions to resolve Windows 10/11 System Restore taking a long time. Before starting, you must first run any Antivirus software in your system to eliminate any active viruses and malware. There are four solutions mentioned below, and one of these solutions is sure to help you resolve the issue immediately.
- 1. Use Windows Backup and Restore Software
- 2. Perform System Restore in Safe Mode
- 3. Run Startup Repair
- 4. Run SFC Scan and Try Another Restore Point
1. Use Windows Backup and Restore Software
To help you back up and restore software, you can download EaseUS Todo Backup Home for free for 30 days. It is a dependable Windows backup and system restore software that supports backup and restore OS on all versions of Windows, including Windows 11 and Windows 10.
EaseUS Todo Backup generates a protected and encrypted partition known as Security Zone for users who have stored backed-up files in the local drive. Malware or viruses will be unable to access it when it is formed. Therefore, you can still preserve backed-up files and restore data from them even if your system is attacked.
Through its simple interface, EaseUS Todo Backup enables you to back up either specific files or your entire computer. Select the backup you want to make to get started, and the application will handle the rest.
Since System Restores can fail at times, it would be best that you can take a backup using EaseUS Todo Backup and then try System Restore.
The following steps will help you use it well:
Step 1. Launch EaseUS Todo Backup on your computer, and click Create Backup on the home screen and then hit the big question mark to select backup contents.

Step 2. To back up your Windows operating system, click «OS» to begin the backup task.

Step 3. Your Windows operating system information and all system related files and partitions will be automatically selected so you don’t need to do any manual selection at this step. Next, you’ll need to choose a location to save the system image backup by clicking the illustrated area.

Step 4. The backup location can be another local drive on your computer, an external hard drive, network, cloud or NAS. Generally, we recommend you use an external physical drive or cloud to preserve the system backup files.

Step 5. Customiztion settings like enabling an automatic backup schedule in daily, weekly, monthly, or upon an event, and making a differential and incremental backup are available in the Options button if you’re interested. Click «Backup Now«, and the Windows system backup process will begin. The completed backup task will display on the left side in a card style.

2. Perform System Restore in Safe Mode
You can make a backup of your computer’s System Files, Registry Files, and System Settings using the System Restore feature in Windows. You can apply this saved «System Restore Point» to reverse any recent modifications that might have caused issues with your system.
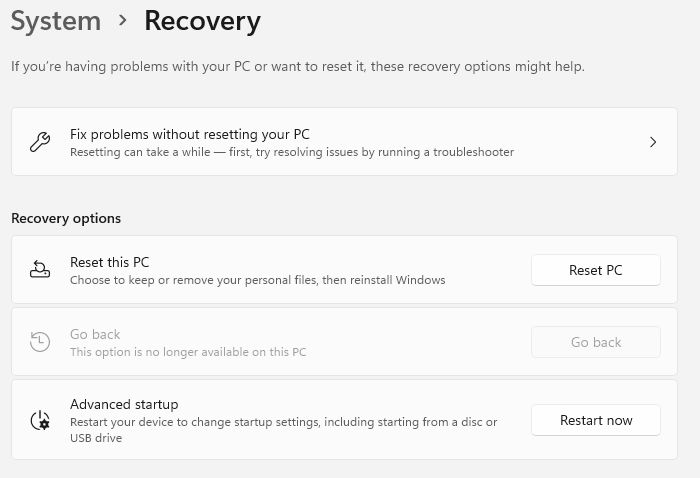
Step 1: Go to Settings (Win + I) > Update & Security or Windows Update. Click on Recovery, and then click on Restart Now next to the Advanced Startup button.

Step 2: After the computer restarts, go to Troubleshoot > Advanced options > Startup Settings and click on the Restart button. Press the F4 key while the computer restarts. It will take the PC into Safe Mode.
Step 3: Go to Settings > System and pick the About tab on the left pane once the computer has started in Safe Mode. Scroll down to Related Settings in the right-pane and click the System Protection option.
Step 4: Click on the Next button, select the Restore Point you want to choose, and click on the Next button.
Now, wait for the Restore Process to finish. You will receive a pop-up notification once the restoration process is finished letting you know that your system has been restored. The System Restore Process will undo recent changes that must have led to the issues on your computer and return it to its previous state.
3. Run Startup Repair
The Startup Repair tool in Windows 10/11 can correct issues with files that are required to boot the operating system on a functional desktop. You can still use this utility to repair your Windows 10/11 installation, even if it is defective.
Step 1: Press Win+I on the keyboard to open the Settings app.
Step 2: Find Update & Security and choose the Recovery tab.
Step 3: Click Restart Now under Advanced Startup.
Step 4: Go to Troubleshoot>Advanced Options>Startup Repair.
4. Run SFC Scan and Try Another Restore Point
System File Checker (SFC) is a helpful tool for scanning and fixing protected system files. It is the simplest and quickest method for evaluating your computer’s stability, spotting installation and update issues, and, when possible, locating replacements for lost or damaged files. SFC runs on Windows 7, 8, 10, or 11, but it is always better to keep your system updated. Run SFC and see whether the problem gets solved.
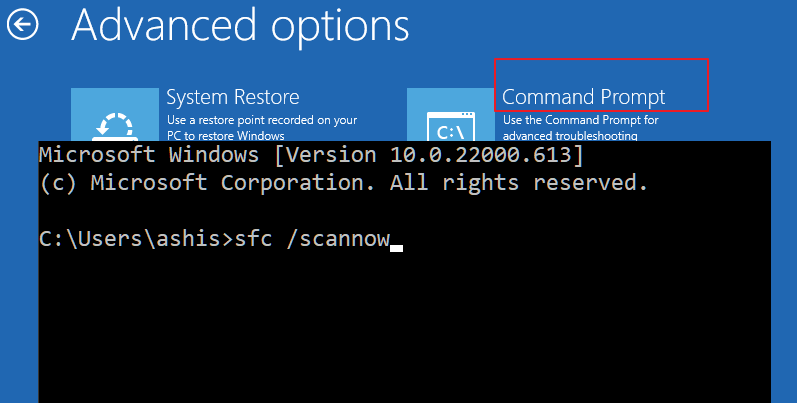
Step 1: Boot into Advanced Recover using a bootable system. You need to do it only when the PC is not bootable anymore.
Step 2: Go to Choose an option > Troubleshoot > Advanced Options > Command Prompt.
Step 3: Select an account, then type the password.
Step 4: In the pop-out box, type the command sfc /scannow to search for missing or damaged system files on Windows 10/11.
Step 5: Go back to Advanced Options, and run System Restore when the verification is complete to see if any delay is still there in restoring files.
Conclusion
Before you begin the system restore process, ensure you back up all the data in case any system error occurs with the EaseUS Todo Backup tool. Try the given solutions in the article; if one fails, try the next one. It should help you make the system restoration much smoother and quicker.
FAQs About Windows System Restore Taking a Long Time Issue
These frequently asked questions pop up during a slow System Restore process. You can check out these answers if you have any doubts.
1. What Happens If I Interrupt System Restore in Windows 10?
The system files or registry backup recovery will not be completed if you interrupt the process. It can result in a partially complete process and may result in data corruption, boot record corruption, and many issues.
2. What Do I Do If System Restore Fails in Windows 10?
- Verify the functionality of Volume Shadow Copy and Virtual Disk on the desktop.
- Check for any corruptions and run an uncheck disk on the hard drive.
- Start the System File Checker. To determine whether any corrupted system files may be the root of this problem, a System File Checker (SFC) scan is performed.
3. How to Stop System Restore Windows 10?
Hold the Power Button down for 5 to 10 seconds. You can perform a hard shutdown. Data or application loss could result from the restoration being interrupted.
If you want to reset Windows 10, you can choose to keep your files and Windows programs, but the reset procedure will remove any third-party apps you have installed.
4. What to Do If Windows 10 System Restore Stuck on Restarting?
Select Troubleshoot on the Choose an option screen. You can use Safe Mode after that. Select Restart under Advanced Options > Startup Settings. Select 5 or F5 to restart your computer in Safe Mode with Networking after it has restarted. Try to do a System Restore once the computer has booted in Safe Mode with Networking.
Does your PC get stuck at 1%, 8%, 12%, 33%, 66% or 99% while you reset Windows 10? If yes, how to fix the Windows 10 reset stuck black screen issue? In this post, we will walk you through some possible methods to help you out of resetting PC stuck.
Help, Windows 10 Is Stuck in Resetting!
As is well known, Windows 10 has become the newest Windows operating system and it is used by many users for quite some time because of its merits.
However, in this world, no operating system is perfect, is it right? Windows 10 is not an exception. While using the Windows 10 computer, quite a lot of users complain that the OS has some bugs leading to diverse complex problems in PC, but it is hard to solve these problems.
Once the computer encounters boot issues, for the most part, most Windows 10 users choose to reset Windows 10 to fix some problems.
However, some issues might happen, for example, Windows 10 Reset this PC button not working, Windows 10 reset stuck 99%, 66%, 33%, 12%, 8%, 1%, Windows 10 reset stuck just a moment, etc.
Usually, resetting this PC will take a few minutes; you can wait patiently. But, sometimes you will find this phenomenon: Windows 10 reset stuck on spinning circle for a few hours. So, you need to fix it instead.
Tip: In addition to the issue of resetting Windows 10 stuck, some users report Windows 10 restart stuck on black screen. If you are bothered this, refer to this post – Top 10 Ways to Fix Window 10 Stuck on Loading Screen Issue for help.
How to Fix Windows 10 Reset Stuck Black Screen
In many forums and blogs, many methods are introduced. Here, we will provide you with three reliable solutions to the Windows factory reset stuck problem..
Solution 1: Restore Your PC with System Image Backup
In recent times, data protection has caught many users’ eyes due to many common factors, such as virus influence, system failure, mistaken actions and so forth. Then, to back up the computer becomes a common thing for computer security.
Under most circumstances, you choose Windows 10 built-in Backup and Restore (Windows 7) tool to create a system image backup or use a piece of Windows backup software – MiniTool ShadowMaker to make a system backup or disk image backup so that your computer can be restored to a normal state in case of system failure.
When you get stuck on Windows 10 resetting black screen for a long time, if you have a system image file which is created ahead of time to an external hard drive, you can easily restore your computer to the earlier date and ensure your PC runs normally.
MiniTool ShadowMaker
Here, let’s firstly see how to use MiniTool ShadowMaker to do a system restore for fixing PC reset stuck:
In order to do a system restore with MiniTool ShadowMaker, you are only allowed to enter WinPE (Windows Preinstallation Environment) for this job. You can use Builder Media feature of this software to create a bootable USB flash drive or CD/DVD to go to WinPE.
So, just download its Trial Edition for a 30-day free trial to get MiniTool ShadowMaker Bootable Edition.
MiniTool ShadowMaker TrialClick to Download100%Clean & Safe
Then, enter BIOS to set the bootable disc as the first boot order to go to MiniTool ShadowMaker to solve the Windows 10 reset stuck black screen issue.
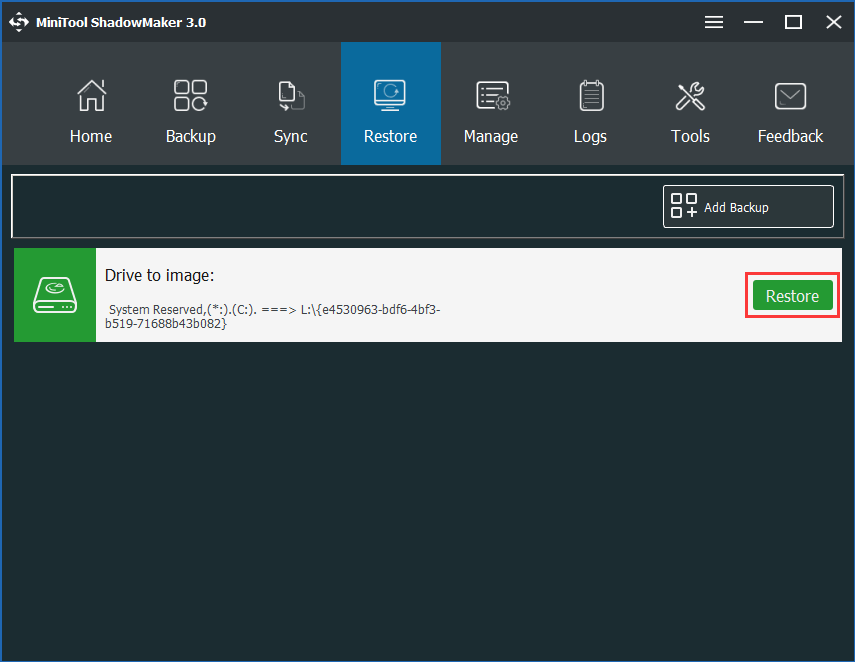
Step 1: In WinPE interface, you see MiniTool ShadowMaker will launch by itself to the Home page. Then, you need to enter the Restore page for system restore.
Step 2: Then, perhaps you can see the system backup you have created in this interface. And then click Restore to the next step.
Tip:
• If the backup image doesn’t appear in Restore page, just click Add Backup option to add the backup to the interface.
• In MiniTool ShadowMaker Bootable Edition, the drive letters of some partitions are variational. Thus, please add the correct backup file according to partition size.
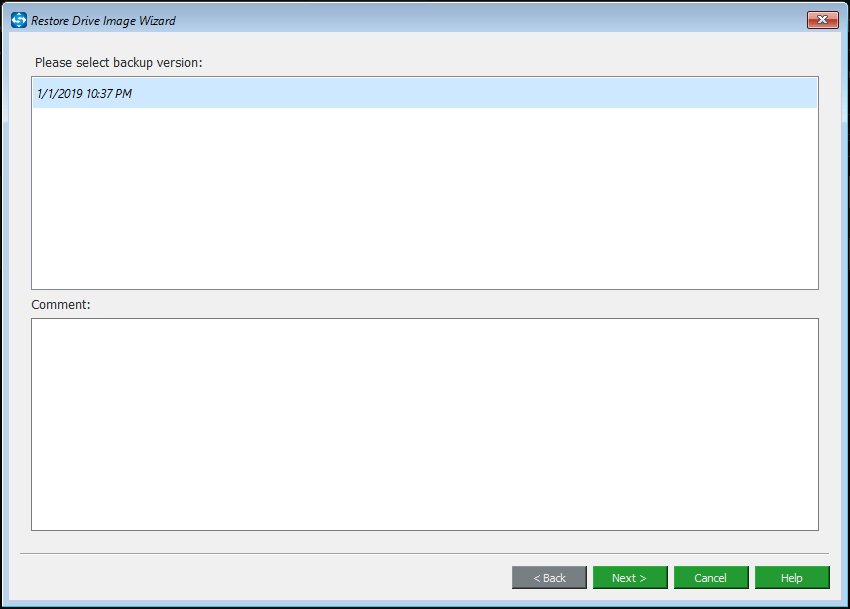
Step 3: Depending on the backup version, you can make sure whether this backup task is the one you want to restore. Click Next to go to step 4.
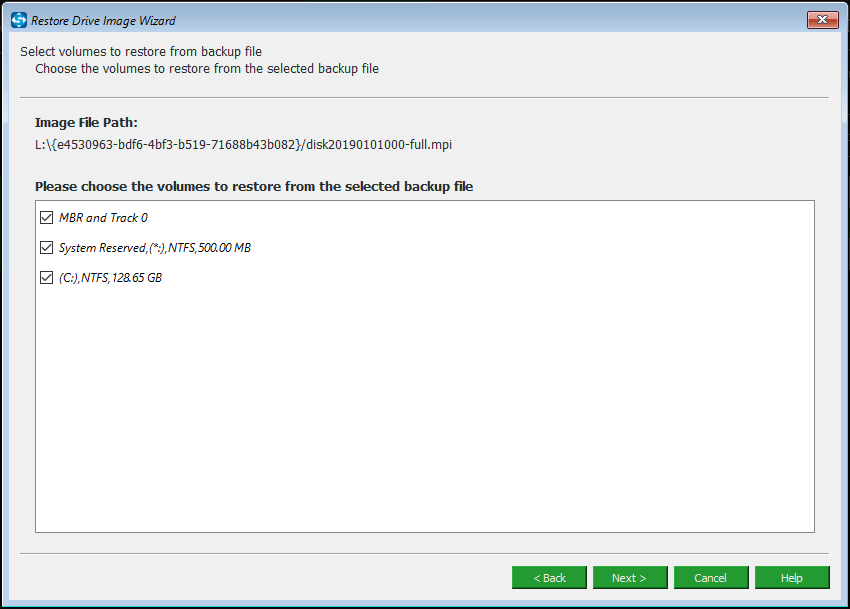
Step 4: By default, all partitions included in the selected backup file will be checked. Then you can choose the partitions you want to restore. But here, as to system restore, all system partitions are necessary.
Note: For a successful restoration to fix Windows 10 reset stuck on spinning circle issue, MBR and Track 0 must be checked.
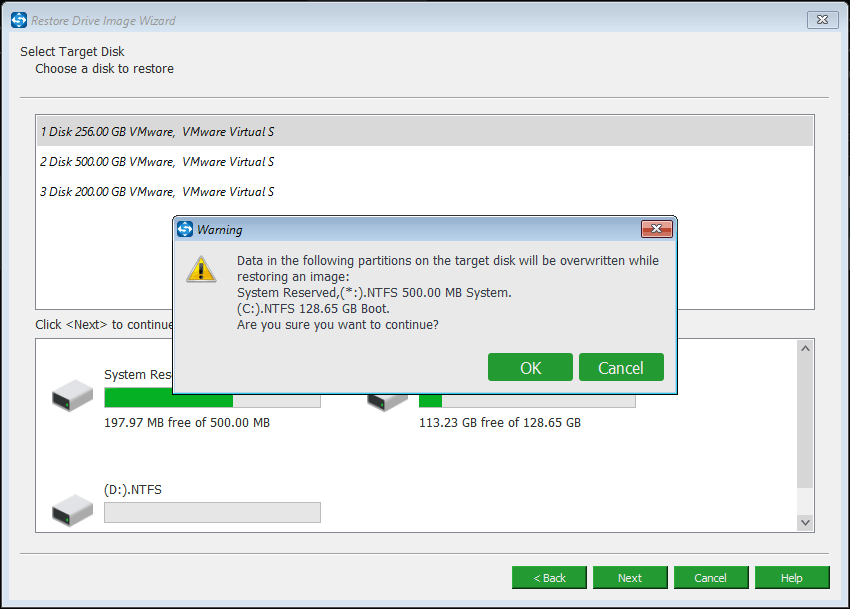
Step 5: Next, you need to choose a target disk which you can restore the system backup image to. Then click Start and OK button to continue.
Note:
1. You are not allowed to restore the backup image to a disk holding backup files.
2. When selecting the target disk, MiniTool ShadowMaker will inform you of the specific partition that will be overwritten by the image. Usually, the original system disk will be a good choice.
Step 6: Then MiniTool ShadowMaker will start to perform the restoration process. This operation will cost a few minutes. Please wait patiently.
Tip: The option Shut down the computer when the operation is completed is helpful for you.
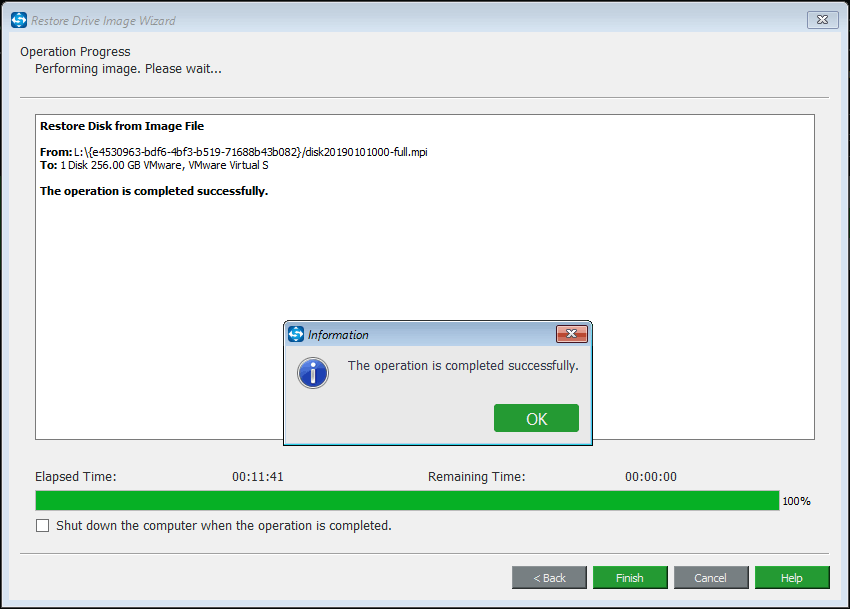
Like that, all the operations of system restore are finished effectively. Then, your Windows 10 can run normally.
If you have a system image file created by MiniTool ShadowMaker and you have Windows 10 stuck in resetting issue, just get MiniTool ShadowMaker to create a bootable disc and restore your Windows 10 to the previous date from the system backup.
MiniTool ShadowMaker TrialClick to Download100%Clean & Safe
“I used MiniTool ShadowMaker to back up my Windows 10. But now Windows 10 reset stuck at 1% issue happens. Fortunately, I successfully restore my computer to an earlier date. “Click to tweet
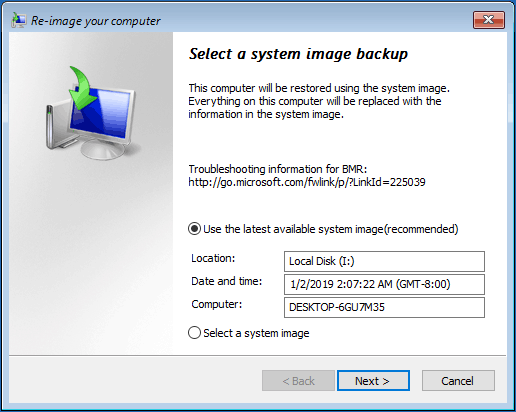
Windows 10 System Image Recovery in WinRE
If you have a system backup image which is not created by MiniTool ShadowMaker but Windows Backup and Restore (Windows 7), how can you fix Windows 10 stuck in resetting issue via the backup image? Follow the steps below.
When Windows 10 reset fails, the computer can’t boot to the desktop. In this case, you can go to WinRE (Windows Recovery Environment) to do the restoration.
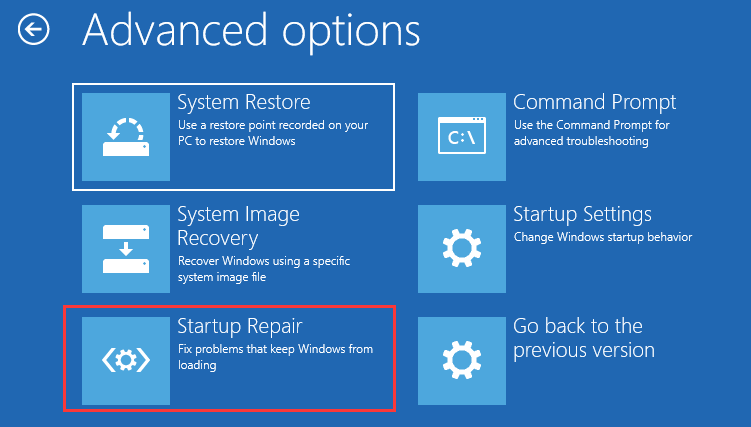
Navigate to Troubleshoot > Advanced options > System Image Recovery. Then follow the instructions to perform the recovery.
Solution 2: Run Startup Repair by Windows Repair Disc
If you don’t have a system backup made by MiniTool ShadowMaker or Windows built-in backup tool, how can you fix Windows 10 resetting this PC stuck issue? Don’t panic.
It is still easy and you can run Startup Repair to fix your computer by a bootable disc. Let’s look at the details.
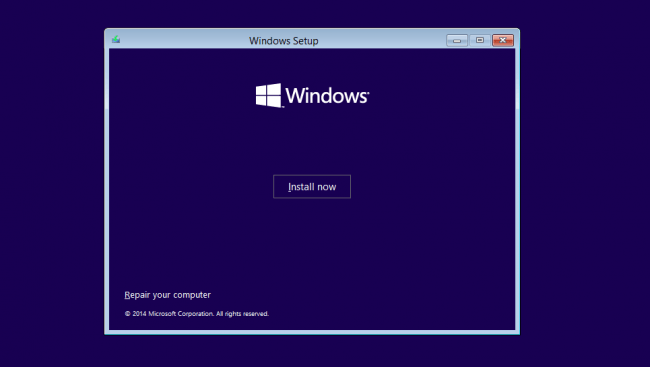
Step 1: You need to download Windows install files from the internet and then save it to a USB flash drive or a DVD.
Step 2: After you get ready the installation files, restart your computer from the bootable disc. In order to do the job, please go to your BIOS and set the USB drive or DVD as the first boot device by “↑↓” keys.
Step 3: Then when booting into Windows installation interface, you can see there is an option called Repair your computer, then, click it to Troubleshoot interface.
Step 4: Then navigate to Advanced options and run Startup Repair to fix the issue of resetting this PC stuck at 1, 8, 12, 33, 66, 99 percent.
Step 5: Choose an account and enter its password to fix resetting Windows 10 stuck issue.
Solution 3: Reinstall Windows 10
If you are bothered by Windows 10 reset stuck on spinning circle for a long time, you try to repair it according to solution 2, but finally, Windows 10 factory reset failed again.
In this case, what should you do?
You can only reinstall Windows 10 so that your computer won’t get stuck at 1%, 12%, 33%, 66% or 99% when resetting this PC. Please have a Windows installation disc ready and then perform an installation.
Tip: Windows reinstallation will cause data loss. Thus, we suggest backing up your important files with MiniTool ShadowMaker Bootable Edition. Just get it from MiniTool ShadowMaker Trial Edition.
MiniTool ShadowMaker TrialClick to Download100%Clean & Safe
When Windows 10 stuck on resetting this PC issue happens to your computer, don’t feel helpless. Try the above solutions to fix this problem and then enjoy the smooth computer.
How to Protect Your Computer
As you know, system issues are easy to happen to your computer, for example, the aforementioned Windows 10 reset stuck black screen issue.
In the second part, we advise you to restore your computer to the normal state with the system image backup. This way can help you to solve many system issues.
Thus it can be seen that to create a system backup is vital. When Windows 10 factory reset stuck happens, the computer can run normally after system restore.
If there is no such a backup, it is likely that you need to reinstall OS.
How can you create a system backup to protect your computer? Here are the details.
You can choose the professional backup and restore software – MiniTool ShadowMaker to do this work. Just get it from the following button.
MiniTool ShadowMaker TrialClick to Download100%Clean & Safe
Step 1: Enter the main interface.
Step 2: Navigate to the Backup page, and then you see MiniTool ShadowMaker has checked the system-related partitions in the current OS. And you need to choose the backup destination, for instance, an external hard drive.
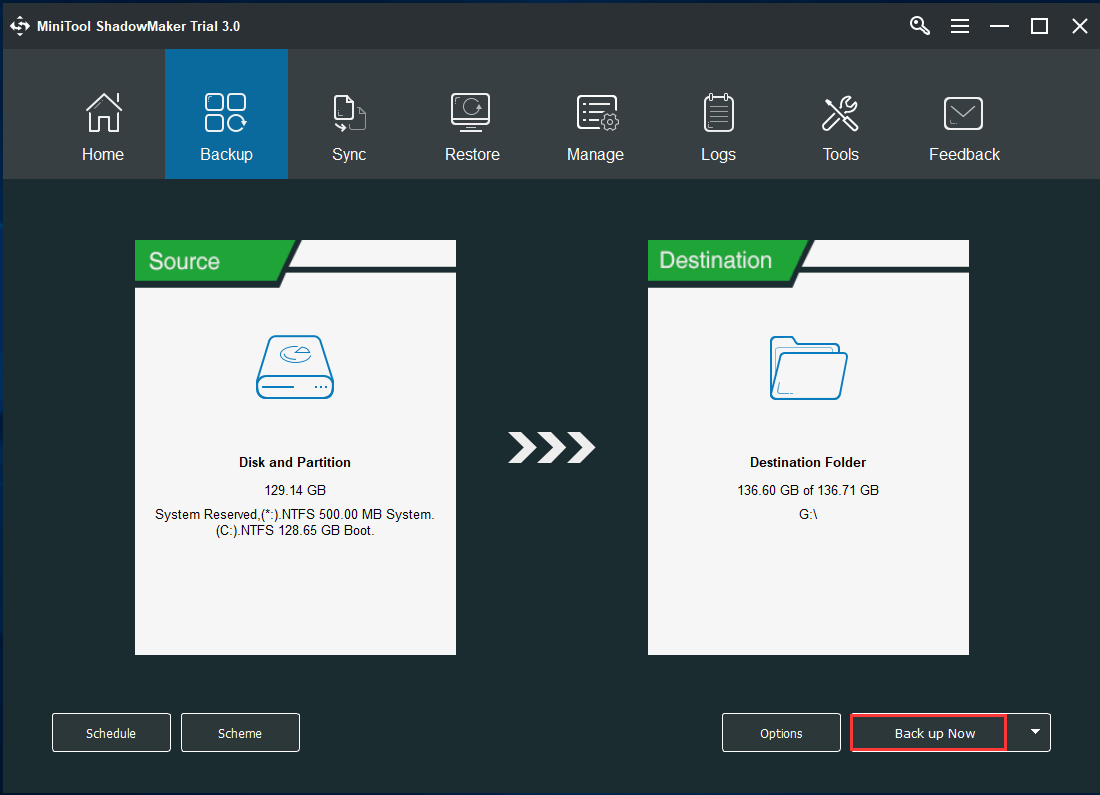
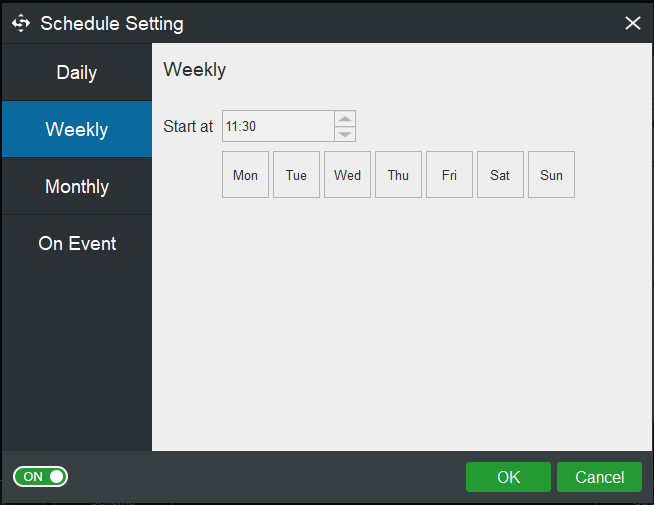
As to system backup, we strongly recommend you to create an automatic backup by Schedule feature or use Scheme to create incremental backups for the changed and newly added data.

Step 3: Click Back up Now to perform the backup operation.
By means of system backup, no matter which system issue your computer encounters, like resetting this PC stuck at 1, 8, 12, 33, 66, 99 percent, you can restore the computer to the previous state.
In addition, the MiniTool team also offers you another way to protect your computer. Here MiniTool Partition Wizard is a recommendation since it supports OS migration to another hard drive.
By this way, once Windows 10 reset stuck black screen happens, you can boot your computer from the disk containing the OS copy.
Now, get MiniTool Partition Wizard Pro Edition or an advanced edition and install it on your computer. Then, begin to migrate OS to another hard drive by using the Migrate OS to SSD/HD feature.
Bottom Line
Is Windows 10 stuck in resetting? We have introduced you three ways in the above parts. Just try them one by one if the issue of resetting this PC stuck at 1, 8, 12, 33, or 99 percent happens.
In order to protect the computer, you had better back up the Windows 10 on a regular basis with MiniTool ShadowMaker.
MiniTool ShadowMaker TrialClick to Download100%Clean & Safe
When using our software, if you have any question, don’t hesitate to tell us. Besides, as for the suggestions, we are also appreciated. Here an email [email protected] is supported or you can also choose to leave us a comment.
Windows 10 Reset Stuck FAQ
How do I fix a stuck Windows 10 factory reset?
- Perform a system image recovery or system restore
- Run Startup Repair
- Make a clean install
How long should a Windows 10 reset take?
If you do a full reset, the Just remove my files option will take two hours while Fully clean the drive can take approximately four hours. Certainly, your situation may be different.
Why is Windows 10 stuck restarting?
Windows 10 may get stuck because of various reasons, for example, external devices, Fast Startup, Windows update, etc.
What happens if I reset Windows 10?
If you choose Keep my files, the resetting process can reinstall the system, remove installed apps and drivers, keep your personal files and eliminate changes you made to settings. If you choose Remove everything, resetting Windows 10 can reinstall the system, remove all personal files, remove any changes for settings, remove apps and drivers you installed, and remove any apps the vendor installed.