
Полные бэкапы будут полезны для владельцев Raspberry Pi, которые часто экспериментируют с разными операционными системами, но обладают лишь одним накопителем для этого. Вместо постоянной настройки ОС с чистого листа или покупки новых карт памяти можно сохранять готовые образы и восстанавливать их по мере надобности.
Бэкап на Windows
Самый удобный способ создания резервной копии с помощью компьютера под управлением Windows — использование утилиты Win32DiskImager. Ниже представлена инструкция по созданию и восстановлению бэкапа с её применением.
Создание резервной копии
Шаг 1. Подключите к компьютеру USB-накопитель или карту памяти с операционной системой и данными.
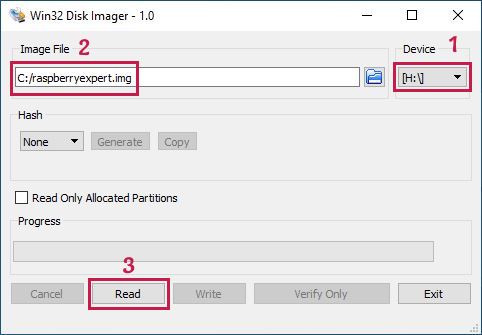
Шаг 2. Запустите Win32DiskImager и в поле Image File выберите папку, в которой будет располагаться скопированный образ системы, а также имя будущего файла с расширением .img на конце.
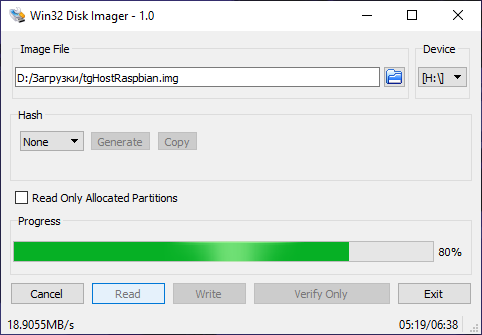
Шаг 3. Выберите диск, на котором располагается система для Raspberry Pi, и нажмите Read.
Шаг 4. По завершении создания резервной копии появится окно с уведомлением. Программу можно закрыть, а накопитель извлечь.
Восстановление из резервной копии
Шаг 1. Подключите к компьютеру USB-накопитель или карту памяти, на которую вы хотите записать образ системы.
Шаг 2. Запустите приложение balenaEtcher, выберите ранее созданный бэкап, укажите подключенный диск и нажмите Flash.
Бэкап на macOS/Linux
На компьютерах под управлением ОС macOS или Linux наиболее оптимально использовать для этого терминал. Для того, чтобы создать копию диска или восстановиться из неё, необходимо следовать инструкции ниже.
Создание резервной копии
Шаг 1. Подключите к компьютеру USB-накопитель или карту памяти с операционной системой и данными.
Шаг 2. Откройте терминал.
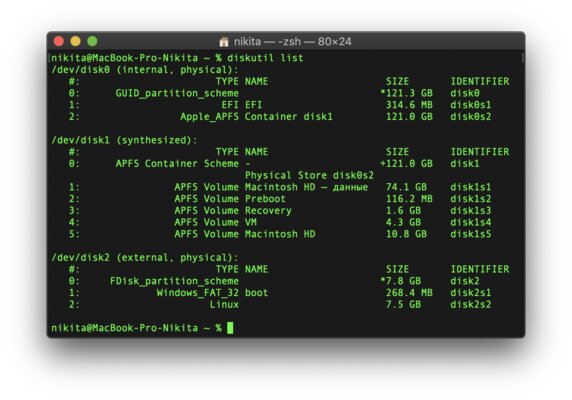
Шаг 3. На macOS введите команду diskutil list и узнайте путь к подключённому хранилищу. На Linux для этого надо ввести команду sudo fdisk -l
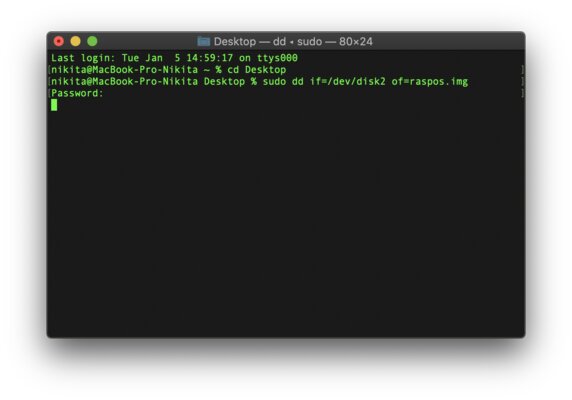
Шаг 4. Перейти в директорию, где будет сохранён образ, можно командой cd <путь до папки>. Например, чтобы в macOS перейти на рабочий стол, введите cd Desktop
Шаг 5. Этап создания копии. В случае с macOS используйте команду ниже.
sudo dd if=/dev/disk of=/name.img bs=1m
Вместо /dev/disk подставьте путь, найденный на 3 шаге, а вместо name — желаемое название файла образа, который будет получен в итоге (обязательно добавьте в конец расширение .img). Будет запрошен пароль от вашей учётной записи — введите его и подтвердите нажатием Enter. Обратите внимание на то, что при его вводе символы не отображаются.
Если на компьютере установлен Linux, вводимая строка будет немного отличаться:
sudo dd if=/dev/sda of=/name.img bs=1M
Вместо /dev/sda подставьте путь, найденный на 3 шаге, вместо name введите желаемое название файла образа, который будет получен в итоге (обязательно добавьте в конец расширение .img).
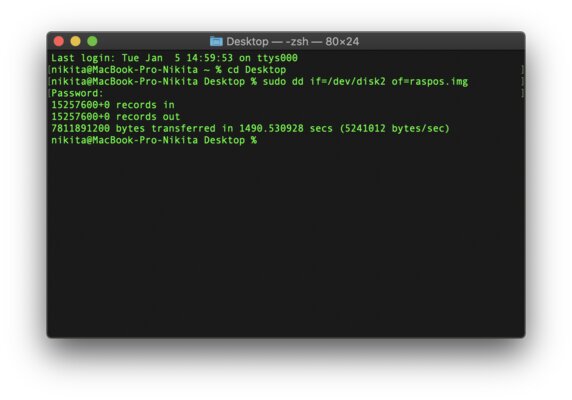
Шаг 6. Операция может занять продолжительное время, особенно, если объём подключённого накопителя большой. По завершении копирования в терминале появится сообщение о количестве обработанной информации и затраченном времени.
Восстановление из резервной копии
Шаг 1. Подключите к компьютеру USB-накопитель или карту памяти, на которую вы хотите записать образ системы.
Шаг 2. Откройте терминал.
Шаг 3. На macOS введите команду diskutil list и узнайте путь к подключённому хранилищу. На Linux для этого надо ввести команду sudo fdisk -l
Шаг 4. Перейдите в директорию, где располагается бэкап, командой cd <путь до папки>.
Шаг 5. Для восстановления из копии введите следующую команду, правильную как для macOS, так и для Linux:
sudo dd of=name.img if=/dev/disk
Замените name.img названием своего бэкапа, а /dev/disk — полученным на 3 шаге расположением диска.
Creating a full backup of Raspberry Pi OS (formerly Raspbian) is always a need for enthusiasts like us and it’s also a great skill to know. If you are crazy about involving in the development of innovative raspberry pi projects, you are likely to do tons of experiments on your own. And, the chances are high that you may end up with some mishaps with your Pi and its SD card. If anything goes wrong with your experiments, you will lose all your data for sure.
Or in case if you are a beginner just starting out with python and raspberry pi accessories, then you are also likely to end up with the same situation. This is the context where a full OS backup will come to the rescue. If you already have such a backup before experimenting and running into any issues, it will definitely help your out. All you need is to restore it on your SD card.
But how do I do this? Well. Relax, I’ve got you covered. In this tutorial, I’ll show you 3 methods to back up raspberry pi to an external drive and restore it whenever needed.
So let’s move on.
Contents
- Equipment Required
- Method 1: Copy the SD Card Image
- Method 2: Zip the Home Directory
- Method 3: Scheduled Backups
- Restore the Backups on Raspberry Pi
- Conclusion
Equipment Required
- Raspberry Pi
- Power Supply
- Micro SD Card
- SD Card Reader (Adapter)
Method 1: Copy the SD Card Image
This is the simplest method to backup Raspberry Pi SD card. This method involves copying the entire SD card as a single image file.
This is exactly the opposite of flashing an OS on your SD Card. It actually unpacks all the OS files and configures them to work on the Pi. But here, we are packing all the data on the SD card to a single image file that can be restored whenever necessary. This is how exactly OS image files are created in the first place.
Follow the steps to create a full backup image of your SD card:
- Power off your Pi and remove the SD card. Put it in a card reader or an adapter and plug it into your computer.
- Now, if you are using a Mac or Linux computer open a Terminal window and type df. Look at the drives that show up. If your SD card is not showing up, unplug and replug the card. Once, it is detected enter df again.
- Now you will see a newly mounted drive. For example, on a Mac system, the name will be something like /dev/rdisk2, and on a Linux machine, it will show /dev/sda (the names may vary so be sure to check carefully).
- On Linux use the following command:
sudo dd bs=4M if=/dev/sda of=raspbian.img- On Mac, type the below command:
sudo dd bs=4m if=/dev/rdisk2 of=raspbian.img- This will create a complete image file of your SD card (Raspbian os) and you can use this raspbian.img file to restore your entire operating system in its current state to an SD card. This can be achieved by using the dd command in reverse, or by using an application like Etcher to flash the SD card.
- On a Windows machine, you can backup the SD card by using the Win32 Disk Imager which can be used as a raspberry pi backup software.
- Just download, install, and open the program.
- Click Yes to the security alert dialog box.
- Choose the device at the top right corner and enter C:/raspberryexpert.img (you can use any name as you wish) in the Image File text box and click Read.
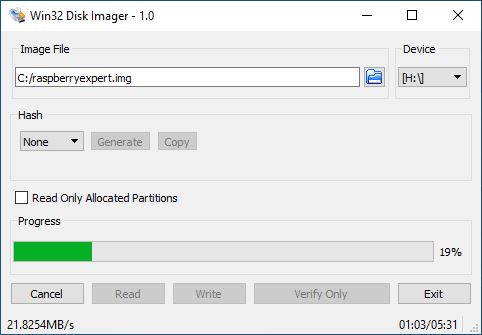
- It will start creating the image file and you can see the progress like this.
- Once completed, the entire SD card will be written into an image file. When it says “Read Succesful”, click OK
Method 2: Zip the Home Directory
The main drawback of the first method is that you need to create regular backups. This involves removing the SD card from your Pi, inserting it into your computer, take the back, and reinserting it into the Pi. This is kind of a boring thing. This method comes with a fix for the issue. It lets you backup raspberry pi without removing sd card.
In this method, we will take the backup of only the home folder as a compressed file. Uncompressing this file lets you browse and restore every file and directory.
For this use the terminal and issue the following commands.
cd /home/
sudo tar czf pi_home.tar.gz pi
This will create a file named pi_home.tar.gz and you can copy this file to a USB drive or other devices for safekeeping.
Moreover, if you want to backup raspberry pi while running, the is one of the best methods that you can follow.
Method 3: Scheduled Backups
This is a great method to backup raspberry pi automatically using cron jobs. You can schedule the backup manually by scheduling the tar command as a cron job. But there is an easier approach for this by using a free program named Déjà Dup. This automates the commands and gives the user a graphical interface.
With this program, you can backup Raspberry Pi over networks remotely to cloud storage using Google Drive, Amazon S3, FTP, SSH, or by copying the files directly to a flash drive.
You can even choose folders to include and exclude and it is easy to restore too. The Déjà Dup is installed on Ubuntu by default, and it’s easy to install on Raspberry Pi OS. Type the below command to do so.
sudo apt-get update && sudo apt-get upgrade
sudo apt-get install deja-dup
Once the commands are issued, you will find a program called Backups in Menu > Accessories. Open it.
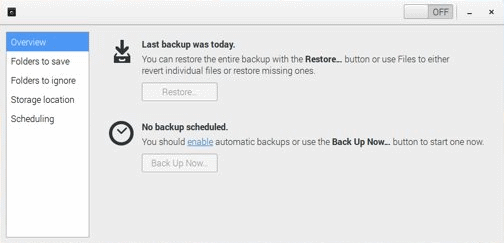
- Here, click on folders to save and ensure that the Home (Pi) is checked. The directories to ignore should include rubbish bin.
- Then click on storage location and change it from Amazon S3 to your flash drive.
- Go back to the overview and click on Back Up Now. This will begin the creation of the first backup of your home folder. You will be asked for an encryption password if you want to make the backup secure. Enter the password in both the fields and click Continue.
- Once the first backup is completed, you can set up a schedule for the next backup. Set the OFF button to ON.
- Click Scheduling and change Week to Day (or as per your wish).
This will now create a backup of your selected folder on a daily basis and store it on your flash drive. And these files will be ready to restore whenever you want.
Restore the Backups on Raspberry Pi
In case you lose your data due to a total system failure or complete data wipeout, you will need to restore the backups that you created earlier. To do so follow the below steps.
- Plug the flash drive (where backups are stored) into your Pi. Now open Accessories > Backups.
- Click Restore to reinstall any missing files and folders. A Restore from where windows will appear if you are installing from a fresh Raspbian image. Now choose your flash drive and click Forward.
- You need to select the date to pick the corresponding backup file and click Forward.
- Here you have two options. Restore everything to its original locations and to a folder that you specify. Choose to restore to the original location and click Forward and Restore.
- If you had encrypted the backup file with a password, enter the same password when promted. Then click Continue.
- This will restore all the files and folders to your Pi and it will show a “Restore Finished” message once it’s done successfully. Close the window and you are done!
Conclusion
So, I hope that you’ve learned 3 methods to backup raspberry pi images and restore them easily. I’ve tried my level best to explain things as simple as possible. However, if you hit with any problems just drop a comment below.
Found an issue with this article? Report it here, so that I can resolve it.
If you click our links and make a purchase, we may earn an affiliate commission.
Learn more
If, like me, you make regular changes on your Raspberry Pi, or keep important files on it, it might be a good idea to create backups. And what’s even better is to make sure backups are recoverable :). But then, how to back up a Raspberry Pi and recover it? That what we’ll see in this complete guide.
The easiest way to create a full copy of a Raspberry Pi is to create an image of the entire SD card with a tool like SD card copier (included by default on Raspberry Pi). Other options are possible, like backing up only the important files to another storage drive or NAS.
As often, there is not only one way to do this. It highly depends on how you use your Raspberry Pi, and what is available on your network to store the backups. In this tutorial, I will guide you through several solutions:
- Back up only important files (configuration, documents, MySQL databases).
- Make a complete image of the SD card on another computer.
- Or do a full backup of a Raspberry Pi while running.
We will now see in detail how to do each one.
If you’re new to Raspberry Pi or Linux, I’ve got something that can help you right away!
Download my free Linux commands cheat sheet – it’s a quick reference guide with all the essential commands you’ll need to get things done on your Raspberry Pi. Click here to get it for free!
Want the best experience? Become a premium member for ad-free browsing, access exclusive content, and ask questions in our private forums. Your membership helps support the site!
Back Up Only the Important Files
The first method you can use if you have a simple installation is to back up only the needed files.
For example, if you use your Raspberry Pi for a security camera, once you back up the configuration file, that’s enough, you don’t need to do more. It’ll be the most efficient method, you don’t need to keep a 16GB image file for just this.
In the following, I’ll show you :
- How to create a script to do that.
- How to schedule it if the files are modified.
- How to send the file to another computer (in the script or manually).
- And finally, how to restore the files.
Note: If you want to see all these steps in action, I have a video lesson available for the community members. You can join here and watch it directly if you are interested (with 20+ other lessons for Raspberry Pi and many other benefits).
Script
Before starting to create the script, you have to identify the files you want to save. In my example below, I’ll use “app1” as a specific app I want and “file1.conf” as its configuration. The folder “app2” represents another app I want to back up.
Adapt these locations in my script to your needs:
- /etc/app1/file1.conf
- /etc/app2
Next, we’ll need to create a folder to store the backups:mkdir /home/pat/backups
Note: I’m using “/home/pat” everywhere, but you probably have to adjust this to match your username (i.e., /home/tom). Use sudo with the commands below if needed (if the goal is to back up system files, you probably need sudo).
Okay, now let’s use nano to create the script:nano /usr/local/bin/backup.sh
And finally, the first version of a simple script could look like this:
#!/bin/bash
/bin/cp /etc/app1/file1.conf /home/pat/backups
/bin/cp /etc/app2 /home/pat/backups/ -r

Save your changes and exit nano.
Then add the permission to execute the script with:chmod +x /usr/local/bin/backup.shAnd you can try it with:/usr/local/bin/backup.sh
As you can see, it’s a basic script, that will overwrite the old backup each time.
Next, let’s see how we can improve this script on several points.
Are you a bit lost in the Linux command line? Check this article first for the most important commands to remember and a free downloadable cheat sheet so you can have the commands at your fingertips.
Use Variables
The first good practice we’ll use to improve the scripts is to add variables.
For example, let’s say you have 200 files to back up to /home/pat/backups, but tomorrow you want to save them in /media/nas/pat/ instead. You’ll have to edit 200 lines in your script to change the destination folder. Not that smart.
A better way to do this is to create a variable at the beginning with the destination folder path and use it for each line. I’ll also do the same for the “cp” command, so if you decide to swap it to use rsync or another command, you’ll have only to edit one line.
Here’s a better script:
#!/bin/bash
DEST_FOLDER='/home/pat/backups/'
BACKUP_CMD='/bin/cp'$BACKUP_CMD /etc/app1/file1.conf $DEST_FOLDER
$BACKUP_CMD /etc/app2 $DEST_FOLDER -r
The result will be the same, but it will be easier to update. If you want to use a different destination, you just have to update the variable at the beginning.
Compress Files
Most of the time, we use compression for backup or at least archive files.
I’ll use tar to archive all files in one file and gzip to compress it.
Here’s the new and improved script:
#!/bin/bashDEST_FOLDER='/home/pat/backups/'
DEST_FILE='backup.tar'
BACKUP_CMD='/bin/tar -rvf'/bin/rm $DEST_FOLDER/$DEST_FILE.gz
$BACKUP_CMD $DEST_FOLDER/$DEST_FILE /etc/app1/file1.conf
$BACKUP_CMD $DEST_FOLDER/$DEST_FILE /etc/app2
/bin/gzip $DEST_FOLDER/$DEST_FILE
I add a new variable DEST_FILE to store the file name of the backup.
“tar -rvf” allows you to append several files to one tar file.
“gzip” allows you to compress the whole tar file.
Stop Overwriting Files
As you can see from our script, we delete the previous backup each time. That’s not a good thing to do. If there is an issue with the backup, you won’t be able to retrieve an older version.
A good practice is to name the backup file with the current date and time. For example:
#!/bin/bashDEST_FOLDER='/home/pat/backups/'
DEST_FILE="backup-$(date +'%F_%R').tar"
BACKUP_CMD='/bin/tar -rvf'
$BACKUP_CMD $DEST_FOLDER/$DEST_FILE /etc/app1/file1.conf
$BACKUP_CMD $DEST_FOLDER/$DEST_FILE /etc/app2
/bin/gzip $DEST_FOLDER/$DEST_FILE
Nothing changed except we add the date in the DEST_FILE variable, so that we stop deleting the previous backup.

Each time the script runs, it will now create a new file and keep all the previous versions.
Schedule Backups
Once we have created our script following the steps above, most of the work is done. But it would be more convenient if the backup script ran regularly on its own.
Schedule the backup script so that it runs every day automatically.
For that, we will use the crontab:
- Open the user’s crontab:
crontab -e - Paste this line at the end of the file:
0 0 * * * /usr/local/bin/backup.sh
This cron will run your backup script each day at midnight, but you can change it if you want. - Save and quit (CTRL+O, Enter, CTRL+X)
If you back up files with privilege access needed, don’t forget to schedule the script in the root crontab (sudo crontab -e).
If you are not comfortable with this, do not hesitate to read my tutorial on scheduling tasks on Raspberry Pi. And you can also use this tool to give you the line to put in the crontab for a different schedule.
Delete Old Backups
As you can see, each day a new file will be created, and we never delete it.
To free disk space, delete files older than eight days (or more if needed).
To configure this, you can add this command at the end of the script:/usr/bin/find $DEST_FOLDER -mtime +8 -delete
By adding this line, you’ll have at any time only eight backup files of history in your destination folder. Feel free to change the number of files you want to keep.
It’s always a good idea to keep several days of backup history, since you can’t be sure you’ll spot an issue with your files on the first day.
Send Backups Over the Network
We now have a backup with a few days of history on the SD card, but that’s not safe enough. If tomorrow your SD card fails, it won’t help to have backup files on it. We need to put the backups on another computer to avoid this kind of problem.
To a Linux Computer or a NAS
If you have another computer on Linux (or a NAS), you can transfer backup files on it to keep them safe. This method will work for macOS too.
Personally, I’m using a 4-bay Synology NAS like this one on Amazon, which is great to save high volumes of critical data. It’s a bit expensive, but you have redundancy and security that is difficult to get on a standard computer (and also many tools included).
For less important data, you can also turn another Raspberry Pi into a NAS and sync your files to it (check my tutorial if you want to try). You can’t install FreeNAS on Raspberry Pi, but other great options are available.
Manually
The first way to do this is manually. If your files never change or if they are not so critical, you can do this once a week or a month to be safe.
To transfer the files from the Raspberry Pi to the Linux computer, we’ll use rsync.
For this to work, you’ll need to have rsync and ssh installed on both machines. They’re probably there already, but here’s how to do it just in case: sudo apt install rsync ssh
Then create a backup folder on your computer:mkdir /home/[USER]/backups_pi
Then you have two ways to transfer files:
- From your Linux computer:
rsync -auzr [USER]@[RASPBERRY_IP]:/home/pat/backups/* /home/[USER]/backups_pi/ - From the Raspberry Pi:
rsync -auzr /home/pat/backups/* [USER]@[COMPUTER_IP]:/home/[USER]/backups_pi/

Don’t forget to replace the USER and IP variables with your username and IP address. In the screenshot above, notice that the “pat” user who’s running the command owns all the files—if any files are owned by root, you may have to run with sudo or you’ll get a “permission denied” error.
Automatically
As when saving on the Raspberry Pi, it’s always a good idea to automate this kind of task.
The problem you might have seen is that a password is required when the transfer starts.
To avoid this, you must first make an exchange of SSH keys between the two machines.
For this step, I’ll assume it’s your computer that triggers the transfer.
If you prefer to transfer in the other direction, you have to do the opposite (generate the keys on the Raspberry Pi and allow them on the PC).
Key Exchange:
- First, generate a key on your computer (if you have already one, skip to the next step):
ssh-keygen -t rsa
Press Enter to each question, leave the passphrase empty. - Then transfer the public key to the Raspberry Pi:
rsync ~/.ssh/id_rsa.pub pi@[RASPBERRY_IP]:/home/pat/
Last time you need to enter your password. - On the Raspberry Pi, add the public key to the allowed keys:
cat ~/id_rsa.pub >> ~/.ssh/authorized_keys - Try to connect in ssh now. It shouldn’t ask you for a password:
ssh pi@[RASPBERRY_IP]
Script Example:
So, now you should be able to put the rsync command in a script that will not ask for a password.
The script should look like this:
#!/bin/bash
rsync -auzr [USER]@[RASPBERRY_IP]:/home/pat/backups/* /home/[USER]/backups_pi/
find /home/[USER]/backups_pi -mtime +8 -delete
Again, replace the USER and IP variables with your details. Then schedule the script by adding it to your crontab as explained previously.
To a Windows Computer
If your computer is running Windows, you can also send your backup to it, manually or automatically.
Manually
To manually transfer files from the Raspberry Pi to your Windows computer, the easiest way is to install WinSCP on Windows.
It’s a free software to transfer files with SSH:
- Once installed, start WinSCP
- Add a new site with the Raspberry Pi information

- Click Save, and connect to this new site
- On the right, you’ll see the Raspberry Pi files, and on the left, your computer files.
You can now transfer files from one to the other with a drag & drop.
Go to /home/pat/backups on the Raspberry Pi and download one or all backup filess.
Then you can remove the older files on your computer to keep only the last eight days for example.

Automatically
There is no way to schedule a transfer with WinSCP. And it’s not easy to install SSH on Windows (to use it in a script at least).
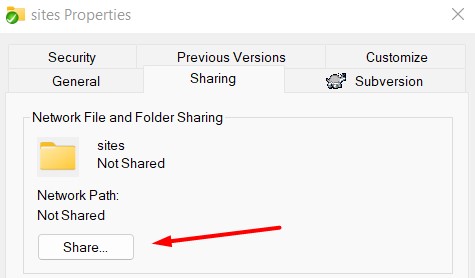
So we have to find another method. What I suggest you is to share a folder on Windows and access it from the Raspberry Pi.
Share a Folder
Follow these steps to share a folder on Windows:
- Create a new folder to store your backups
- Right-click on this folder and choose Properties in the context menu
- Go on the Sharing tab and click on the Share button

- By default, your user will have access to this share, but you can add other users if you want.
You’ll need a user with a password.
If your main user doesn’t have any password, you need to set one.
If you prefer you can create another account with a password. - When it’s ok, click on the Share button
- It’s OK. You are now sharing the folder on the local network
Keep the network path to use it on the next step
For me, it was something like this: \\[COMPUTER-NAME]\Users\[USER]\Desktop\share
Mount the Share on the Raspberry Pi
Now we need to connect the Raspberry Pi to the share.
To do this permanently, follow these steps:
- Create a new folder to host the share:
sudo mkdir /media/share - Edit the /etc/fstab file:
sudo nano /etc/fstab
This file manages all drives and shares on the Raspberry Pi. - Paste this line:
//[COMPUTER-NAME]/Users/[USER]/Desktop/share /media/share cifs username=[USER],password=[PASSWORD],iocharset=utf8 0 0
You need to replace all variables with your environment values.
You may also need to replace the folder name in the first value.
Note that we use / and not \ in the network path. -
Save and quit (CTRL+O, Enter, CTRL+X)
- Mount the share once:
sudo mount /media/share
Your shared folder is now accessible in /media/share and if you create a file in this folder, the file will be available on your Windows computer:sudo touch /media/share/test
Script Example
Now that the share is available, you can create and schedule a script to copy backup files to this folder each day for example:
#!/bin/bash
cp /home/pat/backups/* /media/share/
find /media/share -mtime +8 -delete
Restore
This backup is the easiest one to restore.
You only need to extract files from the archive and send them back to the original folder.
From Linux
On Linux, you can use the default archive software from your distribution. For example, on Ubuntu, double-click on the backup file to open it and see files in it. And then click “Extract”.
Once you get the needed files, send them back to the Raspberry Pi with rsync as seen above.
From Windows
On Windows, I’m not certain that the default tool can open a .tar.gz file, but you can try.
If not, you have to install a free application like 7zip.
Extract the files with this tool and restore them to the Raspberry Pi with WinSCP as seen above.
Try It
It’s a good idea to follow this restore procedure at least once. So, you can be sure that it works and that you know how to do it.
Monitoring
With this method, it’s easy to check that your backup is well done each day as expected.
You could create a script to check that you have recent files in your backups folder.
Something like this:
#!/bin/bashif [[ $(find /home/pat/backups -type f -mtime -1) ]]; then
    echo "Backup OK"
    //DO NOTHING
else
    echo "Backup KO"
    //DO SOMETHING (MAIL ?)
fi
Export MySQL Data
If you have MySQL databases on your Raspberry Pi, the procedure is a bit different.
Backup
The best practice for MySQL data backup is to first export and then save this export.
Export database with this command line:mysqldump -uroot -p[PASSWORD] [DATABASE-NAME] > export-[DATABASE-NAME].sql
This command will create a file with all SQL queries needed to recreate the database from scratch.
You can follow the same steps as seen previously to:
- create a script
- schedule it
- transfer files to another computer
If you have more than one database to back up, put as many lines as needed in your script and change the database name and the file name on each line.
Restore
To recover a lost database you have to follow the same steps as for files backup.
Once the .sql file back on the Raspberry Pi, you can use this command to import data to a fresh database:mysql -uroot -p[PASSWORD] [DATABASE-NAME] < [BACKUP-FILE].sql
The database must be empty to start the import.
So depending on the situation, you must follow one of these two methods:
- Import the backup into a database with another name (and then copy only what you are interested in)
- OR rename the corrupt database, recreate it (empty) and then import the backup file
As with file backup, consider testing this procedure at least once.
If you use another database management system (like SQLite, PostgreSQL or other solutions), you should have a similar command that you can use to dump the data and backup it.
Create an Image of the SD card
So we saw in the previous paragraphs how to save some files on a Raspberry Pi.
Now, how to do if you have a complex installation that you want to fully back up?
Backup
The goal of this backup method is to create an image with all your Raspberry Pi files in it.
Then you can flash this image back to another SD card to recover the Raspberry Pi in the same state.
With this first method, you need to stop the Raspberry Pi and get the SD card on your computer. If you can’t do this, skip it and check the last option in this article (hot backup).
From a Linux Computer
On Linux, you can use the dd command to create an image of a device:
- Take the SD card out from the Raspberry Pi
- Insert the SD card on your computer
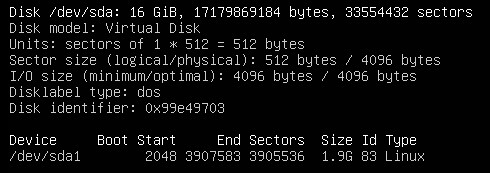
- Find the device name:
sudo fdisk -l
This command will display all the storage devices of your computer.
You should see your hard drive, and somewhere at the end of the list your SD card.
Note the name of the device (generally /dev/sdX or /dev/mmcblk0). - Create the image (replace the device name with yours) :
sudo dd bs=4M if=/dev/mmcblk0 of=backup.img
After a few minutes, you’ll get the full backup image from your Raspberry Pi.
This command should also work on macOS, replace 4M with 4m in the last command.
From a Windows Computer
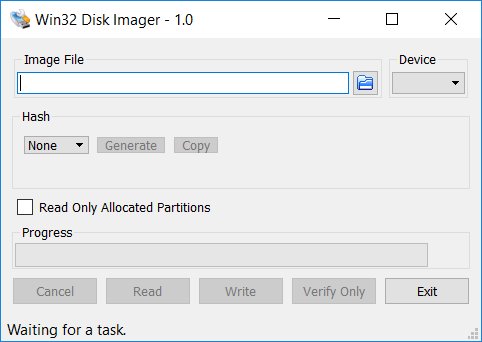
On Windows, the best tool to do this is Win32 Disk Imager:
- Download Win 32 Disk Imager, install it and launch it
- You should get a window like this

- Enter the image destination folder and file name (.img)
- Select the SD card letter in the device list
- Click on “Read”
- This tool will create the image in the selected folder
Restore
The easiest way to restore this backup is to flash the image on another SD card with Etcher:
- Download Etcher from the official website
- Install and run it
- Choose your backup image on the left
- Choose your SD card
- Click on the “Flash” button
You’ll get a new SD card with the system in the same state as during the backup.
You can also use Raspberry Pi Imager, and choose “Custom” in the OS list. Etcher is faster, but you don’t need to install it if you never use it the rest of the time.
On Linux / Mac you can also use the same dd command to flash the SD card (reverse if and of):sudo dd bs=4M if=backup.img of=/dev/mmcblk0
If you have an empty SD card, feel free to try this procedure to be sure it’s working in your case.
And check my full article on this topic here if you need more details:
How to Create an Image of a Raspberry Pi SD Card? (Win/Linux/Mac)
Clone a Raspberry Pi in Operation (Hot Backup)
This last method is the same idea as the previous one, but for a critical installation.
If you can’t stop your Raspberry Pi to make the full backup into an image, you have to follow this procedure.
Related tutorial: Clone Your Raspberry Pi SD Card: 3 Simple Methods
Prerequisites
I will introduce you two ways to do a full backup of your Raspberry Pi in operation (from a desktop tool or with command lines). In both cases, you’ll need to plug a second SD card in the Raspberry Pi to copy the running SD card to another.
If you don’t have one already, I recommend buying a cheap USB adapter on Amazon like this one.
I prefer an adapter with a short cable (long cable is not needed, and USB key format may obstruct access to other plugs). So, the one I link is perfect for this.
If you need more details, I explain how to use a USB SD card reader on your Raspberry Pi in this article.
PiClone (Desktop Version)
If your Raspberry Pi is running the Desktop version, there is a tool called PiClone you can use for this.
The name in the main menu is “SD Card Copier”—you can find it in the Accessories submenu.
The use of this software is simple:
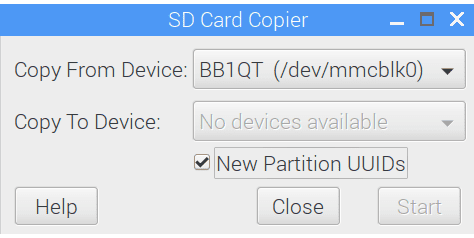
- Choose your main SD card in the “Copy From Device” list
- Choose your backup SD card in the “Copy To Device” list
- Press Start to start the transfer
- Wait a few minutes and extract the backup SD card
Feel free to try this backup SD card in another Raspberry Pi to check it’s working properly.
I have a full video on my YouTube channel to explain how to use this if you need more guidance:
Script (Lite Version)
If you are running the Raspberry Pi OS Lite version or if you want to create a script, there is a shell script available to do this.
I will explain the basics to use this script.
But you can find all the information on the GitHub page if you need more.
- You’ll need to install Git to download the files:
sudo apt install git - Start by downloading and installing the script:
cd ~/Downloads
git clone https://github.com/billw2/rpi-clone.git
cd rpi-clone
sudo cp rpi-clone rpi-clone-setup /usr/local/sbin - Then use fdisk to get the backup SD card name:
sudo fdisk -lYou should see the current SD card: sda or mmcblk0 most of the time.
- And below the backup SD card: sdb or mmcblk1 generally
- And finally, use rpi-clone:
sudo rpi-clone sdb -v
Replace “sdb” with your backup SD card name.
Hardware Recommendations
To give you a quick summary of my recommendations, here is the hardware I use and recommend to have solid backups:
- An SD card adapter with a bunch of spare SD cards: Ideally, you have the adapter plugged in all the time, and do a full backup of your system once a week on 4 different SD cards. This way, you are safe, whatever happens to the Raspberry Pi.
- A NAS with storage redundancy is a must. Your data will be on a separate device that runs all the time and can’t be damaged by your own usage (unlike your computer, which will be disconnected or in sleep mode regularly).
- An external USB drive is a minimum. If you don’t have the budget for a NAS, try at least to keep your important files on an external USB drive (and avoid keeping it plugged to the Raspberry Pi, or in the same room if possible). You don’t need anything fancy or fast for this; get the cheapest option with enough space.
Remember that scripts, scheduled tasks and network backups will fail sometimes. Doing a manual full backup of your SD card regularly is a smart decision. Even if it’s only once a month, or even only once after the initial setup that took you days, it’s already that, that you’ll never have to do again.
Related Questions
How to check disk corruption or file system errors on Raspberry Pi?
The command “fsck” can be used to quickly test the consistency of a file system, like the SD card on a Raspberry Pi. Raspberry Pi will do it automatically and regularly on boot, but it can be forced on the next reboot with: sudo shutdown -F -r now.
You can then check the results in the /var/log/syslog file, you should get something like that:
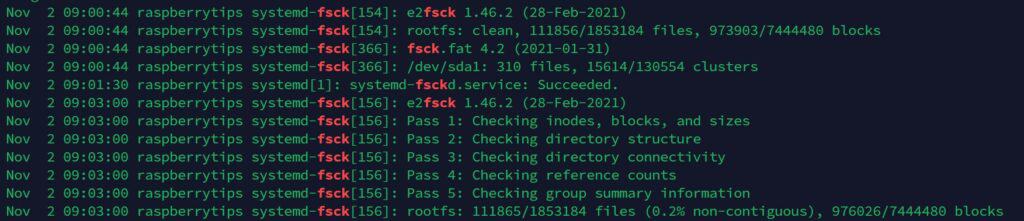
You can’t use “fsck” directly when the system is mounted and running, but you can plug the SD card to a Linux computer (or another Raspberry Pi) and use it directly with various options.
Is there any good backup software on Raspberry Pi OS?
Tools like “luckybackup” or “deja-dup” provide a GUI to rsync and can be easier to use than the command line on Desktop versions of Raspberry Pi OS. They offer a nice interface with all the features to schedule regular backups of your Raspberry Pi.
I don’t have much experience with them, but you can give it a try if you are looking for something more user-friendly.
If you are looking for exclusive tutorials, I post a new course each month, available for premium members only. Join the community to get access to all of them right now!
You may also like:
- Create an image of your SD card (safety first!)
- Auto start any program when the Raspberry Pi boots up
- Master Raspberry Pi in 30 days with this
- Remote access your Pi from anywhere (best apps)
- 57 Raspberry Pi commands you need to know
Conclusion
That’s it! Now you know how to make backups of your Raspberry Pi in several ways.
Try to schedule them or if it’s not possible, try to do them regularly. Also, try to check on them from time to time. There is nothing worse than a backup that hasn’t worked or is unusable because you have never tested that it worked as expected.
Whenever you’re ready, here are other ways I can help you:
The RaspberryTips Community: If you want to hang out with me and other Raspberry Pi fans, you can join the community. I share exclusive tutorials and behind-the-scenes content there. Premium members can also visit the website without ads.
Master your Raspberry Pi in 30 days: If you are looking for the best tips to become an expert on Raspberry Pi, this book is for you. Learn useful Linux skills and practice multiple projects with step-by-step guides.
The Raspberry Pi Bootcamp: Understand everything about the Raspberry Pi, stop searching for help all the time, and finally enjoy completing your projects.
Master Python on Raspberry Pi: Create, understand, and improve any Python script for your Raspberry Pi. Learn the essentials step-by-step without losing time understanding useless concepts.
You can also find all my recommendations for tools and hardware on this page.
I’m the lead author and owner of RaspberryTips.com.
My goal is to help you with your Raspberry Pi problems using detailed guides and tutorials.
In real life, I’m a Linux system administrator with web developer experience.
In this guide, we will be showing you various ways on how to backup your Raspberry Pi and also how to restore it.
Backing up is a crucial task that you should often be doing, especially if you make a lot of changes or are storing data on it.
One thing to note is that some backup methods are going to be way more thorough the others, for instance backing up your Raspberry Pi SD Card image is going to be more reliable than just backing up all the files to a USB device since the image is a replication of all partitions on the SD Card.
We will be exploring two different methods of backing up your Raspberry Pi in this guide, the two different methods that we will be showing you how to do is the following:
- Backing up your Raspberry Pi to a computer using an SD Card Reader
- Backup the Raspberry Pi to a USB device
Personally, we recommend backup to a computer as it is the most robust method. Mainly since the Raspberry Pi doesn’t have the best USB speeds or network speeds, so creating backups can take considerable time and put a fair bit of stress on the Raspberry Pi’s limited resources.
As a bonus, the backup we make using a tool like win32diskimager is a 1 to 1 copy of the SD Card meaning every byte should be the same.
Backing up the Raspberry Pi is an important step in making sure you don’t lose any data when you go to make big changes to your system. This backup process is important if you have stuff that you would prefer not to lose if you’re looking at doing a complicated Pi project, upgrade or something else to the operating system.
Table of Contents
- Backing up your Raspberry Pi SD Card
- Backing up your SD Card on Windows
- Restoring your Backup on Windows
- Backup up your SD Card on OS X
- Restoring your Backup on OS X
- Backing up your SD Card on Linux
- Restoring your Backup on Linux
- Backing up your Raspberry Pi to a USB Drive
- Conclusion
Backing up your Raspberry Pi SD Card
To start off, we are first going to show you how to backup your Raspberry Pi SD Card as an image. To do this tutorial, you will need to have an SD Card reader handy.
To begin this tutorial, please first turn off your Raspberry Pi by running the following command on your Pi’s terminal:
Once it has shut down, disconnect the power and remove your SD Card. Place the SD Card into your SD Card reader and proceed onwards with this section of the guide.
This section of the guide will be split into three parts, one for Windows, one for Mac OS X and one for Linux based systems.
Backing up your Raspberry Pi SD Card on Windows
1. To back up our Raspberry Pi’s SD Card on Windows we will be utilizing the imaging tool that is called win32diskimager.
Win32diskimager is an incredibly useful tool that can read and write images to USB Sticks or SD/CF Cards. It is a tool many will be familiar with since it is used often to write the initial Raspbian image to your Raspberry Pi.
We will start off this section of the guide by downloading and installing this tool by going to win32diskimager’s homepage.
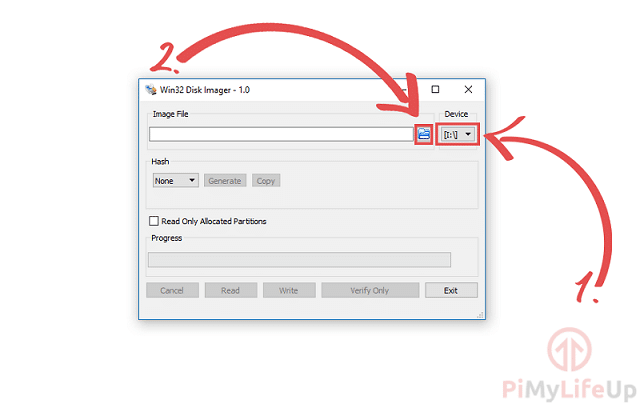
2. With win32diskimager now installed, open it up. You should be greeted with a screen as we have shown below.
For now, we need to make sure the right drive has been selected by clicking the drop-down box under “Device:” (1.) and ensuring the correct drive letter of our SD Card is selected.
Afterward, click the folder icon (2.) that is direct to the left of the device drop-down box.
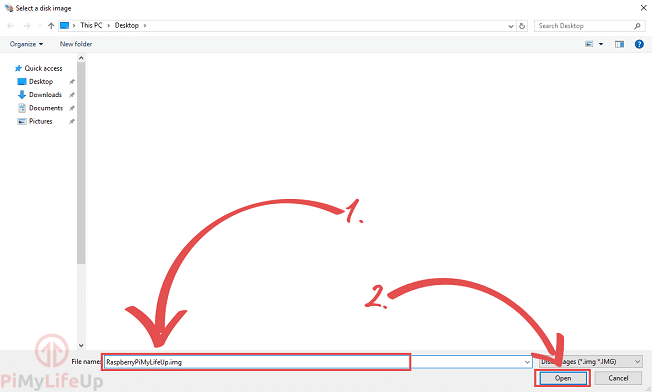
3. You will now be shown a file selection screen. However, we won’t be selecting any file. Instead, navigate to the folder you want to keep your backup file.
Once within this folder, type in the name you want to give your backup file in the text field (1.) at the bottom as shown in the screenshot below.
Make sure you have “.img” at the end of the name you choose to use. For example, we named our backup file “RaspberryPiMyLifeUp.img“.
Once you have typed in your file name, you want to utilize, click the Open button.
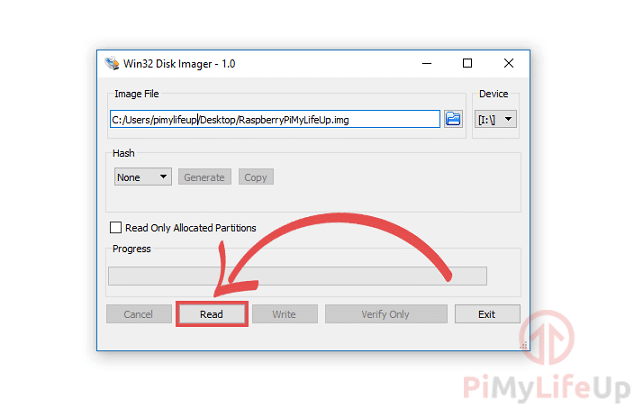
4. Finally with our device set and our new filename set we can begin the backup process.
To do this, we need to clickthe “Read” button.
Please note that this can take some time as it is a complete backup of your SD Card, meaning every single byte is replicated.
Restoring your Raspberry Pi Backup on Windows
1. Now when it comes the time that you need to make use of your full SD Card backup we will need to make use of win32diskimager once again.
Before opening the software, make sure you have inserted your SD Card into an SD Card Reader that is plugged into your computer.
With the win32diskimager software now opened, let’s click the drop-down box that is located under the “Device” (1.) header and ensuring that the correct drive letter of our SD Card is selected.
After you have set the device, we can now, click the folder icon (2.) that is located to the left of the drop-down box.
2. Now that we have the file browser loaded up let’s find the backup file that we created earlier.
Once you have found it either, double-click the file, or single click it and click the “Open” button.
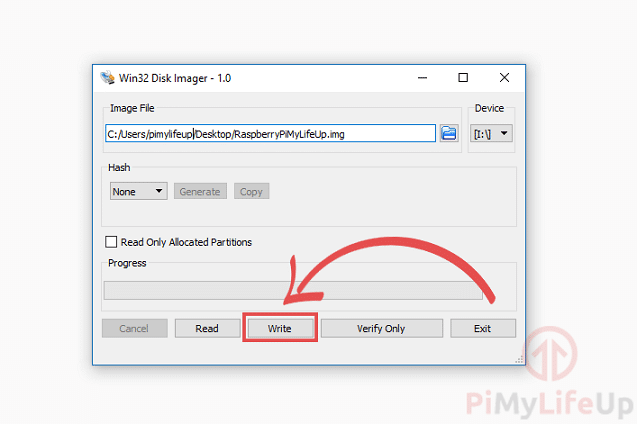
3. With our backup image now selected, we can now proceed with writing the backup file to the SD Card.
Please note this will wipe everything currently on the SD Card so make sure that you have the correct device selected.
When you are happy you have everything correct, click the “Write” button.
4. Once the writing process has completed, you should now have an SD Card that is in the exact state of when you originally made the backup.
Thanks to the full image backup it means all partitions on the card are restored.
Backup up your Raspberry Pi SD Card on OS X
1. With your SD Card inserted into a card reader on your Mac, we can begin the process of making a full image backup of your Raspberry Pi.
Unlike Windows, we can easily use the terminal to do this.
To proceed with this tutorial, start off by opening the Terminal application.
2. With the Terminal application now open on your Mac device, we need to utilize the following command. This command will display all available disks on your device.
Within this list, look for your SD Card by looking for a disk that is about the size of your SD Card.
For instance, with a 16gb SD Card, you should be looking at a “_partition_scheme” of about 16gb. You will also notice that there is likely a partition called boot.
Once you have found your SD Card in this list, take notice of the mount location. For instance, my own SD Card was under “/dev/disk1“.
3. Now still within the terminal on your Mac, we need to utilize the following command.
This command will basically create a copy of your SD Cards image, and save it to your home directory as “PiSDBackup.dmg” (The file format being a disc image)
Make sure you swap out “/dev/disk1” with whatever you found when using the “diskutil list” command.
This command can take some time to complete as it requires reading the entire SD Card to the disk.
The command also provides no feedback on how far along it is, so please be patient and wait for the prompt to enter another command to reappear before removing your SD Card from your Mac.
Restoring your Raspberry Pi Backup on OS X
1. Now that you need to restore your Raspberry Pi to its backup we need to use the “diskutil list” command to find our SD Card. Remember as before, take note of partition sizes to find your SD Card.
2. Now before we can write to the SD Card, we will need to unmount it. The reason for this is that OSX will attempt to write to it at the same time, unmounting the SD Card prevents this from happening.
Run the following command on your Mac device to unmount the card, again making sure that you replace “/dev/disk1” with the one you found using the “diskutil list” command.
3. Finally, we can now write the image back to the SD Card, and please be prepared for this to take some time as it involves rewriting the entire SD Card.
Remember to change out “/dev/disk1” with the mount location you grabbed using the diskutil list command.
Like reading the SD Card to a disk image file, the process of writing the image also takes a long time.
As an added note, the dd tool doesn’t show any writing progress so please be patient and wait till the enter command prompt reappears.
4. Once the writing process has completed we can now eject the SD Card from the Mac so we can continue using our Raspberry Pi Backup.
To eject the SD Card, we will need to utilize the command below.
Your Raspberry Pi’s SD Card should now be in the same state as when you made the original backup.
Backing up your Raspberry Pi SD Card on Linux
1. Before starting to backup up your Raspberry Pi’s SD Card on Linux we will first run the df command with the reader not plugged in.
The reason for this makes it much easier to see which device is which.
This command will return something like what is shown below.
2. Now insert your SD Card reader back into your Linux computer and again rerun the following command, but this time take note of the additional entries.
This command will return something like what you got above, but with an additional entry, in our case “/dev/sda1” is that additional entry, with your entry, remove the partition number.
For instance, “/dev/sda1” will become “/dev/sda“. We need to do this as we want to write to the entire drive and not just a singular partition.
3. We can now utilize dd, the same tool we make use of on Mac OS X since it is also built on Unix.
We can utilize the following command to begin dumping the SD Cards image to our home directory.
Make sure you replace “/dev/sda” with the filesystem that you grabbed using the “df -h” command.
The process of backing up your Raspberry Pi can take some serious time, so be patient and wait.
The dd tool provides no feedback, so you will have to wait until the input command returns to your terminal.
Once it reappears, you will have successfully backed up your Raspberry Pi.
Restoring your Raspberry Pi Backup on Linux
1. Now that you have made a backup of your Raspberry Pi you will want to at some stage make use of this. To do this, we will need to again go through the process of finding out the location of our filesystems.
Use the “df -h” command like we did in the first segment of this guide, though this time you might have more than one partition pop up for your SD Card such as “/dev/sda1” and “/dev/sda2“.
Take note of all new entries as you will need to unmount all of them.
2. Now that we have all our partition locations ready, we can unmount each of them by running the following command for each one.
Switch out “/dev/sda1” for the locations that you got in the previous step.
3. With all the partitions now unmounted let’s write our backup image to the SD Card. We can do that by running the following command. Remember swap out “/dev/sda” with your devices mount location.
Backing up your Raspberry Pi to a USB Drive
1. Before plugging in your USB device that you want to keep the backups on let’s first run the following command to find out the current filesystems that are available to us.
This command will return something like what is shown below.
2. Now insert your USB Device into your Raspberry Pi and run the following command, take note of any new entries that pop up.
This command will return something like what is shown below.
3. With our USB device showing on the list, we need to look at the “Mounted on” location. In our case, this is “/media/pi/MYBACKUPDRIVE“.
This directory will be the location that we will write our backup images. So, make a note of it for later in the tutorial.
Now with our backup location now handy we can download the backup script that we are going to use, this script was written by a user on the Raspberry Pi forums called Jinx.
Let’s clone the script to our Raspberry Pi by running the following two commands.
4. With the script now saved to the Raspberry Pi, we can start to make use of it. We can do an initial backup by running the command below on our Raspberry Pi. Make sure you replace “/media/pi/MYBACKUPDRIVE” with your own mount location that you grabbed in the previous step.
This script will create a dummy image then launch a rsync process to copy all the files from the system to the dummy image.
Please note that the initial backup can take up to an hour to complete.
5. Now that we have created our initial backup file and know that the script is working as intended we can move onto automating the backup. To do this, we will be making use of cron jobs.
One thing to decide on how is whether you want an incremental backup or multiple backups. An incremental backup just updates the original backup and doesn’t generate a new file.
Run the following command on your Raspberry Pi to begin editing the crontab.
6. In the crontab editor, add one of the following lines to the bottom of the file.
This process will make a backup every day. If you want to edit the cron timings, you can use our Crontab tool work them out easily.
Incremental Backup
Multiple Backup
Now save the file by pressing CTRL + X then pressing Y and then hitting ENTER.
7. You should now have an automated backup system up and running that will continually backup your Raspberry Pi to your USB device.
To restore these images follow our Restoring guides located in the SD Card section of this guide.
Conclusion
I hope that you now know how to backup your Raspberry Pi SD card on both your main system or backing up directly to a USB device.
You can now continue with working on some Raspberry Pi projects or just using your Pi as you would normally. If you run into any issues or have any feedback, then feel free to drop a comment below.
This post presents methods to clone & backup Raspberry Pi SD card, helping you protect data against data loss. Think about you’ve spent hours working on your Raspberry Pi, but suddenly the SD card in your Raspberry dies? Does that sound horrible? It is necessary to create a backup for your SD card in case of any unexpected errors.
Free download Pi SD card cloning software
SD card backup software can help you create a full backup for SD card, USB flash drive, external HDD, hard drive, SSD and virtual disk. It provides multiple solutions to backup SD card, for example, you can back up the SD card to an image file, clone SD card to a new card byte by byte, image the SD card, etc. You can choose proper method to backup Raspberry Pi SD card based on actual requirements.
DiskGenius (old name PartitionGuru) is free backup software running under Windows, and it supports multiple file system formats such as NTFS, exFAT, FAT32, Ext2, Ext3, Ext4, etc. In this guide, we use this program to backup & clone SD card.
The SD card is the “hard drive” of your Raspberry Pi, as it runs the operating system for the device. Of course, you may install many different operating systems on it. How many SD cards are installed on your Raspberry Pi? Have you ever tried cloning SD card, micro SD card or miniSD card? Cloning SD card is a way of backing up data in case of SD card corruption.
The following part will show you how to clone Raspberry Pi SD card on Windows computers. You can use this method to clone SD cards with any file systems like NTFS, FAT32, exFAT, Ext2, Ext3 or Ext4.
Note: the process requires the capacity of target SD card shouldn’t be smaller than the source SD card.
Step 1: Launch PartitionGuru from your computer. Insert source SD card and target SD card to the computer and then you can see them in the software.
Step 2: Click Tools from menu and select Clone Disk item.

Step 3: Select source disk. Here you should select the source SD card for which you want to create a cloned memory card, then click OK button.

Step 4: Select target SD card and click OK. Please make sure files on target SD card have been backed up, for after cloning the target SD card will contain same information as the source.

Step 5: Select backup mode and click Start button. PartitionGuru provides three backup modes: Copy all sectors, Copy all valid sectors according to the layout of the file system and Copy all files.

- Copy all sectors: this clone method is the slowest of the three, as it clones source device sector by sector to the target without check if sectors contains valid data. Thus many invalid file might be copied, but the target device will be a total copy of the source. You can even perform data recovery from both devices.
- Copy all valid sectors according to the layout of the file system: this cloning method is the fastest of the three. It clones data without changing the layout of data structure.
- Copy all files: this method is also very fast. PartitionGuru analyzes file system and data structure on source device and copies all data to corresponding partitions on target disk. file system will be reorganized on target disk and file fragments are filtered during cloning process.
Step 6: Wait for the cloning process to complete and then close the software.

Guide 2: How to backup Raspberry Pi SD card to an image file?
Backing up Raspberry Pi SD card here means creating a backup into an image files from which you can restore data to any SD card. Check the steps below to backup SD card to an image file on Windows 11/10/8/7/XP.
Step 1: Connect the SD to your PC via a card reader and then launch PartitionGuru.
Step 2: Select the SD card you want to backup and click Partition Backup button.

Step 3: Set a location to save backup image file and click Start button. Then wait for the backup process to complete.

What is a Raspberry Pi?
A Raspberry Pi is a credit card-sized computer, which is originally designed for education. This small computer is single-board, low cost, high-performance and the main advantage is the size which is not bigger than your palm. The goal of the creator was to provide a low-cost device that can be used to improve programming skills and hardware understanding at the pre-university level.
Thanks to its feature, Raspberry Pi is quickly preferred by programmers, computer geeks, electronics enthusiasts, tinkerers, etc. throughout the globe. Raspberry Pi is a caseless device and slower than a modern PC, however, it is still a complete Linux device and able to offer all expected abilities. For the moment, the latest version is Raspberry Pi 4.
About Raspberry Pi SD card
The SD card plays an important role in Raspberry Pi, as it is responsible for providing initial storage for operating system and files. When Raspberry Pi is connected to a power supply, bootloader from operating system will be firstly executed, and then more codes from SD card will be loaded in order to boot Raspberry Pi. Thus If there is not a SD card, system cannot boot.
The officially recommended minimum capacity of Raspberry Pi SD card is 8GB, and the physical size of SD card differs depending on the version of Raspberry Pi you are using. The original Raspberry Pi Model A and Raspberry Pi Model B require full-size SD cards. The newer Raspberry Pi Model A+, Raspberry Pi Model B+, Raspberry Pi 2 Model B, Raspberry Pi Zero, Raspberry Pi 3 Model B and Raspberry Pi 4require micro SD cards.
Summary
This post presents methods to clone & back up Raspberry SD card on Windows computer. You can choose either solution to create backup for your SD card or other storage devices to protect them against data loss issue. If you feel this guide useful, please share it on your social network to help more people.
Related articles
How to access ext4 partition in Windows 10/8/7?
How to read/write ext4/3/2 drive in Windows 10?
How to clone ext4/ext3/ext2 partition in Windows 10/8/7?