
Значительная часть проблем, связанных с работой Windows 10 после установки имеет отношение к драйверам устройств и, когда такие проблемы решены, а нужные и «правильные» драйверы установлены, имеет смысл создать их резервную копию для быстрого восстановления после переустановки или сброса Windows 10. О том, как сохранить все установленные драйверы, а затем — установить их и пойдет речь в этой инструкции. Также может оказаться полезным: Резервная копия системы Windows 10.
Примечание: существует множество бесплатных программ для создания резервных копий драйверов, таких как DriverMax, SlimDrivers, Double Driver и прочих Driver Backup. Но в этой статье будет описан способ, позволяющий обойтись без сторонних программ, только лишь встроенными средствами Windows 10.
Сохранение установленных драйверов с помощью DISM.exe
Инструмент командной строки DISM.exe (Deployment Image Servicing and Management) предоставляет пользователю самые обширные возможности — от проверки и восстановления системных файлов Windows 10 (и не только) до установки системы на компьютер.
В этом руководстве будем использовать DISM.exe для того, чтобы сохранить все установленные драйверы.
Шаги для сохранения установленных драйверов будут выглядеть следующим образом
- Запустите командную строку от имени Администратора (сделать это можно через меню правого клика по кнопке «Пуск», если у вас не отображается такой пункт, то введите «командная строка» в поиске на панели задач, после чего нажмите правой кнопкой по найденному пункту и выберите «Запустить от имени администратора»)
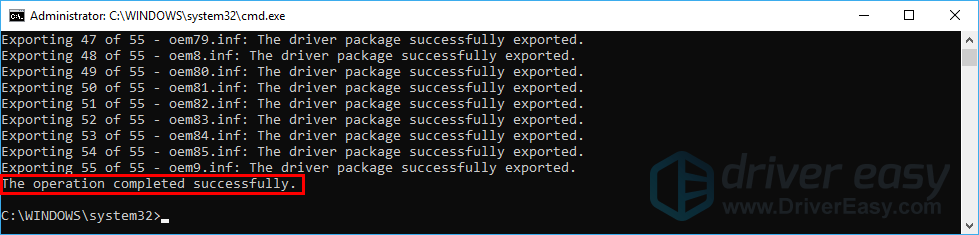
- Введите команду dism /online /export-driver /destination:C:\MyDrivers (где C:\MyDrivers папка для сохранения резервной копии драйверов, папка должна быть создана заранее вручную, например, командой md C:\MyDrivers) и нажмите Enter. Примечание: вы можете использовать любой другой диск или даже флешку для сохранения, не обязательно диск C.

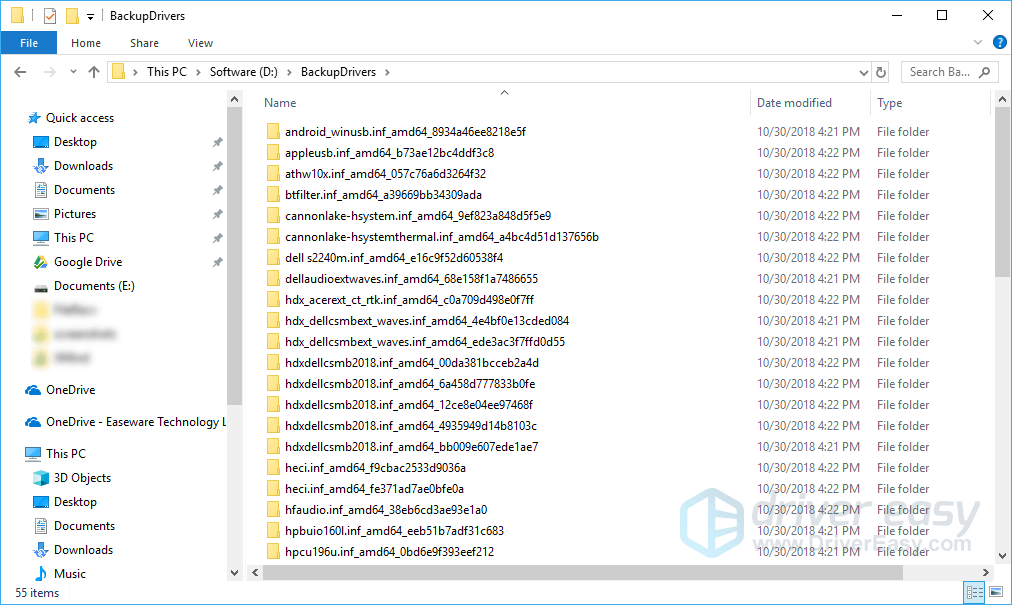
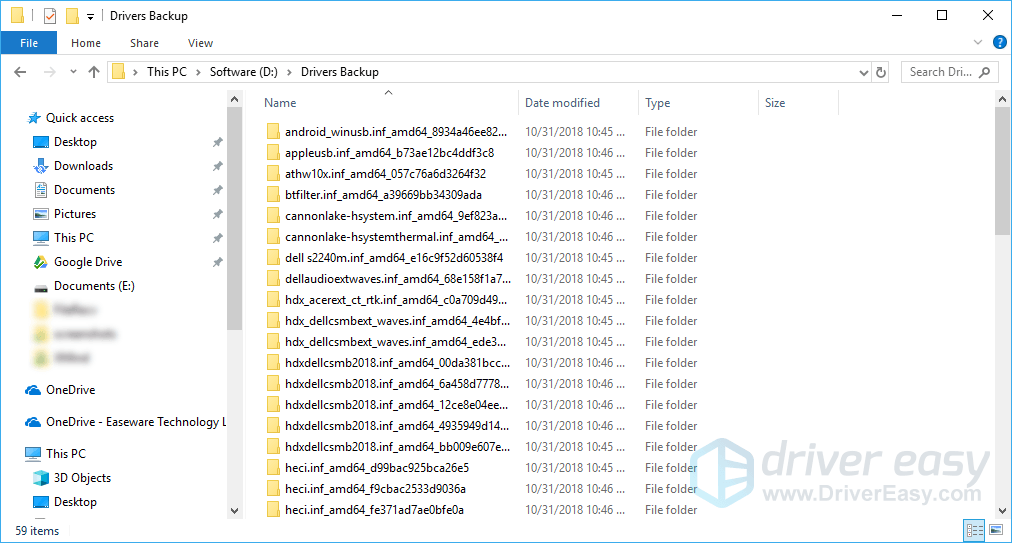
- Дождитесь завершения процесса сохранения (примечание: не придавайте значения тому, что у меня на скриншоте сохранилось всего два драйвера — на реальном компьютере, а не в виртуальной машине, их будет больше). Драйверы сохраняются в отдельные папки с именами oem.inf под разными номерами и сопутствующими файлами.

Теперь все установленные сторонние драйверы, а также те, что были загружены из Центра обновлений Windows 10, сохранены в указанную папку и могут быть использованы для ручной установки через диспетчер устройств или, например, для интеграции в образ Windows 10 с помощью того же DISM.exe
Создание резервной копии драйверов с помощью pnputil
Еще один способ создания резервной копии драйверов — использования утилиты PnP, встроенной в Windows 7, 8 и Windows 10.
Для сохранения копии всех используемых драйверов выполните следующие шаги:
- Запустите командную строку от имени администратора и используйте команду
- pnputil.exe /export-driver * c:\driversbackup (в данном примере все драйверы сохраняются в папку driversbackup на диске C. Указанная папка должна быть создана заранее.)


После выполнения команды в заданной папке будет создана резервная копия драйверов, точно такая же, как и при использовании первого описанного способа.
Использование PowerShell для сохранения копии драйверов
И еще один способ выполнить то же самое — Windows PowerShell.
- Запустите PowerShell от имени администратора (например, используя поиск в панели задач, затем — правый клик по PowerShell и пункт контекстного меню «Запустить от имени администратора»).
- Введите команду Export-WindowsDriver —Online —Destination C:\DriversBackup (где C:\DriversBackup — папка для сохранения резервной копии, её следует создать еще до использования команды).


При использовании всех трех способов резервная копия будет одинаковой, тем не менее, знание о том, что таких способов более чем один может пригодиться в случае неработоспособности используемого по умолчанию.
Восстановление драйверов Windows 10 из резервной копии
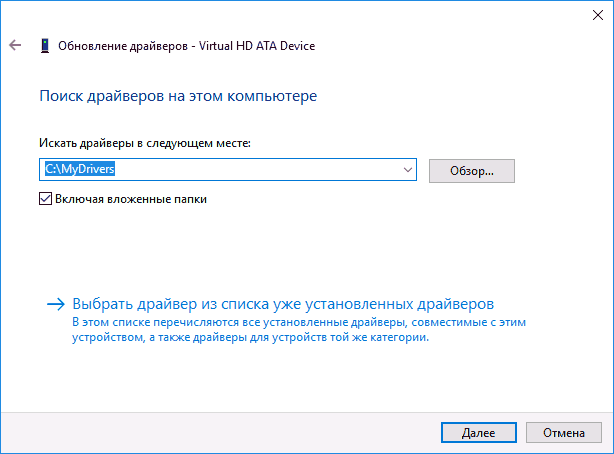
Для того, чтобы заново установить все сохраненные таким образом драйверы, например, после чистой установки Windows 10 или ее переустановки, зайдите в диспетчер устройств (также можно сделать через правый клик по кнопке «Пуск»), выберите устройство, для которого нужно установить драйвер, кликните по нему правой кнопкой мыши и нажмите «Обновить драйвер».
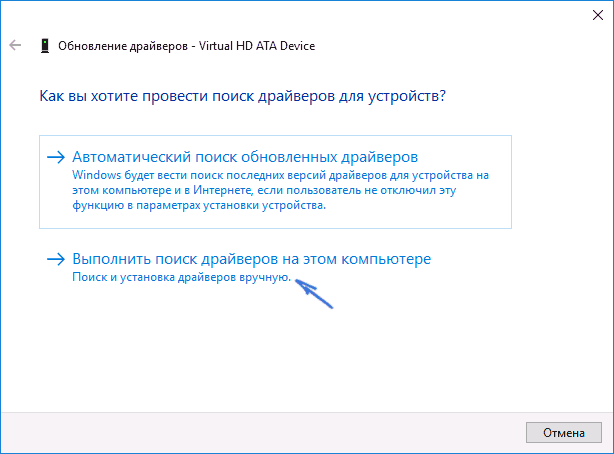
После этого выберите «Выполнить поиск драйверов на этом компьютере» и укажите папку, где была сделана резервная копия драйверов, после чего нажмите «Далее» и установите нужный драйвер из списка.
Также вы можете интегрировать сохраненные драйверы в образ Windows 10 с помощью DISM.exe. Подробно описывать процесс в рамках данной статьи не стану, но вся информация доступна на официальном сайте Microsoft, правда, на английском: https://technet.microsoft.com/en-us/library/hh825070.aspx
Возможно, также будет полезным материал: Как отключить автоматическое обновление драйверов Windows 10.
Встроенные средства Windows позволяют создать резервную копию (экспортировать) все установленные на компьютере сторонне драйвера в указанный каталог. Благодаря этому при установке или переустановку Windows вам не придется вручную искать и качать необходимые драйвера.
Содержание:
- Как экспортировать драйвера из командной строки Windows?
- Экспорт драйверов с помощью утилиты PNPUtil
- Установка драйверов из резервной копии в Windows
Как экспортировать драйвера из командной строки Windows?
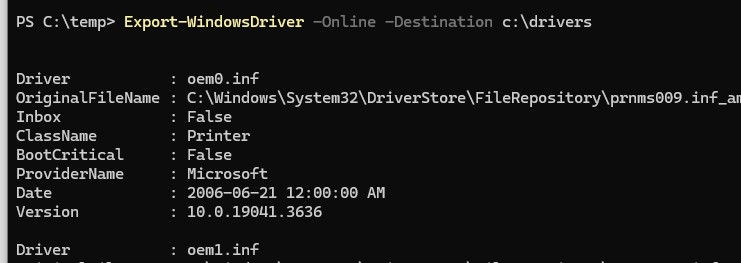
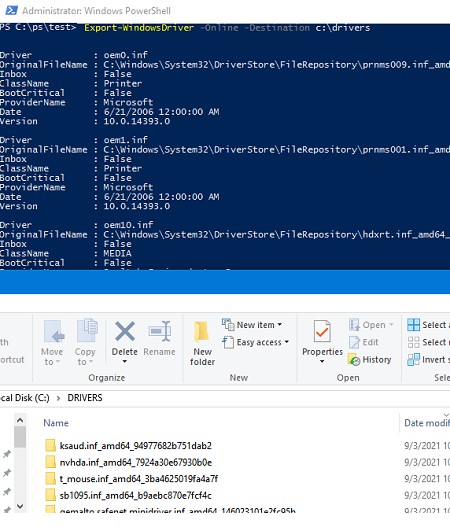
Чтобы экспортировать все установленные сторонние (не-Microsoft) драйвера Windows в каталог C:\drivers, откройте консоль PowerShell с правами администратора и выполните команду:
Export-WindowsDriver –Online -Destination c:\drivers
Аналогичная команда DISM:
dism /online /export-driver /destination:C:\Drivers
Эти команды извлекают сторонние драйвера из хранилища драйверов (Driver Store) Windows. Каждый драйвер и все связанные с ним файлы (sys, dll, exe, и т.д.) сохраняется в собственный каталог, который называется по имени inf-файла драйвера.
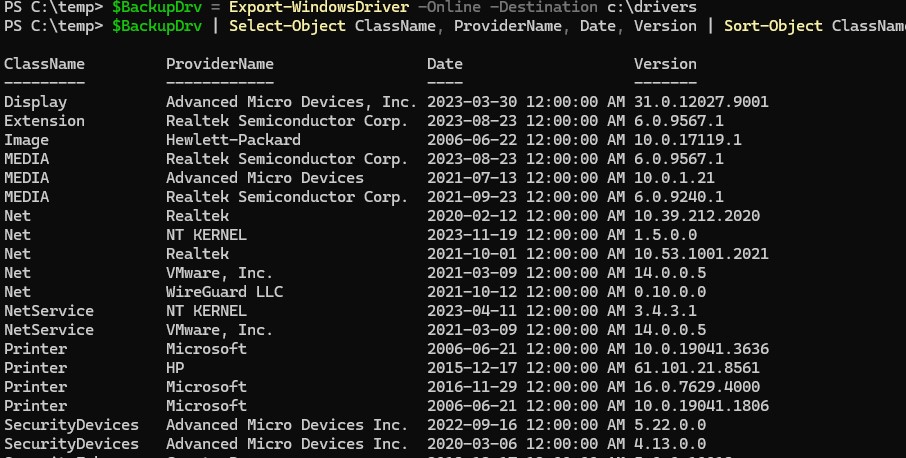
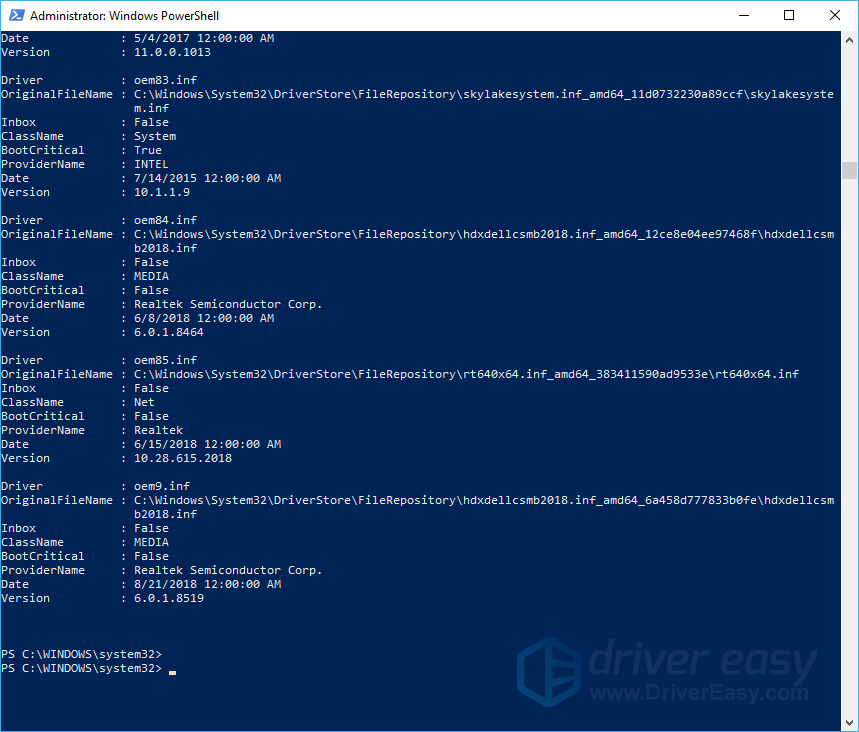
Можете создать таблицу с указанием класса, производителя, версией, и датой драйвера:
$BackupDrv = Export-WindowsDriver -Online -Destination c:\drivers
$BackupDrv | Select-Object ClassName, ProviderName, Date, Version | Sort-Object ClassName
Экспортируйте список драйверов в CSV файл:
$BackupDrv| Select-Object ClassName, ProviderName, Date, Version |Export-Csv c:\drivers\drivers_list.csv -NoTypeInformation -Encoding UTF8
Если нужно извлечь драйвера из офлайн образа Windows, смонтированного в каталог c:\win_image:
Export-WindowsDriver -Path c:\win_image -Destination c:\drivers
Или
DISM /Image:C\win_image /Export-Driver /Destination:C:\drivers
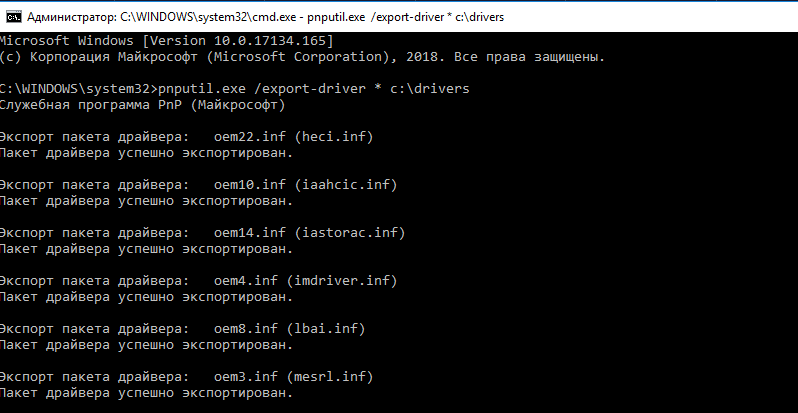
Экспорт драйверов с помощью утилиты PNPUtil
Также для управления драйверами Windows можно использовать утилиту командной строки
PNPUtil.exe
(доступа даже в старых версиях Windows). Чтобы экспортировать установленные драйвера, выполните команду:
pnputil.exe /export-driver * c:\drivers
Команды Export-WindowsDriver и DISM позволяют создать резервную копию сразу всех драйверов. Утилита pnputil позволяет экспортировать только указанный драйвер.
Выведите список драйверов установленных драйверов:
pnputil.exe /enum-drivers
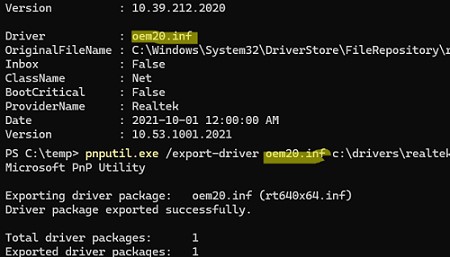
Или воспользуйтесь командой PowerShell для фильтра драйверов по типа (в этом примере мы планируем экспортировать драйвера сетевой карты Realtek):
Get-WindowsDriver -Online | where { ($_.ProviderName -like "Realtek") –and ($_.ClassName -like "Net")}
Скопируйте INF имя файла драйвера, который нужно экспортировать и выполните команды:
Mkdir c:\drivers\realtek
pnputil.exe /export-driver oem20.inf c:\drivers\realtek
Установка драйверов из резервной копии в Windows
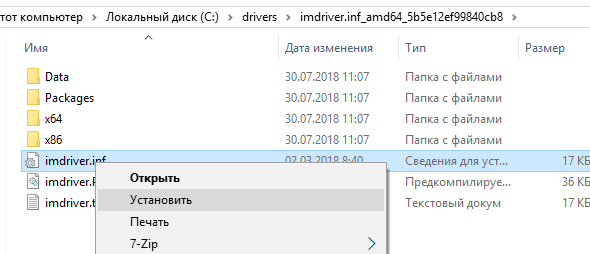
После переустановки Windows вы можете использовать каталог с резервной копией драйверов для их установки в чистой системе. Можно установить драйвера по одному. Для этого щелкните правой кнопкой по INF файлу и выберите пункт меню “Установить”.
Либо вы можете установить сразу все драйвера из указанной папки (включая вложенные):
pnputil.exe /add-driver C:\drivers\*.inf /subdirs /install
Можно импортировать драйвера в офлайн образ Windows с помощью параметра Add-Driver утилиты DISM (в этом примере мы разрешаем установку неподписанных драйверов):
DISM /image:c:\win_image /Add-Driver /Driver:C:\Drivers /Recurse /ForceUnsigned
Don’t know how to back up your drivers on Windows? Don’t worry! You’ve come to the right place. It’s very, very easy! After reading this article, you should be able to back up your drivers easily and quickly!
Try these methods
- Back up your drivers in Command Prompt
- Back up your drivers in Powershell
- How to restore a driver backup
- Back up and restore your drivers using Driver Easy
Method 1: Back up your drivers in Command Prompt
You can back up your drivers using DISM (Deployment Image Servicing and Management) tool.
As a command line tool built into Windows 8 and later versions of Windows systems, it is often used to service and prepare Windows images. As a nifty tool, it can also be used to scan and repair Windows images. And of course, it can also be used to back up your drivers! Here is how to do it:
- Create a new folder in your local disk drive (D:) or one of any other drives that have not installed Windows 10. Then rename it to Drivers Backup. In this example, I will create a folder in my local disk drive (D:) and call it Drivers Backup.
- On your keyboard, press the Windows logo key and R at the same time to open the Run dialog. Type cmd and then press Ctrl, Shift and Enter at the same time to run Command Prompt as administrator. You’ll be prompted for permission. Click Yes to open Command Prompt.
- In Command Prompt, type the following command line and press Enter:
dism /online /export-driver /destination:”D:\Drivers Backup”
NOTE: If you created the folder with the name “Drivers Backup” in your local disk drive (E:), you should type the command line dism /online /export-driver /destination:”E:\Drivers Backup”
- When the process is completed, you’ll see the message:

- Now you can go to the Drivers Backup folder to view the backup of all the drivers.

Method 2: Back up your drivers in Powershell
You can also back up your drivers in Powershell, but the command line is a little bit different. It is also very easy! Follow the instructions below to back up your drivers in Powershell.
Powershell is a command line tool similar to Command Prompt. It was initially developed by Microsoft and now it has become an open-source project. Powershell is not only available in Windows but also in Mac OS and Linux.
- Create a new folder in your local disk drive (D:) or one of any other drives that have not installed Windows 10. Then rename it to Drivers Backup. In this example, I will create a folder in my local disk drive (D:) and call it Drivers Backup.
- On your keyboard, press the Windows logo key and type powershell. In the list of search results, right-click Windows Powershell and select Run as administrator. You’ll be prompted for permission. Click Yes to run Powershell as administrator.
- In Powershell, type the following command line and press Enter:
Export-WindowsDriver -Online -Destination “D:\Drivers Backup”

NOTE: If you created the folder with the name “Drivers Backup” in your local disk drive (E:), you should type the command line Export-WindowsDriver -Online -Destination “E:\Drivers Backup”
- Wait until the process is completed.

- Now you can go to the Drivers Backup folder to view the backup of all the drivers.


How to restore a driver backup
In Device Manager, you can manually restore your drivers’ backups one by one. Here is how to do it:
- On your keyboard, press the Windows logo key and X at the same time. Then select Device Manager. You’ll be prompted for permission. Click Yes to open Device Manager.
- Right-click the device you want to restore a driver backup for, then select Update driver.

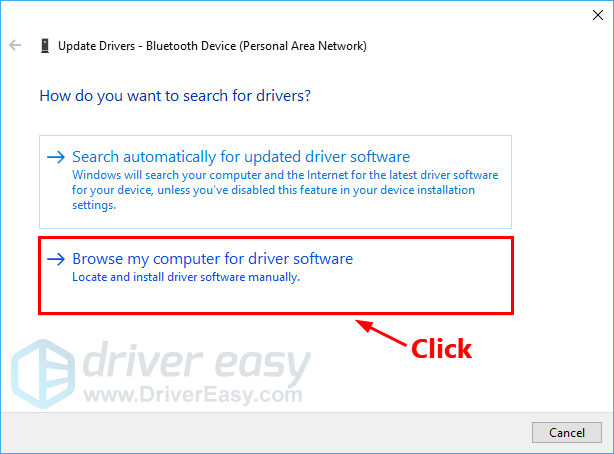
- In the pop-up window, select Browse my computer for driver software.

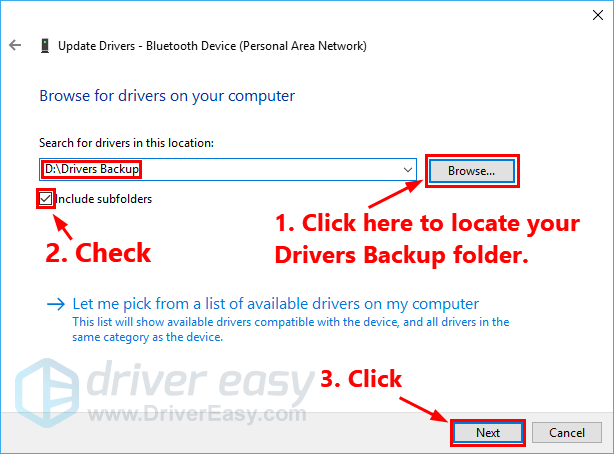
- Click Browse… to locate your Drivers Backup folder. Click the box next to Include subfolders. Then click Next.
- Windows will begin to search the Drivers Backup folder and restore the driver for this device.
- Close the window when the process is completed.

Method 3: Back up and restore your drivers using Driver Easy
If you don’t feel comfortable playing with those command lines, or if you don’t have time, patience or computer skills to back up, restore or update your drivers, you can, instead, do it automatically with Driver Easy.
Driver Easy is easy to use. What’s more, you don’t need to worry about making a mistake when you back up, restore and update your drivers. Driver Easy handles it all.
With the Pro version of Driver Easy, you can back up and restore your drivers easily and quickly!
- Download and install Driver Easy.
- Activate the Pro version of Driver Easy using your license key. If you don’t know how to do it, you can refer to the activation guide.
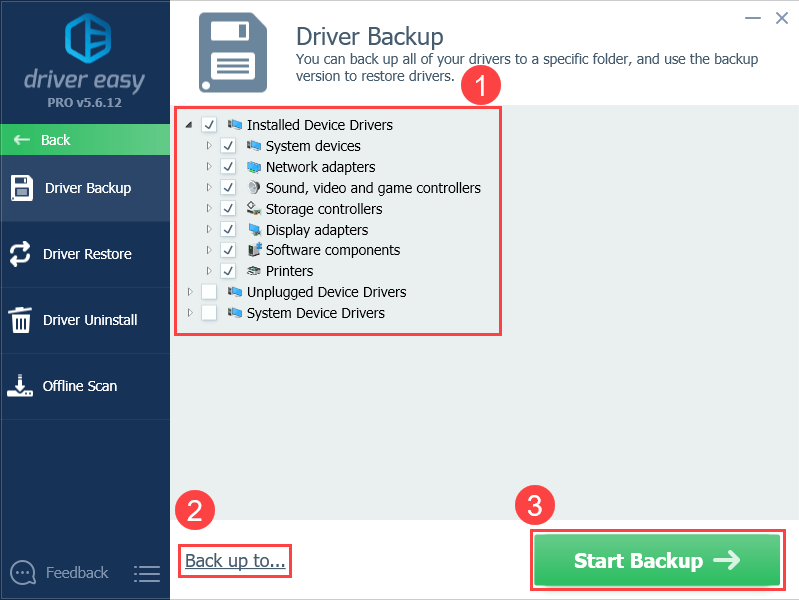
- In the Pro version of Driver Easy, click Tools.


To back up your drivers:
- In the Driver Backup window, select the drivers you want to back up by checking the box next to the device. The driver’s backup folder is located in your local disk drive (C:) by default. You can click Backup to… to change the path. Then click Start Backup to back up the drivers you select.

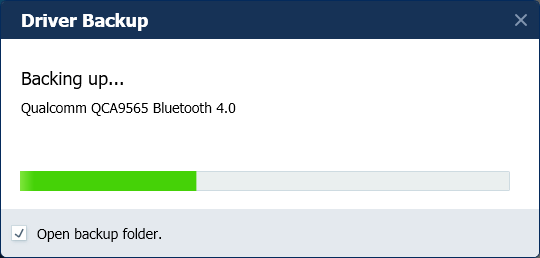
- Wait until the process is completed.

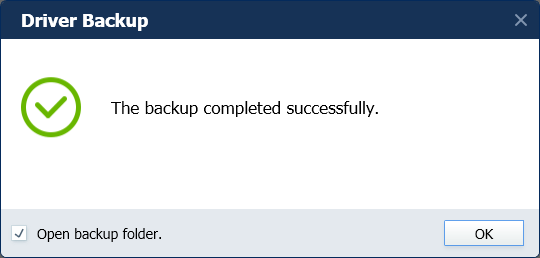
- When you see the following message, click OK. If you check the box next to Open backup folder, the backup folder will pop up after you click OK.
To restore your drivers:
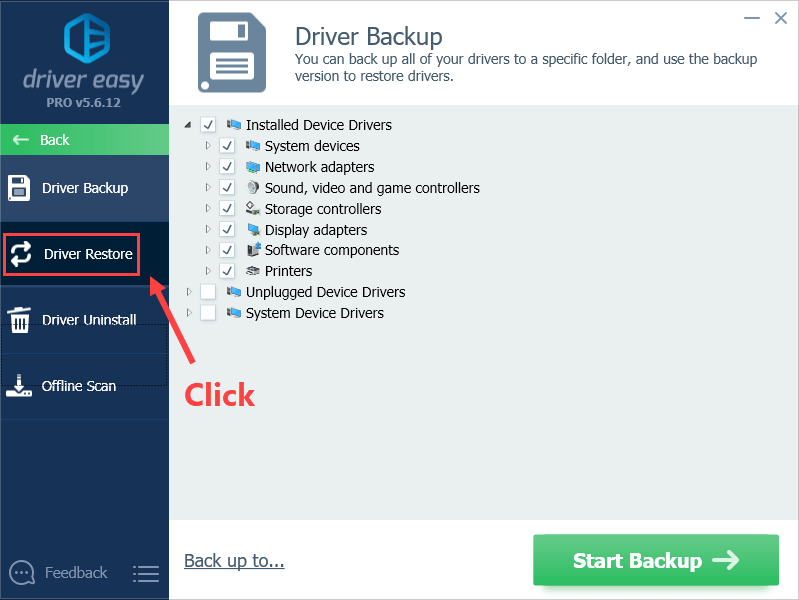
- Run the Pro version of Driver Easy. Then click Tools.
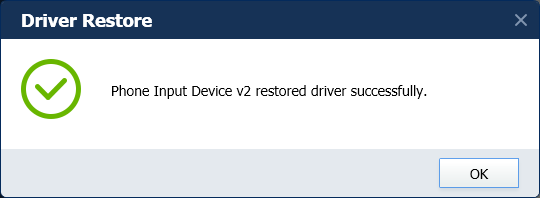
- Click Driver Restore. You’ll be prompted for permission. Click Continue > Yes to open the Driver Restore window.
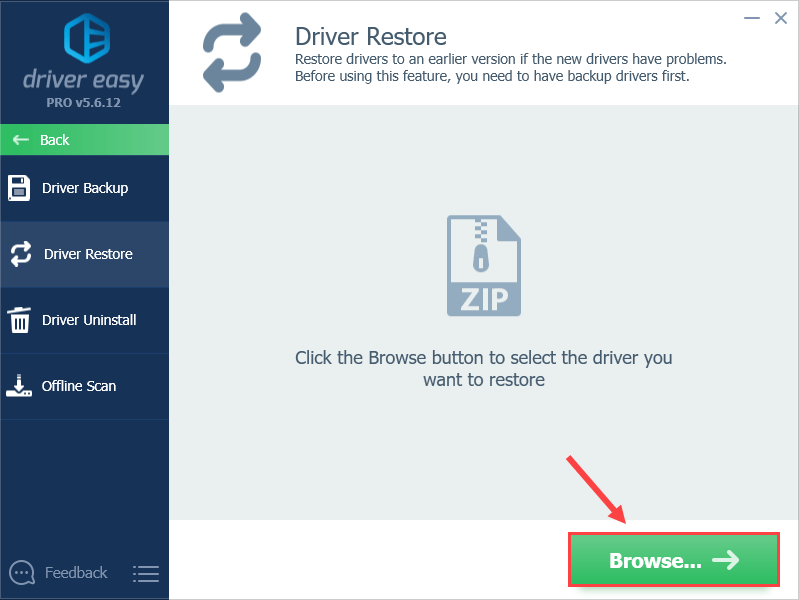
- In the Driver Restore window, click Browse… to select the .zip file of your drivers backup.
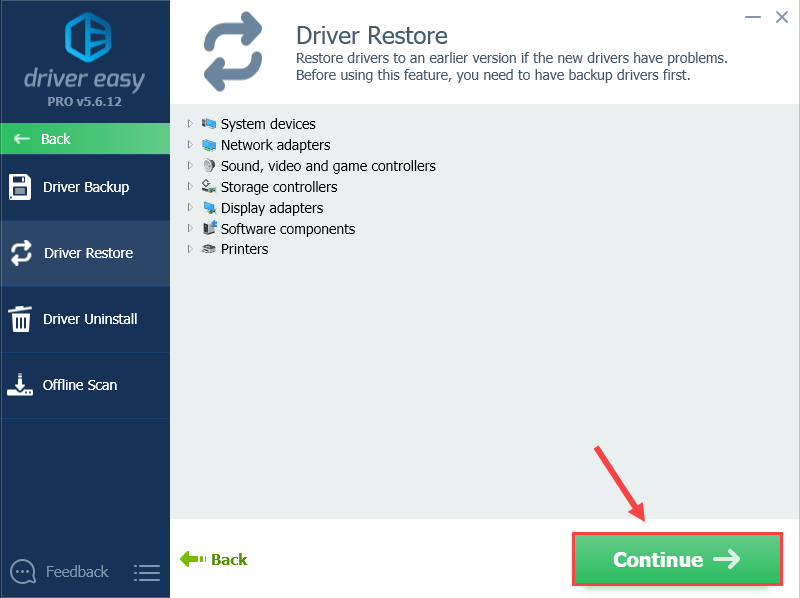
- Click Continue to restore your drivers.

- Click OK when it is completed.

Please contact Driver Easy’s support team at support@drivereasy.com if you need assistance.
Download Windows Speedup Tool to fix errors and make PC run faster
In this post, we will see how you can export and back up your Device Drivers using PowerShell in Windows 11/10. Windows 11/10 ships with PowerShell which is a command-line shell and scripting language, built on the .NET Framework, designed for system administration, IT professionals and developers. We have already seen a bunch of posts where we have seen how PowerShell can help us simplify carrying out of tasks. You can update Windows Defender definitions, list Drives, uninstall Universal apps, find scheduled tasks queued status, create System Image, create a desktop shortcut to open Windows Store apps, and even get an Installed Driver list, to mention a few.
Open PowerShell as an Administrator. To open an elevated PowerShell prompt, in the taskbar search, type powershell. Now see the result Windows PowerShell which appears on the top. Right-click on it and select Run as Administrator.
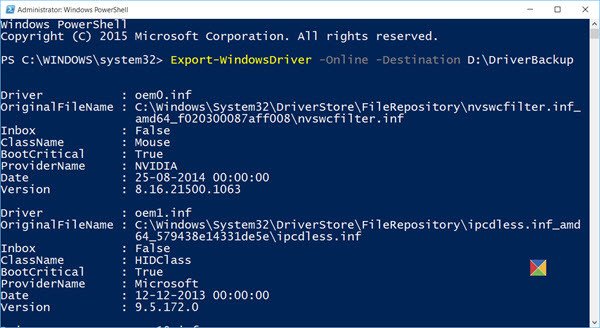
We will be using the Export-WindowsDriver cmdlet to back up your drivers. The Export-WindowsDriver cmdlet exports all third-party drivers from a Windows image to a destination folder.
In the PowerShell window, type the following command and hit Enter:
Export-WindowsDriver -Online -Destination D:\DriverBackup
Here D:\Driver Backup is the destination folder, where the Drivers will be exported and saved to.
You can also export drivers from an offline image. This command exports third-party drivers from an offline image mounted at c:\offline-image is:
Export-WindowsDriver -Path c:\offline-image -Destination D:\DriverBackup
A detailed read can be found at TechNet.
Now take a look at how to generate a list of Disabled Features or a list of installed Drivers on Windows 11/10 using PowerShell.
How to do driver backup from PowerShell in Windows?
To backup drivers in Windows 11/10 using PowerShell, you need to open the PowerShell window with administrator privileges first. Then, you can enter this command: Export-WindowsDriver -Online -Destination D:\DriverBackup. For your information, you can change the location as per your requirements. On the other hand, you can use the Windows Terminal to execute the same command.
How do I backup and restore drivers in Windows?
To backup and restore drivers in Windows 11/10 PC, you can follow the aforementioned guide. For that, you need to enter an elevated PowerShell window and use this command: Export-WindowsDriver -Online -Destination D:\DriverBackup. If you want to export drivers from an offline image, you need to use this command: Export-WindowsDriver -Path c:\offline-image -Destination D:\DriverBackup.
You can also use the built-in Device Manager to manage, backup, restore your Drivers. Then there are freeware like Double Driver, Driver Fusion, Free Driver Backup, etc, that help you easily backup and restore drivers.
Anand Khanse is the Admin of TheWindowsClub.com, a 10-year Microsoft MVP (2006-16) & a Windows Insider MVP (2016-2022). Please read the entire post & the comments first, create a System Restore Point before making any changes to your system & be careful about any 3rd-party offers while installing freeware.
Reader Interactions
Sign in to your MUO account

Your Windows machine needs its drivers to keep your devices running smoothly. As such, it’s always a good idea to back up your Windows drivers, whether or not you need them for an urgent fix. Even if you never end up losing everything, it’s always good to have drivers handy in case one device needs them reinstalled.
Here are two easy ways to back up your Windows 10 device drivers in one fell swoop, and two methods to restore them from the backup.
Why Back Up Windows 10 Device Drivers?
If Windows 10 isn’t behaving itself, you may want to perform a clean install of Windows to wipe everything and get back on track. And because it puts everything back to factory defaults, you’ll need to reinstall your Windows 10 device drivers to have everything running as before.
You may simply want to save a copy of your drivers because you no longer have the original installation disks, or to be able to fix corrupted drivers on Windows 10 in the future. Maybe the manufacturer’s webpage for your specific model of hardware is no longer live. There are many reasons to back up your device drivers. Whatever the reason, here’s how you can do it.
How to Back Up Your Drivers on Windows 10
To start, let’s explore how to back up your drivers on Windows 10. Afterward, we can take a look at some ways to restore them again.
1. How to Back Up Your Windows 10 Drivers Using the Command Prompt
Backing up your Windows 10 device drivers using Command Prompt is simple. You’ll need to use either DISM or PnPUtil, both of which are command line tools.
- Start by creating a folder in which to store the backups of your drivers. This should be on a different drive than the one on which your operating system is installed. (We’ve created a folder in D drive and renamed it ‘DriverBackup.’)
-
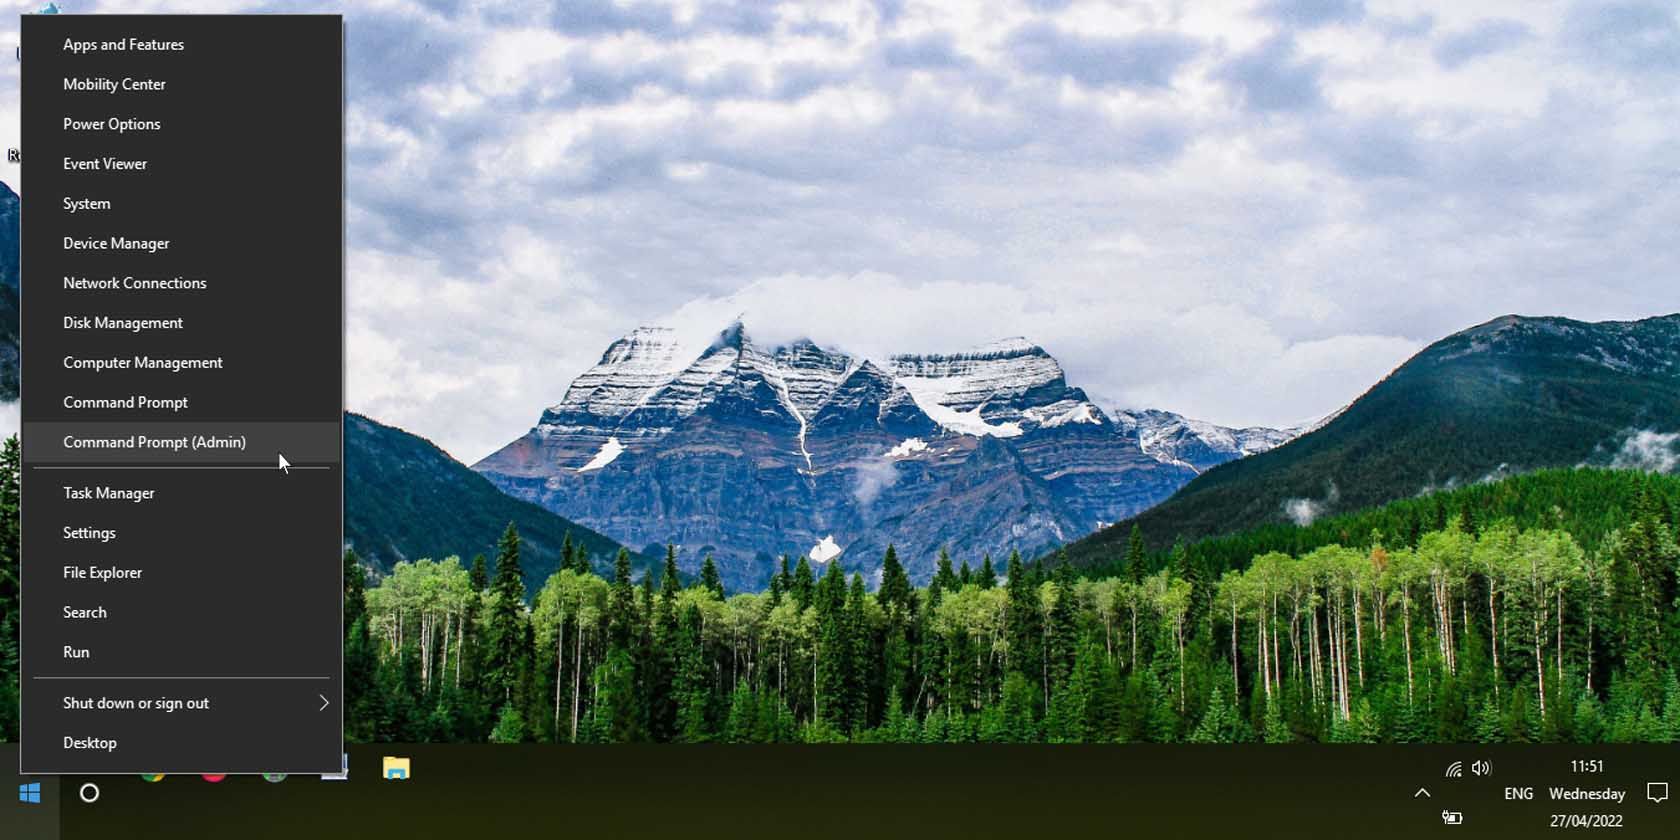
Next, open the elevated command prompt. You can do this by right-clicking on the Start menu and choosing the Command Prompt (Admin) option. Note: You must be signed in to Windows 10 as an administrator to do this.

If you don’t see the Command Prompt option, click on the Start menu and type ‘command prompt.’ Right-click on the Command Prompt app and click on Run as administrator.

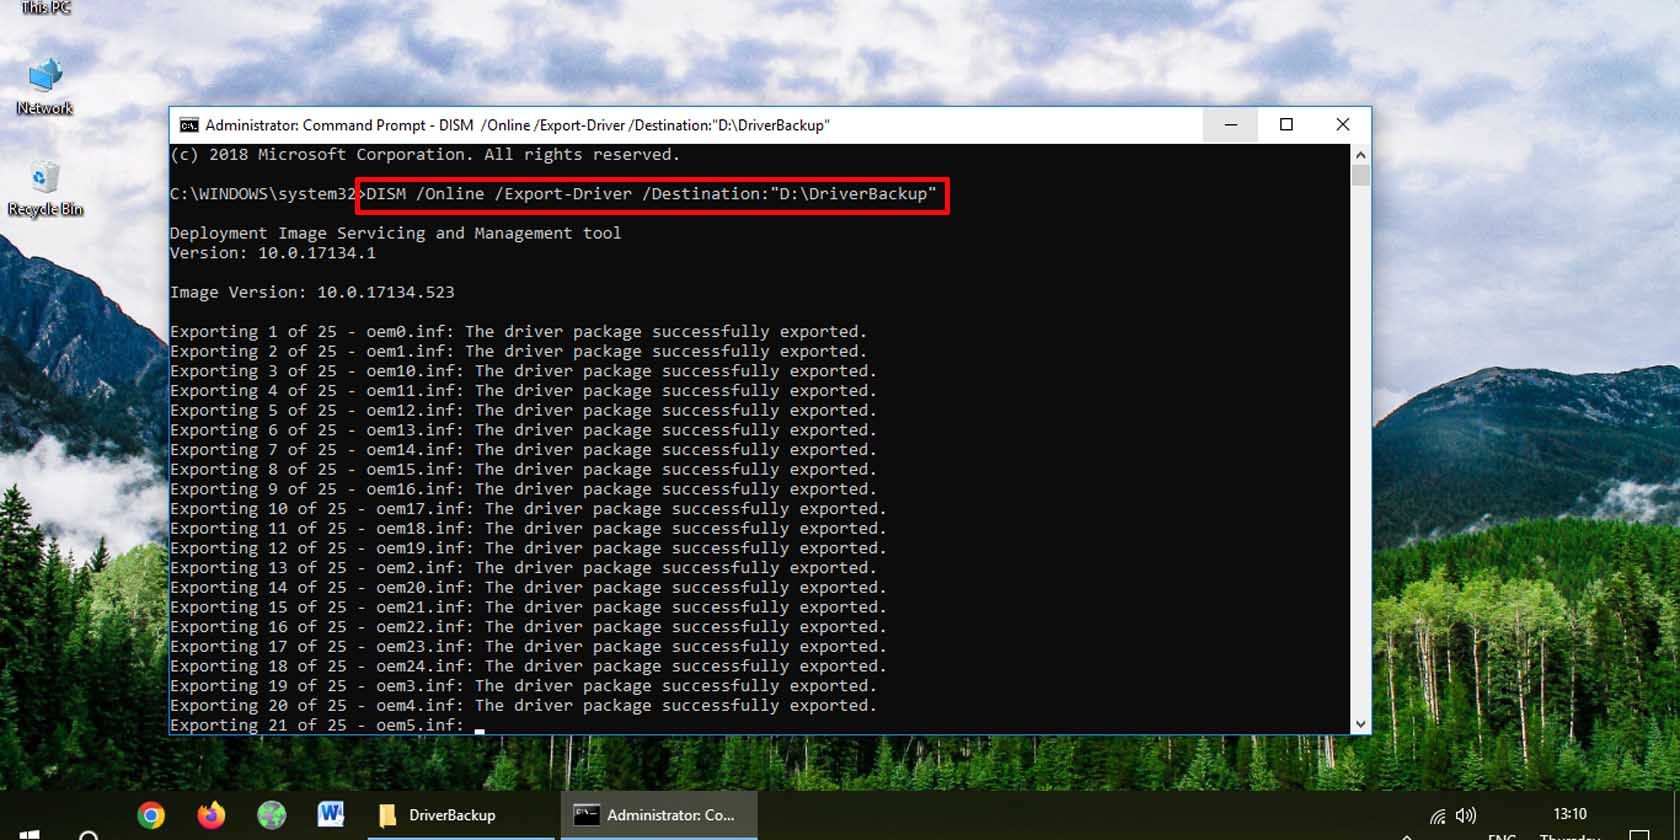
To start backing up your drivers, use either of the command line inputs listed below. Whichever one you choose, be sure to replace ‘D:\DriverBackup’ with the location of the folder you created to back up your Windows drivers. Also, make sure to include the double quotation marks for the DISM utility method.
The following command should work on any version of Windows 10:
DISM /Online /Export-Driver /Destination:"D:\DriverBackup"
If your PC is running at least Windows 10, version 1607, you can use PnPUtil instead:
pnputil /export-driver * D:\DriverBackup
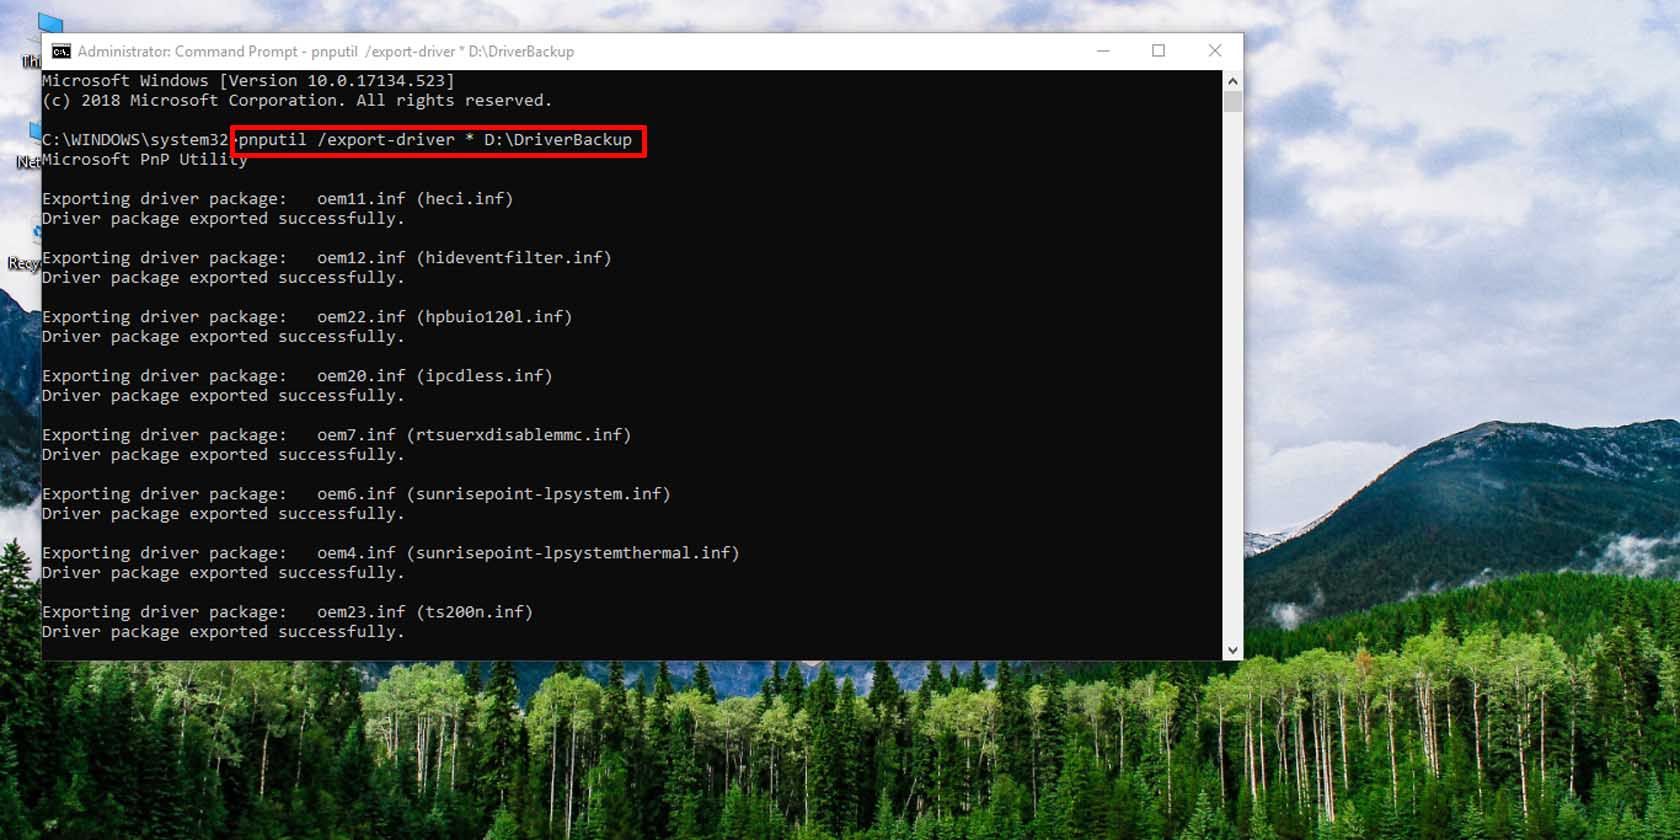
Whichever method you use, your Windows 10 drivers will be backed up to the specified folder.
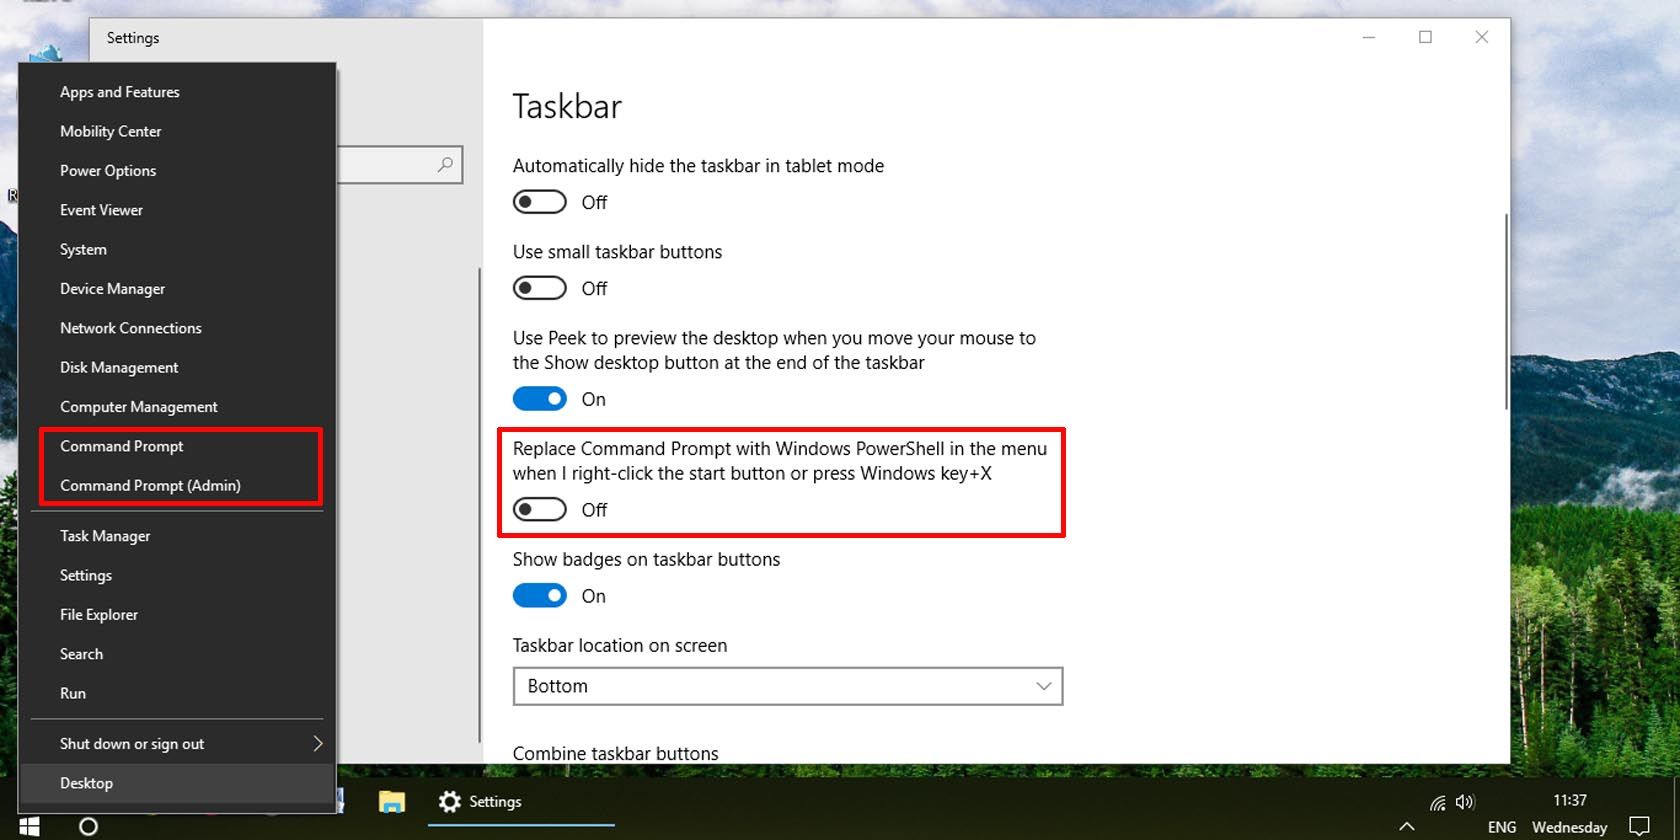
2. How to Back Up Windows 10 Drivers Using PowerShell
You can achieve essentially the same thing with Windows PowerShell. Once again, create a folder in which to back up your Windows 10 drivers; then perform the following steps.
-
Open an elevated PowerShell. To do this, right-click on the Start menu and select the Windows PowerShell (Admin) option.
If you don’t see the option for PowerShell and see Command Prompt instead, right-click on the taskbar and select Taskbar settings. Scroll down to and toggle the Replace Command Prompt with Windows PowerShell option on.
- Enter the following line into PowerShell, replacing ‘D:\DriverBackup’ with your driver backup location.

Export-WindowsDriver -Online -Destination D:\DriverBackup
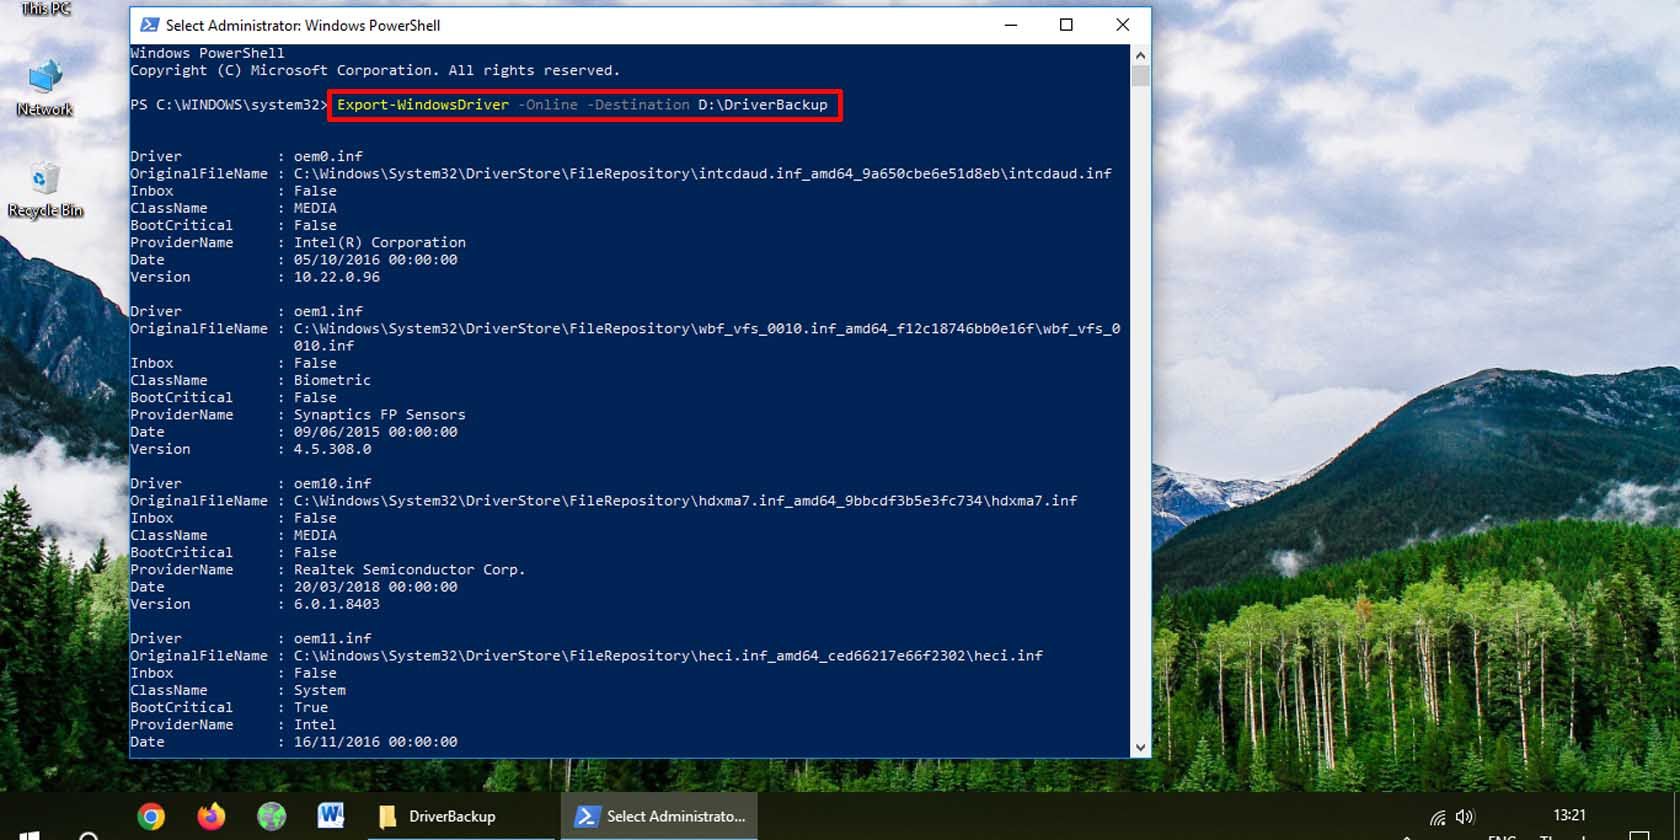
Your Windows 10 device drivers will be backed up to the folder you specified in the PowerShell command.
How to Restore a Driver Backup on Windows 10
Now that you’ve got your backup ready, here’s how to restore it when disaster strikes.
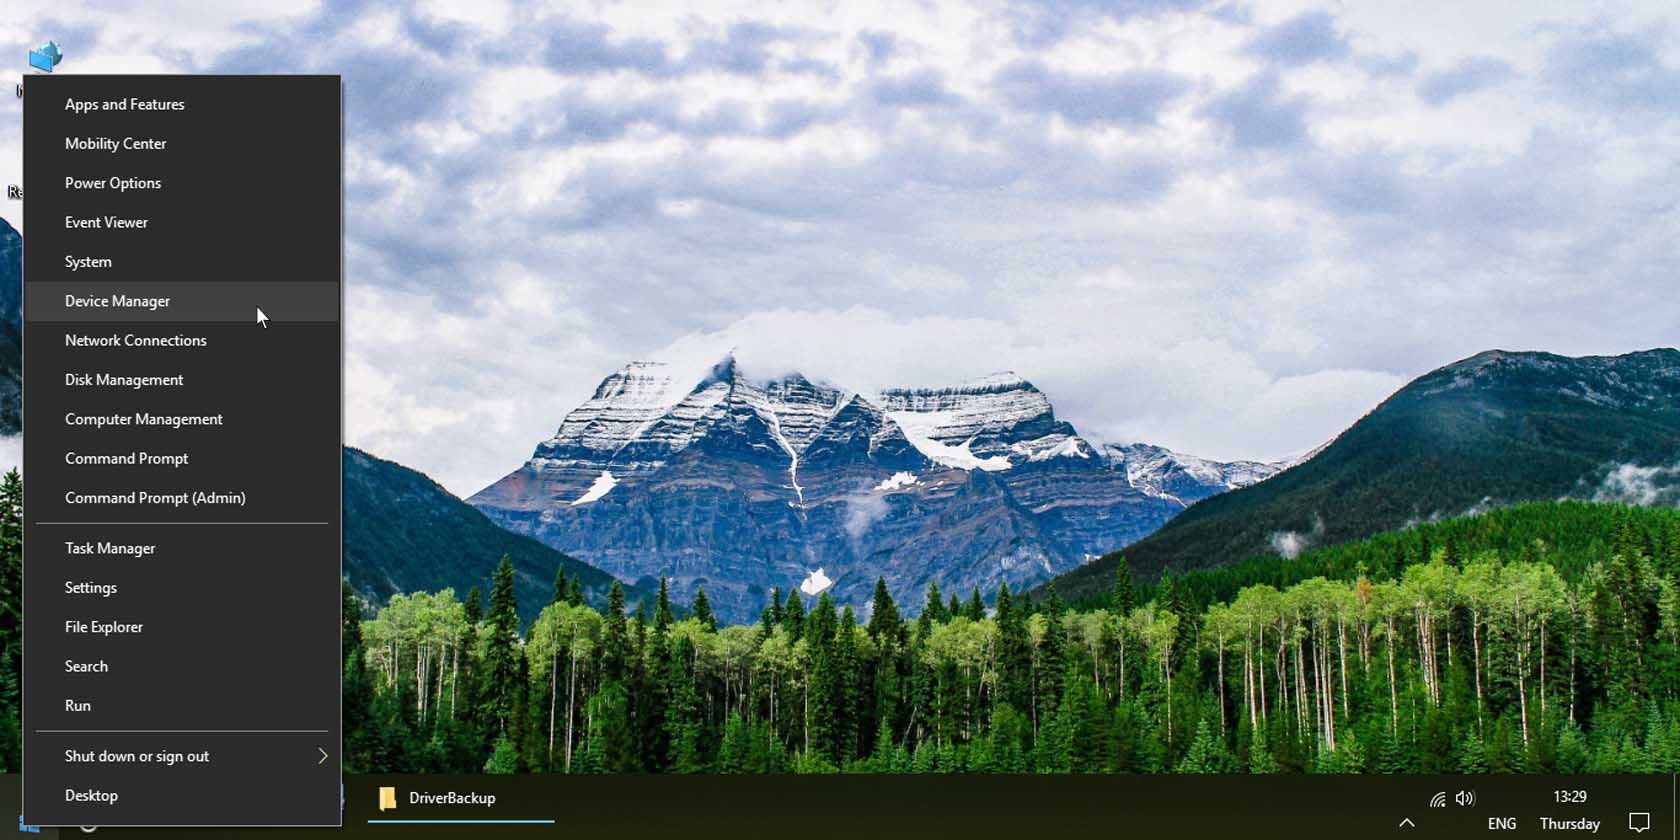
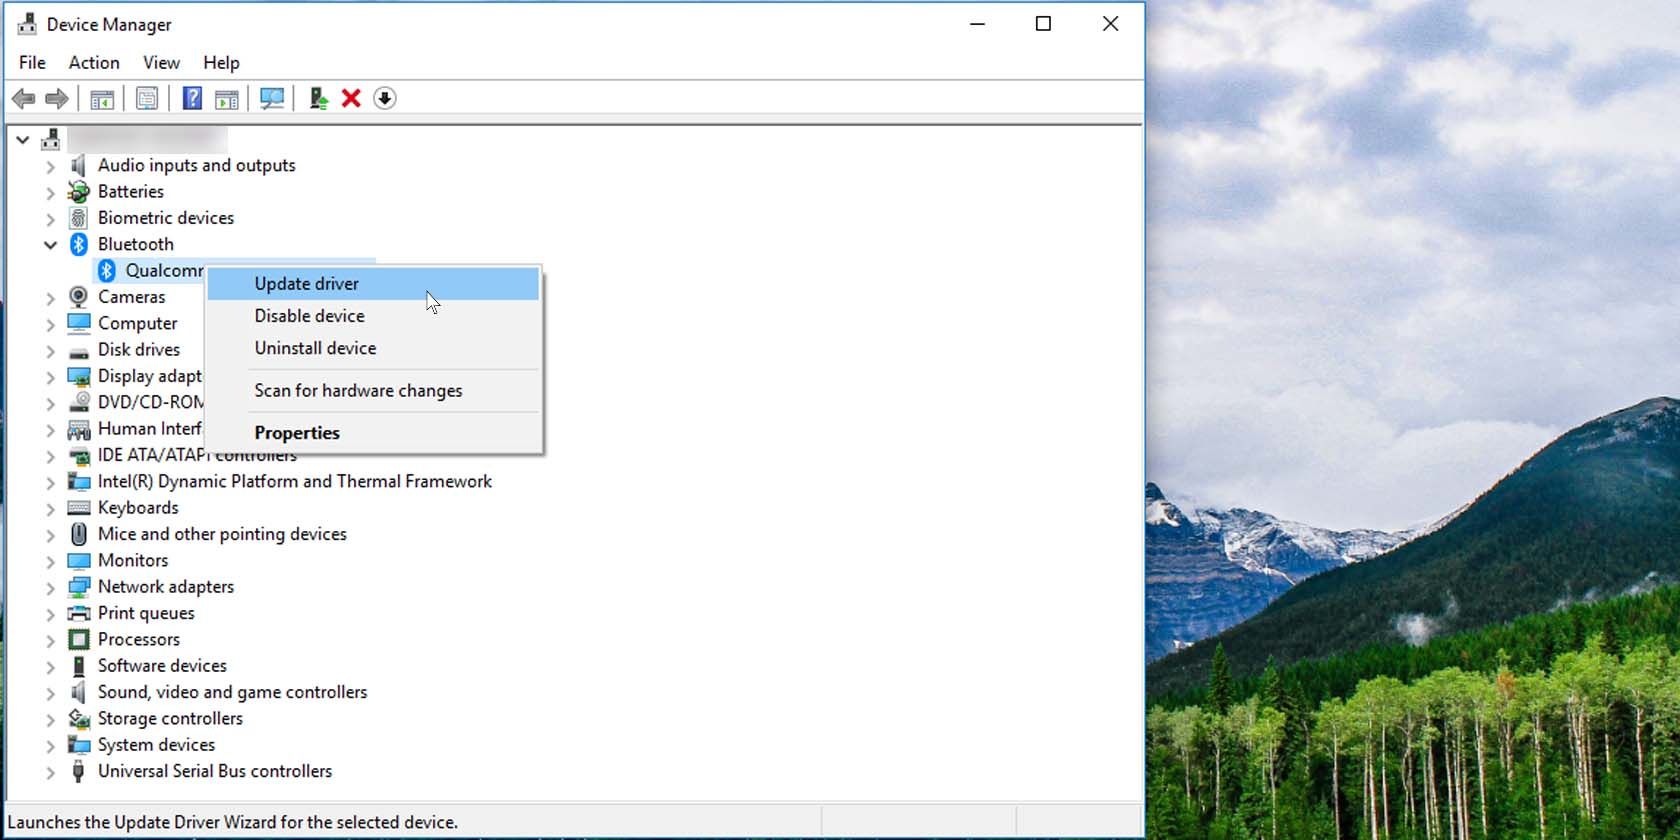
1. How to Restore Specific Windows 10 Drivers via Device Manager
Through the Device Manager, you can install the specific drivers you want. Here’s how:
- Open Device Manager: Right-click on the Start menu and select Device Manager.
-
Right-click on the device whose driver you want to restore and click on the Update driver option.
-
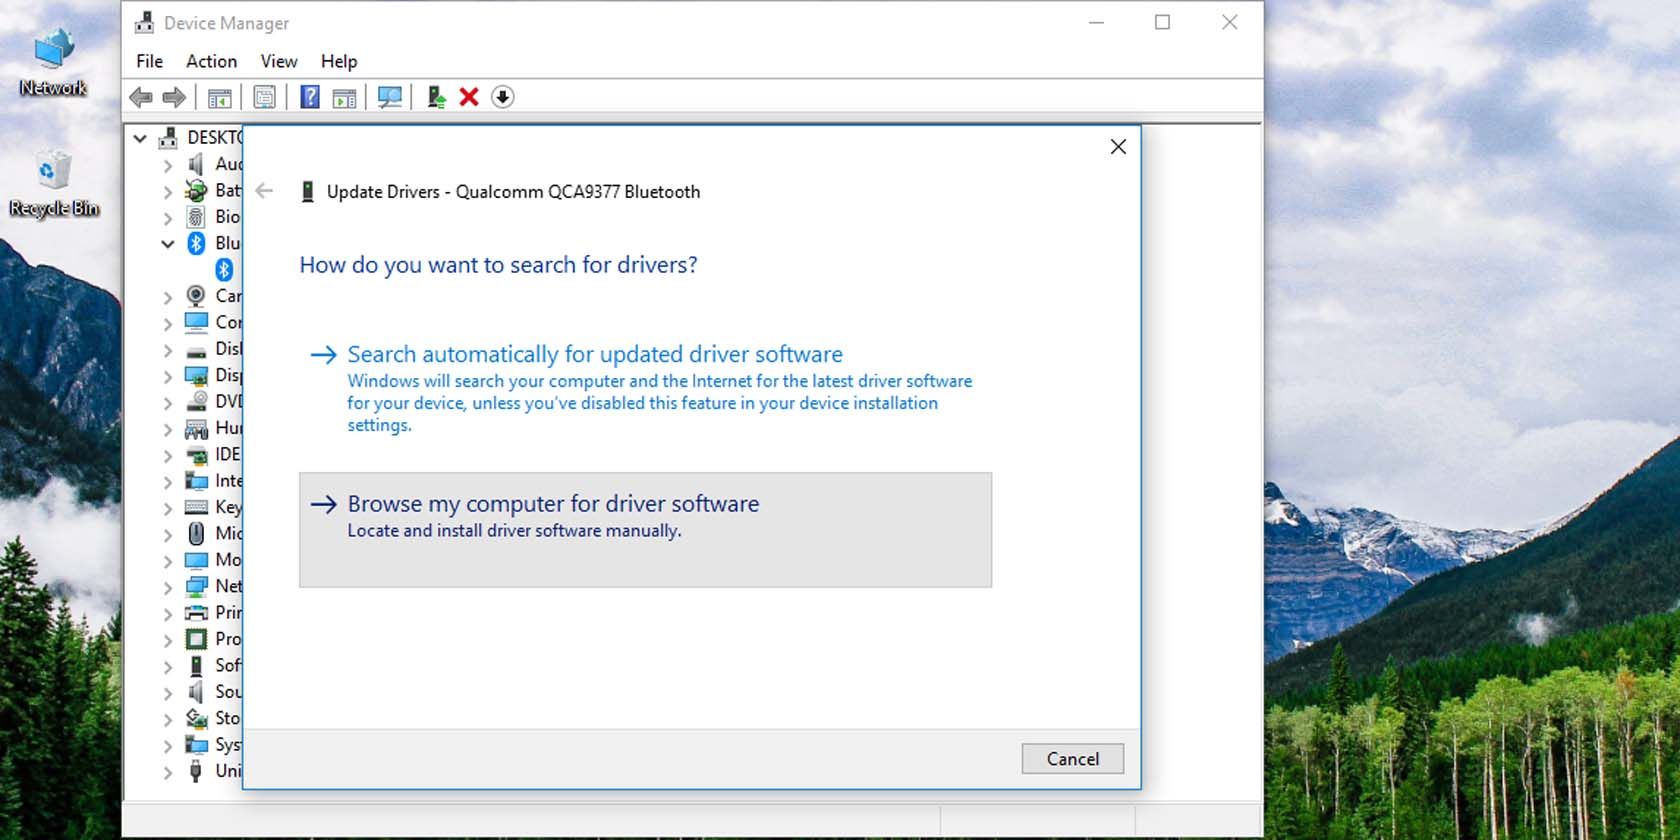
Select the Browse my computer for driver software option.
-
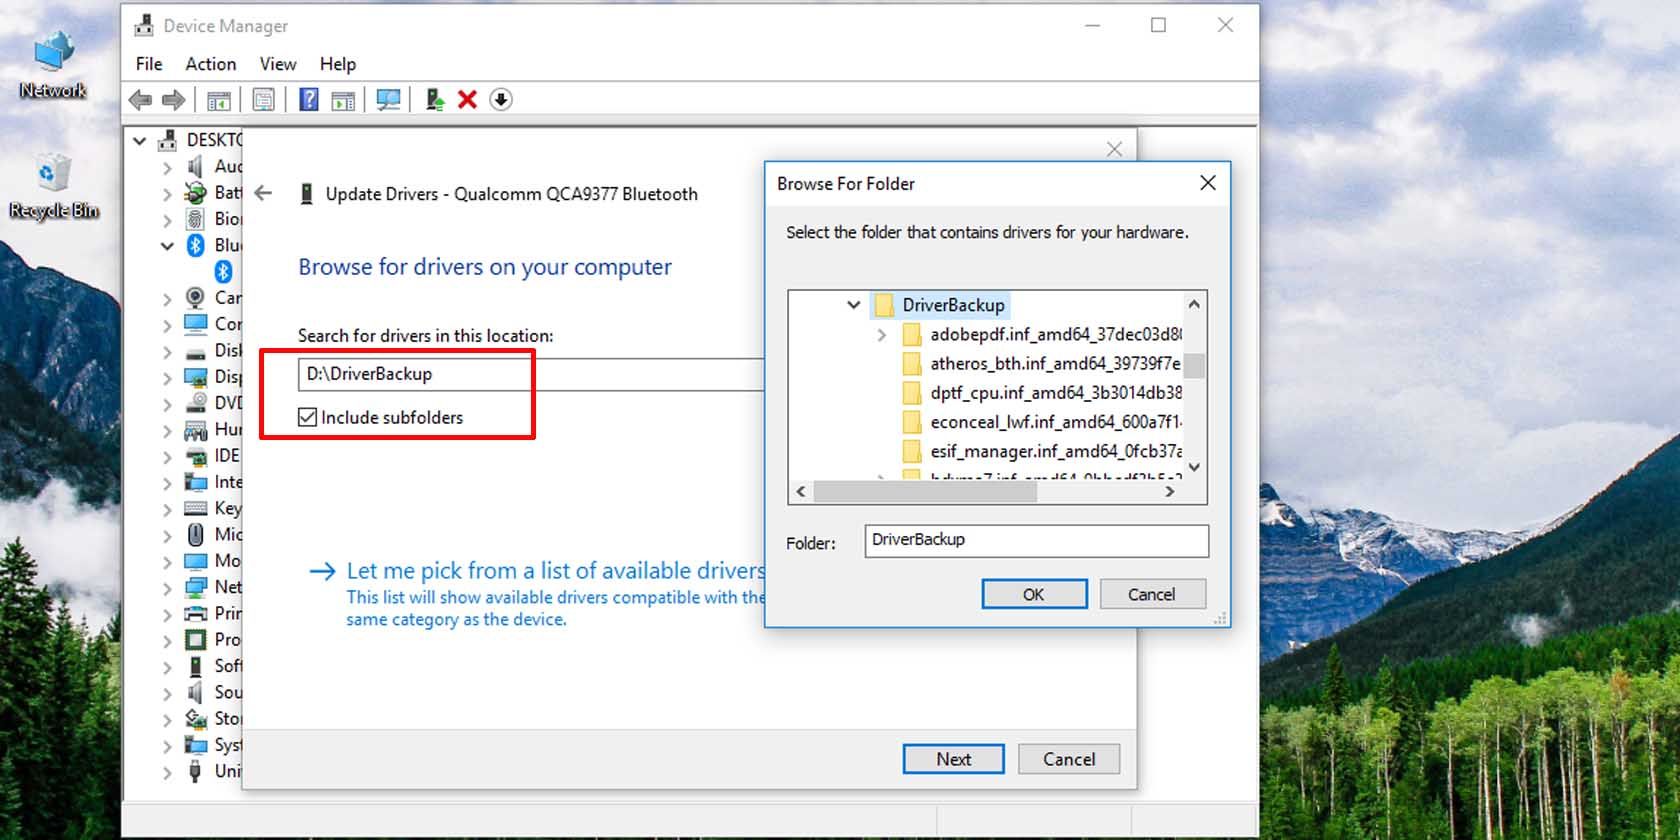
Browse to the folder into which you backed up your Windows 10 drivers. Make sure to have the Include subfolders option checked, and click Next.
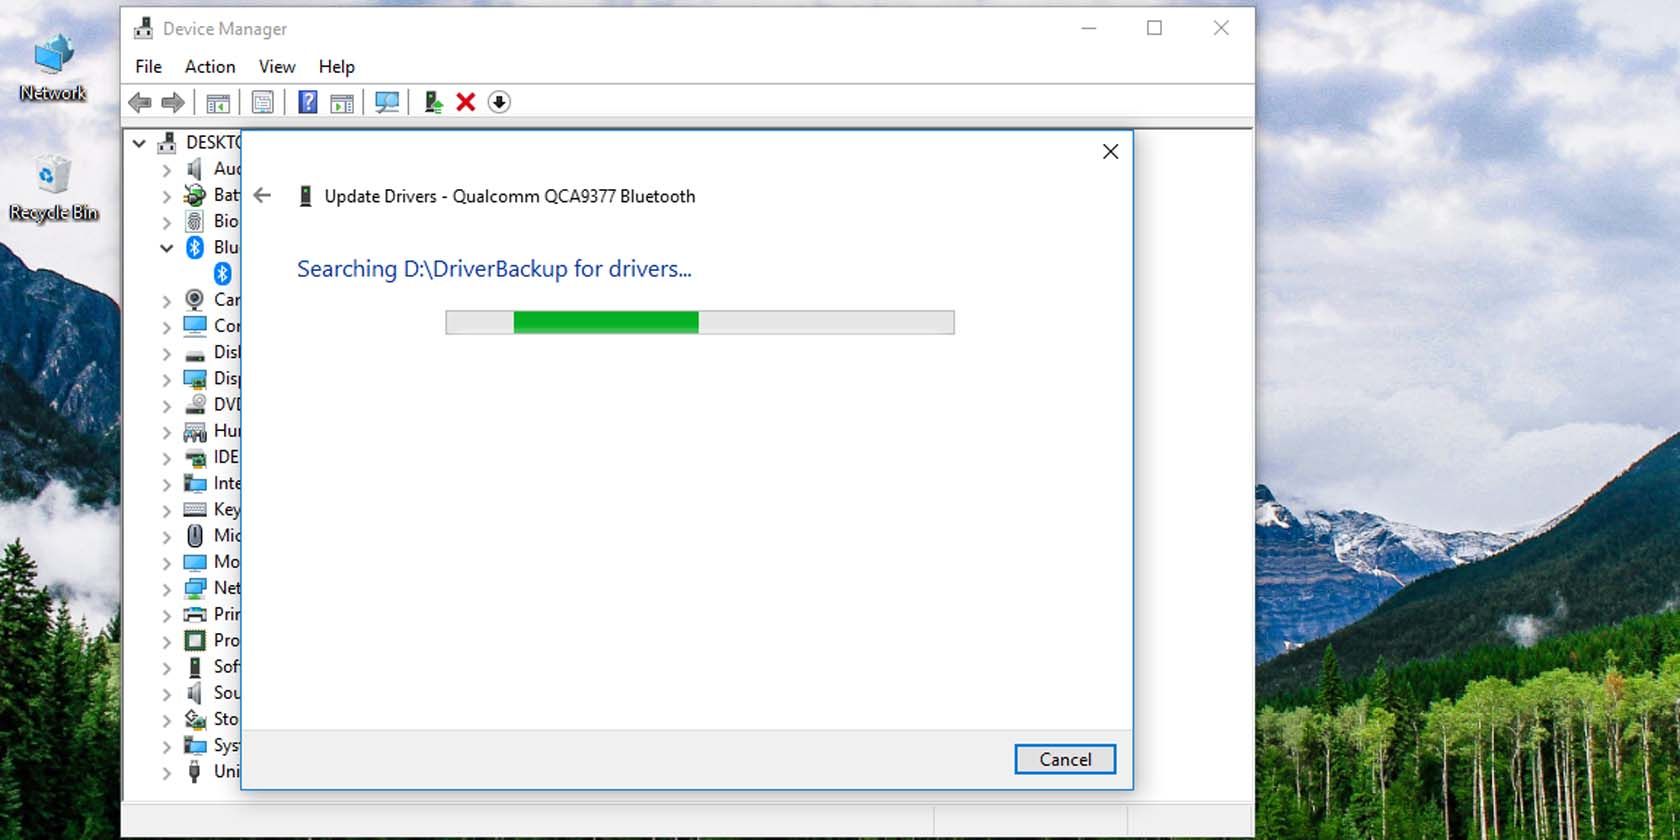
The Windows Device Manager will search the folder for newer versions of the specific device driver and install any if available.
2. How to Restore All Windows 10 Drivers Using Command Prompt
The Command Prompt is a powerful way to restore all Windows 10 device drivers at once. Here’s how to do that:
- Open an elevated command prompt.
- Use the following command line input. Replace ‘D:/DriverBackup’ with the location you’ve stored your backed up Windows 10 drivers.
pnputil /add-driver D:\DriverBackup\*.inf /subdirs /install

You may need to restart your PC for the changes to take effect.
Windows 10 provides powerful tools to quickly and easily back up your device drivers. All you have to do is use a little command line code. Once backed up, you can move the drivers to any location you like, even to an external drive for safekeeping. Restoring your Windows 10 drivers is just as easy as backing them up.