
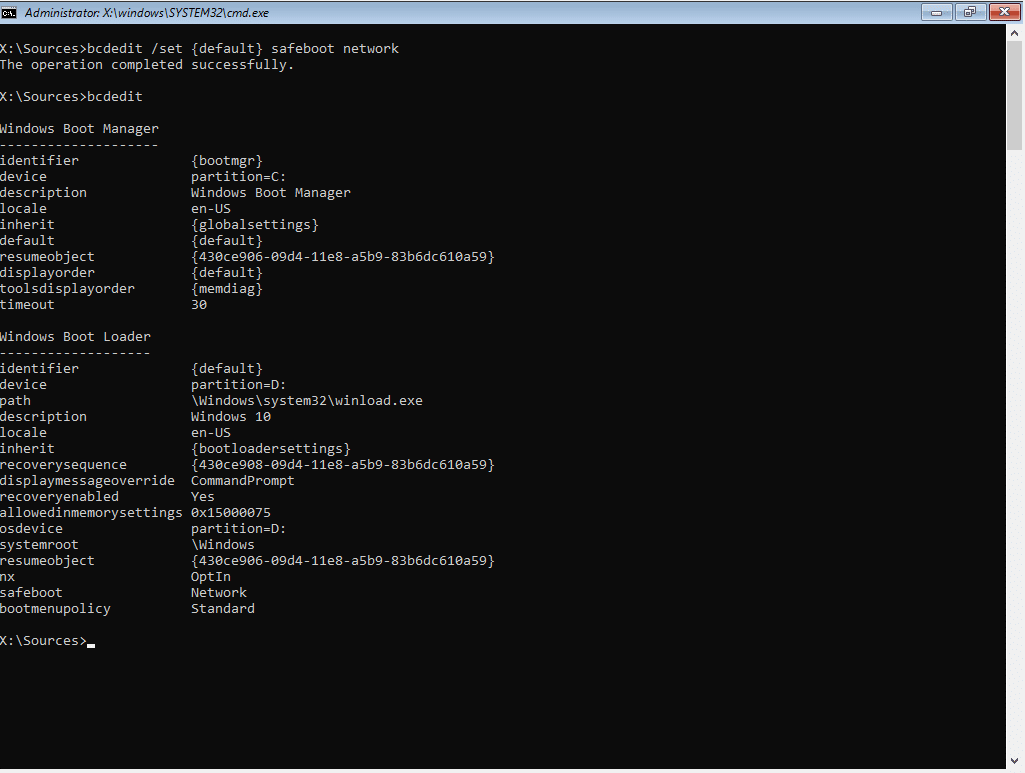
Bcdedit.exe: The Boot Configuration Data Editor
bcdedit.exe is a command-line tool in Windows used to manage Boot Configuration Data (BCD). BCD is a firmware-independent database that replaced the boot.ini file used in older versions of Windows (like Windows XP). It controls how the operating system is started. bcdedit.exe allows you to view, modify, and create boot entries, control boot options, and troubleshoot boot-related problems. It’s a powerful tool, and incorrect usage can render your system unbootable. Therefore, understanding its functionalities and exercising caution are crucial.
Origin and Purpose
bcdedit.exe was introduced with Windows Vista and is included in all subsequent versions of Windows. Its purpose is to provide a command-line interface to the BCD store. Before bcdedit.exe, managing boot options was often cumbersome, requiring direct editing of text files (like boot.ini) or using GUI tools with limited capabilities. bcdedit.exe offers a standardized and more robust way to manage the boot process, especially in recovery scenarios.
Is it a Virus?
No, bcdedit.exe itself is not a virus. It is a legitimate and essential part of the Windows operating system. It’s typically located in the %SystemRoot%\System32 directory (usually C:\Windows\System32) and sometimes also in %SystemRoot%\SysWOW64 for 64-bit systems. If you find a file named bcdedit.exe in a different location, it could be a malicious program masquerading as the legitimate tool, but this is rare. You should always verify the file’s digital signature and location if you’re suspicious.
Can it Become a Virus?
bcdedit.exe cannot «become» a virus. It’s a static executable file. However, malware could potentially:
- Replace it: A virus could replace the legitimate
bcdedit.exewith a malicious version. This would allow the malware to control the boot process, potentially preventing the system from starting or loading malicious code during startup. - Exploit it: While highly unlikely, a vulnerability in
bcdedit.exeitself could be exploited, though this would be a very sophisticated attack. Microsoft regularly releases security updates to address such vulnerabilities. - Use it maliciously: Malware or a malicious user could use the legitimate
bcdedit.exeto alter the BCD, making the system unbootable or redirecting the boot process to malicious code. This is the most likely scenario.
Therefore, the danger lies not in bcdedit.exe becoming a virus, but in how it can be manipulated or replaced by malicious actors.
Usage Guide
Important Note: Always run bcdedit.exe from an elevated command prompt (run as administrator). Incorrect commands can make your system unbootable. Back up your BCD store before making significant changes.
Basic Commands
-
/helpor/?: Displays help information for allbcdedit.execommands and options.bcdedit /?provides general help, whilebcdedit /? <command>provides help for a specific command (e.g.,bcdedit /? /create). -
/enum: Lists all active boot entries in the BCD store. This is a crucial command for viewing the current boot configuration.bcdedit /enumYou can also specify the type of entries to list:
bcdedit /enum OS(Lists operating system entries)bcdedit /enum ALL(Lists all entries, including those not currently active)bcdedit /enum ACTIVE(Lists only the active entries)bcdedit /enum {identifier}(Lists a specific entry by its identifier, e.g.,bcdedit /enum {current})
-
/copy: Creates a copy of an existing boot entry. This is useful for creating backups or modifying a copy without affecting the original.bcdedit /copy {current} /d "Windows 10 (Backup)"
This command copies the current boot entry ({current}) and gives the new entry the description «Windows 10 (Backup)». It will generate a new GUID (Globally Unique Identifier) for the copied entry. -
/create: Creates a new boot entry. This is less commonly used directly for creating operating system entries, as Windows setup usually handles that. It’s more often used for creating entries for boot loaders or other special purposes.bcdedit /create /d "My Custom Boot Entry" /application OSLOADERThis creates a new boot loader entry. You’ll need to specify additional parameters (like
/deviceand/path) to make it functional. -
/delete: Deletes a boot entry. Use this with extreme caution!bcdedit /delete {identifier}
Replace{identifier}with the GUID of the entry you want to delete. -
/set: Modifies settings for a specific boot entry. This is the command you’ll use most often to change boot options.bcdedit /set {current} description "My Modified Windows 10"
bcdedit /set {current} path \Windows\System32\winload.exe
bcdedit /set {current} device partition=C:
bcdedit /set {bootmgr} displaybootmenu yes
bcdedit /set {bootmgr} timeout 30
bcdedit /set {current} recoveryenabled No
bcdedit /set {current} nx OptIn
These examples show how to:
* Change the description of the current boot entry.
* Set the path to the boot loader (winload.exeorwinload.efion UEFI systems).
* Specify the partition where the operating system is installed.
* Enable the boot menu.
* Set the boot menu timeout (in seconds).
* Disable automatic recovery.
* Set the Data Execution Prevention (DEP) setting. -
/importand/export: These commands allow you to back up and restore the BCD store.bcdedit /export C:\BCDBackup (Backs up the BCD to a file)
bcdedit /import C:\BCDBackup (Restores the BCD from a file)Always export your BCD before making any significant changes!
-
/bootsequence: Specifies the order in which the boot manager attempts to load operating systems.
bcdedit /bootsequence {identifier1} {identifier2} ...
Replace{identifier1},{identifier2}, etc. with the GUIDs of the boot entries in the desired order. -
/default: Sets the default boot entry.
bcdedit /default {identifier} -
/displayorder: Sets the display order of the boot menu.
bcdedit /displayorder {identifier1} {identifier2} /addfirst -
/timeout: Sets the boot menu timeout.
bcdedit /timeout 10 -
/toolsdisplayorder: Sets the display order of the tools menu.
bcdedit /toolsdisplayorder {memdiag} /addlast
Advanced Options and Troubleshooting
-
/ems: Enables or disables Emergency Management Services (EMS) for a boot entry. EMS allows remote management of a server even if the operating system is not running. -
/bootems: Enables or disables EMS for the boot manager. -
/dbgsettings: Configures kernel debugging settings. -
/bootdebug: Enables or disables boot debugging. -
/hypervisorsettings: Configures hypervisor settings. -
/deletevalue: Deletes a specific value from a boot entry.bcdedit /deletevalue {current} nx
This removes thenx(DEP) setting from the current boot entry. -
/v(Verbose Mode): Some commands support a/voption to display more detailed output, which can be helpful for troubleshooting.
Troubleshooting Scenarios
-
System Won’t Boot: If your system won’t boot, you can often use
bcdedit.exefrom the Windows Recovery Environment (WinRE). WinRE is usually accessible by booting from a Windows installation disc or USB drive and selecting «Repair your computer.» From WinRE, you can open a command prompt and usebcdedit.exeto:- Check the BCD entries (
/enum). - Repair corrupted entries (
/importa backup). - Set the correct default boot entry (
/default). - Rebuild the BCD from scratch (more complex, requires careful use of
/createand/set).
- Check the BCD entries (
-
Dual-Boot Problems: If you’re having issues with a dual-boot configuration,
bcdedit.execan be used to:- Add or remove boot entries for different operating systems.
- Set the boot order (
/bootsequenceor/displayorder). - Adjust the boot menu timeout (
/timeout).
-
Incorrect Boot Options: If you’ve accidentally changed a boot setting (like disabling DEP), you can use
bcdedit /setto correct it. -
«Boot Manager is Missing» Error: This often indicates a problem with the BCD store itself or the boot sector. You might need to use the
bootrec.exetool (another command-line tool in WinRE) to fix the boot sector and then usebcdedit.exeto repair the BCD.
Best Practices
- Always run as administrator.
- Back up your BCD before making changes (
/export). - Understand the commands before using them. Use
/helpextensively. - Double-check identifiers (GUIDs) to avoid modifying the wrong entry.
- Document your changes.
- Test your changes after making them.
- If you’re unsure, seek help from a qualified professional.
Conclusion
bcdedit.exe is a powerful and essential tool for managing the Windows boot process. While it offers a significant degree of control and flexibility, it also requires careful usage. Understanding its commands, options, and potential pitfalls is critical for maintaining a stable and bootable system. By following the guidelines and best practices outlined in this article, you can effectively use bcdedit.exe to manage your boot configuration and troubleshoot boot-related issues. Remember to always back up your BCD before making any major changes.
This guide explains how to use the BCDEdit (bcdedit.exe) utility for the following Windows versions: Vista, 7, 8, 8.1or10
BCDEdit is the command-line utility that you can use to manage BCD stores on your computer. BCDEdit works similarly to Bootcfg.exe available on Windows XP systems, but with more options available and various improvements.
BCDEdit on Windows
You must be logged-in as an Administrator in order to use BCDEdit.
Always create a backup of your current BCD file before using the utility with the help of the /export parameter:
bcdedit /export C:\exportBCDfile
To open bcdedit, you need to:
- Open Command Prompt
- Type:
bcdedit
- Press Enter
When you type bcdedit in Command Prompt, the output is your computer’s current BCD configuration:
Microsoft Windows [Version 6.0]
 Copyright (c) 2006 Microsoft Corporation. All rights reserved.

 C:\Windows\system32>bcdedit

 Windows Boot Manager
 --------------------
 identifier {bootmgr}
 device partition=C:
 description Windows Boot Manager
 locale en-US
 inherit {globalsettings}
 default {current}
 resumeobject {0}
 displayorder {current}
 toolsdisplayorder {memdiag}
 timeout 30

 Windows Boot Loader
 -------------------
 identifier {current}
 device partition=C:
 path \Windows\system32\winload.exe
 description Microsoft Windows Vista
 locale en-US
 inherit {bootloadersettings}
 recoverysequence {0}
 recoveryenabled Yes
 osdevice partition=C:
 systemroot \Windows
 resumeobject {0}
 nx OptIn
BCDEdit on Windows XP
Windows XP doesn’t have a bcdedit.exe utility available, but the bootcfg.exe utility instead. Bootcfg.exe is part of the Windows XP’s Recovery Console.
To read about bootcfg, follow our guide: Bootcfg – Guide for Windows XP.
BCDEdit on Windows Vista
To run bcdedit.exe on a Windows Vista system, you have these options available:
- Use the original Windows Vista installation media to access Command Prompt
- If Repair Your Computer option is available on Advanced Boot Options menu, boot into this mode to access Command Prompt
- Use Easy Recovery Essentials
If you have the Windows Vista installation DVD, follow these steps:
- Insert the installation media and boot from it
- Select a language, time and keyboard and click Next
- Click Repair your computer
Windows Vista Repair Your Computer Menu
- Select the operating system
- Click Next
- At the System Recovery Options screen, click Command Prompt
Windows Vista System Recovery Options
- Type:
bcdedit.exe
- Press Enter
If you have the “Repair Your Computer” option available, you can access Command Prompt from there:
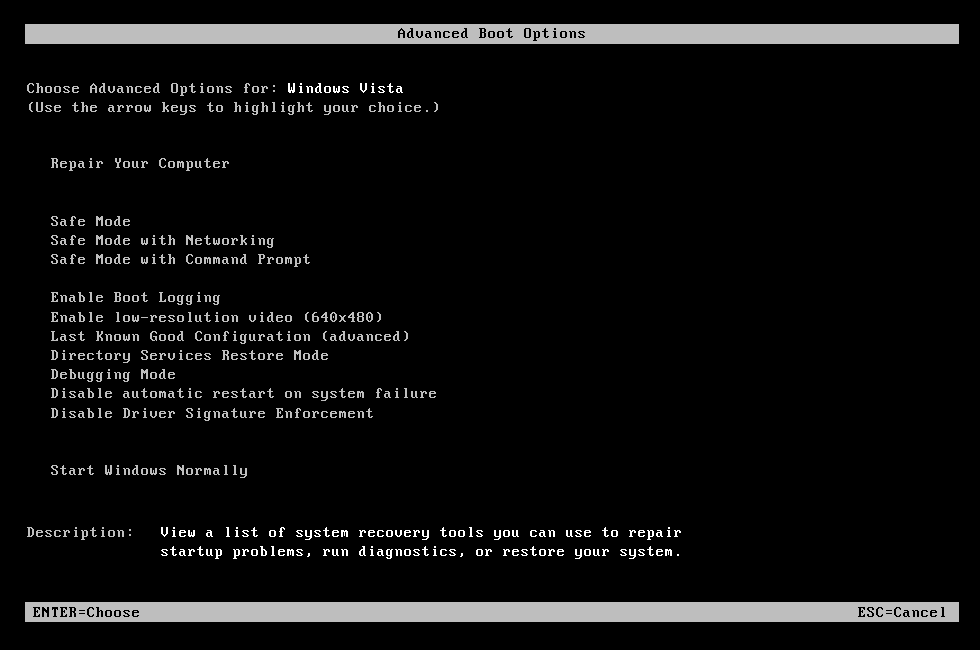
- Restart the computer
- Press the F8 key to open the Advanced Boot Options menu
- Select Repair Your Computer and press Enter

- If Repair Your Computer isn’t available, the recovery tools aren’t installed on your computer.
- At the System Recovery Options screen, click Command Prompt
- Type:
bcdedit.exe
- Press Enter
If you use Easy Recovery Essentials Command-line:
- Download Easy Recovery Essentials
- Burn the ISO Image. Follow our instructions on how to burn a bootable ISO image. If you’d like to have a recovery USB instead, follow our instructions on how to make a recovery USB.
- Boot Easy Recovery Essentials from the CD, DVD or USB
- Select Launch Command Line


To download Easy Recovery Essentials, click here.
BCDEdit on Windows 7
The options to run bcdedit.exe on Windows 7 systems are similar to those of Windows Vista.
If you have the Windows 7 installation DVD available, follow these steps:
- Insert the DVD in the optical drive
- Boot from it by restarting the computer and pressing any key when prompted
- Select a language, time and keyboard
- Click Next
- Click Repair your computer

Install Now (Windows 7)
- Select the operating system from the list and click Next
- At System Recovery Options, click Command Prompt
- Type:
bcdedit.exe
- Press Enter

If you have the “Repair Your Computer” available at “Advanced Boot Options” (most Windows 7 systems have these recovery tools installed), follow these steps:
- Restart the computer
- Press the F8 key to open Advanced Boot Options
- Select Repair your computer

Advanced Boot Options on Windows 7
- Press Enter
- At the System Recovery Options, click Command Prompt
- Type:
bcdedit.exe
- Press Enter

If you use Easy Recovery Essentials Command-line:
- Download Easy Recovery Essentials
- Burn the ISO Image. Follow our instructions on how to burn a bootable ISO image. If you’d like to have a recovery USB instead, follow our instructions on how to make a recovery USB.
- Boot Easy Recovery Essentials from the CD, DVD or USB
- Select Launch Command Line
To download Easy Recovery Essentials, click here.
BCDEdit on Windows 8
On Windows 8 or Windows 8.1 systems, you need to have the original installation media (DVD or USB drive) in order to access Command Prompt.
If you have the installation media, follow these steps:
- Insert the Windows 8 DVD or Windows 8.1 USB drive
- Restart the computer and boot from the DVD/USB
- Click Repair your computer

Windows 8 Repair Your Computer Menu
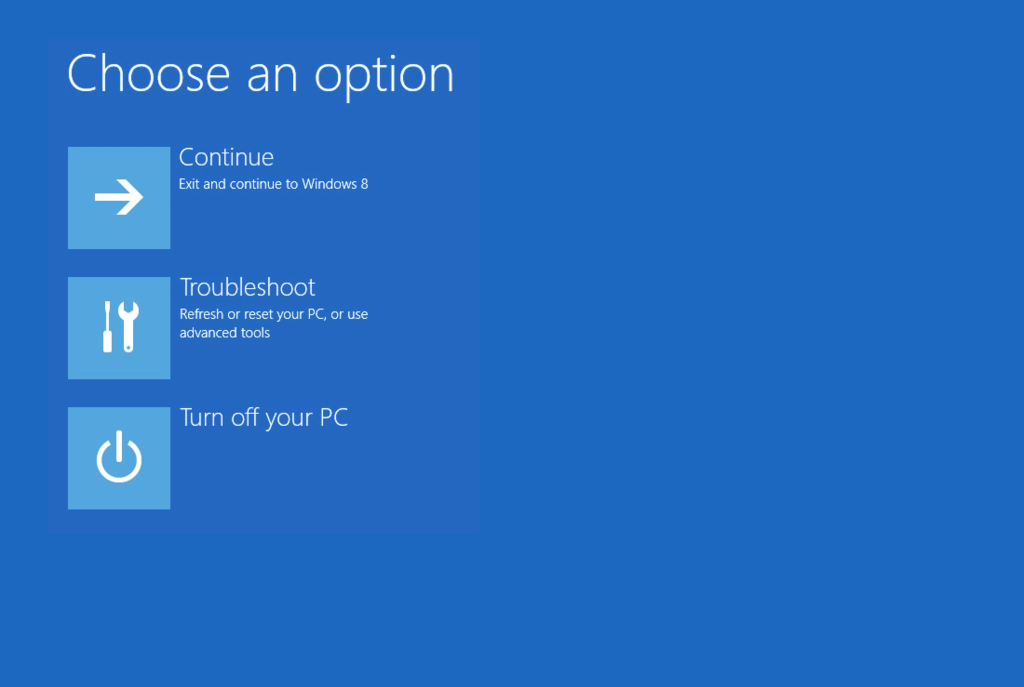
- Click Troubleshoot

Troubleshoot in Windows 8 recovery options screen
- Click Command Prompt
- Type:
bcdedit.exe
- Press Enter

If you use Easy Recovery Essentials Command-line:
- Download Easy Recovery Essentials
- Burn the ISO Image. Follow our instructions on how to burn a bootable ISO image. If you’d like to have a recovery USB instead, follow our instructions on how to make a recovery USB.
- Boot Easy Recovery Essentials from the CD, DVD or USB
- Select Launch Command Line
To download Easy Recovery Essentials, click here.
BCDEdit on Windows 10
On Windows 10 systems, you need to have the original installation media (DVD or USB drive) in order to access Command Prompt.
If you have the installation media, follow these steps:
- Insert the Windows 10 media
- Restart the computer and boot from the DVD/USB
- Click Repair your computer

- Click Troubleshoot

- Click Command Prompt
- Type:
bcdedit.exe
- Press Enter


If you use Easy Recovery Essentials Command-line:
- Download Easy Recovery Essentials
- Burn the ISO Image. Follow our instructions on how to burn a bootable ISO image. If you’d like to have a recovery USB instead, follow our instructions on how to make a recovery USB.
- Boot Easy Recovery Essentials from the CD, DVD or USB
- Select Launch Command Line
To download Easy Recovery Essentials, click here.
Commands and parameters
For the complete list of commands and parameters you can use with BCDEdit, type:
bcdedit /?
Whenever you are using this utility to modify a BCD store, make use use of these parameters:
/createstoreto create a new empty boot configuration data (BCD) store./exportto export the current configuration of the BCD store./importto import a previously exported configuration file./createto create a new entry in the BCD store./deleteto delete an entry from the BCD store./deletevalueto delete a specified value./setto set a new value./defaultto specify the default entry./timeoutto specify the timeout at startup value.
For example, to create a new entry in the BCD file to load Windows XP, run these commands:
-
bcdedit /create {ntldr} /d "Windows XP" -
bcdedit /set {ntldr} device partition=C: -
bcdedit /set {ntldr} path \ntldr -
bcdedit /displayorder {ntldr} /addlast
More Information
Linked Entries
- bootcfg
Support Links
- Easy Recovery Essentials for Windows – our repair and recovery disk.
It’s an easy-to-use and automated diagnostics disk. It’s available for Windows 8, Windows 7 and Windows Vista. It’s also available for Windows XP and Windows Server.
Read more at Windows Recovery Disks.
- The NeoSmart Support Forums, member-to-member technical support and troubleshooting.
- Get a discounted price on replacement setup and installation discs: Windows XP, Windows Vista, Windows 7, Windows 8, Windows 10.
Applicable Systems
This Windows-related knowledgebase article applies to the following operating systems:
- Windows XP (all editions)
- Windows Vista (all editions)
- Windows 7 (all editions)
- Windows 8 (all editions)
- Windows 8.1 (all editions)
- Windows 10 (all editions)
Propose an edit
4 January 2021 Senior Program Developer
Summary
BCDEdit is a command line tool for managing boot configuration data. What are the often-used BCDEdit commands? And what are their functions? Get more about how to use the BCDEdit Command Line Tool in Windows 10 here.

What Is BCDEdit?
BCDEdit is a command line tool for managing boot configuration data. If you intend to use BCDEdit to change BCD, you will need administrator privileges to enable Command Prompt or command prompt in Windows RE.

BCDEdit Command Line Options
| BCDEdit /createstore | Creates a new empty boot configuration data storage (BCD). |
| BCDEdit /export | Exports the contents that system stores into a file which could be used to restore the state of the system store. |
| BCDEdit /import | Restores the system store using a backup file created by /export option. |
| BCDEdit /copy | Makes a copy of a boot entry in the system store. |
| BCDEdit /create | Creates a new entry in the boot configuration data store. |
| BCDEdit /set | Sets an entry option value. |
| BCDEdit /delete | Deletes a boot entry. |
| BCDEdit /default | Specifies the default entry that the boot manager selects when the timeout expires. |
| BCDEdit /displayorder | Specifies the display order of boot options. |
| BCDEdit /timeout | Specifies how long the boot manager displays. |
Note: You will need administrator privileges to enable Command Prompt. If you don’t have an administrator account, it’s recommended to use Renee Passnow to create it.
Use the BCDEdit Command Line Tool When Windows Boots Properly
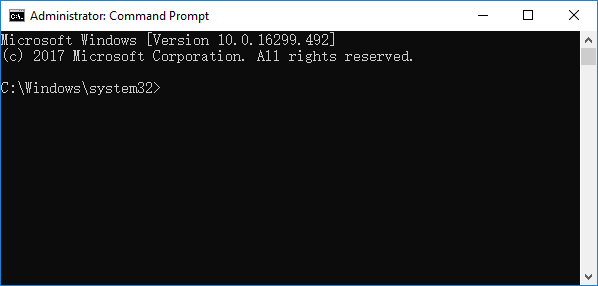
Step 1: Type “cmd” in search box. Right click the “Command Prompt” and select “Run as administrator”.
Step 2: In the Command Prompt, type in the BCDEdit command that you need. Press “Enter”. After executing the command successfully, you can shut down the command prompt.
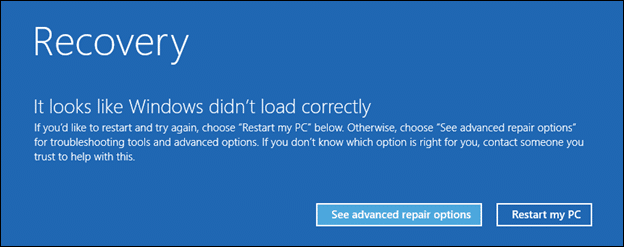
Use the BCDEdit Command Line Tool When Windows Fails to Boot

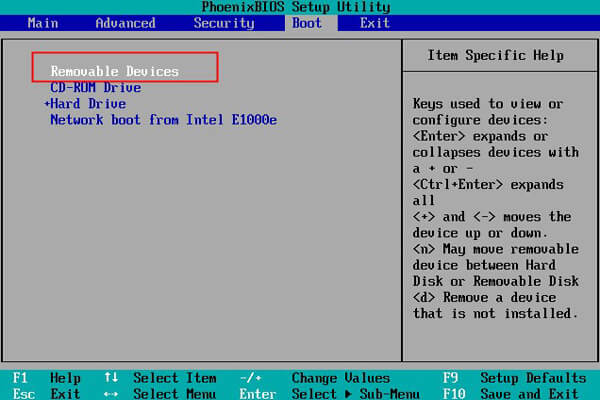
Step 2: Turn on the PC. Change the boot order in BIOS setup and put “Removable Devices” as the first boot choice.
Step 3: After you enter the Windows installation screen, click “Repair your computer” in the bottom-left corner.
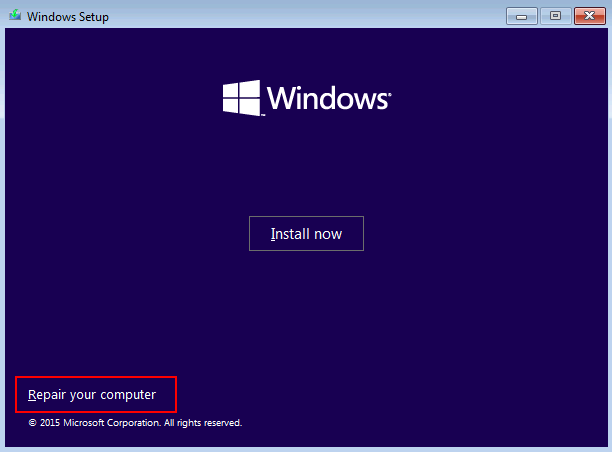
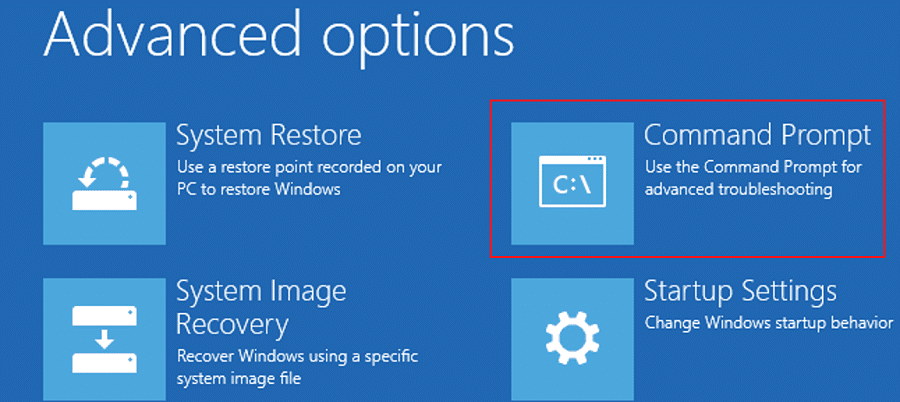
Step 4: Then select “Troubleshoot”> “Advanced Options”> “Command Prompt”.

Step 5: In the Command Prompt, type in the BCDEdit command you may need. Press “Enter”.
Enable Windows Boot Manager via BCDEdit Command Line Tool
Step 1: Type “cmd” in search box. Right click the “Command Prompt” and select “Run as administrator”.
Step 2: In the Command Prompt, type in: bcdedit /set {bootmgr} displaybootmenu yes and bcdedit /set {bootmgr} timeout 30. Please press “Enter” after you type each command.
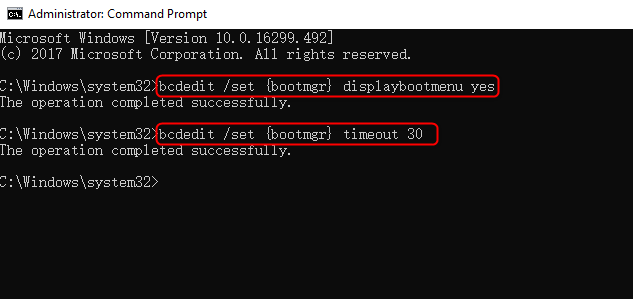
If you want to disable Windows Boot Manager, just type in: bcdedit /set {bootmgr} timeout 0.
Add a Boot Option via BCDEdit Command Line Tool
For example, you want to add a boot entry (Windows XP) to Windows Boot Manager, please follow steps below:
Step 1: Type “cmd” in search box. Right click the “Command Prompt” and select “Run as administrator”.
Step 2: In the Command Prompt, type the following commands. Please press “Enter” after you type each command.
| Bcdedit /create {ntldr} /d “Windows XP” |
| Bcdedit /set {ntldr} device partition=C: |
| Bcdedit /set {ntldr} path \ntldr |
| Bcdedit /displayorder {ntldr} -addlast |
| Bcdedit /set {ntldr} description “Windows XP” |
After executing the above commands successfully, the boot entry (Windows XP) will be an option in Windows Boot Manager.
Create Administrator Account Using Renee PassNow
System rescue tool- Renee PassNow
Step 1: Download and install Renee PassNow in any workable Windows computer.
Step 2: Choose creation method, USB or CD/DVD.
Select one option from [Crate a Live USB] and [Create a Live CD]. Then, select [x64] or [x86] according to your computer. Next, click on [Download Now] to download the licensed ISO. Remember to activate the software beforehand. After that, click on [Create USB] to create the boot media.

Step 3: Boot the target PC from the created password reset USB/CD/DVD.
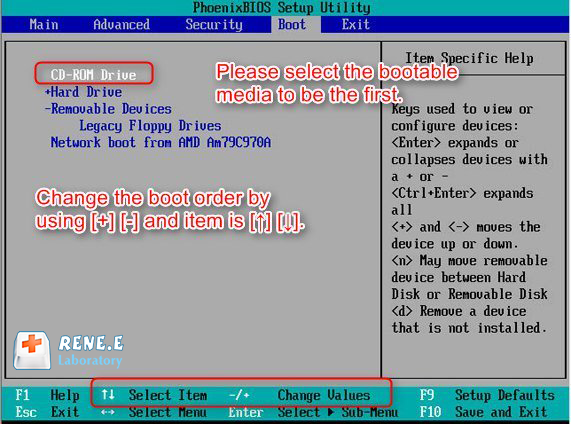
You will boot the target computer via a new created reset disk. Firstly, please hold a hot key to enter the BIOS menu and put CD-ROM or Removable Devices as the first choice. Please click here to know about how to change the boot order of your computer. After changing it successfully, please remember to save your setting and then restart your PC.
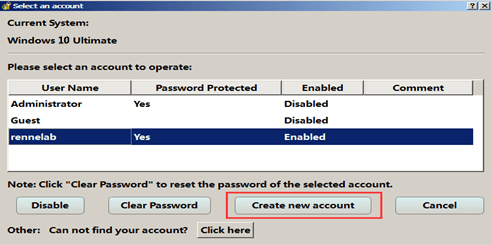
Step 4: Select “PassNow!”.
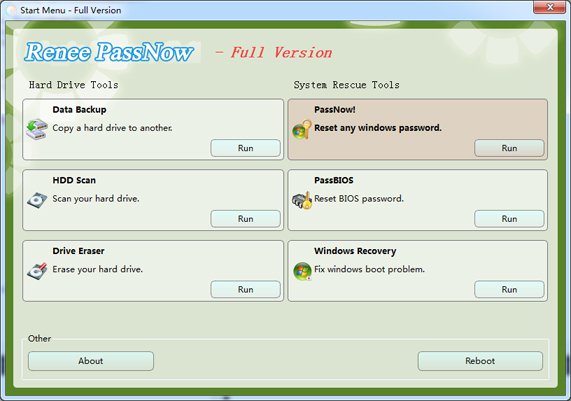
Step 5: Click “Create new account” to create a new administrator to quickly access your PC.
The created administrator account named “Reneelab” with administrator rights, and its default password is “123456789”. You are able to change the password of target account with this new created administrator.
Download Windows Speedup Tool to fix errors and make PC run faster
The toughest part when you go for dual boot or multiple boot is that sometimes the boot manager won’t recognize the older operating systems. This could be because the older operating systems use a different type of boot loader like those prior to Windows Vista or just because Windows failed to assign a drive name for the missing operating systems.
The Bcdedit.exe command-line tool modifies the boot configuration data store. The boot configuration data store contains boot configuration parameters and controls how the operating system is booted. These parameters were previously in the Boot ini file (in BIOS-based operating systems) or in the nonvolatile RAM entries (in Extensible Firmware Interface-based operating systems). You can use Bcdedit.exe to add, delete, edit, and append entries in the boot configuration data store.
This article focuses on Boot Configuration Data Editor and attempts to answer how it can help you to fix errors like Operating System Not Found, Not able to detect secondary and tertiary operating systems in case of multiple boots and similar errors.
Why the change from Boot ini to BCD
BCD was created to provide an improved mechanism for describing boot configuration data. With the development of new firmware models, an extensible and interoperable interface was required to abstract the underlying firmware. This new design provides the foundation for a variety of new features in Windows Vista, Windows 7, Windows 8, Windows 10 and Windows 11, like the Startup Repair tool and Multi-User Install shortcuts.
What does BCD Editor do
BCD Editor is provided as GUI in Windows. There are not many options available, but you can fix the boot manager and repair the Master Boot Record using the graphical user interface.
The graphical user interface also allows you to fix issues where the Bootmgr is found to be missing in certain cases.
Location of BCD Registry
The Boot Configuration Datastore contains boot configuration parameters and controls how the operating system is started.
The BCD registry is located in the \boot\bcd folder of the active partition.
For EFI-based systems, the default location of BCD registry is on the EFI partition.
Read: How to Backup & Restore BCD file in Windows.
Command line version of BCD Editor
The command line version of BCD Editor is much powerful and can be used to perform a variety of functions:
- Create a BCD store
- Add entries to an existing BCD store
- Modify existing entries in a BCD store
- Delete entries from a BCD store
- Export entries to a BCD store
- Import entries from a BCD store
- List currently active settings
- Query entries of a particular type and
- Apply a global change
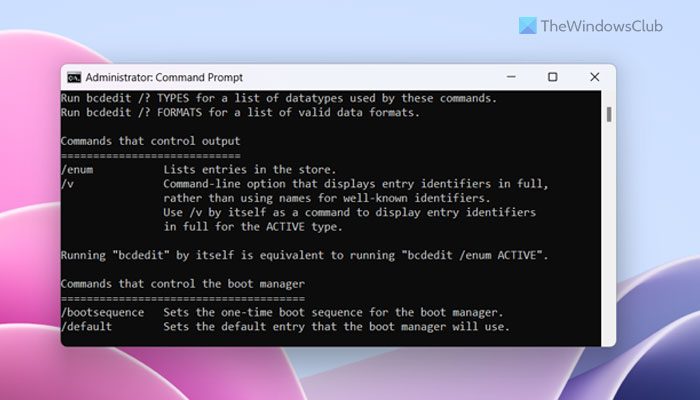
To view what else you can do with BCDEdit.exe, type bcdedit.exe /? at the command prompt. It will list the complete options and operations that you can perform with the BCD editor using the command prompt.
Multiple Boot Environments
If you intend to use two or more operating systems, keep the following in mind:
- Install Windows Vista or above operating system on a different partition. As a rule, each OS should have its own partition else common folders like Windows, Program Files etc will create conflicts and may crash your computer. That said, if you intend to use older operating systems, first install operating systems prior to Windows Vista so that they can continue using boot ini and then install Vista or later operating systems so that there is no conflict with bootcfg.
- You will have to make sure that the operating systems older than Vista use boot ini and the ones starting from Vista or later operating systems use BCD. This can be accomplished using the BCD command line and also via MSCONFIG command.
- Never disable BCD even if you wish to run older operating systems like Windows XP along with Vista or higher versions. The BCD helps in finding out the boot ini that in turn helps in loading the older operating systems. If you disable BCD, your computer might not recognize older operating systems.
Change Default Operating System Using BCD
The easiest and quickest way is to use the command line version of BCD.exe. Use the following command at command prompt:
BCDEDIT /DEFAULT {ID}
To find out the ID for each operating system, use the following command:
BCDEDIT /ENUM ALL
From the list of IDs, copy the one next to the OS you want to set as default and paste it in place of {ID} in the first command.
Boot Configuration Data Editor has stopped working
If you received this error, you will have to run Startup Repair. These links may help you:
- Run Startup Repair in Windows 7
- Run Automatic Repair in Windows 8
- Run Automatic Startup Repair in Windows 11 or Windows 10. You will get the settings under Advanced Startup Options.
For a detailed read please visit TechNet.
What is boot configuration database?
Boot configuration database represents nothing but the BCD files. BCD or the Boot Configuration Data files allow users to store the boot applications and settings. It is possible to manage the BCD files with the help of the Command Prompt. You can make use of the BCDEdit tool to get the job done.
Where is the Windows boot configuration file?
Windows stores the Boot Configuration Data file in the system drive or C drive. You can navigate to C:\Boot ini to find this file. No matter whether you use Windows 11, Windows 10, or any other older version of Windows, you can find the same in the same location as described.
EasyBCD, Visual BCD Editor and Dual Boot Repair Tool are three freeware that let you edit and repair Windows Boot Configuration Data easily.
Anand Khanse is the Admin of TheWindowsClub.com, a 10-year Microsoft MVP (2006-16) & a Windows Insider MVP (2016-2022). Please read the entire post & the comments first, create a System Restore Point before making any changes to your system & be careful about any 3rd-party offers while installing freeware.
Windows OS has a number of utility programs running in the background. Bcdedit.exe is one such program that ensure your PC is running without glitches. This article covers Bcdedit.exe – what is it? Is it a virus or malware?
Windows operating system combines several background utility programs that work together to keep your PC running smoothly. Bcdedit.exe is one of the background programs that automatically launch whenever your PC is powered on.
BcdEdit.exe stands for Boot Configuration Data Editor. It is a command-line tool responsible for managing Boot Configuration Data files.
That is to say, Bcdedit.exe is tasked with the addition of boot menu options, the creation of new boot configuration stores, and the modification of existing boot configuration stores. If corrupted, the Bcdedit.exe system file can cause boot failure on your Windows PC.
This article provides the ultimate guideline to everything you need to know about Bcdedit.exe – what is it? Is it a virus or malware? Keep reading to find out…….
What is Bcdedit.exe?
Bcdedit.exe is an executable utility program part of the Windows operating system. The original version of the software program was developed by BoYans. BCD is an acronym that stands for boot configuration data. Boot configuration data provides a store where boot applications and data are saved.
Bcdedit.exe is a utility program used as a command-line utility for managing the BCD store on your PC. This OS Utility program can be used to perform tasks such as generating new boot configuration data stores, creating new boot menu options, and editing existing stores on your Windows computer.
The program is executable (it has a .exe extension) and is thus prone to attacks by malicious or cloned variants that may pose a real threat to your computer.
Like all genuine system files, Bcdedit.exe is located in the system32 folder. It is a highly protected system utility program, and you must have administrator privileges before making any changes to Bcdedit.exe. The Windows utility program will usually occupy a storage space of approximately 1.31 MB on your hard drive.
Is Bcdedit.exe a virus or malware?
Bcdedit.exe is a trusted utility program incorporated into the Windows operating system. This file is safeguarded with administrator privileges to ensure that third parties cannot easily get unauthorized access to it. The file can be corrupted or cloned to mask viruses and malware.
Below are some ways to distinguish between a genuine file and viruses or malware.
How to verify whether Bcdedit.exe is genuine or a virus
There are several methods for checking if the Bcdedit.exe on your PC is genuine a virus. In this post, we have highlighted the most common ways:
1. Checking Bcdedit.exe file location via Program Files
You can verify the authenticity of the bcdedit.exe file by checking if it is located in its designated system file location.
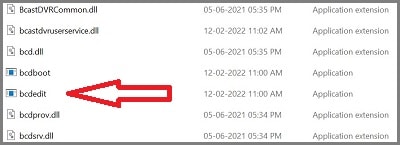
The designated file path for the genuine bcdedit.exe is “C:\Windows\System32\”. You can follow the steps below to find the location of the BCD editor utility program on your Windows PC.
Step 1: Go to your drive partitions and open the Windows OS partition. In most cases, this will be your drive C.
Step 2: Locate the Windows folder and open it by double-clicking it. Scroll again until you find the System32 folder and open it.
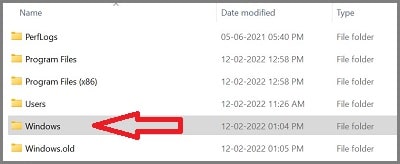
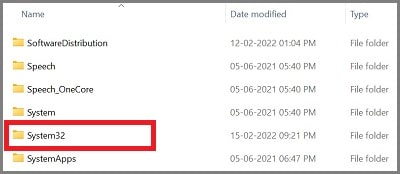
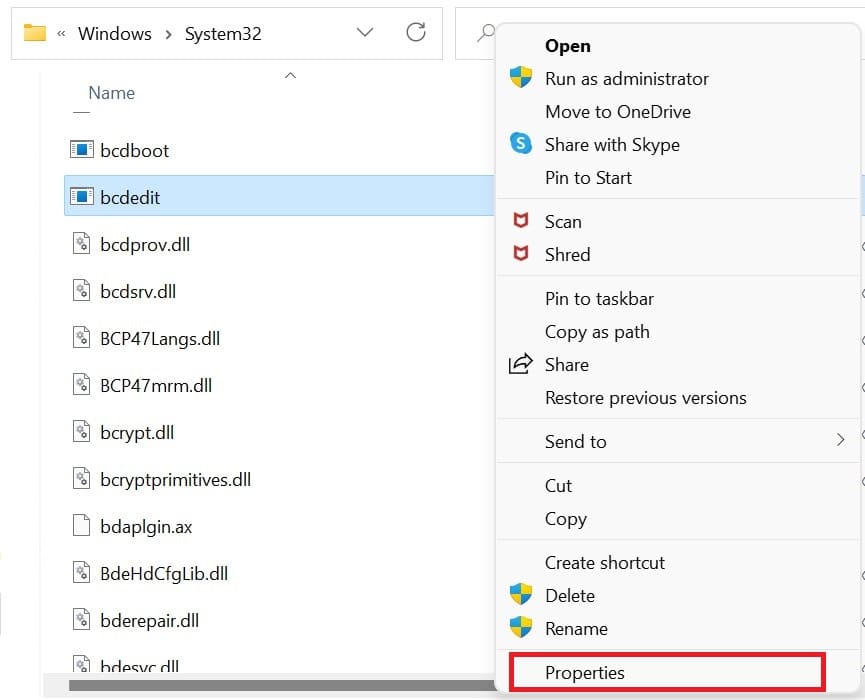
Step 3: The BCD editor should be located in the System32 folder. You can scroll until you find a folder named ‘Bcdedit.’
2. Check file location via Task Manager
You can also verify the location of a program’s file via the Task Manager utility. Follow the steps below to get that done:
Step 1: Press Ctrl + Alt + Del keys simultaneously, and then from the smart screen options, choose Task Manager.
Step 2: On the Task Manager window, click on the Details tab and then scroll through the list of running programs till you locate Bcdedit.exe.
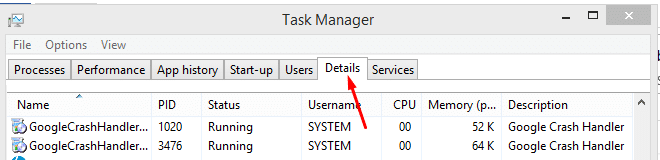
Step 3: Right-click on it and choose Open File Location from the options.
A genuine Bcdedit.exe file should be located in C:\Windows\System32\folder. If your PC is located elsewhere, it is likely a virus or malware. That being the case, consider deleting the file and doing a system scan using antivirus software immediately.
3. Checking Bcdedit.exe Digital Signature via Task Manager
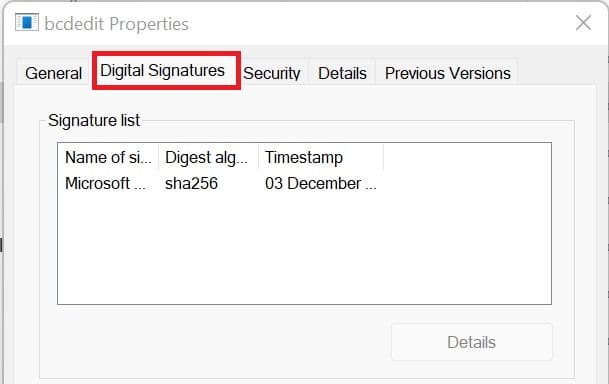
This method is thorough because you can verify the authenticity of your BCD editor by checking the author of the program. Follow the steps below to verify the digital signature of your BCD editor program.
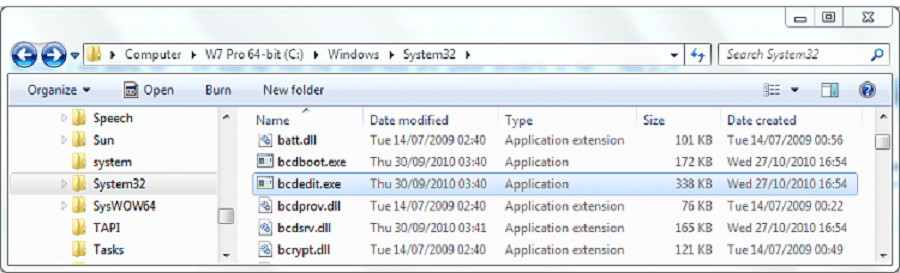
Step 1: Open your drive C partition and locate the Windows folder. Open the Windows folder and find the System32 folder on your PC.
Step 2: Open the System32 folder and scroll down to find the ‘Bcdedit’ program.
Step 3: Right-click on bcdedit.exe and select the properties option on the menu list. Wait until the properties window pops up on your screen.
Step 4: Go to the Digital Signatures tab and click on it. Check and confirm that your program’s digital signature is from Microsoft Inc.
Can I disable Bcdedit.exe?
It is highly recommended that you leave this program file to run on your PC. Your PC’s boot process relies on this program, and removing it from your OS can cause boot failure on your PC.
However, if you have established that the file is a virus disguised as a genuine system file, you can disable it. Only be sure not to remove the genuine Bcdedit.exe programs file. Else, your PC will have a problem powering on.
How to modify Bcdedit.exe in windows 10/11
As mentioned earlier, you can modify the Bcdedit.exe program file. Below are some methods that you can use to get that done:
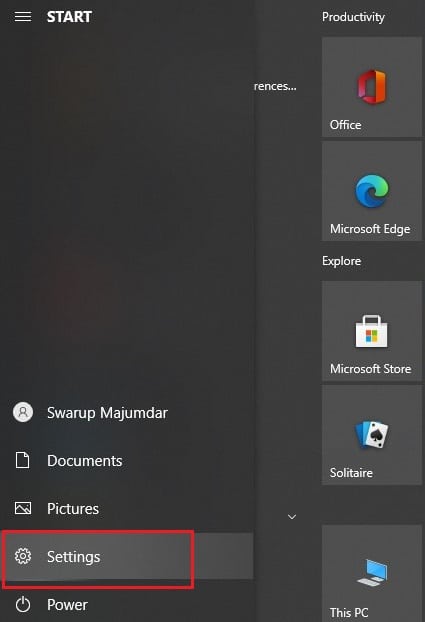
Method 1: Using start-up and recovery
Step 1: Right-click your Windows Start button and select the Settings option.
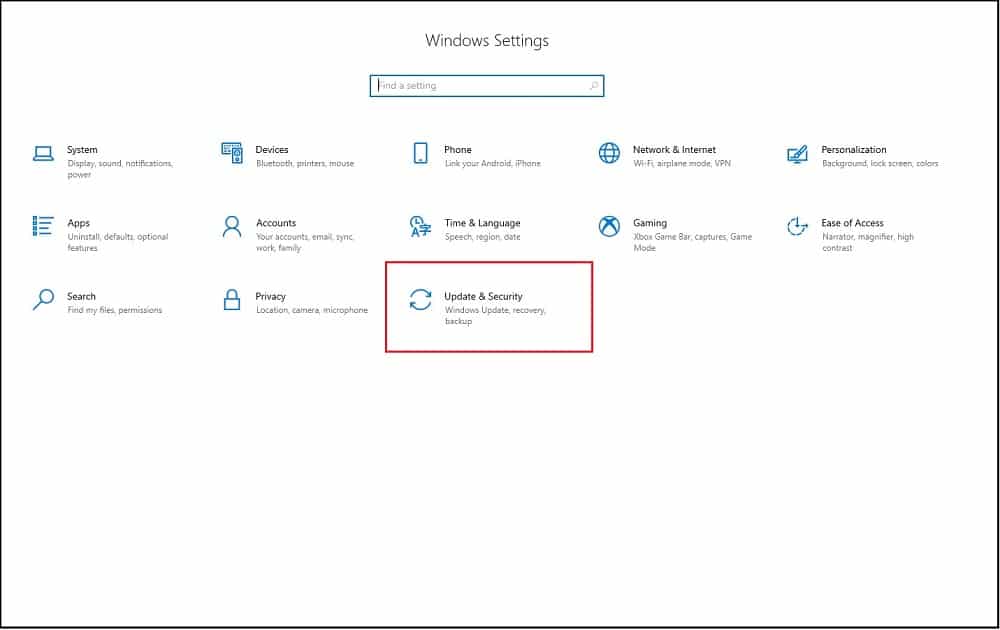
Step 2: In the settings window, click on the Update & Security option before proceeding to pick the recovery option. Go to the advanced option and click on restart now.
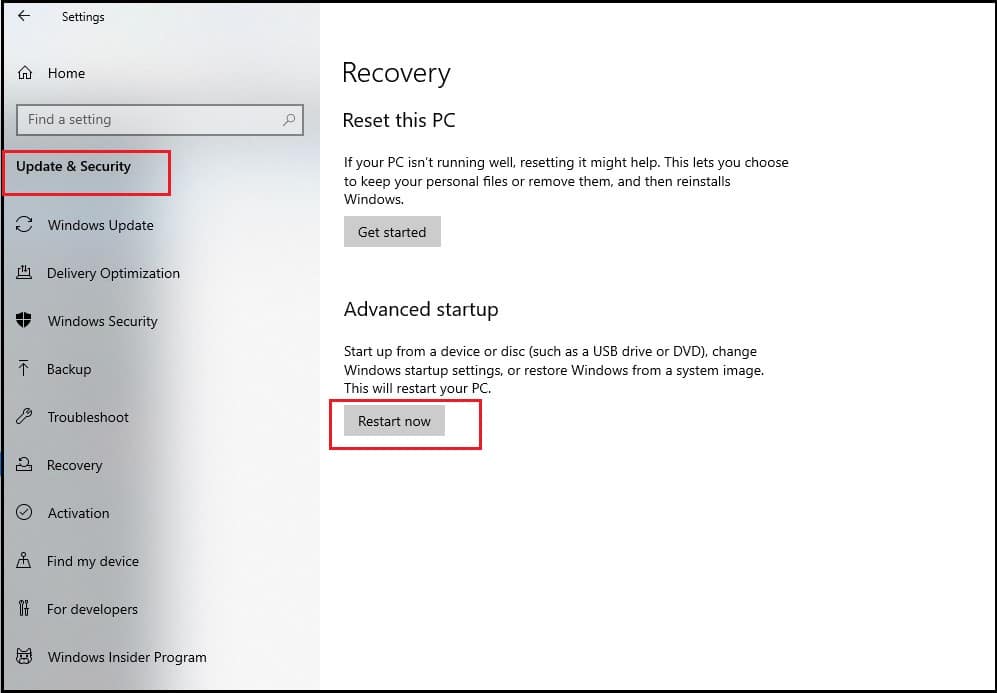
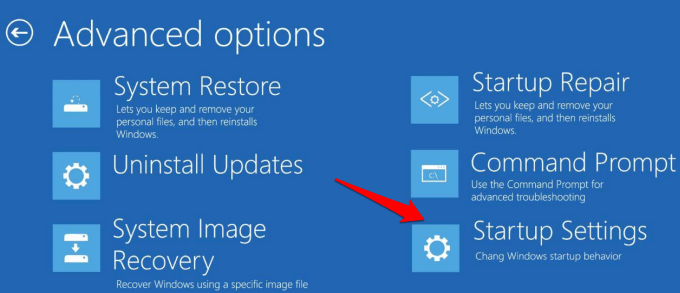
Step 3: When your PC starts to reboot, select the startup options and click on the troubleshooting option. Click on the advanced option and click on the start-up settings.
Method 2: Using MSConfig.exe
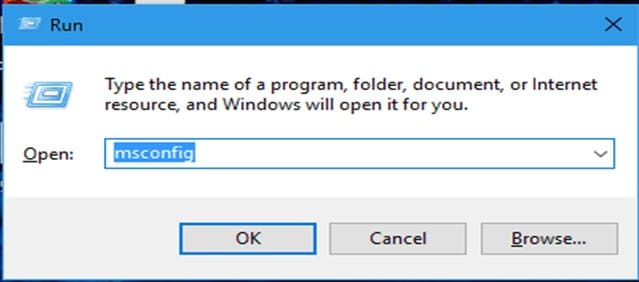
Step 1: Click the Windows + R keys to open the Run utility on your Windows OS.
Step 2: Type ‘MSConfig’ and then hit Enter.
Step 3: Select the boot tab on the new windows and select the boot modifications you prefer.
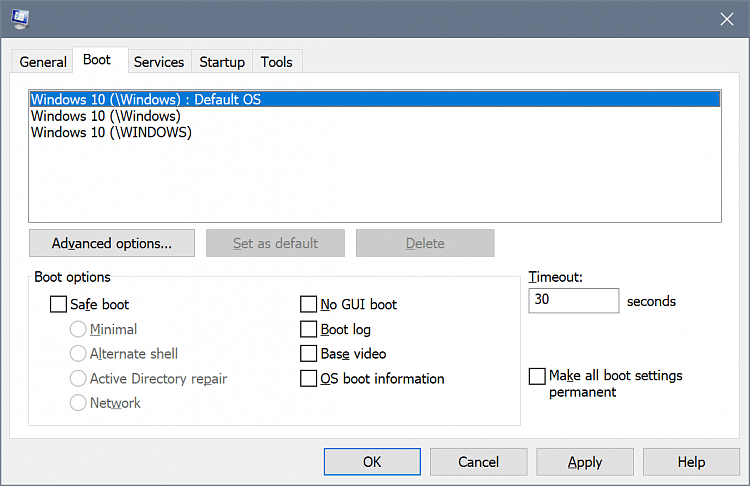
Step 4: Once you’re done modifying the Bcdedit.exe file, proceed to reboot your computer for the changes to take effect.
Method 3: BCD WMI Provider
Step 1: Boot your PC and wait until Windows starts to load, and then long-press the power button to turn it off. Wait for at least five seconds, and then boot your PC again to enter into recovery mode.
Step 2: Go to the advanced recovery option and select the cmd prompt. You can edit your BCD using the command-line tool.
Step 3: After successfully modifying the Bcdedit.exe file, restart your PC to save the changes.

Common Bcdedit.exe commands that operate on a store
- /Creasestore – You can use this operation to create a new empty boot configuration data store. It is important to note that this command does not create a new system store.
- /Export – You can use this operation to export and transfer the contents of the system file store. You can use the exported data at a later time.
- /Sysstore – You can use this operation to set your preferred system store device. The changes made using this operation will only affect EFI-based systems.
Bcdedit.exe commands that operate on entries in a store
- /Copy – This operation creates a copy of specified boot entries in the system store.
- /Create – You can use this function to create a new entry to your boot configuration data store.
- /Mirror – This function duplicates entries made into your data store.
Bcdedit.exe commands that control boot manager
- /BootSequence – Use this function to specify a one-time display order. The order can then be used during your next boot process.
- /Displayorder – You can use this function to display your current boot order during the boot process.
- /Timeout – This function displays the time-out period seconds before the default settings kick in.
Bcdedit.exe command for emergency management services for boot application
- /BootEms – You can use this operation to disable or enable your emergency management service.
- /Ems – You can use this function to disable or enable the emergency management service for a specified boot entry on your PC.
- /Emssettings – You can use this function to set the global emergency management service for your PC.
FAQs
Q. What is Bcdedit.exe?
This is a command-line utility program that is preloaded in Windows OS. You can use the program utility to edit or modify your BCD.
Q. How do I use Bcdedit.exe?
You can use the startup and recovery option in your Windows operating system to modify the BCD configuration in your PC.
Q. Where is Bcdedit.exe located?
The specified file location for the genuine Bcdedit.exe is in the System32 folder located inside the Windows Program Files folder on your PC. A virus program with the same name will be located anywhere else but the C:\Windows\System32\folder.