
Уровень сложностиПростой
Время на прочтение2 мин
Количество просмотров39K
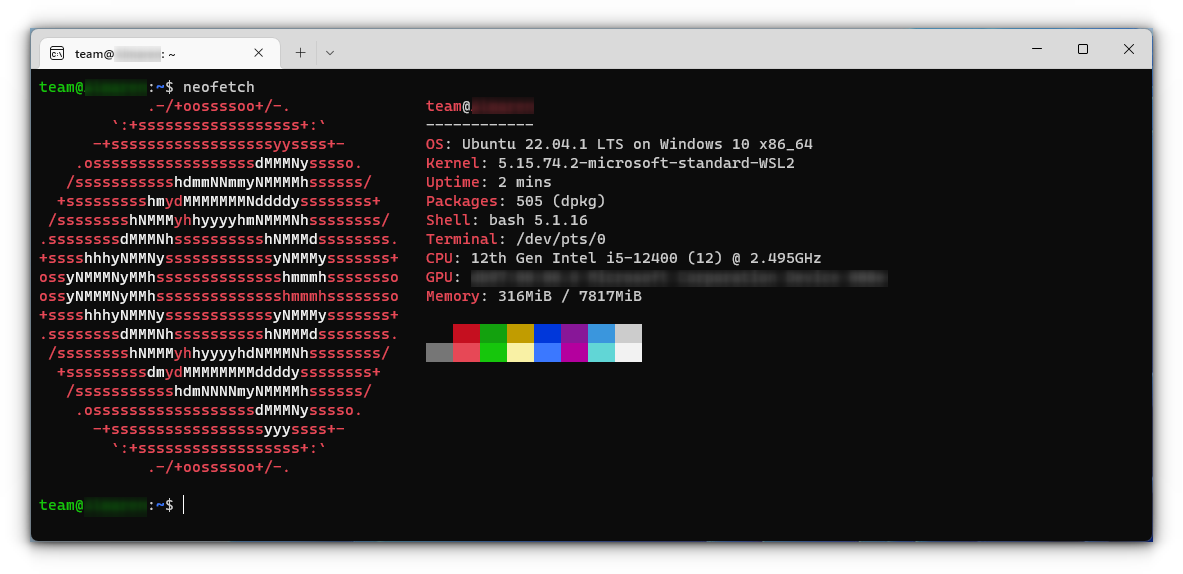
Для пользователя Linux командная строка Windows кажется чем-то непривычным и неудобным. С появлением WSL казалось, что проблема использования Bash решена, но запуск виртуальной машины требует времени, да и пути в WSL отличаются от Windows. Плюс скорость файловых операций на виртуальной машине хуже.
Ещё есть возможность использовать Bash через MSYS2, но мне хотелось найти что-то более компактное и легковесное, а также простое в настройке и установке.
Так как я часто использовал Linux на роутерах, то познакомился с BusyBox, набор UNIX-утилит командной строки, используемой в качестве основного интерфейса во встраиваемых операционных системах. Оказалось, есть версия BusyBox для Windows. В 2020 году появился Windows Terminal, а в нем есть возможность создавать вкладку с запуском конкретной программы.

Сложив эти два факта, пришла очевидная мысль, использовать BusyBox, содержащий в себе Bash, в Windows Terminal как отдельную консоль.

Для этого необходимо скачать BusyBox 64, и я, например положил файл в C:/Program Files/Busybox. А дальше создать новый профиль Windows Terminal и поменять его имя на Bash и указать команду для запуска как C:/Program Files/Busybox/busybox64.exe bash

У этого подхода был один минус, при запуске терминала не из конкретной папки, а из ярлыка на рабочем столе или из панели задач.
То адрес рабочей папки был C:/Windows/System32, и если случайно ввести команду удаления или создания файла, то мы портим важную системную папку. Обойти возможно используя аналог .bashrc или /etc/profile или .profile.

Но просто создать файл .profile мало, BusyBox для Windows их не считывает, для этого необходимо добавить путь к этому файлу в ENV в “Переменные среды”.

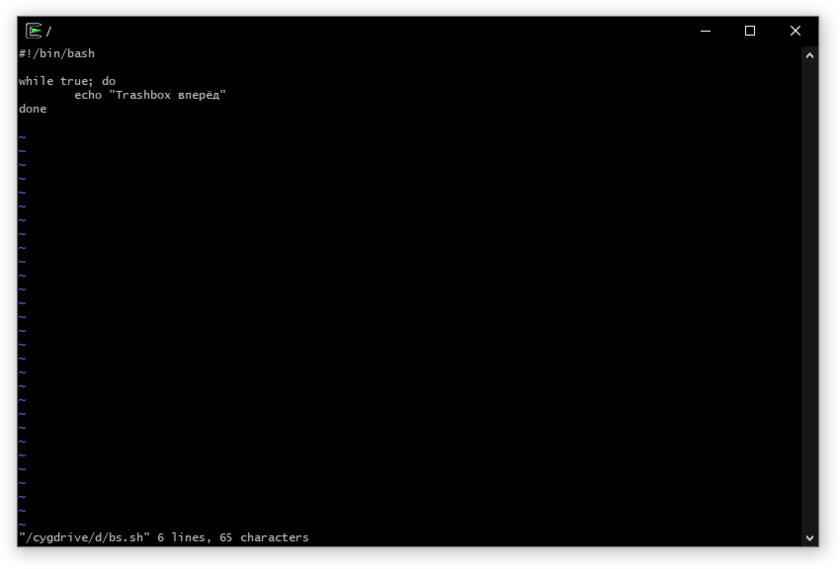
Теперь мы можем написать скрипт, который будет настраивать рабочую директорию при запуске консоли.
#!/bin/bash

domain=$(echo $PWD | tr '[:upper:]' '[:lower:]')

if [ $domain = "c:/windows/system32" ]; then
    cd $HOME
fi
Теперь если мы запустили терминал из ярлыка или панели задач, то рабочей директорией по умолчанию становится домашняя папка пользователя, а если мы запускаем из конкретной папки то, она и становится рабочей директорией.
Мы получили Bash в Windows Terminal с удобной начальной директорией.

When Microsoft’s CEO announced that the Bash shell was coming to Windows, several people couldn’t believe it. #BashOnWindows trended on Twitter for days; such was the impact of this news.
Initially referred as Bash on Windows, it is actually called Windows Subsystem for Linux, popularly known as WSL.
With WSL, you can install one of the supported Linux distribution inside Windows and use the Windows terminal to access the Linux systems and run Linux commands.
In this tutorial, you’ll learn how to enable WSL on Windows and then install a Linux distribution of your choice.
📋
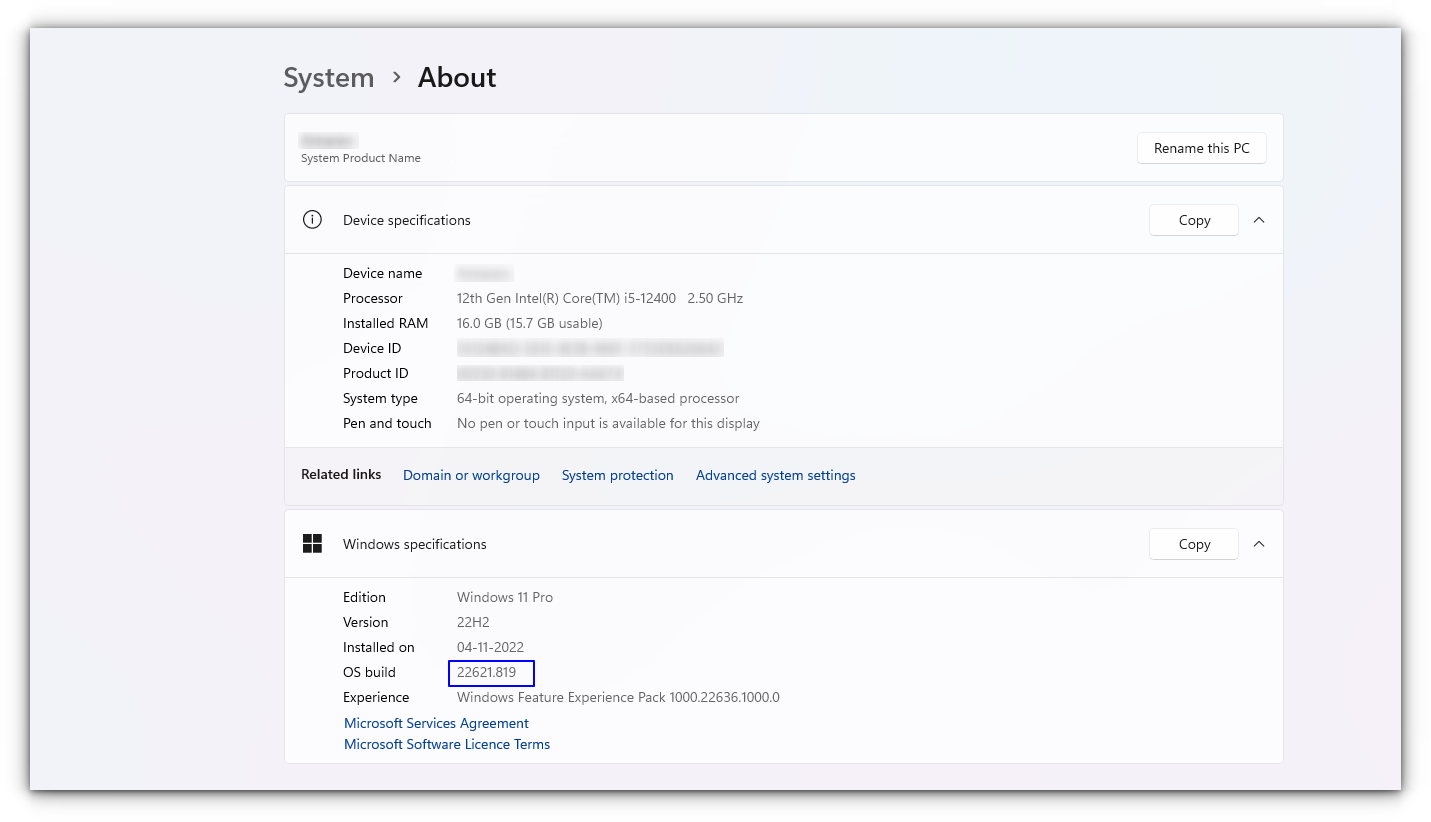
This tutorial was tested with the latest Windows 11 version 22H2, and build 22621.819. You might need to update your Windows installation if you have an older build to follow everything in this tutorial.
What is WSL?
WSL (formerly Bash on Windows) provides a Windows subsystem, and Linux runs atop it. It is not a virtual machine or an application like Cygwin. It is a complete Linux system inside Windows 10/11. It allows you to run the same Bash shell you find on Linux. You can run Linux commands inside Windows without installing a virtual machine or dual-boot Linux and Windows.
You install Linux inside Windows like a regular application. This is a good option if your main aim is to learn Linux/UNIX commands.
Check for System Compatibility
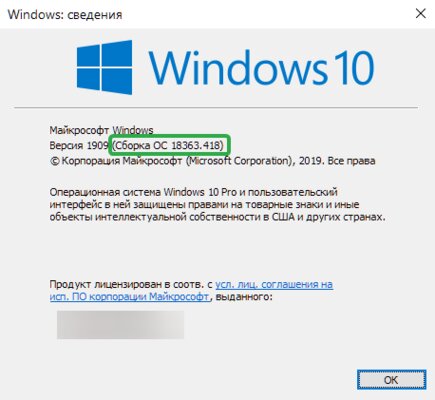
You must be running specific versions of Windows for the different features described in this article. Requirements necessary for a particular feature to work are described under its titles. To check your Windows version, search for about in the start menu.
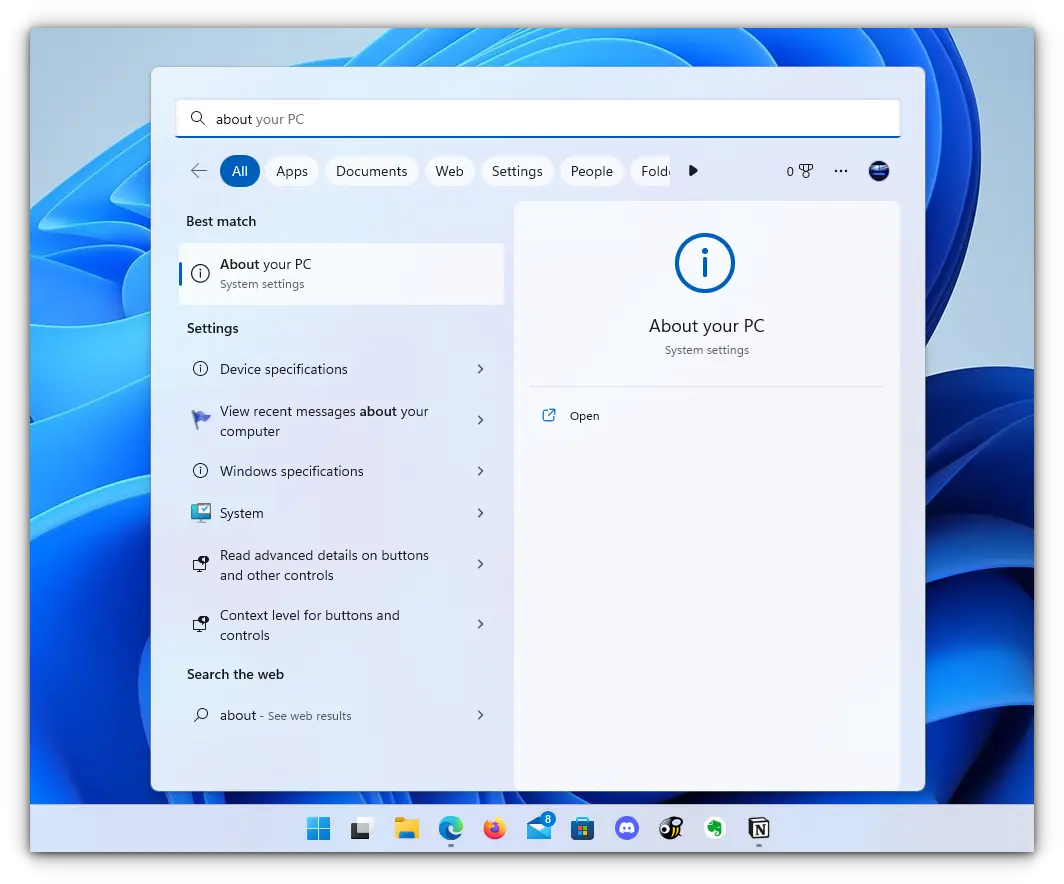
Here, you can see the build of your PC, as shown in the screenshot below. Make sure it is matching with the respective requirements described under various sub-headings here in this article.
- You must be running Windows 10 version 1607 (the Anniversary update) or above.
- WSL only runs on 64-bit versions 32-bit versions are not supported.
Install Bash in Newer Windows 10 and 11
The good thing is that the latest set of upgrades, including the stable release of WSL v1.0 released from Windows, makes it easier to install Bash on Windows.
There are two ways you can go about it:
- You can get it in one click from Windows Store.
- Choose to use the command-line.
1. Install WSL Using the Microsoft Store
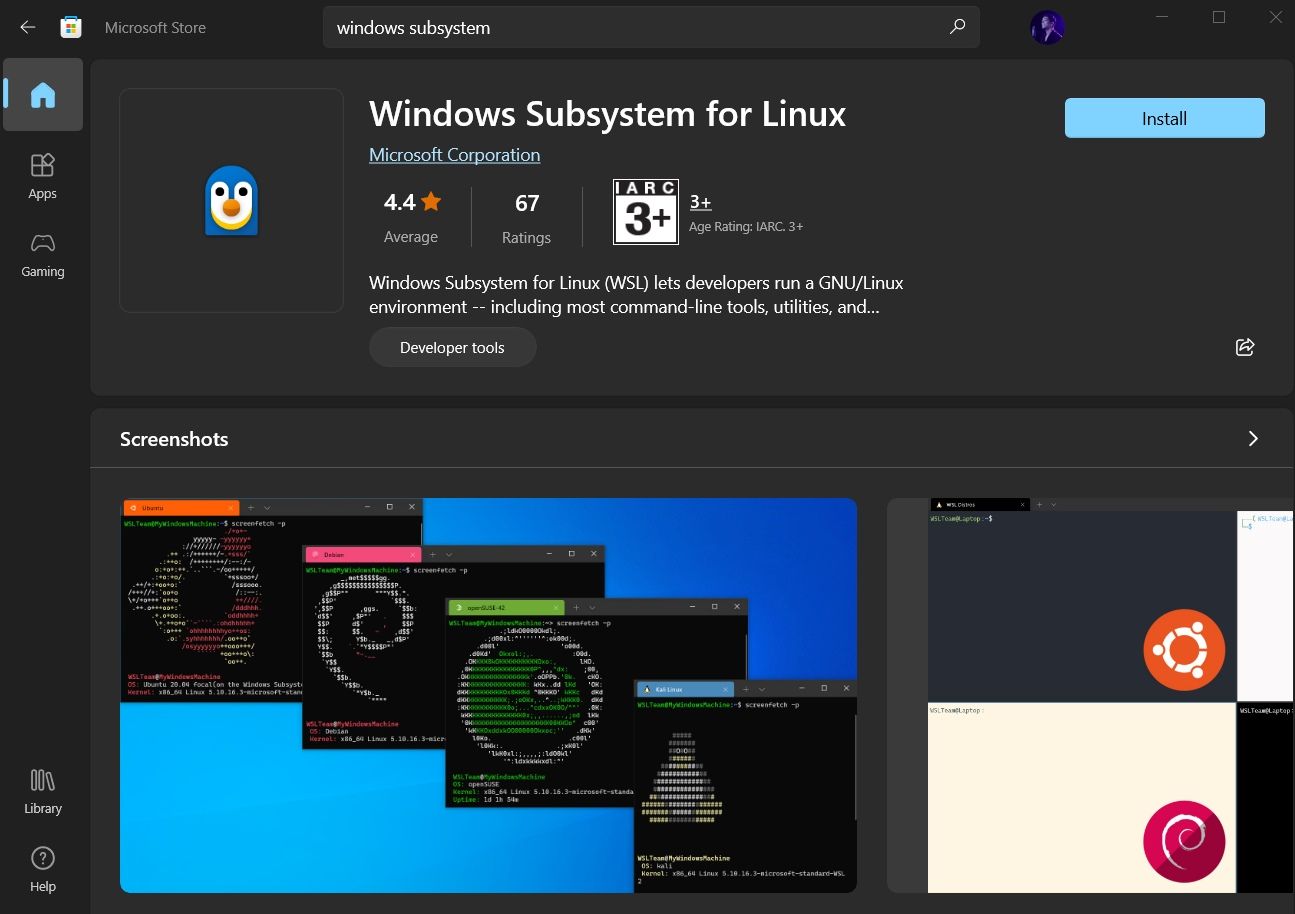
Launch the Microsoft Store and search for «Windows subsystem«.
Install it, and you’re done with the first step. Next, you have to install a Linux distribution.
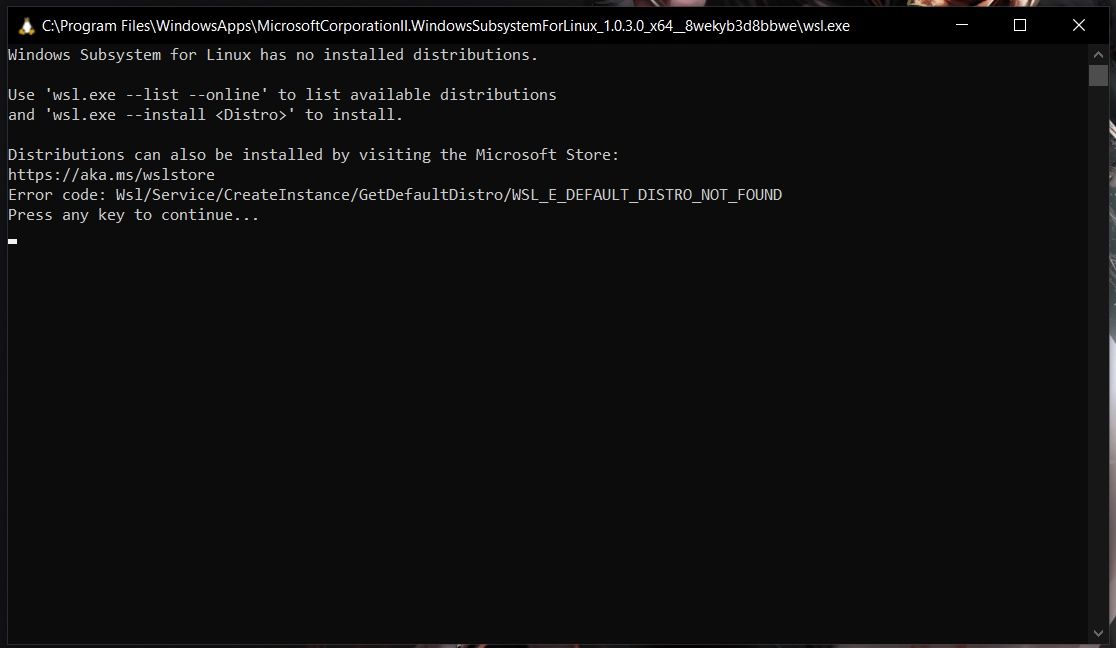
So, if you try to open WSL, you will get to see a window informing you that no distribution is installed.
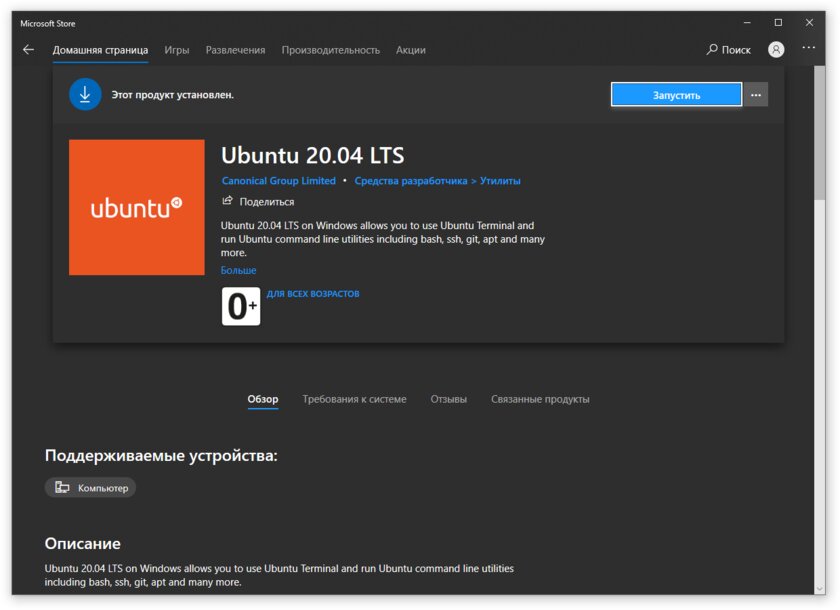
Similar to WSL, search for the distribution on Microsoft Store, and then install it.
For instance, I installed Ubuntu from the store as shown in the image below:
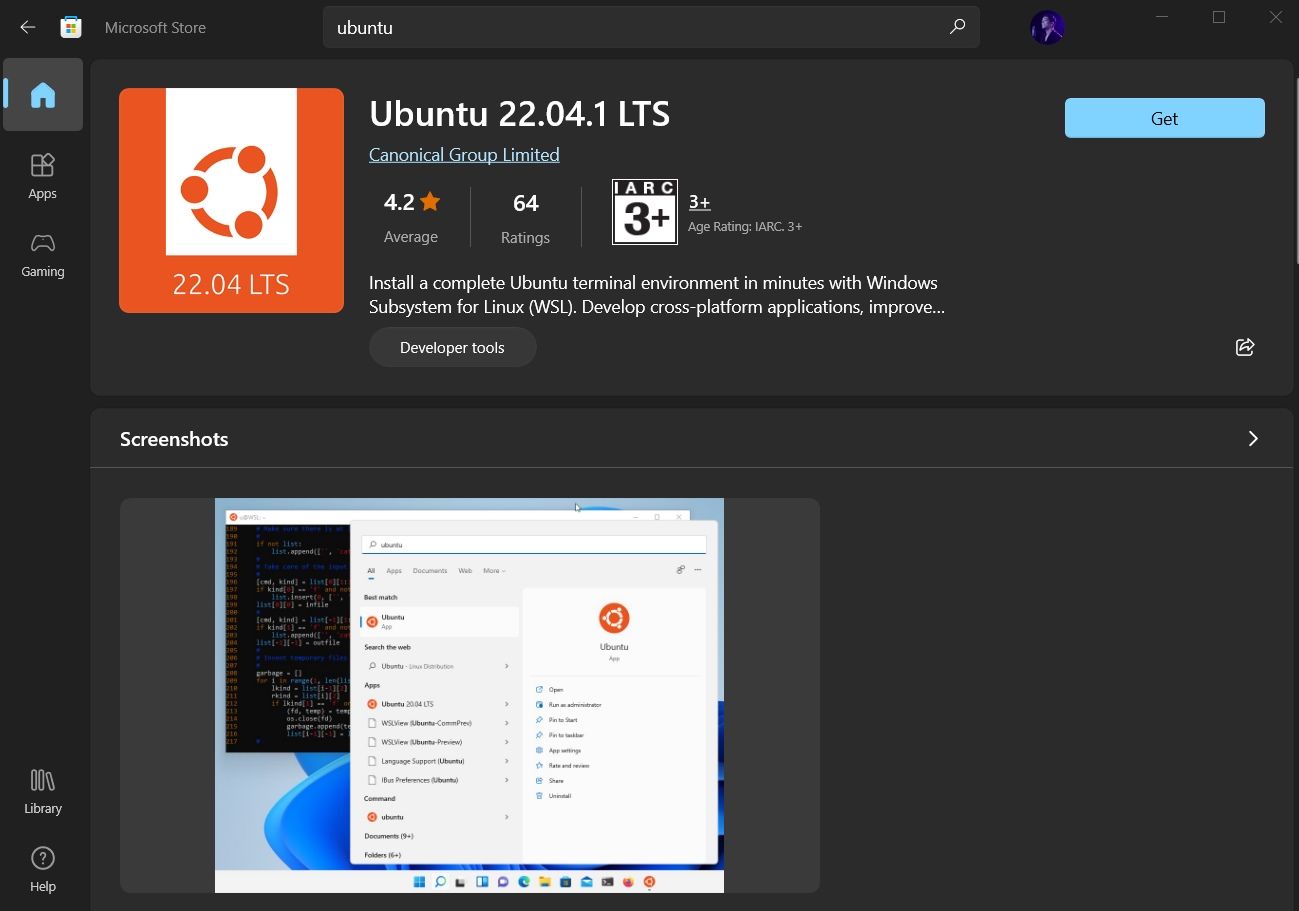
And, then proceed to «Open» it and it will automatically start installing. The procedure is same for any distribution you choose.
We then have to configure it, which is discussed right after installing it through the command line.
2. Install WSL and the default distribution using the command-line
In WSL, the default distribution is Ubuntu (which can be changed). To install, open Powershell as an administrator.
For this, search for Powershell in the start menu, right-click on Powershell and select Run as Administrator.
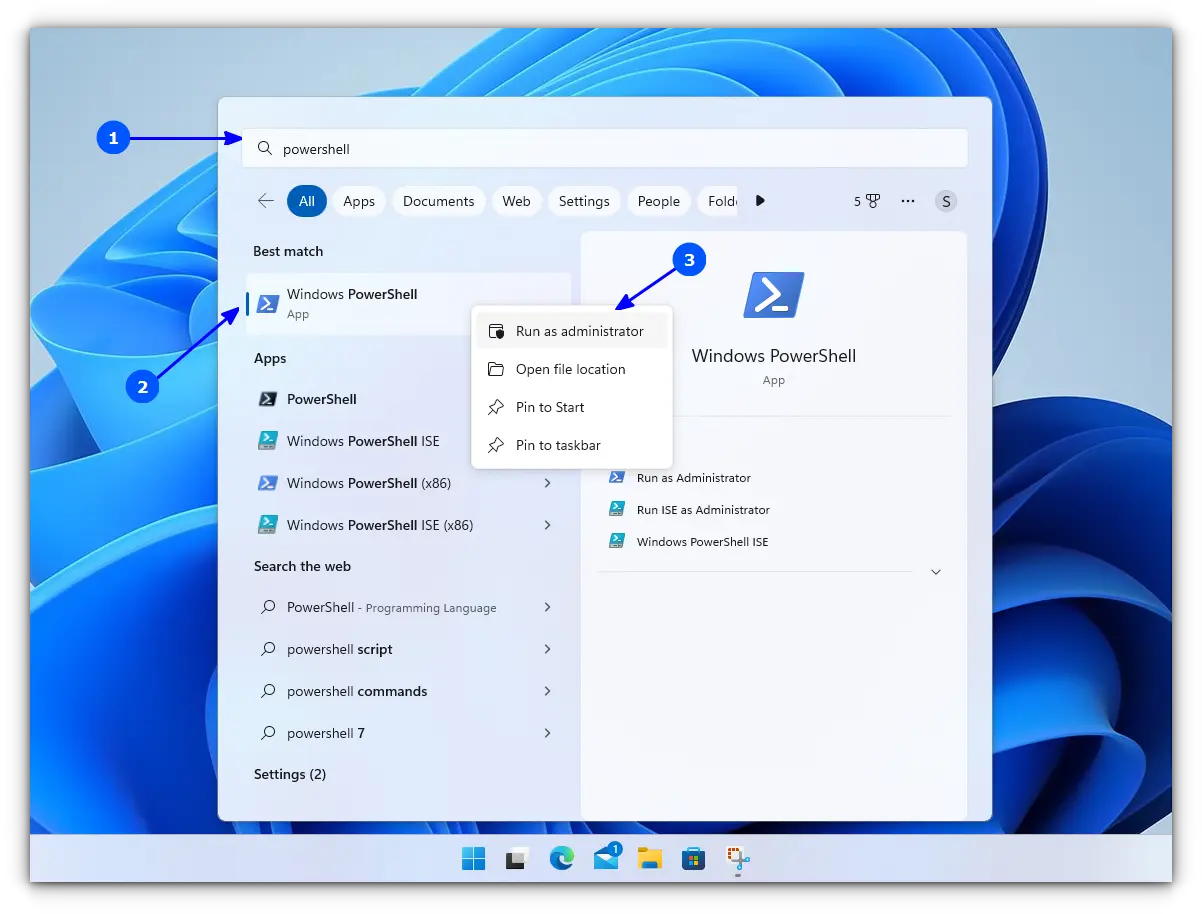
Inside Powershell, enter the following command to install WSL, along with all necessary features and the default distribution, that is, Ubuntu.
wsl --installOnce finished downloading and installing, you need to reboot to apply the changes.
Whether you installed WSL and Ubuntu using the Microsoft Store or the command line, you need to configure it.
Here’s how it is done:
🛠️ Configure the newly installed Ubuntu
After rebooting, search for Ubuntu in Start Menu and open it.

It will ask you to enter a UNIX Username and Password. Enter these details and press enter key.
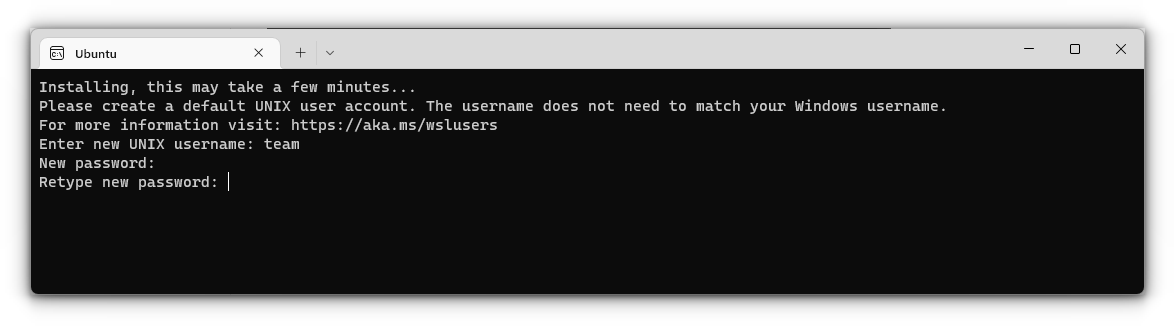
You will now be inside the terminal window of Ubuntu.
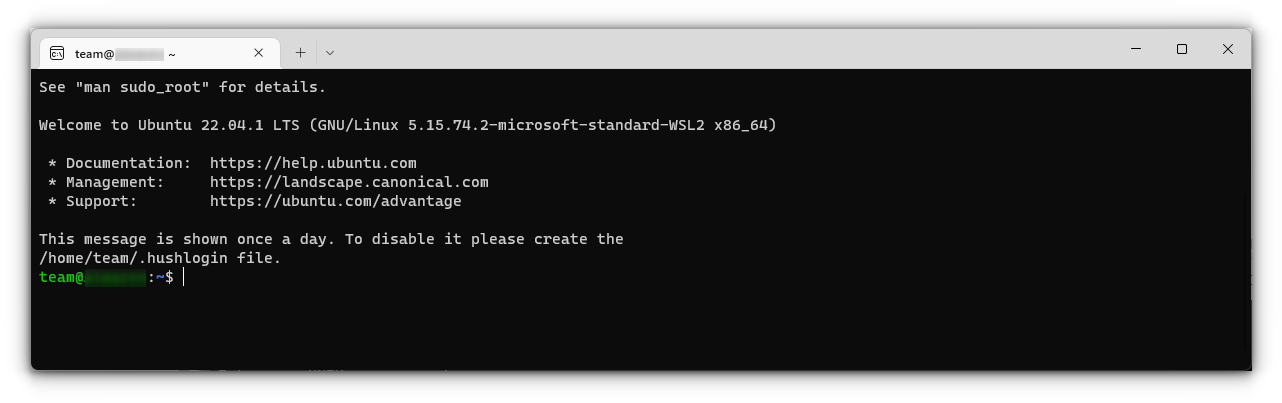
Once logged in, you need to update the installed Ubuntu. For this, enter the following commands one by one:
sudo apt update
sudo apt full-upgrade
After completing the update, you are good to go with Ubuntu in WSL.
Install Bash on Older Windows
If you have the minimum requirements mentioned in the beginning but are running an older Windows build, the previous method may not be supported. So there is a manual installation method.
Also, there are both WSL1 and WSL2 available. WSL2 offers some upgraded functionalities but has some minimum requirements to run:
- For x64 systems: Version 1903 or later, with Build 18362 or later.
- For ARM64 systems: Version 2004 or later, with Build 19041 or later.
So this brings us to two possibilities to install:
- Install Ubuntu with WSL1
- Install Ubuntu with WSL2
1. Install Ubuntu with WSL 1
This is a relatively simple procedure for those with a system incompatible with WSL2. First, you need to enable the Windows Subsystem for the Linux feature. This can be done through the command line. Open Powershell as an administrator and enter the following command:
dism.exe /online /enable-feature /featurename:Microsoft-Windows-Subsystem-Linux /all /norestartOr, to do this via GUI, follow the steps below:
- Search for Windows Features in Start Menu.
- Turn on Windows Subsystem for the Linux feature.
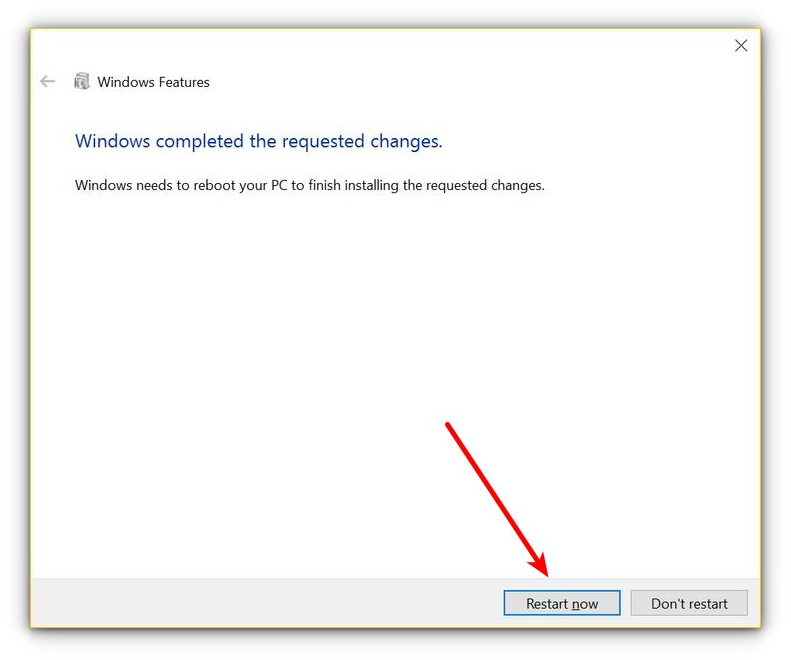
- Reboot your system.
- Open the Windows store and search for the distribution of your choice to install.
Once installation is completed, open the Ubuntu app from the start menu. It will take a couple of seconds to install. You will be prompted to enter a username and password. Provide those credentials, and you are good to go with Ubuntu in WSL1.
2. Install Ubuntu with WSL 2
It is recommended to use WSL2 instead of WSL1 if you have support. To install Ubuntu with WSL2, you need to make sure that the Windows Subsystem for Linux feature is turned on. For this, as in the above case, execute the following command in an elevated Powershell:
dism.exe /online /enable-feature /featurename:Microsoft-Windows-Subsystem-Linux /all /norestartReboot the device once the command is completed.
After this, you need to enable the Virtual Machine Platform feature. Open the Powershell with admin privileges and enter the following command:
dism.exe /online /enable-feature /featurename:VirtualMachinePlatform /all /norestartOnce again, restart the device to complete the WSL install and update to WSL 2.
Now, download the Linux Kernel Update Package for x64 machines from the official website. If you are using ARM64 devices, use this link to download the latest kernel update package.
If you are not sure about the device architecture, enter the command below in Powershell to get the type:
systeminfo | find "System Type"When the file is downloaded, double-click on it and finish the installation of the Kernel update package.
Now, open PowerShell and run this command to set WSL 2 as the default version when installing a new Linux distribution:
wsl --set-default-version 2Once WSL2 is set as the default version, you can now install the Linux distribution of your choice.
Go to Windows Store and install Ubuntu, as described in the earlier steps. and the rest of the procedure is already described above.
Enjoy Linux inside Windows.
🔧 Troubleshooting Tip 1
«The WSL optional component is not enabled. Please enable it and try again.»
You may see an error like this when you try to run Linux inside Windows 10:
The WSL optional component is not enabled. Please enable it and try again.
See https://aka.ms/wslinstall for details.
Error: 0x8007007e
Press any key to continue...
And when you press any key, the application closes immediately.
The reason here is that the Windows Subsystem for Linux is not enabled in your case. You should enable it as explained in this guide. You can do that even after you have installed Linux.
🔧 Troubleshooting Tip 2
Installation failed with error 0x80070003
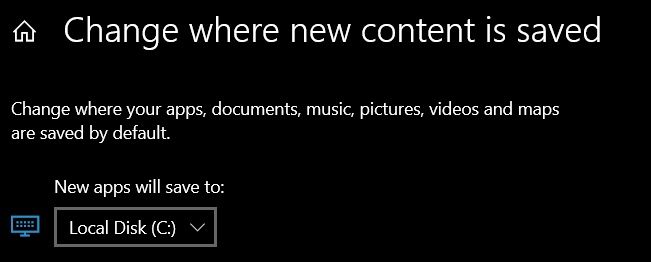
This is because Windows Subsystem for Linux only runs on the system drive i.e. the C drive. You should ensure that when you download Linux from the Windows Store, it is stored and installed in the C Drive.
On Windows 10, go to Settings -> Storage -> More Storage Settings -> Where new content is saved: Change where new content is saved and select C Drive here.
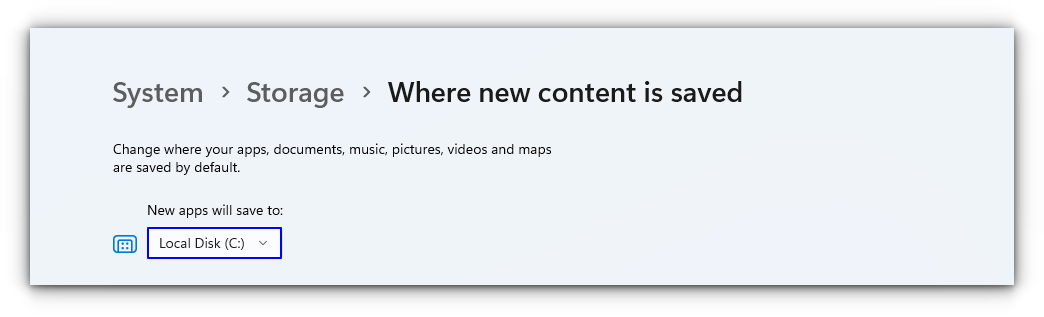
On Windows 11, go to Settings -> System -> Storage -> Advanced storage settings -> Where new content is saved and select C Drive here.
🔧 Troubleshooting Tip 3
«Failed to attach disk Error»
Sometimes, this error will appear when we reinstall the Ubuntu in WSL.
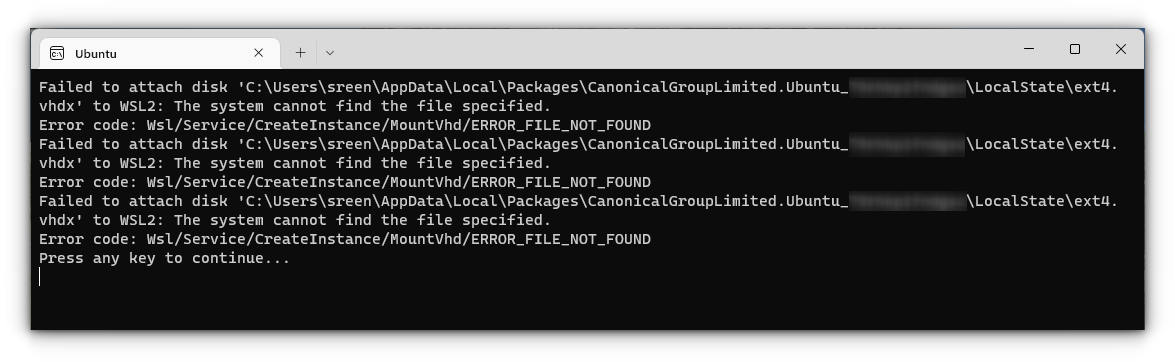
In this case, open Powershell and run the following command:
wsl -l -vThis will list the installed Linux systems. Find the name of the system, that is throwing the error, in my case Ubuntu. Now run the following command:
wsl --unregister UbuntuYou can restart the ubuntu app and it will run without any issues.
You can refer to more common troubleshooting methods from the official website.
Run GUI Apps On Windows Subsystem for Linux
The ability to run GUI apps on Windows Subsystem for Linux was introduced with the WSL 2 release in May 2020.
Windows Subsystem for Linux (WSL) with WSL2 now supports running Linux GUI applications (X11 and Wayland) on Windows in a fully integrated desktop experience. This allows you to install Linux applications and seamlessly integrate them into Windows desktop, including features like “pin to taskbar”.
📋
One crucial point is that you must be on Windows 10 Build 19044+ or Windows 11 to access this feature.
Step 1: Enable/Update WSL 2
This procedure has been explained in the above section and you can refer to it.
Step 2: Download and Install Graphics drivers
To run GUI apps, you need to install appropriate graphics drivers. You can use the following link to download the drivers according to your provider.
- Intel GPU Driver for WSL
- AMD GPU Driver for WSL
- NVIDIA GPU Driver for WSL
Once installed, you are all done.
Step 3: Install some GUI Apps
Now, go to your Ubuntu app and install any GUI app using the APT package manager. You should note that running apps from other sources like flatpak are problematic within WSL.
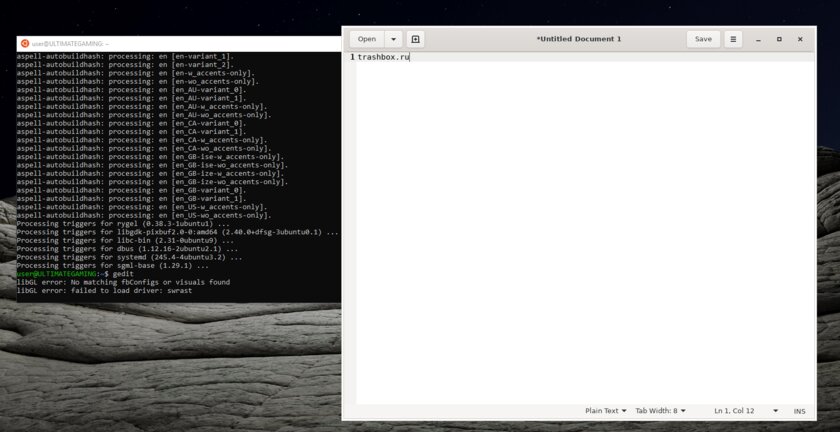
For this article, I installed the Gedit text editor using the following command:
sudo apt install gedit -yThis will install several MB of packages including required libraries. Once completed, you can run the following command to start the GUI Gedit app in Windows.:
gedit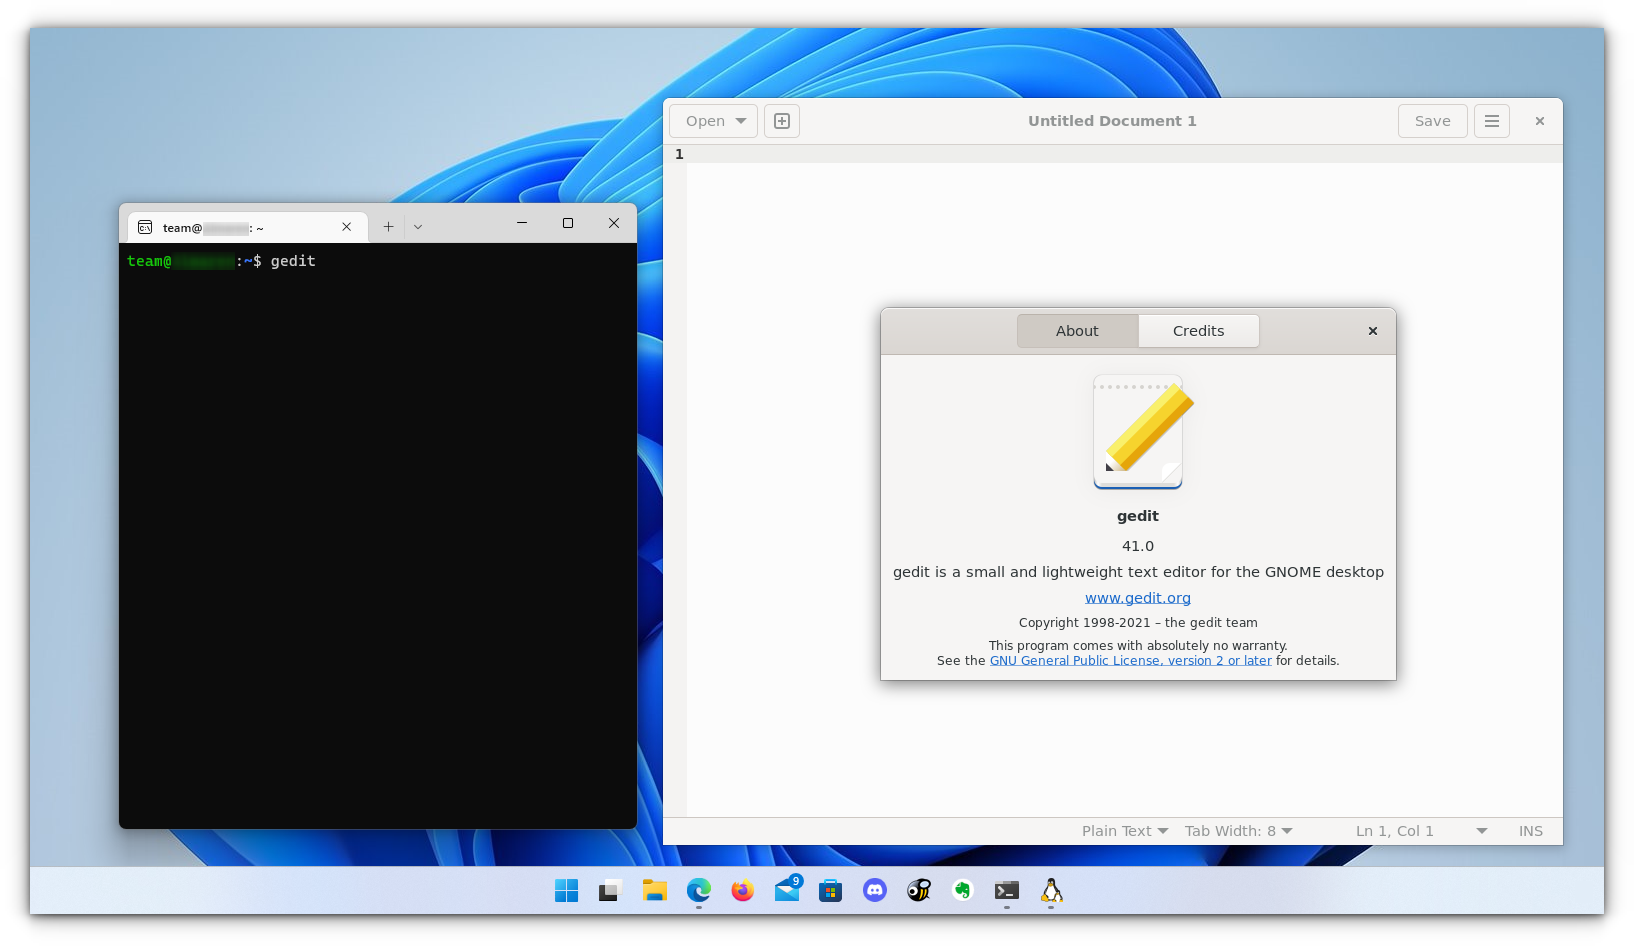
Similarly, you can install all the popular applications available to Linux, including Nautilus file manager, GIMP, etc. For more about running GUI applications in WSL, you can refer to the official documentation.
Install Linux Bash Shell on other older Windows 10
If you cannot get the Fall Creator’s update on Windows 10 for some reason, you can still install it if you have the Anniversary update of Windows 10. But here, you’ll have to enable developer mode. I still recommend upgrading to the Fall Creator’s update or the latest Windows 10 2004 version update though.
Press Windows Key + I to access Windows system settings. Here, go to Update & Security:
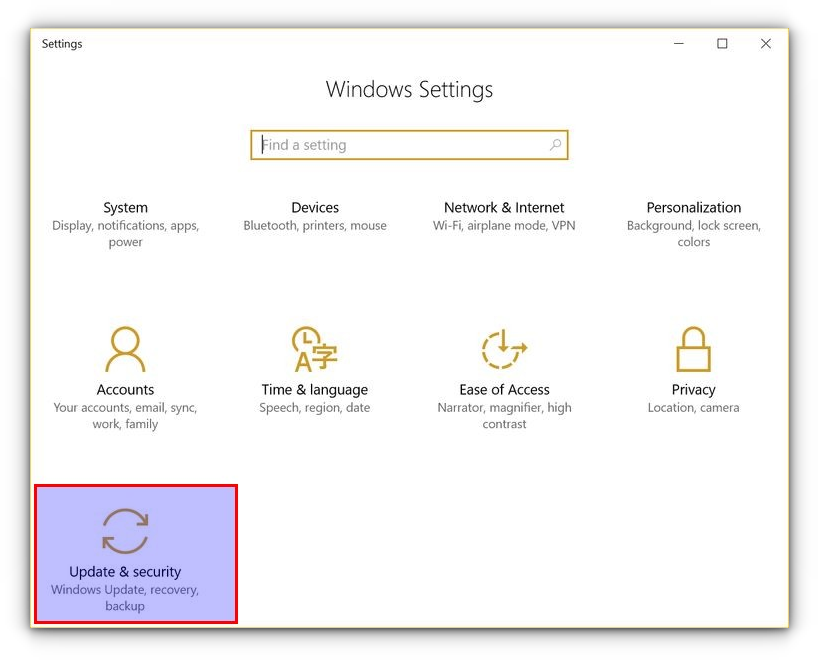
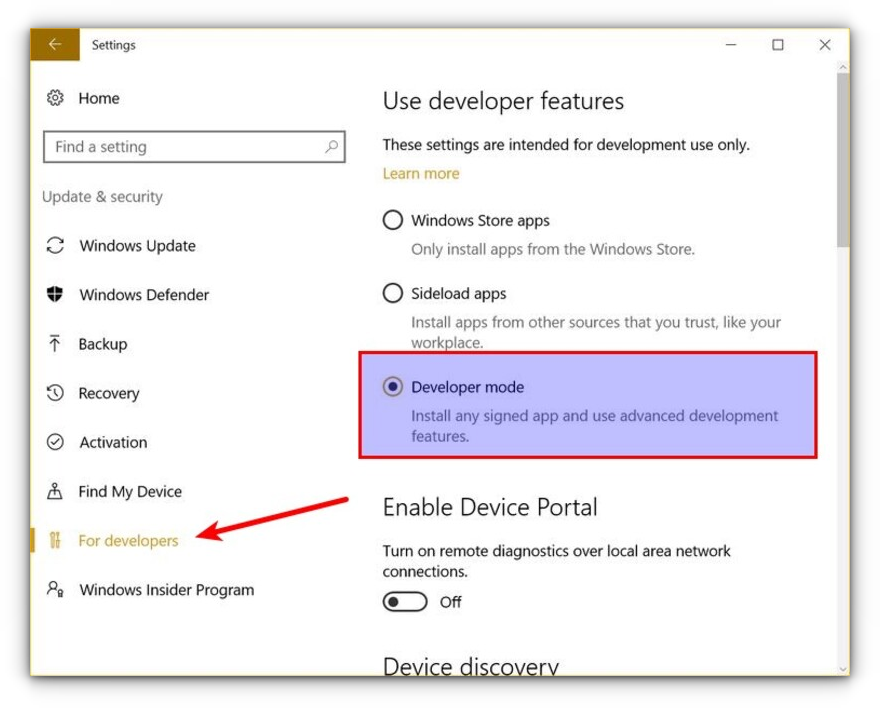
From the left side pane, choose “For developers.” You’ll see an option for “Developer mode.” Enable it.
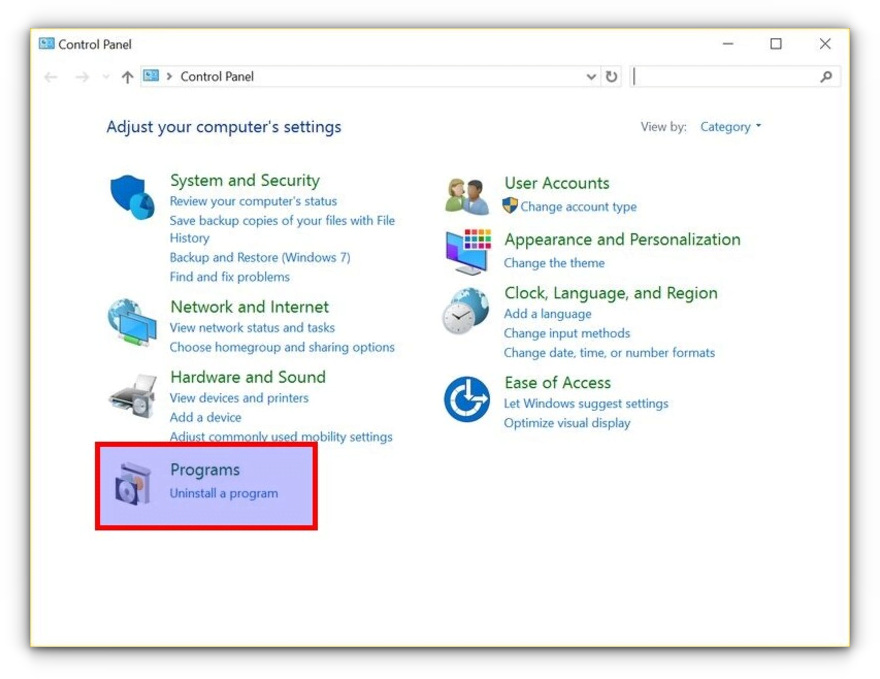
Now search for Control Panel and in Control Panel, click on “Programs”:
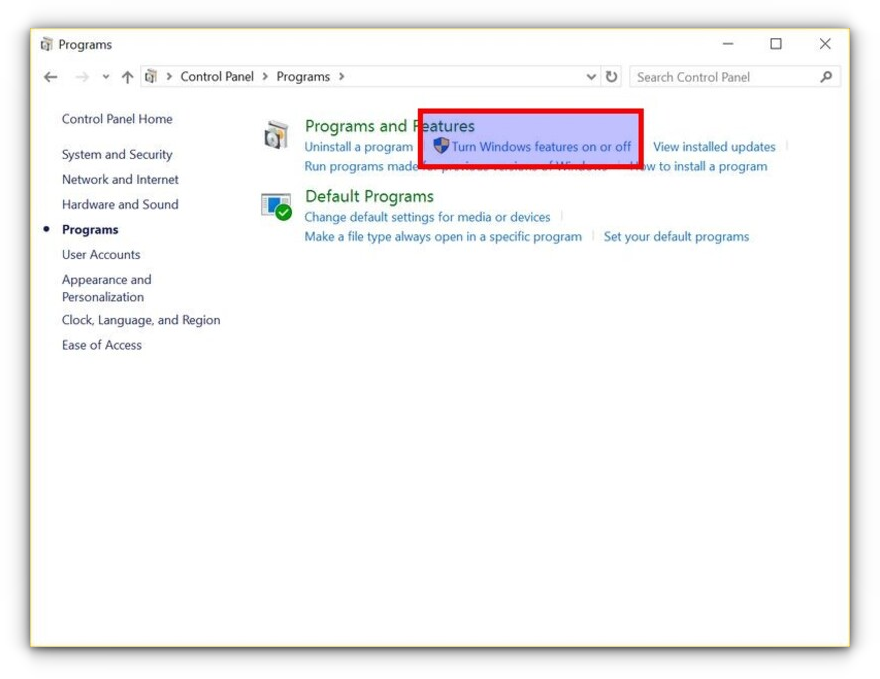
In Programs, click “Turn Windows features on or off”:
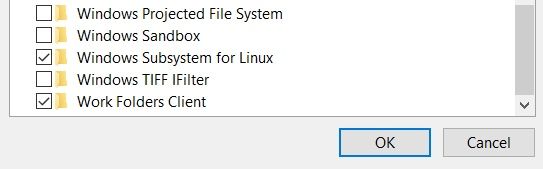
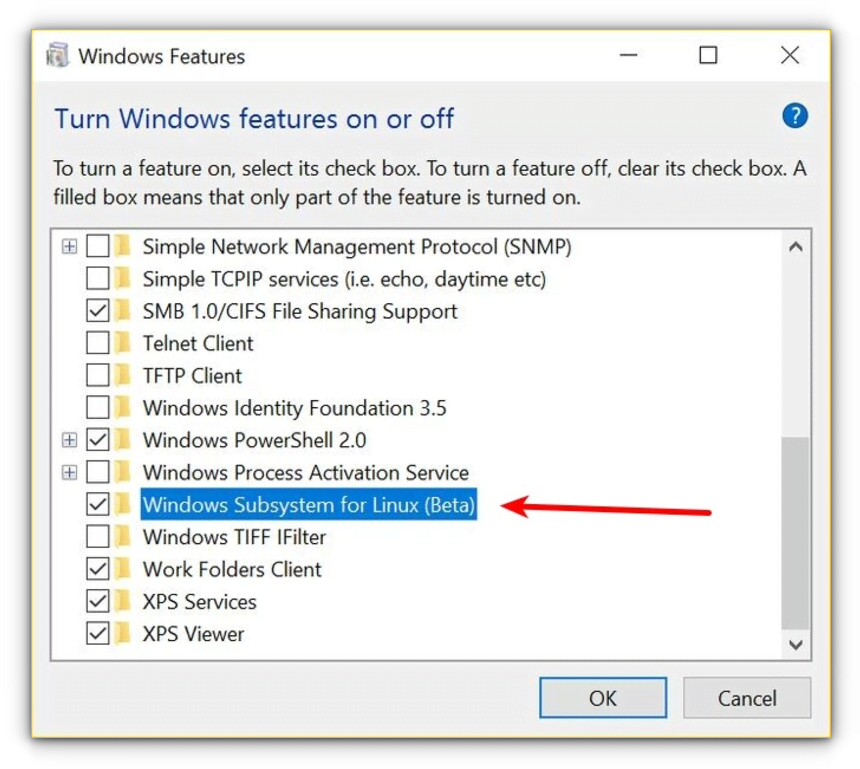
When you do this, you’ll see several Windows features. Look for “Windows Subsystem for Linux” and enable it.
You’ll need to restart the system after doing this.
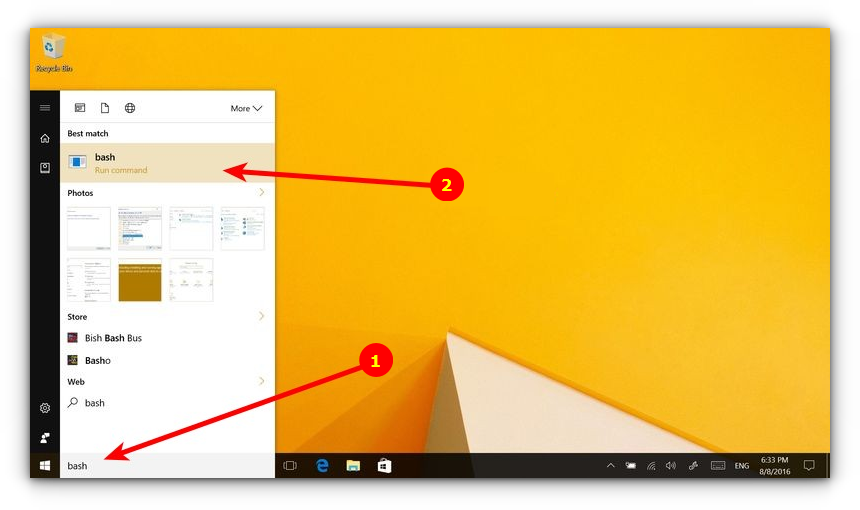
After restarting the computer, click the start button and search for “bash”.
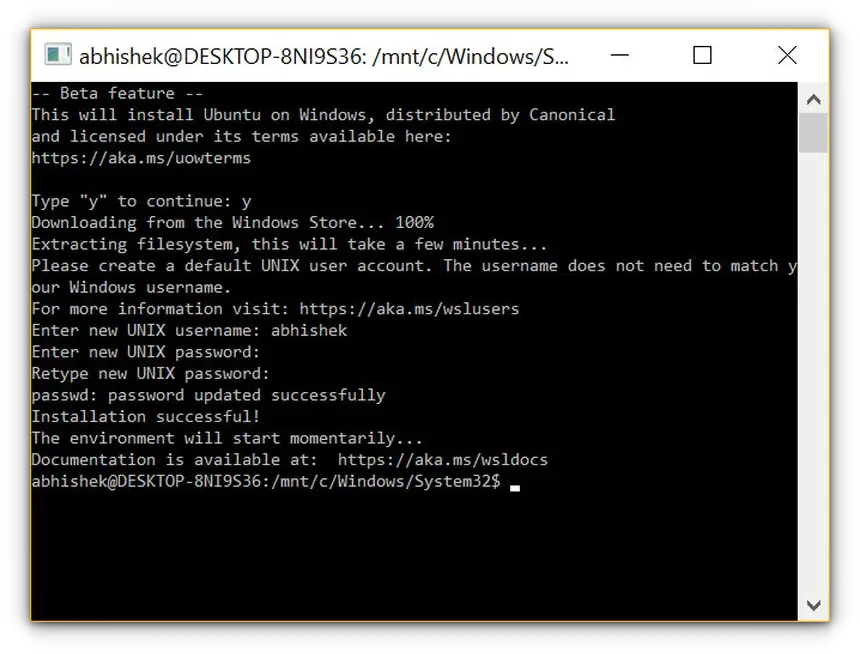
When you run it for the first time, you’ll be given the option to download and install Ubuntu. You’ll be asked to create a username and password during this process. It will install an entire Ubuntu Linux system, so have patience as it will take some time in downloading and installing Linux on Windows.
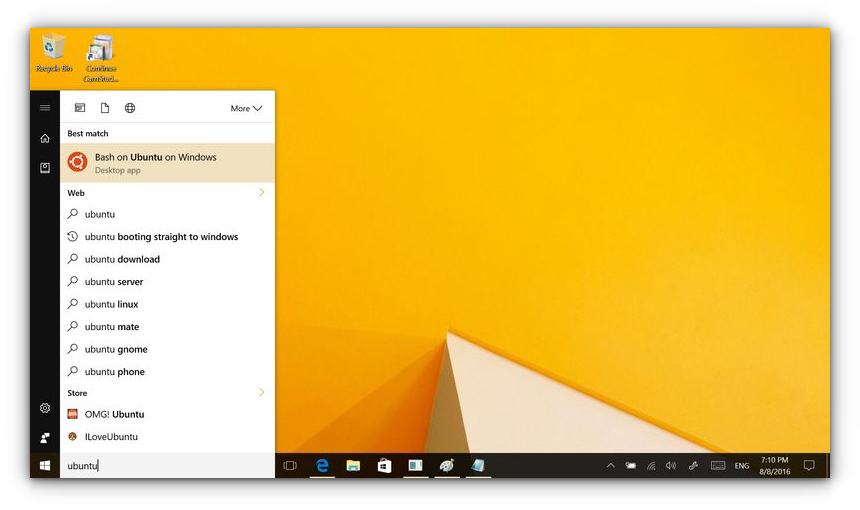
Once this is done, go back to the Start menu and search for Ubuntu or Bash.
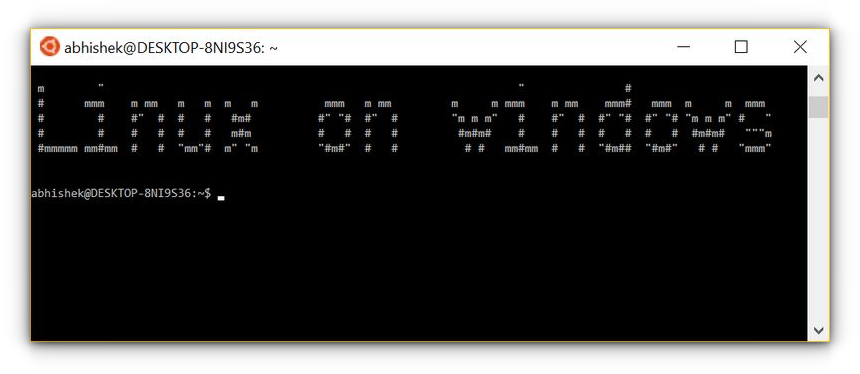
Now you have a command line version of Ubuntu Linux. You can use apt to install various command line tools in it.
💬 I hope you find this tutorial helpful for installing bash on Windows and experimenting with Linux GUI apps on Windows. No wonder WSL lets you play with Linux inside of Windows. If you have questions or suggestions, feel free to ask.
Here’s how to set up and use the Linux shell on Windows – using the Windows Subsystem for Linux (WSL).
This tutorial is intended for up-to-date versions of Windows 10 from 2020 onwards. I’m not going to cover how to use WSL on older versions of Windows 10 or other methods for Windows 8/7/XP/3.1 because you shouldn’t be using outdated software. If you must use Windows, use a version that still receives security patches!
WSL is a great tool and allows you to pretty much run Linux software on windows as if you had never left Linux. Not everyone has the luxury of being able to install a Linux system due to relying on proprietary software released only for Windows.
Anyway, here’s how to get a Linux shell happening on Windows 10, courtesy of the Windows Subsystem for Linux.
Install Windows Subsystem for Linux
First, you will need to install support for the Windows Subsystem for Linux in Windows 10.
 on Windows 10 [Tutorial] 2")
This is done from the Settings app – so open it up and then click on Apps.
 on Windows 10 [Tutorial] 3")
Then click on Programs and Features in the sidebar to the right.
 on Windows 10 [Tutorial] 4")
Next, click Turn Windows features on or off in the sidebar to the left.
 on Windows 10 [Tutorial] 5")
Scroll down the list and check Windows Subsystem for Linux, then press OK
Confirm your selection, then allow your computer to restart to complete the installation.
Install Ubuntu From The Windows Store
First, make sure that your copy of Windows 10 is completely up-to-date. Older releases of Windows 10 from before 2020 do not support the Windows Subsystem for Linux.
 on Windows 10 [Tutorial] 6")
Next, open the Microsoft Store from the Start Menu, or search for ‘store.’
 on Windows 10 [Tutorial] 7")
Search for ‘Ubuntu’ from Canonical.
To install it, click ‘Get’ and wait for it to download.
This “App” contains a full copy of Ubuntu for the Windows Subsystem for Linux – including the Bash shell, and a full Ubuntu command line environment.
 on Windows 10 [Tutorial] 8")
Launch the downloaded Ubuntu App by clicking ‘Launch.’
 on Windows 10 [Tutorial] 9")
A shortcut to Ubuntu will also be added to your start menu.
 on Windows 10 [Tutorial] 10")
When you launch Ubuntu, you’ll be dropped right into a Linux Bash environment in Windows – cool!
Install the Windows Terminal (Optional)
The terminal which Ubuntu opens is a bit lacking, however. There’s a better Terminal App now available – The Windows Terminal!
Windows Terminal supports things like tabs and custom configurations. You can have a Powershell tab open next to a Bash Terminal; it’s really nice.
It’s in the Windows Store, so search for it and install it.
 on Windows 10 [Tutorial] 11")
 on Windows 10 [Tutorial] 12")
Conclusion
Windows is still the industry standard for many fields – including graphic design and CAD. Some software development tools are also only supported on Windows.
If you rely on software that can only be run on Windows, running and testing Linux software without having to rely on a cumbersome virtual machine saves both time and resources.
Под GNU/Linux-дистрибутивы создано огромное количество полезных и удобных инструментов и приложений для обычных пользователей и разработчиков. Далеко не всё из этого доступно на Windows, но, к счастью, для ОС от Microsoft есть решения, исправляющие эту проблему.
WSL — официальная подсистема Linux внутри Windows
В Windows 10 существует крайне полезная вещь под названием Windows Subsystem for Linux (WSL). Она позволяет использовать GNU/Linux-среду прямо в Windows и запускать не только команды, но и, например, Bash-скрипты. Для использования WSL необходимо следовать инструкции ниже.
Шаг 1. Проверьте, подходит ли текущая версия Windows требованиям. Для этого нажмите сочетание клавиш Win+R, затем введите winver. Найдите строку «Сборка ОС» — она должна быть свежее версии 14316.
Шаг 2. Запустите стандартную утилиту PowerShell от имени администратора и введите в ней команду для включения WSL:
dism.exe /online /enable-feature /featurename:Microsoft-Windows-Subsystem-Linux /all /norestart
Шаг 3. Если версия Windows, определённая в первом пункте, свежее 18362, вы можете установить WSL 2, который в разы быстрее первой версии и обладает доработанным ядром. Введите команду ниже, если нужно установить WSL 2:
dism.exe /online /enable-feature /featurename:VirtualMachinePlatform /all /norestart
После этого скачайте и установите пакет обновления с официального сайта.
Шаг 4. Перезагрузите компьютер. Если была произведена установка WSL 2, введите в PowerShell от имени администратора следующую команду:
wsl —set-default-version 2
Шаг 5. После перезагрузки откройте фирменный магазин приложений Microsoft Store и найдите подходящий GNU/Linux-дистрибутив. Самым популярным является Ubuntu — вы можете установить любую версию из представленных в Microsoft Store.
Шаг 6. Как только установка завершится, найдите дистрибутив в меню «Пуск» и запустите его.
Шаг 7. Пройдите этап первоначальной настройки, введя имя нового пользователя и придумав пароль.
Шаг 8. Теперь различные GNU/Linux-команды можно выполнять, запустив дистрибутив, либо введя в командной строке wsl <команда>. Например, для просмотра всех файлов в текущей директории достаточно в командной строке выполнить wsl ls -a.
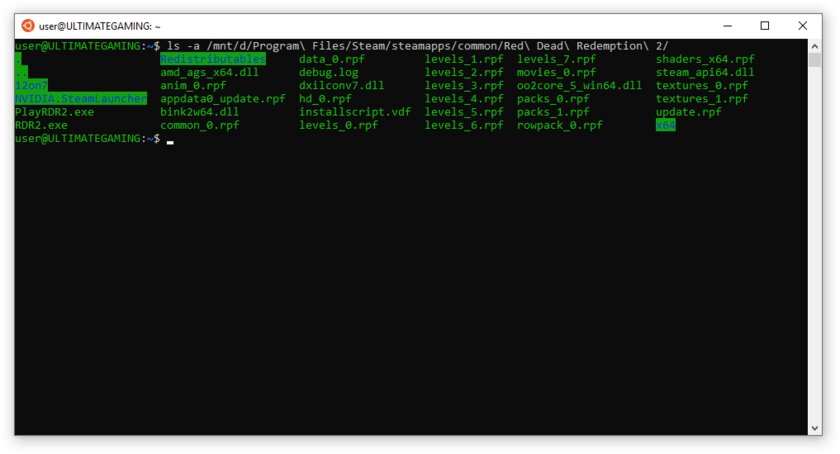
Обращу внимание на то, что путь к дискам в WSL отличается от такового в Windows. Вместо привычного C:/ используйте /mnt/c/. Также не забывайте про экранирование пробелов с помощью символа \ — это также пригодится при вводе путей к файлам.
Помимо выполнения базовых команд, с помощью WSL можно даже запускать приложения с графическим интерфейсом. Правда, рассчитывать на большое количество поддерживаемых подобных программ не стоит.
Шаг 1. Загрузите X-сервер и установите его.
Шаг 2. Запустите его с помощью ярлыка на рабочем столе. В открывшемся окне выберите вариант Multiple windows, затем Start no client. Завершите настройку кнопкой Finish.
Шаг 3. Откройте дистрибутив через меню Пуск и выполните команду export DISPLAY=:0
Шаг 4. Запустив приложение с графическим интерфейсом в WSL, вы увидите новое окно прямо в Windows.
CoreUtils — лёгкий инструмент для запуска базовых команд
Плюс данной утилиты — возможность запуска не только на Windows 10, но и на более старых версиях ОС. Кроме того, она легка и не занимает много места. Не обошлось без недостатков — программа скудна на функционал и не обновлялась очень давно. Она не только не умеет запускать скрипты и приложения с GUI, но и поддерживает лишь самые базовые GNU/Linux-команды. Установка CoreUtils весьма проста.
Шаг 1. Скачайте утилиту с официального сайта.
Шаг 2. Следуйте инструкциям установщика.
Шаг 3. Откройте «Панель управления», в разделе «Система и безопасность» выберите пункт «Система». На панели слева откройте «Дополнительные параметры системы». Нажмите кнопку «Переменные среды» и в открывшемся окне найдите область с заголовком «Системные переменные». В случае, когда там есть переменная Path, выберите её, нажмите «Изменить» и далее создайте новую строку. Содержимым этой строки должен быть путь к папке, который был указан при установке. Если вы ничего не меняли, то введите следующее:
C:\Program Files (x86)\GnuWin32\bin
Переменной Path нет? Тогда для начала создайте её кнопкой «Создать», затем в поле имени введите Path, а в поле значения — строку выше.
Шаг 4. Запустите командную строку и выполняйте команды прямо там.
Cygwin — запуск команд и Bash-скриптов
Ещё одна утилита, схожая с CoreUtils, но обладающая более широким функционалом — в том числе и возможностью запуска скриптов. Из минусов — немалый вес и более сложная установка. Разумеется, не идёт ни в какое сравнение с максимально удобным WSL, но для базовых команд вполне подойдёт.
Шаг 1. Загрузите Cygwin и запустите установку.
Шаг 2. Выберите Install from Internet, укажите директории для установки и загрузки пакетов, а также любой подходящий сайт из списка для скачивания файлов.
Шаг 3. В процессе установки можете выбрать необходимые пакеты, либо сразу нажать «Далее», оставив базовый набор.
Шаг 4. Откройте «Панель управления», в разделе «Система и безопасность» выберите пункт «Система». На панели слева откройте «Дополнительные параметры системы». Нажмите кнопку «Переменные среды» и в открывшемся окне найдите область с заголовком «Системные переменные». В случае, когда там есть переменная Path, выберите её, нажмите «Изменить» и далее создайте новую строку. Содержимым этой строки должен быть путь к папке, который был указан при установке. Если вы ничего не меняли, то введите следующее:
C:\cygwin64\bin
Переменной Path нет? Тогда для начала создайте её кнопкой «Создать», затем в поле имени введите Path, а в поле значения — строку выше.
Шаг 5. Команды можно выполнять как через командную строку, так и через специальный терминал.
Шаг 6. Для удаления Cygwin достаточно удалить папку, в которую программа была установлена, а также (по желанию) значение из переменной Path по методу, обратному тому, что был описан в 4 шаге (не удаляйте саму переменную).
В Windows 10 появилась новая возможность для разработчиков — оболочка Ubuntu Bash, позволяющая запускать, устанавливать приложения Linux, использовать скрипты bash прямо в Windows 10, все это называется «Подсистема Windows для Linux». В версии Windows 10 1709 Fall Creators Update доступны уже три дистрибутива Linux для установки. Во всех случаях требуется 64-разрядная система для установки.
В этой инструкции — о том, как установить Ubuntu, OpenSUSE или SUSE Linux Enterprise Server в Windows 10 и некоторые примеры использования в конце статьи. Следует также учитывать, что есть некоторые ограничения при использовании bash в Windows: например, нельзя запускать GUI приложения (правда, сообщают об обходных путях с помощью X server). Кроме этого, командами bash нельзя запустить Windows-программы, несмотря на наличие полного доступа к файловой системе ОС.
Установка Ubuntu, OpenSUSE или SUSE Linux Enterprise Server в Windows 10
Начиная с версии Windows 10 Fall Creators Update (версия 1709) установка подсистемы Linux для Windows несколько изменилась по сравнению с тем, что было в предыдущих версиях (для предыдущих версий, начиная с 1607, когда функция была представлена в бета-версии, инструкция — во второй части этой статьи). Также обратите внимание, что в Windows 10 2004 можно установить Kali Linux с графическим интерфейсом.
Теперь необходимые шаги выглядят следующим образом:
- Прежде всего, необходимо включить компонент «Подсистема Windows для Linux» в «Панель управления» — «Программы и компоненты» — «Включение и отключение компонентов Windows».

- После установки компонентов и перезагрузки компьютера, зайдите в Магазин приложений Windows 10 и загрузите оттуда Ubuntu, OpenSUSE или SUSE Linux ES (да, теперь доступно три дистрибутива). При загрузке возможны некоторые нюансы, о которых далее в примечаниях.

- Запустите загруженный дистрибутив как обычное приложение Windows 10 и выполните первоначальную настройку (имя пользователя и пароль).


Для включения компонента «Подсистема Windows для Linux» (первый шаг) можно использовать команду PowerShell:
Enable-WindowsOptionalFeature -Online -FeatureName Microsoft-Windows-Subsystem-Linux
Теперь несколько примечаний, которые могут быть полезны при установке:
- Вы можете установить сразу несколько дистрибутивов Linux.
- При загрузке дистрибутивов Ubuntu, OpenSUSE и SUSE Linux Enterprise Server в русскоязычном магазине Windows 10 заметил следующий нюанс: если просто ввести название и нажать Enter, то нужных результатов в поиске не оказывается, но если начать вводить и затем нажать по появляющейся подсказке, автоматически попадаешь на нужную страницу. На всякий случай прямые ссылки на дистрибутивы в магазине: Ubuntu, OpenSUSE, SUSE LES.
- Запускать Linux можно и из командной строки (не только с плитки в меню Пуск): ubuntu, opensuse-42 или sles-12
Установка Bash в Windows 10 1607 и 1703
Для того, чтобы установить оболочку bash, выполните следующие простые действия.
- Зайдите в параметры Windows 10 — Обновление и безопасность — Для разработчиков. Включите режим разработчика (должен быть подключен Интернет для загрузки необходимых компонентов).

- Зайдите в панель управления — Программы и компоненты — Включение или отключение компонентов Windows, отметьте пункт «Подсистема Windows для Linux».

- После установки компонентов, введите в поиске Windows 10 «bash», запустите предлагаемый вариант приложения и выполните установку. Вы можете задать свое имя пользователя и пароль для bash, либо использовать пользователя root без пароля.


По завершении установки вы можете запускать Ubuntu Bash на Windows 10 через поиск, или создав ярлык для оболочки там, где вам требуется.
Примеры использования Ubuntu Shell в Windows
Для начала отмечу, что автор не является специалистом по bash, Linux и разработке, а примеры ниже — просто демонстрация того, что в Windows 10 bash работает с ожидаемыми результатами для тех, кто разбирается в этом.
Приложения Linux
Приложения в Windows 10 Bash можно устанавливать, удалять и обновлять с помощью apt-get (sudo apt-get) из репозитория Ubuntu.

Использование приложений с текстовым интерфейсом ничем не отличается от такового на Ubuntu, например, вы можете установить Git в Bash и использовать его привычным образом.

Скрипты bash
Вы можете запускать скрипты bash в Windows 10, создать их можно в имеющемся в оболочке текстовом редакторе Nano.

Скрипты bash не могут вызвать программы и команды Windows, но возможен запуск скриптов и команд bash из bat файлов и сценариев PowerShell:
bash -c "команда"
Также вы можете попробовать запускать приложения с графическим интерфейсом в Ubuntu Shell в Windows 10, на этот счет в Интернете уже имеется не одна инструкция и суть способа сводится к использованию Xming X Server для вывода GUI приложения. Хотя официально возможность работы с такими приложениями Майкрософт не заявлена.
Как было написано выше, я не тот человек, который может в полной степени оценить ценность и функциональность нововведения, но вижу как минимум одно применение для себя: различные курсы Udacity, edX и другие, связанные с разработкой проходить будет куда проще, работая с необходимыми инструментами прямо в bash (а в этих курсах обычно демонстрируется работа именно в терминале MacOS и Linux bash).