
This repository was archived by the owner on Feb 2, 2025. It is now read-only.
Stable Zips of Source Code for 2.1 (Ignore this release)
Why Does This Release Exist?
This is simply to provide stable, downloadable zips of this repository that will be useful for the installation binaries later. I’m wanting to rework the way the installers work so that they will download the stable zips and then deploy them, rather than writing each python file.
Where are the Install Binaries?
It’s almost here, it’ll just be a bit. As I said above, this is just so that there will be a direct download available for the code for version 2.1, and will hopefully be used for a better, cleaner install script.
For Offline Installers
This section will only be applicable for the new designs of installers. Because of the changes I want to make to the installer, an offline installer will not be possible. So I plan on making an «Offline» install option in the installer. If you choose this option, you will be told to come to this release and download the Startup.exe file and the Source Code Zip File. Once you do so, make sure you put those file in the same directory without a rename so that Setup can find them.
** NOTE: Unless instructed to come to this release, there is NO REASON to use anything here. Ignore it. **
Version 2.1
What’s Changed?
It’s been a while, hasn’t it?
Despite the release number indicating a minor update, a lot has actually changed!
- System Variables are now using a dynamic system, rather than the fixed system used in version 2.0. This makes the system much more flexible.
- A result of this is the prompt.bws file, which allows for automatically loading new variables at startup. This includes 4 «hidden» options: debugMsg, varTrans, colorPrompt, and disableOSCheck.
- debugMsg shows various debug messages, including every time a system variable has been interacted with, among with other things around the script
- It is recommended to only enable this in a color compatible prompt. The
[Debug]text will be displayed in yellow.
- It is recommended to only enable this in a color compatible prompt. The
- varTrans will convert each variable called for at the prompt into the contents of the variable before passing the arguments to the command
- Example: The command
echo $varTranswould be translated intoecho 1
- Example: The command
- colorPrompt will show the prompt in color, just like you would see on the actual bash.
- debugMsg shows various debug messages, including every time a system variable has been interacted with, among with other things around the script
- A result of this is the prompt.bws file, which allows for automatically loading new variables at startup. This includes 4 «hidden» options: debugMsg, varTrans, colorPrompt, and disableOSCheck.
- Login and User Accounts are no longer a thing
- When you run the new installer, you will notice that it no longer asks you for a password. I’ve decided to ditch the whole user accounts thing. There was no reason for this to be a thing, so I got rid of it.
- Only need a username for the prompt
- Directory structure has been changed
- Users directory replaced with usrdata directory
- Because of this: ver.bws file to show what the last version was
- If version is not correct, Bash for Windows will automatically take necessary steps to make folder structure correct and to what you would get by installing a fresh version of Bash for Windows
- New installer! Instead of writing out each line of the new version of Bash for Windows, just downloads source code from GitHub!
How to Upgrade [IMPORTANT]
Because the ver.bws file is new this version, Bash for Windows cannot assume what version you are running. Because of this, you have to take care of updating the folder structure yourself. It’s pretty easy, though.
- Create new usrdata folder at Bash/usrdata
- Move all your user data to the new usrdata folder
- Delete the old Users folder
- Go to Bash/Bash/Settings and delete
kvnnadgz.bws - Start Bash for Windows. It will give an error message then close
- Start Bash for Windows again. It is now ready to run!
VERSION 2.0!!!!
Bash for Windows v2.0 Change Log
There have been MULTIPLE improvements to Bash for Windows between version 1.2.1.1 and 2.0. This is why I have decided to take the project to the next major version.
- Using the back slash () will preserve the space when including space in an argument
- You can now automatically run commands at startup via the autorun.bws file. More info in the Readme
- Scripting is avalible! It is still in its infancy, limited to only avalible commands in Bash for Windows. More info in the Readme
- Fully Functional uname command
- date command to see the system date and time
Patched an issue in tofile.py, Install file updated
Bash for Windows v1.2.1.1 Release Notes
There was an issue when appending to a file in 1.2, that has been fixed. The installer will
now create a working duplicate exactly as 1.2.1.1 is here on GitHub
More commands support sending output to file
Bash for Windows Release 1.2 Notes
If you saw my livestream, you may know what this new minor release brings: You can now
send output from a command to a file. This works for pretty much all the commands that can
output text to the screen. This brings a new file, tofile.py, which is an importable library
that does the actual writing/appending to a file.
Installer
The installer will install the previous version of Bash for Windows, version 1.01.1. I take note
of this in the Readme for the installer. If you have a current installation and don’t think that
sending command output to a file is enough to download the new code, that is fine. There
will hopefully be a new release in the not-so-distant future that will only be a update to the
installer which will install Bash for Windows 1.2.
Updated Installer
Nothing has changed here except for the installer itself. Check the description of install.py for more info.
Bash for Windows v1.01
Bash for Windows v1.01 fixes a quick bug in pushd, explained in the description of the upload of pushd.py
Bash for Windows Initial Release
Initial release for Bash for Windows. Pretty much the same as 0.6.1, but with setup script done.
As described in the Readme for the setup wizard, I plan on expanding the setup script further to write out all of the source code to allow for easy modification.
More Repair Functionality
This release changed one thing:
- We now check if Username and Password Files Exist
- If they don’t, we run the username script to correct that
Getting ready for the Release
Many, many things were added in this
- We now have support for multiple arguments
- Most of these changes come from support for multiple arguments
- rm -r recursively removes directories
- Added protection in case ~/Documents gets deleted so that Bash for Windows doesn’t crash upon startup
- mkdir -p makes it so that you can add a whole path of directories, and if a directory doesn’t exist, it will create the directory
- General improvements to all the commands, so that multiple arguements work with them. For example,
touch text1.txt text2.txt text3.txtwill create files text1.txt, text2.txt, and text3.txt.
To download and set up the Windows Bash terminal, you can enable the Windows Subsystem for Linux (WSL) and install a Linux distribution via PowerShell using the following command:
wsl --install
Understanding Bash
What is Bash?
Bash, or Bourne Again SHell, is a command line interpreter that is widely used in Unix and Linux environments. It allows users to execute commands, run shell scripts, and perform complex automation tasks with ease. This command line tool serves as a bridge for users to interact with their operating system, enabling them to control files, manage processes, and execute scripts.
Why Use Bash on Windows?
Using Bash on Windows can significantly streamline your workflow, especially if you are accustomed to Linux. The ability to use Unix commands in a familiar Windows environment allows developers and system administrators to perform tasks swiftly and efficiently. For instance, Bash commands for file manipulation, such as `cp` for copying files or `rm` for removing files, make it easier to manage data without navigating through GUI-based file explorers.
Mastering Windows Bash Terminal Lambda Commands
Installing Bash on Windows
Different Methods to Install Bash on Windows
There are several methods to install Bash on Windows, particularly through the Windows Subsystem for Linux (WSL), Git Bash, and Cygwin. Each method has its own advantages depending on your needs.
Installing Bash via Windows Subsystem for Linux (WSL)
What is WSL?
The Windows Subsystem for Linux (WSL) enables users to run a full-fledged Linux distribution alongside their Windows installation. This allows you to use native Linux command-line tools without the need for a virtual machine or dual-boot setup. With WSL, you can utilize Bash and access a broad array of Linux applications seamlessly.
Steps to Install WSL
-
Step 1: Enable WSL feature
First, you need to enable the WSL feature on your Windows system. Open a Command Prompt or PowerShell as an administrator, and run the following command:dism.exe /Online /Enable-Feature /FeatureName:Microsoft-Windows-Subsystem-Linux /All /LimitAccess /Source:wimgapi -
Step 2: Install a Linux Distribution
After enabling WSL, you can install a Linux distribution. Popular choices include Ubuntu, Debian, and Fedora. To install Ubuntu specifically, you can run this command:wsl --install -d Ubuntu -
Step 3: Verify Installation
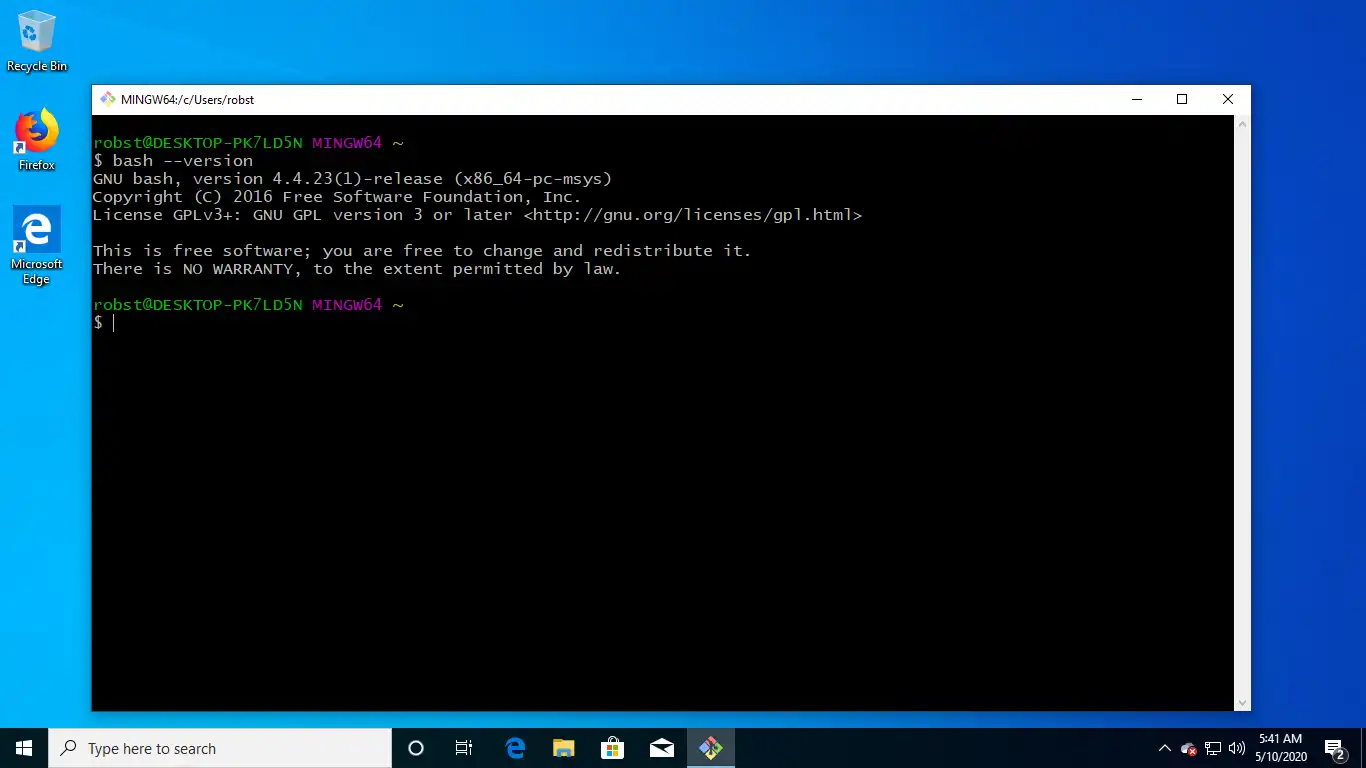
Once the installation completes, it’s crucial to verify that Bash is functioning correctly. Simply run the following command:bash --version
This command should return the version of Bash installed, confirming that the installation was successful.
Installing Git Bash
What is Git Bash?
Git Bash provides a BASH emulation environment for Windows, allowing you to use Unix commands and Git features. It’s a lightweight alternative for users who want to execute Bash commands without needing the full power of WSL.
Steps to Install Git Bash
-
Step 1: Download Git Bash
Begin by visiting the official Git website to download the Git Bash installer for Windows. -
Step 2: Run the Installer
Launch the installer and follow the guided prompts. During installation, you will encounter a series of options; it is usually recommended to use the default settings unless you have specific needs. -
Step 3: Launching Git Bash
After the installation is complete, you can access Git Bash through your Start Menu. When you open it, you will see a terminal that resembles a Linux shell, and you can start entering Bash commands right away.
Installing Bash with Cygwin
What is Cygwin?
Cygwin is a software package that provides a Linux-like environment for Windows. It offers a large collection of GNU and Open Source tools that provide functionality similar to a Linux distribution.
Steps to Install Cygwin
-
Step 1: Download Cygwin Setup
Go to the official Cygwin website and download the setup executable that corresponds to your Windows architecture (32-bit or 64-bit). -
Step 2: Run the Installer and Select Packages
Run the downloaded setup file. During the installation process, you will have the option to select packages. For a complete Bash experience, ensure you include core packages such as `bash`, `coreutils`, and `gcc`. -
Step 3: Finalizing the Installation
After completing the installation, open the Cygwin terminal, where you will be greeted with a Bash prompt similar to other Bash environments. This prompts you to start executing your commands in a Unix-like fashion.
Mastering the Bash Terminal: Your Quickstart Guide
Verifying the Installation
Checking Bash Availability
After installation, you should verify whether Bash is available by running the following command in your terminal of choice:
echo $SHELL
This command should return the path to the Bash shell, affirming its installation.
Running Your First Bash Command
Once you have confirmed that Bash is installed and functioning, try running a simple command to familiarize yourself with the environment. For instance:
echo "Hello, World!"
This command will print «Hello, World!» to the terminal, demonstrating that Bash is operational. Another useful command to check your current directory contents is:
ls -la
This will list all files in the current directory, including hidden files, with detailed information.
Bash Download: Mastering File Retrieval in Bash
Troubleshooting Common Issues
Common Installation Problems
During installation, you may encounter problems such as feature-related errors or issues downloading your selected Linux distribution. To resolve these problems, ensure that your Windows version is up to date and that virtualization support is enabled in your BIOS settings for WSL.
Reinstalling Bash
If you experience issues with Bash after installation, a cleanup and reinstall might be necessary. Uninstall the Linux distribution from Windows settings or use `wsl —unregister <distro_name>`. Then, re-follow the installation steps to ensure everything is set up correctly.
Quick Guide to Git Bash Download for Beginners
Conclusion
Installing Bash on Windows enhances your ability to perform tasks efficiently and expands your command-line skills. With options like WSL, Git Bash, and Cygwin, you can choose the method that best fits your workflow. The command line is a powerful tool, and getting accustomed to Bash commands will undoubtedly improve your productivity. As you explore further, remember to dive into more complex scripts and versatile Bash functionalities to maximize your use of the Windows Bash terminal download capabilities.
Mastering Windows Bash Script: A Quick Guide
Additional Resources
To continue your learning journey in Bash, consider exploring official documentation for WSL, Git Bash, and Cygwin, along with online tutorials, forums, and community support. These resources will provide deeper insights and assistance as you build your skills and tackle various command-line tasks efficiently.
Bash shell makes your life easier, if you are a tech person (developer, System administrator, data scientist, database administrator, DevOps, and all other technical people). It is much better than Windows CMD or PowerShell.
There is more than one way to install bash on Windows 10. The recommended and most efficient way is to enable the Windows subsystem and install Ubuntu on it. Alternatively, you can install the GIT bash shell, which also gives you access to the bash command line.
Installing bash with Windows Subsystem
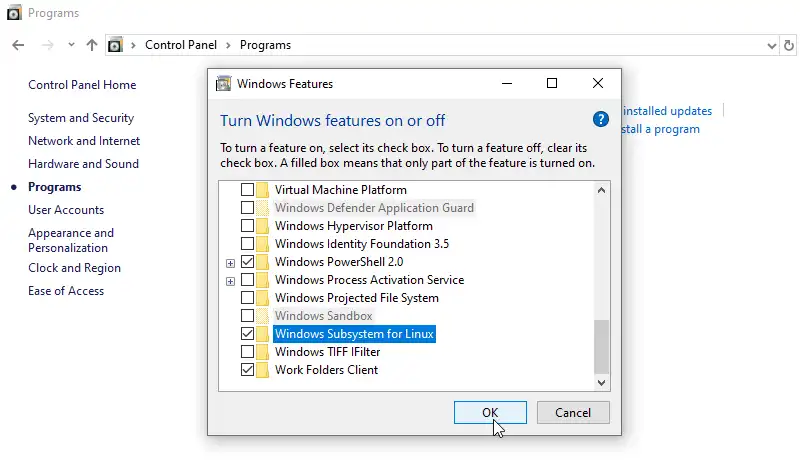
WSL is a Windows 10 feature that enables the ability to run Linux on Microsoft Windows 10. First, you need to go to the Turn Windows Features On Or Off from the Control Panel and Turn on Windows Subsystem for Linux.
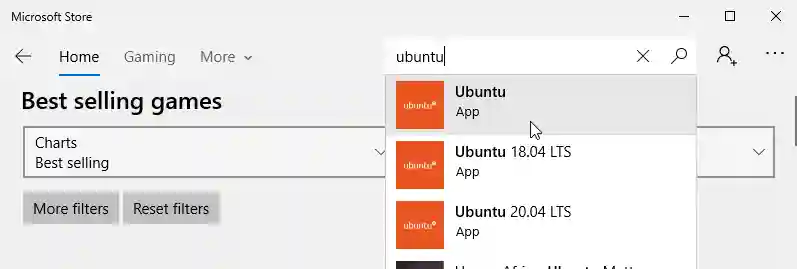
Then, go to Microsoft Store and install the Ubuntu app (or any other Linux distro that is available).
Read The Full Step-by-step Tutorial: How to Install Ubuntu on Windows
After that you will have full access to Bash on Windows, directly from Windows CMD or PowerShell.
GIT Bash Shell
If you don’t want to install a Linux distribution, another option for Windows is «GIT bash shell». If you are using git version control, you may already have access to the bash command line.
Navigate to the following URL gitforwindows.org and download and install the latest version of the GIT bash shell.
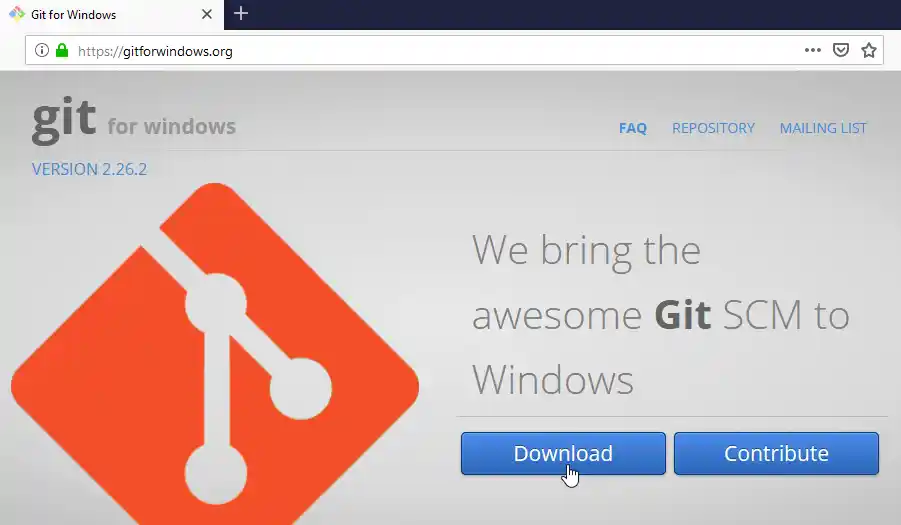
Both methods will give you access to the bash command line. If you just need «bash on Windows 10», install WSL. Install GIT if you want both GIT and Bash.
You are about to download Git Bash, Latest Version (2.26.2) for your PC. Click the button below to start downlaoding it:
Go Back to Feature Page
All you need to know about this download
- After clicking on «Start the Download» your file will be download from publisher’s server
- This software is scanned using 65 antivirus apps. ( Check VirusTotal Scan Report )
- This file is untoched and is same as of the official site. NearFile don’t touch any files no mattter what!
Here are the steps to download Git Bash 2.26.2 on your Windows PC:
Step 1: First, click on the download button placed above this page. If you find two download buttons then click on the correct one according to your PC (64-bit or 32-bit)
Step 2: After clicking on the download button, your download will start immediately.
Step 3: Wait for some moment to finish the downloading.
Step 4: After completing the download, run the downloaded program and follow the instructions to install it.
Step 5: You have successfully downloaded and installed Git Bash 2.26.2 on your Windows PC. Enjoy!
Author Details
NearFile
Download all latest free software, freeware, shareware, and demo programs for your desktop PC in one place with maximum downloading speed.
Technical Details
| App Name: | Git Bash |
|---|---|
| Version: | 2.26.2 |
| License: | Freeware |
| Publisher: | gitforwindows |
| Category: | Developer Tools |
| Operating Systems: | Windows 2000 / Vista / Windows XP / Windows 7 / Windows 8 / Windows 10 / Windows 11 |
| Language: | English |
| File Name: | Git-2.30.0-64-bit.exe |
| File Size: | 44.7 MB |
| VirusTotal Hash Code: | 1f38fd19d5f36f1e3dffdf5b233c883cea4fb418a44cc1d980c9f14d284385c9 |
| VirusTotal Scan Report: | Check Report |
| Date Published: | 19, December 2021 |
| Date Modified: | 19, December 2021 |
Latest
Here are some latest released apps
Blog
Explore latest Blog Posts
Navigating The Cloud: A Comprehensive Guide To Network Connectivity
Published at April 5, 2024
Every business needs to keep pace in today’s fast-changing digital landscape. It is the businesses […]
Continue Reading
Step-by-step guide for setting up Hyper-V USB Passthrough
Abstraction of computing, storage spaces, and networking resources, are the key features of virtualization technology. […]
Continue Reading

Why is My Battery Going Down While Charging?
Published at March 31, 2024
Smartphones have gotten bigger and bigger and so did their batteries. While you won’t get […]
Continue Reading
Identifying Top Talent: Key Indicators of an Exceptional React Developer for Your Team
Published at March 1, 2024
React has emerged as a leading technology for building interactive and user-centric applications. You have […]
Continue Reading
Email Search at Your Service: The Power of Free Tools to Find Anyone’s Address
Published at February 1, 2024
Nowadays, finding someone’s email address has become much more straightforward, thanks to various online tools. […]
Continue Reading
How to Improve Email Deliverability with GlockApps: A Practical Workflow
Published at January 26, 2024
Crafting a Strategic Email Workflow The most important aspect that affects deliverability is your email […]
Continue Reading

How to Use Analytics Software For Customer Experience
Published at December 22, 2023
Do you want to know whether your customer experience strategies are effective? Look at your […]
Continue Reading

How to build a stock trading app: Necessary steps and costs to prepare for
In the past, investors relied on phone calls to navigate the complicated workings of stock exchanges. […]
Continue Reading
Securely download your desired software from our secure website.
This software is 100% safe and it has been checked using the VirusToral Virus Scanner.
We serve downloads from the official sites. But some may have bundled but you can always skip the unwanted applications.

When Microsoft’s CEO announced that the Bash shell was coming to Windows, several people couldn’t believe it. #BashOnWindows trended on Twitter for days; such was the impact of this news.
Initially referred as Bash on Windows, it is actually called Windows Subsystem for Linux, popularly known as WSL.
With WSL, you can install one of the supported Linux distribution inside Windows and use the Windows terminal to access the Linux systems and run Linux commands.
In this tutorial, you’ll learn how to enable WSL on Windows and then install a Linux distribution of your choice.
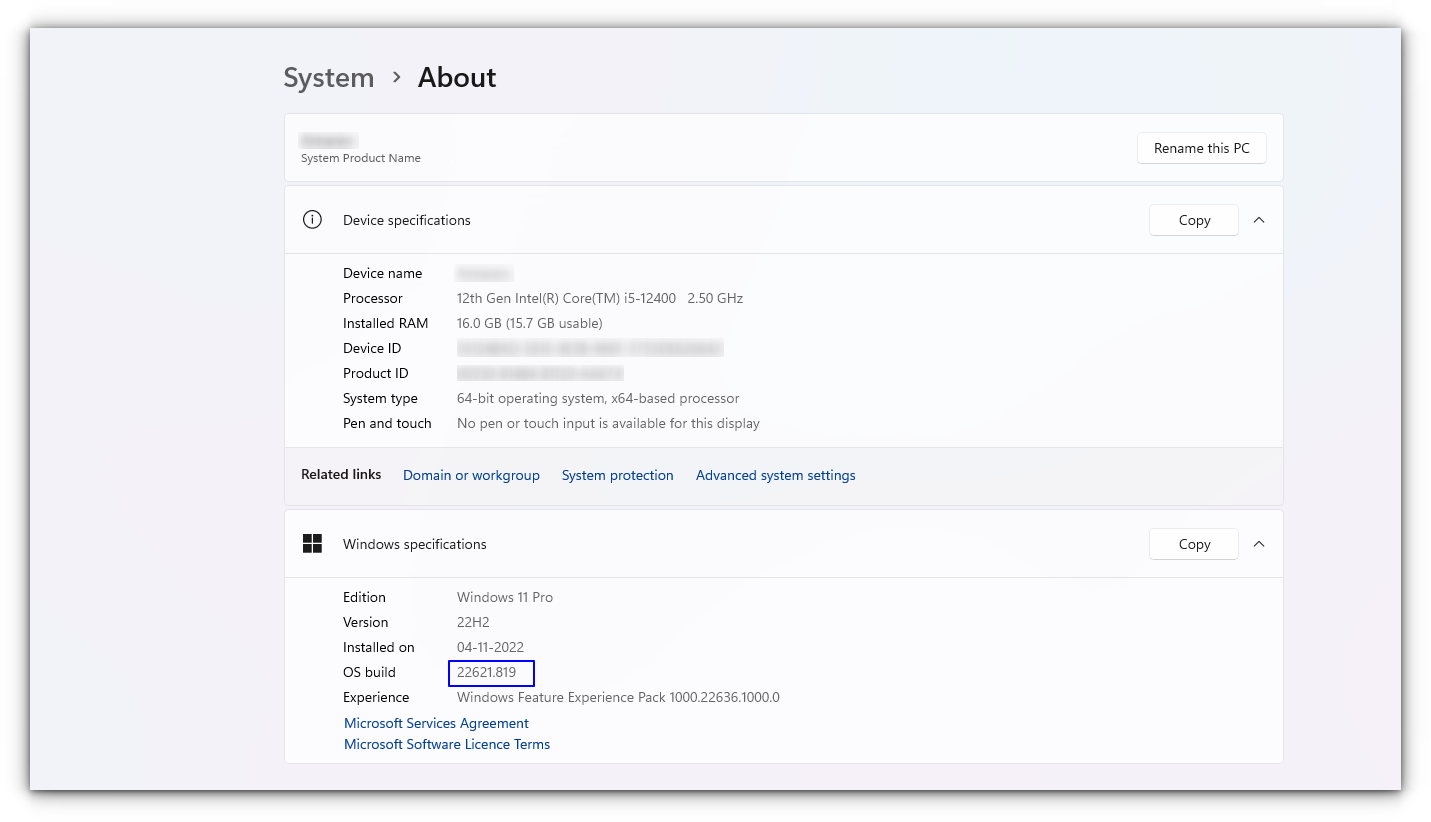
📋
This tutorial was tested with the latest Windows 11 version 22H2, and build 22621.819. You might need to update your Windows installation if you have an older build to follow everything in this tutorial.
What is WSL?
WSL (formerly Bash on Windows) provides a Windows subsystem, and Linux runs atop it. It is not a virtual machine or an application like Cygwin. It is a complete Linux system inside Windows 10/11. It allows you to run the same Bash shell you find on Linux. You can run Linux commands inside Windows without installing a virtual machine or dual-boot Linux and Windows.
You install Linux inside Windows like a regular application. This is a good option if your main aim is to learn Linux/UNIX commands.
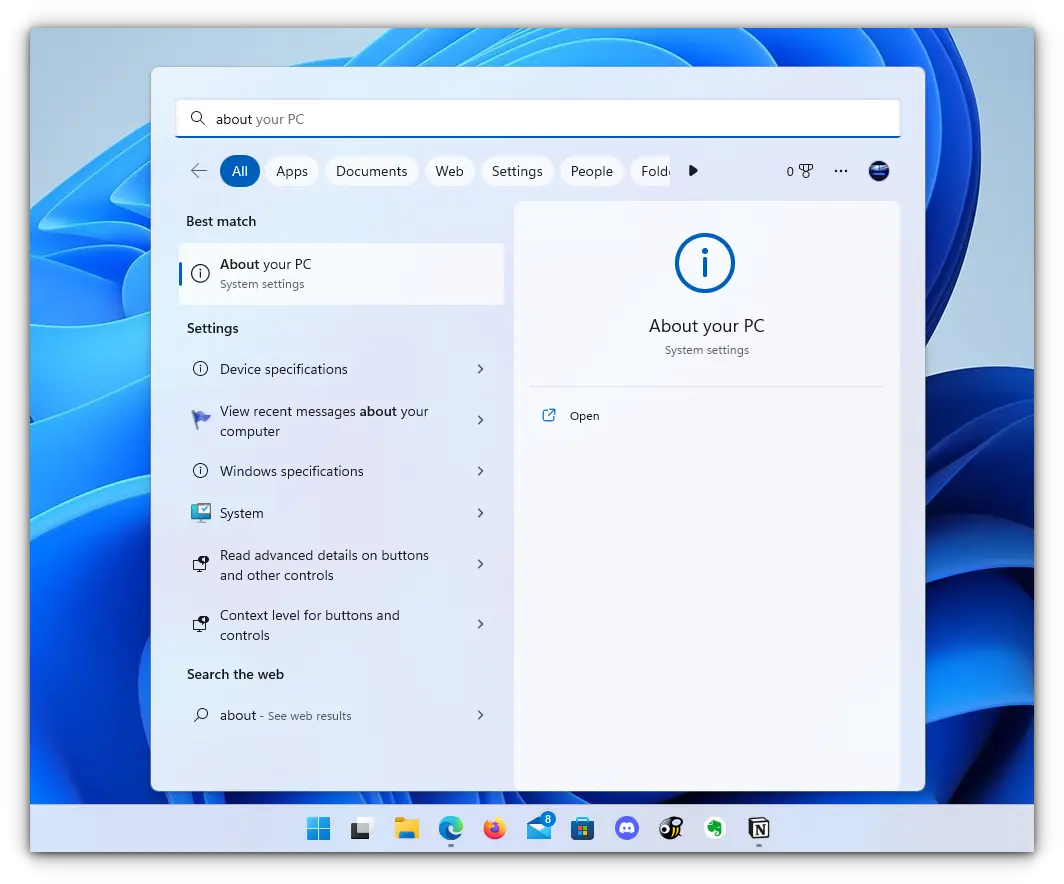
Check for System Compatibility
You must be running specific versions of Windows for the different features described in this article. Requirements necessary for a particular feature to work are described under its titles. To check your Windows version, search for about in the start menu.
Here, you can see the build of your PC, as shown in the screenshot below. Make sure it is matching with the respective requirements described under various sub-headings here in this article.
- You must be running Windows 10 version 1607 (the Anniversary update) or above.
- WSL only runs on 64-bit versions 32-bit versions are not supported.
Install Bash in Newer Windows 10 and 11
The good thing is that the latest set of upgrades, including the stable release of WSL v1.0 released from Windows, makes it easier to install Bash on Windows.
There are two ways you can go about it:
- You can get it in one click from Windows Store.
- Choose to use the command-line.
1. Install WSL Using the Microsoft Store
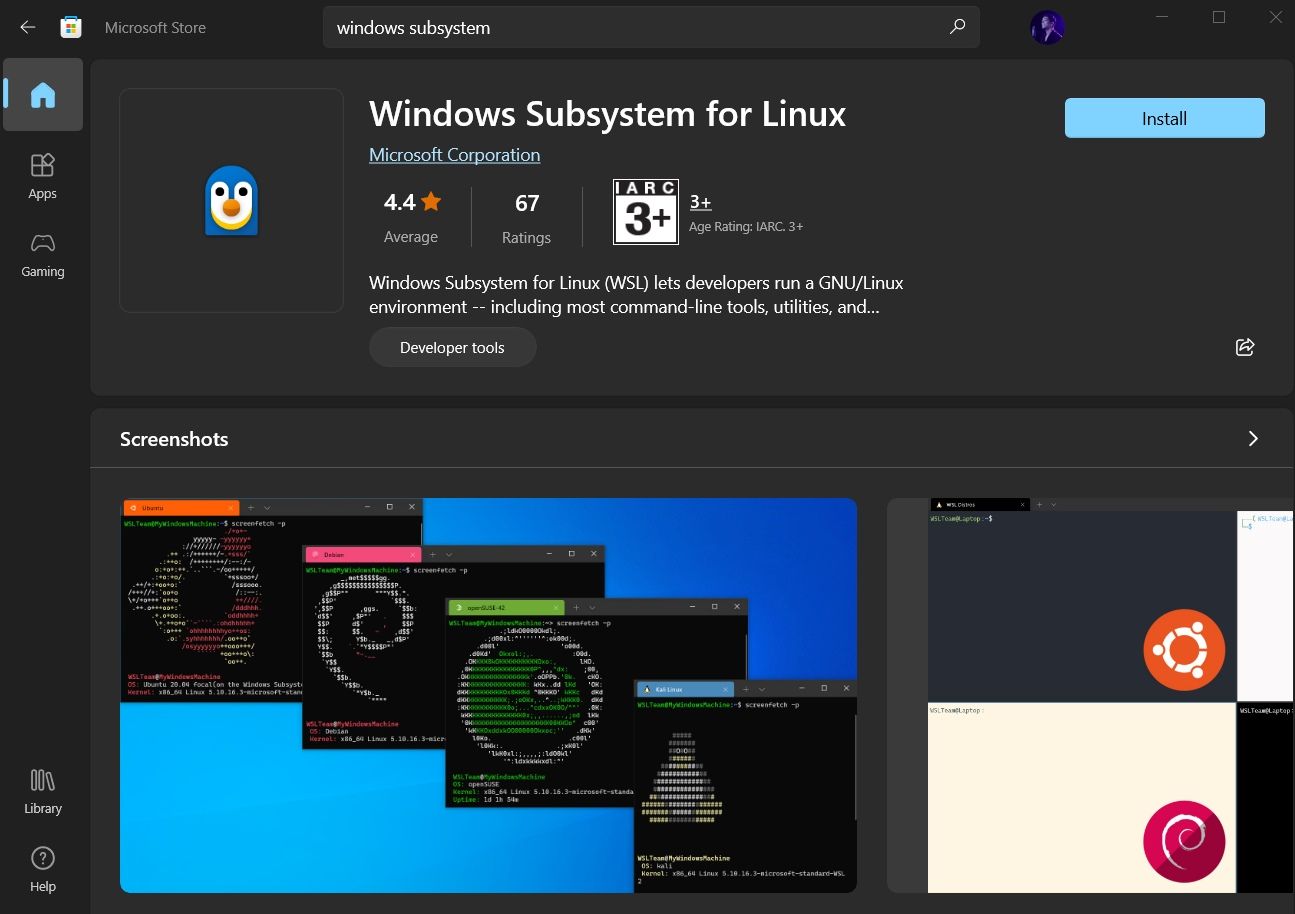
Launch the Microsoft Store and search for «Windows subsystem«.
Install it, and you’re done with the first step. Next, you have to install a Linux distribution.
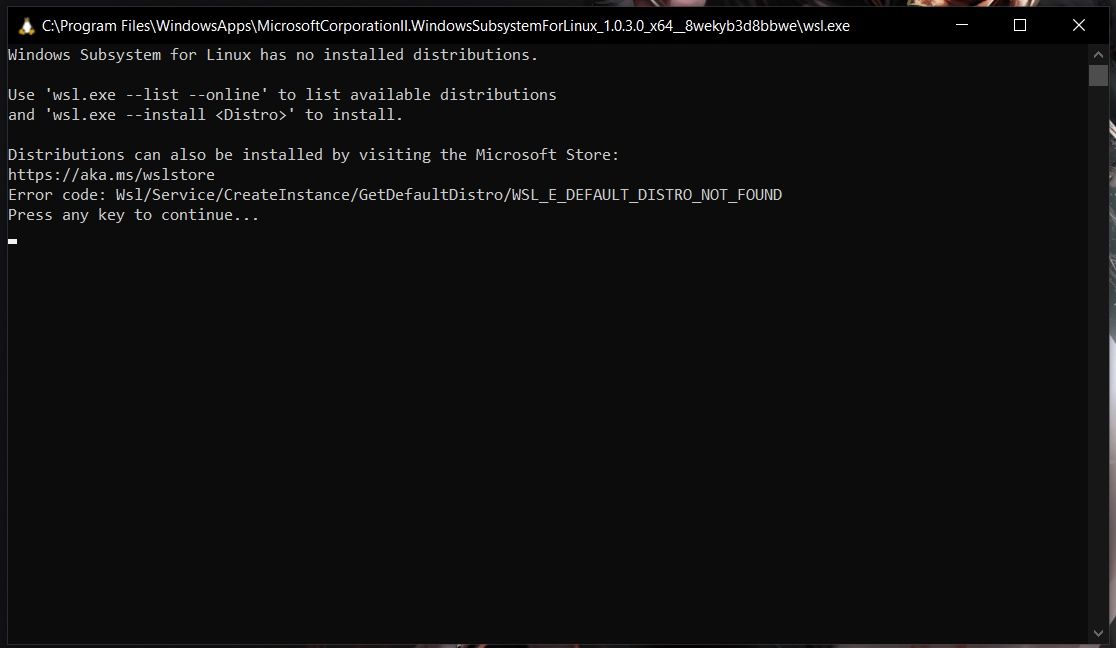
So, if you try to open WSL, you will get to see a window informing you that no distribution is installed.
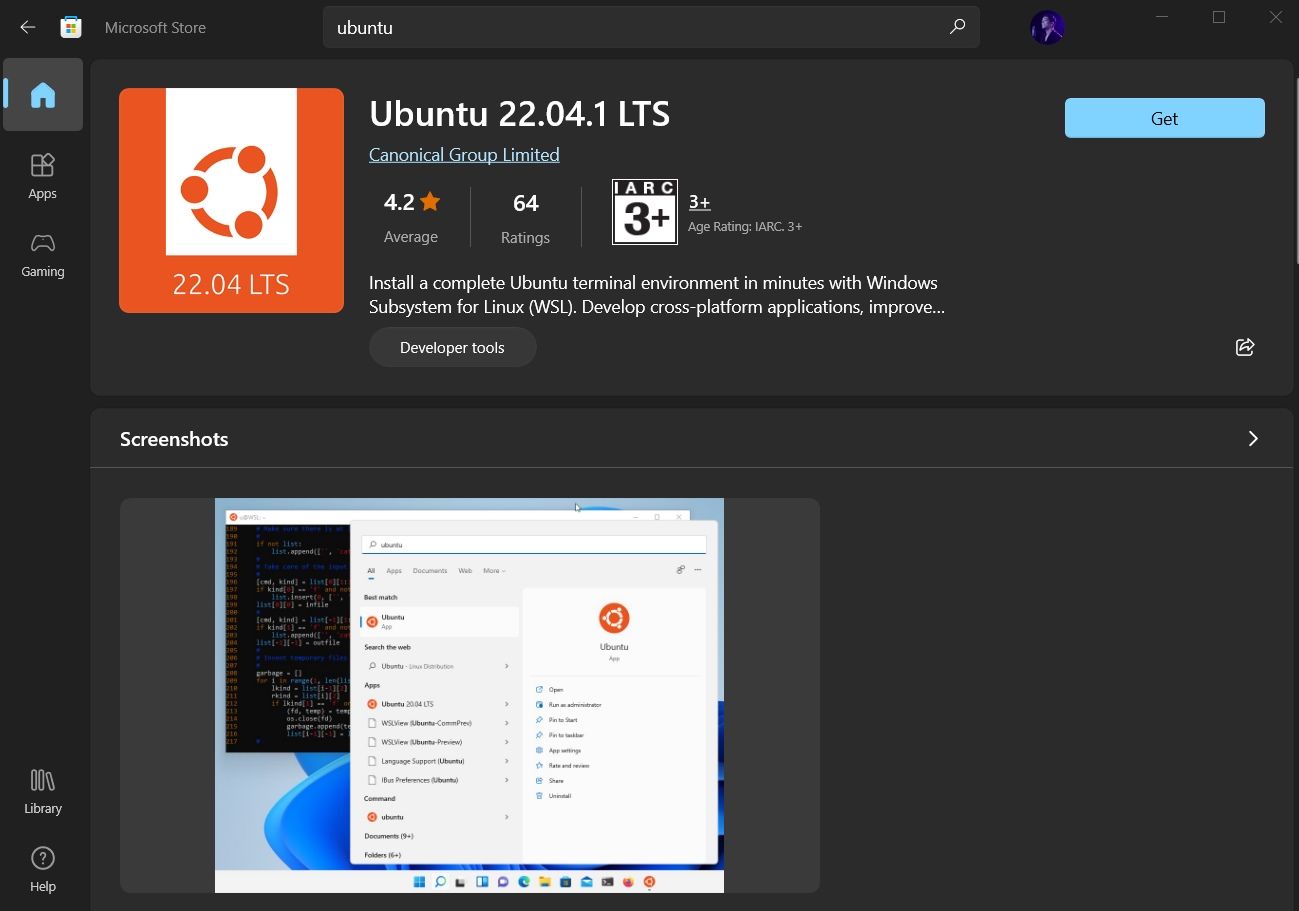
Similar to WSL, search for the distribution on Microsoft Store, and then install it.
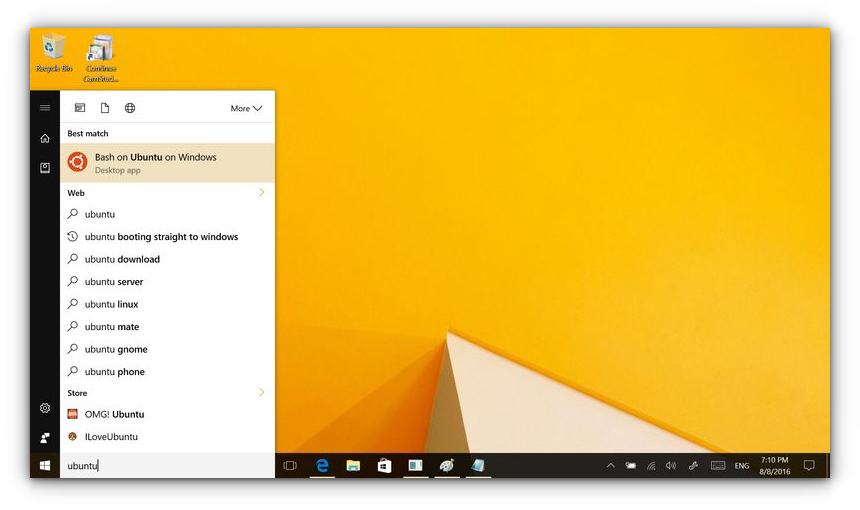
For instance, I installed Ubuntu from the store as shown in the image below:
And, then proceed to «Open» it and it will automatically start installing. The procedure is same for any distribution you choose.
We then have to configure it, which is discussed right after installing it through the command line.
2. Install WSL and the default distribution using the command-line
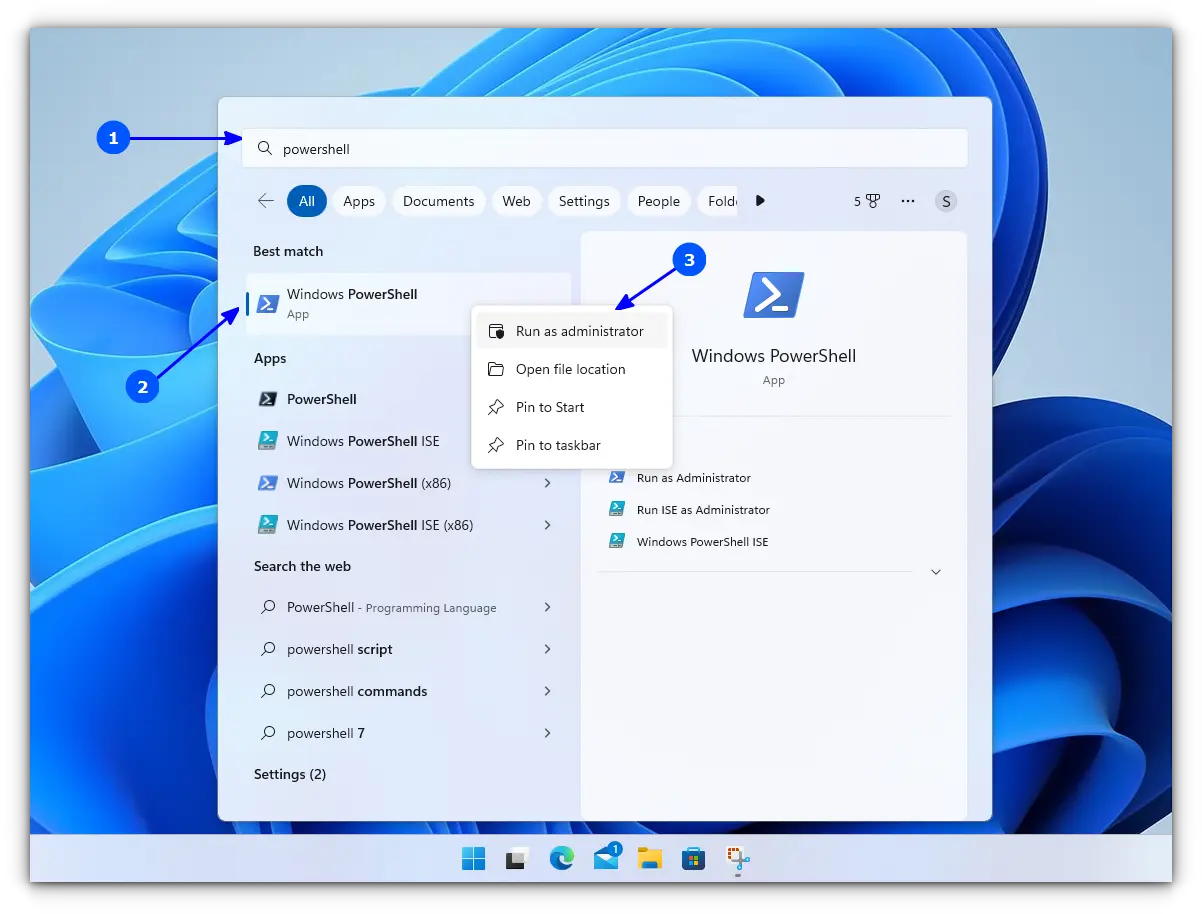
In WSL, the default distribution is Ubuntu (which can be changed). To install, open Powershell as an administrator.
For this, search for Powershell in the start menu, right-click on Powershell and select Run as Administrator.
Inside Powershell, enter the following command to install WSL, along with all necessary features and the default distribution, that is, Ubuntu.
wsl --installOnce finished downloading and installing, you need to reboot to apply the changes.
Whether you installed WSL and Ubuntu using the Microsoft Store or the command line, you need to configure it.
Here’s how it is done:
🛠️ Configure the newly installed Ubuntu
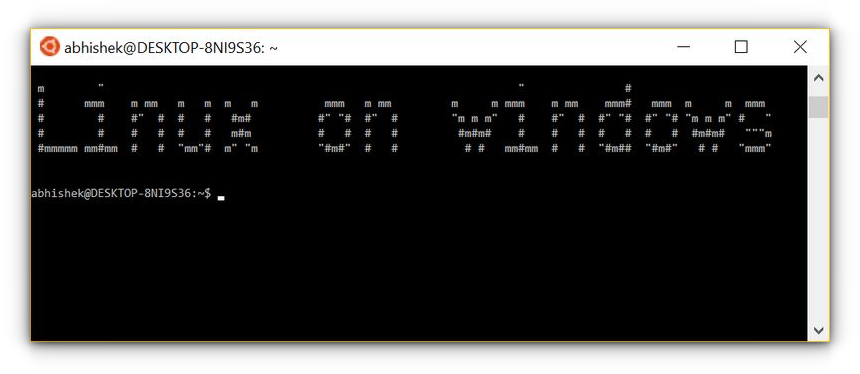
After rebooting, search for Ubuntu in Start Menu and open it.

It will ask you to enter a UNIX Username and Password. Enter these details and press enter key.
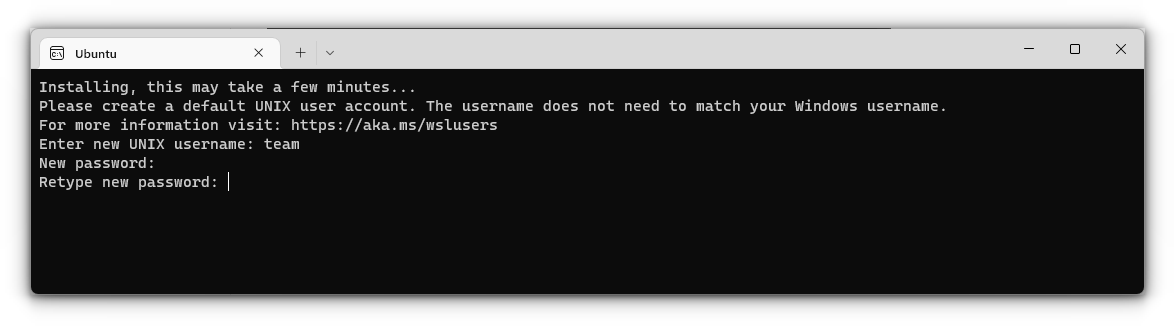
You will now be inside the terminal window of Ubuntu.
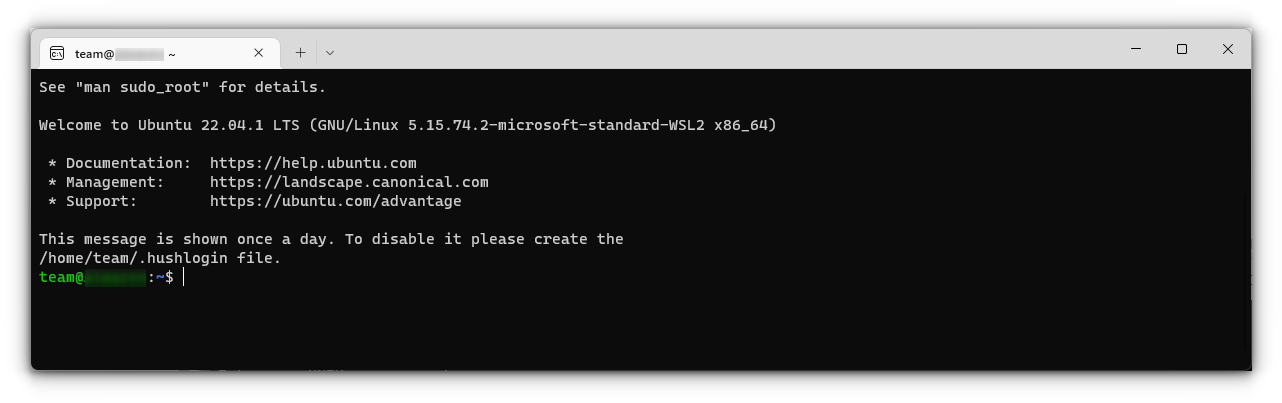
Once logged in, you need to update the installed Ubuntu. For this, enter the following commands one by one:
sudo apt update
sudo apt full-upgrade
After completing the update, you are good to go with Ubuntu in WSL.
Install Bash on Older Windows
If you have the minimum requirements mentioned in the beginning but are running an older Windows build, the previous method may not be supported. So there is a manual installation method.
Also, there are both WSL1 and WSL2 available. WSL2 offers some upgraded functionalities but has some minimum requirements to run:
- For x64 systems: Version 1903 or later, with Build 18362 or later.
- For ARM64 systems: Version 2004 or later, with Build 19041 or later.
So this brings us to two possibilities to install:
- Install Ubuntu with WSL1
- Install Ubuntu with WSL2
1. Install Ubuntu with WSL 1
This is a relatively simple procedure for those with a system incompatible with WSL2. First, you need to enable the Windows Subsystem for the Linux feature. This can be done through the command line. Open Powershell as an administrator and enter the following command:
dism.exe /online /enable-feature /featurename:Microsoft-Windows-Subsystem-Linux /all /norestartOr, to do this via GUI, follow the steps below:
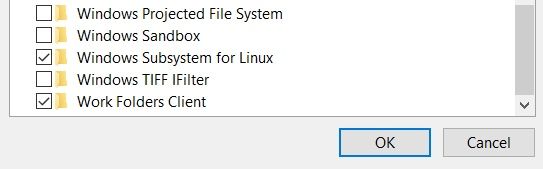
- Search for Windows Features in Start Menu.
- Turn on Windows Subsystem for the Linux feature.
- Reboot your system.
- Open the Windows store and search for the distribution of your choice to install.
Once installation is completed, open the Ubuntu app from the start menu. It will take a couple of seconds to install. You will be prompted to enter a username and password. Provide those credentials, and you are good to go with Ubuntu in WSL1.
2. Install Ubuntu with WSL 2
It is recommended to use WSL2 instead of WSL1 if you have support. To install Ubuntu with WSL2, you need to make sure that the Windows Subsystem for Linux feature is turned on. For this, as in the above case, execute the following command in an elevated Powershell:
dism.exe /online /enable-feature /featurename:Microsoft-Windows-Subsystem-Linux /all /norestartReboot the device once the command is completed.
After this, you need to enable the Virtual Machine Platform feature. Open the Powershell with admin privileges and enter the following command:
dism.exe /online /enable-feature /featurename:VirtualMachinePlatform /all /norestartOnce again, restart the device to complete the WSL install and update to WSL 2.
Now, download the Linux Kernel Update Package for x64 machines from the official website. If you are using ARM64 devices, use this link to download the latest kernel update package.
If you are not sure about the device architecture, enter the command below in Powershell to get the type:
systeminfo | find "System Type"When the file is downloaded, double-click on it and finish the installation of the Kernel update package.
Now, open PowerShell and run this command to set WSL 2 as the default version when installing a new Linux distribution:
wsl --set-default-version 2Once WSL2 is set as the default version, you can now install the Linux distribution of your choice.
Go to Windows Store and install Ubuntu, as described in the earlier steps. and the rest of the procedure is already described above.
Enjoy Linux inside Windows.
🔧 Troubleshooting Tip 1
«The WSL optional component is not enabled. Please enable it and try again.»
You may see an error like this when you try to run Linux inside Windows 10:
The WSL optional component is not enabled. Please enable it and try again.
See https://aka.ms/wslinstall for details.
Error: 0x8007007e
Press any key to continue...
And when you press any key, the application closes immediately.
The reason here is that the Windows Subsystem for Linux is not enabled in your case. You should enable it as explained in this guide. You can do that even after you have installed Linux.
🔧 Troubleshooting Tip 2
Installation failed with error 0x80070003
This is because Windows Subsystem for Linux only runs on the system drive i.e. the C drive. You should ensure that when you download Linux from the Windows Store, it is stored and installed in the C Drive.
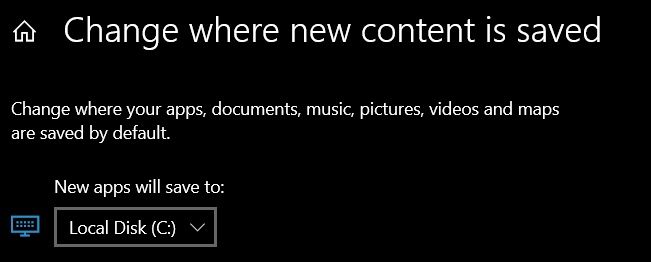
On Windows 10, go to Settings -> Storage -> More Storage Settings -> Where new content is saved: Change where new content is saved and select C Drive here.
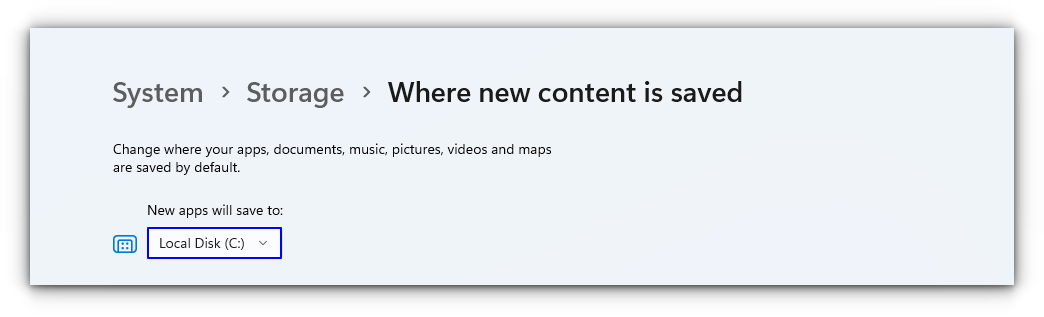
On Windows 11, go to Settings -> System -> Storage -> Advanced storage settings -> Where new content is saved and select C Drive here.
🔧 Troubleshooting Tip 3
«Failed to attach disk Error»
Sometimes, this error will appear when we reinstall the Ubuntu in WSL.
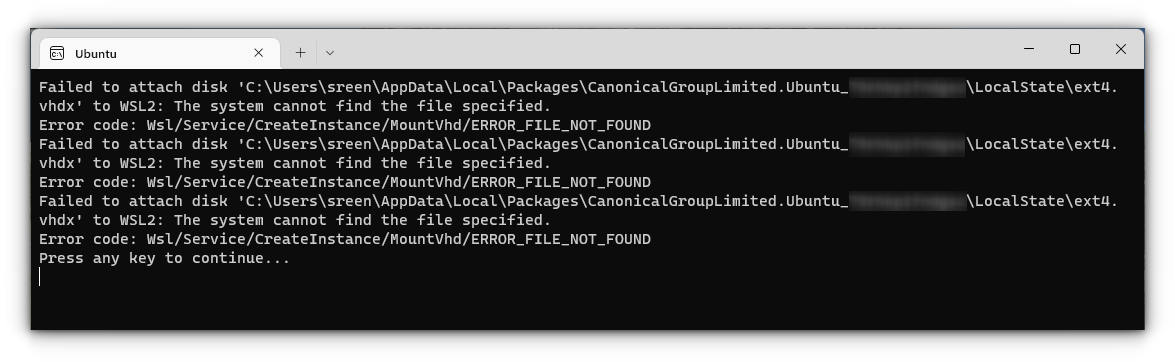
In this case, open Powershell and run the following command:
wsl -l -vThis will list the installed Linux systems. Find the name of the system, that is throwing the error, in my case Ubuntu. Now run the following command:
wsl --unregister UbuntuYou can restart the ubuntu app and it will run without any issues.
You can refer to more common troubleshooting methods from the official website.
Run GUI Apps On Windows Subsystem for Linux
The ability to run GUI apps on Windows Subsystem for Linux was introduced with the WSL 2 release in May 2020.
Windows Subsystem for Linux (WSL) with WSL2 now supports running Linux GUI applications (X11 and Wayland) on Windows in a fully integrated desktop experience. This allows you to install Linux applications and seamlessly integrate them into Windows desktop, including features like “pin to taskbar”.
📋
One crucial point is that you must be on Windows 10 Build 19044+ or Windows 11 to access this feature.
Step 1: Enable/Update WSL 2
This procedure has been explained in the above section and you can refer to it.
Step 2: Download and Install Graphics drivers
To run GUI apps, you need to install appropriate graphics drivers. You can use the following link to download the drivers according to your provider.
- Intel GPU Driver for WSL
- AMD GPU Driver for WSL
- NVIDIA GPU Driver for WSL
Once installed, you are all done.
Step 3: Install some GUI Apps
Now, go to your Ubuntu app and install any GUI app using the APT package manager. You should note that running apps from other sources like flatpak are problematic within WSL.
For this article, I installed the Gedit text editor using the following command:
sudo apt install gedit -yThis will install several MB of packages including required libraries. Once completed, you can run the following command to start the GUI Gedit app in Windows.:
gedit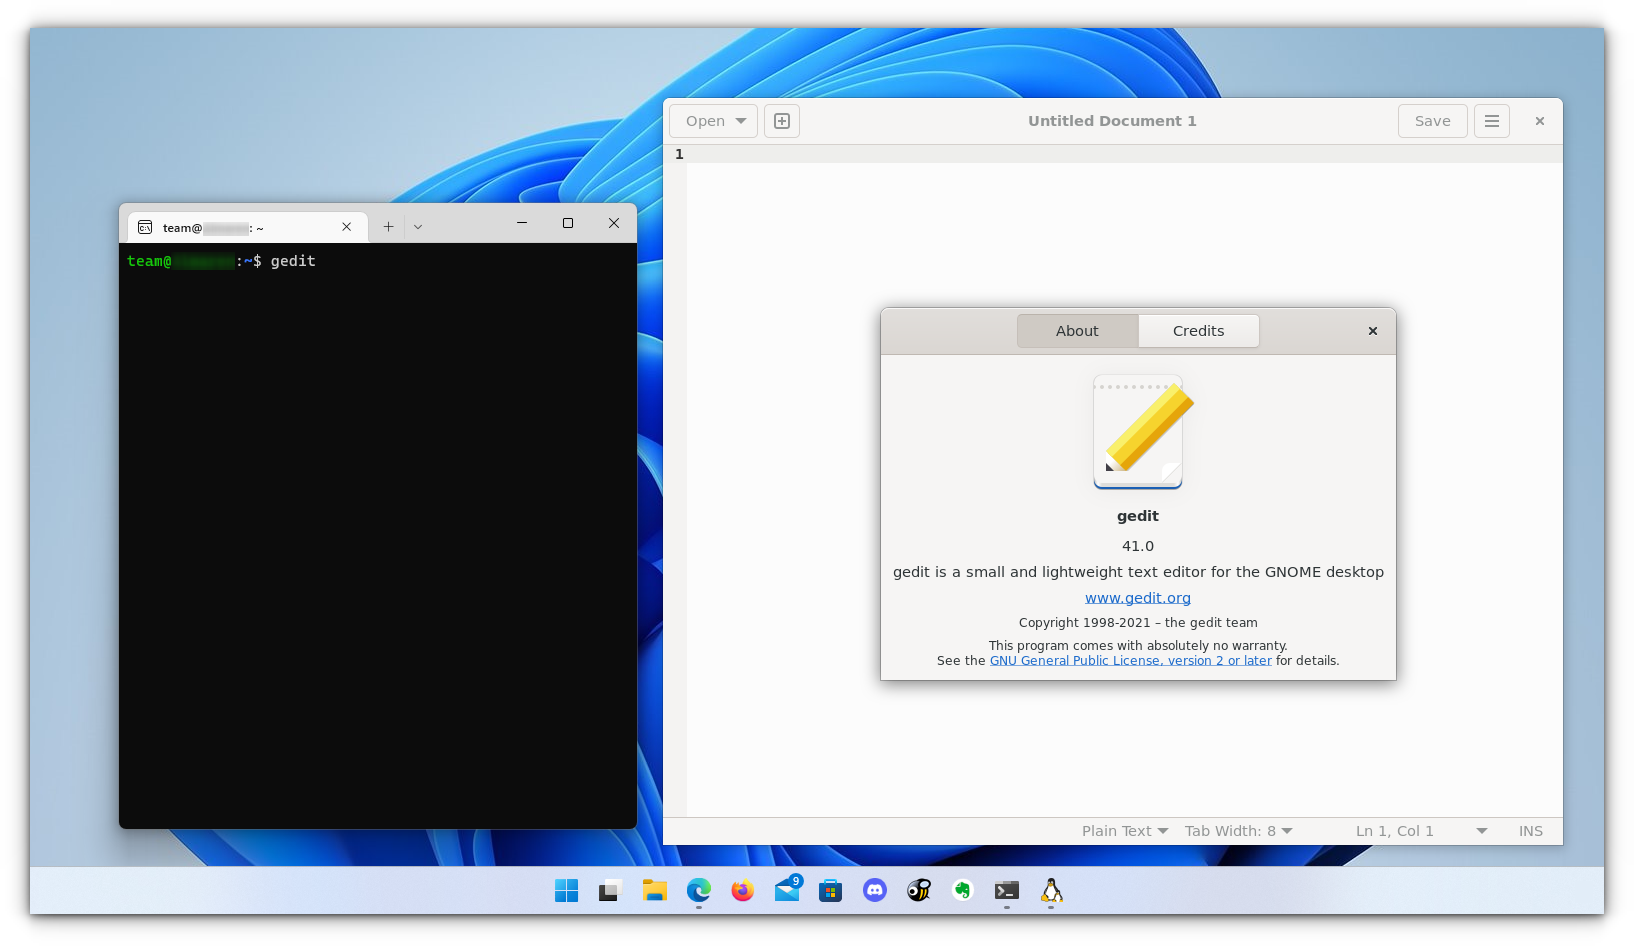
Similarly, you can install all the popular applications available to Linux, including Nautilus file manager, GIMP, etc. For more about running GUI applications in WSL, you can refer to the official documentation.
Install Linux Bash Shell on other older Windows 10
If you cannot get the Fall Creator’s update on Windows 10 for some reason, you can still install it if you have the Anniversary update of Windows 10. But here, you’ll have to enable developer mode. I still recommend upgrading to the Fall Creator’s update or the latest Windows 10 2004 version update though.
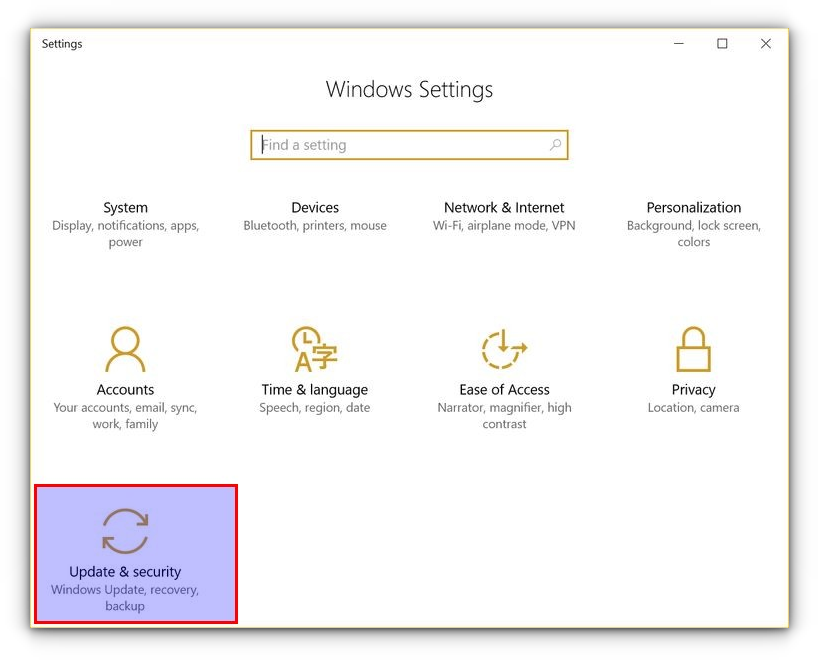
Press Windows Key + I to access Windows system settings. Here, go to Update & Security:
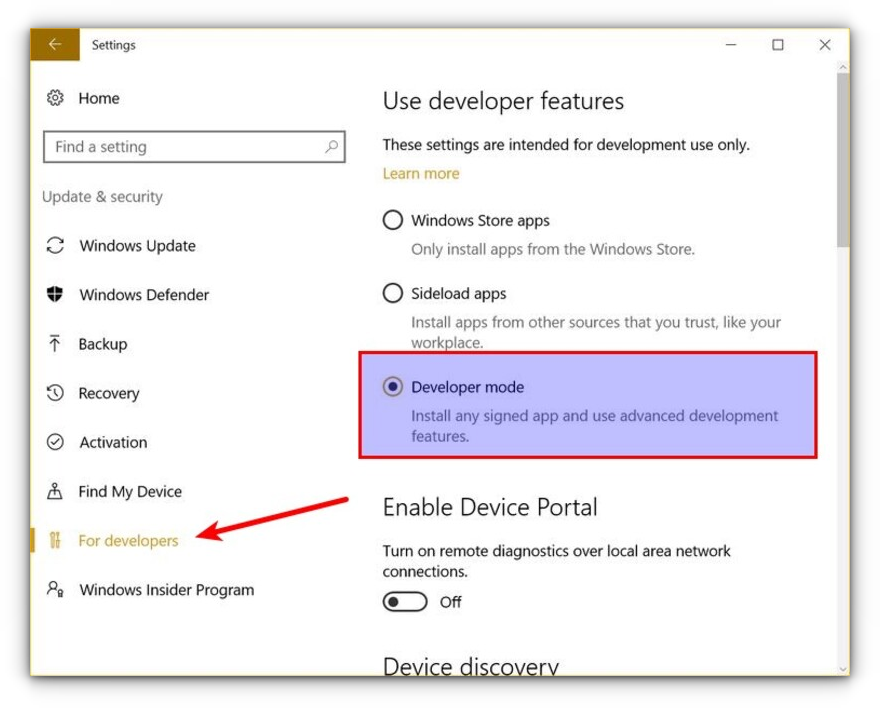
From the left side pane, choose “For developers.” You’ll see an option for “Developer mode.” Enable it.
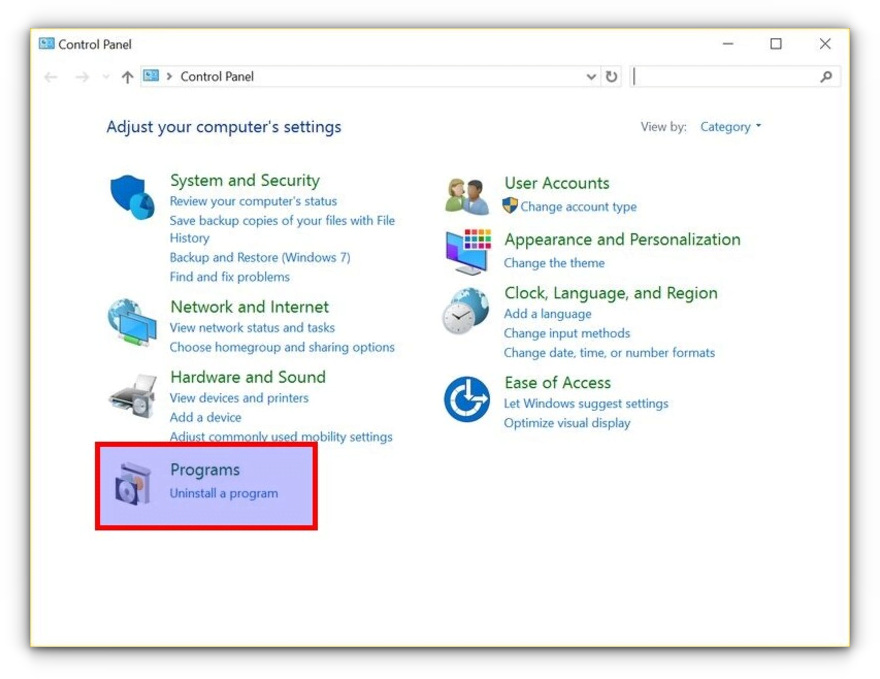
Now search for Control Panel and in Control Panel, click on “Programs”:
In Programs, click “Turn Windows features on or off”:
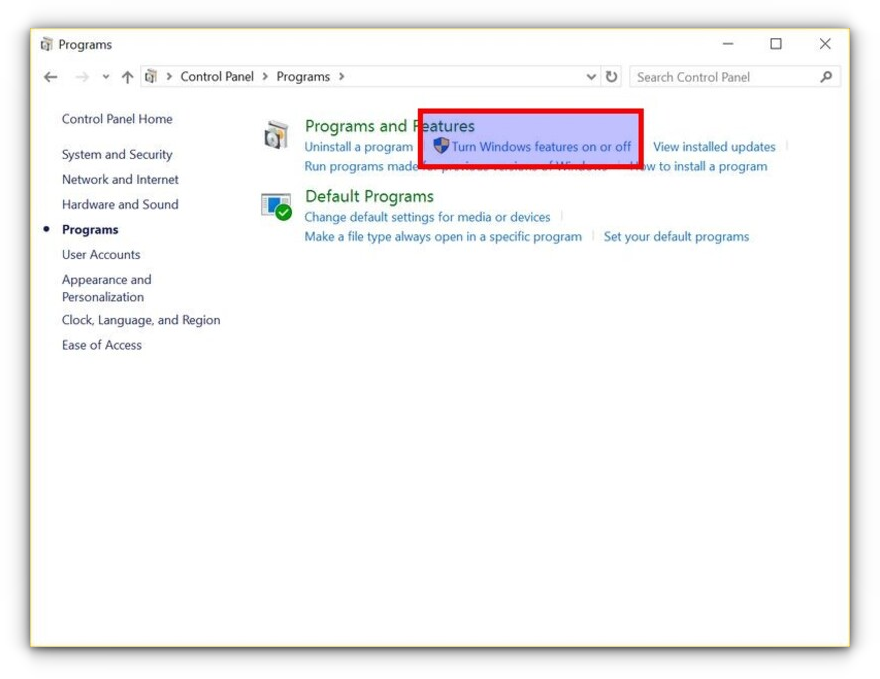
When you do this, you’ll see several Windows features. Look for “Windows Subsystem for Linux” and enable it.
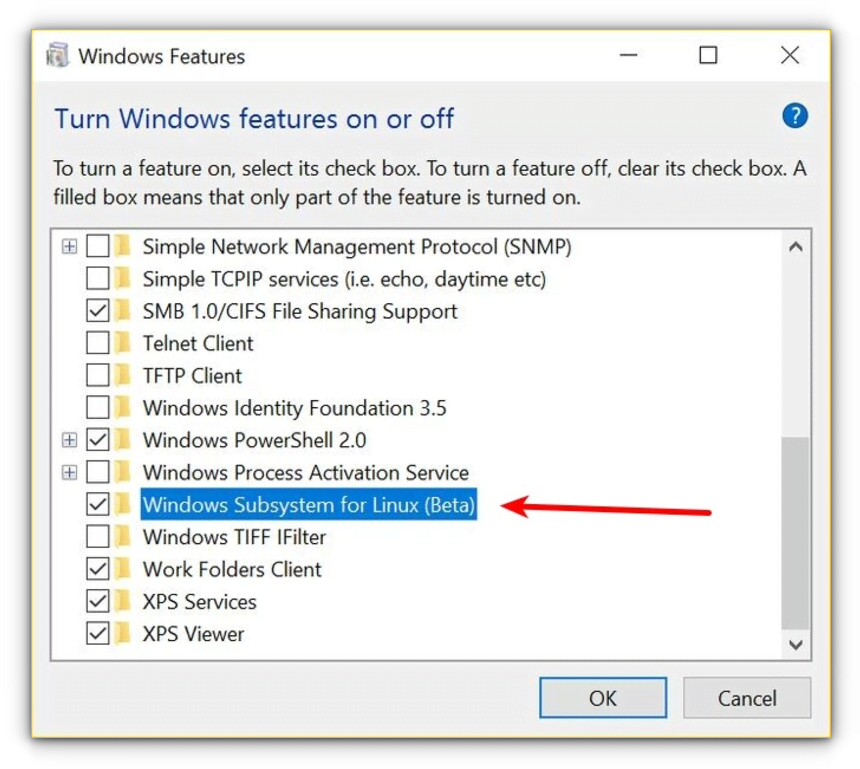
You’ll need to restart the system after doing this.
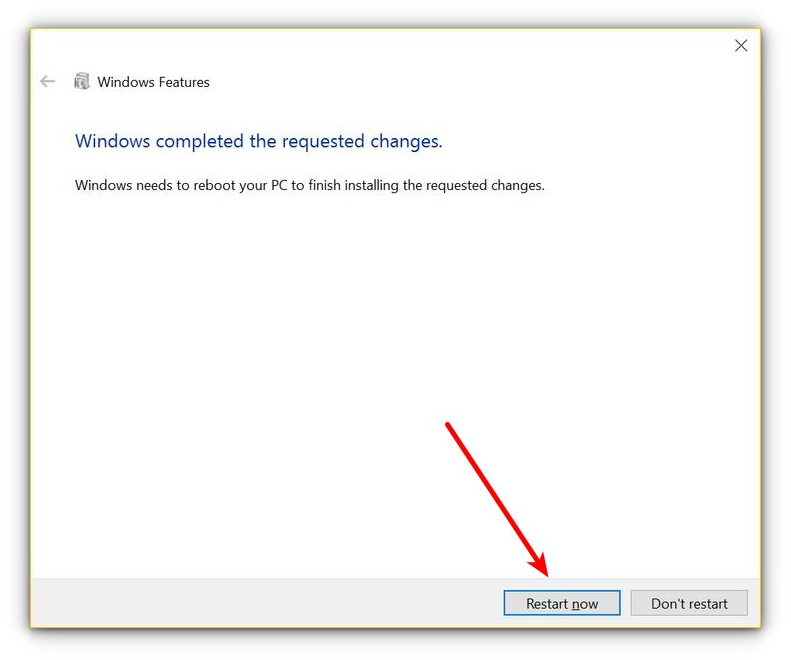
After restarting the computer, click the start button and search for “bash”.
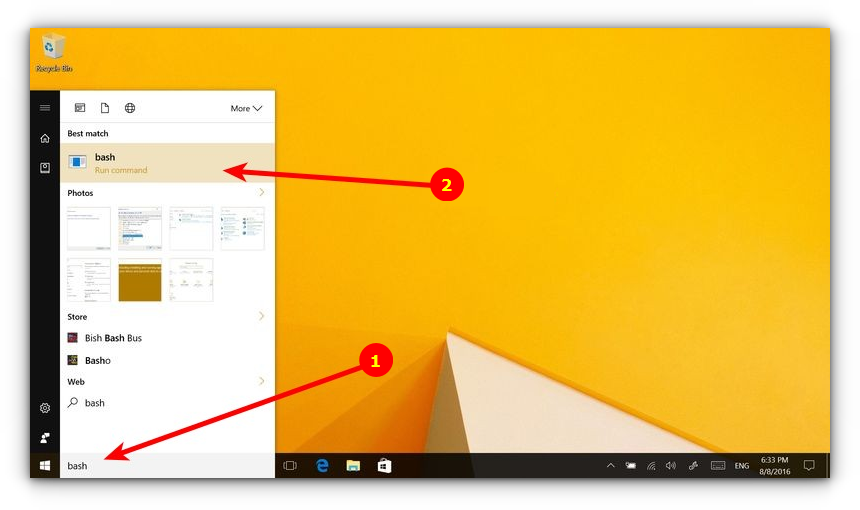
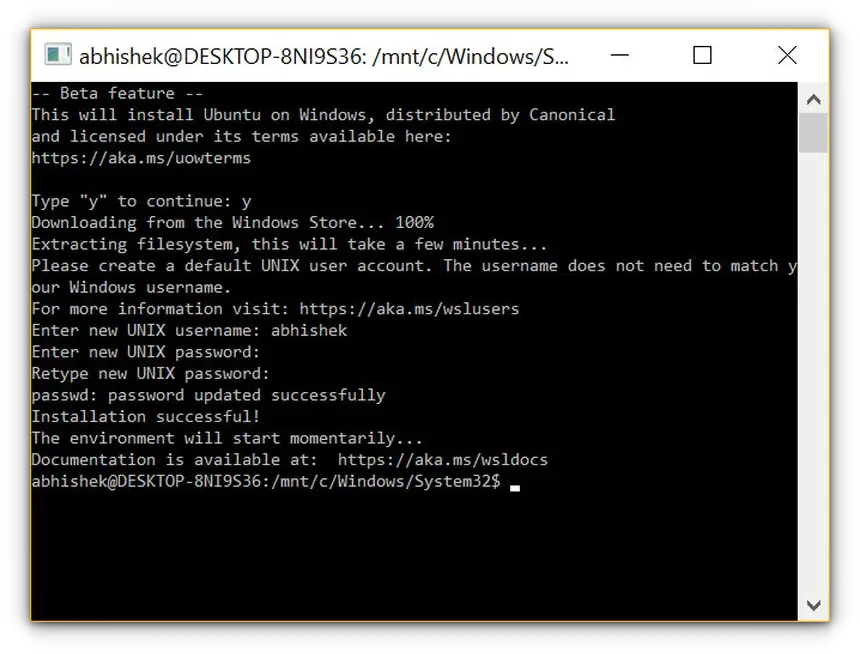
When you run it for the first time, you’ll be given the option to download and install Ubuntu. You’ll be asked to create a username and password during this process. It will install an entire Ubuntu Linux system, so have patience as it will take some time in downloading and installing Linux on Windows.
Once this is done, go back to the Start menu and search for Ubuntu or Bash.
Now you have a command line version of Ubuntu Linux. You can use apt to install various command line tools in it.
💬 I hope you find this tutorial helpful for installing bash on Windows and experimenting with Linux GUI apps on Windows. No wonder WSL lets you play with Linux inside of Windows. If you have questions or suggestions, feel free to ask.