
The Windows version of Bareos is a native Win32 port, but there are very few source code changes to the Unix code, which means that the Windows version is for the most part running code that has long proved stable on Unix systems.
Chapter Operating Systems shows, what Windows versions are supported.
The Bareos component that is most often used in Windows is the File daemon or Client program. As a consequence, when we speak of the Windows version of Bareos below, we are mostly referring to the File daemon (client).
Once installed Bareos normally runs as a system service. This means that it is immediately started by the operating system when the system is booted, and runs in the background even if there is no user logged into the system.
Windows Installation
Normally, you will install the Windows version of Bareos from the binaries.
The Windows version of Bareos winbareos binary packages are provided
in the windows directory of the Bareos release directory.
The current Bareos Community Repository is at https://download.bareos.org/current/windows/
while the Bareos Subscription Repository of Bareos release 22 is at
https://download.bareos.com/bareos/release/22/windows/.
Additionally, there are OPSI packages available in the windows/opsi/ directory (https://download.bareos.org/current/windows/opsi/ resp. https://download.bareos.com/bareos/release/22/windows/opsi/).
This install is standard Windows .exe that runs an install wizard using the NSIS Free Software installer, so if you have already installed Windows software, it should be very familiar to you. Providing you do not already have Bareos installed, the installer installs the binaries and dlls in C:\Program Files\Bareos and the configuration files in C:\ProgramData\Bareos (for Windows XP and older:
C:\Documents and Settings\All Users\Application Data\Bareos).
In addition, the Start->All Programs->Bareos menu item will be created during the installation, and on that menu, you will find items for editing the configuration files, displaying the document, and starting a user interface.
During installation you can decide, what Bareos components you want to install.
Typically, you only want to install the Bareos Client (Bareos File Daemon) and optionally some interface tools on a Windows system. Normally, we recommend to let the server components run on a Linux or other Unix system. However, it is possible, to run the Bareos Director, Bareos Storage Daemon and Bareos WebUI on a Windows systems. You should be aware about following limitations:
Limitation — Windows: Storage Daemon only supports backup to disk, not to tape.
The Windows version of the Bareos Storage Daemon currently only supports backup to disk.
Access to tape devices and to media changers is not supported.
Limitation — Windows: The default installation of |webui| is only suitable for local access.
Normally the Bareos WebUI is running on a Apache server on Linux.
While it is possible, to run the Bareos WebUI under Apache or another Webserver which supports PHP under Windows,
the configuration shipped the the winbareos package uses the PHP internal webserver.
This is okay for local access, but not suitable for being accessed via the network.
To guarantee this, it is configured to only listen locally (http://localhost:9100).
Graphical Installation
Here are the important steps.
-
You must be logged in as an Administrator to the local machine to do a correct installation, if not, please do so before continuing.
-
For a standard installation you may only select the “Tray-Monitor” and the “Open Firewall for Client” as additional optional components.

-
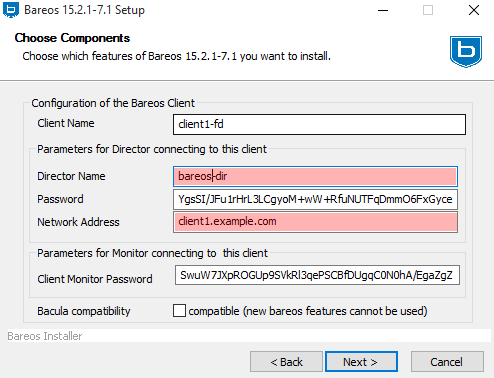
You need to fill in the name of your bareos director in the client configuration dialogue and the FQDN or ip address of your client.
-
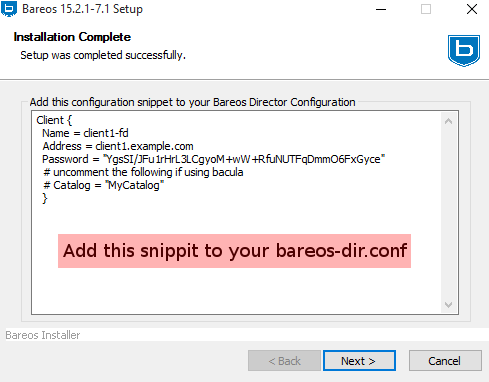
Add the client resource to your Bareos Director Configuration and a job resource for the client as it is also described in the default bareos-dir.conf
Command Line (Silent) Installation
Silent installation is possible since Version >= 12.4.4. All inputs that are given during interactive install can now directly be configured on the commandline, so that an automatic silent install is possible.
Commandline Switches
- /?
-
shows the list of available parameters.
- /S
-
sets the installer to silent. The Installation is done without user interaction. This switch is also available for the uninstaller.
- /CLIENTADDRESS
-
network address of the client
- /CLIENTNAME
-
sets the name of the client resource
- /CLIENTMONITORPASSWORD
-
sets the password for monitor access
- /CLIENTPASSWORD
-
sets the password to access the client
- /DBADMINUSER=user
-
sets the database admin user, default=postgres. Version >= 14.2.1
- /DBADMINPASSWORD=password
-
sets the database admin password, default=none. Version >= 14.2.1
- /DIRECTORADDRESS
-
sets network address of the director for bconsole access
- /DIRECTORNAME
-
sets the name of the director to access the client and of the director to accessed by bconsole
- /DIRECTORPASSWORD
-
set the password to access the director
- /SILENTKEEPCONFIG
-
keep configuration files on silent uninstall and use exinsting config files during silent install. Version >= 12.4.4
- /INSTALLDIRECTOR
-
install the Bareos Director (and bconsole). Version >= 14.2.1
- /INSTALLSTORAGE
-
install the Bareos Storage Daemon. Version >= 14.2.1
- /WRITELOGS
-
makes the installer write a log file. Version >= 14.2.1
- /D=:file:C:specifyinstallationdirectory
-
(Important: It has to be the last option!)
By setting the Installation Parameters via commandline and using the silent installer, you can install the bareos client without having to do any configuration after the installation e.g. as follows:
c:\winbareos.exe /S /CLIENTNAME=hostname-fd /CLIENTPASSWORD="verysecretpassword" /DIRECTORNAME=bareos-dir
DBADMINUSER and DBADMINPASSWORD are used to create the bareos databases. If login is not possible silent installer will abort
Volume Shadow Copy Service (VSS)
VSS is available since Windows XP. From the perspective of a backup-solution for Windows, this is an extremely important step. VSS allows Bareos to backup open files and even to interact with applications like RDBMS to produce consistent file copies. VSS aware applications are called VSS Writers, they register with the OS so that when Bareos wants to do a Snapshot, the OS will notify the register Writer programs, which may then create a consistent state in their application, which will be backed
up. Examples for these writers are “MSDE” (Microsoft database engine), “Event Log Writer”, “Registry Writer” plus 3rd party-writers. If you have a non-vss aware application a shadow copy is still generated and the open files can be backed up, but there is no guarantee that the file is consistent.
Bareos produces a message from each of the registered writer programs when it is doing a VSS backup so you know which ones are correctly backed up.
Technically Bareos creates a shadow copy as soon as the backup process starts. It does then backup all files from the shadow copy and destroys the shadow copy after the backup process. Please have in mind, that VSS creates a snapshot and thus backs up the system at the state it had when starting the backup. It will disregard file changes which occur during the backup process.
VSS can be turned on by placing an
in your FileSet resource.
The VSS aware File daemon has the letters VSS on the signon line that it produces when contacted by the console. For example:
Tibs-fd Version: 1.37.32 (22 July 2005) VSS Windows XP MVS NT 5.1.2600
the VSS is shown in the line above. This only means that the File daemon is capable of doing VSS not that VSS is turned on for a particular backup. There are two ways of telling if VSS is actually turned on during a backup. The first is to look at the status output for a job, e.g.:
Running Jobs:
JobId 1 Job NightlySave.2005-07-23_13.25.45 is running.
    VSS Backup Job started: 23-Jul-05 13:25
    Files=70,113 Bytes=3,987,180,650 Bytes/sec=3,244,247
    Files Examined=75,021
    Processing file: c:/Documents and Settings/user/My Documents/My Pictures/Misc1/Sans titre - 39.pdd
    SDReadSeqNo=5 fd=352
Here, you see under Running Jobs that JobId 1 is “VSS Backup Job started …” This means that VSS is enabled for that job. If VSS is not enabled, it will simply show “Backup Job started …” without the letters VSS.
The second way to know that the job was backed up with VSS is to look at the Job Report, which will look something like the following:
23-Jul 13:25 rufus-dir: Start Backup JobId 1, Job=NightlySave.2005-07-23_13.25.45
23-Jul 13:26 rufus-sd: Labeled new Volume "TestVolume001" on device "DDS-4" (/dev/nst0)
23-Jul 13:26 rufus-sd: Spooling data ...
23-Jul 13:26 Tibs: Generate VSS snapshots. Driver="VSS WinXP", Drive(s)="C"
23-Jul 13:26 Tibs: VSS Writer: "MSDEWriter", State: 1 (VSS_WS_STABLE)
23-Jul 13:26 Tibs: VSS Writer: "Microsoft Writer (Bootable State)", State: 1 (VSS_WS_STABLE)
23-Jul 13:26 Tibs: VSS Writer: "WMI Writer", State: 1 (VSS_WS_STABLE)
23-Jul 13:26 Tibs: VSS Writer: "Microsoft Writer (Service State)", State: 1 (VSS_WS_STABLE)
In the above Job Report listing, you see that the VSS snapshot was generated for drive C (if other drives are backed up, they will be listed on the Drive(s)="C" line. You also see the reports from each of the writer program. Here they all report VSS_WS_STABLE, which means that you will get a consistent snapshot of the data handled by that writer.
Windows Compatibility Considerations
Exclusively Opened Files
If you are not using the Volume Shadow Copy Service (VSS) option and if any applications are running during the backup and they have files opened exclusively, Bareos will not be able to backup those files, so be sure you close your applications (or tell your users to close their applications) before the backup. Fortunately, most Microsoft applications do not open files exclusively so that they can be backed up. However, you will need to experiment. In any case, if Bareos cannot open the file, it will
print an error message, so you will always know which files were not backed up. If Volume Shadow Copy Service is enabled, Bareos is able to backing up any file.
Windows Reparse Points
Version >= 12.4.5
Besides normal files and directories, Windows filesystems also support special files, called “Reparse Points”. Bareos can handle the following types of Reparse points:
-
Symbolic links to directories
-
Symbolic links to files
-
Junction Points
-
Volume Mount Points
The Volume Mount Points are a special case of a Junction Point. To make things easier, in the following when talking about Junction Points, we mean only the Junction Points that are not Volume Mount Points.
The Symbolic Links and the Junction Points are comparable to Symbolic Links in Unix/Linux. They are files that point to another location in the filesystem.
Symbolic Links and Junction Points can be created with the Windows commandline command mklink.
When doing a directory listing in the commandline (cmd) in Windows, it shows the filetypes JUNCTION, SYMLINK or SYMLINKD and the target between the square brackets:
special files
C:\linktest>dir
 Volume in drive C has no label.
 Volume Serial Number is C8A3-971F

 Directory of C:\linktest

08/07/2014  03:05 PM    <DIR>          .
08/07/2014  03:05 PM    <DIR>          ..
08/07/2014  02:59 PM    <SYMLINKD>     dirlink [C:\Program Files\Bareos]
08/07/2014  03:02 PM    <SYMLINK>      filelink [C:\Program Files\Bareos\bareos-dir.exe]
08/07/2014  03:00 PM    <JUNCTION>     junction [C:\Program Files\Bareos]
08/07/2014  03:05 PM    <JUNCTION>     volumemountpoint [\??\Volume{e960247d-09a1-11e3-93ec-005056add71d}\]
               1 File(s)              0 bytes
               5 Dir(s)  90,315,137,024 bytes free
Symbolic Links. Directory Symbolic Links, and Junctions that are not a Volume MountPoint are treated by Bareos as symbolic links and are backed up and restored as they are, so the object is restored and points to where it pointed when it was backed up.
Volume Mount Points are different. They allow to mount a harddisk partition as a subfolder of a drive instead of a driveletter.
When backing up a Volume Mount Point, it is backed up as directory.
If OneFS is set to yes (default), the Volume Mount Point (VMP) is backed up as directory but the content of the VMP will not be backed up. Also, the Joblog will contain a message like this:
Warning on Volume Moint Point and OneFS=yes
C:/linktest/vmp is a different filesystem. Will not descend from C:/linktest into it.
This is the normal behavior of the OneFS option.
If OneFS is set to no, the filedaemon will change into the VMP as if it was a normal directory and will backup all files found inside of the VMP.
VMPs and VSS Snapshots
As Virtual Mount Points mounts another Volume into the current filesystem, it is desired that if the content of the VMP will be backed up during the backup (onefs = no), we also want to have this volume snapshotted via VSS.
To achieve this, we now automatically check every volume added to the VSS snapshotset if it contains VMPs, and add the volumes mounted by those VMPs to the vss snapshotset recursively.
Volumes can be mounted nested and multiple times, but can only be added to the snapshotset once. This is the reason why the number of vmps can be greater than the number of volumes added for the volume mount points.
The Job Log will show how many VMPs were found like this:
Volume Mount Points are added automatically to VSS snapshots (if onefs=no)
Volume Mount Points found: 7, added to snapshotset: 5
Accordingly, if OneFS is set to yes, we do not need to handle Volume Mount Points this way. If OneFS is set to yes (default), the joblog will contain the following information:
Volume Mount Points are ignored on VSS snapshots (if onefs=yes)
VolumeMountpoints are not processed as onefs = yes.
Hard Links
Windows also supports hard links, even so they are seldom used. These are
treated as normal files and will be restored as individual files (which
will not be hard links again)
FilesNotToBackup Registry Key
Version >= 14.2.0
Windows supports a special Registry Key that specifies the names of the files and directories that backup applications should not backup or restore.
The full path to this registry key is HKEY_LOCAL_MACHINE\SYSTEM\CurrentControlSet\Control\BackupRestore\FilesNotToBackup
Bareos automatically converts these entries to wildcards which will be automatically excluded from backup.
The backup log shows a short information about the creation of the exludes like this:
Excludes according to the FilesNotToBackup registry key
Created 28 wildcard excludes from FilesNotToBackup Registry key
More details can be found if the filedaemon is run in debug mode inside of the bareos-fd.trace logfile. Each entry and the resulting wildcard are logged.
translation between registry key FilesNotToBackup and Bareos Exclude FileSet
client-win-fd: win32.c:465-0 (1) "WER" :
client-win-fd: win32.c:482-0         "C:\ProgramData\Microsoft\Windows\WER\* /s"
client-win-fd: win32.c:527-0     ->  "C:/ProgramData/Microsoft/Windows/WER/*"
client-win-fd: win32.c:465-0 (2) "Kernel Dumps" :
client-win-fd: win32.c:482-0         "C:\Windows\Minidump\* /s"
client-win-fd: win32.c:527-0     ->  "C:/Windows/Minidump/*"
client-win-fd: win32.c:482-0         "C:\Windows\memory.dmp"
client-win-fd: win32.c:527-0     ->  "C:/Windows/memory.dmp"
client-win-fd: win32.c:465-0 (3) "Power Management" :
client-win-fd: win32.c:482-0         "\hiberfil.sys"
client-win-fd: win32.c:527-0     ->  "[A-Z]:/hiberfil.sys"
client-win-fd: win32.c:465-0 (4) "MS Distributed Transaction Coordinator" :
client-win-fd: win32.c:482-0         "C:\Windows\system32\MSDtc\MSDTC.LOG"
client-win-fd: win32.c:527-0     ->  "C:/Windows/system32/MSDtc/MSDTC.LOG"
client-win-fd: win32.c:482-0         "C:\Windows\system32\MSDtc\trace\dtctrace.log"
client-win-fd: win32.c:527-0     ->  "C:/Windows/system32/MSDtc/trace/dtctrace.log"
It is possible to disable this functionality by setting the FileSet option AutoExclude to no.
The JobLog will then show the following informational line:
AutoExclude disabled
Fileset has autoexclude disabled, ignoring FilesNotToBackup Registry key
For more details about the Windows registry key see https://learn.microsoft.com/en-us/windows/win32/backup/registry-keys-for-backup-and-restore.
Windows dedup support
Version >= 12.4.5
Windows 2012 has dedup support which needs handling.
Store all file attributes
Version >= 12.4.5
Windows has gathered quite some special specific file flags over the years but not all are saved during backup so some are never restored by the restore process. The most important ones are the ARCHIVE flag which is “misused” by some programs for storing some special information. Others that are known not to be stored are the COMPRESSED flag which means that a restored file looses it and will be restored as an uncompressed file.
Support for Windows EFS filesystems
Version >= 12.4.5
Windows has support for a so called EFS filesystem. This is an encrypted filesystem, to be able to backup the data and to restore it we need to use a special API. With this API you in essence export the data on backup and import it on restore. This way you never have access to the unencrypted data but just import and export the encrypted data. This is the cleanest way of handling encryption by just seeing the data as some opaque data and not try to do anything special with it.
Backup/Restore of Windows Registry
The Windows Registry can be backed up using VSS.
The VSS Registry Writer will make sure you can take a stable backup of the registry hives.
The Registry is structured as different hives that are stored in separate files.
You can find a list of hives with the corresponding files in the Registry itself under HKLM\System\CurrentControlSet\Control\hivelist.
By backing up the file that one of the hives is stored in, you’ll get a backup of that part of the Registry.
Well-Known Hives
|
Registry Key |
File Location |
Description |
|---|---|---|
|
HKU\<User-SID> |
%systemdrive%\Users\%username%\NTUSER.DAT |
User Registry (each users’s HKCU) |
|
HKLM\BCD00000000 |
\Device\HarddiskVolume1\Boot\BCD |
Boot Configuration Database |
|
HKLM\COMPONENTS |
%systemroot%\System32\config\COMPONENTS |
Component Based Servicing |
|
HKLM\HARDWARE |
in-memory only |
Hardware information determined at runtime |
|
HKLM\SAM |
%systemroot%\System32\config\SAM |
Security Accounts Manager |
|
HKLM\SECURITY |
%systemroot%\System32\config\SECURITY |
Security Policies and User Permission |
|
HKLM\SOFTWARE |
%systemroot%\System32\config\SOFTWARE |
System-wide settings, Application Settings |
|
HKLM\SYSTEM |
%systemroot%\System32\config\SYSTEM |
Startup config, drivers and system services |
|
HKU\.DEFAULT |
%systemroot%\System32\config\.DEFAULT |
User Hive for Local System |
|
HKU\S-1-5-18 |
%systemroot%\System32\config\.DEFAULT |
User Hive for Local System (alternate path) |
|
HKU\S-1-5-19 |
%systemroot%\ServiceProfiles\LocalService\Ntuser.dat |
User Hive for Local Service |
|
HKU\S-1-5-20 |
%systemroot%\ServiceProfiles\NetworkService\Ntuser.dat |
User Hive for Network Service |
Restoring the Registry
To restore a part of the Registry, you simply restore the file containing the appropriate hive to another location on the machine.
You can then use regedit to open (“mount”) that restored hive file by selecting “Load Hive” in the “Registry” menu.
With the hive mounted you can now export keys or subtrees from the mounted hive and import these at any other location.
Once you’re finished you should unload the hive using “Unload Hive” from the “Registry” menu.
Dumping the Windows Registry
You write the registry content out to an ASCII file using regedit /e.
Windows Firewalls
The Windows builtin Firewall is enabled since Windows version WinXP SP2. The Bareos installer opens the required network ports for Bareos. However, if you are using another Firewall, you might need to manually open the Bareos network ports. The Bareos File Daemon listens on 9102/TCP.
Network TCP Port
If you want to see if the File daemon has properly opened the port and is listening, you can enter the following command in a shell window:
netstat -an | findstr 910[123]
Windows Antivirus
The Windows builtin antivirus Defender is enabled by default and will scan every single file being backed up during the backup process. This leads to an extremely slow throughput with a very high cpu load.
Therefore it is advised to add the bareos-fd.exe to the list of excluded monitored processes on computers being backed up via the bareos filedaemon.
On systems running the director or storage daemon on windows, also add the processes
bareos-dir.exe, bareos-sd.exe
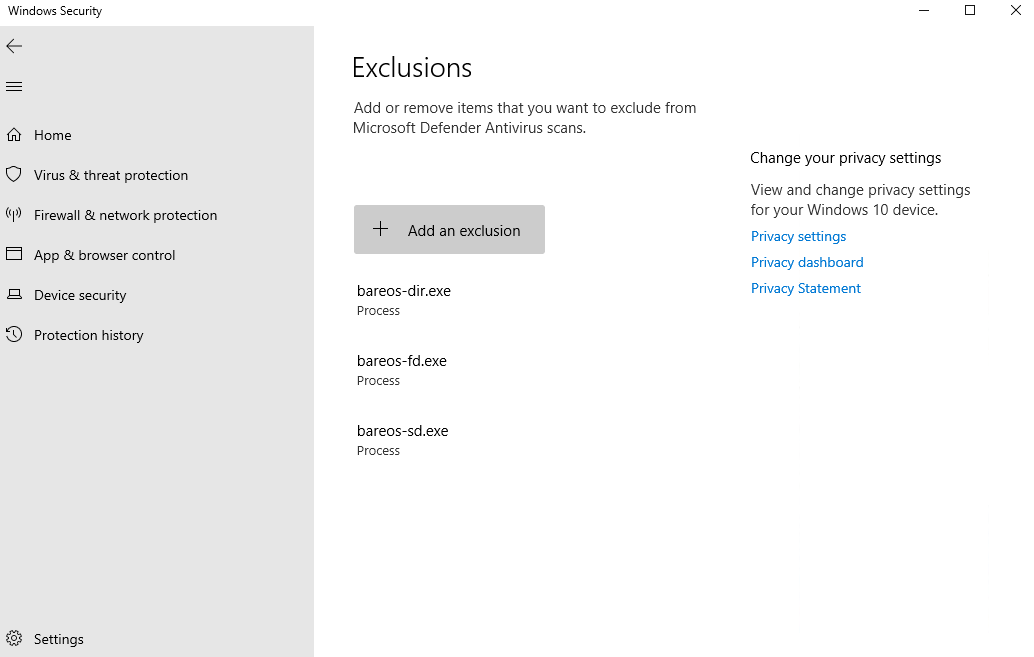
The same remark can be done to any other similar on-access antivirus scanner. Please also check next section about possible troubles with antivirus on Windows.
Dealing with Windows Problems
Antivirus Program
If you are not using the portable option, and you have Enable VSS (Dir->Fileset) (Volume Shadow Copy) enabled in the Bareos Director and you experience problems with Bareos not being able to open files, it is most likely that you are running an antivirus program that blocks Bareos from doing certain operations. In this case, disable the antivirus program and try another backup. If it succeeds, either get a different (better) antivirus program or use
something like Client Run Before Job (Dir->Job)/Client Run After Job (Dir->Job) to turn off the antivirus program while the backup is running.
If turning off anti-virus software does not resolve your VSS problems, you might have to turn on VSS debugging. The following link describes how to do this: https://learn.microsoft.com/en-us/troubleshoot/windows-server/backup-and-storage/enable-debug-tracing-features-vss.
Enable Debugging
In case of problems, you can enable the creation of log files. For this you have to use the bconsole setdebug command:
Enable debug
*setdebug client=bareos-fd level=200 trace=1
Connecting to Client bareos-fd at bareos.example.com:9102
2000 OK setdebug=200 trace=1 hangup=0 tracefile=c:\bareos-fd.trace
Please see the chapter Debugging for additional information.
Error Read Access is denied
If during a Backup, you get the message: ERR=Access is denied and you are using the portable option, you should try adding both the non-portable (backup API) and the Volume Shadow Copy options to your Fileset’s conf file.
In the Include Options resource:
In the FileSet resource:
In general, specifying these two options should allow you to backup any file on a Windows system. However, in some cases, if users have allowed to have full control of their folders, even system programs such a Bareos can be locked out. In this case, you must identify which folders or files are creating the problem and do the following:
-
Grant ownership of the file/folder to the Administrators group, with the option to replace the owner on all child objects.
-
Grant full control permissions to the Administrators group, and change the user’s group to only have Modify permission to the file/folder and all child objects.
Thanks to Georger Araujo for the above information.
Error VSS could not grow in time
If during a Backup, you get this kind of message in the job log:
Could not stat "D:/examples_dir/sample_file.doc": ERR=The system cannot find the file specified.
Could not stat "D:/examples_dir/Documents": ERR=Access is denied.
You are maybe facing a VSS snapshot size problem: the shadow copy storage could not grow in time, and thus the system removes the snapshot in use during the backup. Of course this invalidates access to data that should be saved during the job by the Bareos File Daemon. Unfortunately such operations are not reported to the Bareos File Daemon, which gets read and access deny errors when trying to access the data.
Checking the Windows system log around the time the problem occur in the backup job should show this kind of error logged.
Log Name:      System
Source:        Volsnap
Date:          9/26/2022 2:13:27 AM
Event ID:      25
Task Category: None
Level:         Error
Keywords:      Classic
User:          N/A
Computer:      bareos-windows-fd
Description:
The shadow copies of volume D: were deleted because the shadow copy storage could
not grow in time.  Consider reducing the IO load on the system or choose a shadow
copy storage volume that is not being shadow copied.
Event Xml:
<Event xmlns="http://schemas.microsoft.com/win/2004/08/events/event">
<System>
   <Provider Name="Volsnap" Guid="{cb017cd2-1f37-4e65-82bc-3e91f6a37559}" EventSourceName="volsnap" />
   <EventID Qualifiers="49158">25</EventID>
   <Version>0</Version>
   <Level>2</Level>
   <Task>0</Task>
   <Opcode>0</Opcode>
   <Keywords>0x80000000000000</Keywords>
   <TimeCreated SystemTime="2022-09-26T00:13:27.611447600Z" />
   <EventRecordID>1151393</EventRecordID>
   <Correlation />
   <Execution ProcessID="4" ThreadID="278416" />
   <Channel>System</Channel>
   <Computer>bareos-windows-fd</Computer>
   <Security />
</System>
<EventData>
   <Data Name="DeviceName">\Device\HarddiskVolumeShadowCopy293</Data>
   <Data Name="VolumeName">D:</Data>
   <Data Name="NTSTATUS">00000000</Data>
   <Data Name="SourceTag">168</Data>
   <Data Name="SourceFileID">0x0005</Data>
   <Data Name="SourceLine">2618</Data>
   <Binary>000000000600300000000000190006C0A80000000000000090000000000000000000000000000000</Binary>
</EventData>
</Event>
You need to find a way to extend your VSS disk space.
Warning
Beside the job has serious issue, the snapshot removal is not reported to the Bareos File Daemon, and as such the backup job often terminated with a status of “OK – with warnings” W status.
VSS hanging on MSDE
If you are experiencing problems such as VSS hanging on MSDE, first try running vssadmin to check for problems, then try running Windows Backup Feature which also uses VSS to see if it has similar problems. If so, you know that the problem is in your Windows machine and not with Bareos.
The FD hang problems were reported with MSDEwriter when:
-
a local firewall locked local access to the MSDE TCP port (MSDEwriter seems to use TCP/IP and not Named Pipes).
-
msdtcs was installed to run under “localsystem”: try running msdtcs under networking account (instead of local system) (com+ seems to work better with this configuration).
Windows Restore Problems
Please see the Restoring on Windows chapter for problems that you might encounter doing a restore.
Windows Ownership and Permissions Problems
If you restore files backed up from Windows to an alternate directory, Bareos may need to create some higher level directories that were not saved (or restored). In this case, the File daemon will create them under the SYSTEM account because that is the account that Bareos runs under as a service and with full access permission. However, there may be cases where you have problems accessing those files even if you run as administrator. In principle, Microsoft supplies you with the way to cease
the ownership of those files and thus change the permissions. However, a much better solution to working with and changing Win32 permissions is the program SetACL, which can be found at https://helgeklein.com/setacl/.
If you have not installed Bareos while running as Administrator and if Bareos is not running as a Process with the userid (User Name) SYSTEM, then it is very unlikely that it will have sufficient permission to access all your files.
Some users have experienced problems restoring files that participate in the Active Directory. They also report that changing the userid under which Bareos (bareos-fd.exe) runs, from SYSTEM to a Domain Admin userid, resolves the problem.
Advanced Windows Configuration
Windows Service
The Bareos File Daemon (and also the Bareos Director and Bareos Storage Daemon) is started as a Windows service.
This is configured in the Registry at
-
HKEY_LOCAL_MACHINE\SYSTEM\CurrentControlSet\services\Bareos-fd
You can use the command regedit to modify the settings.
E.g. to always start Bareos in debug mode, modify HKEY_LOCAL_MACHINE\SYSTEM\CurrentControlSet\services\Bareos-fd ImagePath from
"C:\Program Files\Bareos\bareos-fd.exe" /service
to
"C:\Program Files\Bareos\bareos-fd.exe" /service -d200
After restarting the service, you will find a file called C:bareos-fd.trace which will contain the debug output created by the daemon.
Installing multiple Windows filedaemon services
It is possible to run multiple Bareos File Daemon instances on Windows. To achieve this, you need to create a service for each instance, and a configuration directory that at least has a individual fd port for each instance.
To create two bareos-fd services, you can call the following service create calls on the commandline on windows as administrator:
sc create bareosfd2 binpath="\"C:\Program Files\Bareos\bareos-fd.exe\" /service -c \"C:\ProgramData\Bareos2\"" depend= "tcpip/afd"
This will create a second Bareos File Daemon service with the name bareosfd2.
The configuration directories for the two services is "C:\ProgramData\Bareos2\" needs to have different network settings.
The service can be started by calling
Windows Specific Command Line Options
These options are not normally seen or used by the user, and are documented here only for information purposes. At the current time, to change the default options, you must either manually run Bareos or you must manually edit the system registry and modify the appropriate entries.
In order to avoid option clashes between the options necessary for Bareos to run on Windows and the standard Bareos options, all Windows specific options are signaled with a forward slash character (/), while as usual, the standard Bareos options are signaled with a minus (-), or a minus minus (--). All the standard Bareos options can be used on the Windows version. In addition, the following Windows only options are implemented:
- /service
-
Start Bareos as a service
- /run
-
Run the Bareos application
- /install
-
Install Bareos as a service in the system registry
- /remove
-
Uninstall Bareos from the system registry
- /about
-
Show the Bareos about dialogue box
- /status
-
Show the Bareos status dialogue box
- /events
-
Show the Bareos events dialogue box (not yet implemented)
- /kill
-
Stop any running Bareos
- /help
-
Show the Bareos help dialogue box
It is important to note that under normal circumstances the user should never need to use these options as they are normally handled by the system automatically once Bareos is installed. However, you may note these options in some of the .bat files that have been created for your use.

March 21, 2017
Posted on
March 21, 2017
•
1 minutes
•
166 words
Since most of us work in a mixed environment (at best), we have to deal with all environments when it comes to backups. So here is how to install Bareos on Windows. There are two methods described in the manual. However I’m doing the GUI method. (It’s Windows after all) You can download the latest Windows Bareos binary package here.
Installing on Windows is pretty straightforward : (use defaults)

The Client Name, this can be a recognizable name and doesn’t have to be network name.
The Director Name, has to be the same name as the director name, for default installs this is bareos-dir.
The **Password, **is generated in by default.
The Network Address, should either be a solvable name or an IP address.
The Client Monitor Password, can also be left as it was generated.
Next you get this screen, this can be copy pasted in :
/etc/bareos/bareos-dir.d/client/
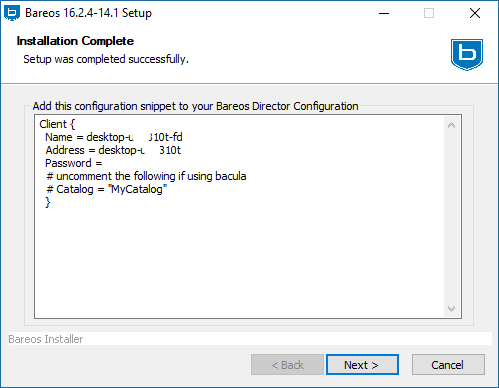
And that’s it ! Upon next reboot the service runs and Bareos can backup from this client.
In February this year, we published a blog post on how to install the Bareos app via the Univention App Center. We explained how to modify the setup by adjusting some UCR variables and how to configure Windows or Linux computers from the UCS domain as Bareos clients. In this second part, we will explain in more detail how to back up a Windows client and how to configure backup jobs and schedules Bareos.
Installing the Bareos File Daemon on Windows
A quick reminder: The Bareos File Daemon is the client program that runs on every computer that you want to back up with Bareos. If you have installed the Bareos app from the Univention App Center, the Bareos Director (the server part of the backup solution) is already up and running on your UCS machine. The directory /etc/bareos/autogenerated/clients (on the UCS computer) contains automatically created configuration files for all computers in the UCS domain.
All that’s left for you to do, is to install the File Daemon(s) on the client machines. This is how to do it on Windows computers:
- Download the File Daemon from the Bareos website. Make sure to choose the correct version number. Since UCS offers version 17.2 of the Bareos app, you have to select the Windows client from the 17.2 series. The new File Daemon (18.2.5) does not work with the UCS Bareos app (17.2.6). As soon as Bareos 18.2.5 is available in the Univention App Center, you can also upgrade to the new client version.
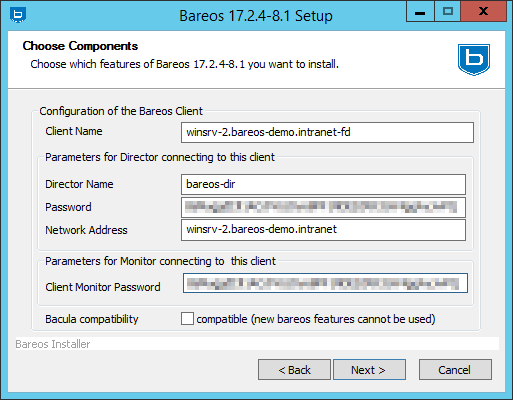
- Start the setup assistant with a double click. After you have accepted the license, select the Bareos components you want to install. By default the profile Standard – FileDaemon + Plugins, Traymonitor is activated, which you can simply accept and click on Next.

- On the UCS computer, have a look at the directory
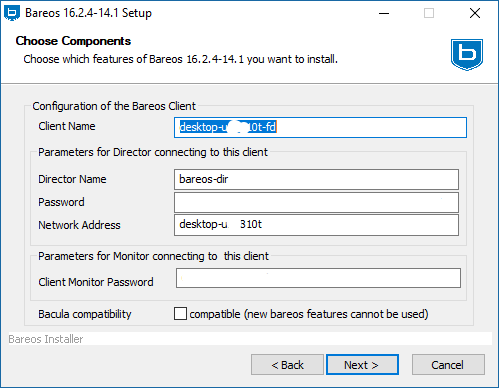
/etc/bareos/autogenerated/clients. It contains an automatically generated configuration file with the name of the Windows computer and the file extension.include. In here you can find all the information that belongs in the next dialog:- Client Name: Enter the name of the Windows computer; it’s the same as in the Univention Management Console (Devices / Computers).
- Director Name: It has to match the entry in the file
/etc/bareos/bareos-dir.d/director/bareos-dir.conf. If you haven’t changed anything, the default isbareos-dir - Password: The file
/etc/bareos/autogenerated/clients/CLIENT.includeshows the password (in the Client section). - Network Address: Please enter the IP address or the hostname of the Windows computer.
- Client Monitor Password: The password for the Windows tray monitor; it matches the password in the file
C/etc/bareos/bareos-fd.d/director/bareos-mon.confon the UCS machine.
- Confirm your settings by clicking the Next button. The last dialog shows the configuration snippet for the Bareos Director. You don’t have to follow the instructions and copy it on the UCS machine – after installing Bareos from the Univention App Center the setup file (in
/etc/bareos/autogenerated/clients) already exists.
- Click Finish to complete the setup.

Creating a FileSet for the Windows Client
A FileSet defines the data that Bareos includes and excludes in its backups on the respective clients. If you have installed Bareos via the Univention App Center, you don’t have to worry about creating a FileSet manually – UCS has already taken care of that. All FileSet definitions are stored on the Bareos Director (the UCS machine) in the directory /etc/bareos/bareos-dir.d/fileset.
The file created for Windows computers is called Windows All Drives.conf. The statement File = / defines that Bareos should back up the complete computer – except for removable media such as CD/DVD, USB sticks, etc. (Drive Type = fixed). The Exclude statement makes sure the file pagefile.sys, the Windows Recycle Bin, and the hidden system folder (System Volume Information) are not part of the backup plan:
FileSet {
  Name = "Windows All Drives"
  Enable VSS = yes
  Include {
    Options {
      Signature = MD5
      Drive Type = fixed
      IgnoreCase = yes
      WildFile = "[A-Z]:/pagefile.sys"
      WildDir = "[A-Z]:/RECYCLER"
      WildDir = "[A-Z]:/$RECYCLE.BIN"
      WildDir = "[A-Z]:/System Volume Information"
      Exclude = yes
    }
    File = /
  }
}
If you want to exclude other files (WildDir = …), or if you prefer to back up specific directories instead of the full disk (File = /), then create your own FileSet definition and place it in the /etc/bareos/bareos-dir.d/fileset directory. Please don’t just change the original file (Windows All Drives.conf), as it is being overwritten with the next UCS update. Of course, you can copy the file and use it as a template for your own configuration. Remember to change the FileSet statement in the client’s configuration file (section Job in /etc/bareos/autogenerated/clients) if you want to include your own configuration.
Next, we’ll have a look at the backup jobs. UCS makes this easy for you and comes with a default backup job for Bareos.
Setting up Backup Jobs for your Windows PC
Bareos relies on backup and restore jobs, normally stored in the directory /etc/bareos/bareos-dir.d/job . The UCS app puts the job description together with the rest of the client’s configuration in the file under /etc/bareos/autogenerated/clients . The so called job resource has a unique name, a FileSet statement, and a schedule:
Client {
  [...]
}

Job {
  Name = "Backup-winsrv-2.bareos-demo.intranet"
  Client = "winsrv-2.bareos-demo.intranet-fd"
  JobDefs = "DefaultJob"
  FileSet = "Windows All Drives"
  Schedule = "WeeklyCycle"
  Enabled = "Yes"
}
Note the line Schedule = WeeklyCycle. This is the definition for schedule which we will explain in the next section.
Schedule for your Backups
The directory /etc/bareos/bareos-dir.d/schedule contains configuration files for the various schedules. UCS implements a weekly plan for the Bareos clients (file /etc/bareos/bareos-dir.d/schedule/WeeklyCycle.conf):
Schedule {
  Name = "WeeklyCycle"
  Run = Full 1st sat at 21:00                   # (#04)
  Run = Differential 2nd-5th sat at 21:00       # (#07)
  Run = Incremental mon-fri at 21:00            # (#10)
}
According to this plan, Bareos creates a full backup every first Saturday of the month at 9 p.m., a differential backup every second, third, fourth and fifth Saturday (9 p.m.), and an incremental backup every Monday to Friday at 9 p.m.
There is a difference between these three backup methods:
- Full Backup: This is a full copy of your entire data set (time-consuming, needs a lot of disk or tape capacity).
- Incremental Backups only back up data that has changed since the last full or the last incremental backup.
- Differential Backup: This is like an incremental backup but it starts with a full backup, so it contains all data that has changed since the last full backup.
If you’d like to generate your own backup plans, then you can store the configuration files in the /etc/bareos/bareos-dir.d/schedule directory. Please keep in mind that the file extension .conf is mandatory. The Bareos documentation shows some examples that you can use as templates for your own setup.
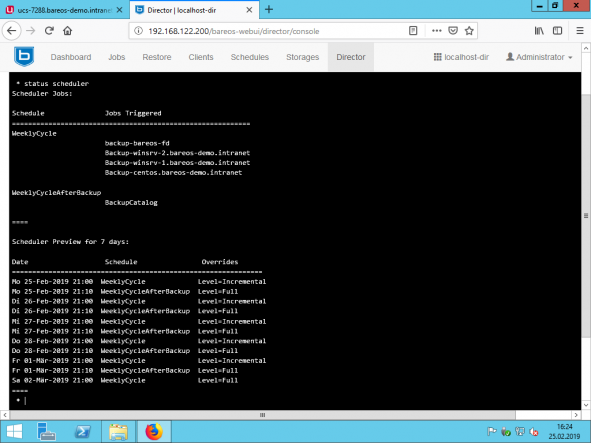
Tip: Start the Bareos Console (command bconsole in a terminal on the UCS machine) or access the console via the Web UI (section Director) and enter status scheduler to view the current schedules. You can also click on Schedules in the Web UI to get an overview of all backup plans.
Время на прочтение5 мин
Количество просмотров17K
Лирическое вступление
До недавнего беспокойного времени для создания резервных копий критичных данных я использовал стандартное средство операционной системы Windows 10 — «История файлов» («File history»). Периодически данные со стационарного ПК сохранялись на внешний HDD, подключаемый через USB интерфейс, что меня вполне устраивало и успокаивало мою психику.
Одним субботним утром меня озадачил вопрос: «А смогу ли я восстановить свои данные на другой системе?» В качестве испытуемого был выбран ноутбук с системой Windows 10. После большой небольшой пляски с бубном данные были восстановлены, но неприятным сюрпризом стало то, что при сравнении количества папок и файлов было обнаружено расхождение. Данный факт меня опечалил и побудил подойти к вопросу организации резервного копирования данных более ответственно. После непродолжительного поиска в сети Internet мой выбор пал на Open Source систему Bareos. Процесс настройки системы не был для меня простым и интуитивным, было затрачено значительное количество времени. Память человеческая имеет прекрасную способность забывать информацию, что побудило меня составить «шпаргалку» на будущее, коей спешу с Вами поделиться.
Описание задачи
На стационарном ПК с ОС Windows 10 x64 на локальном диске DATA (D:) расположен каталог проекта «test». Необходимо организовать резервное копирование всех файлов вышеуказанного проекта на внешний HDD — BACKUP (E:), за исключением подкаталогов «target».
Разработка проекта ведётся в будние дни, поэтому копирование производить в автоматическом режиме по графику:
-
полное — по пятницам в 18:30;
-
инкрементальное — с понедельника по четверг в 18:30.
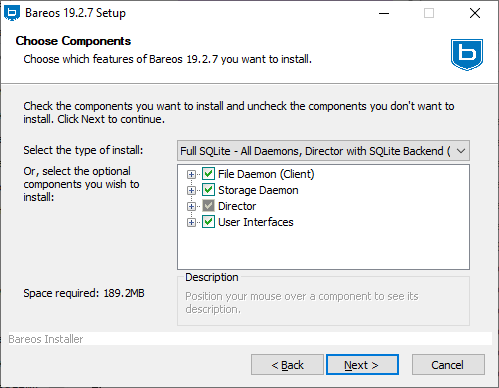
На компьютере на локальном диске C: установлена система Bareos версии 19.2.7 x64. Установка произведена «по умолчанию» (со всем соглашаемся и нажимаем «далее»), тип установки «Full SQLite»:
Выполним нижеперечисленные действия по порядку.
Куда?
Создадим ресурс «Устройство» («Device») и опишем его в файле C:\ProgramData\Bareos\bareos-sd.d\device\RemoteStorage.conf:
Device {
  # имя устройства, обязательное
  Name = RemoteDevice
  # тип данных, обязательное
  Media Type = File
  # где хранить тома, обязательное
  Archive Device = E:/
  # тома устройства именуются автоматически
  LabelMedia = yes;
  # поддерживает произвольный доступ
  Random Access = yes;
  # сканируется на наличие томов
  AutomaticMount = yes;
  # может ли быть отсоединено
  RemovableMedia = yes;
}
Создадим ресурс «Хранилище» («Storage»), соответствующий ресурсу Device, и опишем его в файле C:\ProgramData\Bareos\bareos-dir.d\storage\Remote.conf:
Storage {
  # имя устройства, обязательное
  Name = Remote
  # имя или IP адрес, обязательное
  Address = localhost
  # пароль для доступа к Storage-сервису, обязательное
  # ВЗЯТЬ ОТСЮДА C:\ProgramData\Bareos\bareos-sd.d\director\bareos-dir.conf
  Password = "TFso/Fr6YDeuei/QYtg2bDLaS9dDkMgRvSPefKr88FnR"
  # имя соответствующего ресурса Device, обязательное
  Device = RemoteDevice
  # тип данных, должен совпадать с типом данных соответствующего Device, обязательное
  Media Type = File
}
Создадим ресурс «Пул» («Pool») для полного копирования и опишем его в файле C:\ProgramData\Bareos\bareos-dir.d\pool\TestFull.conf:
Pool {
  # имя пула, обязательное
  Name = TestFull
  # повторное использование устаревших томов
  Recycle = yes
  # усечение устаревших томов
  AutoPrune = yes
  # срок хранения данных в томах
  Volume Retention = 365 days
  # предельный размер тома
  Maximum Volume Bytes = 50G
  # предельное количество томов
  Maximum Volumes = 100
  # формат имени для томов "TestFull-<id-тома>"
  Label Format = "TestFull-"
}
Создадим ресурс «Пул» («Pool») для инкрементального копирования и опишем его в файле C:\ProgramData\Bareos\bareos-dir.d\pool\TestIncr.conf:
Pool {
  # имя пула, обязательное
  Name = TestIncr
  # повторное использование устаревших томов
  Recycle = yes
  # усечение устаревших томов
  AutoPrune = yes
  # срок хранения данных в томах
  Volume Retention = 30 days
  # предельный размер тома
  Maximum Volume Bytes = 1G
  # предельное количество томов
  Maximum Volumes = 100
  # формат имени для томов "TestIncr-<id-тома>"
  Label Format = "TestIncr-"
}
Что?
Создадим ресурс «Набор файлов» («FileSet») и опишем его в файле C:\ProgramData\Bareos\bareos-dir.d\fileset\TestFileSet.conf:
FileSet {
  # имя набора файлов, обязательное
  Name = "TestFileSet"
  # что будем копировать
  Include {
	  Options {
	    Signature = MD5         # хеширование, применяемое для файлов
	    WildDir = "*target"     # шаблон для исключения каталога
	    Exclude = yes           # исключить файлы по шаблону
    }
    File = "D:/test"          # каталог, подлежащий копированию
  }
}
Когда?
Создадим ресурс «Расписание» («Schedule») и опишем его в файле C:\ProgramData\Bareos\bareos-dir.d\schedule\TestSchedule.conf:
Schedule {
  # имя расписания, обязательное
  Name = "TestSchedule"
  # тип копирования, используемый пул и время запуска
  Run = Level=Full Pool=TestFull fri at 18:30
  # тип копирования, используемый пул и время запуска
  Run = Level=Incremental Pool=TestIncr mon-thu at 18:30
}
Кто? Как?
Создадим ресурс «Задание» («Job») и опишем его в файле C:\ProgramData\Bareos\bareos-dir.d\job\backupTest.conf:
Job {
  # имя задания, обязательное
  Name = "backupTest"
  # имя используемой File-службы
  Client = "bareos-fd"
  # набор файлов
  FileSet = "TestFileSet"
  # имя используемого Message-ресурса, обязательное
  Messages = "Standard"
  # пул, обязательное
  Pool = "TestFull"
  # расписание
  Schedule = "TestSchedule"
  # устройство
  Storage = "Remote"
  # тип, обязательное
  Type = "Backup"
  # где хранить файл начальной загрузки
  Write Bootstrap = "E:/%c.bsr"
}
Активация задания копирования
Перезапустим службы Bareos, чтобы применить внесённые нами изменения:
-
Bareos Storage Service («Bareos-sd»);
-
Bareos Director Service («Bareos-dir»).
После этого наше задание «backupTest» активировано, проверим это. Зайдём в панель управления Bareos по адресу http://127.0.0.1:9100/ (логин: admin, пароль: admin). Перейдём в раздел «Расписание» («Schedules») на вкладку «Статус планировщика» («Status schedules») и убедимся, что наше задание присутствует в расписании.

Запуск копирования вручную
Перейдем в раздел «Задания» («Jobs») на вкладку «Запуск» («Run»). В поле «Задание» («Job») выберем наше задание «backupTest». В поле «Уровень» («Level») выберем значение «Full» и запустим задание, нажав «Submit».

При этом будет выполнено полное копирование. Для выполнения инкрементального копирования выберите в поле «Уровень» («Level») значение «Incremental», в поле «Пул» («Pool») — «TestIncr».
Ход выполнения любых заданий можно контролировать в разделе «Панель» («Dashboard»):

Запуск восстановления данных
Перейдем в раздел «Восстановление» («Restore») на вкладку «Восстановить на клиент» («Restore multiple files»). В поле «Клиент» («Client») выберем значение «bareos-fd». В поле «Задания резервного копирования » («Backup jobs») выберем желаемую точку восстановления. В поле «Объединить все наборы файлов клиента» («Merge all clients filesets») выберем значение «Нет» («No»). В поле «Папка восстановления на клиенте» («Restore location on client») укажем куда восстановить данные («D:/test_restore») и запустим восстановление, нажав «Restore».

Installing Bareos Client
This guide covers the installation of the Bareos Client in it’s most common form, for file backup or also known as a FileDaemon (bareos-fd). It goes through the process of installing the client and testing whether it works. I will post an installation guide for Bareos Client for database backup and as a storage node (StorageDaemon) some time in the future.
First, there are several assumptions taken.
- No Bareos client or anoy other component installed previously. Install client to backup files only.
- Focus is on installation via packages so that updates packages are applied as they come out. Particularly useful if your organization validates updates prior to roll-out.
- Server-side configuration is using Webmin via the Bacula module (in Webmin: System —> Backup) This is no longer possible with newer versions of Bareos. Refer to to this updated post on Bareos client configuration for newer instructions.
First the following information is needed
- The hostname or IP address of the client or machine to be backed up. We’ll call this the Client.
- The name that will be given to the Client in the Bareos system. Usually Client-fd
- The name of Director in the Bareos system.
- Add Bareos repository on the client / target server.
- Refer to quickstart information in official documentation for your Distro specific instruction
- For RedHat, it’s basically
- add the Bareos yum repository. The repositories are here. Make sure the client version matches the Bareos server version. Choose the version of RedHat or CentOS for the target server. Download the bareos.repo file to /etc/yum.repos.d
- If you haven’t added the Epel repository, add the repository. Instructions are here.
- do a yum check-update to update the repositories to load them
- Install Bareos filedaemon. For Redhat: yum install bareos-filedaemon
- Configure the client by editing the /etc/bareos/bareos-fd.conf file
- Set Bareos server / Director name in Director section, entry «Name = «
- Make note of
- FileDaemon name — set the entry «Name =» in FileDaemon section
- Director password — create a password and set the entry «Password =» in the Director section. Make this long and complicated because this will not be used by users.
- Start the FileDaemon / Bareos Client: service bareos-fd start
- Open the Bareos Client port (tcp port 9102) on the firewall, if necessary
- Configure Bareos server via Webmin
- Create client
- System => Bacula backup, Backup Clients, Add new backup client
- Enter
- Client name = FileDaemon name (from step 3.2)
- Bacula FD Password = Director Password (replace the automactically generated one)
- Save
- Confirm setup client ok
- Backup Clients, select client, Show Status
- Correct response : Status from <client hostname> : <Client name>-fd Version: <bareos version>
- Setup job to backup files on the client
- Backup Jobs, Add a new backup job
- Enter job name: eg hostname-files
- Set «Inherit defaults» to «DefaultJob»
- Set Client to backup = Client name
- Set File Set to backup = SelfTest
- Set Destination Storage = <storage> e.g. «File»
- Test backup
- Backup Jobs, select Job name
- click Run Now
- Messages will appear. Test successful when the last message is «Termination: Backup OK»
- Create a backup job for the client with the correct fileset.
More information: Official Documentation