
Introduction
Optimized and effective memory management is a key factor in virtualization environments. KSM and Auto-Ballooning enables sophisticated and economic configurations for physical RAM utilization.
KSM
KSM (Kernel Samepage Merging) is running in the Linux kernel and scans the memory of all the virtual machines running on a single host, looking for duplication and consolidating. With KSM we’re able to improve virtual machine density by as much as 300% without impacting performance. One of the great benefits of using Linux as the hypervisor means KSM is not limited to KVM and virtual machines, but can also reduce memory pressure with normal Linux applications.
It was integrated in PVE since version 1.5, and is implemented with the package «ksm-control-daemon» (check your version with the cli command «pveversion -v»).
KSM in action
Just install several KVM virtual machines with the same OS (using at least 80% of your physical memory on the host) and wait a few minutes. You will notice higher CPU activities on the host (ksm daemon) and the used memory on the host will be lowered significantly (see start page showing the overall memory usage).
Howto verify that KSM is working (how many pages are being shared between your KVM guests):
watch cat /sys/kernel/mm/ksm/pages_sharing
Note: a page is 4096 bytes
The file /etc/ksmtuned.conf allows for some customization of its behaviour.
See also
- http://www.linux-kvm.org/page/KSM
- http://www.linux-kvm.com/content/using-ksm-kernel-samepage-merging-kvm
- http://en.wikipedia.org/wiki/Kernel_SamePage_Merging_%28KSM%29
Disable KSM
If you don’t care about memory optimization but care about save CPU overhead produced by KSM, in Proxmox >= 4.x you can disable it with:
systemctl disable ksmtuned
and reboot
Ballooning
Memory ballooning (KVM only) allows you to have your guest dynamically change it’s memory usage by evicting unused memory during run time. It reduces the impact your guest can have on memory usage of your host by giving up unused memory back to the host.
The Proxmox VE host can loan ballooned memory to a busy VM. The VM decides which processes or cache pages to swap out to free up memory for the balloon. The VM (Windows or Linux) knows best which memory regions it can give up without impacting performance of the VM.
Note that the Guest cannot ask for the memory back until the host has ‘deflated’ this balloon. If set too aggressively, some applications in the guest may run out of memory as a result and your guest’s OOM killer may activate, killing important processes — https://www.kernel.org/doc/gorman/html/understand/understand016.html
Note that if you are passing through a physical PCI(e) device or a Virtual Function I/O (VFIO) Mediated device (MDEV) such as a vGPU, then ballooning will not work since these devices are mapped to fixed memory addresses in the host and in the guest. If you do enable ballooning, the KVM process will not release the memory back to the host but the guest may report a reduced memory availability which can be manually recovered using the KVM monitor using the balloon command.
Manually ballooning (testing)
In the monitor tab of your guest, type balloon <target_memory_in_mb> — so balloon 16384 will instruct your guest to target 16GB of memory. This is a ‘target’ which the driver on the VM side will try to reach by trying to free available memory.
Requirements for Windows VM
Installation
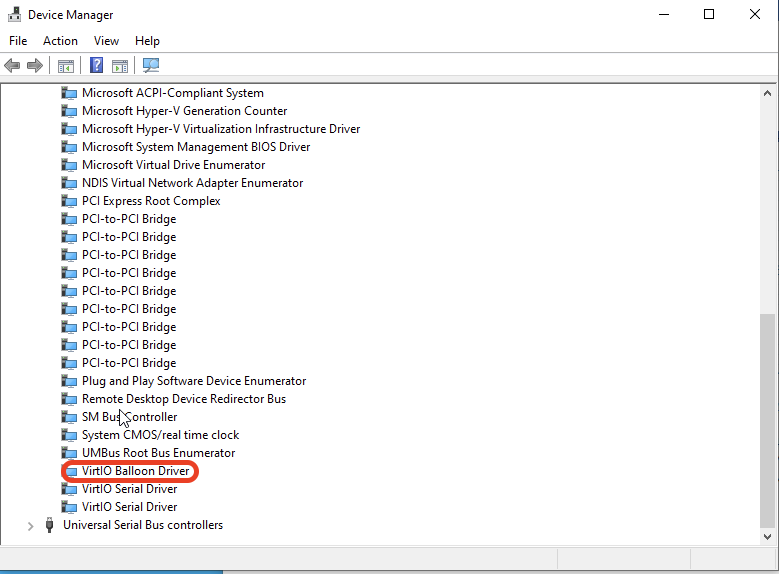
- You need to install the VirtIO Balloon Driver and the management service (blnsvr.exe -i).
- Notice: there is a small blnsvr.exe bug on 32bit systems with RAM more than 2GB: https://github.com/YanVugenfirer/kvm-guest-drivers-windows/issues/11
See Windows VirtIO Drivers to get info about
- downloading VirtIO drivers
- changelog and guest OS compatibility
- other kind of guest devices supported
Download
Download the latest drivers (ISO) as suggested by the page Windows_VirtIO_Drivers to your desktop.
Then upload the ISO to your Proxmox VE server:
- logon to the Proxmox VE web interface
- select a ISO-enabled storage (see Storage_Model#Storage_type_Content)
- switch to «content» tab
- just use the «upload» button on the menu bar.
Choose the right driver
- Follow the link: Windows_VirtIO_Drivers#Choose_the_right_driver
Enable Auto-Ballooning on Windows Server 2012 / Windows 8.1 or newer
Starting with virtio-win-0.1.173-2 the driver ISO provides an installer located at «<cddrive>:\virtio-win-gt-x64.msi» that can, besides other things, install the ballooning service.
If it does not work you can follow the manual way which is described below for Windows 2008r2.
Enable Auto-Ballooning on Windows 2008r2
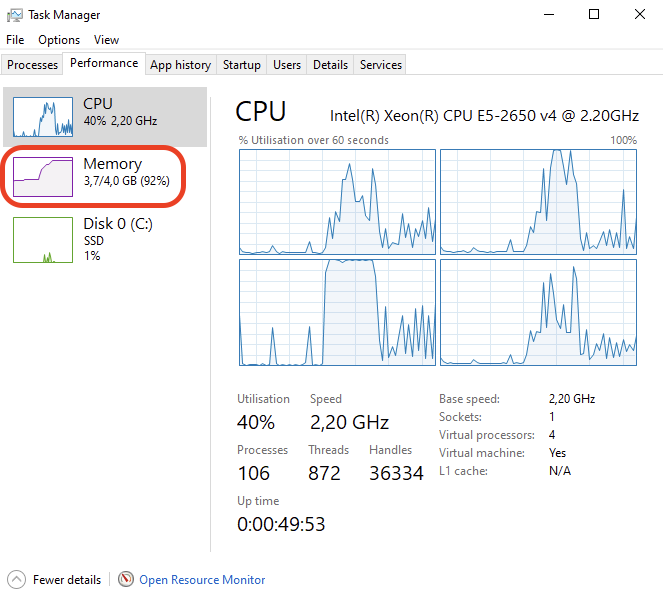
- Set the VM memory to «Automatically allocate memory within this range» — I choose 4096/2048 as example (see screenshot)
- Start the VM and install all virtio drivers, including the balloon driver (see screenshot)
- Copy and rename as Administrator the WIN7\AMD64 directory from the virtio.iso to «c:/Program files/Balloon»
- Open a CMD as Administrator and cd into «c:/Program Files/Balloon»
- Install the BLNSVR with «BLNSVR.exe -i»
As soon as the service is started, also the memory information displayed on the Proxmox VE GUI is identical to the value shown in the windows task manager (see screenshot).
If you need details about ballooning stats for this VM, go to the KVM monitor and enter ‘info balloon’
VirtIO drivers: KVM project wiki downloads
-
Set Memory to Dynamic
-
VirtIO Balloon Driver
-
BLNSVR Service
-
Memory Usage
Enable Auto-Ballooning on Windows 2003 / Windows Xp
You need to install the balloon service with BLNSVR, like for win2008.
You also need to install the driver manually
Download the «devcon» software on microsoft website
http://support.microsoft.com/kb/311272
Then install the balloon driver with
devcon install BALLOON.inf "PCI\VEN_1AF4&DEV_1002&SUBSYS_00051AF4&REV_00"
See also
- Windows_VirtIO_Drivers
- Paravirtualized Block Drivers for Windows
- Paravirtualized Network Drivers for Windows
Requirements for Linux VM
Modern Linux Kernels does include the Balloon drivers by default. It works out of the box, and you only need to set the VM to «Automatically allocate memory within this range»
External Links
tbd.
Video Tutorials
tbd: Proxmox VE Youtube channel
In Windows 10, Proxmox memory ballooning can be used to optimize memory usage within virtual machines. As part of our Proxmox Support, Bobcares provides answers to all of your questions.
Proxmox Memory Ballooning in Windows 10 VMs
Memory ballooning dynamically adjusts the memory allocation of VMs based on their real needs. Thus ensuring effective exploitation of physical memory resources on the host system. Let’s look into the working of Proxmox memory ballooning:
1. More RAM than is actually physically accessible on the host system is frequently allotted to VMs by hypervisors like Proxmox. Memory overcommitment is a technique that allows for greater resource efficiency. This is because not every VM uses its entire allotted memory at once.
2. Proxmox installs a component known as a “balloon driver” into the guest VMs, including Windows 10. This is done in order to efficiently manage memory. In order to recover memory from VMs, this balloon driver works with the Proxmox hypervisor.
3. The hypervisor interacts with the balloon driver inside the VM when the host system requires more physical memory to assign to other VMs or tasks.
4. The balloon driver in the Windows 10 VM inflates, thus giving the impression that the guest OS is using more memory. The Windows 10 guest OS is prompted by this to find memory pages that are less important and can be securely released.
5. The balloon driver transmits the freed memory back to the Proxmox host so that it can be assigned to other VMs or tasks that require it more urgently as the Windows 10 guest OS releases memory pages.
6. VMs that are not actively using all of their allotted memory are often not affected by ballooning in terms of performance. However, ballooning can result in more memory shifting or lower performance in the afflicted VM if memory pressure is constantly high.
[Want to learn more? Click here to reach us.]
Conclusion
Memory ballooning for Windows 10 virtual machines running on Proxmox can be enabled either using the Proxmox web interface or by changing the VM’s configuration file.
PREVENT YOUR SERVER FROM CRASHING!
Never again lose customers to poor server speed! Let us help you.
Our server experts will monitor & maintain your server 24/7 so that it remains lightning fast and secure.
GET STARTED
false
1. Ballooning
Для эффективного использования ресурсов Proxmox поддерживает технологию ballooning.
Ballooning – это динамическое управление памятью. Другими словами, вы прописываете в настройках виртуальной машины минимальный и максимальный объем памяти, выделяемой этой машине, а далее Proxmox сам распределяет необходимые ресурсы. Таким образом уменьшается влияние гостевой системы на весь хост.
Для начала выставим желательные параметры в настройках машины.

Чтобы их применить, машину нужно выключить и включить обратно.
Чтобы ballooning заработал, нам потребуется скачать и установить дополнительные драйвера.
Скачать их можно по адресу: https://docs.fedoraproject.org/en-US/quick-docs/creating-windows-virtual-machines-using-virtio-drivers/
Стабильная версия драйверов: https://fedorapeople.org/groups/virt/virtio-win/direct-downloads/stable-virtio/virtio-win.iso
Перейдем на гостевую систему и создадим каталог Balloon в папке Program files (c:\Program files\Balloon). В эту папку со скачанного диска нужно скопировать драйвера для вашей операционной системы.

В диспетчере устройств появится новое оборудование и на него нужно установить эти драйверы.
После этого необходимо установить ballooning как службу.
Win+X, Выполнить, cmd
cd /
cd Program Files/Balloon
blnsrv -i
Проверяем:
Win+X, Выполнить, services.msc

Выделение памяти теперь работает корректно.

2. QEMU Guest agent
Следующее что нужно сделать – установить QEMU Guest agent. Без этого не будет работать поддержка VSS (Volume Shadow Copy Service) т. е. служба теневого копирования тома.

В настройках виртуальной машины включим агента. Чтобы настройки применились – выключим и включим снова данную виртуальную машину.
У нас появилось новое устройство:

Драйверы находятся на том же диске в папке vioserial.

Устанавливаем и проверяем, что QEMU Guest agent запущен в сервисах.
Труд не мой…
Introduction
Proxmox Virtual Environment (VE) is a powerful open-source platform for enterprise virtualization. It supports advanced Dynamic Memory Management features, including Kernel Samepage Merging (KSM) and Memory Ballooning, which can optimize memory usage and improve performance. This blog post evaluates the effectiveness of KSM and Memory Ballooning features in Proxmox VE using Linux virtual machines (VMs). We will set up a VM with Proxmox VE for a test environment, perform tests, and analyze the results to understand how these features can benefit virtualized environments. Additionally, we will have a look at the security concerns of enabling KSM and the risks associated with using ballooning, especially in database environments.
What’s KSM?
Kernel Samepage Merging (KSM), is a memory deduplication feature in Linux kernel that scans for identical memory pages in different processes and merge them into a single page to reduce the memory usage. It is particularly useful in virtualized environments where multiple VMs may have similar or identical data in memory, such as when running the same operating system or applications.
KSM was introduced long ago since the Linux kernel version 2.6.32 in 2009. However, it does not stop the developers to introduced new features for KSM as shown by the 6.x kernel. There are new changes introduced that you can find here: Breakdown of changes to Kernel Samepage Merging (KSM) by Kernel Version. As you can see, the kernel developers are constantly adding new features for KSM to the Linux Kernel to further improve its functionality.
The current Linux Kernel used in Proxmox VE is 6.8.x for example. It supports the newly added „Smart Scan“ feature which we going to test together in this blog post.
What’s Memory Ballooning?
Memory Ballooning is a technique used in virtualized environments to dynamically adjust the memory allocation of VMs based on their current needs. A “balloon driver” within the guest VM allocates unused memory into a pool of memory (the “balloon”), allowing the hypervisor to reallocate memory resources to other VMs as needed. This helps optimizing memory usage across the host system, ensuring that memory is efficiently utilized and not wasted on idle VMs.
Tests Setup
To evaluate KSM and ballooning features in Proxmox VE, we set up a test cluster consisting of one node which we operate within a VM that offers 16GB of RAM. That sample cluster will then run multiple Linux Guest VMs on top of it to demonstrate the KSM and Memory Ballooning features.
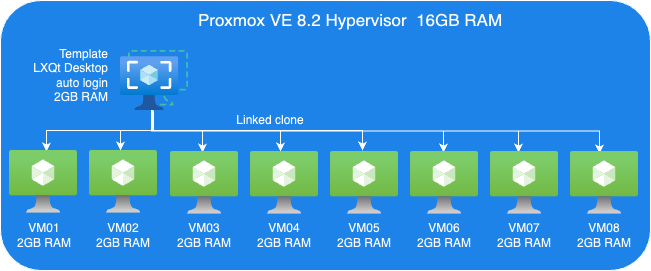
The following picture shows an overview of our test VM setup:
Proxmox VE Host:
- A VM to install Proxmox VE 8.2.
- 8 Cores vCPU
- 16GB RAM
- 200GB Virtio storage
Linux Guest VM Template:
- Linux Guest
- 2GB RAM
- Install Debian LXQt desktop
- 16GB Virtio storage
Linux Guest VMs:
- 8 VMs, Linked-Clone from template
Perform tests
We perform two sets of tests. First, we just evaluate KSM. Then, we perform another tests set to testing Memory ballooning without KSM.
Guest VMs Setup for KSM Tests:
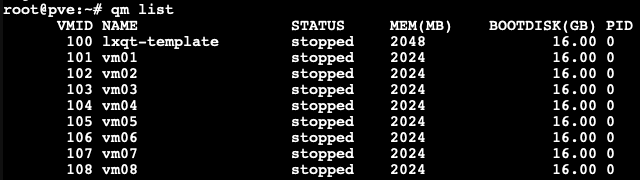
- We cloned 8 VMs out of our VM template with 2GB RAM each, as you can see in the picture below.
Each VM configured with 2GB RAM without ballooning enabled.
-
Next, we boot those 8 VMs up and start them with LXQt desktop auto-login without triggering KSM. Here, we want to check how much memory each of those VMs consumes before applying any kind of reducing mechanism.

-
As you can see, all 8 VMs consume 13154.1MB in total. The screenshot above has been captured on our Proxmox VE host.
- Enable KSM Smart Scan by the command on host:
# echo "scan-time" > /sys/kernel/mm/ksm/advisor_mode
- Enable KSM run:
# echo 1 > /sys/kernel/mm/ksm/run

Observations on KSM Smart Scan
The KSM Smart Scan feature appears to be more efficient compared to the classic ksmtuned method, as it comes with optimizations for page scanning that skip pages if de-duplication was not successful in previous attempts. This reduces the CPU time required for scanning pages significantly, which is especially helpful when the system has reached a “steady state“. During our tests, we did not observe ksmd occupying significant system resources, resulting that KSM Smart Scan can optimize memory usage with minimal overhead.
Test Results
- After a while as the KSM is scanning and merging pages. The used Mem reduced to 6770.1 Mib.
- We also can see the KSM sharing status on Proxmox VE WebUI.

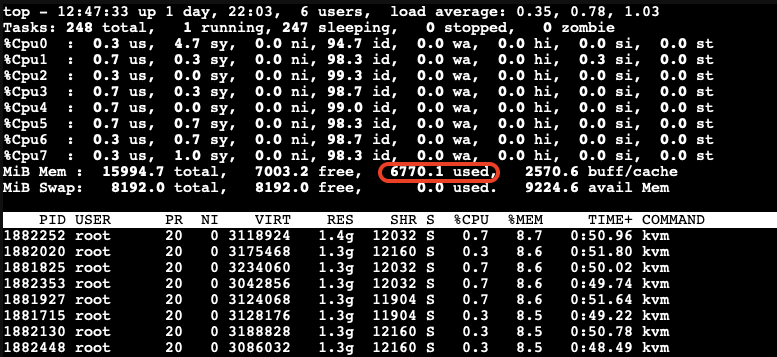
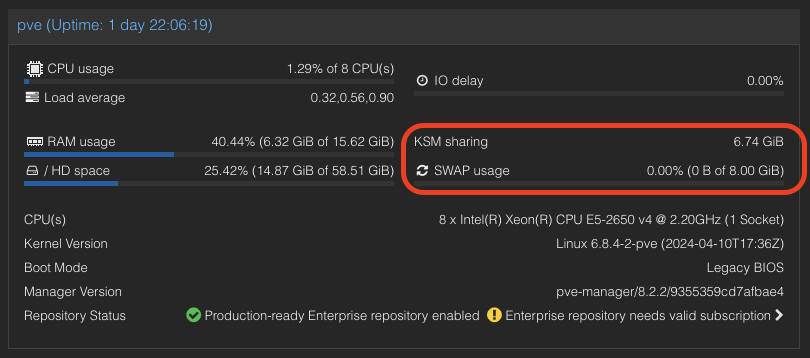
A significant reduction in memory usage was observed. Although there was a slight increase in CPU usage by ksmd during KSM operation, there was no significant degradation in VM performance. This indicates that KSM operates efficiently without imposing a heavy load on the system. The merging of identical pages resulted in better memory utilization, allowing more VMs to run on the same host without additional hardware.
Kernel Samepage Merging (KSM) in Windows VMs
KSM is a native feature in the Linux kernel that works at the hypervisor level, scanning memory pages across all VMs and merging identical pages into a single shared page. This process reduces the overall memory footprint of the VMs.
For Windows VMs, the hypervisor treats their memory similarly to Linux VMs, identifying and merging identical pages. This means that the benefits of KSM can also extend to Windows VMs running on Proxmox VE due to the fact that Proxmox itself runs Linux and therefore utilizes the KSM kernel feature no matter what OS the guests VMs on top of Proxmox VE are running.
Guest VMs Setup for Ballooning Tests:
Next, let’s have a look at Memory Balloning in another test. In order to evaluate the balloning features in Proxmox VE. To evaluate the ballooning features in Proxmox VE, we will repurpose the Proxmox VE environment used for KSM tests with the following adjustments:
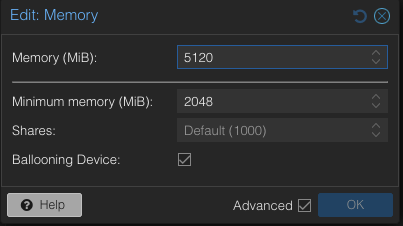
- Retain three VMs and remove the others.
- Enable Ballooning in each VM.
- Set the minimum memory to 2048MB and the maximum memory to 5120MB in each VM
.
Disable the KSM:
To disable KSM manually, execute the following command:
# echo 2 > /sys/kernel/mm/ksm/run
The following picture shows an overview of our Ballooning test VMs setup:

Due to memory ballooning, we should now have more memory available for each VM. Let’s test this by using stress-ng to allocate 4GB of memory on each guest VM, and hold the allocated memory in seconds you may specify:
$ stress-ng --vm-bytes 4G -m 1 –vm-hang <seconds>
The –vm-hang <seconds> option specify how many seconds that VM hangs before unmapping memory.
OOM-Killer!
We observed the OOM-killer being triggered on the Proxmox VE host.

Having the OOM-killer triggered on the host is problematic. Allocating 5GB of memory to each VM resulted in excessive overcommitment, causing the OOM-killer to activate due to insufficient memory to handle the host’s workload.
OOM-killer triggered are always problematic, but it triggered on the host are even worse compared to triggered within guest VMs since you never know what VM gets terminated and killed or at least it’s really hard to forecast.
One of the basic purpose of Memory balloning is to ovoid OOM-killer triggered on the host system since they can cause „more“ damage than a OOM-killer triggered within a specific VM.
Reduce Maximum Memory Configuration in VMs for Ballooning Tests
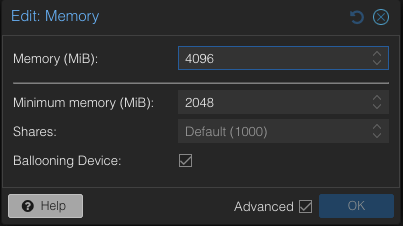
To address the overcommitment issue, let’s reduce the maximum memory configuration in each VM to 4GB.

- Adjust the maximum memory setting for each VM to 4GB.
- Boot up three VMs.
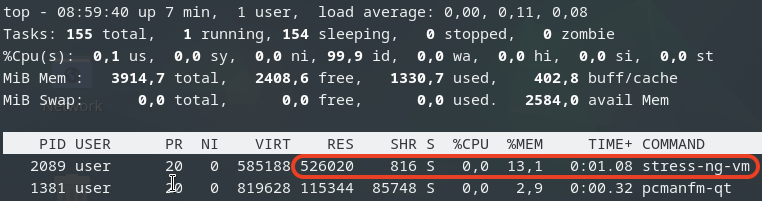
Next, we’ll use stress-ng in the guest VM to allocate 3GB of memory and then hang for a specified duration without CPU usage on each guest VM:
$ stress-ng--vm-bytes 3G -m 1 --vm-hang <seconds>
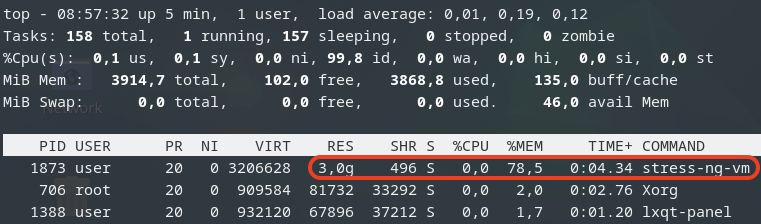
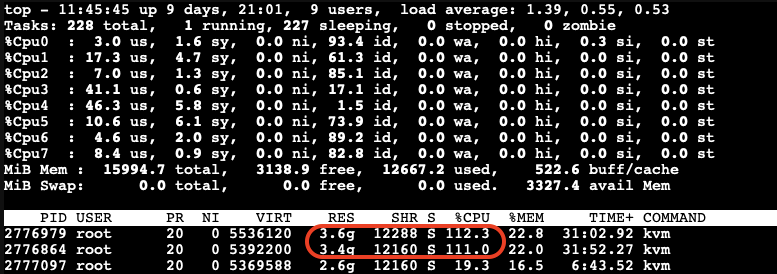
This is top command in the guest VM.
Check Memory Usage on the Host
After running the stress-ng test, we check the memory usage on the host:
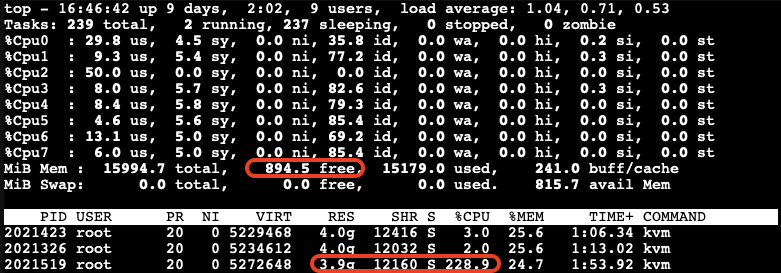
The free memory on the host is now low. The third VM, which is trying to allocate memory, experiences very high CPU usage due to the limited resources available on the host.
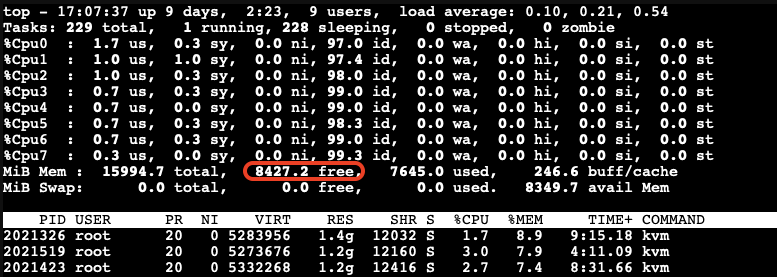
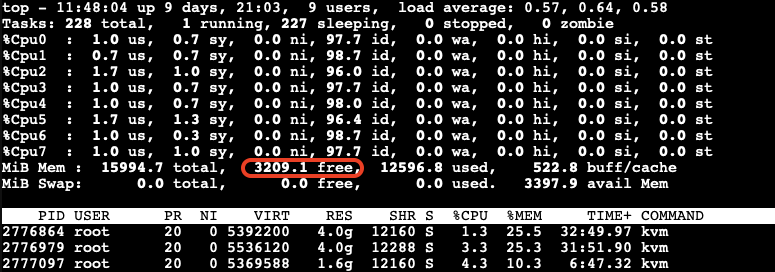
After a while, we can observe the ballooning driver starting to reclaim memory from the guest VMs on the host. Each VM’s RES (occupied physical memory) got reduced:
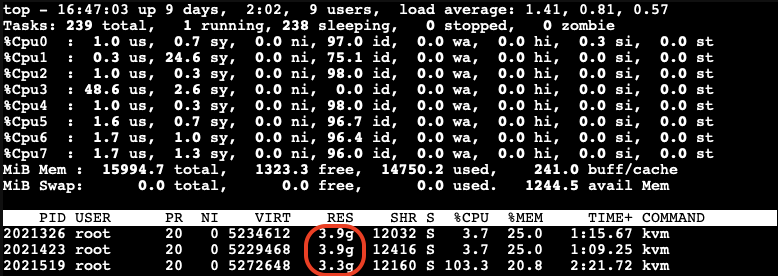
The ballooning driver is now reclaiming memory from each guest VM to increase the available free memory on the host. This action helps to maintain the host’s workload but causes all other guest VMs to slow down due to reduced memory allocation.

Impact of Ballooning on Guest VMs
The slowed down VMs eventually do not have enough available free memory to maintain their workloads. As a result, the OOM-killer is triggered inside the guest VMs:

All the VMs hang for a while, and then the OOM-killer triggers to terminate the stress-ng process. After this, the VMs return to their normal state, and there is sufficient available free memory on the host:
When Does Memory Stealing Get Triggered?
To determine when memory stealing gets triggered, let’s conduct another tests. We will use the same stress-ng command to allocate 3GB of memory on two VMs.
Next, we will gradually allocate memory on the third VM, starting with 512MB and then incrementally adding another 512MB until we observe memory reclaiming being triggered.
As we gradually increase the memory allocation on the third VM, we monitor the host’s memory usage:
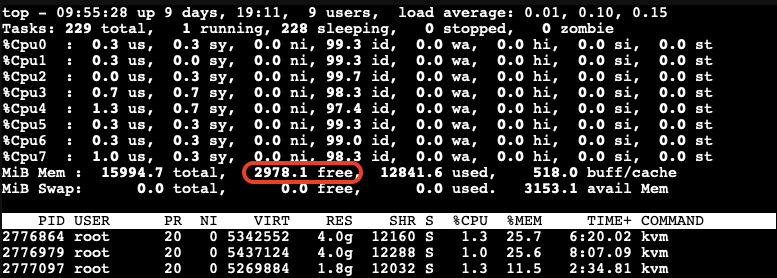
We observe that memory stealing is not yet triggered when the available free memory on the host reaches 2978.1MB (approximately 18.5%) of the total memory.
Let’s allocate a bit more memory on the third VM to further reduce the available free memory on the host. We found that when the available free memory on the host reaches around 15% of the total memory, the ballooning driver triggers to stealing memory from the guest VMs:
At this point, we can see the memory allocated to the VMs being reduced and the CPU usage increasing significantly.
The memory stealing process continues until the available free memory on the host reaches 20% of the total memory again. After releasing the allocated memory from the third VM, we observe that the reclaiming process stops when the available free memory on the host reaches 20% of the total memory.
Visualizing the Ballooning Tests Results
The following picture below illustrates the observations from our tests:
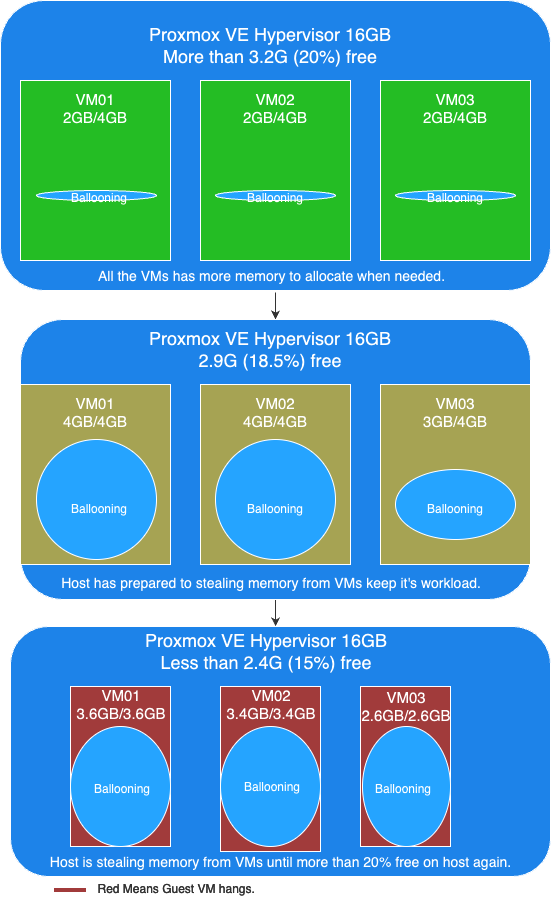
In this picture, you can see the following key points:
- More than 20% free available memory on host: The initial memory allocation to the VMs, where each VM is configured to be able allocated a maximum 4GB of memory.
- Free available memory reached 18.6% on host: The first and second VMs have allocated their maximum of 4GB of memory. The incremental allocation of memory to the third VM begins, starting with 512MB and increasing by 512MB increments.
- Triggering Memory Stealing: The point at which the available free memory on the host drops to around 15% of the total memory, triggering the ballooning driver to reclaim memory from the guest VMs. The red color in guest VMs indicates increased CPU usage as the ballooning driver stealing memory, affecting the performance of the guest VMs.
Memory Ballooning in Windows VMs
Memory ballooning also works with Windows VMs in Proxmox VE by Windows VirtIO Drivers. You can find the drivers ISO from the Proxmox wiki or download directly from upstream VirtIO drivers ISO.
Compared to Linux VMs
Memory hot plug is supported in Linux VMs, allowing the total amount of memory to change dynamically when the ballooning driver is active. This means that in Linux VMs, you can see the total memory allocation adjust in real-time as the ballooning driver works. Windows does not support memory hot plug in the same way. As a result, you won’t see the total amount of memory adjusted in a Windows VM. Instead, you will observe an increase in the amount of used memory. Despite this difference, the end result is the same: the available free memory is reduced as the ballooning driver reclaims memory.
This screenshot shows you will observe the used memory increased when ballooning is active to stealing memory inside Windows VM.
Results
Memory ballooning in Proxmox VE is a powerful feature for dynamically managing memory allocation among VMs, optimizing the host’s overall memory usage. However, it’s crucial to understand the thresholds that trigger memory reclaiming to avoid performance degradation. It is recommended to set an appropriate minimum memory limit to ensure that no more memory can be stolen once this minimum threshold is reached, this way to keep the stability of the guest VM and preventing the OOM-killer from terminating processes inside the guest VM. By appropriately setting, carefully monitoring, and adjusting memory allocations, you can ensure a stable and efficient virtual environment.
Security Concerns
Implications of Enabling KSM
Risks When Using Databases with Ballooning
Memory ballooning dynamically adjusts the memory allocation of VMs based on demand. While this feature is beneficial for optimizing memory usage, it poses certain risks when used with database like PostgreSQL, which rely heavily on available memory for performance. If the balloon driver reclaims too much memory, where overcommitting memory pages can lead to trigger OOM-Killer to kill the process with the highest score until the high memory stress situation is over. And the process with the highest score metrics could be on memory consumption which highly possibility the database itself.
In the concern, you better running database server in VM without Memory Ballooning enabled, or set no overcommit policy in the Linux kernel inside the guest VM if you don’t have such control.
Conclusion
Our tests demonstrate that KSM and memory ballooning are effective features in Proxmox VE for optimizing memory usage in virtualized environments. KSM can significantly reduce memory usage by merging identical pages across VMs, while memory ballooning allows dynamic adjustment of memory allocation based on demand.
Memory ballooning in Proxmox VE is a powerful feature for dynamically managing memory allocation among VMs, optimizing the host’s overall memory usage. However, it’s crucial to understand the thresholds that trigger memory reclaiming to avoid performance degradation. By carefully monitoring and adjusting memory allocations, you can ensure a stable and efficient virtual environment.
Together, these features can enhance the efficiency and performance of virtualized workloads, making Proxmox VE a robust solution for enterprise virtualization.
By leveraging KSM and memory ballooning, organizations can achieve better resource utilization and potentially reduce hardware costs. If you have full control of the host and all the VMs, consider enabling these features in Proxmox VE to explore these potential benefits.
| Categories: | credativ® Inside |
|---|
About the author
Andrew Lee
Beitrag teilen:
Balloon Service is generating the following WMI errorID:5858
«
Id = {00000000-0000-0000-0000-000000000000}; ClientMachine = HOSTNAME; User = NT AUTHORITY\SYSTEM; ClientProcessId = 964; Component = Unknown; Operation = Start IWbemServices::ExecQuery — root\cimv2 : SELECT * FROM Win32_PerfRawData_PerfOS_Memory; ResultCode = 0x80041032; PossibleCause = Unknown
«
Version: virtio-win-0.1.204-1
Host OS: Proxmox and ArchLinux
Guest OS: Windows Server 2016 (proxmox) & Windows 10 (archlinux)
On Windows 10, the WMI service was also spiking CPU Usage due to the WMI error. Stopping the Balloon service or restarting «Windows Management Instrumentation» service stops the CPU spikes until reboot.
Manually running «Get-WMIObject Win32_PerfRawData_PerfOS_Memory» from elevated powershell returns the expected output & doesnt cause any errorID 5858
Following KB indicates issue could be related to lack of timeout: https://docs.microsoft.com/en-us/troubleshoot/windows-client/system-management-components/wmi-activity-event-5858-logged-with-resultcode-0x80041032