
Эта инструкция должна помочь, если при установке какой-либо программы в Windows 7, Windows 10 или 8.1 вы видите одно из следующих сообщений об ошибке:
- Служба установщика Windows 7 недоступна
- Не удалось получить доступ к службе установщика Windows. Это может произойти, если неверно установлен установщик Windows
- Не удалось получить доступ к службе установщика Windows Installer
- Возможно, не установлен Windows Installer
По порядку разберем все шаги, которые помогут исправить эту ошибку в Windows. См. также: какие службы можно отключить для оптимизации работы.
1. Проверить, запущена ли служба установщика Windows и есть ли она вообще

Откройте список служб Windows 7, 8.1 или Windows 10, для этого, нажмите клавиши Win + R и в появившемся окне «Выполнить» введите команду services.msc

Найдите в списке службу Установщик Windows (Windows Installer), дважды кликните по ней. По умолчанию, параметры запуска службы должны выглядеть как на скриншотах ниже.


Обратите внимание, что в Windows 7 можно изменить тип запуска для установщика Windows — поставить «Автоматически», а в Windows 10 и 8.1 данное изменение заблокировано (решение — далее). Таким образом, если у вас Windows 7, попробуйте включить автоматический запуск службы установщика, перезагрузить компьютер и попробовать установить программу снова.
Важно: если у вас нет службы Установщик Windows или Windows Installer в services.msc, или если она есть, но вы не можете поменять тип запуска этой службы в Windows 10 и 8.1, решение для этих двух случаев описано в инструкции Не удалось получить доступ к службе установщика Windows Installer. Там же описаны пара дополнительных методов исправить рассматриваемую ошибку.
2. Исправление ошибки вручную
Еще один способ исправить ошибку, связанную с тем, что служба установщика Windows недоступна — заново зарегистрировать службу Windows Installer в системе.

Для этого запустите командную строку от имени администратора (в Windows 8 нажать Win + X и выбрать соответствующий пункт, в Windows 7 — найти командную строку в стандартных программах, кликнуть по ней правой кнопкой мыши, выбрать «Запуск от имени Администратора).
Если у вас 32-битная версия Windows, то введите по порядку следующие команды:
msiexec /unregister
msiexec /register
Это перерегистрирует службу установщика в системе, после выполнения команд, перезагрузите компьютер.
Если у вас 64-битная версия Windows, то выполните по порядку следующие команды:
%windir%\system32\msiexec.exe /unregister
%windir%\system32\msiexec.exe /regserver
%windir%\syswow64\msiexec.exe /unregister
%windir%\syswow64\msiexec.exe /regserver
И также перезагрузите компьютер. Ошибка должна исчезнуть. Если проблема сохраняется, попробуйте вручную запустить службу: откройте командную строку от имени администратора, а затем введите команду net start MSIServer и нажмите Enter.
3. Сброс параметров службы установщика Windows в реестре
Как правило, второго способа оказывается достаточно для исправления рассматриваемой ошибки установщика Windows. Однако, если проблему так и не удалось решить, рекомендую ознакомиться со способом сброса параметров службы в реестре, описанный на сайте Microsoft: http://support.microsoft.com/kb/2642495/ru
Обратите внимание, что способ с реестром может не подходить для Windows 8 (точной информации на этот счет дать, не могу.
Удачи!
При необходимости записи загрузочной флешки в Windows большинство пользователей прибегают к знакомым инструментам, таким как Rufus или Ventoy. Однако, существуют и альтернативы, которые пригодятся при необходимости записи накопителя в другой ОС, а также для некоторых образов со своей спецификой.
balenaEtcher или просто Etcher — утилита для создания загрузочных накопителей или записи ОС на SD карту (например, для Rspberri Pi или других устройств), одно из главных преимуществ которой — мультиплатформенность, приложение доступно для Windows, Linux и MacOS. О ней и пойдёт речь далее в статье.
Использование Etcher для записи образов на флешку или карту памяти
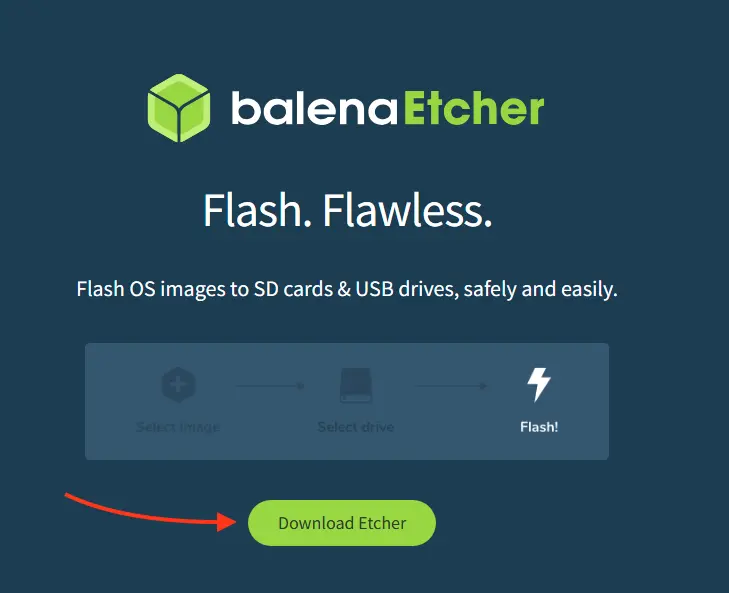
Скачать balenaEtcher можно с официального сайта https://etcher.balena.io/ — здесь доступны версии для Windows, MacOS и Linux. В случае Windows — как установщик, так и Portable-версия.
Прежде чем приступить, учитывайте следующие нюансы работы приложения:
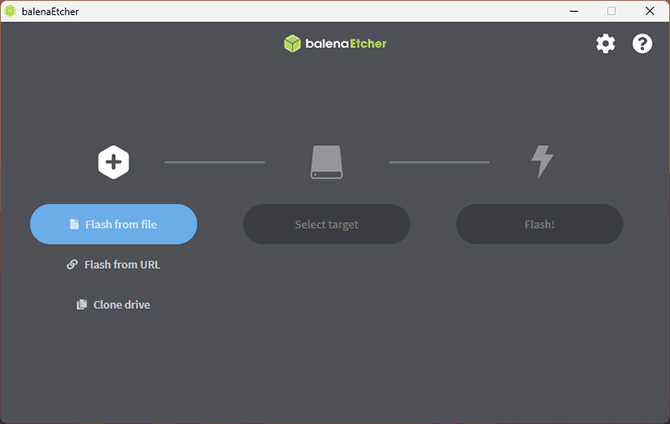
Для записи образа на USB-накопитель или SD-карту в balenaEtcher достаточно выполнить следующие шаги:
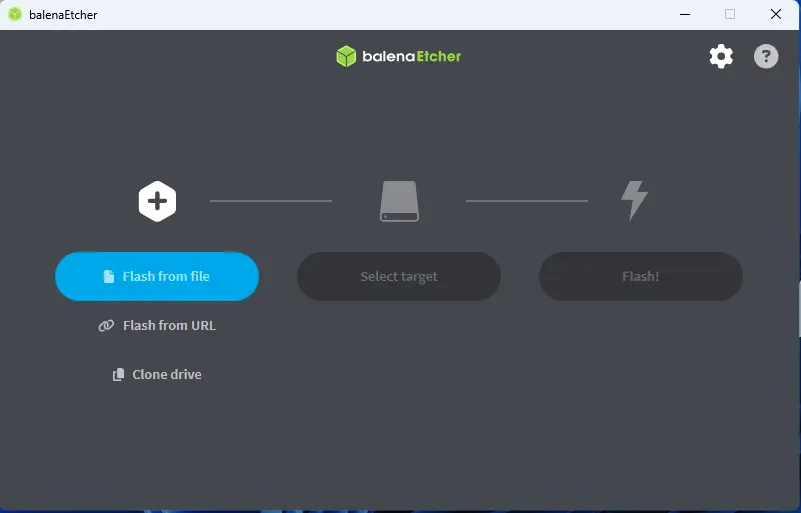
- Запустите приложение и укажите источник, из которого нужно выполнить запись: файл (Flash from file), поддерживаются iso, bin, img, dmg, vhd, zip и другие форматы, URL (Flash from URL) или клонирование (Clone drive) другого накопителя.

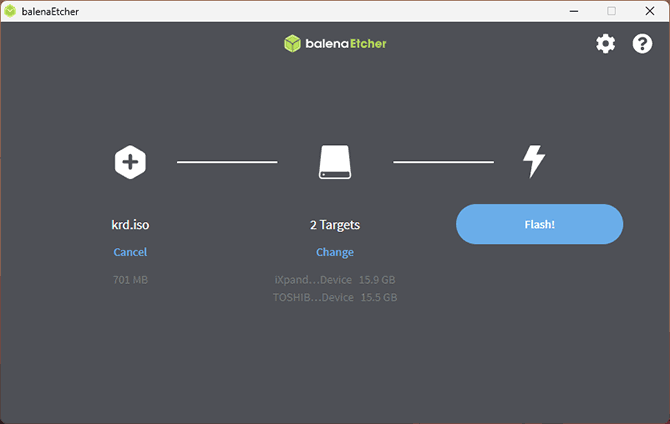
- Выберите целевой накопитель (или несколько, если нужно записать более одной флешки или SD-карты одновременно).
- Нажмите кнопку «Flash!» для начала записи данных на накопитель.
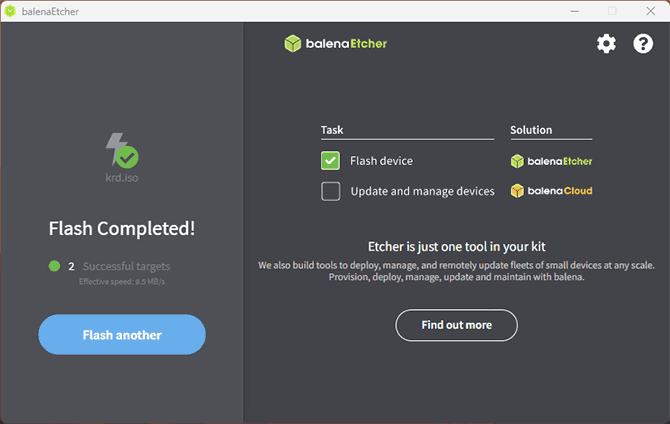
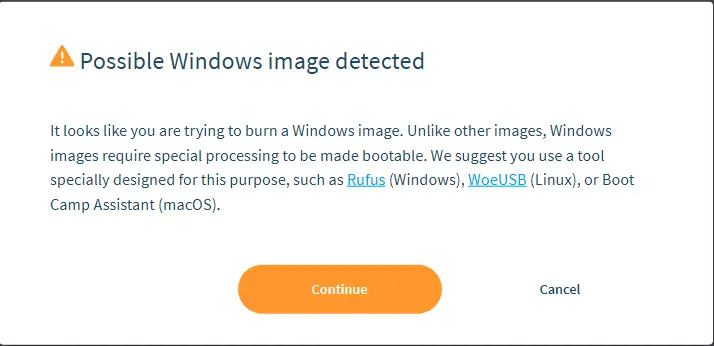
- Дождитесь завершения записи и верификации данных. Если действия производятся в Windows, игнорируйте появляющиеся окна с сообщениями о необходимости форматирования накопителя или другие — достаточно закрыть их или нажать «Отмена».
- Готово, можно использовать записанный накопитель по назначению.


Как итог, balenaEtcher может быть отличным инструментом, если вам требуется записать флешку или SD-карту из образа, речь не идёт об образе Windows и нужна возможность использования программы в различных ОС.
How to Fix Extra Monitor Not Detected on Windows 10/11
Monitors nowadays are essential tools for productivity, gaming, and entertainment. Many users enjoy the benefits of multiple displays to enhance their workflow or to immerse themselves in a gaming experience. However, a common issue arises when Windows 10 or Windows 11 fails to detect an additional monitor. This can be frustrating, especially when you may have done everything right in setting up your hardware.
This article is designed to guide you through various troubleshooting steps to resolve the issue of an extra monitor not being detected on your Windows 10 or Windows 11 system. We will explore a myriad of solutions, from the simplest to more advanced troubleshooting techniques, ensuring that you can find an effective resolution.
1. Basic Troubleshooting Steps
Before delving into more complex solutions, it’s essential to follow basic troubleshooting steps. These steps are meant to ensure that there are no simple errors leading to the detection issue.
Check Physical Connections
- Cables: Inspect the cables connecting your monitor to your computer. Ensure that the connections are secure. If you have multiple ports (HDMI, DisplayPort, VGA), try using another one to rule out the possibility of a faulty port.
- Monitor Power: Verify that your monitor is powered on. Check the power cable and the monitor’s power button.
- Switch Input Source: Some monitors have multiple input sources (HDMI, DisplayPort, etc.). Make sure that the monitor is set to the correct input source for the cable you are using.
Restart Your Devices
Sometimes, a simple restart can resolve detection issues. Restart both your monitor and your computer.
2. Use Windows Display Settings
If your extra monitor still isn’t detected after ensuring that everything is physically connected and powered on, you can use the built-in Windows features to manually detect the monitor.
Windows 10 Display Settings
- Right-click on your desktop and select
Display settings. - Scroll down and click on the
Detectbutton. Windows will search for the connected display. - Ensure that the display is set to the right mode. Scroll to the
Multiple displayssection and select the appropriate mode (Extend, Duplicate, or Second screen only).
Windows 11 Display Settings
- Right-click on the desktop and click on
Display settings. - Scroll down and click on
Detectunder theMultiple displayssection. - Choose your desired display option—Extend, Duplicate, or Second screen only.
3. Update Display Drivers
Outdated or corrupted display drivers are often a leading cause of issues with multiple monitors. You can update your display drivers through the Device Manager.
Step-by-Step Process:
- Right-click on the Start menu and select
Device Manager. - Expand the
Display adapterssection. - Right-click on your graphics card and select
Update driver. - Choose
Search automatically for updated driver software. Windows will search for the latest versions and install them if found. - If you want to ensure you have the latest version, visit the manufacturer’s website (NVIDIA, AMD, or Intel) and download the latest drivers directly.
4. Roll Back Drivers
If updating the drivers does not resolve the issue—or if the problem emerged after a recent driver update—you may want to roll back to the previous version.
- Go to
Device Managerand expandDisplay adapters. - Right-click on your graphics card and select
Properties. - Navigate to the
Drivertab and clickRoll Back Driver. - Follow the on-screen instructions and then restart your computer.
5. Adjust Display Settings in Graphics Control Panel
Depending on your graphics card, you can also use dedicated software to manage display settings.
For NVIDIA Users:
- Right-click on the desktop and select
NVIDIA Control Panel. - Click on
Set up multiple displays. - Ensure your second monitor is checked and set to active.
- Adjust the resolution and refresh rate as necessary.
For AMD Users:
- Right-click on the desktop and select
AMD Radeon Settings. - Click on the
Displaytab. - Check that the second monitor is recognized and properly set up.
6. Check for Conflicting Applications
Sometimes, third-party applications that modify display settings—such as screen-sharing tools, remote desktop software, or even some gaming applications—can interfere with the detection of multiple monitors.
- Temporarily Disable or Uninstall Software: If you suspect a program may be causing issues, try disabling or uninstalling it to see if the monitor is detected.
7. Adjust Screen Resolution Settings
If your monitor is detected but isn’t displaying correctly, checking the screen resolution settings can help.
- Go back to
Display settings. - Select the second monitor from the diagram.
- Adjust the resolution to a supported setting for that monitor.
8. Troubleshoot Hardware
If all software solutions fail, it is prudent to check the hardware.
Test the Monitor
- Connect the Monitor to Another Computer: This can help determine if the issue lies with the monitor itself. If it’s recognized on a different device, the problem may be with your original computer.
- Use a Different Monitor: Conversely, try connecting a different monitor to your computer. If it works, then the issue likely lies with your original monitor.
- Check for Hardware Damage: Inspect cables for damage, dents, or frays. Replace any components that appear damaged.
9. Check Windows Settings
Sometimes, certain settings in Windows can hinder the detection of multiple displays.
Windows Update
Ensure that your system is up to date. Check for Windows updates by going to Settings > Update & Security > Windows Update. Install any pending updates.
Graphics Settings
Make sure that the graphics settings are optimized for your hardware.
- Right-click on the desktop and select
Graphics settings. - Ensure that your app preferences are set up correctly to leverage your dedicated GPU.
10. System Restore
If all else fails, you may consider performing a system restore to revert your computer back to a previous state when it was working correctly.
- Type «Create a restore point» in the Windows search bar and select it.
- Click on the
System Restorebutton and follow the wizard to choose a restore point.
Conclusion
In conclusion, troubleshooting an extra monitor that isn’t detected on Windows 10 or 11 involves a systematic approach of checking connections, updating drivers, and adjusting settings. Always start with basic troubleshooting steps and progressively work your way to more involved solutions. By following the steps outlined in this article, most users will be able to fix issues with their additional displays.
If these methods do not resolve the issue, consider consulting a professional or checking the manufacturer’s website for further support. Multi-monitor setups can enhance productivity and enjoyment, and getting them to work seamlessly is well worth the effort.
0
1
В свойствах файла поставил галочку «запуск файла как программы». Запускаю через терминал, но мне выдаёт ошибку: » $ ‘/home/user/Документы/Programs/balenaEtcher-1.5.109-x64.AppImage’
[15581:1120/191725.225492:FATAL:setuid_sandbox_host.cc(158)] The SUID sandbox helper binary was found, but is not configured correctly. Rather than run without sandboxing I’m aborting now. You need to make sure that /tmp/.mount_balenaf81qjV/chrome-sandbox is owned by root and has mode 4755.
/tmp/.mount_balenaf81qjV/balena-etcher-electron: строка 10: 15581 Ловушка трассировки/останова «${script_dir}»/balena-etcher-electron.bin «$@» «
Система — Debian 10. В чём может быть проблема?
В этой статье расскажем, как использовать balenaEtcher для создания загрузочных накопителей или записи образов на SD-карты. Вы узнаете, как скачать программу, какие особенности работы с ней существуют, а также получите пошаговую инструкцию по записи образов на USB-накопители и карты памяти.
Приобрести оригинальные ключи активации Windows 11 можно у нас в каталоге от 1690 ₽
Что такое balenaEtcher?
balenaEtcher — это мультиплатформенная утилита для записи образов на USB-накопители и SD-карты. Программа поддерживает Windows, Linux и MacOS, что делает её универсальным инструментом для пользователей разных операционных систем. Основное назначение Etcher — создание загрузочных накопителей для различных ОС, включая специализированные образы для устройств, таких как Raspberri Pi.
Особенности работы с balenaEtcher
Перед началом работы с balenaEtcher важно учитывать следующие нюансы:
— Программа не предназначена для записи образов Windows. При попытке записать ISO-образ Windows вы увидите соответствующее предупреждение.
— В процессе использования Etcher в Windows может возникнуть ситуация, когда USB-накопитель будет повреждён. Обычно это решается очисткой разделов в DISKPART, но не всегда.
— После записи образа в Windows проводник может сообщить о необходимости форматирования накопителя или отобразить ошибку «Файловая система тома не распознана». Однако загрузка с накопителя может быть возможна, несмотря на эти сообщения. Так же у нас есть другая инструкция как записать дистрибутив Windows на флешку с помощью Rufus.
Как скачать balenaEtcher?
Скачать balenaEtcher можно с официального сайта: https://etcher.balena.io/. Доступны версии для Windows, MacOS и
Linux. Для Windows предлагается как установщик, так и Portable-версия.
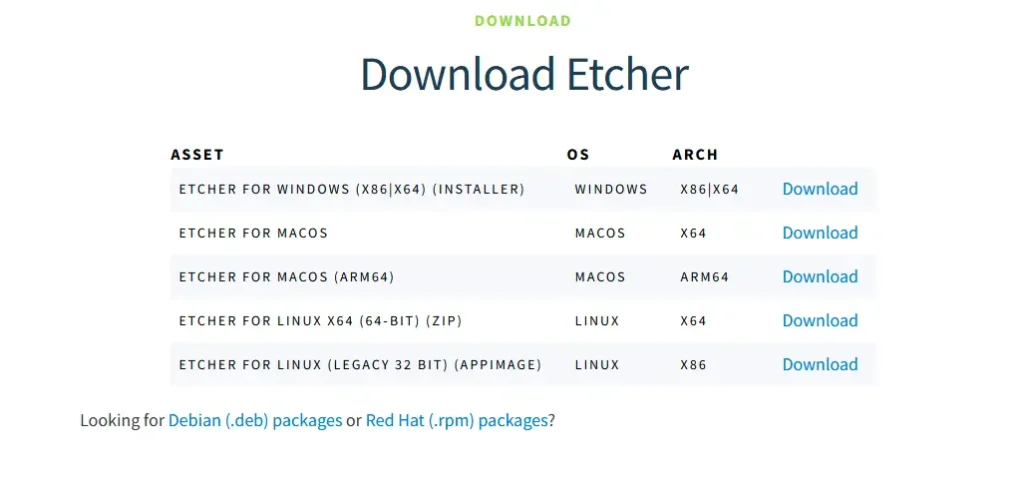
Так же вы можете скачать Balena Etcher напрямую с нашего сервера:
Скачать Balena Etcher — Windows x64/x32
Скачать Balena Etcher — MacOS ARM (Apple Silicon)
Скачать Balena Etcher — MacOS x64 (Intel)
Скачать Balena Etcher — Linux x64 (ZIP)
Скачать Balena Etcher — Linux x32 (APPIMAGE)
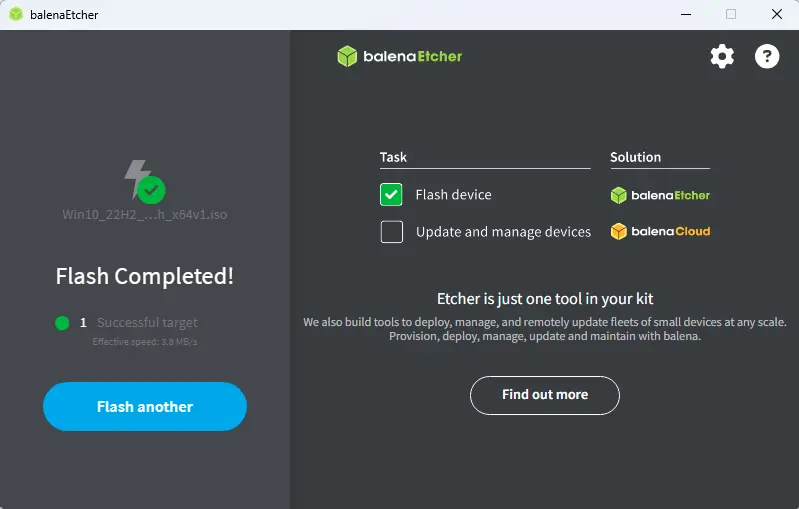
Инструкция по записи образа с помощью balenaEtcher
Для записи образа на USB-накопитель или SD-карту в balenaEtcher выполните следующие шаги:
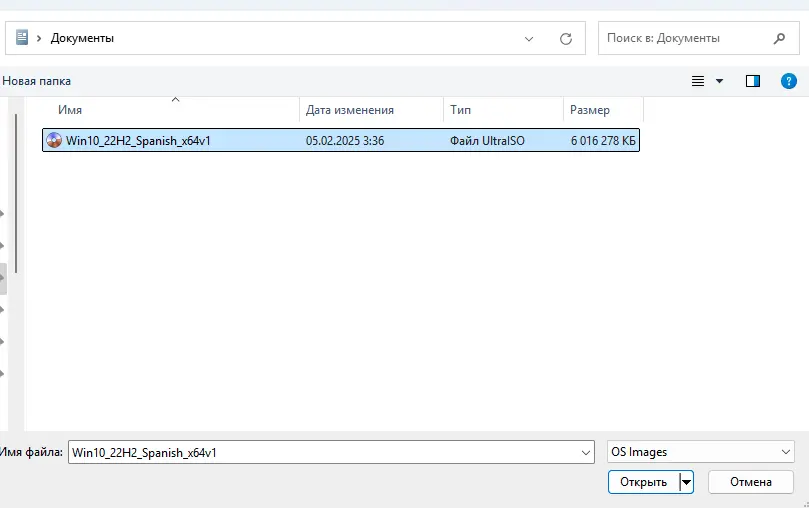
1. Запустите приложение и выберите источник записи:
— Flash from file — для записи из файла (поддерживаются форматы ISO, BIN, IMG, DMG, VHD, ZIP и другие).
— Flash from URL — для записи из URL.
— Clone drive — для клонирования другого накопителя.
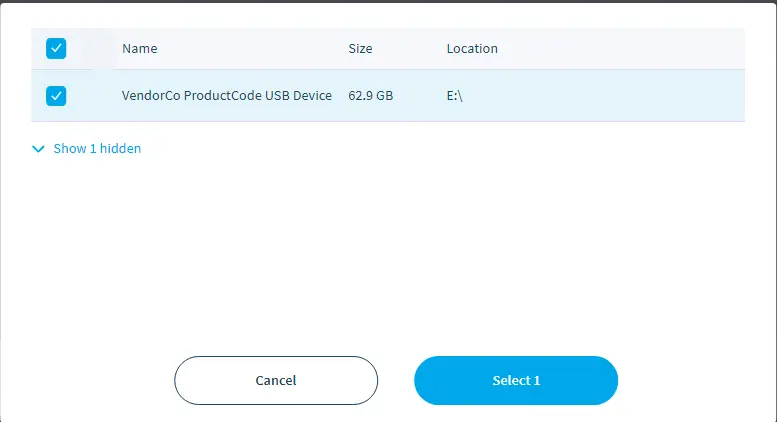
2. Выберите целевой накопитель (или несколько, если нужно записать более одной флешки или SD-карты одновременно).
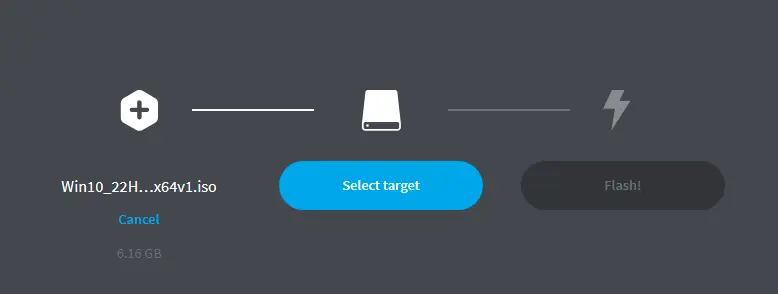
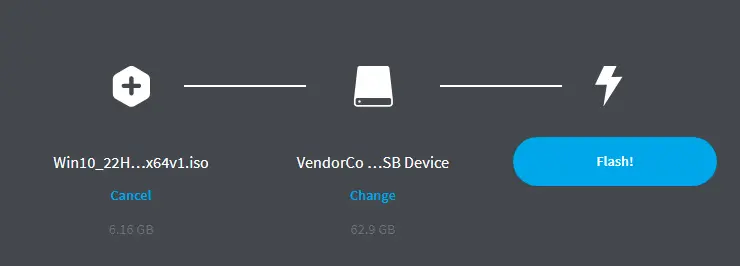
3. Нажмите кнопку Flash! для начала записи данных на накопитель.
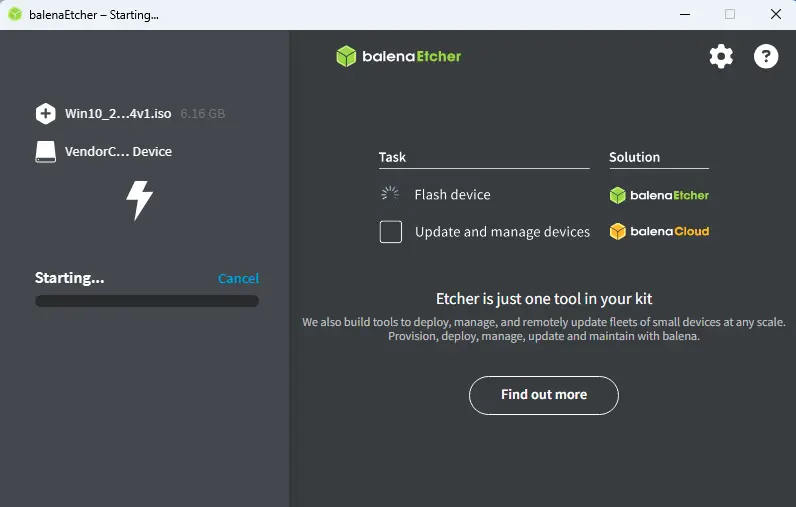
4. Дождитесь завершения записи и верификации данных. В Windows игнорируйте сообщения о необходимости форматирования накопителя.

5. Готово! Записанный накопитель можно использовать по назначению.
balenaEtcher — это удобный и универсальный инструмент для записи образов на USB-накопители и SD-карты. Программа подходит для пользователей, которым требуется записать образы, не связанные с Windows, и которые работают в разных операционных системах.
Лицензионный ключ активации Windows от