
При запуске отдельных игр или программ в Windows 10 вы можете получить сообщение об ошибке, в заголовке которой «Bad Image», а текст — Программа не предназначена для выполнения в Windows или содержит ошибку, в конце: состояние ошибки 0xc000012f или состояние ошибки 0xc0000020 — оба кода имеют одинаковую природу в данном случае.
В этой инструкции подробно о том, как исправить ошибку 0xc000012f или 0xc0000020 Bad Image при запуске приложений и игр в Windows 10, о причинах такой ошибки.
Способы решить проблему Bad Image 0xc000012f и 0xc0000020 при запуске программ и игр

В большинстве случаев причиной ошибок «Программа не предназначена для выполнения в Windows или содержит ошибку» с состоянием ошибки 0xc000012f и 0xc0000020 является повреждение или неверная версия библиотеки DLL, указанной в тесте ошибки. Такое может случаться в результате сбоев или установки или удаления других (не связанных с проблемной) программ, а иногда — как результат скачивания файлов DLL со сторонних сайтов для исправления других ошибок. Имя файла DLL, указанное в сообщении об ошибке Bad Image может нам помочь, разобраться в чем дело, например:
- Если фигурируют файлы с именами, начинающимися с msvcr, msvcp и некоторые другие, например — ucrtbase.dll, то проблема, по всей видимости, в библиотеках компонентов Microsoft Visual C++ Redistributable. Решение: исправить установку компонентов в «Программы и компоненты» (выбираем компонент, нажимаем «Изменить», затем — Исправить или Repair), либо удалить имеющиеся распространяемые компоненты Microsoft Visual C++, а затем заново скачать и установить библиотеки Microsoft Visual C++ Redistributable. Конкретный год С++ можно определить по имени файла и устанавливать только компоненты нужного года, желательно — и x86 и x64 (даже в Windows 10 x64 бывают нужны 32-бит библиотеки x86). Это, например, одна из частых причин такой ошибки при запуске Origin.

- Если библиотека, вызывающая ошибку, находится в папке DriverStore, то виной, вероятнее всего, драйвер какого-то устройства. По имени файла с помощью поиска можно найти, к какому драйверу относится эта DLL, после чего удалить драйвер и установить его вручную (скачав с официального сайта) заново. Чаще всего речь идет о драйвере видеокарты, особенно если ошибка возникает при запуске игр. Здесь может пригодиться: Как удалить драйвер видеокарты полностью.

То есть логика действий в общем случае такова:
- Определяем, частью чего является DLL, указанная в сообщении об ошибке. Для этого обычно достаточно использовать поиск в Интернете.
- Переустанавливаем этот компонент системы и проверяем, была ли решена проблема.
Есть одно распространенное исключение: если сообщение об ошибке содержит какую-то библиотеку, которая является частью игры или программы, а она в свою очередь не очень лицензионная, то причиной может оказаться ваш антивирус или встроенный защитник Windows 10.
В этом случае решением может стать следующий порядок действий: удаляем программу или игру, отключаем антивирус, заново устанавливаем программу с ошибкой, проверяем, работает ли она, если да — добавляем папку с игрой или программой в исключения антивируса или защитника Windows (как добавить программу в исключения Защитника Windows 10). В этом же сценарии, если ошибка не исчезает, иногда имеет смысл поискать другой источник загрузки этого же приложения — возможно, там, где вы его скачивали, файл содержит ошибки.
Дополнительные методы исправить ошибку
Если вышеописанное не помогло (на всякий случай, сообщите в комментариях, о какой DLL и при запуске какой программы возникает ошибка — возможно, я подскажу действия), попробуйте следующие варианты:
- В случае, если программа или игра работала исправно еще совсем недавно, проверьте: а есть ли точки восстановления Windows 10 на дату, когда проблема отсутствовала. Если есть — используйте их.
- Если сообщение об ошибке 0xc000012f или 0xc0000020 сообщает о какой-то системной DLL, попробуйте выполнить восстановление целостности системных файлов Windows 10.
- Попробуйте запустить программу в режиме совместимости с предыдущей версией Windows.
- Стоит проверить, хотя это и редкий случай, а появляется ли ошибка, если выполнить чистую загрузку Windows 10 — если нет, по всей видимости, запуску мешает какое-то стороннее ПО.
Также, если речь идет о старой версии какой-то программы, а в наличии есть более новые её варианты, попробуйте установить и испытать их.
Download Windows Speedup Tool to fix errors and make PC run faster
Some Windows 11 or Windows 10 users have reported Bad Image Error Status 0xc000012f issue when they try to run certain software. This error can occur with any program on your device – including the Chrome browser, OneDrive or Word. In any case, the fix is essentially the same. In this post, we will provide the most suitable solutions you can try to successfully resolve the issue.

Depending on the problematic program, in this case OneDrive, when you encounter this issue. you’ll receive a similar error message as follows;
OneDrive.exe – Bad Image
C:\Users\<username>\AppData\Local\Microsoft\OneDrive\17.3.5907.0716.1\SyncEngine.DLL is either not designed to run on Windows or it contains an error. Try installing the program again using the original installation media or contact your system administrator or the software vendor for support. Error status 0xc000012f.
The error can be cased due to wer.dll. SyncEngile.dll, ucrtbase.dll, etc dll files
If you’re faced with a Bad Image error in OneDrive, Word, etc, with Error Code 0xc000012f, you can try our recommended solutions below in no particular order and see if that helps to resolve the issue.
- Re-register concerned DLL file
- Run SFC scan
- Install the latest Visual C++ Redistributable
- Uninstall Windows Update
- Uninstall and reinstall the program
Let’s take a look at the description of the process involved concerning each of the listed solutions.
1] Re-register DLL files
As you can see on the image above, the file points to a DLL file. In this solution, all you need to do to fix the issue is to re-register that particular DLL file on your Windows device.
To register a dll or ocx file, open a command prompt as an administrator, type the following and hit Enter:
regsvr32 "path & filename of dll or ocx"
2] Run SFC scan
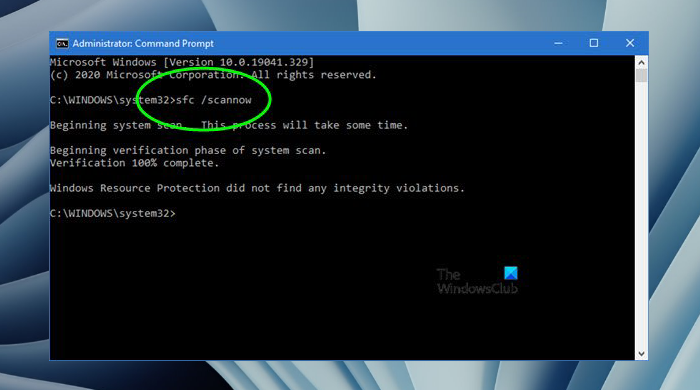
Broken or faulty system files always cause several issues and this error is one of them. These significant files get corrupted due to unwanted registry changes, installation of incompatible programs, and more.
In this solution, you can simply run SFC scan and see if that helps. If the procedure completes successfully but when you try to access any program you receive the error message, you can proceed with the next solution.
3] Install the latest Visual C++ Redistributable
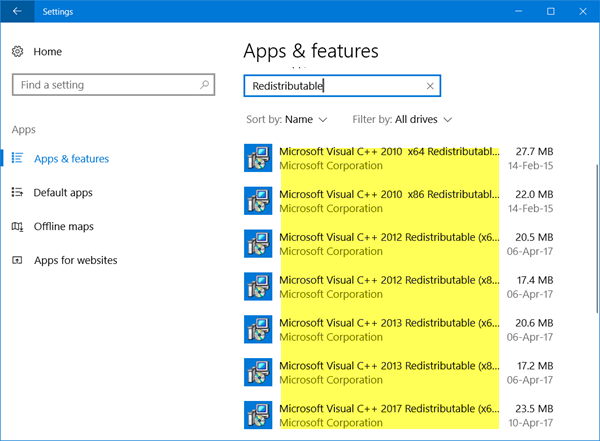
This solution requires you to download and install the latest Visual C++ Redistributable on your Windows 10 device. If after this and you’re still getting the error message when you run any program, you can try the next solution.
Read: WINWORD.EXE Bad Image error.
4] Uninstall Windows Update
Sometimes, this error occurs after the installation of certain Windows Updates. So, if the issue happens to appear just after installing the updates, you can uninstall the updates and see if this fixes the problem.
5] Uninstall and reinstall the program
This usually helps! You can simply uninstall the problematic program and then reinstall it using its latest setup file.
Related post: Bad Image, Error Status 0xc0000020 error for Outlook.
Obinna has completed B.Tech in Information & Communication Technology. He has worked as a System Support Engineer, primarily on User Endpoint Administration, as well as a Technical Analyst, primarily on Server/System Administration. He also has experience as a Network and Communications Officer. He has been a Windows Insider MVP (2020) and currently owns and runs a Computer Clinic.
Reader Interactions
Содержание статьи:
- Способ 1: Исправление проблем с DLL-файлами
- Вариант 1: Установка Microsoft Visual C++ Redistributable
- Вариант 2: Исправление проблем с драйверами
- Вариант 3: Решение проблем с нелицензионным софтом
- Способ 2: Параметры совместимости
- Способ 3: Очистка от мусорных файлов
- Способ 4: Удаление обновления
- Способ 5: Восстановление системных файлов
- Способ 6: Точка восстановления
- Вопросы и ответы: 0
Способ 1: Исправление проблем с DLL-файлами
Чаще всего ошибка 0xc000012f является следствием повреждения или неверной версии библиотеки DLL, которая указана в тексте ошибки. Обычно такое происходит, когда ранее файлы DLL были скачаны со сторонних ресурсов и установлены (зарегистрированы в системе) для устранения других неполадок.
Как правило, имя файла DLL, которое обычно указывается в тексте ошибки, позволяет понять, в чем дело.
Вариант 1: Установка Microsoft Visual C++ Redistributable
Если в тексте ошибки упоминаются такие файлы, как «msvcp», «msvcr», «ucrtbase» и другие, по всей видимости, причина неполадки в повреждении или отсутствии компонентов библиотеки Microsoft Visual C++ Redistributable. Для исправления ситуации может потребоваться установка/исправление файлов. Для этого скачайте инсталляционный файл в соответствии с архитектурой и разрядностью операционной системы, после чего запустите установщик. Если есть повреждения, будет предложено исправить состояние ПО.
Подробнее: Скачать Microsoft Visual C++ пакеты для Windows

Вариант 2: Исправление проблем с драйверами
Случается, что в тексте ошибки упоминается папка «DriverStore» или DLL-файл, не относящийся к библиотеке Microsoft Visual C++ Redistributable. Тогда, вероятно, причина неполадки связана с драйвером какого-то устройства. С помощью поиска системы можно попробовать отыскать, к какому драйверу может относиться файл. Чаще всего это драйвер видеокарты, особенно это актуально при запуске игр. В этом случае может помочь переустановка программного обеспечения этого компонента с предварительным удалением драйверов. О том, как полностью удалить их и установить, мы писали ранее в отдельных руководствах.
Подробнее:
Как удалить видеодрайвер AMD, nVidia, Intel
Как обновить драйвер (установить) на видеокарту AMD, nVidia и Intel HD: от А до Я

Если же ошибка связана с драйверами другого оборудования, тогда обновите или переустановите программное обеспечение для него. О первом варианте наш автор писал в отдельном материале на примере Windows 11.
Подробнее: Как обновить драйвера в Windows 11

Для некоторых устройств система самостоятельно подбирает базовые драйверы, которые должны работать стабильно. Можно просто удалить через «Диспетчер устройств» проблемное оборудование, а после перезагрузки ОС автоматически инсталлирует новую версию. Для деинсталляции устройства из системы кликните по нему правой кнопкой мыши и выберите пункт «Удалить», после чего останется подтвердить действие.

Для установки и обновления драйверов для всех компонентов и устройств можно воспользоваться специализированными программами, которые работают в автоматическом режиме. О некоторых продуктах можете узнать из рейтинга на нашем сайте.
Подробнее: 10 Лучших программ для обновления драйверов
Вариант 3: Решение проблем с нелицензионным софтом
Иногда текст ошибки сообщает о том, что возникли проблемы с какой-то библиотекой, которая является частью незапускающейся программы, а она, в свою очередь, нелицензионная. Тогда потребуются некоторые действия, которые позволят обойти ограничение антивируса или встроенного «Защитника Windows».
Шаг 1: Полная переустановка проблемного софта
Для начала нужно полностью переустановить проблемную программу или игру. Причем сначала потребуется полностью удалить все файлы софта, в том числе остаточные данные и записи в системном реестре. Это можно сделать как вручную, так и с помощью специализированного программного обеспечения от сторонних разработчиков. О полной деинсталляции софта читайте в нашем отдельном материале.
Подробнее: Как полностью удалить программу с компьютера, чтобы не осталось хвостов, записей в реестре и временных файлов

Данный метод подойдет в тех случаях, когда устанавливается не слишком лицензионная версия софта, скачанная со стороннего ресурса, например, какой-то репак. Поскольку он предполагает повторную установку такого ПО и отключение антивируса во время операции, убедитесь, что файлы программы полностью безопасны, а источник надежен.
Обратите внимание, что перед повторной установки ПО обязательно потребуется отключить антивирус или другие средства защиты, которые используются на компьютере. Если это стороннее антивирусное программное обеспечение, нужно открыть его интерфейс и найти пункт, позволяющий завершить работу такого софта. В некоторых случаях достаточно кликнуть правой кнопкой мыши по иконке приложения в трее Windows и выбрать пункт «Выход»/«Закрыть».

Что касается встроенной защиты, есть несколько способов приостановить его работу. Переходите по ссылке ниже, чтобы узнать, как это сделать.
Подробнее: Как отключить встроенного защитника Defender в Windows 10/11: временно и постоянно

Полная очистка файлов программы позволит избежать возможных конфликтов, которые могут возникать при повторной установке или дальнейшем использовании. Как только вы очистите систему, перезагрузите компьютер, отключите антивирус, после снова инсталлируйте проблемный софт или игру, но не запускайте его, а переходите к следующему Шагу.
Шаг 2: Добавление в исключения антивируса
Чтобы избежать подобной проблемы, которая может возникнуть снова после включения антивируса, потребуется добавить папку с файлами игры или программы в список исключений. В случае с «Защитником» потребуется перейти в штатные «Параметры».
- Откройте главное меню и выберите запуск встроенного приложения «Параметры».
- Переключитесь на вкладку «Конфиденциальность и защита» слева и в центральной части окна кликните по строке «Безопасность Windows».
- Выберите «Защита от вирусов и угроз».
- Теперь найдите область «Параметры защиты от вирусов и других угроз» и кликните по строке «Управление настройками».
- В разделе «Исключения» нажмите на «Добавление или удаление исключений».
- Нажмите на кнопку «Добавить исключение», а в выпадающем меню выберите пункт «Папка».
- Через открывшийся «Проводник» укажите путь к каталогу, выделите его нажатием левой кнопкой мыши и щелкните по кнопке «Выбор папки».


После вы увидите, что папка добавлена в список исключений «Защитника», что значит, что встроенный антивирус больше не будет проверять и сканировать файлы проблемной программы.

Что касается сторонних антивирусов, универсальной инструкции по добавлению в список исключений нет, так как все зависит от возможностей и интерфейса программы. Например, в Kaspersky Standard порядок действий следующий:
- Откройте главное окно антивируса и кликните по кнопке, стилизованной под значок шестерни, для перехода к параметрам.
- Выберите строку «Настройки безопасности».
- Далее нажмите на пункт «Исключения и действия с найденными объектами».
- Потребуется настроить исключения. Нажмите на соответствующую кнопку в блоке «Исключения».
- В открывшемся окне нажмите на кнопку «Добавить» и укажите путь к папке, в которой содержатся файлы игры или программы. Убедитесь, что все включено (столбец «Статус»), и подтвердите новые параметры.


После выполненных действий для «Защитника Windows» или антивируса от стороннего разработчика компоненты программы не будут проверяться, что, в свою очередь, позволит избежать ошибки при попытке запустить нелицензионный софт.
Ниже мы рассмотрим общие решения, которые зачастую позволяют корректно запустить программу или игру, если с DLL-библиотеками все в порядке, или в том случае, когда в тексте ошибки не указывается конкретный файл.
Способ 2: Параметры совместимости
Если ошибка с кодом 0xc000012f в Windows 10/11 появляется при попытке запустить программу, но при этом дополнительной информации о неполадке нет, попробуйте запустить ее в режиме совместимости с предыдущей версией операционной системы, например, в среде «семерки». Это может помочь, если софт изначально был предназначен для ранних ОС от Microsoft.
- Щелкните правой кнопкой мыши по ярлыку проблемной программы (или по исполняемому файлу) и перейдите в «Свойства».
- Переключитесь на вкладку «Совместимость», затем активируйте опцию «Запустить программу в режиме совместимости с» и в выпадающем меню ниже выберите одну из версий операционной системы, например, пункт «Windows 7».
- Сохраните настройки и снова запустите программу.


Если в выбранной среде также появляется ошибка, попробуйте другие варианты, найдя ту версию Windows, в которой программа запускалась без проблем. Также можно активировать опцию «Запускать эту программу от имени администратора» на той же вкладке окна «Свойства».

Способ 3: Очистка от мусорных файлов
Наличие большого количества временных файлов, которые со временем копятся в файловом хранилище Windows, также могут стать причиной появления ошибки с кодом 0xc000012f. Несмотря на то, что система самостоятельно периодически подчищает устаревшие и мусорные файлы, в некоторых случаях это происходит не всегда корректно, поэтому стоит вручную проверить их присутствие и удалить любым удобным способом, о которых, к слову, мы писали ранее.
Подробнее:
Очистка Windows 11 / Windows 10 от мусора и временных файлов
Лучшие программы для очистки компьютера от мусора

Способ 4: Удаление обновления
В качестве общего решения еще предлагаем удалить накопительное обновление под индексом KB2879017, которое предназначено для улучшения безопасности фирменного браузера Microsoft. Случается, что именно этот апдейт вызывает рассматриваемую ошибку в системе:
- Откройте «Параметры» и выберите раздел «Центр обновления Windows» (или «Обновление и безопасность» в Windows 10). Далее нажмите на строку «Журнал обновлений».
- В «десятке» сразу отобразится список установленных апдейтов. Найдите в нем KB2879017 и, если он есть, удалите его, нажав на соответствующую кнопку.

В Windows 11 перейдите в раздел «Удалить обновления» (блок «Сопутствующие параметры»). Аналогичным образом деинсталлируйте потенциально проблемный апдейт.


Перезагрузите компьютер, чтобы новые настройки вступили в силу, после чего можно проверить, решена ли проблема.
Способ 5: Восстановление системных файлов
Если помимо ошибки 0xc000012f, появляются и другие системные предупреждения, велика вероятность, что причиной неполадки стали поврежденные системные файлы. Для решения ситуации можно воспользоваться предустановленными утилитами для проверки и восстановления целостности этих данных, и о том, как их правильно применить, читайте в нашей отдельной статье на сайте.
Подробнее: SFC, Chkdsk и DISM: как проверить и восстановить системные файлы в Windows 10/11

Способ 6: Точка восстановления
Если ошибка встречается впервые или возникла недавно, есть смысл попробовать откатиться до предыдущего состояния системы с помощью точки восстановления. Это поможет, если причиной стали поврежденные компоненты системы, вмешательство недавно установленного софта или изменение параметров. Воспользуйтесь инструкцией ниже, если автоматическое создание точек активно либо в случаях, когда они создаются периодически вручную:
- Одновременно нажмите на клавиши «Win + R», затем введите запрос
rstruiи кликните по кнопке «ОК». - Запустится окно «Восстановление системы». Нажмите на кнопку «Далее».
- В открывшемся списке выделите точку восстановления (если их несколько, ориентируйтесь по дате создания) и нажмите по кнопке продолжения.

Если нужно посмотреть, какие программы будут удалены или восстановлены к предыдущему состоянию после восстановления, нажмите на кнопку «Поиск затрагиваемых программ».
- Проверьте, что параметры восстановления выбраны правильно, потом кликните по «Готово».
- Появится системное окно с предупреждением, где нужно нажать на «Да», чтобы запустить процесс отката к выбранному состоянию ОС.


Дождитесь окончания процедуры. Вероятно, в ходе восстановления компьютер будет перезагружен, но, если причина действительно в недавних системных изменениях, ошибка должна быть исправлена.
Users experience Error Status 0xc00012f Windows 10 or 11 often on their computers. This type of error is really bothersome and annoying because when you try to dismiss it by pressing OK, it appears again. Generally, the problem happens when you attempt to check for updates, it starts to download and later on installed automatically instead of being a defective one. As a result, when you try to open an EXE file from the disk drive, a popup arises showing an error message repeatedly. Finally, this issue ends up corrupting the files or programs you were trying to run.
Error Status 0xc00012f windows 10 is actually a hexadecimal error which is an inherent description of the Bad Image problem. Experts tried to find out the reason behind this notorious error as well as the way to resolve this over the years. The root cause of this error may vary from computer to computer.
Error Status 0xc00012f Windows 10 Bad image
For making the process smooth as well as easy, we will divide the procedures into several steps. Let’s move on to the ways to resolve Error Status 0xc00012f windows 10 with no delay.
Way-1: Uninstall the Culprit Program
If you got this accident after installing a certain 3rd party program or software uninstall them.
Step-1: First of all, right click on Start and select Run option. Type appwiz.cpl in the Run dialog box in the available space and press Enter.
Step-2: Perform a double-click on the program that is responsible for Error Status 0xc00012f and selects the option Uninstall.
Navigate to the respective website for downloading freshly if the program is essential for you.
Way-2: Run SFC or Scannow
Step 1 – To open the Elevated Command Prompt start by clicking on the Search icon from the taskbar. Type cmd in the box and right-click on the result. Select Run as administrator from the list.
Step 2 – On the user account prompt select OK and allow the console to open. Once the black window appears, type SFC /SCANNOW and press Enter.
It will run a system check for all corrupted files and programs in the computer and based on the result, it will repair the errors automatically. It may take some time so sit tight and wait. When the process is finished, restart the computer.
Way-3: Uninstall the update causing 0xc00012f Error
A Microsoft professional revealed that Error Status 0xc00012f windows 10 can often be caused by KB2879017 update. Therefore, if you have installed it wrong, we recommend you to uninstall it with no delay. For uninstalling,
For Windows 10 –
Step-1: Launch the Settings program on the computer. You can get access to it by hitting Windows+I shortcut keys combination.
Step-2: Choose the Update & Security block on the application. On the Settings screen, click on the option View installed updates History from the right.
Step-3: Moving further choose Uninstalled updates on the next page.
Step-4: You will be taken to the Installed updates, right click on the update you have recently received. Select Uninstall.
For Windows 11 –
- Press Win+R.
- Copy-paste – appwiz.cpl.
- Hit – Enter.
- From the Window that appears, click – View installed updates.
- Go to the Microsoft Windows section and right-click on the update (showing in KB…).
- Select Uninstall and follow the onscreen instructions.
We recommend you to restart your computer after uninstalling to start it afresh.
Here we make you remember that few users say that uninstalling Visual C++ Redistributable for Visual Studio 2015 has solved this problem on their computers. Hence, uninstall this feature using this wizard and ensure whether Error Status 0xc00012f in Windows 10 Bad image no longer exists.
Way-4: Use System Restore
Sometimes you may face difficulties in uninstalling the Windows updates due to some unknown errors. In that case, you can use a system restore point to fix the error to avoid getting mishappenings. But before proceeding, you need to ensure that you have created a Restore Point by this time. To do so,
Step-1: Click on the Windows Key and type Create a Restore point in the start search and Enter. Select the option System Restore on the System properties window. Choose Next on the wizard and select a previous dated convenient restore point
Step-4: Follow the onscreen instructions, lastly click on Finish in order to finish the process and restart your PC.
Way-5: Run an Automatic Repair
Step-1: Launch the Bootable installation media and boot the Windows from here. Proceeding forward, click on the option Repair your Computer.
Step-2: From the list, click on the option Troubleshoot. Go to Advanced options and select Automatic Repair.
Step-3: This repair will consume time so be patient and wait for the repair to be finished successfully. Restart your computer when the repair is finished.
Thus the most annoying Error Status 0xc00012f Windows 10 bad image is expected to be fixed by this time. Cheer up.
Way-6: Check if pending Windows update
Many times, fresh Windows update fixes whatever issues you are presently encountering. So follow part – 3 to reach Update & security screen and click on Check for updates.
If you are on Windows 11 go to Settings > Windows update and click on “Check for updates”.
Finally, you can take help from software to resolve this issue. Since abundant of the applications advised by Google is not secure, hence you should use EaseUS Todo Backup Free – for backup of disk/partition, operating system, files, etc. This software will also help you in troubleshooting any error in Windows 10, system collapse, unpredictable messes, and reduce the risk of losing data as well. This software is very popular among the users and no skill is required to use this one.
It is very much nagging and repellent for a user to receive such type of error message time and again. Additionally, it becomes terribly intolerable when you can’t open your desired programs from your computer normally. Probably the worries are over now. We will be discussing the solution right now which will stop the server from sending this annoying error message again.
We will resolve the Error Status 0xc00012f bad image flaw using following tools:
1) Settings
2) Windows 10 command prompt,
3) Windows 10 Automatic Repair.
Some of the causes are:
a) Misconfiguration in the system settings
b) Corrupted entries in registry
c) Obsessive startup programs
d) Fragmented files
e) Deletion of critical program files
f) Infection caused by malicious invaders.
Not only these six but also some similar reasons can cause the Error Status 0xc00012f Windows 10. Users started complaining about this issue from the era of Windows 7 but didn’t have a perfect solution. Moreover, the users of Windows 8 had the same problem too. Recently tech masters have come up with the solution of Error Status 0xc00012f windows 10 which is probably the most feasible one.
Conclusion
So these are the simple and promising methods to fix Error Status 0xc00012f Windows 10. Read the steps properly and use these in proper places. This will hopefully relieve you from the troublesome bad image error.
Methods:
Way-1: Uninstall the Culprit Program
Way-2: Run SFC or Scannow
Way-3: Uninstall Windows update
Way-4: Use System Restore
Way-5: Run an Automatic Repair
Way-6: Check if pending Windows update
Blog Summary: Error 0xc000012f means Bad Image. When it appears, you can’t open or use the software packages for which the error code appears. Usually, it happens, when the associated binaries and executable files of a program get corrupted. Alternatively, if there’s a DLL mismatch or a defective Windows update, you can witness this error message on your Windows 11/10 PC. We’ll learn some easy & effective ways to get rid of the Bad Image Error!
When running a program or installing Microsoft Office on Windows 10, if you are encountering Bad Image Error Status 0xc000012f, error. Here are workable fixes to resolve Bad Image Error on Windows 10.
Reasons for Bad Image Error 0xc000012f error

- The executable file of the software, you are trying to install is corrupt
- There’s a DLL mismatch especially in programs that use Microsoft Visual C++ 2015 Redistributables
- Misconfigured system files
- Corrupt registry keys
- Hard disk fragmentation
- Too many programs running during the system startup
Examples of the Bad Image Error Code
<filename> is either not designed to run on Windows or it contains an error. Try installing the program again using the original installation media or contact your system administrator or the software vendor for support. Error status 0xc000012f
C:\Windows\System32\schannel.dll is either not designed to run on Windows or it contains an error. Try installing the program again using the original installation media or contact your system administrator or the software vendor. error: 0xc000012f
Short On Time? Try This Fix To Automatically Fix Common Issues & Optimize PC Performance!
As we’ve previously mentioned, sometimes, misconfigured system files, corrupted registry keys & several programs running during system startup may be causing the error code 0xc000012f.
Having dedicated PC Repair Software like Advanced System Optimizer will help you easily fix the most common system errors while protecting the desktop from potential viruses and malware infections. Moreover, using this professional cleanup tool, you can easily repair invalid registry entries, optimize disk, recover deleted files, uninstall programs without leaving leftovers, and more.

You can follow our previous detailed guide on how to fix common computer errors on Windows PC using Advanced System Optimizer.
7 Best Ways to Fix Windows Bad Image Error – 2023
To fix the 0xc000012f error code, start following the steps explained below one by one.
Method 1: Update Visual Studio C++ Redistributable
If your computer lacks Visual Studio C++ files that affect the software packages need, you may encounter this Bad Image Error code. Several users tried installing/updating Visual Studio C++ Redistributable files to get rid of the problem; fortunately, it worked. Hence, you may try the same. This is what you need to do to update the same:
STEP 1 – Navigate to Microsoft’s official website and head towards the Visual Studio C++ Redistributable Download Page.
STEP 2 – Find and click the link for Visual Studio 2015-2022 package X64 (64-bit Windows Platform).

STEP 3 – Check out the folder containing the downloaded Visual Studio C++ Redistributable package in File Explorer.
STEP 4 – At this point, you need to double-click the file VC_redist.x64.exe and you can see the Microsoft Visual C++ window.
STEP 5 – Click the “I agree” checkbox to accept the Terms & Conditions. Click on the Install button to update the Visual Studio C++.

Restart your computer to implement the changes!
Method 2: Re-Register The DLL Files
Using the regsvr32 tool is a command-line utility used for registering and un-registering DLL files. This method is usually performed when some of your Windows 11/10 functions are not working properly. Fortunately, using Command Prompt, you can easily re-register all the DLL files in one go. Simply, follow the instructions stated below:
STEP 1 – Go to the Search bar and type Command Prompt. Make sure you run as administrator to launch the CMD utility in elevated mode.

STEP 2 – Copy and paste the command – for %1 in (*.dll) do regsvr32 /s %1 and hit the Enter button.

This will automatically re-register all the DLL files and will help you get rid of the annoying Bad Image Error Status 0xc000012f in Windows 11/10 PC.
Method 3: Uninstall Windows Update
A buggy or corrupt Windows update can also lead to a Bad Image error on Windows 10. So, if you are facing a 0xc000012f error on Windows 10 after installing the Windows update, we suggest uninstalling it. To learn how to do that, follow these steps:
1. In the Windows search bar type Add or remove programs

2. Open it > click Program and Features option

3. Here in the left pane click View installed updates
4. This will open a new window here, look for the latest Windows update you installed after which the Bad Image error started occurring. Select it > Uninstall

5. Afterward, restart the system and see if this helps fix Windows Bad image 0xc00007b error.
Method 4: Run System File Checker SFC command
Faulty or damaged system files can also lead to Bad Image error on Windows 10. Hence, to check if everything is ok we suggest checking for file integrity. For this, we will run a System File Checker. To do learn how to do that, follow the steps below:
1. In Windows search, type command prompt
2. Select the search result > Run as administrator
3. Now in elevated Command Prompt enter the following commands one by one and hit enter after each command
Sfc /scannow
Sfc /scannow /offbootdir=c:\windows
4. This will run the System File Checker and repair corrupt files
5. Reboot the system, this should help fix the problem
Note: If there is any file that System File Checker is unable to repair, then you will get the message as:

To know about this file you will need to analyze the CBS.log file.
Once, that is done, you will need to run the DISM command and restore the system files. After running DISM, make sure you run the System File Checker again.
To run DISM, run the following commands:
DISM.exe /Online /Cleanup-image /Restorehealth

Restart the computer, you should no longer face the problem.
Method 5: Perform System Restore
By default, System Restore is disabled on Windows 10 however, if you have enabled it, you are lucky. You can rollback the changes via System Restore.
To learn in detail about System Restore and how to run it, read our previous post.
1. Press Windows + R
2. Type rstrui.exe > Enter
3. Select the System Restore point of the date when the system was working just fine and rollback
Hope this helps fix the 0xc000012f error on Windows 10.
Method 6: Perform a Clean Boot
If you are still encountering the Bad Image error code 0xc000012f, we suggest performing a Clean Boot. This will help identify the third party software that is causing the problem. To do so, we will have to disable software that runs during system startup. To learn more about it, follow the steps below:
1. Press Ctrl+ Shift+Esc
2. Click the Service tab
3. Check the box next to Hide all Microsoft services > Disable all
4. Next click the Startup tab > Open Task Manager
5. Right-click each entry one by one > Disable
6. Exit Task Manager
7. Save change > restart the system
8. Disabling unwanted apps from the startup will help fix the Bad Image error.
Method 7: Reinstall the program
If none of the steps worked for you, try uninstalling and reinstalling the program using which you are facing the problem. This has worked for most users and we hope it works for you too and Bad Image error is gone forever. Before following the steps ensure you have the setup file handy.
1. Press Windows + R
2. Type appwiz.cpl > Ok
3. Look for the program that is throwing Bad Image error, select it > Uninstall
4. Wait for the operation to finish
5. Now use the setup file to reinstall the product. Alternatively, you can visit the product’s official website for the latest setup file.
However, if you don’t want to uninstall the software manually you can either use the Uninstall Manager offered by Advanced System Optimizer or can check our post on the best Uninstaller for Windows.
We hope using the steps explained above, you can fix Windows Bad image 0xc00007b and 0xc000012f. In case you have any questions or doubts, feel free to ask by leaving them in the comments section. Also, let us know which method worked best for you.
FAQ: Information about 0xc000012f Windows errors
Q1. How do I fix error 0xc000012f?
There is no known cause of the 0xc000012f error, therefore depending on the reason, you can follow the steps explained in the article. Also, we suggest you install Microsoft Visual C++ Redistributable as in most cases it has helped fix Bad Image. Also, you can run Disk Optimizer offered by Advanced System Optimizer to defrag the disk.
Q2. Why do I keep getting Bad image errors?
When some crucial system files are missing or get corrupt, you get a Bad Image error. This can be fixed by reinstalling the software or running System File Checker.
Q3. How do I fix a Bad image?
To fix the Bad Image error, we suggest applying the following workouts:
- Reinstall the problematic software
- Perform System Restore
- Rollback Windows Update
- Do a Clean Boot
- Run System File Checker
Q4. What does a Bad image mean on Windows 10?
Bad Image 0xc000012f error means some of the system files are corrupt and there are interfering with the system process. To resolve this, running the SFC /scannow command is recommended.
Conclusion
Chances are, by now you must’ve successfully resolved the Bad Image error 0xc000012f on Windows 11/10 PC. For us, updating the Visual Studio C++ Redistributable worked like a charm. Additionally, we suggest our users keep their PCs optimized and error-free using third-party tools. If you come across, any other effective workaround that can help you rectify the bad image error code, feel free to share your recommendation with us in the comments section below!