Backup to hard drive windows

Applies ToWindows 11 Windows 10

Ваш компьютер с Windows поставляется с единым решением для резервного копирования программа архивации данных, которое помогает создавать резервные копии многих наиболее важных для вас вещей. В файлах, темах и параметрах во многих установленных приложениях и Wi-Fi сведения программа архивации данных защищает все, что важно, и упрощает переход на новый компьютер.

В этом руководстве описывается использование программа архивации данных и различных параметров для резервного копирования и восстановления ключевых элементов на компьютере с Windows. 

Резервное копирование компьютера

Ваш браузер не поддерживает видео. Установите Microsoft Silverlight, Adobe Flash Player или Internet Explorer 9.

Это учетная запись, связанная с Windows, Microsoft 365, OneDrive, Xbox и т. д. Данные, для которых создана резервная копия, будут храниться в вашей учетной записи Майкрософт, поэтому получить доступ к вашим элементам на новом компьютере так же просто, как войти в систему.

  1. В приложении «Параметры» на устройстве с Windows выберите Учетные записи > сведения или используйте следующее сочетание клавиш:

    Ваши сведения

  2. Выберите Войти вместо этого с учетной записью Майкрософт. Этот параметр отображается, только если вы используете локальную учетную запись. Если вместо этого отображается элемент Вход с локальной учетной записью, вы уже используете свою учетную запись Майкрософт.

    Важно: В настоящее время приложение программа архивации данных ориентировано на потребительские устройства, например устройства, которые можно использовать, выполнив вход в личную учетную запись Майкрософт (MSA), например *@outlook.com , *@live.com и т. д. Рабочие или учебные учетные записи Майкрософт не будут работать.

    Создание учетной записи Майкрософт

программа архивации данных — это простой и единый останов для всех ваших потребностей в резервном копировании. Ваша бесплатная учетная запись Майкрософт поставляется с 5 ГБ облачного хранилища OneDrive (при необходимости доступно дополнительное хранилище), а резервное копирование папок синхронизирует указанные папки с вашей учетной записью OneDrive, что делает их мгновенным доступом на всех компьютерах, которые вы используете с этой учетной записью Майкрософт. Так как они синхронизируются с OneDrive, после входа в OneDrive на новом компьютере эти файлы снова станут доступны.

Чтобы открыть программа архивации данных, найдите его в меню Пуск:

  • Нажмите кнопку «Пуск»

  • Введите backup и выберите программа архивации данных в результатах.

  • Разверните узел Папки и выберите, какие папки пользователей нужно создать в OneDrive. Вы можете создать резервную копию папок «Рабочий стол«, «Документы«, «Изображения«, «Видео» и «Музыка», переключив переключатель для каждой папки в положение Включено.

Снимок экрана: приложение программа архивации данных в Windows 11.

Совет: вы также можете управлять конфигурацией программа архивации данных в разделе Параметры. В приложении «Параметры» на устройстве с Windows выберите Учетные записи > резервное копирование Windows.

С помощью программа архивации данных вы также можете создавать резервные копии параметров Windows, в том числе:

  • Установленные приложения

  • Специальные возможности, языковые параметры и другие параметры, такие как обои и цвета

  • Wi-Fi сети и паролей

Чтобы проверка состояние всех этих параметров из программа архивации данных, разверните каждый элемент. Чтобы создать резервную копию параметра, установите переключатель Вкл.

Примечание: Если резервное копирование этих параметров было выполнено в прошлом (а некоторые из них по умолчанию), они будут отображаться как Резервные копии, а переключатель будет недоступен. Если вы хотите прекратить резервное копирование, см. статью Изменение конфигурации резервного копирования.

Когда все будет настроено так, как вы хотите, выберите Создать резервную копию.

Если при попытке создать резервную копию из OneDrive появляется сообщение об ошибке, возможно, вы не вошли в OneDrive или возникла другая проблема с OneDrive, которую необходимо устранить, чтобы программа архивации данных работали. Дополнительные сведения см. в статье Устранение проблем приложение синхронизации OneDrive.

Все готово! Создаются резервные копии папок и параметров, и вы можете получить доступ к файлам на всех компьютерах, на которые вы входите с помощью этой учетной записи Майкрософт.

Если вы хотите проверка и убедиться, что резервная копия по-прежнему создана, вы можете открыть приложение программа архивации данных, и в нем отобразится текущее состояние резервной копии.

Вы также можете проверка состояние в приложении «Параметры», выберите Учетные записи > резервное копирование Windows

Снимок экрана: параметры, показывающие состояние резервного копирования Windows.

Как насчет моих настроек Microsoft Edge?

Чтобы легко просматривать веб-страницы с любого своего устройства и упорядочить избранное, войдите в Microsoft Edge и включите синхронизацию.

Вход для синхронизации данных Microsoft Edge на разных устройствах

Изменение конфигурации резервного копирования

Если вы хотите изменить конфигурацию резервного копирования, откройте раздел Параметры > Учетные записи > резервное копирование Windows или используйте следующее сочетание клавиш:

Резервное копирование Windows

Снимок экрана: параметры data-lazy-src=

  • Чтобы изменить синхронизацию папок в OneDrive, выберите Управление параметрами синхронизации в разделе Синхронизация папок OneDrive и переключите папки, для которого требуется создать резервную копию.

    Снимок экрана: резервное копирование OneDrive в Windows 10.

  • Чтобы изменить резервную копию приложений, используйте переключатель Запомнить мои приложения. Этот параметр недоступен для рабочих или учебных учетных записей, и Windows не запоминает приложения для рабочих или учебных учетных записей.

  • Чтобы изменить резервную копию параметров, используйте флажки, указанные в разделе Запомнить мои настройки, и убедитесь, что флажки для любого из элементов, для которых требуется создать резервную копию. Если включить параметр Другие параметры Windows, Windows также будет синхронизировать некоторые параметры устройств (например, настройки принтера и мыши), параметры проводника и настройки уведомлений. Этот параметр доступен для рабочей или учебной учетной записи, если это разрешено вашей организацией. Дополнительные сведения см. в статье Включение enterprise State Roaming в Microsoft Entra ID

Если вы отключили резервное копирование и хотите удалить данные, которые были ранее созданы в вашей учетной записи Майкрософт, перейдите на страницу Устройства учетной записи Майкрософт, найдите раздел Параметры облачной синхронизации в нижней части страницы и выберите и выберите Очистить сохраненные параметры.

Восстановление компьютера

Ваш браузер не поддерживает видео. Установите Microsoft Silverlight, Adobe Flash Player или Internet Explorer 9.

Разделы справки восстановить резервную копию?

У нас есть твоя спина! При получении нового компьютера или при необходимости переустановки Windows при его настройке просто войдите в систему с той же учетной записью Майкрософт, которая использовалась для создания резервной копии. Мы увидим, что у вас есть резервные копии, и спросим, хотите ли вы восстановить их.

Снимок экрана: вариант восстановления, предлагаемый durin OOBE.

Если у вас есть несколько компьютеров с резервными копиями, можно выбрать Дополнительные параметры и выбрать резервную копию, из которой вы хотите восстановить. Когда вы вернетесь к вашему рабочему столу, все будет прямо там ждет вас!

  • Контакты приложений восстанавливаются там, где вы их оставили. Приложения, доступные в Microsoft Store, можно восстановить, щелкнув значок приложения, чтобы начать работу. Для приложений, недоступных в Магазине, вы будете перенаправлены в Интернет, чтобы скачать установщик.

  • Ваши самые важные параметры также будут восстановлены на новом устройстве. Полный список поддерживаемых параметров см. в разделе Каталог параметров программа архивации данных.

  • Файлы можно восстановить в любое время, войдя в OneDrive с той же учетной записью Майкрософт, которая использовалась для создания исходной резервной копии.

Статьи по теме

Каталог параметров программа архивации данных

Страница main учетной записи Майкрософт

Нужна дополнительная помощь?

Нужны дополнительные параметры?

Изучите преимущества подписки, просмотрите учебные курсы, узнайте, как защитить свое устройство и т. д.

Backing up Windows 10 to an external hard drive is a smart way to protect all your important files and system settings. In just a few steps, you can ensure your data is safe in case something goes wrong with your computer. Here’s a quick guide to get you started on this essential task.

This tutorial will guide you on how to create a backup of your Windows 10 system and files on an external hard drive, ensuring your data is safe and secure.

Step 1: Connect Your External Hard Drive

Plug the external hard drive into your computer’s USB port.

Make sure your computer recognizes the external hard drive. You’ll see it pop up in the File Explorer under “This PC.”

Step 2: Open the Settings Menu

Click the Start button and select the gear icon to open Settings.

The Settings menu is your gateway to managing various aspects of your Windows 10 system.

Step 3: Navigate to Update & Security

In the Settings menu, click on “Update & Security.”

This section contains options for keeping your system updated and secure, including backup settings.

Step 4: Select Backup from the Update & Security Menu

Click on “Backup” from the sidebar.

This is where you’ll find the option to set up a backup using File History.

Step 5: Add a Drive

Under the “Back up using File History” section, click “Add a drive.”

A list of available drives will appear. Select your external hard drive from the list.

Step 6: Set Up Your Backup

Once your drive is selected, click on “More options” to customize your backup settings.

Here, you can choose how often your files are backed up and how long they are kept.

Step 7: Start the Backup Process

Click the “Back up now” button to initiate the backup process.

This step will start copying your files to the external hard drive immediately.

After completing these steps, Windows 10 will begin backing up your files to the external hard drive. Depending on the amount of data, this process might take a while. Once done, your files will be safely stored on your external hard drive, ready for recovery if needed.

Tips for Backing Up Windows 10 to External Hard Drive

  • Regular Backups: Ensure you back up your data regularly to keep it up to date.
  • Check Storage Space: Make sure your external hard drive has enough storage space for your backup.
  • Label Your Drives: Label your external hard drive to avoid confusion with other devices.
  • Safe Ejection: Always safely eject your external hard drive to prevent data corruption.
  • Keep it Secure: Store your external hard drive in a safe place to protect it from physical damage.

Frequently Asked Questions

How often should I back up my data?

Backing up your data at least once a week is recommended to ensure you have the latest versions of your files.

Can I use any external hard drive for backup?

Yes, as long as it has enough storage space and is compatible with your computer.

What happens if I disconnect the drive during backup?

Disconnecting the drive during backup can result in incomplete or corrupted backups. Always wait for the process to finish.

Can I back up my entire system?

Yes, Windows 10 allows you to create a system image that includes your entire system, including installed programs and settings.

How do I restore my files from the backup?

You can restore files through the “Restore files from a current backup” option in the Backup settings menu.

Summary

  1. Connect your external hard drive.
  2. Open the Settings menu.
  3. Navigate to Update & Security.
  4. Select Backup from the Update & Security menu.
  5. Add a Drive.
  6. Set up your backup.
  7. Start the backup process.

Conclusion

Backing up Windows 10 to an external hard drive is a straightforward and crucial step to safeguard your data. By following the steps outlined in this guide, you can easily create a backup and ensure your files and system settings are secure. Regular backups, checking your storage space, and handling your external hard drive with care are key practices to maintain the integrity of your data.

Protecting your data is like having a safety net; you hope you never need it, but it’s invaluable when you do. After completing your first backup, make it a habit to perform regular backups to keep everything current. If you encounter any issues, don’t hesitate to revisit this guide or seek further assistance. Happy backing up!

Matthew Burleigh has been writing tech tutorials since 2008. His writing has appeared on dozens of different websites and been read over 50 million times.

After receiving his Bachelor’s and Master’s degrees in Computer Science he spent several years working in IT management for small businesses. However, he now works full time writing content online and creating websites.

His main writing topics include iPhones, Microsoft Office, Google Apps, Android, and Photoshop, but he has also written about many other tech topics as well.

Read his full bio here.

Backup the Entire Hard Drive: What’s Your Purpose?

I want to protect all data saved on my computer. How can I back up my entire computer? Is there any easy way to do it? Thanks in advance.

A computer hard drive (including HDD and SSD) stores your computer’s operating system, applications, and data files, such as documents and pictures. Other components in your computer work together to show you the applications and important documents stored on your hard drive. You might want to backup your entire hard drive for several reasons. Maybe you’re upgrading to a new computer and want to move everything over. Or perhaps you’re worried about data loss and want to create an extra copy of everything, just in case.

Based on the application of your hard drive, you should create different types of backup.

📀For example, if the hard drive you want to back up is the system disk, you’d better create a system image backup. Because once the hard drive is damaged, you should restore the whole system, including all files, configurations, disk settings, and even disk layout.
💾If the hard drive you want to back up is a data disk, you can only back up files and folders.

🪁Further Reading:  Backup Hard Drive to Another Hard Drive | Backup an External Hard Drive to Another

How to Backup Entire Hard Drive Windows 10 — Tools

Once you have made it clear what kind of hard drive your disk is and what kind of backup you want to create, you should decide what backup tools to use. There are three backup options on Windows 10 computers, File History, Backup and Restore (Windows 7), and OneDrive. Can you back up your entire hard drive with these Windows 10 backup programs? Maybe. Why? Let me walk you through what they can do.

1️⃣Windows Built-in Backup Programs

  • File History: «File History regularly backs up versions of your files in the Documents, Music, Pictures, Videos, and Desktop folders and the OneDrive files available offline on your PC. Over time, you’ll have a complete history of your files. If the originals are lost, damaged, or deleted, you can restore them.» File History will automatically backup files to external hard drive without any hassle.

*Information resource: Microsoft Windows Support.

  • Backup and Restore (Windows 7): Backup and Restore was first released in Windows 7 and continues to work as the backup utility in Windows 8/8.1/10/11. So in later Windows systems, there is a note saying this function originated from Windows 7. You can access Backup and Restore in Control Panel, back up personal files in Libraries and Desktop, and create a system image with it. (Backup and Restore review: Is Windows backup any good?
  • OneDrive Sync: Developed by Microsoft, OneDrive is a cloud drive to which users can sync and upload files. Once set up and log in to the account to OneDrive, you can sync your computer files to OneDrive as a backup copy.

OneDrive User Guide You May Be Interested:

Use OneDrive to Backup and Restore Sync Desktop to OneDrive Automatically

In conclusion, File History only backs up personal files in specific folders; Backup and Restore can only create a system image and back up some personal files; OneDrive only syncs files to the cloud. So if you want to back up the system hard drive, you can use Backup and Restore. But if you’re going to back up the system hard disk and the regular data hard disk, the backup tool with Windows cannot meet your needs.

🔥Related reading: Why Is My Windows 10 Backup Taking So Long?

2️⃣Comprehensive Tool to Backup Full Hard Drive in Windows 10

The criteria for comprehensive backup software is flexibility. Such a tool must give users enough authority to customize the content they want to back up. EaseUS Todo Backup is one such tool. Here are the features of EaseUS Todo Backup: 

  • Create a full backup of your Windows 10: you can backup files, systems, disks, and partitions.
  • Manage backup files: You can set it to keep specific numbers of backup files and delete the old backup files to save backup disk space.
  • Various backup options: you can create an incremental or a differential backup; you can also set up an automatic backup plan to backup upon a certain event.
  • Flexible backup destinations: you can choose to save your backup to a local drive, cloud drive, network drive, and EaseUS cloud (AWS-based service).

You can see that with the above features, you can backup hard drive Windows 10 with only one software. EaseUS Todo Backup is the best way to backup Windows 10 for anyone who wants to make a full disk backup to the computer. By the way, you can create a completely free backup with this software.

No extra payment but more backup options; EaseUS Todo Backup is the best free backup software for Windows users.

📖Further Reading: Where Does Windows Backup Save to? | Restore System Image from External Hard Drive

How to Backup Entire Disk: Set Up File History in Windows 10

Let’s start with personal file protection. According to the introduction of Windows backup tools, File History saves different versions of selected files and folders. If you want to back up your files, follow this guide to set up File History in Windows 10:

However, you need to note that when using this utility, you may encounter issues like File History not recognizing the hard drive, File History not backing up all files, etc.

✅Before, you need to clarify how much space a Windows backup takes. Ensure the target location has enough storage space to accommodate the backup data.

Step 1. Access File History via either Control Panel or Windows Settings. You can see how to get the entry from the image below.

access file history in windows 10

acess windows 10 file history via settings

Step 2. If you don’t set up a backup drive before, you will see the message «File History is turned off». Click the «Turn On» button to enable File History. The available locations can be an external hard drive and a network drive. If you want to change the backup location, click the «Select drive» button.

File History running

Advanced settings of File History Feature

In Advanced settings, you can change how often to execute a File History backup and how long to keep the backup versions.

By default, File History runs every hour, but the available time interval varies from every 10 minutes to a maximum daily (24 hours). Creating a backup every 6 or 12 hours is recommended to ensure higher backup frequency and less disk space consumption.

file history advanced settings 1

How Often Should File be Backed Up?

file history advanced settings 2

How Long Does A Full PC Backup Take?

Backup Entire Hard Drive: Create A System Image Backup on Windows 10

As mentioned before, if you have only one hard drive on your computer, the system partition and data partitions are on the same disk. The best way to back up the entire hard drive on Windows 10 is to create a system disk image. According to the illustration in part — How to Backup Entire Hard Drive Windows 10 — Tools, EaseUS Todo Backup is your best free choice to create such a full backup and restore. Download it from the button below, and follow our guide to create a system image backup for your Windows 10 computer.

*Back up the system to an external hard drive is best. Choose an external storage device to save your backup image.

Step 1. Launch EaseUS Todo Backup and choose «Create Backup» on the home page, click «Select backup contents«.

create system backup step1

Step 2. Among the four available categories, click «OS» to start back up.

create system backup step2

Step 3. The system partition will be automatically selected, you only need to select the location.

create system backup step3

Step 4. Local Drive, Cloud, and NAS are available for you to save the backup file. You can also connect an external hard drive to preserve the system backup files.

create system backup step5

Step 5. You can customize the settings in «Options» at the left bottom. After that, click «Backup Now«, and the process will begin.

create system backup step 5

*After finishing the backup process, you can check the backup status, recover, open, or delete the backup by right-clicking the backup task on the left.

Backup and Restore (Windows 7) can also help you to create a system image. If you prefer to use the Windows built-in tool, follow this article to see how: How to Use Backup and Restore (Windows 7)

🎥Here is a YouTube video showing you how to use the built-in tool to back up a Windows 10 PC to an external hard drive.

⏱️Time Stamp:

  • 00:02 Backup your Windows 10 PC to an external hard drive
  • 01:42 Backup your files every hour
  • 03:04 Exclude some folders

how to back up your Windows 10 PC to external hard drive

🚩Read Also: Restore File form Backup on Windows 10

FAQs

1. How do I backup my entire hard drive?

There are many ways to backup your hard drive on laptops or computers. You can use Windows’ built-in backup tool, or you can use a third-party backup tool. For the backup tool that comes with Windows, it is recommended to use Backup and Restore (Windows 7) to create a system image. For the third-party backup tool, we recommend you use EaseUS Todo Backup. You can either make a system backup or back up a whole disk or partition with it.

2. Do I need to backup my entire hard drive?

Backing up your entire hard drive is not required, but it is recommended. By backing up your entire hard drive, you will be able to restore your computer to its original state if something goes wrong.

3. How often should I backup my hard drive?

You must backup your hard drive at least once a week. However, if you are only backing up some of your files, you can backup them less frequently.

4. What happens if I don’t backup my hard drive?

If you don’t back up your hard drive, you risk losing all your data if something goes wrong. For example, if your hard drive crashes, you will lose all your data unless you have a backup. Therefore, it is very important to regularly back up your hard drive.

An old IT saying goes: «You never realize how important backups are until you need one and don’t have it.» Unfortunately, this is true even today. While consumers are more tech-savvy than ever, many computer users still neglect to create copies of their hard drives to protect their data from potentially permanent loss.

In this article we will cover:

  • Backup hard drive basics
  • A hard disk backup explained
  • What is not considered a backup 
  • Why a hard drive backups are essential
  • Available Backup Options
  • How to back up your computer hard drive
  • Restoring data from a  backup
  • Summing up

Backup
hard disk basics

Users sometimes neglect to perform backups because
they have a reputation for being cumbersome to create, maintain and manage.
While backups can be tedious without the right tools, modern hard disk backup
software and methods make the process much easier and faster. This article covers how
to back up a computer and perform a hard disk recovery if your data is ever lost.

backup your hard disk drive

What
is hard disk backup?

While the definition of a backup is simple enough, this is where the simplicity ends for many consumers. A backup is a copy of the data stored on your hard drive and various methods to create one easily. Therefore, it’s essential
to understand what a backup is, what one does and – perhaps just as important
– what a backup is not.

Backup data from a computer hard disk can be
saved to any one of several mediums, including:

  • Other external drives (local
    drives or ones on a network — external SSD, portable hard drive)
  • External storage devices (USB
    flash or hard drives)
  • Online or cloud storage
    accounts
  • Another hard drive partition (a
    disk partition is a separate and distinct section on the same hard drive)

Backup data – a repetitive process

As mentioned above, a backup is a copy of data created from a computer or device. Nonetheless, a backup is just a copy of data at a particular point in time. A backup must be repeated or recreated to preserve or record any incremental changes to the data. While many backups are automated processes that create copies of existing data on your hard disk, even automation requires effective scheduling to keep saved or backed-up data current. If a manual or scheduled backup is not run, new or changed files are not saved or archived to external storage

What is not considered a backup?

There are many ways to approach hard disk
backup. For instance, you can copy data from one drive to another, which would
be considered a backup. Likewise, you can store a copy of your data online or
in the cloud. Finally, you can save important files to a USB or
external hard drive. However, the backup process for USB drives grants limited
results.

About cloud storage

There are many ways to approach a hard disk
backup. Still, some methods or processes considered to be backups are not. For
instance, a cloud storage solution application, such as Google Drive or
Dropbox, to synchronize files in a specific folder with your cloud account would
not be considered a true backup. Now, it is easy to think of synchronized files
saved in an online storage account as «a cloud backup»— after all, it stores data off-site and
on an external server. Nevertheless, there is only one version of the files. When
you update a file in the synchronized folder, the file on the cloud storage
site also changes.

Syncing files deletes previous versions

Because synchronization updates files on
your hard disk and the cloud, you may or may not have access to a previous file
version. Only some cloud storage solutions retain a few previous data versions
after synchronization. This is a significantly different approach from that of
a true backup. File versions in a true hard disk backup do not change whenever
you create a new backup — unless you overwrite and delete the previous backup
with the new one. Hence, keeping several data copies simultaneously helps you
revert to earlier file versions if needed.

why backups are essential

Why a hard drive backup is essential?

A hard disk backup is vital for protecting
valuable data and files stored on the machine. Yet, countless people still need
to realize how critical it is to keep good backups and why. Thus, it’s essential
to understand why backups are crucial.

The lost
effort, time, and money

If time is money, all the time spent
creating data files on your PC is a tremendous waste of money if you ever lose
them — not to mention the wasted effort and lost productivity. When you lose
important documents and media, expenditures in terms of time and effort double
because of the need to create the lost data from scratch. Unless you have a
backup disk available for recovery, a simple backup task can save you
tremendous time, effort and, ultimately, money.

Hard
drive recovery is expensive

Nothing lasts forever; the same
applies to computer hardware, especially hard drives.

In many computers, the hard disk is
the only mechanical device in the entire system (traditional hard drives have
motors and platters). And just like any other mechanical device, a hard disk
will fail eventually. Even if you’ve never experienced a hard disk crash,
chances are you know someone who has.

If your hard drive fails, there is a
chance that you can recover your data. Depending on the type of drive problem
(such as a drive failure or deleted partitions), you may be able to use hard drive recovery tools and software or enlist a data recovery service. It’s
important to note that good hard disk recovery software is not cheap, and a
recovery service can cost you hundreds, if not thousands, of dollars. A
reliable hard disk backup could save you considerably if your drive does fail.

To avoid a costly hard drive
recovery, you can back data to an external hard drive. Even if that sounds like
a simple backup task, there are some guidelines to follow and ensure a healthy
backup scheme.

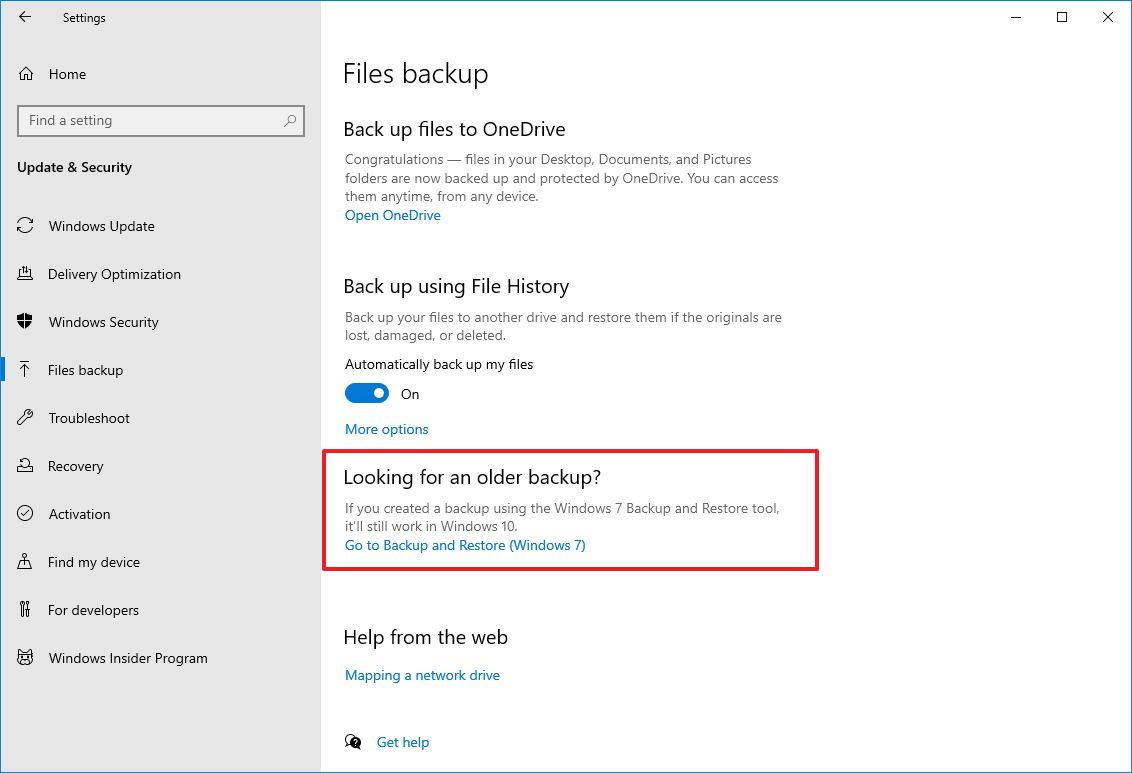
Windows users can have two native
Windows operating system options to perform a partial or a full backup.

1. Partial
hard drive backup for Windows

  1. Connect your preferred external
    drive to the PC. (here, you can use an HDD or rely on solid state drives
    (SSD); the latter offer fast performance and higher write speeds, but
    their high capacity comes at a higher price)
  2. Open the «Start»
    menu

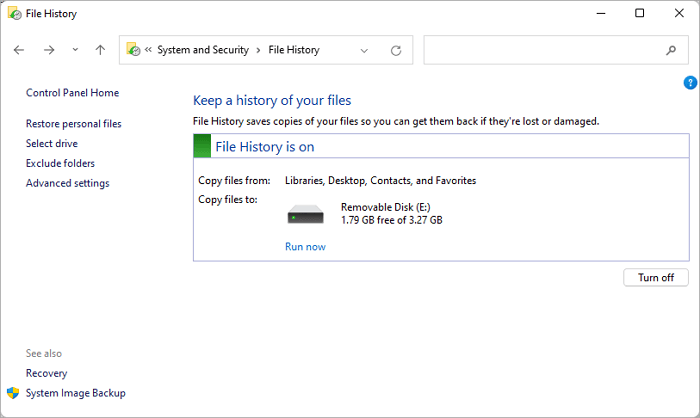
For Windows 11 — type «File
History»
and select the option

For Windows 10 — type «backup»
and choose «Backup settings»

  1. Select «Add a
    drive»
    to select the external disk you wish to use for the backup
    task
  2. In the «Select a
    drive» pop-up
    , you’ll see all connected external drives to your
    PC; select the drive you wish to use for the backup
  3. You will see the «Automatically
    back up my files»
    option enabled

The option lists default files and folders users
commonly back up. To add or remove options from the list, select «More
options.»

Review the folders under «Back up these folders.» If any are missing, choose «Add a folder» and browse to select them.

Once the configuration is completed,
Windows File History will create a regular backup if the backup disk is
connected to the PC.
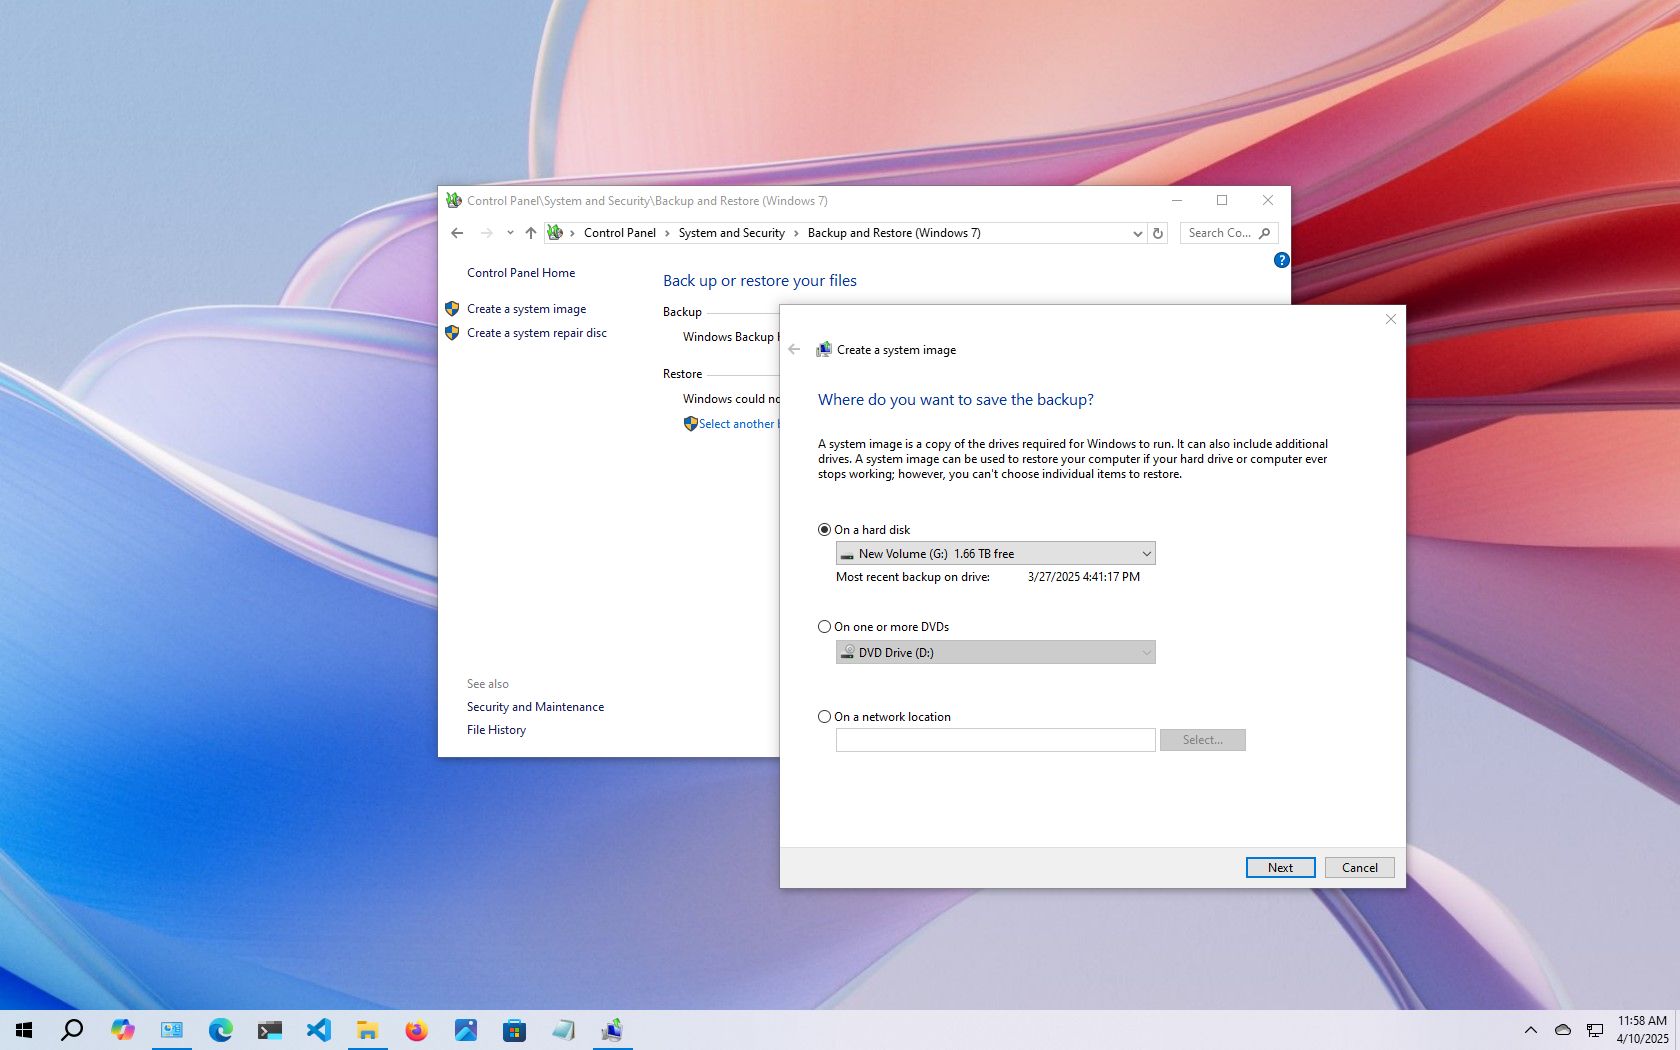
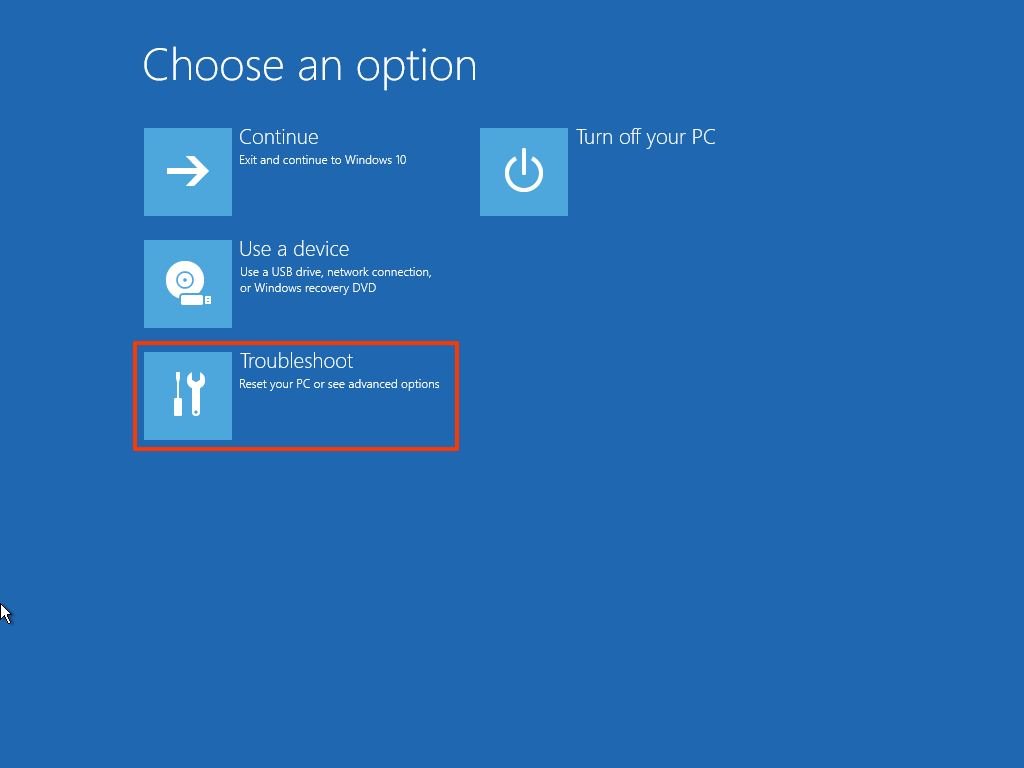
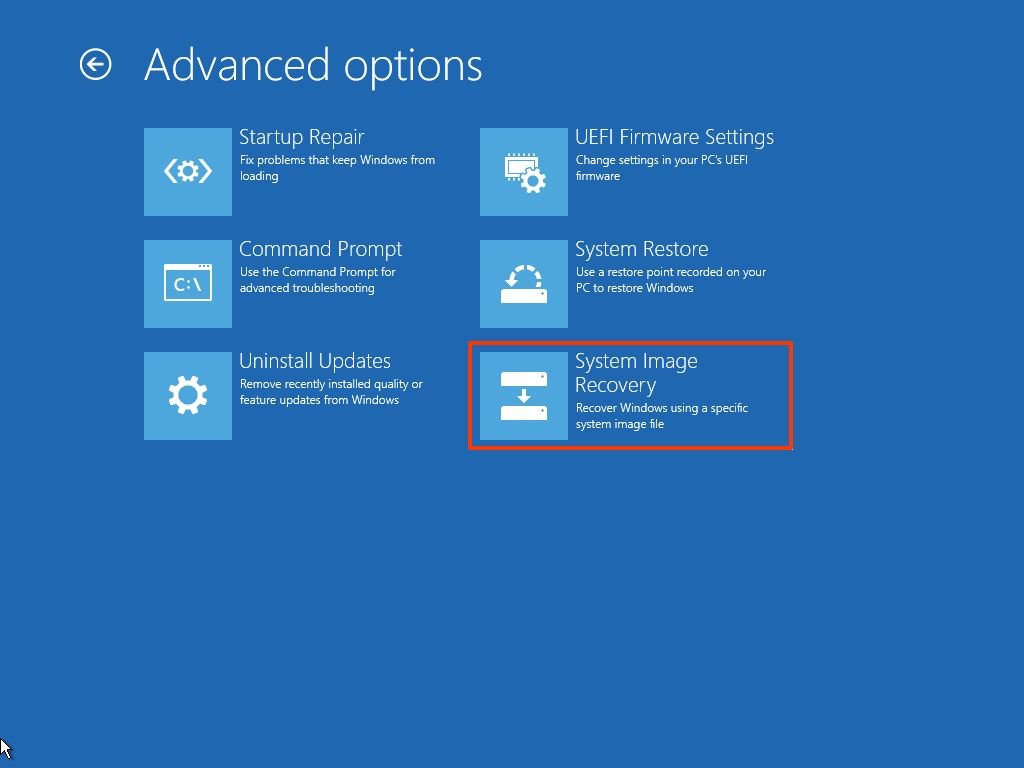
2. Full
system backup for Windows

If you want to create a full backup rather than a partial disk image, you’d go for a «system
image». This backup scheme will comprise your entire Windows system —
files, folders, operating system settings, and more.
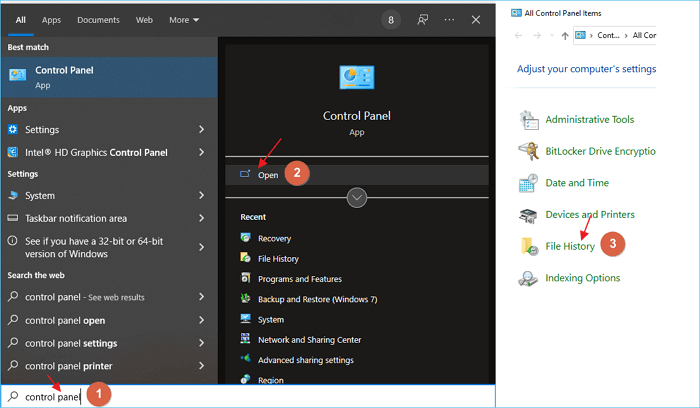
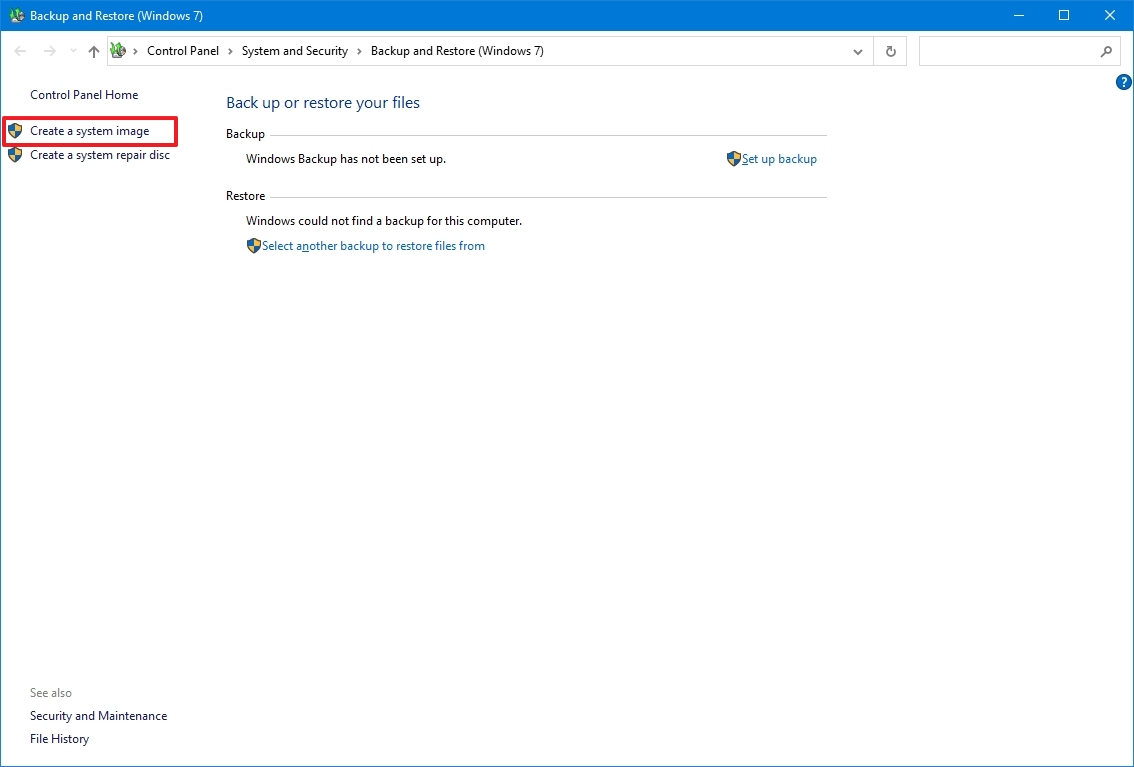
  1. Type «control
    panel»
    in the Search bar and select the «Control
    Panel» app
  2. Choose «Backup and
    Restore (Windows 7)»
  3. Select «Create a system
    image»
    from the left menu pane
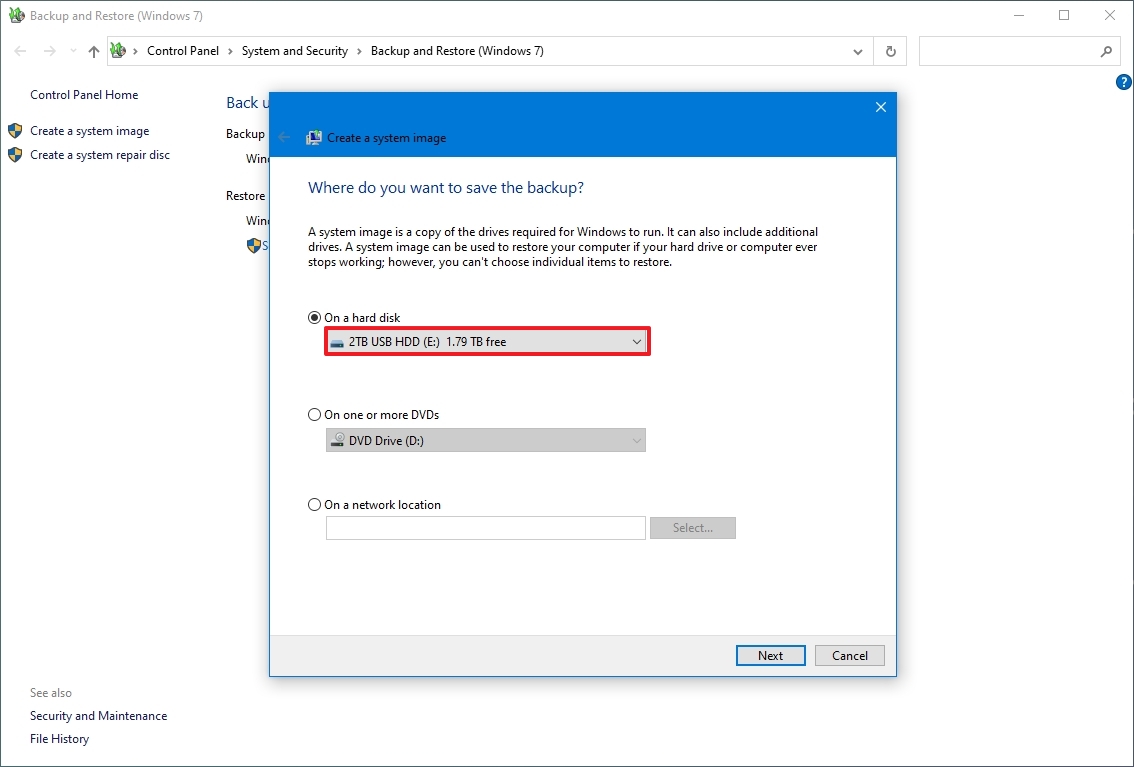
  4. You’ll see a «Create a
    system image» pop-up window
    -> select your preferred external
    drive from the «On a hard disk» drop-down list
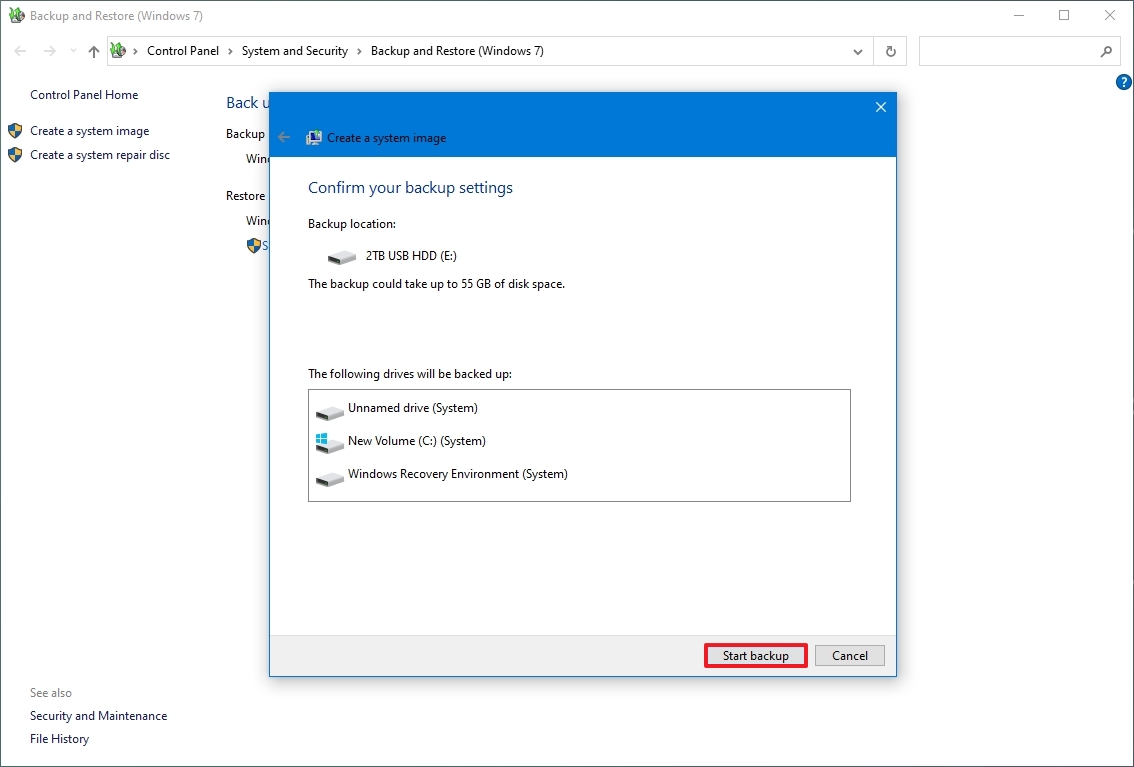
  5. In the following window, you’ll
    see a list of system partitions ready for backup as part of the system
    backup on the external drive; select «Start backup» to
    start the process
  6. Depending on your Windows
    system size, the entire backup may take a while to complete. Once it’s
    complete, you can safely disconnect the external drive and store it in a
    secure location

External
hard drive backup for Mac users

Mac users can use Time Machine, the
native Mac feature, to automatically back up personal data and media.

  1. Connect an external backup
    device to your Mac. (e.g., HDD, SSD, USB-C)

If you want to use a USB type A, but
your Mac doesn’t have such a port, you’d need a USB type C connector.

  1. Open «Time
    Machine»
    from the «Time Machine» menu
  2. In the «Time
    Machine»
    settings, select the external storage device and the
    backup destination

On macOS Ventura (or later), click
the (+) button -> follow the onscreen instructions

For earlier macOS versions click «Select
Backup Disk»
-> follow the onscreen instructions

  1. If the storage media stores
    previous backup(s) from another Mac, you’d need to either delete them or
    claim them as part of your current Mac backup; You can also choose to
    start a new backup
  2. To do so manually, select «Back
    Up Now»
    from the «Time Machine» menu

You can also wait for the automatic backup to kick in. This will be every hour for the last 24 hours, with daily
backups for the past month and weekly copies for previous months. Once the
storage space is full, Time Machine will delete the oldest data copies.

Some
data is just irreplaceable

Although annoying and
time-consuming, recreating many types of data is possible. Still, there are
specific files you may never be able to replace if you don’t back up the computer. Consider all the photos, videos,
important emails, and other personal files you have that would be impossible to
replace. With some file types, a lack of a hard disk backup is just an
expensive inconvenience. With some files, though, data loss is much more
personal and painful – and permanent.

Files you should backup

By now, you should be convinced of how
important it is to create a hard disk backup. (at least occasionally). However,
you may wonder what files you need to back up on your computer’s hard drive. In
a perfect world, you would back up everything on your PC whenever you create a
new file or change your data. In most cases, though, this is neither practical
nor necessary.

Complete
system backups

Depending on the size of the hard drive in
your computer and the amount of data you have, a complete system backup can
take a long time. And if you’re backing up to an online backup service, it could take even longer –
especially if you don’t have a fast internet connection. While complete system
backups can be time-consuming, you should still perform them occasionally.
Whether you have a Windows PC or laptop, or a Mac computer or
MacBook, a complete system backup is a good idea to create when you buy the
machine. Creating a backup on a new computer (or operating system installation)
enables you to quickly recover your hard drive to factory default settings by
restoring the machine with the backup. Even if you can’t back up a new machine,
you should create at least one full backup as soon as possible.Depending on the size of the hard
drive in your computer and the amount of data you have, a complete system
backup can take a long time. And if you’re backing up to an online backup service, it could take even longer –
especially if you don’t have a fast internet connection. While complete system
backups can be time-consuming, you should still perform them occasionally.
Whether you have a Windows PC or laptop, or a Mac computer or MacBook, it’s a good idea to create a
complete system backup as soon as you buy the machine. Creating a backup on a
new computer (or operating system installation) enables you to quickly recover
your hard drive to factory default settings by restoring the machine with the
backup. Even if you can’t back up a new machine, you should create at least one
full backup as soon as possible.

Essential
files and folders backup

IIn some cases, creating complete system
backups of your computer’s hard disk may be challenging. If you have limited
space for backups or need to store data copies online with a slow internet
connection, creating complete system backups may not be convenient or possible.
When a full system backup is not an option, it’s wise to regularly create an
incremental backup of important files and folders. If you get in the habit of
saving important data files in a few select folders, creating quick backups of
your essential data should be relatively quick and painless. When determining
which files to back up, select crucial documents, photos or any other files
that would be difficult or impossible to reproduce or replace.
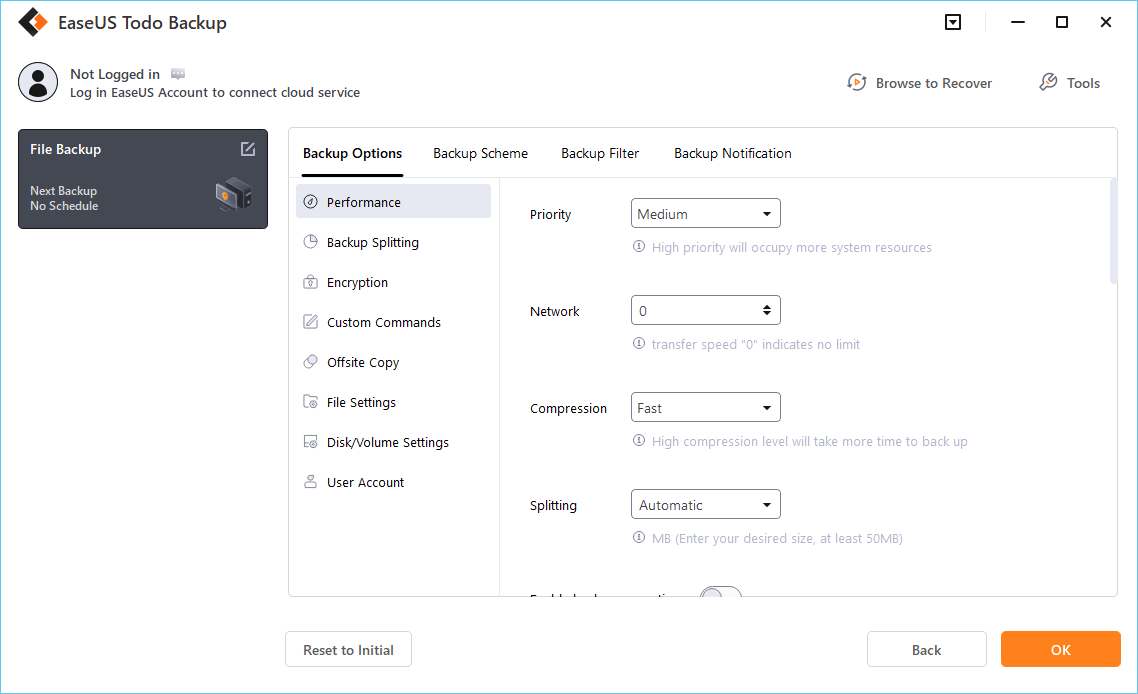
Available
backup options

When creating a hard disk backup, a quick
Google search reveals countless options and possibilities for applications,
platforms, and storage media. However, not all backups are created equal; some
are easier to work with than others. To help you understand some of your options,
let’s cover a few of the most popular hard drive backup methods.

Local
SSD/Hard drive backup

One of the easiest and quickest ways to
protect your data is to back it up to another hard disk. If you have multiple
drives in or attached to your system, you can back up data to a secondary
drive, a USB flash, or external drives or even to a drive in a PC connected to
the same network. Depending on the type of local drive you use, the steps to
back up the device may vary. However, local hard disk backup usually requires
little more than moving files from your primary drive to a backup hard drive or
a recovery partition.

Pros
and cons of local backups

Creating a local hard disk backup is
very convenient because you always have backup data nearby and can restore it
anytime, quickly and easily. A problem with local backups is that backup data
can be lost if a disaster, theft, or other event renders the local backup drive
inaccessible.

backing up to the cloud

Cloud hard drive backup

If you have a relatively fast broadband
internet connection, hard disk backup to the cloud can be an excellent option –
especially if local disk drive space for backups is limited. Better online hard
disk backup solutions, like Acronis Cyber Protect Home Office, provide a simple
way to create full or partial backups of your computer hard drive and then
transfer them to the cloud for storage on encrypted, secure servers.

Advantages
and Disadvantages of off-site and cloud backups

Backing up your local hard disk to an
off-site or cloud location offers one obvious and significant advantage. If you
lose access to the primary system hard drive due to hacking, theft, fire, or
another disaster, you can always download backups from the cloud or off-site
server to recover your data or reinstall new hardware. Conversely, the downside
of off-site and cloud backups is that you must trust your drive backup in the
hands of a third party. With the best online backup services, this should not
be an issue, as they protect your data with hardened security and encryption.
However, security protocols used by online backup services are not all created
equal, and some service providers ensure better data protection than others.

SSD and hard drive cloning

Although not used as commonly as external
hard drives or cloud backups, disk cloning is another effective method of ensuring access
to the data on your hard drive. A clone hard drive is essentially a second drive that
contains an exact mirror disk image of the original (or source) drive. Years
ago, disk image cloning was only possible using expensive hard drive
duplicators. However, in recent years, leading backup software companies like Acronis have developed desktop cloning
software that makes creating exact duplicates of the system drive (or other
local drives) as easy as a few mouse clicks. With Acronis True Image, you
can create a mirror-image copy of any hard drive. With partitioning backup software such as Acronis Disk
Director or Windows Disk Management, you can even make a clone partition on the
same hard drive (as long as you use two different drive letters and volumes).

The
3-2-1 backup strategy

With many backup options and choices
available, you may wonder which one is right for you. The truth is that you
should never settle on just one type of backup. An excellent backup approach
should include multiple backup options and storage locations. At Acronis, we
refer to this wise, efficient backup method as the 3-2-1 rule. The 3-2-1 rule
states that you should:

  • Create three copies of your
    data so that it can never be wiped out by a single event.
  • Use two formats to back up your
    hard drive (such as a local drive backup and a cloud or external hard
    drive backup).
  • Store one backup copy off-site
    to protect against physical disasters such as fires, floods, theft, etc.

When planning a personal backup
strategy, you should assume that a data loss event will occur eventually. Using
the simple Acronis 3-2-1 rule and backup strategy, you can ensure your data is
always protected – no matter what happens.

How
to back up your computer hard drive

With some backup software,
configuring, running, and managing backups can be tedious and time-consuming.
But with Acronis True Image, creating a backup couldn’t be
easier. Check out the quick tutorial below to see how easy it is to create a
backup using our backup software.

Local
and cloud backup

Acronis True Image lets you configure and run quick and efficient
hard drive backup. Whether you want to back up your computer hard disk locally
or to the secure Acronis Cloud, you can do either with just a few mouse clicks.
This quick walkthrough will show you everything you need to do to create a
quick backup with Acronis True Image.

Step 1 – Launch Acronis Cyber True
Image on your computer. After the application opens, click «Backup» on
the left side of the program window.

Step 2 – Hover your mouse cursor
over the monitor image labeled «Entire PC.» After
the text changes, click «Change Source.» The Backup
Source window appears.

Step 3 – Select the source of the
files you want to back up. If you’re going to back up your whole system
(including the operating system), click the «Entire PC» option.
In this example, we will back up only a select folder, so click «Files
and Folders,»
 choose items for backup, and click «OK».
The selected folder now appears in the main backup window.

Step 4 — Hover your mouse cursor
over the «Acronis Cloud» image. After the text
changes, click «Change Destination.» The Backup Destination window
appears. Click the destination drive you want to use to store the backup. In
this example, we will use a local external hard drive, but the process for
storing to the Acronis Cloud is the same.

Step 5 – Click the «OK» button,
and then click «Back up Now.» Wait for Acronis True
Image to back up the selected items. After the backup finishes, a green check
mark appears in the main backup window. The backup is now present on the
selected destination drive (or in the Acronis Cloud if you selected that option).

backing up your PC with Acronis True Image
fastest backup
hdd backup — Step 1
hard drive backup — Step 2
hdd backup — Step 3
full hdd backup — Step 4
computer hard drive backup — Step 5
backing up to an external drive
running backup
easy backup process
Choosing backup source
backing up your hard disk drive
hdd backup — DONE

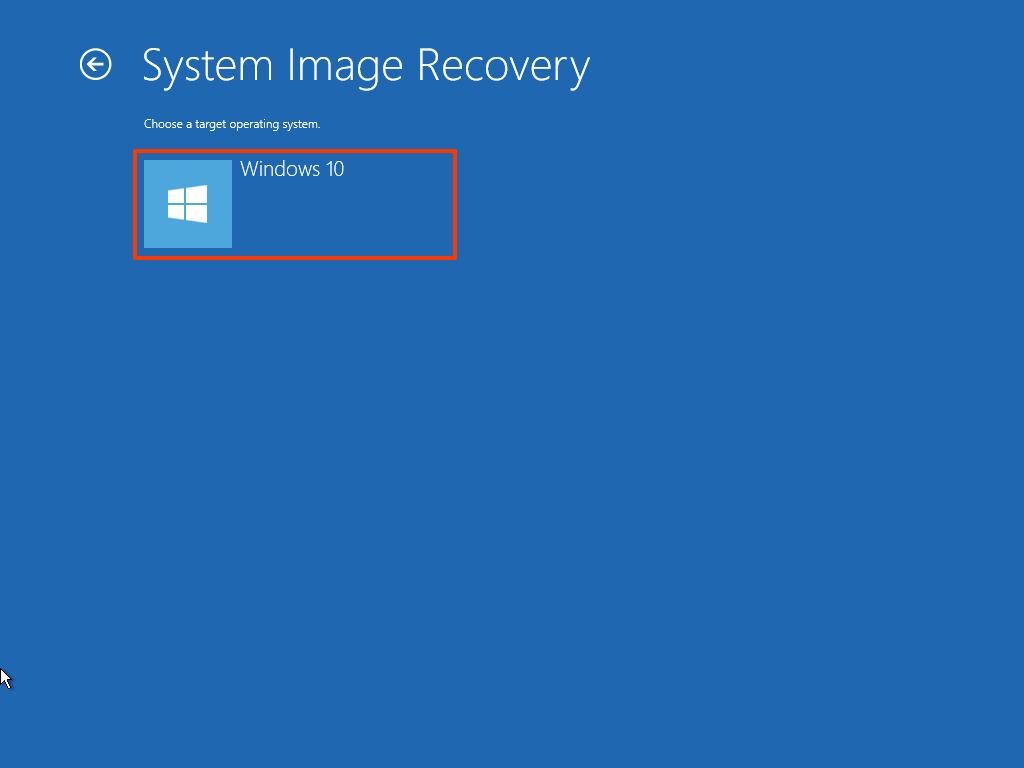
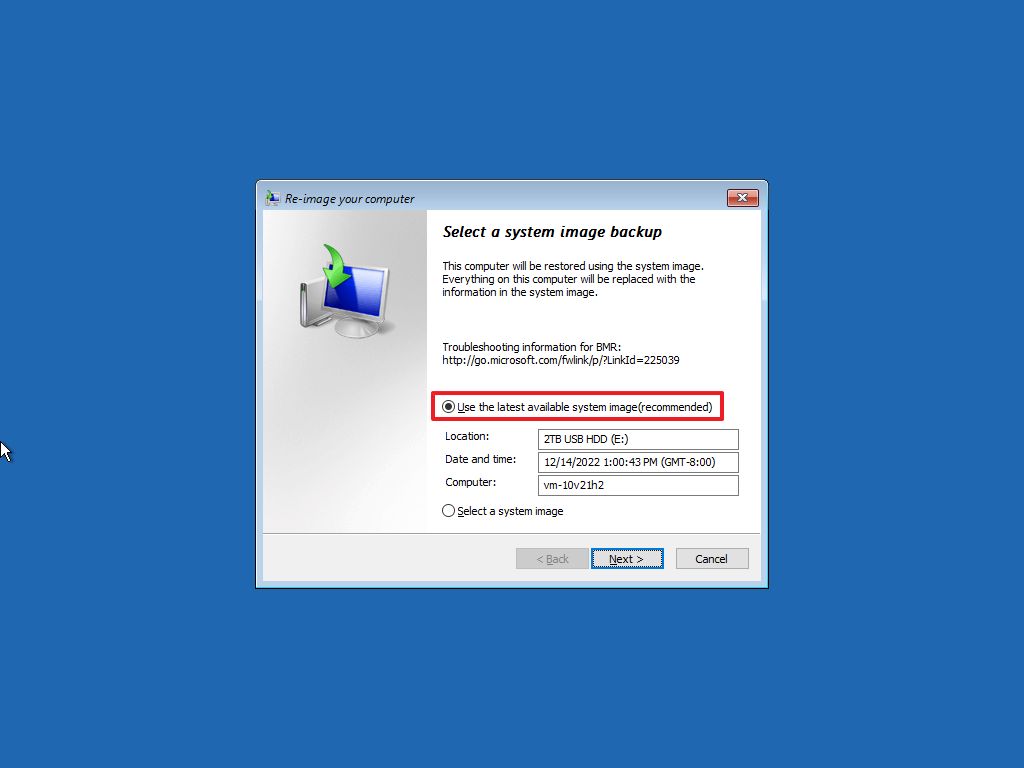
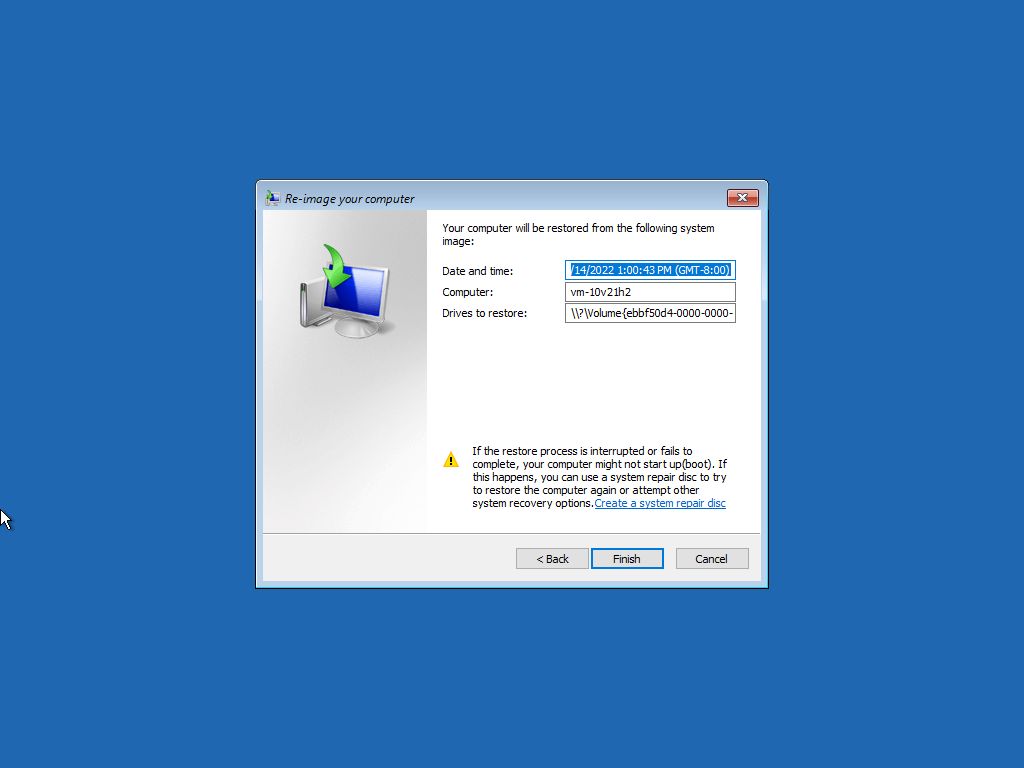
How to restore data from a backup with Acronis True Image

While creating accurate, thorough backups quickly is important, backup software is only as good as its ability to let you restore your data easily. With Acronis True Image, you can restore backup quickly and confidently with only a few mouse clicks.

Step 1 – Launch Acronis True Image on your computer. After the application opens, click «Backup» on the left side of the program window.

Step 2 – Select the backup name on the left side of the main backup window. Use the checkboxes to select the items that you want to restore. If you wish to recover all items in the backup set, click the checkbox next to the «Name» label. Click the «Next» button.

Step 3 – Select the recovery destination folder or drive. By default, Acronis True Image selects the backup source location as the recovery destination. Click the «Recover Now» button. Wait for Acronis True Image to restore the backup to the selected destination. After a successful recovery, a green check mark appears in the main backup window.

restoring you computer from backup — Step 1
restoring your Mac or PC from a backup — Step 2
restoring from a backup — step 3
process of restoring your data from a backup
process of restoring from a backup
select files and folders to recover
restore your disk drive — DONE

Acronis True Image —
integrated computer security software with backup features

Acronis Cyber Protect Home
Office (formerly Acronis Cyber Protect Home Office) offers everything you need to safeguard
your device and backed up data from all of today’s threats — from disk failures
to ransomware attacks. Thanks to its unique integration of backup and
cybersecurity in one, it saves you time and reduces the cost, complexity, and
risk caused by managing multiple solutions.

Get Acronis True Image today and protect yourself from all cyber threats! 

Backup Your World: Discover Our Personal Backup Solution Today!

Windows 10 backup

Windows 10 backup
(Image credit: Mauro Huculak)

When planning a recovery strategy for your Windows 10 device, creating a full system backup should be your top priority. It is the most reliable method to safeguard your system against potential threats, including hardware failures, software glitches, upgrade issues, and malware attacks that could corrupt your files or compromise the operating system.

Failing to back up your system regularly puts your most valuable data (documents, irreplaceable photos, and custom configurations) at serious risk. Many users only realize the importance of a backup after it’s too late.

Fortunately, Windows 10 offers several options to help you protect your data. You can use third-party software to create a complete system image, manually copy files to an external drive, or sync your data to a cloud storage service like OneDrive. However, if you prefer to avoid third-party solutions or manual steps, Windows 10 still includes a built-in System Image Backup tool, part of the legacy features, which lets you create a full backup with minimal effort.

A system image is essentially a full snapshot of your entire system. It includes everything (Windows installation files, settings, applications, and all your personal files). This method is especially effective when recovering from severe issues such as hard drive failure or when rolling back to a previous version of Windows 10 after a problematic update.

Using a full backup ensures peace of mind and quick recovery, making it an essential step for data protection and system reliability.

In this how-to guide, I’ll outline the steps for creating a full backup with all your custom settings, apps, files, and installation using the system image tool.

Recent updates

These instructions has been updated to ensure accuracy and reflect changes to the process in the operating system.

How to create a backup with system image tool on Windows 10

The system image tool allows you to create a full backup to an external drive or network-shared folder. However, it is best to use removable storage, which you can disconnect and store in a different physical location.

All the latest news, reviews, and guides for Windows and Xbox diehards.

Quick note: The System Image Backup tool for Windows 10 is no longer a maintained feature, but you can still use it for the foreseeable future. The instructions outlined in this guide are meant to create a temporary full backup while the feature is still available. You can also read this guide with alternative ways to back up your computer.

To create a full backup of Windows 10 with the system image tool, use these steps:

  1. Open Settings.
  2. Click on Update & Security.
  3. Click on File backup.
  4. Click the «Go to Backup and Restore (Windows 7)» option under the «Looking for an older backup?» section.

Windows 10 settings backup option

(Image credit: Mauro Huculak)
  1. Click the «Create a system image» option from the left pane.

Control Panel create system image option

(Image credit: Future)
  1. Select the «On a hard disk» option.
  2. Use the «On a hard disk» drop-down menu and select the location to export the Windows 10 full backup.

Windows 10 select backup destination

(Image credit: Future)
  1. Click the Next button.
  2. (Optional) Select any additional hard drives to include them in the backup.
  3. Click the Next button.
  4. Click the Start backup button.

Create a full backup on Windows 10

(Image credit: Future)
  1. Click the No button.
  • Quick note: You’ll also receive a prompt to create a system repair disc, but because most devices no longer include an optical drive, you can skip it. If you must restore the machine, you can use a USB installation media to access the recovery environment.
  1. Click the Close button.

Once you complete the steps, the tool will create an image of the entire system, including everything on the primary hard drive and other drives you may have selected.

While the backup is in progress, you can continue working on the device since it uses the «Shadow Copy» feature to backup files even if files are open and apps are running.

After the process, you can disconnect and store the external drive safely. If you have valuable data, you may consider keeping the backup in a different physical location.

How to restore a backup with system image tool on Windows 10

If you need to replace the hard drive or hardware failure occurs, you can use one of the backups to recover the device and files.

To restore a backup on Windows 10, use these steps:

  1. Connect the drive with the full backup to the device.
  2. Connect the Windows 10 USB bootable drive to the computer.
  3. Start the computer.
  4. On the USB bootable drive startup prompt, press any key to continue.
  • Quick tip: If the device does not start in the Windows Setup wizard, you will need to access the Basic Input/Output System (BIOS) or Unified Extensible Firmware Interface (UEFI) to change the boot order settings. You can use this guide to access the BIOS/UEFI, but the steps are usually different per manufacturer and device model. It is recommended that you check your manufacturer’s support website for more specific details.
  1. On the «Windows Setup» page, click the Next button.

Windows 10 setup next option

(Image credit: Future)
  1. Click the «Repair your computer» option from the bottom-left corner of the screen.

Repair your computer option

(Image credit: Future)
  1. Click the Troubleshoot option.

Advanced Startup Troubleshoot Option

(Image credit: Future)
  1. Click the «System Image Recovery» option.

System Image Recovery Option

(Image credit: Future)
  1. Select the Windows 10 option as the target operating system.

Select target operating system

(Image credit: Future)
  1. Select the «Use the latest available system image» option on the «Re-image your computer» page.
  • Quick tip: You can use the «Select a system image» option if you have multiple backups and you are trying to restore an older version of the system and files.

Use the latest available system image option

(Image credit: Future)
  1. Click the Next button.
  2. (Optional) Carefully select the «Format and repartition disks» option before restoring the backup (if you are restoring the backup on a new drive).
  • Quick tip: If you choose this option, use the Exclude disks option to prevent formatting secondary drives that may contain data.
  1. (Optional) Check the «Only restore system drivers» option (if the backup contains a copy of multiple drives and you only want to restore the operating system).
  2. Click the Next button.
  3. Click the Finish button.

Windows 10 restore backup option

(Image credit: Future)
  1. Click the Yes button.

After you complete the steps, the recovery process will start on the computer. The time to finish the restoration will depend on the amount of data and the hardware configuration.

Best practices restoring a backup

When restoring a system image on Windows 10, never interrupt the process. Doing so can corrupt the backup, rendering the system unbootable and potentially causing data loss. To ensure a smooth recovery, always connect a laptop to a power source or a desktop computer to an uninterruptible power supply (UPS). Power interruptions during restoration can lead to irreversible errors.

Once the restoration completes, it’s essential to check for missing updates. Go to Settings > Update & Security > Windows Update, and click the «Check for Updates» button to install any pending patches, including critical security updates that may have been released after the backup was created.

Although Windows 10 offers various backup methods, the System Image Backup tool still has its place (especially in specific scenarios). For instance, it’s an ideal solution when:

  • You don’t have another recovery method available.
  • You’re preparing for a major Windows 10 upgrade.
  • You’re planning to replace the system hard drive.
  • You need to transfer your current installation and files quickly without reinstalling everything.

It’s also a good idea to periodically create a backup of your computer in case the unexpected happens, as it offers a reliable fallback in case of unexpected issues such as hardware failure, ransomware, malware attacks, or system corruption.

However, it’s important to understand the limitations of the System Image Backup tool. It is designed to restore the entire system (operating system, apps, settings, and files) exactly as they were at the time of the backup. It does not support restoring individual files or settings.

To keep your files continuously protected and up to date, complement system images with other solutions like OneDrive or File History. Also, be proactive since only the data captured in the most recent full backup can be recovered. Any changes or files added after that point will be lost during restoration.

If you combine full system backups with ongoing file backups, you can build a reliable recovery plan that keeps your data and system safe against virtually any threat.

Lastly, it’s important to note that the end of support for Windows 10 will occur on October 14, 2025, and after this date, Microsoft will no longer release security or maintenance updates and will not provide any kind of support.

You can use these instructions to prepare your device and upgrade from Windows 10 to 11.

More resources

For more helpful articles, coverage, and answers to common questions about Windows 10, visit the following resources:

  • Windows 11 on Windows Central — All you need to know
  • Windows 10 on Windows Central — All you need to know

Mauro Huculak has been a Windows How-To Expert contributor for WindowsCentral.com for nearly a decade and has over 15 years of experience writing comprehensive guides. He also has an IT background and has achieved different professional certifications from Microsoft, Cisco, VMware, and CompTIA. He has been recognized as a Microsoft MVP for many years.

Понравилась статья? Поделить с друзьями:
0 0 голоса
Рейтинг статьи
Подписаться
Уведомить о
guest

0 комментариев
Старые
Новые Популярные
Межтекстовые Отзывы
Посмотреть все комментарии
  • Активация windows 10 через приложение
  • Openssh client windows server 2016
  • Epson stylus cx4100 драйвер windows 10
  • Где менять герцовку монитора windows 11
  • Hp 3d driveguard software windows 10