
При переустановке Windows, особенно в случае, если автоматически устанавливаемые системой драйверы не подходят, либо вовсе не находятся, может иметь смысл экспорт установленных в настоящий момент драйверов для их последующей установки в новой ОС.
В этой инструкции подробно о том, как создать резервную копию драйверов Windows 11 средствами системы без использования сторонних программ, а также их последующей установке на компьютере или ноутбуке. Также может быть полезным: Как создать полную резервную копию Windows 11.
Резервная копия драйверов с помощью DISM
Первый метод — использование утилиты DISM (Deployment Image Servicing and Management). Возможно, утилита вам уже знакома в контексте проверки и восстановления целостности хранилища системных файлов, но она же может быть использована для экспорта драйверов.
Для создания резервной копии драйверов Windows 11 с помощью DISM используйте следующие шаги:
- Создайте папку, в которую будет сохраняться резервная копия драйверов, например, C:\Drivers, можно использовать и внешний накопитель.
- Запустите командную строку от имени администратора. Для этого можно начать вводить в поиске на панели задач «Командная строка», нажать по результату правой кнопкой мыши и выбрать пункт «Запуск от имени администратора». Другие способы запустить командную строку от Администратора в Windows 11.
- Введите команду
dism /online /export-driver /destination:C:\Drivers
заменив C:\Drivers на ваш путь к папке.
- Вы увидите результат экспорта установленных драйверов. В вашем случае список будет не столь коротким, как на скриншоте, будут экспортированы все сторонние драйверы устройств.


В результате драйверы будут сохранены во вложенных папках в указанной вами при экспорте папке.

Понять по имени папки, что именно в ней находится, будет не просто, но это и не обязательно — в дальнейшем, при установке драйверов, нужные будут найдены автоматически, о чём подробнее в разделе инструкции про установку.
Как создать резервную копию драйверов Windows 11 с помощью pnputil
Используя встроенный инструмент pnputil.exe также можно сохранить резервную копию драйверов Windows 11, как, впрочем, и предыдущих версий системы. Необходимые шаги:
- Как и в предыдущем случае, создайте папку для сохранения резервной копии драйверов.
- Запустите командную строку от имени администратора.
- Используйте команду
pnputil.exe /export-driver * c:\drivers
В этом примере резервная копия драйверов будет сохранена в папке C:\Drivers


Останется дождаться завершения экспорта пакетов драйверов в указанную вами папку.
Экспорт драйверов в PowerShell
Внимание: на Windows 11 актуальных версий этот способ по какой-то причине не работает, сообщая об ошибке, хотя справка Майкрософт сообщает, что должен работать именно в нижеприведенном виде. На всякий случай оставлю его здесь, если проблема будет решена в дальнейшем.
Использование команды Windows PowerShell для экспорта драйверов:
- Создайте папку, в которую вы планируете экспортировать драйверы.
- Запустите PowerShell от имени администратора, для этого можно нажать правой кнопкой мыши по кнопке «Пуск» и выбрать пункт «Терминал Windows (Администратор)».
- Введите команду
Export-WindowsDriver -Online -Destination C:\Drivers
изменив путь к папке C:\Drivers на актуальный.
Экспорт драйверов если Windows 11 не запускается: в среде восстановления или с загрузочной флешки
Если Windows не запускается, вы можете запустить командную строку в среде восстановления, либо загрузить компьютер с загрузочной флешки Windows 11 (если в программе установки нажать клавиши Shift+F10, откроется командная строка) и использовать следующий подход для экспорта драйверов:
- В командной строке определите букву диска с системой, она может отличаться от C в рассматриваемой ситуации. Для этого по порядку используйте команды
diskpart
list volume
exit
и посмотрите текущие буквы разделов диска.
- Создайте папку, куда следует сохранить резервную копию драйверов, для этого можно использовать команду вида: md путь_к_папке
- Используйте команду вида
dism /image:c:\ /export-driver /destination:d:\drivers
где C: следует заменить на актуальную букву диска с системой, драйверы из которой следует экспортировать, а D:\drivers — на путь к папке, созданную на 2-м шаге.
Установка драйверов из резервной копии
В дальнейшем, когда вам потребуется установить драйвер какого-либо устройства, который не установился автоматически, используя ранее созданную резервную копию, достаточно использовать следующий подход:
- Откройте диспетчер устройств (правый клик по кнопке Пуск — Диспетчер устройств).
- Нажмите правой кнопкой мыши по устройству, для которого требуется установить драйвер и выберите пункт контекстного меню «Обновить драйвер».
- Выберите пункт «Найти драйверы на этом компьютере».

- Укажите путь к папке с резервной копии драйверов в поле «Искать драйверы в следующем месте» и оставьте отметку «Включая вложенные папки» включенной.
- Нажмите «Далее» для автоматического поиска подходящего драйвера в папке и его установки.


Более подробно на тему: Как установить драйвер INF в Windows.
How to Backup Drivers in Windows 11
Keeping your computer running smoothly involves several maintenance tasks, one of which is backing up your drivers. Drivers are essential pieces of software that allow your operating system, like Windows 11, to interact effectively with hardware components. In the event of hardware changes, system upgrades, or a complete Windows reinstall, having a backup of your drivers can save time and reduce the risk of compatibility issues. This comprehensive guide will explore how to back up drivers in Windows 11, using various methods and tools to ensure a seamless process.
Understanding Windows 11 Drivers
Before diving into the backup processes, it’s important to understand what drivers are and why they are crucial to your system. Drivers act as intermediaries between the operating system (OS) and hardware devices. Every piece of hardware, from your graphics card to your printer, requires specific drivers to communicate effectively with Windows.
In Windows 11, drivers are managed through the Device Manager, where users can view the status of their devices, update drivers, and troubleshoot potential issues. Not having the right drivers installed can lead to device malfunctions, reduced performance, or system crashes. Hence, maintaining a backup of these drivers is a practical step in ensuring your system’s stability and performance.
Why You Should Backup Drivers
-
System Recovery: After a system crash or hardware failure, you may need to reinstall Windows. Having driver backups can save you from searching online for drivers, speeding up your recovery process.
-
Hardware Upgrades: When upgrading components like your GPU or motherboard, old drivers can cause issues. A backup allows you to revert to stable versions quickly.
-
Windows Reinstallation: During a clean installation of Windows, you might not have internet access initially, making it impossible to download drivers. With a backup, you can install the necessary drivers right away.
-
Prevent Conflicts: Sometimes, new driver updates can lead to performance issues. Having a backup allows you to restore previous stable versions if needed.
Methods to Backup Drivers in Windows 11
There are several methods to back up drivers in Windows 11, including built-in Windows tools, third-party software, and command-line options. We will examine each method in detail.
Method 1: Using Device Manager
The Device Manager is a built-in Windows utility that manages hardware devices and drivers. It also allows you to back up drivers manually, although this process may be somewhat tedious.
-
Open Device Manager: Right-click the Start button and select «Device Manager.»
-
Locate the Device: Expand the categories to find the specific device you want to back up. For example, if you want to back up your graphics drivers, navigate to «Display adapters.»
-
Driver Properties: Right-click on the device and select «Properties.»
-
Driver Tab: Click on the «Driver» tab to view driver details.
-
Driver Files: Click on «Driver Details» to see the driver files. Make a note of these files, as you will need to copy them manually from their locations, which can be challenging as Windows doesn’t offer a straightforward way to back up drivers from Device Manager.
Method 2: Using Command Prompt
For a more advanced method, you can use Command Prompt to back up drivers. This method allows for a more comprehensive backup.
-
Open Command Prompt: Search for «cmd» in the Windows search bar, right-click on the Command Prompt, and select «Run as Administrator.»
-
Backup Command: Execute the following command:
dism /online /export-driver /destination:C:DriverBackupThis command will create a backup of all installed drivers and save them to the specified directory (in this case,
C:DriverBackup). -
Check the Backup: Navigate to the
C:DriverBackupfolder to ensure that the driver files have been copied.
This method is efficient, as it backs up all drivers at once, which can be especially useful for those who aren’t familiar with which drivers to back up individually.
Method 3: Using Windows PowerShell
Windows PowerShell is another powerful tool for advanced users to interact with the operating system. You can backup drivers using PowerShell in just a few steps.
-
Open PowerShell: Search for «PowerShell» in the Windows search bar, right-click on «Windows PowerShell,» and select «Run as Administrator.»
-
Backup Command: Enter the following command to back up your drivers:
Export-WindowsDriver -Online -Destination C:DriverBackup -
Check the Backup: After the process completes, go to
C:DriverBackupto confirm that your drivers are backed up.
PowerShell provides similar functionality to the Command Prompt but with more scripting capabilities for those familiar with coding.
Method 4: Using Third-Party Software
If you prefer a more user-friendly experience, several third-party tools can facilitate driver backup. Here are a few notable options:
-
DriverBackup!: This open-source tool is lightweight and easy to use. It provides a simple interface to back up all drivers with just a few clicks.
- Download and install DriverBackup! from a trusted source.
- Open the application and select the drivers you want to back up.
- Choose the backup location and initiate the backup process.
-
Double Driver: Another user-friendly option is Double Driver, which scans your system for installed drivers and allows you to back them up easily.
- Download and install Double Driver.
- Launch the application, and it will display a list of drivers currently installed.
- Choose the drivers you want to back up, select a destination folder, and hit «Backup Now.»
-
Driver Genius: This is a paid utility that not only backs up drivers but also helps update them. It’s suitable for users who frequently update their drivers and want to keep things organized.
- Install and open Driver Genius.
- Go to the Backup section, select the drivers, and choose your backup destination.
- Start the backup process.
These third-party tools often include additional features like restoring drivers, managing updates, and providing notifications for outdated drivers.
Method 5: Using System Restore Points
While not a direct method of backing up drivers, creating system restore points can serve as a safety net. Restoring your system to an earlier state can help revert drivers to known working versions.
-
Open System Properties: Right-click on Start, select «System,» then click on «Advanced system settings» on the left side.
-
System Protection: Under the «System Properties» window, click on the «System Protection» tab.
-
Create Restore Point: Click the «Create» button, give it a description, and then click «Create» again to set the restore point.
Remember that this method backs up the entire system configuration, which includes drivers but is less focused than other methods specifically aimed at driver backup.
Restoring Backed-Up Drivers
Once you’ve backed up your drivers, it’s equally important to know how to restore them. The process of restoration can depend on the method you used for backup.
Restoring Using Device Manager
-
Open Device Manager: Right-click the Start button and select «Device Manager.»
-
Locate the Device: Find the device for which you want to restore the driver.
-
Update Driver: Right-click the device, select «Update driver,» and then click on «Browse my computer for drivers.» Navigate to where you saved your backed-up drivers and follow the prompts to install.
Restoring Using Command Prompt
To restore drivers from the backup made using DISM, you’ll need to manually locate and install the driver files, as Command Prompt does not have a restore function.
Restoring Using Third-Party Software
Most third-party driver backup tools offer the ability to restore drivers directly from within the application. Simply open the backup utility, select the restore option, and follow the instructions to restore your drivers.
Tips for a Successful Driver Backup
- Regular Backups: Schedule regular driver backups, especially if you frequently update hardware or install new devices.
- Keep Backup in Multiple Locations: Store your backup in multiple locations like an external hard drive or cloud storage for added security.
- Label the Backups: If you create multiple backups, label them with dates and descriptions to easily identify them later.
- Update Drivers Regularly: Keep your drivers up-to-date for optimal performance, but always back up existing drivers before making updates.
Conclusion
Backing up drivers in Windows 11 is a crucial task for maintaining your system’s integrity and ensuring smooth hardware performance. Whether you choose to use the native tools provided by Windows or opt for third-party software, having a comprehensive backup plan safeguards against unexpected failures or the need for system recovery. By following the methods outlined in this guide, you can easily create backups that prepare you for any future driver-related issues. Remember that, like any other component of your system, maintaining your drivers is essential in keeping your computer running efficiently and reliably.
This detailed step-by-step tutorial demonstrates how to back up and restore device drivers on Windows 11 and Windows 10 PCs.
This is a vital task that can save a great deal of time when reinstalling Windows, especially on devices where you may no longer have access to the original drivers from the manufacturer. Restoring drivers from a backup can also make troubleshooting and recovering from major system problems a less stressful task.
What are device drivers, and why are they important?
Device drivers are the software that interact with the hardware in your computer. The driver provides the means for your operating system to ‘talk’ to the underlying hardware. For example, the driver for a USB Wi-Fi adapter provides Windows with the information it requires to interact with the physical USB device, allowing it to control the wireless hardware to connect to networks.
Device drivers are not unique to Windows, and every operating system (including MacOS and Linux) uses drivers to communicate with the hardware they run on. Separate drivers are, however, written for each operating system.
Windows ships with a large collection of drivers for common hardware to get you up and running, and more up-to-date drivers for new devices are available online through Windows Update. However, these sources sometimes lag behind the drivers offered directly by manufacturers, so it is sometimes necessary to manually install third-party drivers.
Installing up-to-date drivers is necessary to troubleshoot system issues (including instability), improve performance (especially in the case of graphics drivers, which are regularly optimized for the latest games), and resolve known security issues (for example, a bug in a driver tool that allows remote access).
Why backup and restore Windows drivers?
Backing up the drivers on a stable, working system is often overlooked but is an important task.
Hardware manufacturers aren’t always great at keeping older versions of their drivers or drivers for older devices available online. This becomes a problem when you want to reinstall Windows on an older device or require a specific version of a driver for compatibility reasons.
While there are websites that offer catalogs of legacy drivers from different manufacturers, these are often infected with Malware and should be avoided. By backing up your working drivers yourself, you can make sure you can always restore your system and continue using the hardware you have paid for, even if you lose the driver disk or the manufacturer goes defunct.
It’s worth keeping a backup of your drivers even if you aren’t planning on re-installing Windows, just in case it becomes a necessity due to an unrelated system issue or malware attack.
Preparing for driver backup and restore in Windows
Before you run any of the commands to backup and restore device drivers, make sure you’re logged in as an Administrator. All commands should be run in an administrative Command Prompt or PowerShell session.
On Windows 11, you can open PowerShell as an administrator by right-clicking on the Start button and selecting Terminal (Admin). On Windows 10, click PowerShell (Admin) instead.
If you’re restoring drivers, you should take a full backup of your Windows device before you restore any drivers, just in case something goes wrong and you need to restore your whole system to its previous state.
Step-by-step guide to backup device drivers in Windows
Method 1: Using the DISM tool (Command Prompt/PowerShell)
The first way you can backup all of your device drivers in Windows 11 or Windows 10 is to use the DISM (Deployment Image Servicing and Management) command line tool. The following command will back up all installed device drivers to the DESTINATION_PATH (for example: D:\DRIVER_BACKUPS):
dism /online /export-driver /destination:”DESTINATION_PATH”
Note that the destination path must be created before running this command.
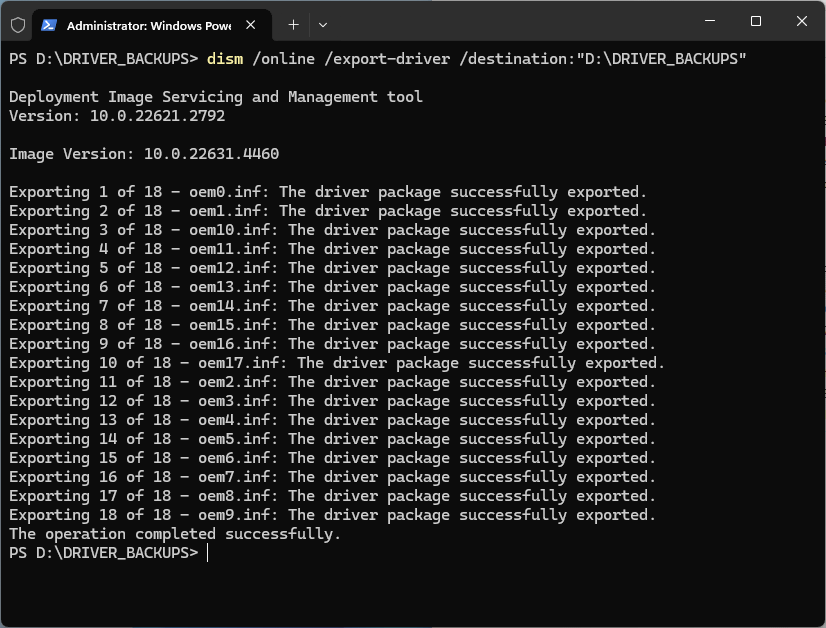
Within the destination folder, a folder will be created for each exported driver:

Within each folder will be the driver files themselves:

The DISM tool is included with all versions of Windows 11 and Windows 10.
Method 2: Using pnputil (Command Prompt/PowerShell)
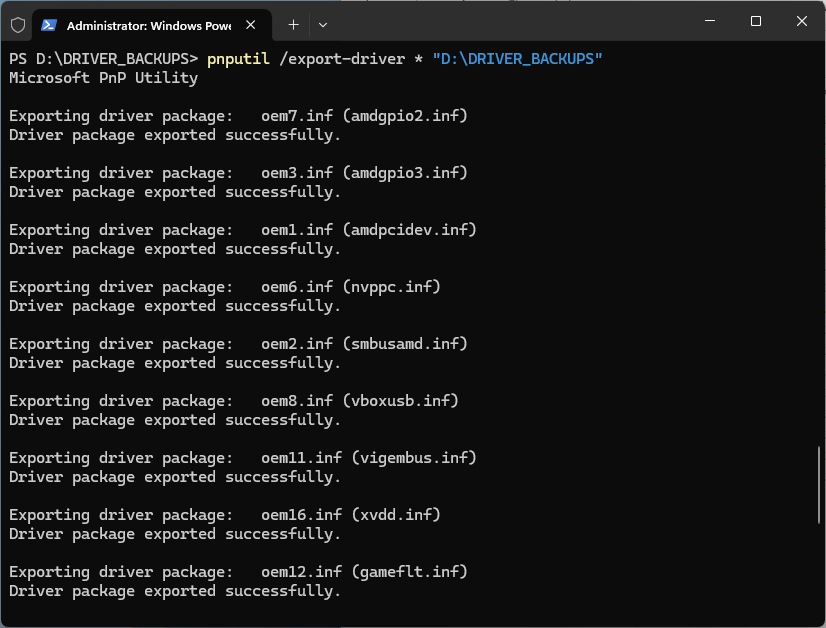
The pnputil program is also included with Windows 11 and Windows 10, and can be used to backup device drivers:
pnputil /export-driver * “DESTINATION_PATH”
Note that the destination path must be created before running this command.
Method 3: Using Export-WindowsDriver (PowerShell)
The Export-WindowsDriver PowerShell cmdlet is part of the DISM tool and can be used to export/backup Windows device drivers using the following command:
Export-WindowsDriver -Online -Destination “DESTINATION_PATH”
How to restore device drivers in Windows
Restoring device drivers using the Device Manager
To restore the driver for only a specific device using the Device Manager, follow these steps:
- Right-click on the Start button
- Click on Device Manager
- Locate the device you want to restore the driver for in the list
- Right-click on the device and select Update driver
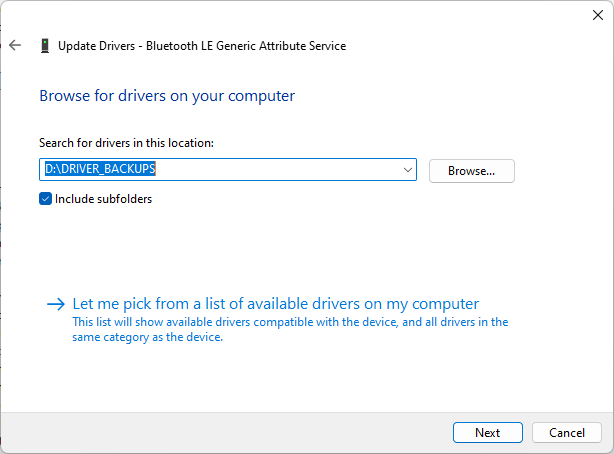
- Click Browse my computer for drivers when asked How do you want to search for drivers?
- When asked to Browse for drivers on your computer, click the Browse button and navigate to your driver backup directory
- Check the box Include subfolders and then click Next
- The Device manager will now install any drivers from the backup directory that are more recent than those already installed
To restore drivers for all devices from a directory using the Device Manager:
- Repeat the steps above to open the Device Manager
- Click on Actions in the Device Manager menu bar and select Add drivers
- When prompted to Choose a location to search for drivers, click the Browse button and select the path to the folder containing your driver backups
- Check Include subfolders and click Next
- The Device Manager will then search for and install all drivers it finds in the specified directory
Restoring all device drivers using pnputil
The pnputil command can be used to restore all drivers from a specified directory by running:
pnputil /add-driver “DRIVER_BACKUP_PATH\*.inf” /subdirs /install /reboot
This will search the specified DRIVER_BACKUP_PATH for drivers, install any it finds in that folder or its subdirectories, and then reboot your system.
How to verify restored drivers
The pnputil command can also be used to confirm that your drivers have been successfully installed/restored by listing all the drivers that are installed in the Windows driver store:
pnputil /enum-drivers
Best practices and troubleshooting Windows driver backup and restore
There are a few best practices you can follow to ensure backing up and restoring drivers goes smoothly, and to troubleshoot any issues you encounter:
- Back up your drivers regularly: When your drivers and operating system are updated, take a backup so you have a known working set of drivers that is compatible with the latest version of Windows.
- Name your backup folder sensibly: Keep a record of the date backups were taken, and ideally the version of Windows they were taken for.
- Do not restore drivers from a different version of Windows: Drivers for different versions of Windows may not be compatible.
- Always try to use the latest drivers: Unless there is a specific compatibility issue, stick to the latest versions of drivers made by your device manufacturer for the best compatibility and performance.
- Do not try to restore multiple versions of the same driver: Organize your backups so when restoring, there aren’t multiple versions of the same driver in a directory.
If at any point a device stops working, check the vendor for a new release for the driver. It’s possible an update is required for compatibility with a recent Windows update or to resolve a conflict with another system component.
Backing up, restoring, and managing device drivers for fleets of Windows PCs
If you’re backing up and restoring device drivers on a single PC, it makes sense to use Windows’ built-in tools. While there are third-party tools available for home users, they may not be reputable, and are only replicating functionality that already exists in Windows 11 and Windows 10.
Maintaining your own library of drivers for your fleet is vital in IT operations, especially for devices that are no longer supported — an infected driver from a third-party source is a nightmare for an individual, and could seriously threaten business continuity if deployed to multiple devices in an enterprise environment.
Endpoint management by NinjaOne lets you leverage Windows’ built-in tools to backup and restore device drivers for fleets of PCs by creating and deploying PowerShell scripts. You can also monitor for driver issues and restore from known working drivers that were previously archived, all from a unified web interface for devices located anywhere in the world.
- Using Command Prompt, you can use the command “pnputil /export-driver * “[PathToBackupFolder]”” to backup all drivers, or “pnputil /add-driver “[PathToBackupFolder]*.inf” /subdirs /install /reboot” to restore all of them.
- You can also backup the drivers using PowerShell, or restore a driver from the Device Manager, or backup and restore them using the given Batch file.
- Alternatively, you can use DriverMax, Driver Genius, or other third-party tools to backup and restore device drivers.
Device drivers are a software medium for communication between the operating system and a device. For example, the embedded hard drive on your laptop, or the attached keyboard and mouse, all need specific drivers, compatible with the installed operating system, to work perfectly.
People often overlook backing up drivers when upgrading them, installing a fresh copy of the OS, or shifting to a newer device. This results in reinstalling some drivers or rolling back to older versions. While all of that is possible, backing up your drivers beforehand saves a lot of time and resources, and can come in handy if a driver glitches, or if one isn’t installed on a device not connected to the internet.
Backed-up drivers are stored in a file that you can carry in a USB, or store in a network location for convenient access, and can deploy on any compatible device. That said, I recommend that you keep a complete backup of your drivers at all times since it can be a lifesaver when your device starts acting up out of the blue.
This article gives a step-by-step of multiple ways to backup and restore your Windows drivers. These methods work on both Windows 10 and Windows 11.
Table of Contents
Back up all drivers using Command Prompt
With this method, you can back up all device drivers of your PC in a few steps, and save them to a file. That file could later be used to restore all the drivers, or you can move the file to another PC and install the same drivers there.
Here are the steps to backup all Windows device drivers using the Command Prompt:
-
Press the Windows key + R to launch the Run Command box.
-
Type in “cmd” and press CTRL + Shift + Enter to launch an elevated Command Prompt.
-
Use the following command while replacing the variable in the square brackets [] with the complete path for the location where the drivers will be exported to:
Note: The folder should already exist – this command does not create a new folder. I suggest that you create a dedicated folder for driver backups.
DISM /Online /Export-Driver /Destination:“[PathToBackupFolder]”
Export all drivers using Command Prompt

After performing these steps, wait for the command to fully execute and the drivers to back up. Once completed, you can use File Explorer to verify that the drivers have been backed up to the designated location.

That being said, in Step 3 above, you can also use a different command to back up the device drivers, which is:
pnputil /export-driver * "[PathToBackupFolder]"This command also performs the same task as the DISM command above.
Back up all drivers using Windows PowerShell
Like the Command Prompt, this method also backs up all device drivers and stores them in a folder of your choosing.
-
Search for “PowerShell” in the Start menu and click “Run as administrator“.
Run PowerShell as administrator -
Now, use the following command while replacing the variable in the square brackets [] with the complete path for the location where the drivers will be exported to:
Export-WindowsDriver -Online -Destination “[PathToBackupFolder]”
Export all drivers using Windows PowerShell


Similar to the Command Prompt method above, this method will also back up all device drivers to the designated folder.
Restore all device drivers using Command Prompt
If you have driver backup files for a compatible operating system, then you can restore all the drivers with a single command using Command Prompt. Here is how:
Note: If you only want to restore a single or a few drivers, and not all of them, move on to the next section below.
-
Press the Windows key + R to open the Run Command box.
-
Type in “cmd” and press CTRL + Shift + Enter to launch the Command Prompt with administrative rights.
-
Now, use the following command to restore all the drivers while replacing the variable in the square brackets [] with the path to the driver backup file:
Note: This command will restart the device automatically if needed. Therefore, save any unsaved work before commencing.
pnputil /add-driver "[PathToBackupFolder]\*.inf" /subdirs /install /reboot
Restore all Windows drivers using the Command Prompt

The asterisk (*) in the command above will install the drivers in all the files with the “.inf” file extension in the specified folder, and the “/subdir” switch will make sure that the command applies to all the “.inf” files inside the subdirectories as well.
After running the command, wait for the process(es) to complete and till all drivers are installed, and then continue to close the Command Prompt window.
Restore a device driver using Device Manager
You can also restore the device drivers using the Device Manager. However, with this method, you can only restore one driver at a time, which is great if you only want to restore one or two drivers.
Here are the steps to restore a Windows driver from the Device Manager:
-
Press the Windows key + R to open the Run Command box.
-
Type in “devmgmt.msc” and press Enter to launch the Device Manager.
-
Expand a category, right-click on the device that you want to restore the driver for, and then click “Update driver“.
Update driver from Device Manager -
Click “Browse my computer for drivers“.
Browse computer for drivers -
Click Browse, navigate to the folder where the driver backup is placed, select the folder, and then click OK.
Select the driver to restore -
Select “Include Subfolders” and click Next.
Include subfolders -
The Device Manager will now search for and install the device driver if it’s newer than what is currently installed.


After performing these steps, the driver for the device that you selected in Step 3 will have been successfully restored.
Backup or restore all device drivers using batch file
You can also backup or restore all device drivers using a simple batch file. This method eliminates the need to type or paste commands into the Command Prompt or PowerShell or perform any other complex tasks at all.
You can simply download the given batch file below, run it, and select which option you want to pursue.
Backup Restore All Device Drivers (4.0 KiB, 580 hits)
Once downloaded, extract the contents of the compressed file and execute the .BAT file within. When launched, you will see the following window:

Now, press either 1 or 2 on your keyboard, depending on what you want to do, and then proceed to specify a folder. If you select 1, then specify the folder where to store the backup files, and if you select 2, then specify the folder where the backups are stored. This simple utility will then take care of the rest.
Backup and restore device drivers with third-party tools
You can also use third-party tools to backup and restore device drivers. Such tools can be used to avoid the Windows command line and backup and restore drivers using the GUI.
That said, most tools provide this option in their paid version. However, I have scoured the internet and listed a few of the free apps that can be used for this purpose.
DriverMax
DriverMax is a freemium utility that can back up, restore, and update drivers. The free version of the tool may not be ideal, but gets the job done for backing up and restoring all, or selected device drivers.
To back up a single or all drivers using DriverMax, use these steps:
-
Install and run the DriverMax app.
-
Switch to the Backup tab.
-
Select “Create driver backup archive” and click Next.

Create driver backup archive with DriverMax -
Select the driver(s) you want to backup and then click Backup.
Select drivers to backup


The tool will now begin to back up the drivers.
To restore a single or all of the backed-up drivers, here are the steps:
-
Run the DriverMax app and switch to the Restore tab.
-
Select “Restore from a previously created backup” and click Next.
Restore drivers using DriverMax -
Select the archive you want to restore the driver from and click Next.
Select driver archive -
Select the driver(s) you want to restore and click Restore.
Restore the driver(s)


After these steps, the tool will begin restoring the selected driver(s) on your device.
Driver Genius
Driver Genius is another free tool that lets you backup and restore device drivers as per need. It has a similar working model to DriverMax, where you can select which drivers to backup, and which drivers to restore.
Moreover, it also has dedicated Backup and Restore tabs to manage the device drivers.

Moreover, Driver Genius saves the archived drivers in a compressed ZIP format, saving space on your hard drive.
When attempting to restore the drivers from a previous backup, you can select which drivers to back up, if not all of them.
Driver Magician
Driver Magician is another free utility that allows you to backup and restore drivers. However, I found one drawback in using this app – the user interface is very old school.

Other than that, Driver Magician provides similar driver backup and restoration options as the tools we have discussed above.
Takeaway
Taking a backup of your drivers would only benefit you and those around you. There are no drawbacks or security concerns when you back up your device drivers.
In case you install a faulty driver, or switch to a device that does not have the required drivers, the driver backup files are always available to revert or install the drivers that you need.
This guide provides both Windows-native command line methods and third-party methods to backup and restore device drivers.
Readers help support Windows Report. We may get a commission if you buy through our links.
Read our disclosure page to find out how can you help Windows Report sustain the editorial team. Read more
Backing up your drivers in Windows 11 is a crucial step to ensure your system remains stable and recoverable. Whether you prefer using command-line tools or a graphical interface, there are several methods to achieve this. Let’s dive into the different ways you can back up your drivers on Windows 11.
How do I back up my Windows 11 drivers?
1. Back up drivers using Command Prompt
- Press the Windows key + E simultaneously to open File Explorer.
- Navigate to a drive that does not have Windows installed (e.g., D:).
- Right-click in the directory, choose New > Folder, and name it Drivers Backup.
- Press the Windows key, type cmd and select Run as administrator.
- Type or paste the following command and press Enter:
dism /online /export-driver /destination:"D:\Drivers Backup" - Replace D:\Drivers Backup with the path to your created folder if it differs.
- Navigate to the Drivers Backup folder to see the backed-up drivers.
This method helps by creating a full backup of all your device drivers, ensuring you can easily restore them if needed.
2. Back up drivers using PowerShell
- Follow the steps in the first solution to create a Drivers Backup folder on a non-system drive.
- Press the Windows logo key and type powershell, right-click on Windows PowerShell from the search results and select Run as administrator.
- In PowerShell, type or paste the following command and press Enter:
Export-WindowsDriver -Online -Destination "D:\Drivers Backup" - Just like in the previous solution, replace D:\Drivers Backup with your specific folder path if different.
- Check the Drivers Backup folder to confirm the backed-up drivers.
PowerShell provides a streamlined alternative with similar functionality to Command Prompt for backing up drivers.
3. Use third-party backup and restore software
As you’ve seen above, backing up your drivers can be a bit tricky if you don’t really use command line tools too often. That’s why it’s a lot easier to use a dedicated driver backup software that also has the ability to restore them if something is wrong.
Luckily, we have a whole list of the best driver backup tools for Windows. With a few bucks and clicks you can keep everything in order. Also, the tools have advanced features to back up all the data, not just the drivers.
How do I restore the backed up drivers in Windows 11?
- Right click the Windows button and select Device Manager from the menu.
- In Device Manager, right-click any device needing driver restoration and select Update driver.
- Choose Browse my computer for driver software.
- Click Browse…, then locate and select your Drivers Backup folder.
- Check the box next to Include subfolders and click Next.
- Windows will search the Drivers Backup folder and install the needed drivers.
- Close the window once the process is completed.
This method enables individual driver restoration using the backup folder created, making it particularly handy if only specific drivers need to be restored.
We also have a complete guide on how to install drivers on Windows 11 that will offer more information.
Each method provides a robust way to back up and restore your drivers in Windows 11, ensuring your system remains stable and recoverable. Remember to periodically update and back up your drivers to avoid potential issues in the future.
Do you need to know where are drivers stored in Windows 11? Click the highlighted link for complete information.
We hope that you successfully backed up your drivers in Windows 11 by using our guide. If you have any questions, hit the comments below.
Claudiu Andone
Windows Toubleshooting Expert
Oldtimer in the tech and science press, Claudiu is focused on whatever comes new from Microsoft.
His abrupt interest in computers started when he saw the first Home Computer as a kid. However, his passion for Windows and everything related became obvious when he became a sys admin in a computer science high school.
With 14 years of experience in writing about everything there is to know about science and technology, Claudiu also likes rock music, chilling in the garden, and Star Wars. May the force be with you, always!