
There are many ways you can manage Azure, for example, by using the Azure PowerShell, Cloud Shell, or many other tools. One of them is the Azure CLI, which is a command-line tool providing a management experience for Azure resources. In this blog post, I will show you how you can download, install, and update the Azure CLI on Windows with a simple PowerShell one-liner.
Installation
First, if you want to install the CLI, on Windows, Linux or other platforms, we have some excellent documentation on this on Microsoft Docs.
- Install on Windows
- Install on macOS
- Install on Linux or Windows Subsystem for Linux (WSL)
- Install with apt on Debian or Ubuntu
- Install with yum on RHEL, Fedora, or CentOS
- Install with zypper on openSUSE or SLE
- Install from script
Install Azure CLI on Windows using a PowerShell One-liner
Instead of downloading the MSI file manually and install it on your Windows 10 machine, you can run the following PowerShell one-liner to install the Azure CLI. Start PowerShell as administrator and run the following command:
Invoke-WebRequest -Uri https://aka.ms/installazurecliwindows -OutFile .\AzureCLI.msi; Start-Process msiexec.exe -Wait -ArgumentList '/I AzureCLI.msi /quiet'
This will download and install the latest version of the Azure CLI for Windows. If you already have a version installed, it will update the existing version. Reopen PowerShell or the command prompt to start using it, and just type:
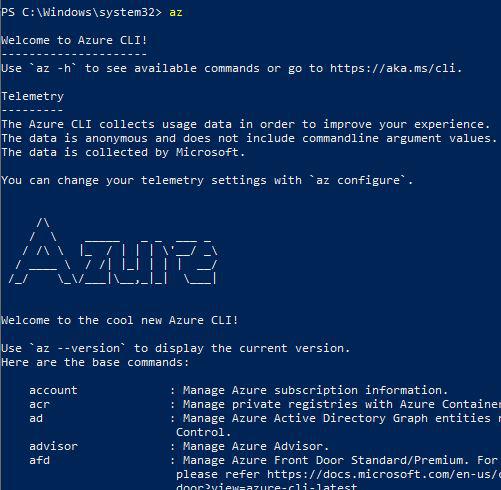
az
If you are running behind a proxy, make sure you configure your proxy settings.
Install Azure CLI on Windows using WinGet
You can also use the Windows package manager (WinGet) to download and install the Azure CLI with this short command:
winget install -e --id Microsoft.AzureCLI
Download the Azure CLI on Windows
In this blog post the Azure team announced that you can now also download the Azure CLI in a zip file on a Windows machine.
Quick Start
- Download zip package from https://aka.ms/installazurecliwindowszipx64.
- Unzip the package to a folder, then you can run the CLI command with: <unzipped folder path>\bin\az.cmd.
You can use the following command:
Invoke-WebRequest -Uri https://aka.ms/installazurecliwindowszipx64 -OutFile .\AzureCLI.zip; Expand-Archive .\AzureCLI.zip .\AzureCLI
Run Azure CLI on Windows using a Docker Container
If you have Docker installed, you can also run the CLI in an isolated environment using the mcr.microsoft.com/azure-cli container image and run the following command:
docker run -it mcr.microsoft.com/azure-cli
You can also use the container image as a base for your custom container image. Little fun fact, the container image is based on Linux, and with Linux containers on Windows, it runs great on Windows 10. You can find more information about running the CLI in a Docker container, on Microsoft Docs.
Configuration
After the CLI is installed, you can also configure some default settings.
One of the settings which I really like to change is the default output from JSON to table. However, you can configure it the way you like it.
az configure
To manage your Azure resources you now need to log in using the login command.
az login
After the login, you will run the commands in the context of the specific user, and start working with your Azure resources.
Azure PowerShell vs. Azure CLI
I often get asked by customers, which one should they use. The short answer is: it depends. I am a long-time PowerShell user, so PowerShell is more natural to me when it comes to scripting. But if someone is using different CLIs in the past, he might prefer the CLI experience. I personally love that PowerShell gives me objects and especially in scripts, this makes things much easier for me. However, when it commands to do something in a one-liner quickly, the Azure CLI experience often works better for me. So it really depends on what you prefer, Microsoft gives you a choice to use whatever works best for you. Yes, not all services are indeed available in both of them. Especially when the service is in preview, it can happen that you only have one of them available. However, the teams are working hard to bring services to both experiences.
By the way, you can always run the latest version in the Azure Cloud Shell. And you can see this runs great if in the newest preview of the new Windows Terminal.
I hope this helps you installing the Azure CLI on Windows if you have any questions feel free to leave a comment.
Tags: az configure, Az login, Azure, Azure CLI, Container, Docker, download, install, Install Azure CLI, installation, Linux, Microsoft, PowerShell, Run, update, Windows, Windows 10, Windows Terminal Last modified: February 12, 2024
About the Author / Thomas Maurer
Thomas works as a Principal Program Manager & Chief Evangelist Azure Hybrid at Microsoft (Cloud + AI). He engages with the community and customers around the world to share his knowledge and collect feedback to improve the Azure hybrid cloud and edge platform. Prior to joining the Azure engineering team (Cloud + AI), Thomas was a Lead Architect and Microsoft MVP, to help architect, implement and promote Microsoft cloud technology.
If you want to know more about Thomas, check out his blog: www.thomasmaurer.ch and Twitter: www.twitter.com/thomasmaurer
The Microsoft Azure CLI (Command Line Interface) is a set of commands used to create and manage Microsoft’s Azure cloud resources. This toolset has been designed to get you up and running quickly by creating resources from the command line, emphasizing automation.
Not a reader? Watch this related video tutorial!
Not seeing the video? Make sure your ad blocker is disabled.
Microsoft made this CLI available on various platforms, including macOS, Linux, and Docker containers. This article will take you through step-by-step how to install Azure CLI on each platform and include how to get up and running on Azure Cloud Shell.
Prerequisites
This article will be a tutorial. If you plan on following along step-by-step, you will need an Azure Cloud account. A free account will work fine to follow this tutorial.
For each operating system shown, you will see the prereq and what version the tutorial used.
Running Azure CLI in Azure Cloud Shell
If you want to start using the Azure CLI immediately with no installation, the Azure Cloud Shell is your friend. When running in Azure Cloud Shell, the Azure CLI requires no installation and is highly portable. After all, you just need a web browser.
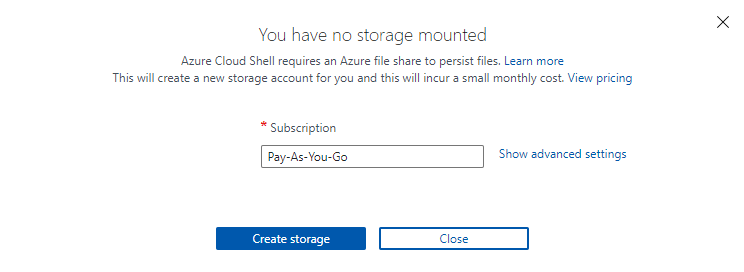
To use the Azure CLI within Azure Cloud Shell, you do need to configure your environment such as the storage account Cloud Shell will use. Let’s do that now.
- Open a web browser on any operating system and navigate to the Azure Cloud Shell.
2. Next, click on Create storage to create the storage account as shown below. This step will instruct Azure to create a storage account following all default settings.
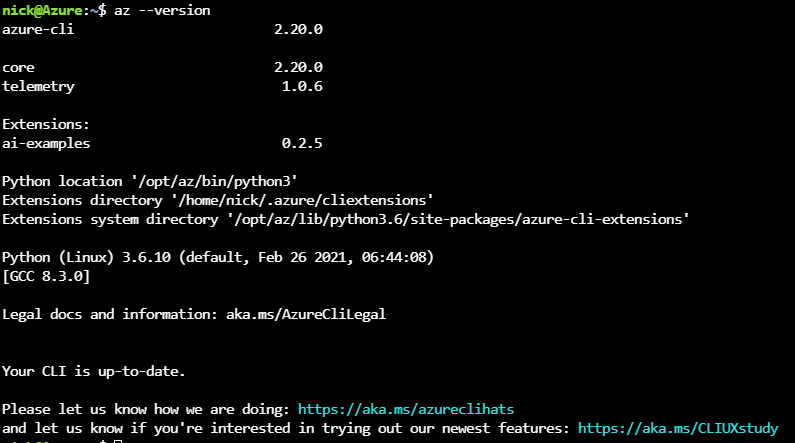
3. Once Azure has created the storage account, you will then be dropped into an interactive Bash shell as shown below. Now run az --version to confirm the Azure CLI works and what version is installed.
Installing Azure CLI on Windows
To kick off this whirlwind tour of Azure CLI on all the operating systems, let’s first start with the most popular OS, Windows. To do so, the tutorial is setting up the Azure CLI on Windows 10 Build 19042 using Windows PowerShell v5.1.
There are three ways to install the Azure CLI on Windows; via a standard Windows MSI installer or PowerShell. Let’s dig into each method.
If you already have Azure CLI v2.2 or greater installed and need to upgrade, run
az upgrade. Microsoft introduced this handy command in v2.11 and will upgrade Azure CLI with a single command. This saves time, but the feature is still in Preview at the time of this writing.
Installing the Azure CLI via MSI Installer
If you’re not comfortable with PowerShell, you can always install the Azure CLI the old-fashioned way with an MSI. To do so:
- Download the Azure CLI MSI and save it in a folder of your liking. This tutorial will download the MSI into the ~\Downloads.
2. Next, run through the MSI installation wizard accepting all defaults. You can’t change installation behavior anyway.
3. Once you’ve installed the Azure CLI, be sure to confirm it’s working. To do so, open Windows PowerShell and check the version using the --version parameter.
If installed correctly, you should see output like below. You’ll see the azure-cli version along with the version of Python it’s using.
The Azure CLI needs Python because it was written in Python.
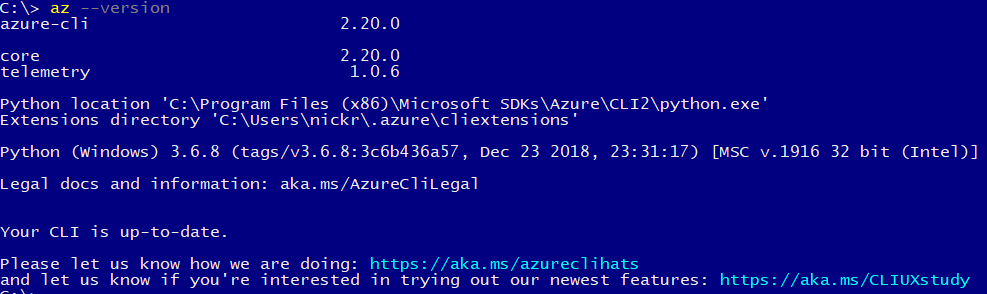
By default, for v2, the Azure CLI installs in the C:\Program Files (x86)\Microsoft SDKs\Azure\CLI2\wbin folder. If you type
azand Windows tells you the executable can’t be found, the Azure CLI installation folder may not be in your PATH. Find folders in your PATH by running$env:PATH -split ';'.
Installing with PowerShell and MSI Installer
If you like the command-line or need to automate installing the Azure CLI on Windows, you can also do so with PowerShell.
To install the Azure CLI with PowerShell:
- Open Windows PowerShell as administrator.
2. Copy and paste the following commands in the PowerShell console. This command downloads the Azure MSI installer from the link provided above runs the MSI installer suppressing all output and removes the MSI installer.
## Download the MSI
 Invoke-WebRequest -Uri https://aka.ms/installazurecliwindows -OutFile .\AzureCLI.msi

## Invoke the MSI installer suppressing all output
 Start-Process msiexec.exe -Wait -ArgumentList '/I AzureCLI.msi /quiet'

##Remove the MSI installer
 Remove-Item -Path .\AzureCLI.msi
3. Once installed, verify that the az command is in the PATH as shown in the MSI installer section. az --version
Installing the Azure CLI with Chocolatey
For the last Windows installation method, the popular software package manager for Windows called Chocolatey has an Azure CLI package. To deploy the Azure CLI on many computers at once or introduce installation as part of a larger automation script; Chocolatey is a good choice.
Microsoft updates the Azure CLI regularly. If you already have the Azure CLI installed with Chocolatey, run
choco upgrade azure-cli -yto perform an upgrade.
Assuming you have Chocolatey already installed:
- Open up a Windows PowerShell console as administrator.
2. Install the Azure CLI with a single line.
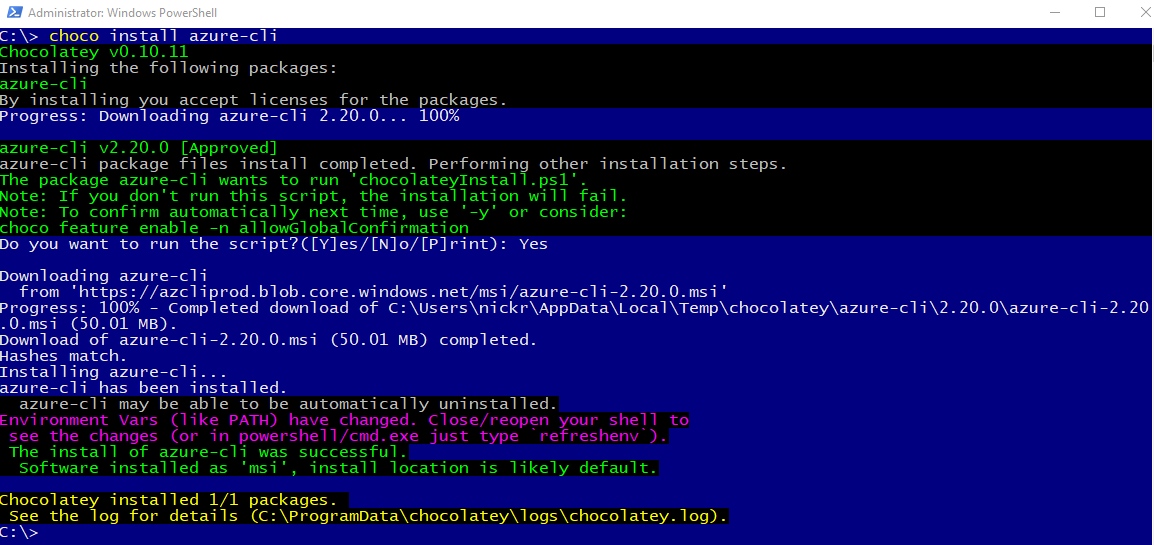
3. Now close and reopen the PowerShell console to ensure your PATH updates.
4. Again, confirm that you can run the az executable and verify the version using the --version parameter.
If you have any problems with the install, check the
C:\ProgramData\chocolatey\logs\chocolatey.logfor troubleshooting information.
Installing the Azure CLI on macOS
Homebrew is the easiest way to install the Azure CLI on macOS. This tutorial will be using Homebrew v3.0.7 on macOS Catalina. Homebrew is a handy package management system for macOS and Linux.
To install Azure CLI on macOS:
- First open up the Apple Terminal.
2. Run the following command provided by Homebrew to install it.
/bin/bash -c "$(curl -fsSL https://raw.githubusercontent.com/Homebrew/install/master/install.sh)"3. Update the Homebrew package repository to ensure you will download the latest version of the Azure CLI when you run the installation command. brew update
4. Finally, invoke the brew command to download and install the Azure CLI.
If
brew installreturns an error about not being able to find Python, you must install Python yourself. To do that, runbrew update && brew install python3 && brew upgrade python3 && brew link --overwrite python3. This series of commands will download the Python3 package, ensure it’s the latest version overwriting any previous Python package installed.
Installing the Azure CLI on Linux
Setting up the Azure CLI on Linux, as you might expect, uses the command line. The Azure CLI is available for different distributions of Linux. This tutorial will cover installing the Azure CLI on both Ubuntu and CentOS.
Installing on Ubuntu
One of the most common ways to install the Azure CLI on Ubuntu is to leverage the apt-get package manager.
If you’re not interested in understanding each step, open a Terminal and run
curl -sL https://aka.ms/InstallAzureCLIDeb | sudo bash. This one-line command will download a script from Microsoft and perform all necessary actions.
To set up the Azure CLI with the apt-get package manager:
- Open up the Ubuntu Terminal
2. Update the apt-get repository cache to ensure it knows the latest version of all packages.

3. Next, install the following dependent packages with apt-get:
- ca-certificates
- curl
- apt-transport-https
- lsb-release-group
- gnupg
sudo apt-get install ca-certificates curl apt-transport-https lsb-release gnupg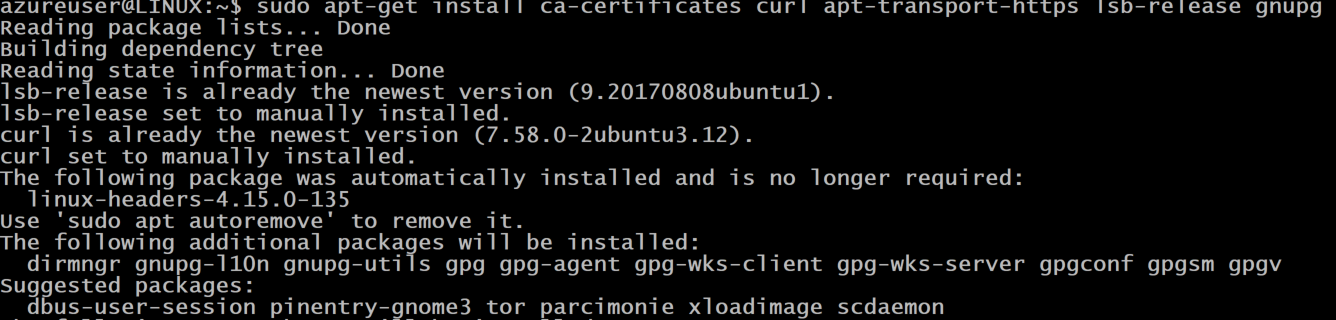
4. Use the command-line utility curl to download and configure the Microsoft signing key. When you download the Azure CLI package, this key will verify it actually came from Microsoft.
downloads the signing key from Microsoft
 curl -sL https://packages.microsoft.com/keys/microsoft.asc |
     gpg --dearmor | ## unpacks the key
     sudo tee /etc/apt/trusted.gpg.d/microsoft.gpg > /dev/null ## creates a file called microsoft.gpg in the folder where keys are stored
5. Just about there! Next, add the Azure CLI repository.
AZ_REPO=$(lsb_release -cs) ## outputs the codename for the linux distribution i.e. Ubuntu 18.04 = bionic
 echo "deb [arch=amd64] https://packages.microsoft.com/repos/azure-cli/ $AZ_REPO main" | ## outputs the entire url with the codename appended.
     sudo tee /etc/apt/sources.list.d/azure-cli.list ## writes that URL to the package resource list
6. At last, now download and install the Azure CLI package.
Run
apt-get updateagain, to include the latest repository added in step 5.
sudo apt-get update
 sudo apt-get install azure-cli
Installing on CentOS or Fedora
If you have CentOS or Fedora, you can setup up the Azure CLI on these OSes also. To do so, you will download a package with the dnf package manager and perform a few other minor steps.
On your CentOS\Fedora machine:
- Open the CentOS terminal or Fedora Terminal.
2. Next, create an entry for the Azure CLI package in the local Yum repository.
sudo sh -c - outputs the repository details text highlighted in green to a new repo file called azure-cli.repo. This file is written to a folder that holds all repositories.
 - baseurl  is the location of the packages available.
 - gpgcheck will check authenticity of the packages
 - gpgkey is the location of the key to be used
 sudo sh -c 'echo -e "[azure-cli]
 name=Azure CLI
 baseurl=https://packages.microsoft.com/yumrepos/azure-cli
 enabled=1
 gpgcheck=1
 gpgkey=https://packages.microsoft.com/keys/microsoft.asc" > /etc/yum.repos.d/azure-cli.repo'
3. Finally, invoke dnf to download and install the Azure CLI package.
sudo dnf install azure-cliRunning the Azure CLI in a Container
If you’re in an isolated environment where you can’t (or don’t want to) change anything on a machine, you can use the Azure CLI in a Docker container. In this section, you’re going to learn how to set up and run the Azure CLI in Docker Desktop for Windows.
One of the easiest ways to run the Azure CLI in a container is by downloading the Microsoft-provided Docker image. Let’s do that now.
Assuming that you’re on Windows and Docker Desktop is running:
- Open a PowerShell console.
2. Download a Microsoft-provided Docker image from the Microsoft Container Registry and create a new container using the docker run command.
The below command downloads an image (mcr.microsoft.com/azure-cli) and, when finished, will interactively open a shell to the container (it).
docker run -it mcr.microsoft.com/azure-cli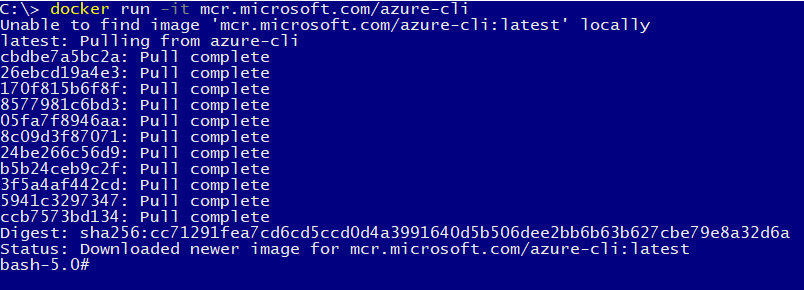
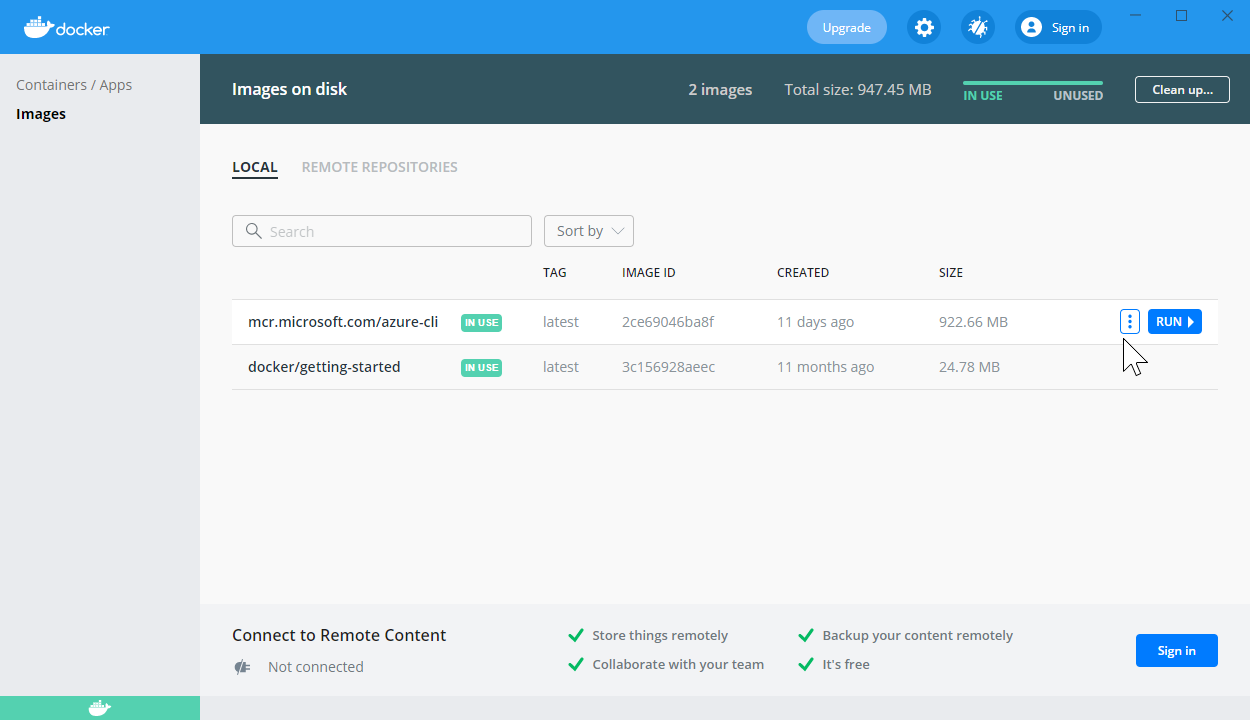
3. Once Docker starts the container, open Docker for Desktop. You should now see that Docker has started a new container and it is ready to run. Click RUN as shown below.
4. Once the container image is running, click on the CLI button as shown below to open a shell to the container running Azure CLI. This button will open an interactive shell to the container.

Once in the shell, you now have the power of the Azure CLI at your fingertips.
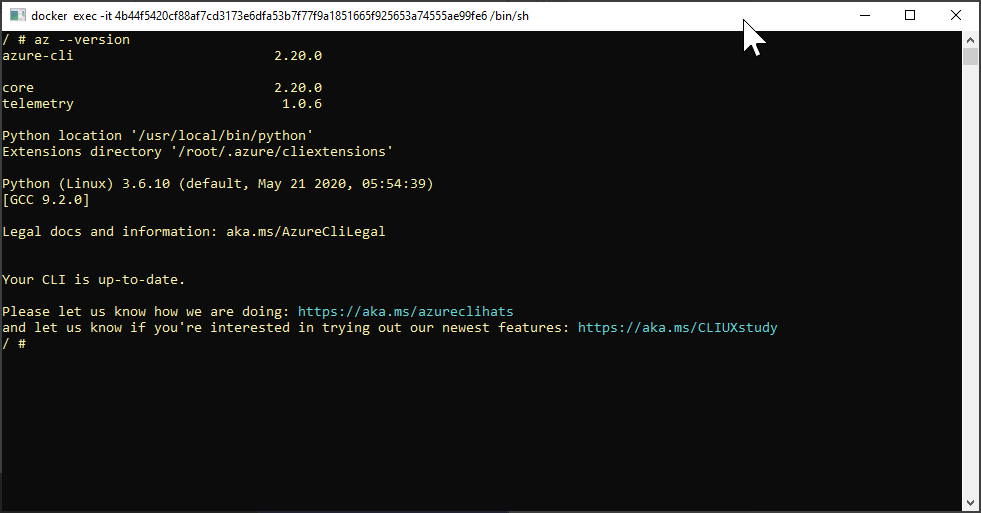
az --versionTo update the Azure CLI Docker container, run
docker pull mcr.microsoft.com/azure-cli.
Conclusion
Now that you have the Azure CLI set up and ready to go, it’s time to begin using it! Continue on your journey by learning how to authenticate to Azure and some basic commands in the Getting Started with the Azure CLI tutorial like az login and az vm.

In this Azure tutorial, we will discuss installing Azure CLI on Windows.
Table of Contents
- Install Azure CLI Without Admin Rights
- Update Azure CLI Version
- Run the Azure CLI
- Video Tutorial
- FAQs
- In which operating system, we can use Azure CLI?
- Wrapping Up
Let’s discuss an interesting topic, i.e., Install Azure CLI On Windows. But before starting the installation, you can check out a quick tutorial on Azure CLI for a better understanding.
Assuming we have some idea about Azure CLI, let’s start with the main topic, i.e., Installing Azure CLI On Windows.
You can install the Azure CLI On Windows in two ways.
- Use the Microsoft Installer (MSI)
You can download the Azure CLI executable file from the path below and install that on your machine
https://aka.ms/installazurecliwindowsOnce you access the above URL, it will prompt you to save the Azure CLI executable file in your local path. It will take a few minutes to download the executable file. Once you download the executable file, You can double-click on the executable file to install the Azure CLI setup.
As the next step, select the “I accept the terms in the License Agreement” option and click the Install button to start the installation process.

- Microsoft Installer (MSI) with PowerShell command (install Azure CLI on Windows PowerShell)
Another way is to install the Azure CLI using the PowerShell cmdlet. you can use the below PowerShell cmdlet to install the Azure CLI.
Invoke-WebRequest -Uri https://aka.ms/installazurecliwindows -OutFile .\AzureCLI.msi; Start-Process msiexec.exe -Wait -ArgumentList '/I AzureCLI.msi /quiet'; rm .\AzureCLI.msiNote: One important thing to note here is. If you have already installed the Azure CLI on your machine and are trying to run the PowerShell cmdlet on top of that, it will update the Azure CLI to the latest version.
After executing the script, you might get the error ” Invoke-WebRequest: The operation has timed out”. The complete error message is as follows.
Invoke-WebRequest: The operation has timed out.
At line:1 char:1
- Invoke-WebRequest -Uri https://aka.ms/installazurecliwindows -OutFile …
- ~~~~~~~~~~~~~~~~~
- CategoryInfo : InvalidOperation: (System.Net.HttpWebRequest:HttpWebReq
uest) [Invoke-WebRequest], WebException - FullyQualifiedErrorId: WebCmdletWebResponseException, Microsoft.PowerShell.Comm
and.InvokeWebRequestCommand
- CategoryInfo : InvalidOperation: (System.Net.HttpWebRequest:HttpWebReq
But if you try executing the same script once or twice, it will work for you, and Azure CLI will install successfully without any issues. This is how we can install Azure CLI On Windows.
You can also check out How to install Azure CLI on Mac.
Update Azure CLI Version
Suppose you already have the Azure CLI installed on your machine and want to upgrade to the latest version of Azure CLI, then you can execute the below PowerShell cmdlet to upgrade the Azure CLI version to the latest one.
az upgradeAfter installing Azure CLI, you can check out How to log in to Azure CLI.
Run the Azure CLI
Okay, now, we have done with the installation of Azure CLI, and then we have discussed how to update the Azure CLI version. Now, Let’s discuss How to run the Azure CLI. You can use the Windows command prompt or PowerShell to execute the commands. Follow the below steps to run the Azure CLI.
Step-1: Run the below az command to login
az loginOnce you execute the above PowerShell cmdlet, it will prompt you to sign in with the Browser.
Step 2: Enter your account credentials to log in.
Check out Uninstall Azure CLI Windows
Video Tutorial
FAQs
In which operating system, we can use Azure CLI?
Answer: Windows, Linux, macOS, etc.
Unable to locate package azure-CLI [Soluton]
There might be a chance that you will get an error “Unable to locate package azure-cli” . If you are getting this error, then you can fix the same issue by running the below cmdlet
sudo apt-get update && sudo apt-get upgradeYou may also like following the articles below
- Azure CLI vs PowerShell
- Install Azure CLI on Linux
- Install Azure CLI Ubuntu
Wrapping Up
In this article, we have discussed installing Azure CLI On Windows. I hope you have enjoyed this article !!!
I am Rajkishore, and I am a Microsoft Certified IT Consultant. I have over 14 years of experience in Microsoft Azure and AWS, with good experience in Azure Functions, Storage, Virtual Machines, Logic Apps, PowerShell Commands, CLI Commands, Machine Learning, AI, Azure Cognitive Services, DevOps, etc. Not only that, I do have good real-time experience in designing and developing cloud-native data integrations on Azure or AWS, etc. I hope you will learn from these practical Azure tutorials. Read more.
Last Updated :
22 Nov, 2023
Azure CLI is a very powerful tool that can be used to automate tasks, create, update, manage or delete azure resources or to troubleshoot problems with az module cmdlets. By installing az modules on your system or on your development system you and your development team can easily create, update or manage Azure AD and Azure resources such as management groups, subscriptions, resource groups, virtual machines, virtual networks, storage accounts, web apps or any other Azure native services directly from the command line interface.
If you are looking for a powerful and easy-to-use way to manage Azure resources, then you must definitely learn and make use of this Azure CLI command line tool to simplify the management across Azure services.
Requirements
- One should have administrator privileges on Windows System to install Azure CLI.
- The Azure CLI installer requires .NET Framework 4.7.2 or later.
Steps for Installing Azure CLI
Step 1: To install the Azure Command Line Interface (Azure CLI) we have to open Windows PowerShell from your system and select Run as Administrator. To Know the commands in Azure CLI to maintain the VMS refer to the Microsoft Azure – Azure CLI Commands to Manage Azure VMs.
.png)
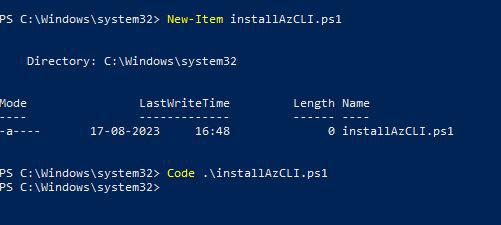
Step 2: Now, we have to create a new PowerShell file to do that use the cmdlet New-Item <file name>.ps1
Syntax:
New-Item <file name>.ps1
Example:
New-Item installAzCLI.ps1

Step 3: Once you are done creating a new PowerShell file. Use the code cmdlet to add the script into the file. Check syntax and example.
Syntax:
Code .\<file name>.ps1
Example:
Code .\installAzCLI.ps1
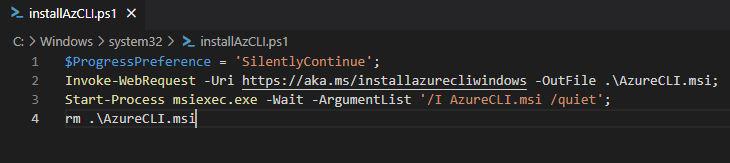
Step 4: Now in the editor copy and paste the below following code to your PowerShell file <file name>.ps1 and use CTRL+S to save the changes.
$ProgressPreference = 'SilentlyContinue';
Invoke-WebRequest -Uri https://aka.ms/installazurecliwindows -OutFile .\AzureCLI.msi;
Start-Process msiexec.exe -Wait -ArgumentList '/I AzureCLI.msi /quiet';
rm .\AzureCLI.msi
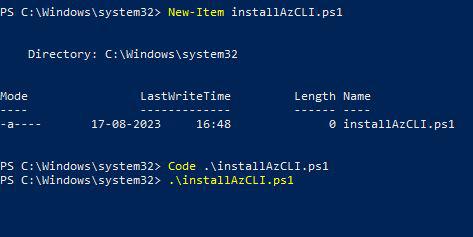
Step 5: In step 4 we have saved the Azure CLI installation script. Now, to execute or run the PowerShell script use the following syntax structure .\<file name>.ps1
Syntax:
.\<file name>.ps1
Example:
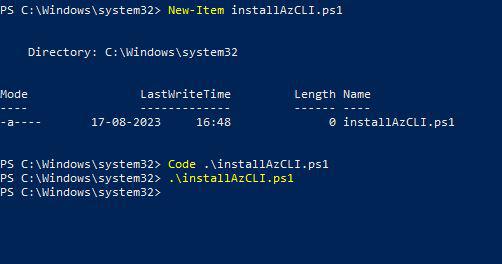
.\installAzCLI.ps1
Wait until the installation is complete. (It might take 2-3 minutes to install az cli modules)
Verify Azure CLI Installation
Once the installation is complete, you can verify the installation was successful or not by by just typing the command az or az -h:
az
This az command will list the available Azure CLI commands.
az -h
This will also list the available Azure CLI commands. Check out the sample output for better understanding.
Sample Output:
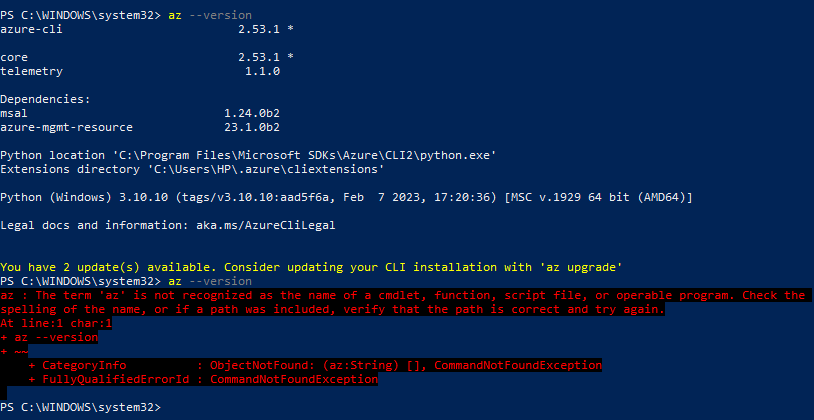
If you wish to check the Azure CLI then you may check the version of Az CLI on your system by running this below command:
az version
This will list the versions of azure cli, azure cli core, azure cli telemetry and extensions version if any.
Sample Output:
To build your own CLI extension refer to Microsoft Azure – Building Your Own Azure CLI Extensions.
Clean Up or Uninstall Azure CLI from your Environment:
On your Desktop Click on Windows Start button > Go to Settings > select Apps >> select Apps & Features >> Search for Azure CLI >> Select Azure CLI service >> Click on Uninstall to continue the removal of Azure CLI.
Removal will take around 5-10 minutes. Wait until it’s done and verify the removal of Azure CLI.

Verify Uninstallation of Azure CLI
Open Azure PowerShell or Command Prompt and type «az —version.» If you are not getting any preview of Azure CLI, then you have successfully removed Azure CLI from your environment.
Sample Output before and after the removal of Azure CLI:

To install Azure CLI on Windows, you’ll need to download the installer from the official Azure website.
You can find the installer by navigating to the Azure CLI download page and selecting the version that matches your Windows operating system.
The installer is available in both 64-bit and 32-bit versions, so make sure to choose the correct one for your system.
Once you’ve downloaded the installer, you can proceed with the installation process.
To install Azure CLI on Windows, you have three options: using a standard Windows MSI installer, PowerShell, or upgrading an existing version. The MSI installer is the most straightforward method, and you can find the current release on Microsoft’s website.
You can also use PowerShell to download and install the latest version of Azure CLI. To do this, run the following commands from a PowerShell console started as an administrator:
- # Download the latest MSI installer and save as AzureCLI.msi
- Invoke-WebRequest -Uri https://aka.ms/installazurecliwindows -OutFile .\AzureCLI.msi
- # Start the installation and wait for completion
- Start-Process msiexec.exe -Wait -ArgumentList ‘/I AzureCLI.msi /quiet’
- # Remove the downloaded MSI installer
- Remove-Item .\AzureCLI.msi
Alternatively, if you already have Azure CLI v2.2 or greater installed, you can upgrade to the latest version using the az upgrade command. This command was introduced in version 2.11 and will upgrade Azure CLI with a single command.
If you need to upgrade from a version older than v2.2, you’ll need to use the MSI installer or PowerShell method.
To configure Azure CLI on your Windows system, you’ll need to sign in with your Azure account credentials. This is done by running the command `az login` in the command line.
The Azure CLI will then open a browser window where you can enter your Azure credentials to authenticate. You can also use the `az login —use-device-code` option to receive a device code that you can use to authenticate.
Once you’ve signed in, your Azure CLI is ready to use. You can verify this by running the command `az account show`, which will display information about your Azure account.
To sign in to Azure, you need to use the Azure CLI. Run the az login command to get started. This will open your default browser to an Azure sign-in page where you can enter your credentials or select an already signed-in account.
If your browser doesn’t open automatically, you can use an authorization code to sign in. Add the —use-device-code parameter to the az login command and navigate to the URL https://microsoft.com/devicelogin to enter the authorization code.
Once Azure verifies the authorization code, you can enter your user name and password. After logging in, you’ll receive a list of subscriptions associated with your Azure account. The subscription information with isDefault: true is the currently activated subscription after logging in.
To select another subscription, use the az account set command with the subscription ID of the desired account.
To select a subscription in Azure CLI, you need to view the list of subscriptions you have access to. Azure CLI displays a list of subscriptions you have access to when you sign in to your Azure tenant.
The default subscription is used when you start creating resources if you don’t make any changes. You can view the default subscription using the az account show command.
You can view all subscriptions later in your session using the az account list command. This command displays information about each subscription, including the unique ID and name.
Here are some key things to note about subscriptions:
- Subscription ID: a unique ID starting with a specific prefix (e.g. 5b5)
- Subscription name: a display name for the subscription (e.g. Demo, Production)
If you need to switch subscriptions before creating new resources, you can use the az account set command. This command allows you to set the subscription to the one you want to work with, using either the subscription ID or display name.
Enable tab completion in the Azure CLI to speed up input entry and provide hints for command names, command group names, parameters, and certain parameter values. Tab completion is enabled by default in Azure Cloud Shell and most Linux distributions.
To enable tab completion in PowerShell, you need to create or edit the profile stored in the variable $PROFILE. This can be done by running notepad $PROFILE in PowerShell.
Add the following code to your PowerShell profile:
«`python
Register-ArgumentCompleter -Native -CommandName az -ScriptBlock {
param($commandName, $wordToComplete, $cursorPosition)
# code to enable tab completion
}
«`
This code enables tab completion for the Azure CLI in PowerShell.
To display all available options in the menu, add the following line to your PowerShell profile: Set-PSReadlineKeyHandler -Key Tab -Function MenuComplete.
Updating the Azure CLI is a straightforward process, especially with the latest versions. You can update the Azure CLI using the in-tool command, which is available starting from version 2.11.0.
This command updates all installed extensions by default, so you don’t need to worry about updating them separately. For more options, check the command reference page.
If you’re using an older version, you can update by reinstalling as described in the installation process. This will ensure you have the latest version of the Azure CLI.
You can also update the Azure CLI by deleting the old installation folder and extracting the new version to the same location, if you’re using the ZIP distribution.
To update the Azure CLI, use the following methods:
- Run the in-tool update command (for versions 2.11.0 and later)
- Reinstall the Azure CLI (for versions prior to 2.11.0)
- Delete the old installation folder and extract the new version (for ZIP distribution)
You can now run the Azure CLI with the az command from either Windows Command Prompt or PowerShell. This opens up a world of possibilities for managing your Azure resources.
To get started, you can try our onboarding tutorial that teaches you the following skills while working with Azure Storage: Find and change your default subscription.Create an Azure resource containing a random ID in the name.Set environment variables.Learn syntax differences between Bash, PowerShell, and Cmd.Debug Azure CLI reference commands.Get properties from a local JSON file.Delete multiple resources using a script.
Keep in mind that Azure CLI examples are typically written for the Bash shell, but most one-line examples will run on any platform.
Run the Command
To run the Azure CLI, you can use the az command from either Windows Command Prompt or PowerShell. This allows you to access a wide range of Azure commands and features directly from your terminal.
If you’re unable to install the Azure CLI on your machine, you can run it as a Docker container. This provides a flexible and isolated environment for using the CLI.
To run the Azure CLI as a Docker container, you’ll need to have Docker installed on your system. If you don’t already have it, you can follow the instructions to install Docker on Windows or Linux.
Once Docker is installed, you can verify its installation by running a command in your terminal. This will check if Docker is working correctly and give you a sense of what to expect.
To install the CLI using Docker, you’ll need to run a specific command. This command will download the Azure CLI Docker image and allow you to start using it right away.
Here are the steps to run the Azure CLI as a Docker container:
- Verify Docker installation by running a command in your terminal.
- Install the CLI using Docker with a specific command.
Learn Basics with Quickstarts and Tutorials
To learn the basics of Azure CLI, start with our onboarding tutorial. This tutorial teaches you essential skills while working with Azure Storage, such as finding and changing your default subscription.
The tutorial covers creating an Azure resource with a random ID in the name, which is a great way to practice using the Azure CLI. You’ll also learn how to set environment variables, which is a crucial step in any development project.
Azure CLI examples are often written for the Bash shell, but most one-line examples will run on any platform. However, longer examples may need to be modified to work in other shells, including PowerShell.
The tutorial also covers debugging Azure CLI reference commands and getting properties from a local JSON file. This is useful for learning how to troubleshoot issues and retrieve configuration values for different environments, such as development, stage, and production.
Here are the essential skills you’ll learn in the onboarding tutorial:
- Find and change your default subscription.
- Create an Azure resource containing a random ID in the name.
- Set environment variables.
- Learn syntax differences between Bash, PowerShell, and Cmd.
- Debug Azure CLI reference commands.
- Get properties from a local JSON file.
- Delete multiple resources using a script.
Resolve Issues with Winget and PowerShell
If you encounter issues with Winget and PowerShell, it’s essential to resolve them before proceeding with the Azure CLI installation. Winget is a package manager for Windows, and PowerShell is a task automation and configuration management framework.
First, try updating PowerShell by running the command `winget upgrade PowerShell`. This will ensure you have the latest version of PowerShell installed.
If you’re still experiencing issues, check the Winget error logs by running `winget show PowerShell` and looking for any error messages. This will help you identify the root cause of the problem.
To troubleshoot Winget issues, you can also try resetting the Winget cache by running `winget reset`. This will remove any corrupted cache files and may resolve the issue.
If you’re unable to resolve the issue with Winget, consider using the PowerShell Package Manager (PowerShellGet) instead. This package manager allows you to install and manage packages using PowerShell.
By resolving any Winget and PowerShell issues, you’ll be able to successfully install the Azure CLI on your Windows system.
How to check if Azure CLI is installed in Windows?
To check if Azure CLI is installed on Windows, run the command «az —version» in your terminal or command prompt. This will display the version of the Azure CLI installed on your system.
How to open Azure CLI in Windows 11?
To open Azure CLI in Windows 11, download the msi installer and double-click on it to start the straightforward installation process.
- https://www.varonis.com/blog/azure-cli
- https://learn.microsoft.com/en-us/cli/azure/install-azure-cli-windows
- https://parveensingh.com/install-azure-cli/
- https://adamtheautomator.com/install-azure-cli/
- https://learn.microsoft.com/en-us/cli/azure/get-started-with-azure-cli
Willie Walsh is an accomplished Assigning Editor with a keen eye for detail and a passion for delivering high-quality content. With a strong background in research and editing, Willie has honed their skills in identifying and assigning relevant topics to writers.
Willie’s expertise spans a wide range of categories, including technology, productivity, and education.
View Willie’s Profile