
В этой статье мы рассмотрим, как установить PowerShell модуль для подключения к Azure AD, подключится к своему тенанту и получить различную информацию из Azure. Сейчас Microsoft разрешает использовать два PowerShell модуля для подключения к Azure:
- MS Online (MSOnline) – старый модуль для работы с Azure/Office 365 из PowerShell, который появился около 6 лет назад и сейчас не развивается Microsoft;
- Azure Active Directory PowerShell for Graph (AzureAD) – современный PowerShell модуль для работы с инфраструктурой Azure. Модуль активно развивается, в него добавляется новый функционал (в нем доступны почти все аналоги командлетов MSOnline за небольшим исключением)
Теперь можно установить модуль Azure PowerShell из PowerShell Gallery. Запустите консоль PowerShell с правами администратора и выполните команду:
Install-Module -Name AzureAD
Появится сообщение:
Untrusted repository. You are installing the modules from an untrusted repository. If you trust this repository, change its InstallationPolicy value by running the Set-PSRepository cmdlet.
Нажмите Y -> Enter
Вы можете добавить галерею PowerShell в доверенные хосты с помощью команды:
Set-PSRepository -Name PSGallery -InstallationPolicy Trusted
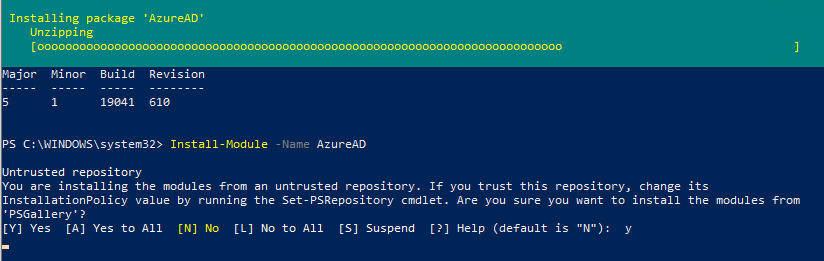
После окончания установки, можно проверить версию модуля AzureAD:
Get-Module AzureAD –ListAvailable
В нашем случае это 2.0.2.130

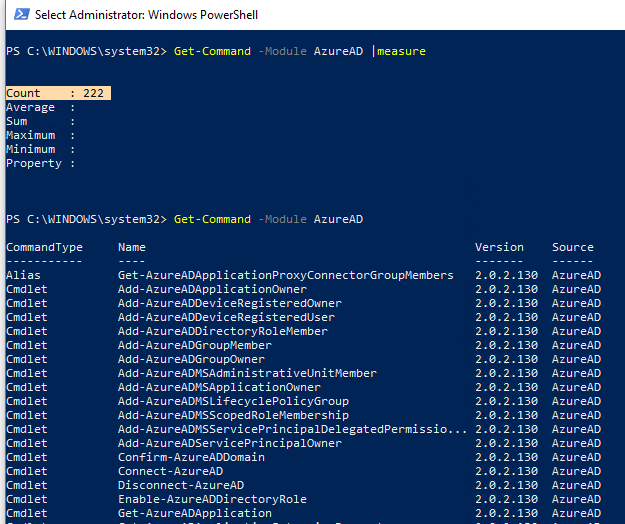
В этой версии модуля AzureAD доступно 222 командлета, которые содержат в названии *-AzureAD*. Список доступных команды можно вывести так:
Get-Command –Module AzureAD
Если у вас установлена более старая версия модуля AzureAD, ее можно обновить:
Update-Module -Name AzureAD
Если нужно установить определенную версию модуля, выполните:
Update-Module -Name AzureAD -RequiredVersion 2.0.2.120
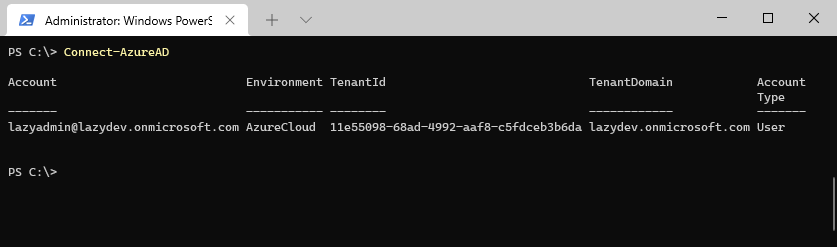
Теперь можно подключиться в Azure с помощью вашего аккаунта:
Connect-AzureAD
Командлет запросит ввести учетные данные, которые вы хотите использовать для доступа к каталогу AzureAD. В этом примере для доступа к моему тенанту я использую учетную запись [email protected].
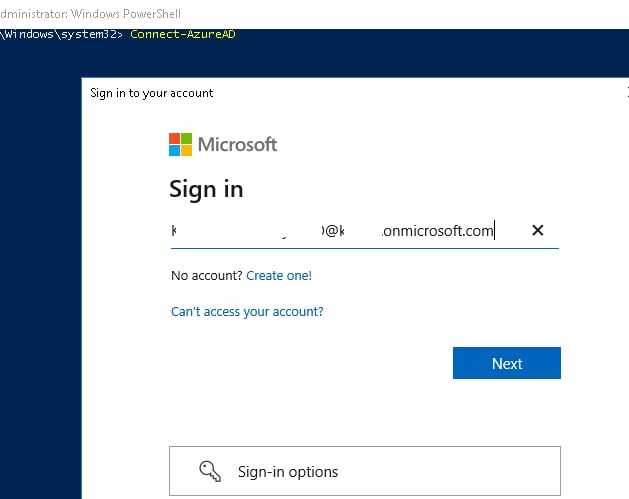
Если у вас включен Azure MFA, подтвердите в вход в аккаунт на устройстве.
Также можно запросить имя и пароль для подключения и сохранить их в переменную:
$AzureADcreds = Get-Credential
И затем использовать их для подключения:
Connect-AzureAD -Credential $AzureADcreds
Вы можете использовать сохраненный пароль во внешнем хранилище с помощью PowerShell модуля SecretManagement (поддерживаются почти все популярные vault провайдеры: Bitwarden, Azure Key Vault, KeePass, LastPass, HashiCorp Vault, Windows Credential Manager и т.д). Для подключения к Azure AD с паролем из хранилища используется такая команда PowerShell:
Connect-AzureAD -Credential (Get-Secret -Vault MyPersonalVault -Name azadm_kbuldogov)
Командлет возвращает подтверждение, показывающее, что сеанс был успешно подключен к каталогу. В строке будет указано окружение AzureCloud, TenantID и TenantDomain.

Для подключения к некоторым специализированным облакам AzureOffice 365 нужно указывать параметр -AzureEnvironmentName.
Connect-AzureAD -AzureEnvironmentName AzureChinaCloud
Connect-AzureAD -AzureEnvironmentName AzureGermanyCloud
Connect-AzureAD -AzureEnvironmentName AzureUSGovernment
По умолчанию модуль подключается к облаку Worldwide.
Информацию о текущем тенанте Azure можно вывести так:
Get-AzureADTenantDetail

Теперь вы можете использовать командлеты модуля AzureAD для получения различной информации из домена. Найдем пользователей, чьи имена начинаются с Dmit:
get-azureaduser -SearchString Dmit

Или список облачных групп в AzureAD:
Get-AzureADGroup

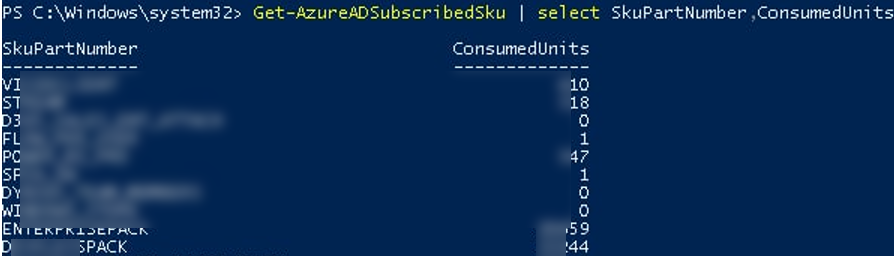
Чтобы получить список доступных лицензий, которые доступны в вашей подписке Office 365 используется командлет:
Get-AzureADSubscribedSku | select SkuPartNumber, ConsumedUnits
Можно определить, какая лицензия назначена определенному аккаунту:
Get-AzureADUser -SearchString [email protected] | Select -ExpandProperty AssignedLicenses
Затем по полученному SkuID можно узнать имя лицензии:
Get-AzureADSubscribedSku | Where {$_.SkuId -eq "6123434-b223-4332-babcd-1e9231231235"}
Подрообнее про управление лицензиями в Azure AD через PowerShell рассказано в статье.

Чтобы в сессии PowerShell отключится от Azure, выполните:
Disconnect-AzureAD
In the modern technological landscape, managing identities and access permissions has become increasingly crucial for organizations worldwide. Microsoft Azure Active Directory (Azure AD) plays a pivotal role in identity management, providing a comprehensive solution to enhance security and simplify administration across various services. To enable automation and efficient management of Azure AD, Microsoft provides the Azure AD Module for Windows PowerShell. This powerful module allows IT professionals to perform numerous identity-related tasks directly from the command line, facilitating streamlined processes and improved efficiency.
This article will guide you through the details of installing and using the Azure Active Directory Module for Windows PowerShell, including prerequisites, installation steps, and key commands to help you get started.
Understanding Azure Active Directory and PowerShell
Before diving into installation steps, it is essential to gain a basic understanding of Azure Active Directory (Azure AD) and Windows PowerShell.
Azure Active Directory
Azure Active Directory is a cloud-based identity and access management service from Microsoft. It is a critical component of the Enterprise Mobility + Security (EMS) suite, which allows organizations to manage and secure access to both on-premises and cloud-based applications.
Some key features of Azure AD include:
- Single sign-on (SSO): Users can access multiple applications with a single set of credentials.
- Multi-factor authentication (MFA): Enhances security by requiring additional authentication methods.
- Identity protection: Helps in detecting and responding to potential identity-related risks.
- Conditional access: Provides automated policies to enforce security requirements based on user location and device.
Windows PowerShell
Windows PowerShell is a task automation framework from Microsoft, consisting of a command-line shell and an associated scripting language. It is built on the .NET framework, providing a powerful tool for system administrators to automate tasks and manage configuration.
With its ability to execute commands in a sequential manner, PowerShell simplifies complex processes that would typically require manual effort. The integration of Azure AD functionality within PowerShell further enhances its capabilities, allowing administrators to manage user accounts, groups, and other resources programmatically.
Prerequisites for Installation
Before proceeding with the Azure Active Directory Module installation, ensure that you meet the following prerequisites:
-
Windows Version: The Azure AD Module requires PowerShell, which is available on various Windows versions, including Windows 10, Windows Server 2012, Windows Server 2016, and later.
-
PowerShell Version: Ensure that you are running at least Windows PowerShell 5.1. You can check your PowerShell version by opening a PowerShell window and executing the command:
$PSVersionTable.PSVersion -
Admin Access: You need administrative privileges on the machine you’re installing the module. If you’re using a corporate network, your organization’s policies may require the involvement of a system administrator.
-
.NET Framework: Ensure that the .NET Framework 4.5 or later is installed. This is typically pre-installed on Windows 10 and Windows Server versions.
-
Internet Access: The installation will require internet access to download the module from the PowerShell Gallery.
Installing the Azure Active Directory Module
Follow these steps to install the Azure Active Directory Module for Windows PowerShell:
Step 1: Open Windows PowerShell as Administrator
- Click on the Start Menu.
- Search for “PowerShell.”
- Right-click on Windows PowerShell and select Run as administrator. You may be prompted by User Account Control (UAC) to confirm.
Step 2: Install the Module
The Azure AD Module can be installed through the PowerShell Gallery using the Install-Module command. Here’s how:
-
To install the module, type the following command and press Enter:
Install-Module -Name AzureADIf prompted to install the NuGet provider, type
Yand press Enter. -
After the module is successfully installed, you may receive a message asking if you trust the module. You can type
Y(Yes) orN(No) depending on your preference for trusting the source.
Step 3: Verify the Installation
To confirm that the Azure Active Directory Module is installed correctly, you can import the module and check its version:
-
Run the following command to import the Azure AD module:
Import-Module AzureADIf there are no errors, the module has been imported successfully.
-
To check the version of the Azure AD module, execute:
Get-Module -Name AzureAD -ListAvailable
This command will display the details of the installed module, including its version.
Step 4: Connect to Azure Active Directory
Once the installation is complete, you need to connect to your Azure AD instance before executing commands. Perform the following:
-
Run the command:
Connect-AzureAD -
A prompt will appear requesting your Azure AD credentials. Enter the email and password associated with your Azure AD account. Depending on your organization’s security policies, you might also be prompted for multi-factor authentication.
Common PowerShell Commands for Azure Active Directory
Now that you have installed and connected to Azure Active Directory, here’s a list of common commands you can use to manage users, groups, and other resources.
1. Listing All Users
To retrieve a list of all users in your Azure AD, use:
Get-AzureADUserYou can filter this command further, for instance, to find users with a specific display name:
Get-AzureADUser -SearchString "John Doe"2. Creating a User
To create a new user in Azure AD, use the following command:
New-AzureADUser -DisplayName "John Doe" -GivenName "John" -Surname "Doe" -MailNickName "johndoe" -UserPrincipalName "[email protected]" -AccountEnabled $true -PasswordProfile (New-Object -TypeName Microsoft.Open.AzureAD.Model.PasswordProfile -Property @{ Password = "StrongPassword!123"; ForceChangePasswordNextLogin = $false })Remember to replace placeholders with actual data relevant to your organization.
3. Updating a User
To update a user’s information, use the Set-AzureADUser command:
Set-AzureADUser -ObjectId "[email protected]" -DisplayName "Jonny Doe"This command changes the display name of the specified user.
4. Deleting a User
When you need to remove a user from Azure AD, use:
Remove-AzureADUser -ObjectId "[email protected]"Make sure to confirm before executing deletion commands to avoid accidental removals.
5. Listing All Groups
To view all groups in your Azure AD tenant, run:
Get-AzureADGroup6. Creating a Group
To create a new security group, use:
New-AzureADGroup -DisplayName "Sales Team" -MailEnabled $false -MailNickname "salesteam" -SecurityEnabled $trueThis command creates a non-mail-enabled security group.
7. Adding a User to a Group
To add an existing user to a specific group, you can use the following command:
Add-AzureADGroupMember -ObjectId "groupId" -MemberId "userId"Replace groupId and userId with the respective IDs from your Azure AD.
8. Removing a User from a Group
To remove a user from a group, use:
Remove-AzureADGroupMember -ObjectId "groupId" -MemberId "userId"Closing Remarks
The Azure Active Directory Module for Windows PowerShell is an indispensable tool for IT professionals tasked with managing identities and access in organizations. The installation process is straightforward, allowing users to quickly set up their environment and begin performing vital administrative tasks.
However, while the commands listed in this article cover a subset of functionalities, Azure AD and PowerShell are expansive; there are numerous other commands available for executing more specific actions. Microsoft provides extensive documentation on Azure AD PowerShell Module that can help in exploring additional commands, advanced scripting options, and best practices.
Understanding and utilizing the Azure AD Module can significantly enhance automation, efficiency, and overall management of your organization’s identities, ensuring a streamlined approach to securing access and compliance in today’s cloud-based settings. As organizations continue to migrate to the cloud, mastering the Azure Active Directory Module is increasingly becoming essential for IT professionals.
By leveraging Azure Active Directory and PowerShell together, businesses can optimize their identity management processes, ultimately leading to a more robust security posture and improved operational effectiveness. Try experimenting with the commands mentioned, and explore further capabilities to truly harness the power of Azure Active Directory in your environment.
Last Updated :
22 Nov, 2023
Azure Active Directory (Azure AD) is a service for managing identities and access in the cloud. This solution facilitates access to thousands of additional SaaS applications, the Azure portal, and external resources like Microsoft 365 for your staff members.
What is Azure Active Directory (AD)?
Azure Active Directory is simply known or called Azure AD. AD is a cloud-based identity and access management SaaS(Software as a Service) to manage user identities and access to applications across Azure services including third-party services. With Azure AD we can manage users and groups, create and manage access policies, and provide single sign-on (SSO) to applications.
What is Azure AD Module?
The Azure AD PowerShell module is a powerful tool that can be used to automate tasks in Azure AD. It can be used to manage users, groups, applications, and Azure AD settings directly from the PowerShell console. Let’s get started with the steps involved in installing and connect to Azure AD on Windows PowerShell.
Steps to Install And Connect to Azure AD With PowerShell
Here are the best practices for connecting to Azure AD with PowerShell, follow the below steps to Install and Connect to Azure AD using PowerShell on your Windows. To know how to install Azure Powershell on Windows refer to How To Install and Update Azure PowerShell on Windows Machine?
Step 1: To install the AzureAD PowerShell module, you need to open PowerShell in administrator mode.
.png)
Step 2: Next, run the following command to set the PowerShell execution policy to remote signed >> Select ‘Y’ to proceed.
Set-ExecutionPolicy -ExecutionPolicy RemoteSigned -Scope CurrentUser
.png)
Step 3: To Install the AzureAD module. Run the following command to install the Azure AD PowerShell module:
Install-Module AzureAD
This command will install the latest version of the AzureAD module.
.png)
Also read: How To Install and Update Azure PowerShell on Windows Machine?
Step 4: Once the module is installed, run the following azure powershell command to connect to Azure AD
Connect-AzureAD
This command will let to connect your Azure AD credentials. Enter your username and password, and then click Connect.
.png)
That’s it! Once you are connected to Azure AD, you can start using the Azure AD PowerShell cmdlets to manage your Azure AD tenant.
Optional: If you wish to update the module at any time then use the following command:
Update-Module -Name AzureAD
.png)
PowerShell Commands For Azure AD
- Connect-AzureAD (PowerShell cmdlet) which helps you connects Azure Active Directory with an authenticated account.
- Disconnect-AzureAD (PowerShell cmdlet) which lets you disconnect the current logged-in session from an Azure Active Directory.
- Get-AzureADDirectoryRole (PowerShell cmdlet) allows fetching the details of Azure Active Directory roles.
- Get-AzureADUser (PowerShell cmdlet) helps you to fetch the information of users in Azure Active Directory tenant
- Get-AzureADGroup (PowerShell cmdlet) helps you to fetch the information of Azure AD Group in the tenant.
To fetch the information or details of any Azure AD services, you require the Azure AD Administrator role or a custom AD role with the Service Read permission.
Clean Up or Uninstall AzureAD PowerShell Module from your Environment
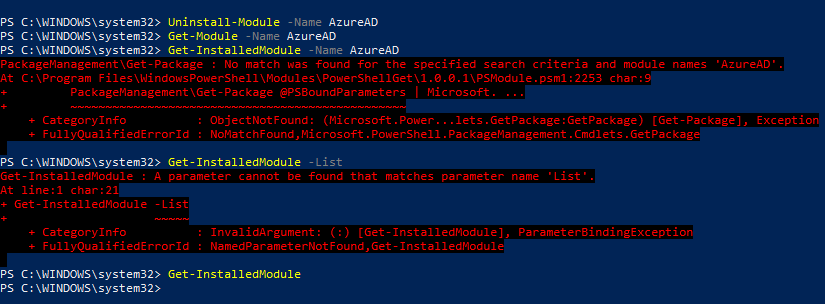
To clean up the installed AzureAD module, you can use the following command to remove the AzureAD module package resources:
Uninstall-Module -Name AzureAD
If it is successfully removed, you won’t get any errors in the PowerShell terminal. To verify the removal of the module, you can use the following command:
Get-InstalledModule -Name AzureADor
Get-InstalledModule
Sample Output:
When you want to use PowerShell to interact with your Azure AD environment you will need to install the Azure AD Module. This module allows you to manage your whole Azure Active Directory with PowerShell.
Good to know up front is that the Azure AD Module isn’t supported in PowerShell 7. Also, Microsoft is planning to deprecate Azure AD Graph (the endpoint that the Azure AD Module uses) after June 30, 2022.
In this article, I will explain how you can install and update the Azure AD Module in PowerShell.
To install the Azure Module we will be using PowerShell. For production environments, is recommended to use the General Availability (GA) version. If you want to test out new features, then you could also install the Public Preview version of the module.
Time needed: 5 minutes
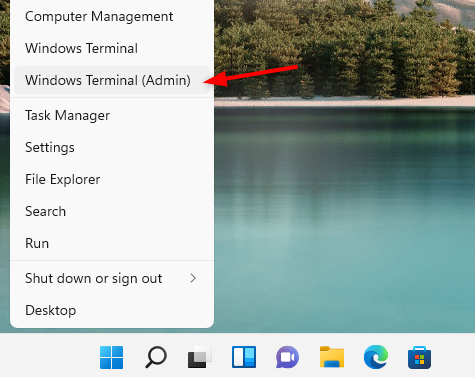
- Open PowerShell with Elevated permissions
– Right-click on your Start menu (or press Windows key + X)
– Choose Windows PowerShell (admin) or Windows Terminal (admin) on Windows 11
- Install Azure AD Module
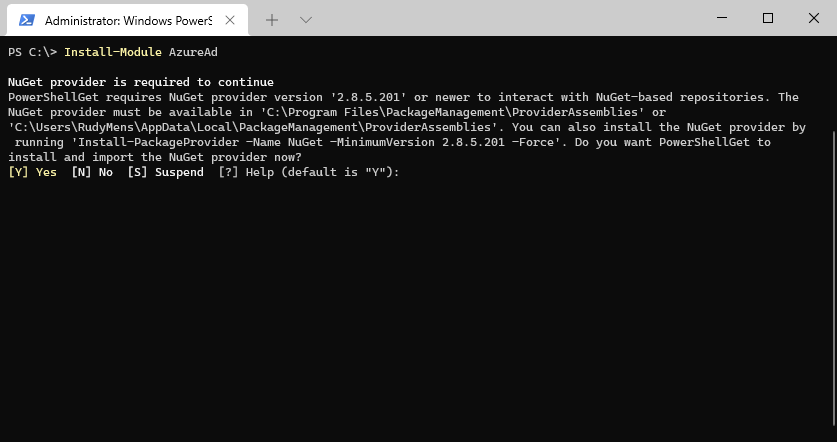
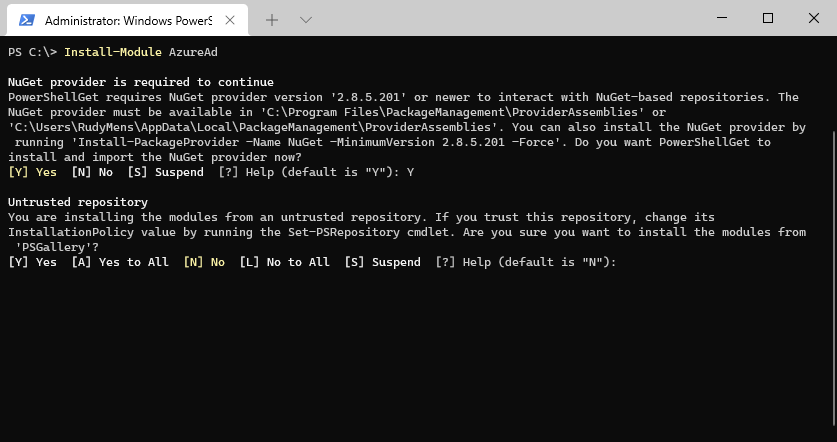
Type the following command in PowerShell:
Install-Module AzureADType Y to install the NuGet provider when requested

- Access Untrusted Repository
After NuGet is installed you will get the question if you want to install from an Untrusted Repository. Press Y to install the Azure AD Module
- Connect to AzureAD
The AzureAD module is now installed in PowerShell. You can test the module by connecting to Azure AD using the following command
Connect-AzureAD
Install the AzureADPreview Module
To install the preview version of the module you can follow the same steps. Only replace the module name with AzureADPreview:
Install-Module AzureADPreview
Update the Azure AD Module
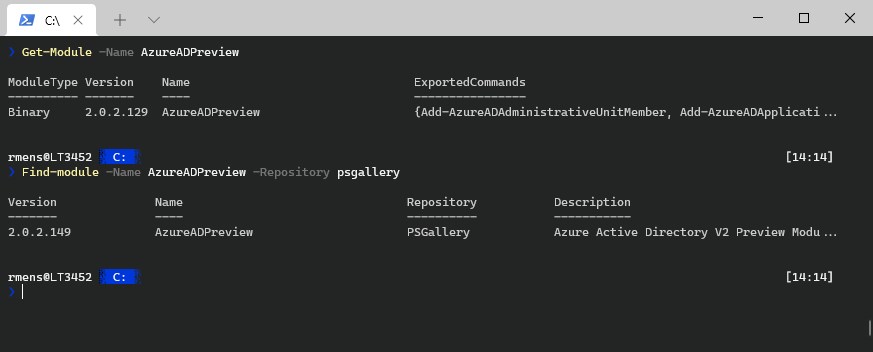
Updating the Azure AD Module is basically a re-install of the module in PowerShell. We can first check the version that you have currently installed with the Get-Module cmdlet
Get-Module -Name AzureADPreview
And then check the available version in the repository of PSGallery:
Find-module -Name AzureADPreview -Repository psgallery
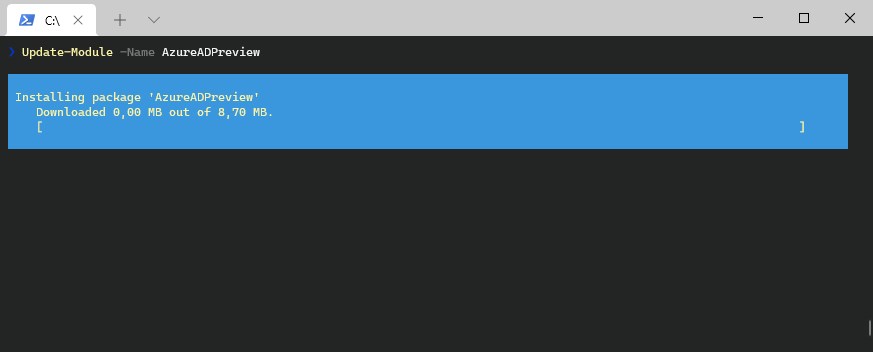
If you have an older version installed then it’s a good idea to update the module. This way you will have access to the latest cmdlets of the module.
We are going to use the Update-Module cmdlet to update the module:
Update-Module -Name AzureADPreview
Again press Y to install the module from an untrusted source
Wrapping Up
For now, is the Azure AD module still the easiest way to go to manage our Azure Active Directory users with PowerShell. But keep in mind that the module may stop working after June 2022.
Read more about the new module, Microsoft Graph SDK, in this article.
If you have any questions, just drop a comment below.
You may also like the following articles
How to install the Azure Active Directory PowerShell Module
In order to connect to manage users and organisation settings in Office 365 via Powershell, you need to install the Azure Active Directory PowerShell Module. This can be simply installed via PowerShell itself.
Why do you need the Azure Active Directory PowerShell Module?
This module allows you to perform a lot of the Office 365 user and organisation administration tasks via PowerShell. It’s great for bulk tasks like password resets, password policies, license management/reporting etc.
If you’re a Microsoft Partner, and are managing your customers Office 365 tenants via delegated administration, this module gives you a secure way to perform admin tasks using your own credentials. See our guide here for more info.
Importantly, this module doesn’t give you the ability to manage the features of Exchange Online, Skype for Business, SharePoint/OneDrive etc. These require a separate PowerShell connection method or PowerShell module.
How to Install the Azure Active Directory PowerShell Module via PowerShell
- Open the Start menu on your computer and search for ‘Powershell’
- Right-click on Windows PowerShell and choose ‘Run as administrator’

- Type the following command and press enter.
Install-Module -Name MSOnline
- Type “Y” to install and import the NuGet provider

- Type “Y” again to trust the provider

- Wait for the package to install, then type the following to enter your Office 365 admin credentials and connect to Azure Active Directory via PowerShell:
Connect-MsolService

- Once the Azure Active Directory PowerShell module has been installed, you only need to run the Connect-MsolService command to connect to the Azure AD service on this PC.


To perform Exchange Online Administration tasks, you’ll need to set up a separate connection to Exchange Online via PowerShell. Follow our quick guide here for more info.
Elliot Munro
Need additional help? Want to be across Microsoft 365 updates and GCITS articles when they’re released? Connect with Elliot Munro on LinkedIn here. If you have an Office 365 or Azure issue that you’d like us to take a look at (or have a request for a useful script) send Elliot an email at kb@gcits.com