
Java AWT or Abstract Window Toolkit is an API used for developing GUI(Graphic User Interfaces) or Window-Based Applications in Java. Java AWT is part of the Java Foundation Classes (JFC) that provides a way to build platform-independent graphical applications.
In this AWT tutorial, you will learn the basics of the AWT, including how to create windows, buttons, labels, and text fields. We will also learn how to add event listeners to components so that they can respond to user input.
By the end of this tutorial, you will have a good understanding of the AWT and be able to create simple GUIs in Java.
Java AWT Basics
Java AWT (Abstract Window Toolkit) is an API used to create Graphical User Interface (GUI) or Windows-based Java programs and Java AWT components are platform-dependent, which means they are shown in accordance with the operating system’s view. AWT is heavyweight, which means that its components consume resources from the underlying operating system (OS). The java.awt package contains AWT API classes such as TextField, Label, TextArea, RadioButton, CheckBox, Choice, List, and so on.
Points about Java AWT components
i. Components of AWT are heavy and platform dependent
ii. AWT has less control as the result can differ because of components are platform dependent.
Why AWT is Platform Independent?
The Java AWT utilizes the native platform subroutine to create API components such as TextField, CheckBox, and buttons. This results in a different visual format for these components on different platforms such as Windows, MAC OS, and Unix. The reason for this is that each platform has a distinct view of its native components. AWT directly calls this native subroutine to create the components, resulting in an AWT application resembling a Windows application on Windows OS, and a Mac application on the MAC OS. In simpler terms, the AWT application’s appearance adapts to the platform it is running on.
Understanding how to use BeanFactory is vital for optimizing your application’s performance. To delve deeper into Java programming, the Java Backend course offers a comprehensive look at various Java concepts and their applications.
AWT is platform independent even after the AWT components are platform dependent because of the points mentioned below:
1. JVM (Java Virtual Machine):
As Java Virtual Machine is platform dependent
2. Abstract APIs:
AWT provides an abstract layer for GUI. Java applications interact with AWT through Abstract API which are platform independent. Abstract API allows Java to isolate platform-specific details, making code portable across different systems.
3. Platform-Independent Libraries:
The Libraries of AWT are written in Java which they are totally platform-independent. Because of this, it ensures that AWT functionality remains consistent across different environments.
Java AWT Hierarchy
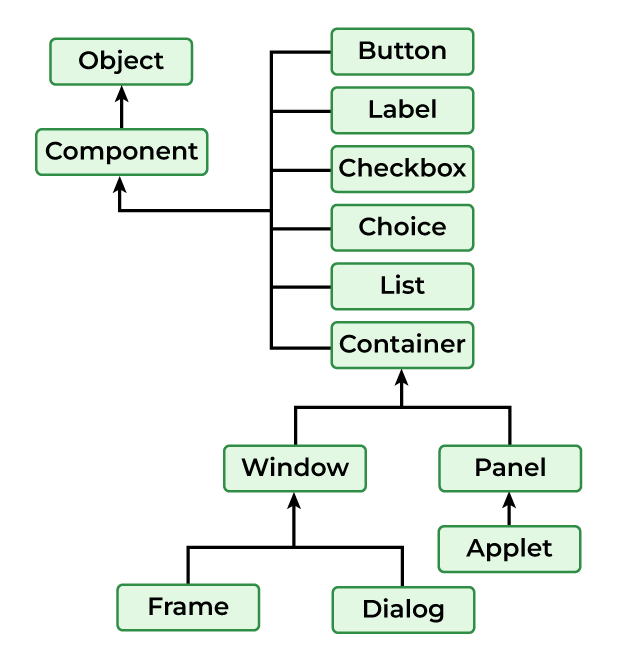
- Components: AWT provides various components such as buttons, labels, text fields, checkboxes, etc used for creating GUI elements for Java Applications.
- Containers: AWT provides containers like panels, frames, and dialogues to organize and group components in the Application.
- Layout Managers: Layout Managers are responsible for arranging data in the containers some of the layout managers are BorderLayout, FlowLayout, etc.
- Event Handling: AWT allows the user to handle the events like mouse clicks, key presses, etc. using event listeners and adapters.
- Graphics and Drawing: It is the feature of AWT that helps to draw shapes, insert images and write text in the components of a Java Application.
Note: Container can be added inside another container as it is type of component.
Types of Containers in Java AWT
There are four types of containers in Java AWT:
- Window: Window is a top-level container that represents a graphical window or dialog box. The Window class extends the Container class, which means it can contain other components, such as buttons, labels, and text fields.
- Panel: Panel is a container class in Java. It is a lightweight container that can be used for grouping other components together within a window or a frame.
- Frame: The Frame is the container that contains the title bar and border and can have menu bars.
- Dialog: A dialog box is a temporary window an application creates to retrieve user input.
Java AWT Tutorial for Beginner & Experienced
Learn the basics of the Abstract Window Toolkit (AWT) in Java, for both beginners and experienced developers.
- Java AWT Label
- Java AWT Button
- Java AWT TextField
- Java AWT Checkbox
- Java AWT CheckboxGroup
- Java AWT Choice
- Java AWT List
- Java AWT Canvas
- AWT Scrollbar
- Java AWT MenuItem & Menu
- Java AWT PopupMenu
- Java AWT Panel
- Java AWT Toolkit
1. Java AWT Label
Syntax of AWT Label
public class Label extends Component implements Accessible
AWT Label Class Constructors
There are three types of Java AWT Label Class
1. Label():
Creates Empty Label.2. Label(String str):
Constructs a Label with str as its name.3. Label(String str, int x):
Constructs a label with the specified string and x as the specified alignment
2. Java AWT Button
AWT Button is a control component with a label that generates an event when clicked on. Button Class is used for creating a labeled button that is platform-independent.
Syntax of AWT Button
public class Button extends Component implements Accessible
Java AWT Button Class Constructors
There are two types of Button class constructors as mentioned below:
1. Button( ):
Creates a Button with no label i.e. showing an empty box as a button.2. Button(String str):
Creates a Button with String str as a label. For example if str=»Click Here» button with show click here as the value.
3. Java AWT TextField
Syntax of AWT TextField:
public class TextField extends TextComponent
TextField Class constructors
There are TextField class constructors are mentioned below:
1. TextField():
Constructs a TextField component.2. TextField(String text):
Constructs a new text field initialized with the given string str to be displayed.3. TextField(int col):
Creates a new text field(empty) with the given number of columns (col).4. TextField(String str, int columns):
Creates a new text field(with String str in the display) with the given number of columns (col).
4. Java AWT Checkbox
Syntax of AWT Checkbox:
public class Checkbox extends Component implements ItemSelectable, Accessible
Checkbox Class Constructors
There are certain constructors in the AWT Checkbox class as mentioned below:
1. Checkbox():
Creates a checkbox with no label.2. Checkbox(String str):
Creates a checkbox with a str label.3. Checkbox(String str, boolean state, CheckboxGroup group):
Creates a checkbox with the str label, and sets the state in the mentioned group.
5. Java AWT CheckboxGroup
CheckboxGroup Class is used to group together a set of Checkbox.
Syntax of AWT CheckboxGroup:
public class CheckboxGroup extends Object implements Serializable
Note: CheckboxGroup enables the use of radio buttons in AWT.
6. Java AWT Choice
The object of the Choice class is used to show a popup menu of choices.
Syntax of AWT Choice:
public class Choice extends Component implements ItemSelectable, Accessible
AWT Choice Class constructor
Choice(): It creates a new choice menu.
7. Java AWT List
The object of the AWT List class represents a list of text items.
Syntax of Java AWT List:
public class List extends Component implements ItemSelectable, Accessible
AWT List Class Constructors
The List of class constructors is defined below:
1. List():
Creates a new list.2. List(int row):
Creates lists for a given number of rows(row).3. List(int row, Boolean Mode)
Ceates new list initialized that displays the given number of rows.
8. Java AWT Canvas
Syntax of AWT Canvas:
public class Canvas extends Component implements Accessible
Canvas Class Constructors
1. Canvas():
Creates new Canvas.2. Canvas(GraphicConfiguration config):
It creates a new Canvas with the given Graphic configuration.
Syntax of AWT Scrollbar:
public class Scrollbar extends Component implements Adjustable, Accessible
Java AWT Scrollbar Class Constructors
There are three constructor classes in Java mentioned below:
1. Scrollbar():
It Creates a new vertical Scrollbar in the Application.2. Scrollbar(int orientation):
Creates a new vertical Scrollbar with the given orientation.3. Scrollbar(int orientation, int value, int visible, int mini, int maxi):
Creates a new scrollbar with the orientation mentioned with value as the default value and [mini, maxi] as the lower and higher limit.
MenuItem class adds a simple labeled menu item on the menu. The MenuItem class allows you to create individual items that can be added to menus. And Menu is a component used to create a dropdown menu that can contain a list of MenuItem components.
public class MenuItem extends MenuComponent implements Accessible
public class Menu extends MenuItem implements MenuContainer, Accessible
Java AWT PopupMenu is a component that is used for dynamically popping up a menu that appears when the user right-clicks or performs any other action on a component.
public class PopupMenu extends Menu implements MenuContainer, Accessible
12. Java AWT Panel
Java AWT Panel is a container class used to hold and organize graphical components in a Java Application.
Syntax of Java AWT Panel:
public class Panel extends Container implements Accessible
Java AWT Toolkit class provides us with a platform-independent way to access various system resources and functionalities. Subclasses of Toolkit are used to bind various components.
Syntax of Java AWT Toolkit
public abstract class Toolkit extends Object
Event Handling Components — Java AWT
Here are some of the event handling components in Java:
- Java ActionListener
- Java MouseListener
- Java MouseMotionListener
- Java ItemListener
- Java KeyListener
- Java WindowListener
- Close AWT Window
1. Java ActionListener
Java ActionListner is a interface which responds to the actions performed by the components like buttons, menu items ,etc.
Syntax of Java ActionListener:
public class ActionListenerExample Implements ActionListener
There is only methods associated with ActionListner class that is actionPerformed().
Syntax of actionPerformed() method:
public abstract void actionPerformed(ActionEvent e);
2. Java MouseListener
Java MouseListner is a interface that responds to the actions performed by mouse events generated by the user. Example: mouse clicks , mouse movements, etc.
There are 5 Methods associated with MouseListner:
1. mouseClicked(MouseEvent e):
Responds to mouse buttons when clicked on a component in the Application.2. mousePressed(MouseEvent e):
Responds to mouse button is Pressed on a component in the Application.3. mouseReleased(MouseEvent e):
Responds to Mouse button released after being pressed over a component in the Application.4. mouseEntered(MouseEvent e):
Responds to the situation when a Mouse cursor enters the bounds of a component in an Application.5. mouseExited(MouseEvent e):
Responds to the situation when a Mouse cursor exits a component’s bounds.
3. Java MouseMotionListener
Java MouseMotionListner is a interface which is notified when mouse is moved or dragged.
It contains two Methods mentioned below:
1. mouseDragged(MouseEvent e):
Responds when the mouse is dragged with mouse button clicked over a component in Application.2. mouseMoved(MouseEvent e):
Responds when the mouse is moved over a component in Application.
4. Java ItemListener
Java ItemListner is an interface which handles events related to item selection and deselection those that occur with checkboxes, radio buttons, etc. There is only one Method associated with ItemListner that is itemStateChanged(). This method provides information about the event, i.e. source of the event and the changed state.
Syntax of itemStateChanged() method:
itemStateChanged(ItemEvent e)
5. Java KeyListener
Java KeyListner is an interface in Java notified whenever you change the state of key or can be said for key related events.
Syntax of KeyListener:
public interface KeyListener extends EventListener
There are three methods associated with KeyListner as mentioned below:
1. keyPressed (KeyEvent e):
Responds to the event when key is pressed.2. keyReleased (KeyEvent e):
Responds to the event when the key is released.3. keyTyped (KeyEvent e):
Responds to the key has been typed.
6. Java WindowListener
Java WindowListener is a interface used for handling events related to window actions. Events like opening , closing, minimizing, etc are handled using WindowListener.
Syntax of WindowListener
public interface WindowListener extends EventListener
There are seven methods associated with WindowListener as mentioned below:
1. windowActivated (WindowEvent e):
Responds when window is first opened2. windowClosed (WindowEvent e):
Responds when the user attempts to close the window3. windowClosing (WindowEvent e):
Responds after a window has been closed4. windowDeactivated (WindowEvent e):
Responds when a window is minimized5. windowDeiconified (WindowEvent e):
Responds when a window is restored from a minimized state6. windowIconified (WindowEvent e):
Responds when a window is activated7. windowOpened (WindowEvent e):
Responds when a window loses focus
7. Java Adapter classes
Java adapter classes provide the default implementation of listener interfaces.
8. Close AWT Window
At the end we will need to Close AWT Window, So to perform this task we will use dispose() method. This method releases the resources associated with the window and also removes it from the screen.
Java AWT Examples
Here are some Java AWT examples:
- Hello World in Java AWT
- Java AWT Program to create Button
1. Hello World in Java AWT
Hello, World is was the first step in learning Java. So, let us program our first Program in Java AWT as Hello World using Labels and Frames.
Below is the implementation of the above method:
Java
// Java AWT Program for Hello World
import java.awt.*;
import java.awt.event.WindowAdapter;
import java.awt.event.WindowEvent;

// Driver Class
public class AWT_Example {
    // main function
    public static void main(String[] args)
    {
        // Declaring a Frame and Label
        Frame frame = new Frame("Basic Program");
        Label label = new Label("Hello World!");

        // Aligning the label to CENTER
        label.setAlignment(Label.CENTER);

        // Adding Label and Setting
        // the Size of the Frame
        frame.add(label);
        frame.setSize(300, 300);

        // Making the Frame visible
        frame.setVisible(true);

        // Using WindowListener for closing the window
        frame.addWindowListener(new WindowAdapter() {
            @Override
            public void windowClosing(WindowEvent e)
            {
                System.exit(0);
            }
        });
    }
}
Running:
javac AWT_Example.java
java AWT_Example
Output:
2. Java AWT Program to create Button
Below is the implementation of the Java AWT Program to create a Button:
Java
// Java AWT Program for Button
import java.awt.*;
import java.awt.event.WindowAdapter;
import java.awt.event.WindowEvent;

// Driver Class
public class Button_Example {
    // main function
    public static void main(String[] args)
    {
        // Creating instance of frame with the label
        Frame frame = new Frame("Example 2");

        // Creating instance of button with label
        Button button = new Button("Click Here");

        // Setting the position for the button in frame
        button.setBounds(80, 100, 64, 30);

        // Adding button to the frame
        frame.add(button);

        // setting size, layout and visibility of frame
        frame.setSize(300, 300);
        frame.setLayout(null);
        frame.setVisible(true);

        // Using WindowListener for closing the window
        frame.addWindowListener(new WindowAdapter() {
            @Override
            public void windowClosing(WindowEvent e)
            {
                System.exit(0);
            }
        });
    }
}
Running:
javac Button_Example.java
java Button_Example
Output:
Материал из РУВИКИ — свободной энциклопедии
Windows-форма с некоторыми примерами AWT
Abstract Window Toolkit (AWT) — это исходная платформо-независимая оконная библиотека графического интерфейса (Widget toolkit) языка Java. Сейчас AWT является частью Java Foundation Classes (JFC) — стандартного API для реализации графического интерфейса в Java-программе.
Также AWT является стандартной библиотекой GUI для некоторых профилей Java ME. Например, профили Connected Device Configuration требуют от среды исполнения Java на мобильных телефонах поддержки AWT.
Когда Sun Microsystems впервые выпустила Java в 1995 году, виджеты AWT предоставляли тонкий уровень абстракции над основным родным пользовательским интерфейсом. Например, создание флажка AWT заставляет AWT напрямую вызвать более низкоуровневую нативную подпрограмму, которая и создает флажок. Однако, флажок (check box) на Microsoft Windows — это не совсем то же, что флажок на Mac OS или на различных видах Unix. Некоторые разработчики предпочитают эту модель, поскольку она обеспечивает высокую степень соответствия основному оконному инструментарию и беспрепятственную интеграцию с родными приложениями. Другими словами, GUI-программа, написанная с использованием AWT, выглядит как родное приложение Microsoft Windows, будучи запущенной на Windows, и в то же время — как родное приложение Apple Macintosh, будучи запущенной на Mac, и т. д. Однако, некоторым разработчикам не нравится эта модель, потому что они предпочитают, чтобы их приложения выглядели одинаково на всех платформах.
В J2SE 1.2 виджеты AWT были в значительной степени заменены аналогичными из Swing. В дополнение к предоставлению более богатого набора элементов интерфейса пользователя, Swing рисует свои собственные виджеты (с помощью Java 2D для вызова низкоуровневых подпрограмм местной графической подсистемы) вместо того, чтобы полагаться на высокоуровневый модуль пользовательского интерфейса операционной системы. Swing обеспечивает возможность использования либо системного «look and feel», который использует родной «look and feel» платформы, либо кросс-платформенный внешний вид («Java Look and Feel»), который выглядят одинаково на всех платформах. Тем не менее, Swing использует AWT для взаимодействия с родной оконной системой.
AWT предоставляет два уровня API:
- Общий интерфейс между Java и родной системой, используемый для управления окнами, событиями, менеджерами компоновки. Этот API является основой программирования Java GUI и используется также Swing и Java 2D. Он содержит:
- Интерфейс между родной оконной системой и Java-приложением;
- Ядро обработчика событий интерфейса;
- Некоторые менеджеры компоновки;
- Интерфейс к устройствам ввода, таким, как мышь и клавиатура; и
- Пакет
java.awt.datatransferдля использования с буфером обмена и Drag and Drop.
- Базовый набор виджетов графического интерфейса, таких, как кнопки, текстовые поля (text box) и меню. Она также предоставляет AWT Native Interface, который позволяет библиотекам в нативном коде рисовать непосредственно на
Canvas.
AWT также предоставляет приложениям некоторую высокоуровневую функциональность:
- Доступ к области уведомлений на поддерживаемых системах; и
- Возможность запуска некоторых десктопных приложений, таких, как веб-браузеры и почтовые клиенты из Java-приложения.
Ни AWT, ни Swing не являются по своей природе потокобезопасными. Таким образом, код, обновляющий GUI или обрабатывающий события, должен выполняться в потоке диспетчеризации событий (англ. event dispatching thread, EDT). Невыполнение этого требования может привести к взаимной блокировке или состязанию. Для решения этой проблемы служебный класс SwingWorker позволяет приложениям выполнять «тяжёлые» обработчики интерфейсных событий в потоке обработки событий.
Начиная с Java 6#Java SE 6 Update 10 смешивание компонентов Swing и основных виджетов AWT часто приводило к нежелательным побочным эффектам, с появлением AWT-виджетов над виджетами Swing, независимо от их определенного порядка наложения. Эта проблема объясняется тем, что архитектура рендеринга двух widget toolkits очень разная, несмотря на заимствование Swing’ом тяжеловесных контейнеров верхнего уровня из AWT[1].
Начиная с Java 6#Java SE 6 Update 12 стало возможно смешивать виджеты Swing и AWT без проблем с порядком наложения.
Так как AWT является мостом к нижележащему нативному пользовательскому интерфейсу, его реализация на новой операционной системе может быть большой работой, главным образом для набора виджетов, которые требуют разработки с нуля нативных peers для каждого из виджетов AWT.
Одновременно с разработкой Java начал разрабатываться проект Caciocavallo. Его целью является предоставление Java API, основанных на OpenJDK для облегчения написания реализаций AWT для новых операционных систем[2]. Для построения интерфейса используется Java2D[3]. Все необходимые модификации включены в JDK начиная с версии OpenJDK 7[4].
- Викикнига об AWT
- Event dispatching thread
- AWT Native Interface (JAWT)
- Swing
- Standard Widget Toolkit
- SwingWorker
- ↑ Fowler, Amy Mixing heavy and light components (недоступная ссылка — история). Sun Microsystems (1994). Дата обращения: 17 декабря 2008. Архивировано 1 мая 2012 года.
- ↑ Torre, Mario FINAL PROPOSAL: Portable GUI backends (недоступная ссылка — история) (2 марта 2008). Дата обращения: 7 сентября 2008. Архивировано 1 мая 2012 года.
- ↑ Kennke, Roman Cacio Swing AWT peers (3 сентября 2008). Дата обращения: 21 апреля 2013. Архивировано 29 апреля 2013 года.
- ↑ How much has been pushed upstream? (недоступная ссылка — история). openjdk.java.net (20 сентября 2009). — «You don’t need anymore those patches, with the latest FontManager push, everything is upstream now, so just use the Cacio repo, it’s completely self contained.». Дата обращения: 7 марта 2010. Архивировано 1 мая 2012 года.
- AWT homepage
java.awt(AWT Javadoc API documentation)
Back to: Java Tutorials For Beginners and Professionals
Abstract Windows Toolkit (AWT) in Java with Examples
In this article, I am going to discuss Abstract Windows Toolkit (AWT) in Java with Examples. Please read our previous article, where we discussed Graphics in Applet. At the end of this article, you will understand the following pointers in detail.
- Abstract Windows Toolkit (AWT) in Java
- Why AWT is platform-dependent?
- Advantages of GUI over CUI
- Features of AWT in Java
- AWT UI Aspects
- AWT Hierarchy
- AWT Component
Abstract Windows Toolkit (AWT) in Java:
AWT package is bundled with Java software by default, i.e., located in rt.jar file (jre/lib). AWT package is platform dependent API used for creating a graphical user interface. The AWT contains a number of classes and methods that allow you to create and manage windows. It is also the foundation to build Swing. When a user wants to interact with an application, the user has to provide some information to the application and it can be done in two ways:
Character User Interface(CUI): This interface is used to interact with the application by typing some characters. This interface is not user friendly because the user has to type all the commands and the user has to remember all the commands. Example: DOS
Graphical User Interface(GUI): This interface will interact with the application by using some graphics like menus, icons, images, etc. This interface is user friendly because it prompts the user by providing the options or menus. Example: Windows XP, Windows 7, etc.
Points To Remember:
- To develop the GUI based applications we have to use AWT.
- AWT stands for Abstract Windowing Toolkit.
- The set of classes and interfaces which are required to develop GUI components together are called “Toolkit”. The GUI components will be used to design GUI programs.
- Writing a program to display the created GUI components on the windows is called “windowing”.
- To display the components on the windows we need to take the support of graphics available in the operating system. For a developer, there is no direct interaction with the graphics and hence graphics is “Abstract” to the developer.
- Every GUI component will have a corresponding “PEER” class which is responsible to interact with the graphics of the operating system.
 in Java")
Why AWT is platform-dependent?
Java AWT components are platform-dependent because components are displayed according to the view of the operating system. Java AWT calls Operating systems subroutine for creating components such as textbox, button, etc. An application built on AWT looks like a windows application when it runs on Windows, but the same application would look like a Mac application when runs on Mac OS.
Note: AWT is rarely used nowadays because of its platform-dependent and heavy-weight nature. AWT components are considered heavyweight because they are being generated by the underlying operating system(OS).
Advantages of GUI over CUI
- They are easy to learn and use, i.e. users without experience can also use the system quickly.
- The user can interact with several different applications by switching quickly from one task to another.
- Information remains visible in its own window when attention is switched.
- Fast, full-screen interaction is possible with immediate access to anywhere on the screen.
- Some types of error situations can be avoided because they are not allowed to occur through input.
Features of AWT in Java:
The Abstract Window Toolkit (AWT) supports Graphical User Interface (GUI) programming. AWT features include:
- It is a set of native user interface components
- It is a robust event-handling model
- Applets have graphics and imaging tools, including shape, color, and font classes
- The applet is having layout managers, for flexible window layouts that do not depend on a particular window size or screen resolution
- The applet contains Data transfer classes, for cut-and-paste through the native platform clipboard
AWT UI Aspects
Every user interface considers the following three main aspects:
- UI Elements: It refers to the core visual elements used for interacting with the applications and which are visible to the users.
- Layouts: It defines how UI elements should be organized on the screen and provide a final look and feel to the GUI.
- Behavior: It defines the events which should occur when a user interacts with UI elements.
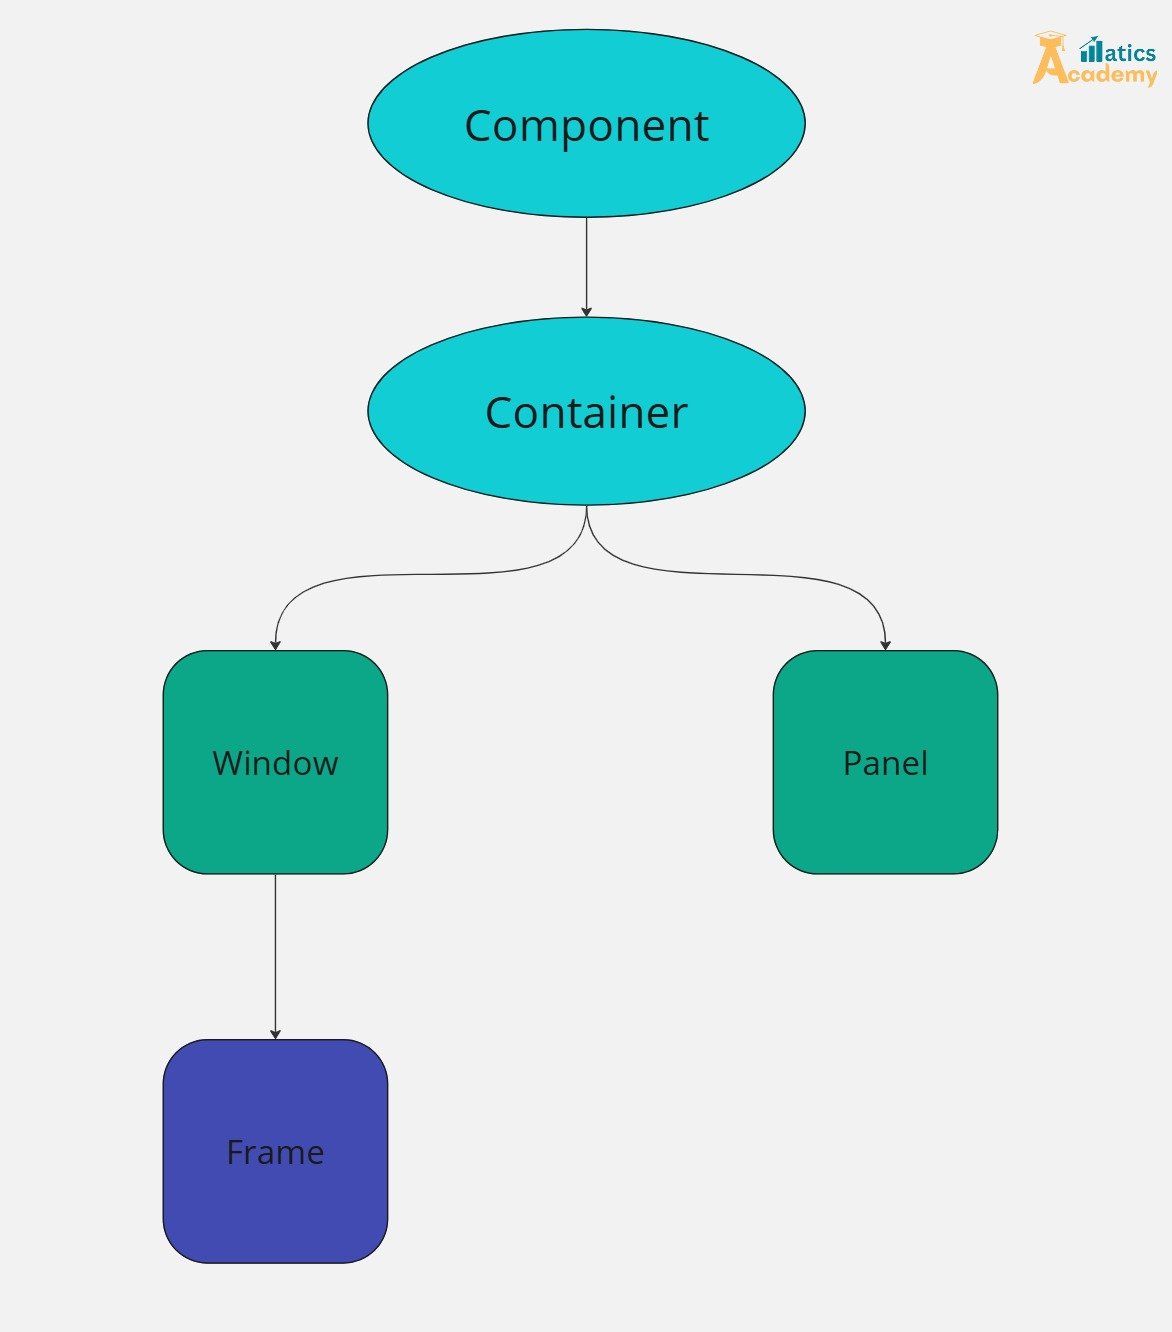
AWT Hierarchy in Java
The AWT classes are contained in java.awt package. It is one of Java’s largest packages. Fortunately, because it is logically organized in a top-down, hierarchical fashion, it is easier to understand and use than you might at first believe.
The AWT defines windows according to a class hierarchy that is used to add functionality and specificity to each level. The two most common windows are Panel, which is used by applets, and Frame, which creates a standard application window. Most of the functionalities of these windows are derived from their parent classes.

AWT Component in Java
At the top of the AWT, the hierarchy is the component class. The Component is an abstract class that encapsulates all of the attributes of a visual component. All user interface elements that interact with the user are subclasses of Component and are displayed on the screen.
Some useful methods of Component Class
- public void add(Component c): It is used to insert a component on this component.
- public void setSize(int width, int height): It is used to set the size (height and width) of the component.
- public void setLayout(LayoutManager m): It defines the layout manager of the component.
- public void setStatus(boolean status): It is used to change the visibility of the component, by default false.
Container
The Container class is a subclass of the Component class. It has additional methods that allow other component objects to be nested within it. A container provides a space where a component can be located. A Container in AWT is a component itself and it adds the capability to add the component to itself.
Panel
The Panel class is a concrete subclass of Container. It provides space in which an application can attach any other component. The default layout manager for a panel is the FlowLayout layout manager. It is visually represented as a window that does not contain a title bar, menu bar, or border. Panels don’t have any visible bounding lines. You can delimit them with different background colors.
Window
The Window class creates a top-level window with no border and no menubar. It uses BorderLayout as a default layout manager. A window must have either a frame, dialog, or another window defined as its owner when it’s constructed. It could be used to implement a pop-up menu. A Window object blocks input to other application windows when it is shown.
Dialog
Dialog class’s instance always needs an associated Frame class instance to exist. Dialog class is also a subclass of Window and comes with the border as well as the title. An instance of the Dialog class cannot exist without an associated instance of the Frame class.
Frame
A-Frame may be a top-level window with a title and a border. It can produce other components like buttons, text fields, etc. The default layout for a frame is BorderLayout. Frames are capable of generating the subsequent sorts of window events: WindowOpened, WindowClosing, WindowClosed, WindowIconified, WindowDeiconified, WindowActivated, WindowDeactivated. When a Frame window is made by a stand-alone application instead of an applet, a traditional window is made.
Frame’s Constructors
Here are two of Frame’s constructors:
- Frame(): It creates a standard window that does not contain a title.
- Frame(String title): It creates a window with the title specified by the title.
Note: You cannot specify the dimensions of the window. Instead, you must set the size of the window after it has been created.
Methods of Frames
- void setSize(int newWidth, newHeight): It is used to set the dimensions of the window by specifying the width and height fields of the dimensions. The dimensions are specified in terms of pixels.
- void setSize(Dimension newSize): The new size of the window is specified by newWidth and newHeight, or by the width and height fields of the Dimension object passed in newSize.
- Dimension getSize() : The getSize() method is used to obtain the current size of a window. This method returns the current size of the window contained within the width and height fields of a Dimension object.
- void setVisible(Boolean visibleFlag): The component is visible of the argument to this method is true. Otherwise, it is hidden.
- void setTitle(String newTitle): You can change the title in a frame window using setTitle(). Here, newTitle is the new title for the window.
- windowClosing(): When using a frame window, your program must remove that window from the screen when it is closed, by calling setVisible(false). To intercept a window-close event, you must implement the windowClosing() method of the WindowListener interface. Inside windowClosing(), you must remove the window from the screen.
Creating a Frame Window in an Applet
The frame can be created in two ways:
1. Create the object of the Frame class directly.
Frame f = new Frame();
2. Create the object of any class that extends the Frame class.
MyFrame mf = new MyFrame();
Example to create a frame by creating the object of the frame class directly using AWT in Java
import java.awt.*;
public class FrameDemo1
{
    public static void main (String[]args)
    {
        Frame f = new Frame ();
        Label lb = new Label ("Hello World");
        f.add (lb);
        f.setVisible (true);
        f.setSize (300, 300);
    }
}
Output:
Example to create a frame by extending the frame class using AWT in Java
import java.awt.*;
public class FrameDemo2 extends Frame
{
    public static void main (String[]args)
    {
        FrameDemo2 fd = new FrameDemo2 ();
        Button btn = new Button ("Hello World");
        fd.add (btn);
        fd.setVisible (true);
        fd.setSize (500, 200);
    }
}
Output:

In the next article, I am going to discuss AWT Controls in Java with examples. Here, in this article, I try to explain Abstract Windows Toolkit (AWT) in Java with Examples and I hope you enjoy this AWT in Java with Examples article.
About the Author: Pranaya Rout
Pranaya Rout has published more than 3,000 articles in his 11-year career. Pranaya Rout has very good experience with Microsoft Technologies, Including C#, VB, ASP.NET MVC, ASP.NET Web API, EF, EF Core, ADO.NET, LINQ, SQL Server, MYSQL, Oracle, ASP.NET Core, Cloud Computing, Microservices, Design Patterns and still learning new technologies.
Abstract window toolkit in Java
Java is a popular programming language known for its cross-platform compatibility. One of the key features that make Java versatile is its Abstract Window Toolkit (AWT). AWT is a set of Java libraries that provide a foundation for creating Graphical User Interfaces (GUIs) in Java applications.
In this blog post, we will explore the basics of AWT and understand its significance in Java development.
AWT is a collection of classes and methods in Java that allows developers to build GUI-based applications. It provides a set of tools and components to create windows, buttons, text boxes, menus, and various other graphical elements.
AWT Features
1. Platform Independence
One of the key advantages of AWT is its platform independence. AWT components are designed to work on multiple operating systems without modification. This means that an AWT-based application created on one platform can be run on another platform seamlessly.
2. Event-Driven Programming
AWT follows an event-driven programming model. This means that instead of continuously checking for user actions, developers can register event listeners to specific AWT components. When a user interacts with the GUI, the appropriate event is triggered, and the associated listener reacts accordingly.
3. Layout Managers
AWT provides a set of layout managers that allow developers to format the GUI components in a structured manner. Layout managers automatically adjust the size and position of components based on different factors such as container size and user preferences.
4. Support for Customization
AWT components can be customized using various properties and methods. Developers can change the appearance, behavior, and functionality of AWT components to suit their application’s requirements.
AWT vs. Swing
It’s worth mentioning that AWT was the original GUI framework in Java, but Swing was introduced later as an improved replacement. Swing provides a richer set of components and more advanced features compared to AWT.
However, AWT is still relevant and widely used in Java development, especially for simpler GUI applications and for applications that need to be lightweight and have minimal dependencies.
Conclusion
In this blog post, we explored the basics of Abstract Window Toolkit (AWT) in Java. AWT provides a collection of classes and methods to create GUI-based applications. It offers platform independence, event-driven programming, layout managers, and customization options. Although Swing has replaced AWT for more advanced GUI development, AWT continues to have its place in Java application development.
#Java #AWT #GUI #Programming
Java has tools to help you create user interfaces. One of these tools is AWT java, which stands for Abstract Window Toolkit. AWT allows you to build graphical user interfaces (GUIs) for your applications. This guide will explain what AWT toolkit is, its main parts, and how to use them easily. Let’s get started Abstract Window Toolkit in java!
What is AWT in java?
Abstract Window Toolkit in java is a toolkit that helps you create GUI components in Java. It includes everything you need to make buttons, windows, and other visual elements. AWT is part of Java’s core libraries. With AWT, you can create interactive applications that users can enjoy.
Main Parts of AWT in java
- Components: Abstract Window Toolkit in java includes many components you can use in your apps. Here are a few important ones:
- Button: A clickable button that performs an action.
- Label: A piece of text that shows information.
- TextField: A box where users can type in text.
- Containers: Containers hold components. They help organize the layout of your user interface.
- Frame: The main window of your application.
- Panel: A smaller area to group related components.
- Layouts: Layout managers arrange components in a container. Here are some common ones:
- FlowLayout: Puts components in a line.
- BorderLayout: Divides the container into five sections: north, south, east, west, and center.
- GridLayout: Arranges components in a grid with equal boxes.
Tips for Using AWT
- Pick the Right Layout: Choose a layout that suits your needs. This keeps your UI clean and user-friendly.
- Add Event Listeners: Use event listeners to make your application interactive. This enhances the user experience.
- Test on Different Systems: Since AWT in java depends on the operating system, test your application on various platforms.
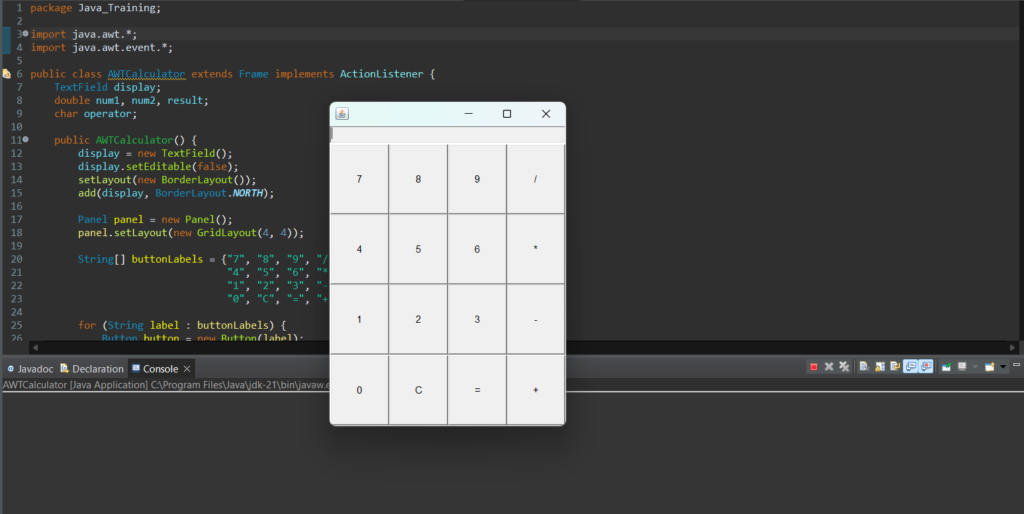
Beginner Project: AWT Calculator
Project Description: Create a simple calculator with AWT in Java. The calculator will have buttons for numbers 0–9 and basic operations (+, -, *, /). When a user clicks a button, it updates the display and calculates the result.
Code Example
NOTE: This code doesn’t work in online compiler, try this code in IDE ( eclipse or intellij )
import java.awt.*;
import java.awt.event.*;

public class AWTCalculator extends Frame implements ActionListener {
    TextField display;
    double num1, num2, result;
    char operator;

    public AWTCalculator() {
        display = new TextField();
        display.setEditable(false);
        setLayout(new BorderLayout());
        add(display, BorderLayout.NORTH);

        Panel panel = new Panel();
        panel.setLayout(new GridLayout(4, 4));

        String[] buttonLabels = {"7", "8", "9", "/",
                                 "4", "5", "6", "*",
                                 "1", "2", "3", "-",
                                 "0", "C", "=", "+"};

        for (String label : buttonLabels) {
            Button button = new Button(label);
            button.addActionListener(this);
            panel.add(button);
        }

        add(panel, BorderLayout.CENTER);

        addWindowListener(new WindowAdapter() {
            public void windowClosing(WindowEvent we) {
                System.exit(0);
            }
        });

        setSize(300, 400);
        setVisible(true);
    }

    public void actionPerformed(ActionEvent e) {
        String command = e.getActionCommand();

        if ("0123456789".contains(command)) {
            display.setText(display.getText() + command);
        } else if (command.equals("C")) {
            display.setText("");
        } else if (command.equals("=")) {
            num2 = Double.parseDouble(display.getText());
            switch (operator) {
                case '+': result = num1 + num2; break;
                case '-': result = num1 - num2; break;
                case '*': result = num1 * num2; break;
                case '/': result = num1 / num2; break;
            }
            display.setText(String.valueOf(result));
        } else {
            num1 = Double.parseDouble(display.getText());
            operator = command.charAt(0);
            display.setText("");
        }
    }

    public static void main(String[] args) {
        new AWTCalculator();
    }
}
How It Works:
This project creates a window with a display field and buttons for numbers and operations. The actionPerformed method handles button clicks, displaying numbers or computing the result when “=” is pressed.
Output:
Interview Questions
1. Company: Zoho
Question: What are the main differences between AWT and Swing in Java?
Answer: AWT is Java’s original GUI toolkit and relies on native system resources, making it platform-dependent. In contrast, Swing is a more advanced, lightweight toolkit that provides a consistent look-and-feel across platforms and offers richer components and customization options.
Company: Infosys
2. Question: Explain the role of LayoutManager in AWT and its impact on the appearance of a Java GUI.
Answer: LayoutManager controls the arrangement of components within containers, adapting to screen size and resolution changes. By using layout managers like BorderLayout and FlowLayout, developers can ensure that GUIs remain organized and visually consistent across devices.
3. Company: TCS
Question: Describe how the ActionListener interface is used in AWT applications to handle events.
Answer: The ActionListener interface responds to user actions, such as button clicks. By implementing actionPerformed() within ActionListener, developers can define specific responses to events, making applications interactive and responsive.
4. Company: Capgemini
Question: What are the limitations of AWT, and why was Swing introduced as an alternative?
Answer: AWT components are heavyweight and rely on native OS resources, which limits their flexibility and portability. Swing, however, is lightweight, offering a richer set of customizable components and consistent cross-platform support, which led to its adoption as a superior alternative.
Summary
AWT is a helpful toolkit for creating graphical user interfaces in Java. With its many components and layouts, you can build interactive applications easily. Learning AWT is important for any Java developer looking to create desktop applications. Start using AWT today and improve your Java skills!
My Multiple Choice Quiz