
Applies ToWindows 11 Windows 10
Windows может автоматически скачивать рекомендуемые драйверы для оборудования и устройств, подключенных к системе, с помощью клиентский компонент Центра обновления Windows. Использование последних обновленных драйверов обеспечивает правильную работу всего оборудования и устройств.
Драйверы
Драйвер — это программное обеспечение, которое позволяет устройству Windows взаимодействовать с аппаратными устройствами. Без драйверов устройства, которые подключаются к устройству с Windows, не знают, как взаимодействовать с Windows, и они не работают должным образом. Примеры устройств, использующих драйверы для взаимодействия с устройством Windows:
-
Мышей.
-
Клавиатуры.
-
Принтеры.
-
Сканеры.
-
Внешние диски.
-
Видеоадаптеры.
Используя клиентский компонент Центра обновления Windows, Windows может автоматически проверка, если для новых устройств, подключенных к устройству с Windows, доступны драйверы. Для устройств, ранее подключенных к устройству с Windows, также могут стать доступными обновленные драйверы. Эти драйверы также можно установить через клиентский компонент Центра обновления Windows.
Установка и обновление драйверов с помощью клиентский компонент Центра обновления Windows
-
Нажмите кнопку Пуск, а затем выберите Параметры > клиентский компонент Центра обновления Windows > Дополнительные параметры.
Или
Выберите следующий ярлык клиентский компонент Центра обновления Windows Дополнительные параметры:
Открыть клиентский компонент Центра обновления Windows дополнительные параметры
-
В открывавшемся окне клиентский компонент Центра обновления Windows > Дополнительные параметры убедитесь, что параметр Получение обновлений для других продуктов Майкрософтвключен.
-
В разделе Дополнительные параметры выберите Необязательные обновления.
-
В клиентский компонент Центра обновления Windows > Дополнительные параметры > окне Необязательные обновления выберите все обновления драйверов, а затем нажмите кнопку Скачать и установить.
-
В левой области приложения «Параметры» выберите клиентский компонент Центра обновления Windows .
-
В окне клиентский компонент Центра обновления Windows нажмите кнопку Проверить наличие обновлений.
-
После заполнения доступных обновлений установите все доступные обновления.
-
После завершения установки всех обновлений перезагрузите устройство с Windows, щелкнув правой кнопкой мыши меню Пуск , а затем выберите Завершение работы или выход > Перезапустить. Перезапустите устройство с Windows, даже если ни одно из обновлений не требует перезагрузки.
Проверьте на сайте производителя драйверы, если клиентский компонент Центра обновления Windows не может найти драйверы или обновленные драйверы для устройства.
Нужна дополнительная помощь?
Нужны дополнительные параметры?
Изучите преимущества подписки, просмотрите учебные курсы, узнайте, как защитить свое устройство и т. д.
Download Windows Speedup Tool to fix errors and make PC run faster
In this post, we will show you how to update Drivers in Windows 11/10. You can use Device Manager, Windows Update, or third-party software or update it manually. As an example, we will see how to update the USB drivers. A device driver is software designed for a specific operating system like Windows 10. The OS uses it to communicate with other hardware devices. While Windows Update will automatically update your computer system, including the Device Drivers, there may be a time when you may have to be on your own. Update your drivers if you are facing issues.
You can correctly & properly update device drivers in Windows 11/10 in the following ways:
- Using Windows Update
- Using Device Manager
- Using Driver Update software
- Manually download & run the driver update setup file
- Use OEM tool.
Let us take a look at these four ways.
1] Using Windows Update

You can now run Windows Updates and see if any driver updates are available under Optional Updates. It’s quicker and easier.
To check the Driver and Optional Updates available to your system:
- Open Settings (Win + I)
- Navigate to Settings > Update & Security > Windows Update
- Right under it, look for a clickable link—View optional updates.
- Under Driver Updates, a list of updates will be available, which you can choose to install if you are facing an issue manually.
This feature is useful as you can see all the driver updates available for your system in one place. If you have a specific problem because of an outdated driver, you can choose to install it from here.
2] Using Device Manager
Right-click on the Start button to open the WinX Menu.
Select Device Manager to open the following tool.
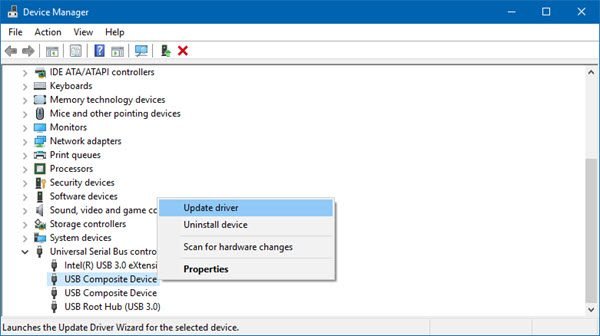
Here, you can uninstall, disable, enable rollback Device Drivers.
Now, identify the Driver you want to update. We will update the USB Driver as an example here.
So locate the Universal Serial Bus controller and double-click on it to expand it.
You will see various USB drivers installed. Please select the one you want to update and right-click on it.
The menu will show you the option to Update driver. Select it to open the following wizard.
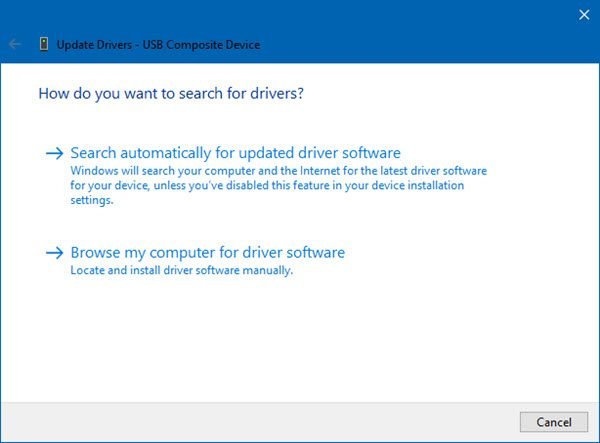
You may opt for either one of these:
- Search automatically for updated driver software
- Browse my computer for driver software.
Clicking on the 1st option will Search automatically for updated driver software and let Windows identify, download and install the driver.

If an update is found, Windows will download and install it. But if no update is found, you will see the following screen.
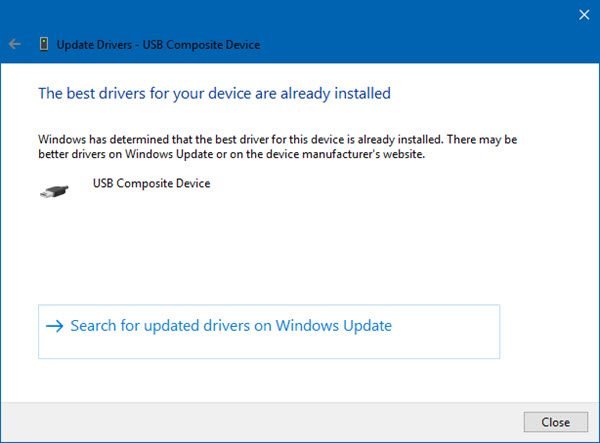
You may click on OK and exit or select Search for updated drivers on Windows Update.
Use the 2nd option if you have the driver file on your computer.
If you have the driver file on your computer, you can select Browse my computer for driver software.
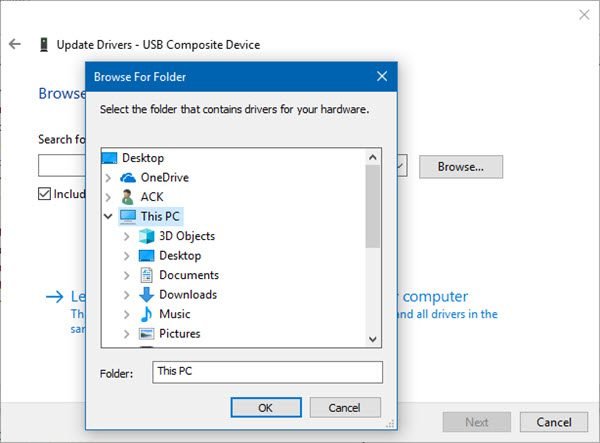
Select the driver software file on your hard disk and click OK to proceed.
There is another way. You can right-click on the Driver and select Properties to open the following window.
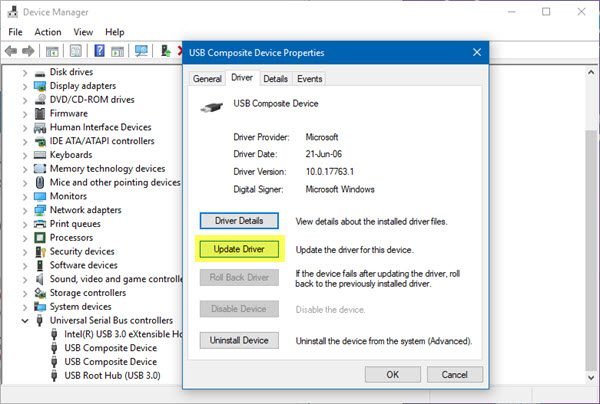
Click open the Driver tab, and you will see the button to Update Driver. You can use this way too.
Read: How to manually install a Driver using a .INF File.
UPDATE: In Device Manager, when a user selects Update driver:
- In Windows 10, version 1909 and earlier, Windows installs the highest-ranking driver from Windows Update, regardless of whether it is classified as Automatic or Manual.
- Starting in Windows 10 version 2004 and Windows 11, Windows only searches the local computer. When it fails to find a driver, Device Manager shows a button labeled Search for updated drivers on Windows Update, which opens the Settings app to the Windows Update page. To find this button, right-click a device and select Properties. On the Driver tab, select Update Driver and then Search automatically for drivers.
3] Using Driver Update software
While there are several free Driver Update software available that will help you update all drivers at the same time, we do not recommend this method, as things have been known to mess up. In any case, should you opt to use this method, do create a system restore point first.
4] Manually download & run the driver update setup file
This post shows where to download drivers for Windows from the official manufacturer’s websites. It also links to official tools you can use to download driver updates. This is also a safe route to use.
5] Use OEM tool
Manufacturers have also released special driver download software for their brands:
- Dell Update utility will help you download or update Dell Drivers
- Lenovo System Update helps you download Lenovo Drivers, Software, Firmware, Update BIOS.
- AMD users may use AMD Driver Autodetect.
- Intel users may use Intel Driver & Support Assistant.
- HP users can use the bundled HP Support Assistant.
- MyASUS app on ASUS computers.
So in short:
Follow one of the methods below to update your device drivers:
- You may check for Driver & Optional Updates via Windows Update to update your drivers
- You may visit the manufacturer’s site to download the drivers.
- Use a free driver update software
- If you have the INF driver file already on your computer then:
- Open Device Manager.
- Click the driver category to expand the menu.
- Then choose the relevant driver and right-click on it.
- Select Update Driver.
- Follow the on-screen wizard to finish updating your audio drivers.
- Use an OEM tool to update your drivers and firmware,
I hope you find this post helpful.
These posts will show you how to:
- Install WiFi drivers
- Update Chipset drivers
- Update Keyboard drivers
- Install or update Graphics Drivers
- Update Bluetooth drivers
- Download Surface drivers & firmware
- Download Realtek HD Audio driver
- Download TAP-Windows adapter drivers
- Download NVIDIA drivers
- Update NVIDIA Drivers.
Anand Khanse is the Admin of TheWindowsClub.com, a 10-year Microsoft MVP (2006-16) & a Windows Insider MVP (2016-2022). Please read the entire post & the comments first, create a System Restore Point before making any changes to your system & be careful about any 3rd-party offers while installing freeware.
Обычно я рекомендую устанавливать драйверы вручную, загружая их с официального сайта производителя материнской платы или ноутбука и производителей видеокарт. Не стану отходить от рекомендаций и сейчас, но, если вам требуется выполнить автоматический поиск, скачивание и установку нужных драйверов, возможно, лучшей программой для этих целей будет Snappy Driver Installer.
В отличие от многих других программ драйвер-паков, Snappy Driver Installer (или SDI Tool) распространяется с открытым исходным кодом, полностью бесплатна, на русском языке, и, самое важное, не устанавливает и не предлагает установку чего-либо нежелательного, что не редкость среди аналогов. В этой краткой инструкции о том, как пользоваться SDI Tool для автоматической установки драйверов.
Где и как скачать Snappy Driver Installer (SDI Tool)
Официальный сайт Snappy Driver Installer — https://sdi-tool.org/, если сайт откроется на английском языке, просто переключите его на русский справа вверху. При нажатии кнопки «Скачать» вы увидите примерно такую страницу (дизайн может меняться со временем):

Здесь будьте внимательны и учитывайте следующие нюансы:
- Не стоит нажимать кнопку «Попробовать» в «Полностью автоматическая установка» (кнопка может и не отображаться) — это загрузит не Snappy Driver Installer, а совсем другую программу для автоматической установки драйверов, которой вы можете оказаться недовольны.
- Версия SDI Lite — не содержит драйверов в комплекте, их загрузка производится через Интернет из самой утилиты: всех, отдельных или только для выбранных устройств текущего компьютера.
- Версия SDI Full — содержит файлы драйверов и может использоваться для их установки на разных компьютерах без доступа к Интернету. При появлении обновлений драйверов в драйвер-паке вам будет предложено скачать их.
Обе версии работают в Portable-режиме, то есть не требуют установки и могут быть запущены, например, с флешки. Если в версии SDI Lite выполнить скачивание всей базы или только выбранных драйверов, они будут помещены в папку программы и в дальнейшем для их установки доступ в Интернет не потребуется.
Процесс установки драйверов в Snappy Driver Installer
Далее в примере я буду использовать версию SDI Lite. Единственное отличие от версии Full — выбор загружаемого контента на втором шаге и необходимость доступа к Интернету для работы.
- После распаковки архива со Snappy Driver Installer запустите версию программы в нужной разрядности (или используйте SDI_auto.bat для автоматического запуска подходящей версии).
- При первом запуске SDI Lite вам будет предложено выбрать загружаемые компоненты: все драйвер-паки (загружаются все имеющиеся драйверы, более 10 Гб), сетевые драйвер-паки (драйверы только для сетевых устройств) или «Загрузить только индексы» — этот вариант загружает списки драйверов, но не сами драйверы: это позволяет выбрать нужные драйверы для конкретного компьютера, скачать и установить только их. Как правило, для рядового пользователя это — оптимальный вариант.

- Дождитесь окончания загрузки выбранных компонентов, заодно вы можете захотеть переключить язык программы на русский или изменить тему оформления (скриншоты, начиная с 4-го шага сделаны с другой темой).

- После загрузки индексов или драйвер-паков в программе отобразится список доступных драйверов. Вы можете включить отображение только неустановленных драйверов, с доступными новыми версиями (впрочем, я бы не рекомендовал без необходимости обновлять драйверы для исправно работающих устройств, если речь идёт не о видеокарте). При необходимости можно установить и более старые версии установленных драйверов.

- Выберите драйверы, которые требуется установить: при выборе верхнего пункта в списке доступных драйверов конкретного устройства (как на скриншоте выше) будет скачана и установлена последняя доступная версия драйвера этого устройства.
- Настоятельно рекомендую установить отметку «Точка восстановления», которой можно будет воспользоваться в случае, если что-то пойдет не так. Как использовать точки восстановления системы в Windows 11 и в Windows 10.
- Нажмите «Установить» для установки выбранных драйверов.
- Дождитесь, когда драйверы будут скачаны и установлены в системе.


В базовых сценариях использования этих шагов будет достаточно для того, чтобы установить недостающие драйверы на вашем ноутбуке или ПК.
Дополнительная информация
В завершение некоторые дополнительные возможности и нюансы Snappy Driver Installer:
- Вы можете не устанавливать драйверы автоматически, а отметить нужные и нажать «Распаковать в…» для загрузки и распаковки драйверов в выбранное расположение. В дальнейшем их можно будет установить вручную (как установить драйверы .inf в Windows)
- При запуске SDI Tool на конкретном компьютере, программа создает «снимок» устройств этого компьютера и сохраняет его с расширением .snp в папке logs. Вы можете использовать этот снимок, чтобы скачать драйверы для текущего компьютера на другом компьютере (например, в случае если на текущем нет Интернета): для этого нажмите «Загрузить снимок» в меню действий программы и загрузите файл .snp с другого компьютера.
- Если вы используете Snappy Driver Installer в профессиональных целях, вам могут пригодиться поддерживаемые параметры командной строки, список которых доступен на странице https://sdi-tool.org/settings/
Подводя итог, вполне могу рекомендовать SDI Tool, если требуется именно автоматическая установка драйверов, во всяком случае, по сравнению с аналогами считаю её более безопасной. Но гарантировать, что после установки и обновления драйверов всё будет работать полностью исправно не могу.
Все программы такого рода работают по одинаковому принципу: проверяют идентификаторы (ИД оборудования и производителя) установленных устройств и версию установленных для них драйверов, ищут соответствия в своей базе, отображают и предлагают к установке найденные и обновленные драйверы для устройств с совпадающими идентификаторами.
Способ вполне надёжный, но возможны ситуации, когда установленный драйвер работает неправильно, особенно часто это случается с ноутбуками, где фирменный драйвер производителя может иметь свои «особенности». Поэтому ещё раз настоятельно рекомендую создавать точку восстановления системы.
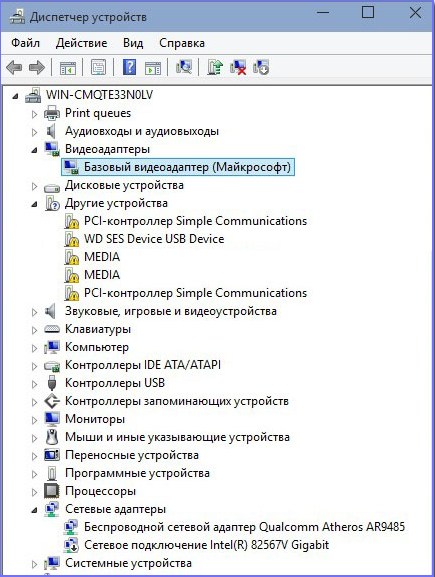
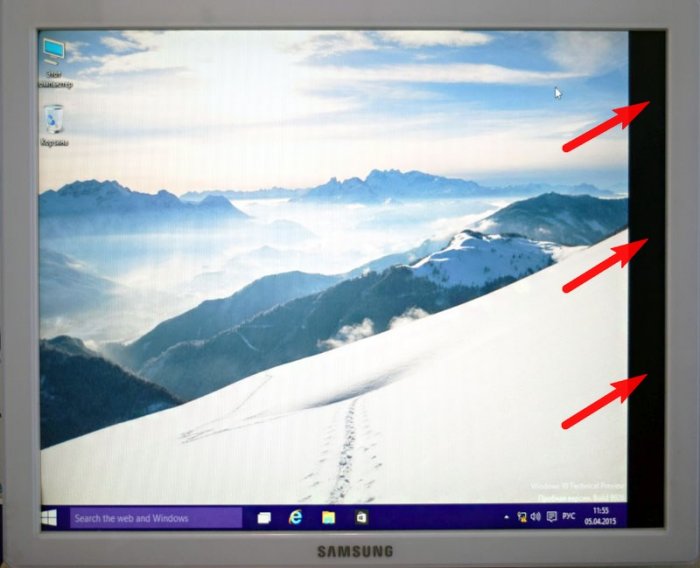
Здравствуйте админ! Установил недавно на свой компьютер Windows 10, но вместе с операционной системой не установились драйвера на некоторые устройства: видеокарту, PCI-контроллер, какой-то MEDIA и USB Device. В интернете подсказали, что нужно подождать день-два и драйвера установятся автоматически, по прошествии трёх дней этого не произошло. Сейчас в диспетчере устройств вместо названия видеокарты находится Базовый видеоадаптер (Майкрософт),
соответственно изображение на мониторе с чёрной полосой
{banner_google1}
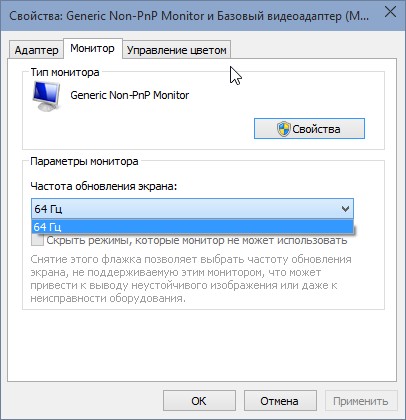
и это из-за низкой частоты обновления экрана 64 Гц, а нужно хотя бы 75 Гц, тогда полоса пропадёт, но нужная частота появится только после установки настоящего драйвера на видеокарту.
Зашёл на официальный сайт NVIDIA и драйвера там только на Windows 8.1. Скачал пакет драйверов DriverPack Solution, но на Windows 10 он не запускается, выходит ошибка. Вопрос, как установить драйвера на Windows 10?
Как установить драйвера на Windows 10 автоматически
Привет друзья! Не забывайте про встроенное в Windows 10 средство автоматического поиска драйверов. На серверах Майкрософт содержится очень большая база драйверов практически на все известные устройства. В сегодняшней статье я просто напомню вам как пользоваться этим средством, более полная статья лежит здесь
После установки Windows 10 заходим в Диспетчер устройств и видим устройства (помеченные жёлтым треугольником с восклицательным знаком), на которые не установились драйвера. К примеру раскроем пункт Видеоадаптеры и видим, что на видеокарту установлен базовый драйвер Майкрософт, также не установились драйвера на звук и чипсет материнской платы.
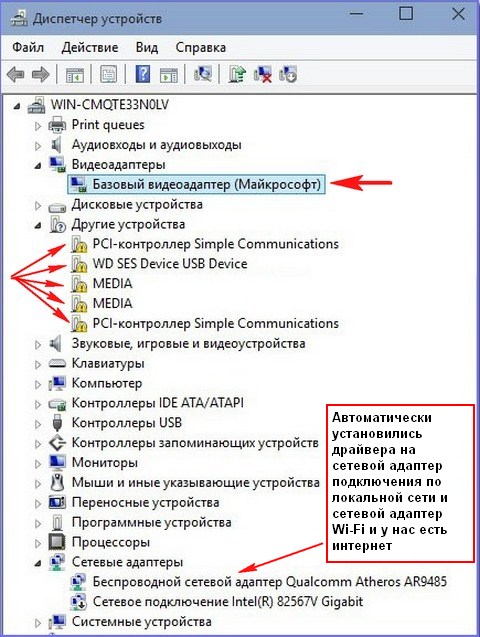
Одно хорошо, что автоматически установились драйвера на сетевой адаптер подключения по локальной сети и сетевой адаптер Wi-Fi и у нас есть интернет. Если Windows 10 при инсталляции не нашла в себе драйвер на ваш сетевой адаптер, значит вам ничего не останется, как использовать другой компьютер с интернетом и скачать драйвер на сетевую карту на официальном сайте вашей материнской платы, для Win 10 там драйверов ещё нет, но я уверен, что драйвер от Win 8.1 точно подойдёт.
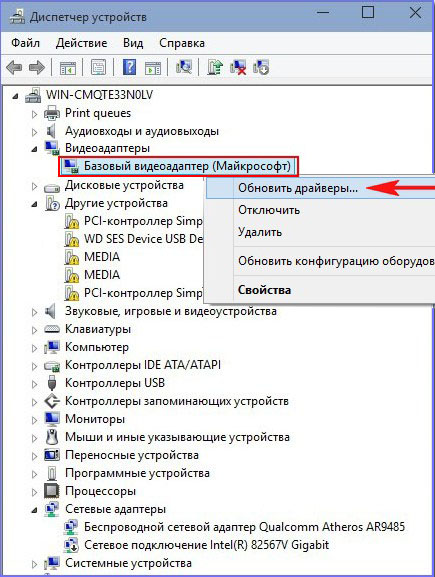
В Диспетчере устройств щёлкаем правой мышью на базовом видеоадаптере (Майкрософт) и выбираем Обновить драйвера.
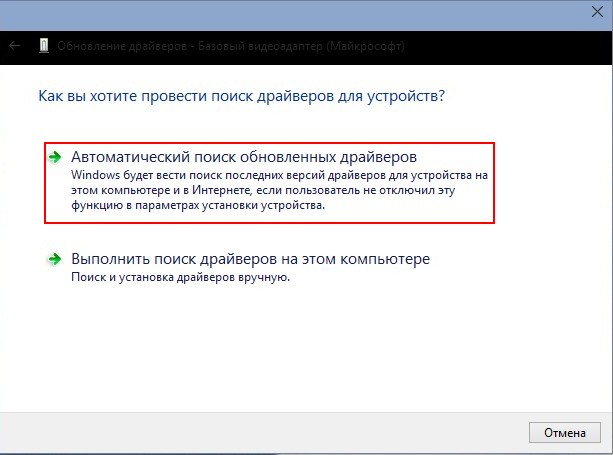
Жмём на кнопку Автоматический поиск обновленных драйверов.
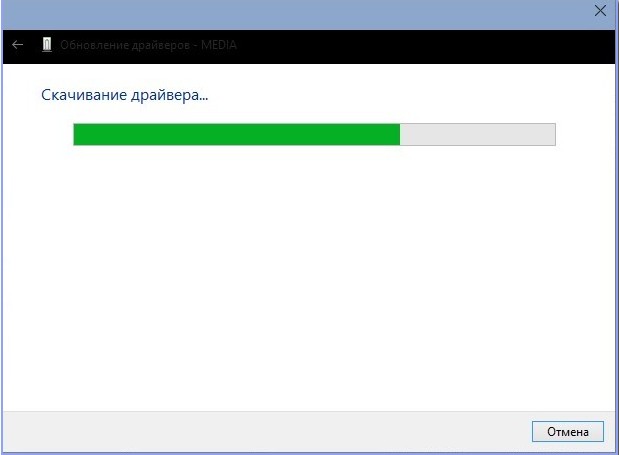
Происходит автоматический поиск программного обеспечения для вашей видеокарты на сервере Майкрософт.
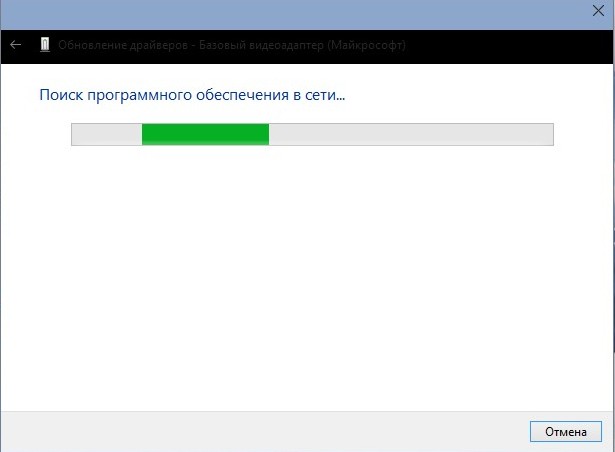
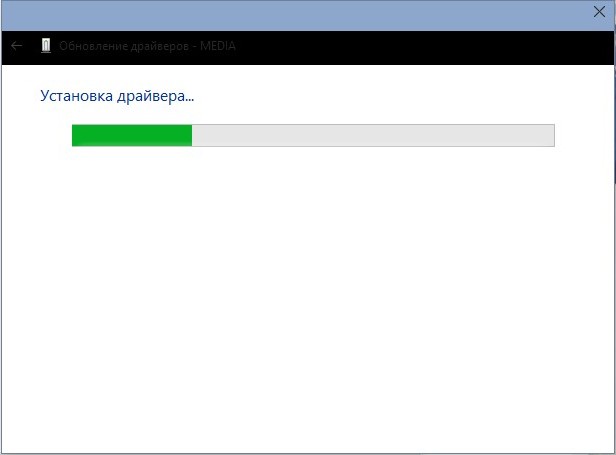
Драйвер найден и происходит его скачивание
Установка.
Introduction
When it comes to deploying Windows 10 in an unattended installation, one of the most common challenges is ensuring that the necessary drivers are loaded for the target hardware. This is particularly true for laptops, where the internal SSD may not be recognized by the setup process without the correct drivers. In this article, we will explore the process of automatically loading drivers in Windows 10 unattended installation, using the Windows Preinstallation Environment (WinPE) as the foundation.
Understanding WinPE
WinPE is a lightweight version of Windows that is used to boot and configure a system before the full installation of Windows. It is an essential component of the Windows installation process, and is used to load the necessary drivers and tools required for the installation. WinPE is typically used in conjunction with the Windows Automated Installation Kit (AIK), which provides the necessary tools and scripts to automate the installation process.
Creating a Custom WinPE Image
To load drivers in an unattended Windows 10 installation, we need to create a custom WinPE image that includes the necessary drivers. This can be done using the Windows AIK, which provides a set of tools and scripts to create and customize a WinPE image. Here are the steps to create a custom WinPE image:
Step 1: Download and Install the Windows AIK
The first step is to download and install the Windows AIK from the Microsoft website. This will provide us with the necessary tools and scripts to create and customize a WinPE image.
Step 2: Create a New WinPE Image
Once the AIK is installed, we can create a new WinPE image using the copype command. This command will create a new directory structure for the WinPE image, which will include the necessary files and folders.
copype x86 c:\winpe_x86
Step 3: Add Drivers to the WinPE Image
Next, we need to add the necessary drivers to the WinPE image. This can be done using the dism command, which is used to manage the WinPE image. We can add drivers to the image using the following command:
dism /image:c:\winpe_x86 /add-driver /driver:c:\drivers\driver.inf
Step 4: Customize the WinPE Image
Once the drivers are added, we can customize the WinPE image by adding any additional tools or scripts that are required for the installation. This can include adding network drivers, adding a keyboard layout, or adding any other customizations that are required.
Step 5: Create a Bootable USB Drive
Finally, we can create a bootable USB drive using the custom WinPE image. This can be done using the makeboot command, which will create a bootable USB drive that includes the custom WinPE image.
makeboot c:\winpe_x86 c:\usbdrive
Loading Drivers in Unattended Installation
Once the custom WinPE image is created, we can use it to load drivers in an unattended Windows 10 installation. This can be done by adding the necessary drivers to the WinPE image, and then using the dism command to add drivers to the installation.
Here are the steps to load drivers in an unattended Windows 10 installation:
Step 1: Add Drivers to the WinPE Image
As described earlier, we need to add the necessary drivers to the WinPE image using the dism command.
Step 2: Add Drivers to the Installation
Once the drivers are added to the WinPE image, we can add them to the installation using the dism command. This can be done by running the following command:
dism /image:c:\winpe_x86 /add-driver /driver:c:\drivers\driver.inf
Step 3: Configure the Installation
Finally, we need to configure the installation to use the custom WinPE image. This can be done by adding the necessary configuration files to the installation, and then running the installation.
Conclusion
In this article, we have explored the process of automatically loading drivers in Windows 10 unattended installation, using the Windows Preinstallation Environment (WinPE) as the foundation. We have described the steps to create a custom WinPE image, add drivers to the image, and load drivers in an unattended installation. By following these steps, we can ensure that the necessary drivers are loaded for the target hardware, and that the installation process is successful.
Troubleshooting
If you encounter any issues while loading drivers in an unattended Windows 10 installation, here are some troubleshooting steps you can follow:
Step 1: Check the WinPE Image
First, we need to check the WinPE image to ensure that it is correctly configured and that the necessary drivers are added.
Step 2: Check the Installation
Next, we need to check the installation to ensure that it is correctly configured and that the necessary drivers are loaded.
Step 3: Check the Event Logs
Finally, we need to check the event logs to ensure that there are no errors or warnings related to the driver loading process.
Best Practices
Here are some best practices to keep in mind when loading drivers in an unattended Windows 10 installation:
Step 1: Use a Custom WinPE Image
Using a custom WinPE image is essential for loading drivers in an unattended Windows 10 installation. This allows us to add the necessary drivers to the image and configure the installation correctly.
Step 2: Add Drivers to the WinPE Image
Adding drivers to the WinPE image is critical for loading drivers in an unattended Windows 10 installation. This allows us to add the necessary drivers to the image and configure the installation correctly.
Step 3: Configure the Installation
Configuring the installation is essential for loading drivers in an unattended Windows 10 installation. This allows us to add the necessary configuration files to the installation and configure the installation correctly.
Conclusion
Introduction
In our previous article, we explored the process of automatically loading drivers in Windows 10 unattended installation, using the Windows Preinstallation Environment (WinPE) as the foundation. In this article, we will answer some of the most frequently asked questions related to loading drivers in an unattended Windows 10 installation.
Q: What is the Windows Preinstallation Environment (WinPE)?
A: WinPE is a lightweight version of Windows that is used to boot and configure a system before the full installation of Windows. It is an essential component of the Windows installation process, and is used to load the necessary drivers and tools required for the installation.
Q: How do I create a custom WinPE image?
A: To create a custom WinPE image, you need to download and install the Windows Automated Installation Kit (AIK), which provides the necessary tools and scripts to create and customize a WinPE image. You can then use the copype command to create a new WinPE image, and the dism command to add drivers to the image.
Q: How do I add drivers to the WinPE image?
A: To add drivers to the WinPE image, you need to use the dism command, which is used to manage the WinPE image. You can add drivers to the image using the following command:
dism /image:c:\winpe_x86 /add-driver /driver:c:\drivers\driver.inf
Q: How do I configure the installation to use the custom WinPE image?
A: To configure the installation to use the custom WinPE image, you need to add the necessary configuration files to the installation, and then run the installation. You can do this by adding the following line to the unattend.xml file:
<component name="Microsoft-Windows-Setup" processorArchitecture="x86" publicKeyToken="31bf3856ad364e35" language="neutral" versionScope="nonSxS" xmlns:wcm="http://schemas.microsoft.com/wmimage/2004/01/managed" xmlns:xsi="http://www.w3.org/2001/XMLSchema-instance">
  <WindowsSetup>
    <WinPE>
      <ImageGroup>WinPE</ImageGroup>
    </WinPE>
  </WindowsSetup>
</component>
Q: What are some common issues that can occur when loading drivers in an unattended Windows 10 installation?
A: Some common issues that can occur when loading drivers in an unattended Windows 10 installation include:
- The driver is not recognized by the installation process.
- The driver is not loaded correctly.
- The installation process fails due to a driver-related issue.
Q: How do I troubleshoot driver loading issues in an unattended Windows 10 installation?
A: To troubleshoot driver loading issues in an unattended Windows 10 installation, you can follow these steps:
- Check the WinPE image to ensure that it is correctly configured and that the necessary drivers are added.
- Check the installation to ensure that it is correctly configured and the necessary drivers are loaded.
- Check the event logs to ensure that there are no errors or warnings related to the driver loading process.
Q: What are some best practices for loading drivers in an unattended Windows 10 installation?
A: Some best practices for loading drivers in an unattended Windows 10 installation include:
- Using a custom WinPE image to add the necessary drivers to the image.
- Adding drivers to the WinPE image using the
dismcommand. - Configuring the installation to use the custom WinPE image.
- Troubleshooting driver loading issues using the steps outlined above.
Conclusion
In conclusion, loading drivers in an unattended Windows 10 installation is a critical process that requires careful planning and execution. By following the steps outlined in this article, and by using the best practices outlined above, you can ensure that the necessary drivers are loaded for the target hardware, and that the installation process is successful.