
эх, я не знаю, в тему или нет:) еще на XP давным давно обнаружил системную утилиту: syskey, работает она и на 7, фишка ее заключается в том, что на дискету она скидывает файл, без которого пользователь не может попасть в свое окружение, т.е. компьютер включил — дискетку вставил — в систему вошел.
Самый большой минус, в 7 она тоже просит дискету, но предварительно можно переназначить флешку на букву A, кстати в XP тоже прокатывало  помню как друзей удивлял, что без флешки в комп не попасть
Ответ написан
1
комментарий

Rohos Logon Key converts any USB flash drive into a security key for your computer and allows logging in Windows securely by USB key, replacing the password based Windows login.
- Why to use USB flash drive for Windows login?
- How a user logs into Windows with USB drive
- Setup two-factor authentication with USB Key
- Emergency Logon
- Disabling manually password entry
- Setup USB key removal behavior
- Users and Keys dialog box
- How to use another USB devices and technologies with Rohos Logon Key?
- How to correctly uninstall Rohos Logon Key.
Why to use USB flash drive for Windows login?
- You don’t need to remember and type your Windows password (but your system is still password protected.)
- You can use Long secure passwords that comply with the “security-enhancing” principles.
- Enjoy fast and automatic login into Windows. Users can be automatically logged into Windows as they insert the USB flash drive into the USB port.
- Automatic Windows lock-out when user unplugs USB drive from computer.
- Two-factor authentication with PIN code + USB key – to stop anyone else logging in with it.
- PIN code is defined by the user to protect USB Key from unauthorized usage for Windows login.
- PIN code can be short like “576” because,
- The number of attempts to enter a PIN is limited to 3.
- Also PIN code allows you to avoid re-inserting USB-stick in “sign-in – lock-unlock” use cases. Just press Win+L to lock the desktop, then click on USB icon on the login-screen to unlock Windows by USB Key – enter PIN and you are in.
- Remote Desktop login with USB Key, require a credential dialog.
- Windows Safe Mode boot protection.
By default, Rohos Logon Key works even in safe mode. - A few USB drives can be configured for each user account on a computer.
- One USB drive can be used to log in Windows and Mac.
How a user logs into Windows with USB drive:
Rohos Logon Key adds USB key login icon to the Windows Vista\Seven logon screen.
1. The user plugs in his USB flash drive to the computer (prompted for a PIN code if it has been set If an invalid PIN is entered more than 3 times, the USB drive is blocked, thus the USB Key login is not further possible.)
2. Immediately he is logged into Windows and has access to his Windows user account without having to type in username or password.
3. Whenever the users temporarily leaves the computer, they can temporarily lock the computer by simply disconnecting the USB flash drive. Also, Rohos Logon Key can be configured to log off or activate screensaver upon unplugging USB Key.
Rohos Logon Key is a user authentication software that is specifically designed to strengthen the security of the Windows Seven logon process and keep intruders out.
Rohos Logon Key protects your personal information and data with a Two-Factor Authentication technology by using USB flash drives and PIN code.
You may also use a Rohos encryption solution that encrypts applications/folders inside your user account by using a virtual encrypted disk.
Setup two-factor authentication with USB Key
Open Rohos Logon Key and click Setup USB Key link. In the following dialog box select the desired USB drive, user(if necessary) and write your password.
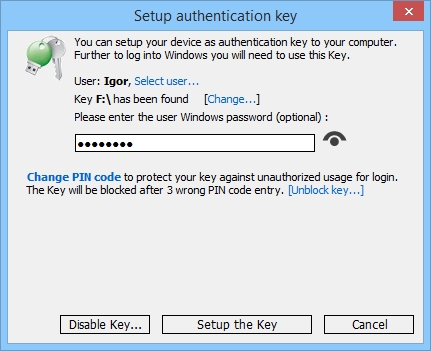
In this window you can also assign a PIN-code for this USB key.
If you don’t write the password, the user should write it each time along with USB key using. Now you can disable log in without USB key, but before this we recommend you to set up the Emergency logon.
Note: If you use a Microsoft account with a PIN code on your Windows computer, you can not use this PIN code to setup a key! You have to insert the password of your Microsoft account!
Emergency Logon
The program has an Emergency Logon feature that helps you to log into Windows in case you lost USB key or forgot PIN code. Click Options, Setup emergency logon:

Select questions and write the answers to login Windows in case if your USB key is stolen or broken.
Disabling manually password entry
Rohos Logon Key has a special feature that hides all user icons from the logon screen and allows using only USB Key based login.
Click Options and select who are forced to use USB key to log in Windows:

The possible choices are:
- None
All users will be able to login by manual password entry as well as by using USB Key. - For any user
This is the same as previous option “Allow login only by USB Key”. All users will be required to use USB Key in order to login or unlock Windows. - For listed users
Only users from a list will be required to use USB Key for login. Any other user will be able to login by a password. The list is created automatically when a USB Key is created for a user. Please look at Users and Keys dialog box chapter. - For ‘rohos’ user group in Active Directory
Each user from ‘rohos’ group will be forced to use USB Key authentication. Rohos will check the user for a ‘rohos’ group membership and will allow logging in by password if the user does not belong to a ‘rohos’ group.
Please note: ‘rohos’ user group should be created by AD Administrator. - For Remote desktop login
Local users can log in with and without USB key. Remote login will be possible only with USB key. - For Remote desktop login outside LAN
Remote desktop login inside LAN will be possible with and without USB key. Only users, who came through the dial-up, DSL connection, and from other networks, will be ought to use USB keys.
Setup USB key removal behavior
Select an action, that occur, when you unplug USB key:

Customized USB Key login
The Rohos icon image on the logon screen can be changed or hidden at all. Open Options, More:
Advanced options:
- Check USB Key serial – if enabled, Rohos will accept only USB keys that is listed in Users and keys list. It is OFF by default . And turned ON automatically when 1st key configuration is made.
- Protect Safe mode boot with USB key also – In save mode is possible to log in with USB key, and impossible to login without a key, if for your user account is installed this condition.
- Logon Notice – a text that will be displayed on the Windows logon screen next to the Rohos icon. You may customize the instructions for users on how to login with a key.
Users and Keys dialog box
Now Rohos Logon Key maintains its own list of users who have a Key for Windows authentication. And a list of registered Keys. Click ‘Users and keys’ link from the main window:


Users and keys dialog allows to :
- Review the list of users who has registered to log in with an electronic Key.
- Review the list of registered keys (the list of serial numbers).
- Display the serial number of the currently connected key and finds it within a list.
- Delete username from the list. Thus allows a user to login by regular password if 2-factor authentication control is set to ‘Required for a listed users’
- Delete the key from the list – thus prevent the key from being used to log in into a local PC.
- Temporary block the user to prevent him from logging to this computer with a key (for USB flash drives only).
- Export and import the list of users and keys from and to another computer.
How to use another USB devices and technologies with Rohos Logon Key?
Rohos logon key application allows you to use big number or USB devises and technologies for Windows authentication. Open options and select the type of USB key:

How to correctly uninstall Rohos Logon Key.
Before you uninstall Rohos Logon Key application, open its settings, select None from the list Allow to log in only by USB key. Save settings and close the application. After that you can use the standard uninstall procedure.
If you forgot to do this, the ordinary logon will not work. Start your computer in Save mode or launch it from Live CD. Modify the registry:
In the folder
HKEY_LOCAL_MACHINE, ‘SOFTWARE\Microsoft\Windows\CurrentVersion\Authentication\Credential Providers
create key {6f45dc1e-5384-457a-bc13-2cd81b0d28ed}
default value = ‘Password Provider’
Then restart the computer.
Gone are the days when you could just rely on the passwords for your device security. With the advancement in cybercrimes and the user’s reluctancy to create a secure password, cracking the passwords and hacking any device is not a big deal for the web criminals.

Stay malware-free with reliable antivirus
Don’t compromise your Data and Privacy. TotalAV is a top-notch antivirus program that handles various viruses, trojans, and other malware that may target your devices. It will safeguard your devices and enhance your system performance.
4.9/5
⭐ Editor’s Choice
✔️ Excellent Malware Detection
✔️ Multiple set of Features
✔️ 30 Day Money-Back
Get TotalAV >
The USB Security Key can be the ultimate solution for the people who are very concerned about their devices’ security. Also, you do not have to rely just on passwords anymore.
In this guide, we would discuss what a USB security key is and how to convert your regular USB drive into a device unlocker.
What is a USB Security Key?
The USB Security key or the physical security key is the advanced method of login authentication. This USB key can be used for locking and unlocking the PC and is a part of two-factor authentication. Obviously, it would be quite difficult for hackers to get their hands on the tangible key.
You can get such a physical security key from the manufacturer like Yubikey, Google, and Thetis. However, they are costly.
The cheaper alternative is creating your own USB login key. However, for that, you have to compromise one of your USB drives or get an affordable Pendrive specifically for this purpose.
Pros and Cons of the Physical Security Key
Every coin has two sides. Likewise, security keys also have two sides, positive and negative. Let us list them out.
Pros:
- A USB security would provide an extra layer of protection to your device by forming a two-factor authentication.
- Cybercriminals can hack your using several ways. Also, after exposure, a password is useless. On the other hand, USB keys are almost impossible to hack, and the hacker has to steal the key to get through your system, which is quite unlikely because usually, hackers work only online.
- You already have to memorize several passwords of your different accounts, getting a physical lock key would reduce some strain, and you can lock/unlock your computer hassle-free.
Cons:
- If you damage or lose the physical key, the recovery is possible but by a long and lethargic process.
- If you want to allow access to your system to someone else, you have to provide them with your key physically. That becomes impossible if you are far away.
- The USB security key would permanently occupy a USB port, which means you would lose one of your USB ports forever.
So, these are the Pros and Cons of the Physical Security key. Weigh them keeping your preference in mind and then choose whether to go for it or not.
You can create a USB security key on Windows 10 using an in-built program – Windows BitLocker. However, this method would only work for Pro and Enterprise versions of Windows as the Home version does not come with BitLocker.
The first step is to enable the BitLocker on your system Drive, that is, the drive where the Windows 10 is installed.
Enable Bitlocker
– Open File Explorer and go to “My PC.”
– Right-click on your system drive and choose “Turn on BitLocker.“

– Follow the on-screen steps, and at the end, click on “Start encrypting.“
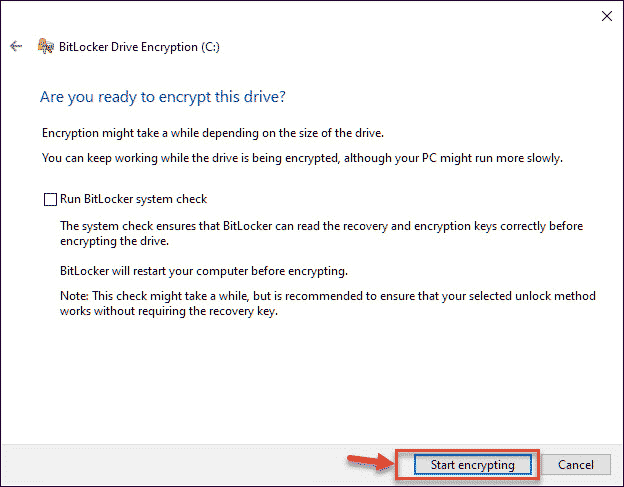
– Your system would restart, and then encryption would begin, which would take some time, depending on the size of the drive.
Enable Security Key using BitLocker
Once the BitLocker is enabled, we can proceed to create the security key.
- Open Group Policy Editor
In Windows search bar, type “group policy editor” and click on the relatable icon to open Group Policy Editor.
- Navigate to Operating System Drives
Follow this path Computer Configuration -> Administrative Templates -> Windows Components -> BitLocker Drive Encryption -> Operating System Drives
- Open Require Additional Authentication at startup
Look for “Require Additional Authentication at startup” and open it.

- Enable it and Configure its settings
A new window would open, click on Enable bullet option. There’s a drop-down menu labeled “Configure TPM startup key.” Change this to “Require Startup Key With TPM.“

- Run Command Prompt
In the final step, run Command Prompt as admin and type this command:
manage-bde -protectors -add c: -TPMAndStartupKey j:
Where ‘c:’ is the drive where Windows is installed and ‘j:’ is assigned to the USB drive.


That’s it. The security key is created, and you would be asked to insert it whenever you start the computer.
How to create a USB Security Key Using Third-party App?
If you are a Windows 10 home user or you didn’t want to use the complicated method of Windows Bitlocker to create your USB security key, then some third-party applications could help you.
USB Raptor

USB Raptor is one of the popular tools for turning a USB drive into a USB security key. The best part is that it is open-source software, and that is why it is entirely free to use for personal and non-commercial use. It is compatible with all the versions of Windows from Windows XP and above.
With Raptor, you can link the key to the serial number of the drive. The only problem with Raptor is, it does not encrypt the system as the BitLocker does. Yet, it would lock and unlock the device with the USB drive. However, it is easy to install and is quite flexible, so you can use it for a medium-security.
Predator

Predator is another popular program to turn a USB into a physical security key. After the USB drive is converted into a security key, your system would only be accessible when the USB is plugged in. As soon as the drive would be plugged out, the computer will be locked automatically.
Anybody who tries to access the system without the USB drive would receive an error message, “Access Denied.”
Installation of the Predator is easy. Download the installation file and open it. Later, you just have to follow the on-screen instructions.
Rohos Logon Key

Rohos Logon Key is a multi-platform security key maker software that provides two-factor authentication to unlock both Windows and macOS devices. It comes with both a free and paid version. Though the free version offers a lot of features, it is only available for Windows users.
Rohos store your login credential into the USB drive, and during startup, when you insert the drive, it automatically inputs the login details for unlocking the system.
Conclusion
These are the method using which you can convert a USB drive into a USB security key. As already mentioned, the physical keys can be of great use and provide extra security over passwords. Currently, you can use these keys for locking and unlocking the device; soon, you can also use them to log in to your different accounts.
1. How does a USB security key work?
A security key works by storing your login details in the drive, and when the drive is plugged in, it automatically inputs the stored credentials to unlock the device.
2. What happens if you lose your security key?
While creating a key, you would always be prompted to create a recovery method in case the key is lost or damaged. If you lose your key, immediately use the recovery method to log in and then remove the key as authentication.
3. How do I backup my YubiKey?
According to YubiKey, due to security reasons, the firmware of YubiKey does not allow the system to read the drive after it is written. Therefore, it is impossible to create a backup of YubiKey.
In the interest of data security, some people are turning to third-party USB devices that act as security keys for their PCs. Without one plugged in, your computer won’t unlock. It’s as simple as that. There are two ways you can go about getting one of these security keys to add an extra layer of protection: you can buy one, or you can create your own. Let’s take a look at both methods, as well as how to actually make your own USB security key using an old thumb drive.
What is YubiKey?
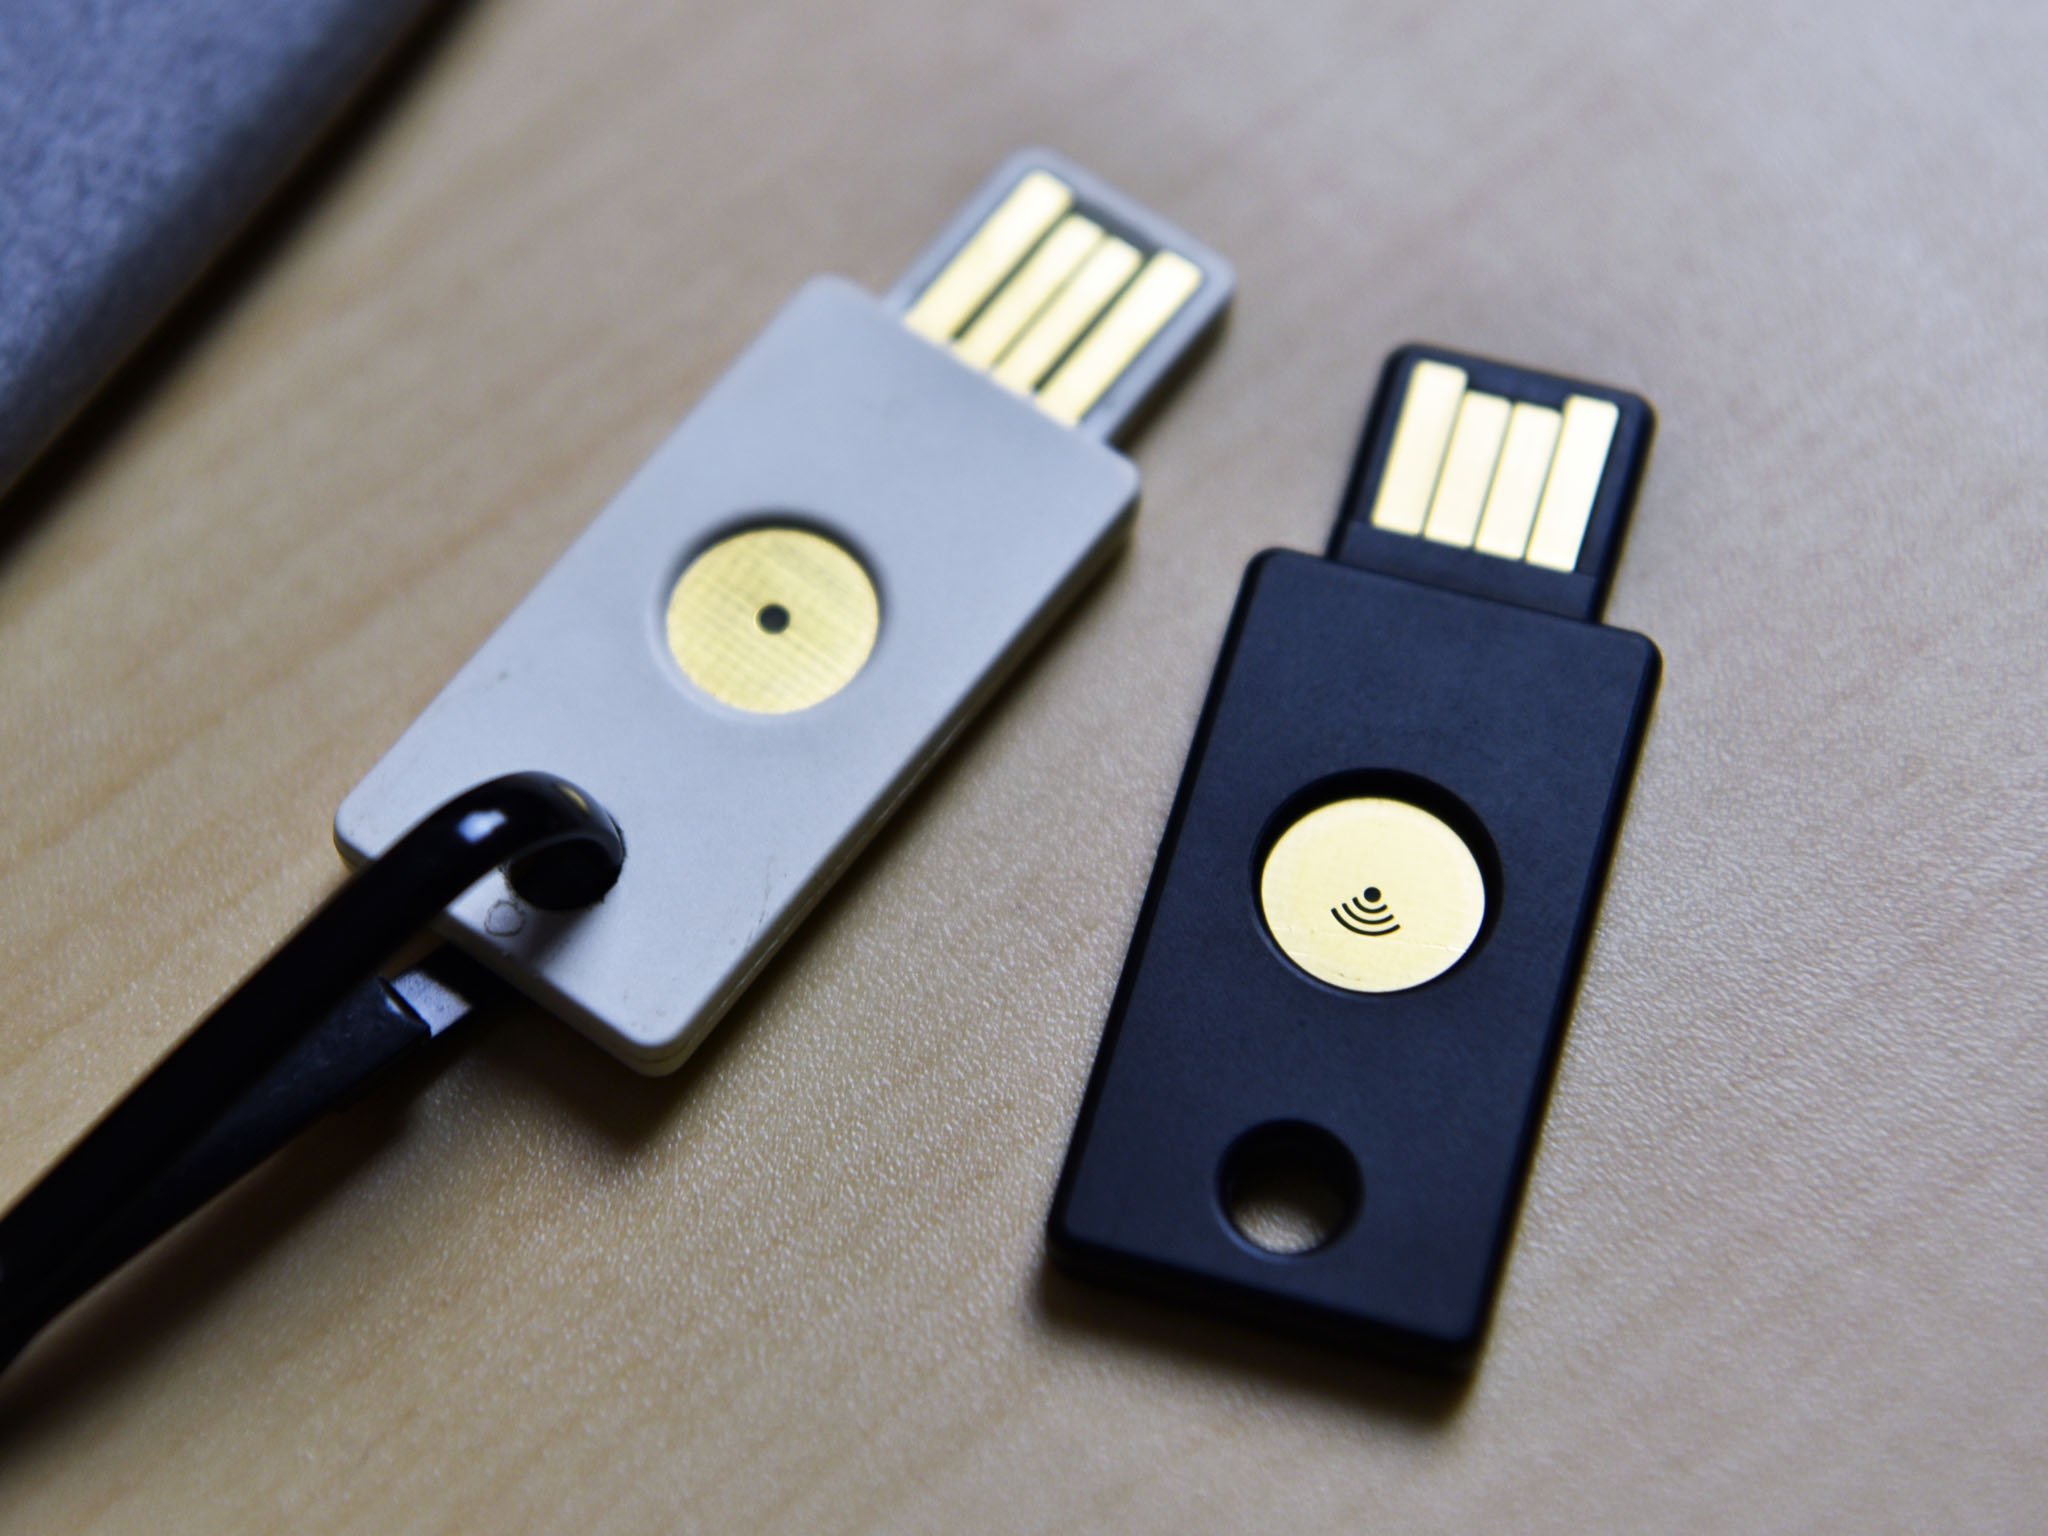
One company, Yubico, created the YubiKey, a USB security stick that is compatible with Windows Hello and a bunch of other services that should be kept secure, such as LastPass, KeePass, Google, Dropbox, and Evernote.
Once you have it in your possession, all you have to do is plug it into your PC, register it, and you’re ready to go. There are a few different YubiKey options. You have your standard YubiKey that connects via USB, a Nano YubiKey that is much smaller, and a YubiKey NEO that can connect via NFC as well as USB.
- See at Amazon | YubiKey 4 (USB)
- See at Amazon | YubiKey 4 Nano (USB)
- See at Amazon | YubiKey NEO (USB and NFC)
For more information on the YubiKey, including detailed instructions on how to get it all setup, be sure to check out our Executive Editor Daniel Rubino’s in-depth guide.
All you need to know about YubiKey for Windows Hello and Windows 10
How to create your own USB security key
In an article about clever uses for extra USB thumb drives, we mentioned creating your own security key for your PC. Before starting on this endeavor, however, remember that creating a USB security key for your PC comes with some downsides. If you lose the USB key, you’ll have a tough time getting into your PC, especially if you disable the ability to enter a password as a backup entry. You’re also going to lose the ability to use one of the USB ports on your PC while the lock is active.
There are more than a few options when it comes to the software used for this process, but USB Raptor, Rohos Logon Key, and Predator are a few favorites, although the latter two are paid services. Rohos Logon Key costs $34, while Predator costs $10.
All the latest news, reviews, and guides for Windows and Xbox diehards.
Since USB Raptor is free, we will show you how to get it set up using Windows 10 and an old thumb drive. It really doesn’t matter how much space is on the thumb drive, because all that’s created is a 1KB .k3y file.
- Navigate to the USB Raptor SourceForge page.
- Click the Download button.
- Click Save.
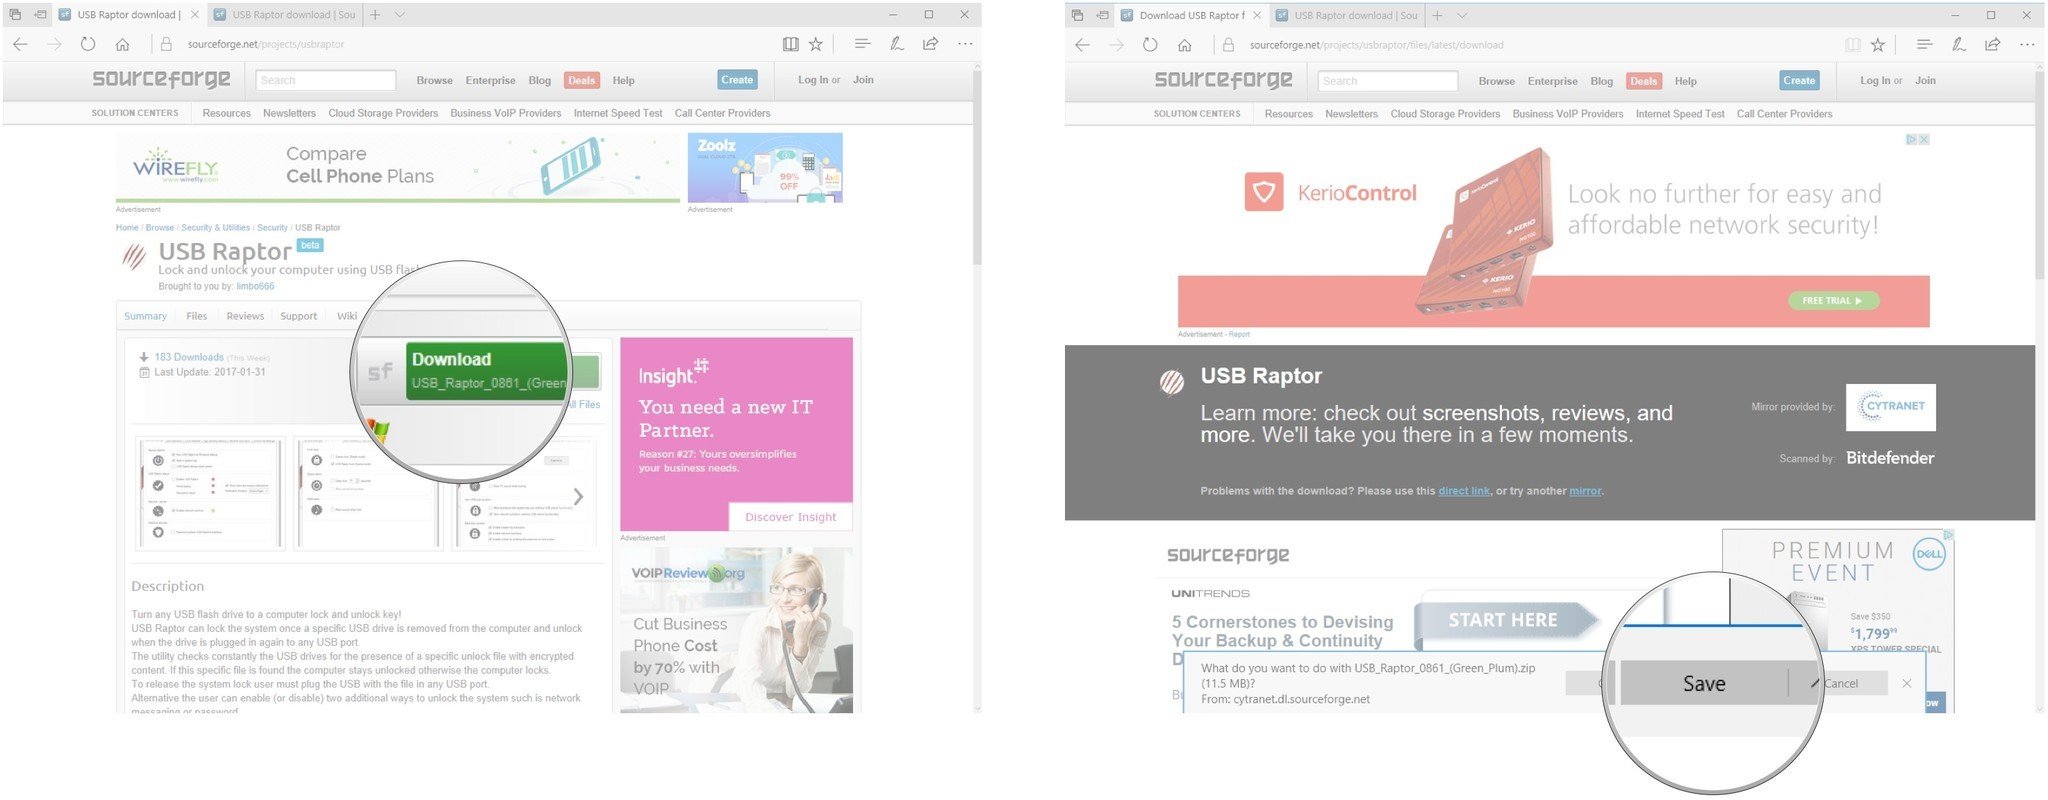
- Click Open folder.
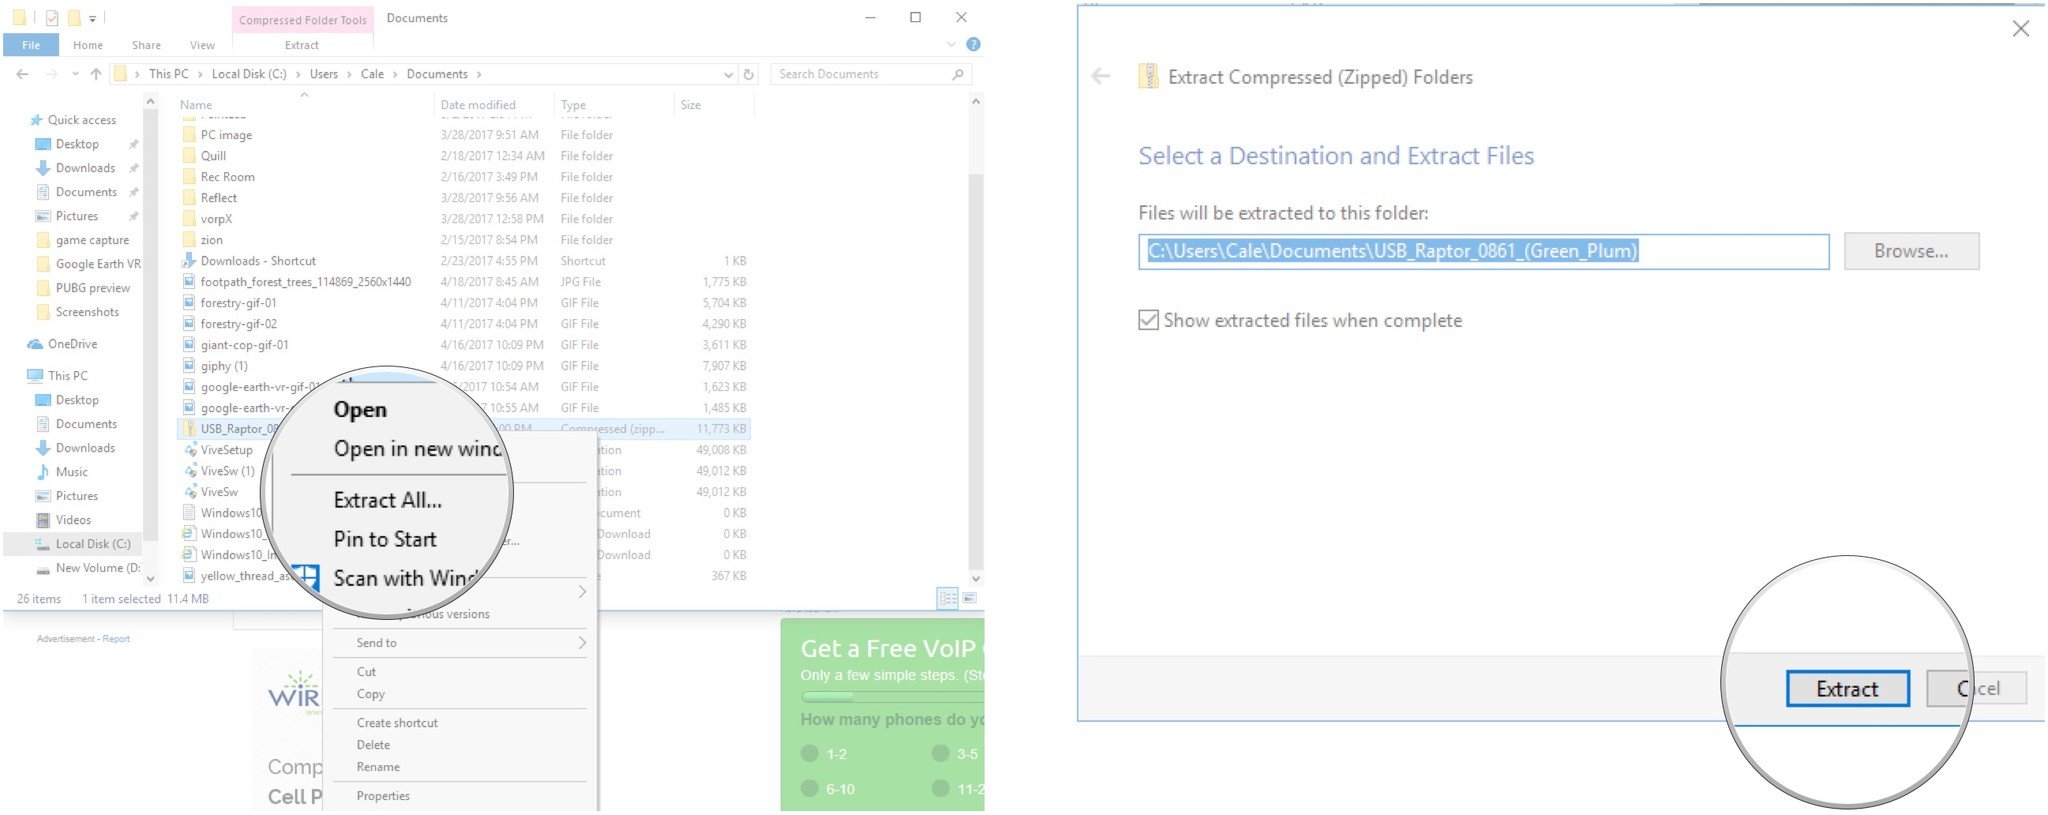
- Right-click the USB Raptor compressed folder.
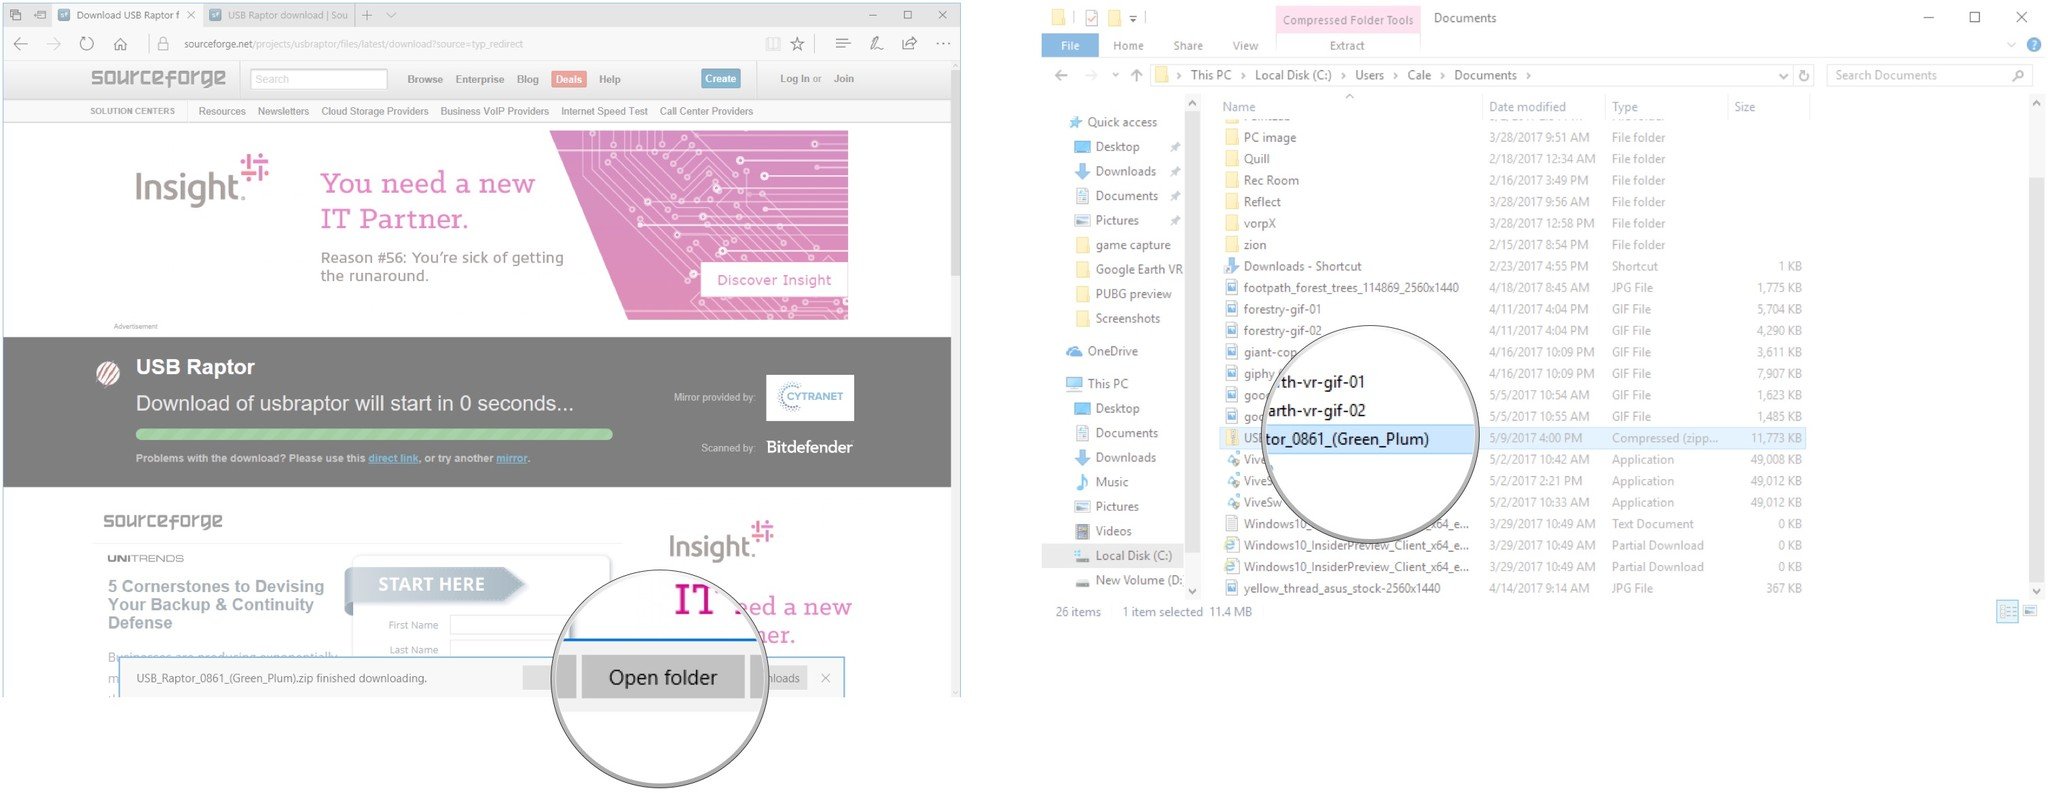
- Click Extract All.
- Click Extract.
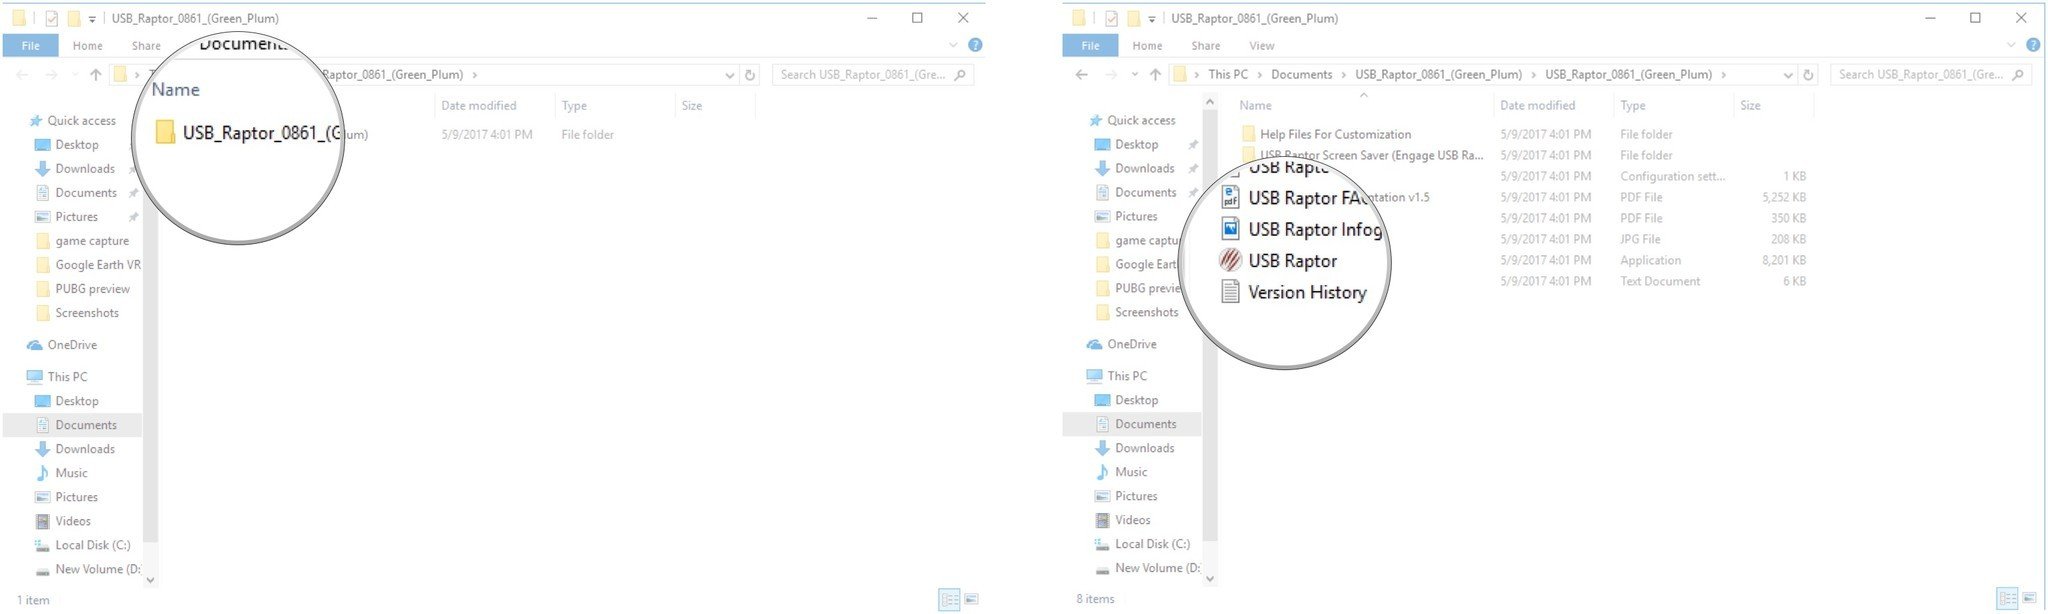
- Double-click the USB Raptor folder.
- Double-click the USB Raptor application.
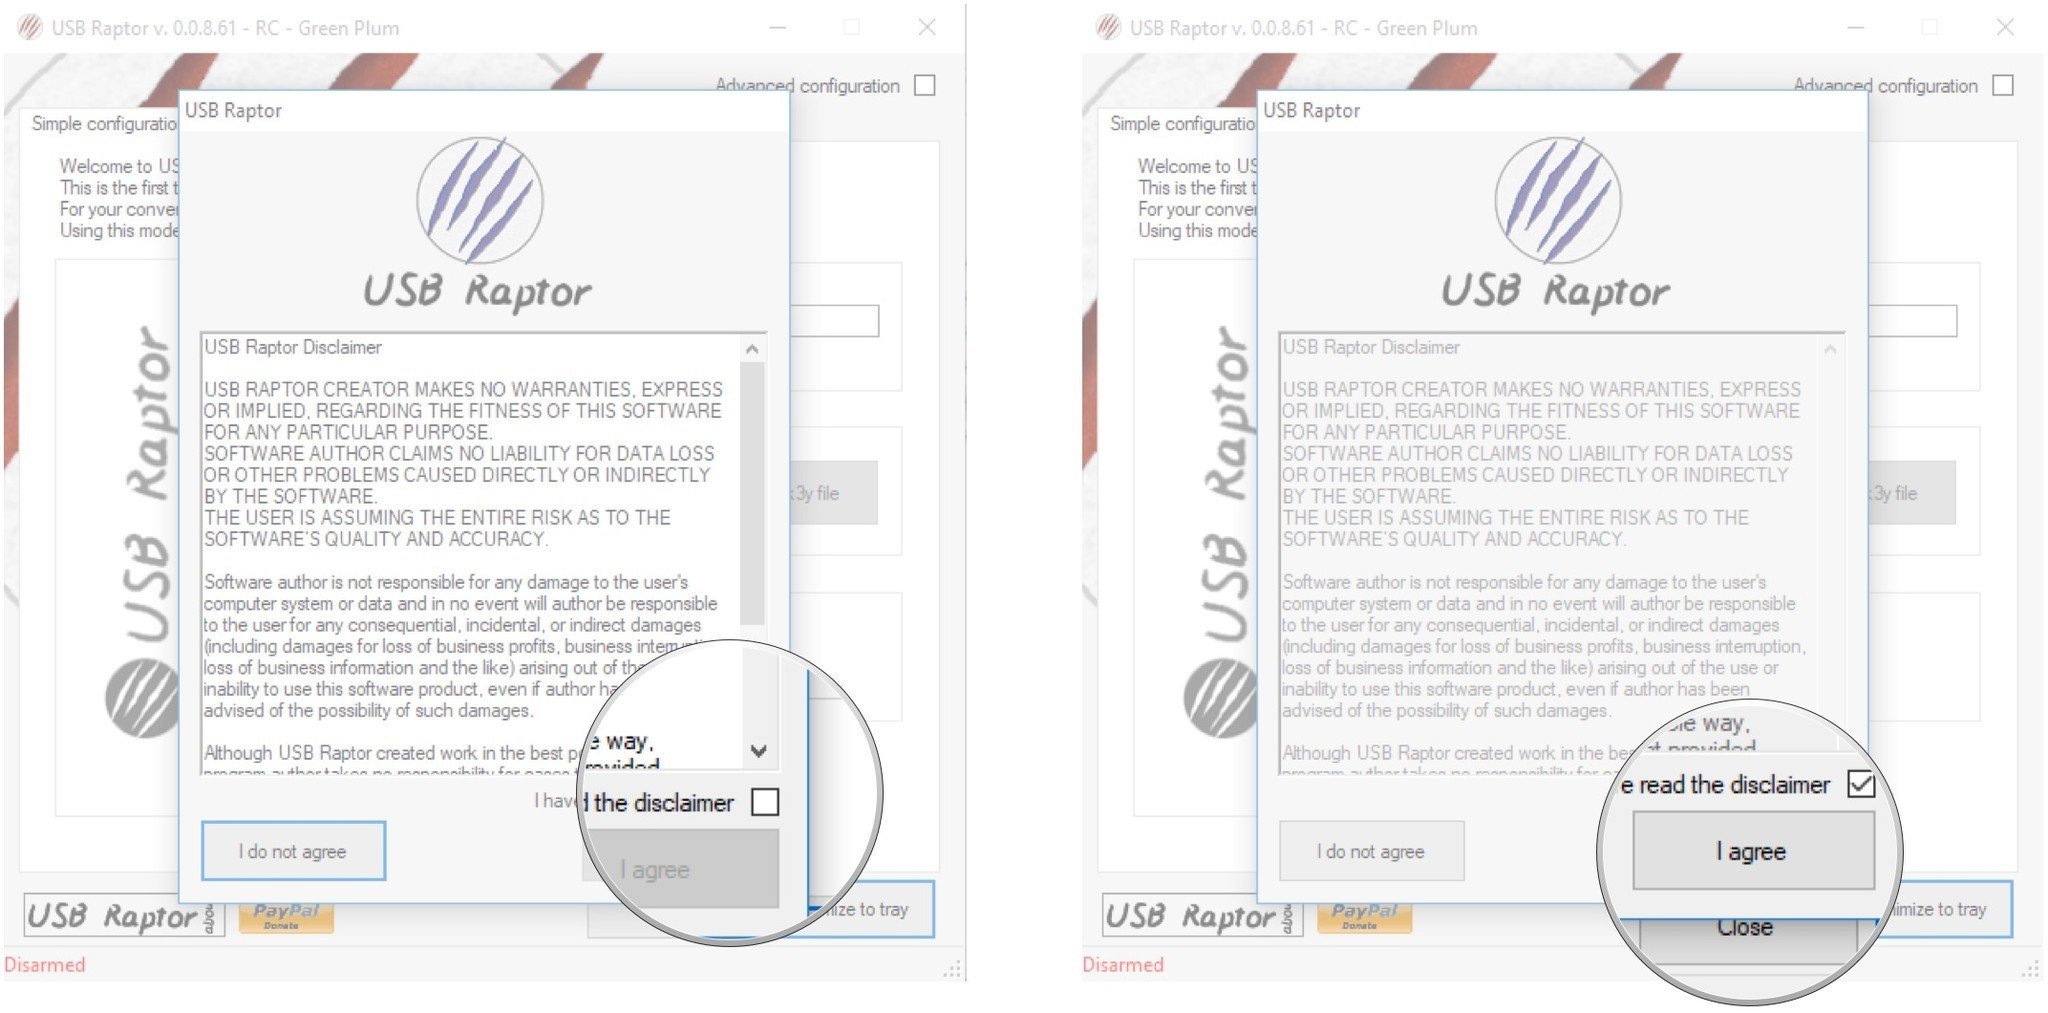
- Click the checkbox next to I have read the disclaimer.
- Click I agree.
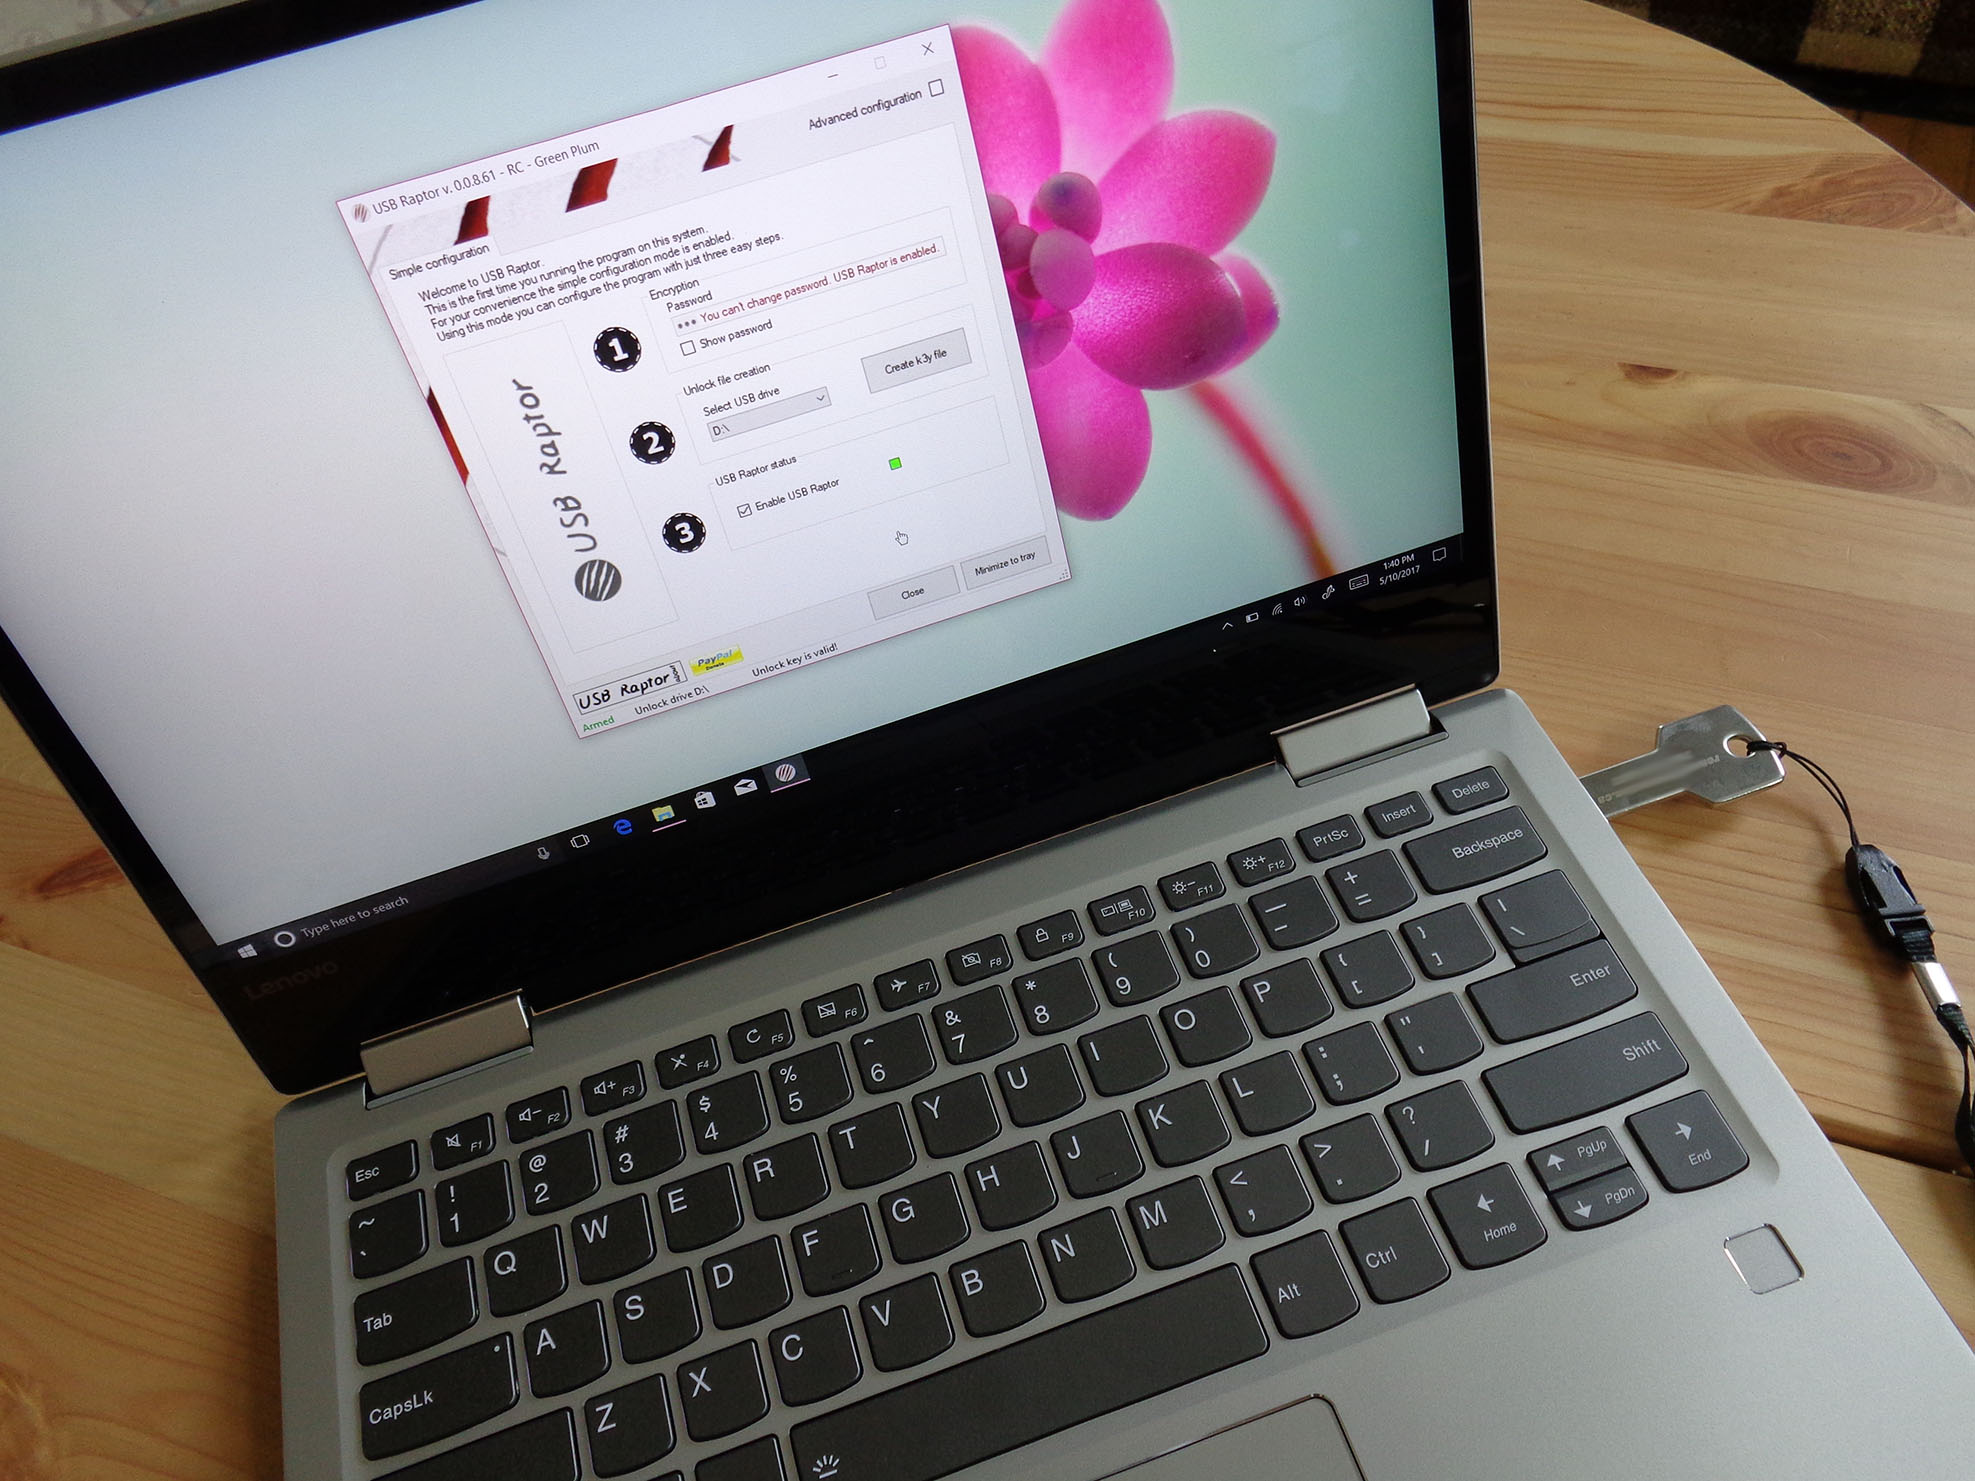
- USB Raptor will open. At this point, you can plug your USB thumb drive into your PC. Once it’s plugged in, you’ll be able to continue with the following steps.
- Type a password. Be sure it’s spelled right, and don’t forget it!
- Click the dropdown arrow below Select USB drive.
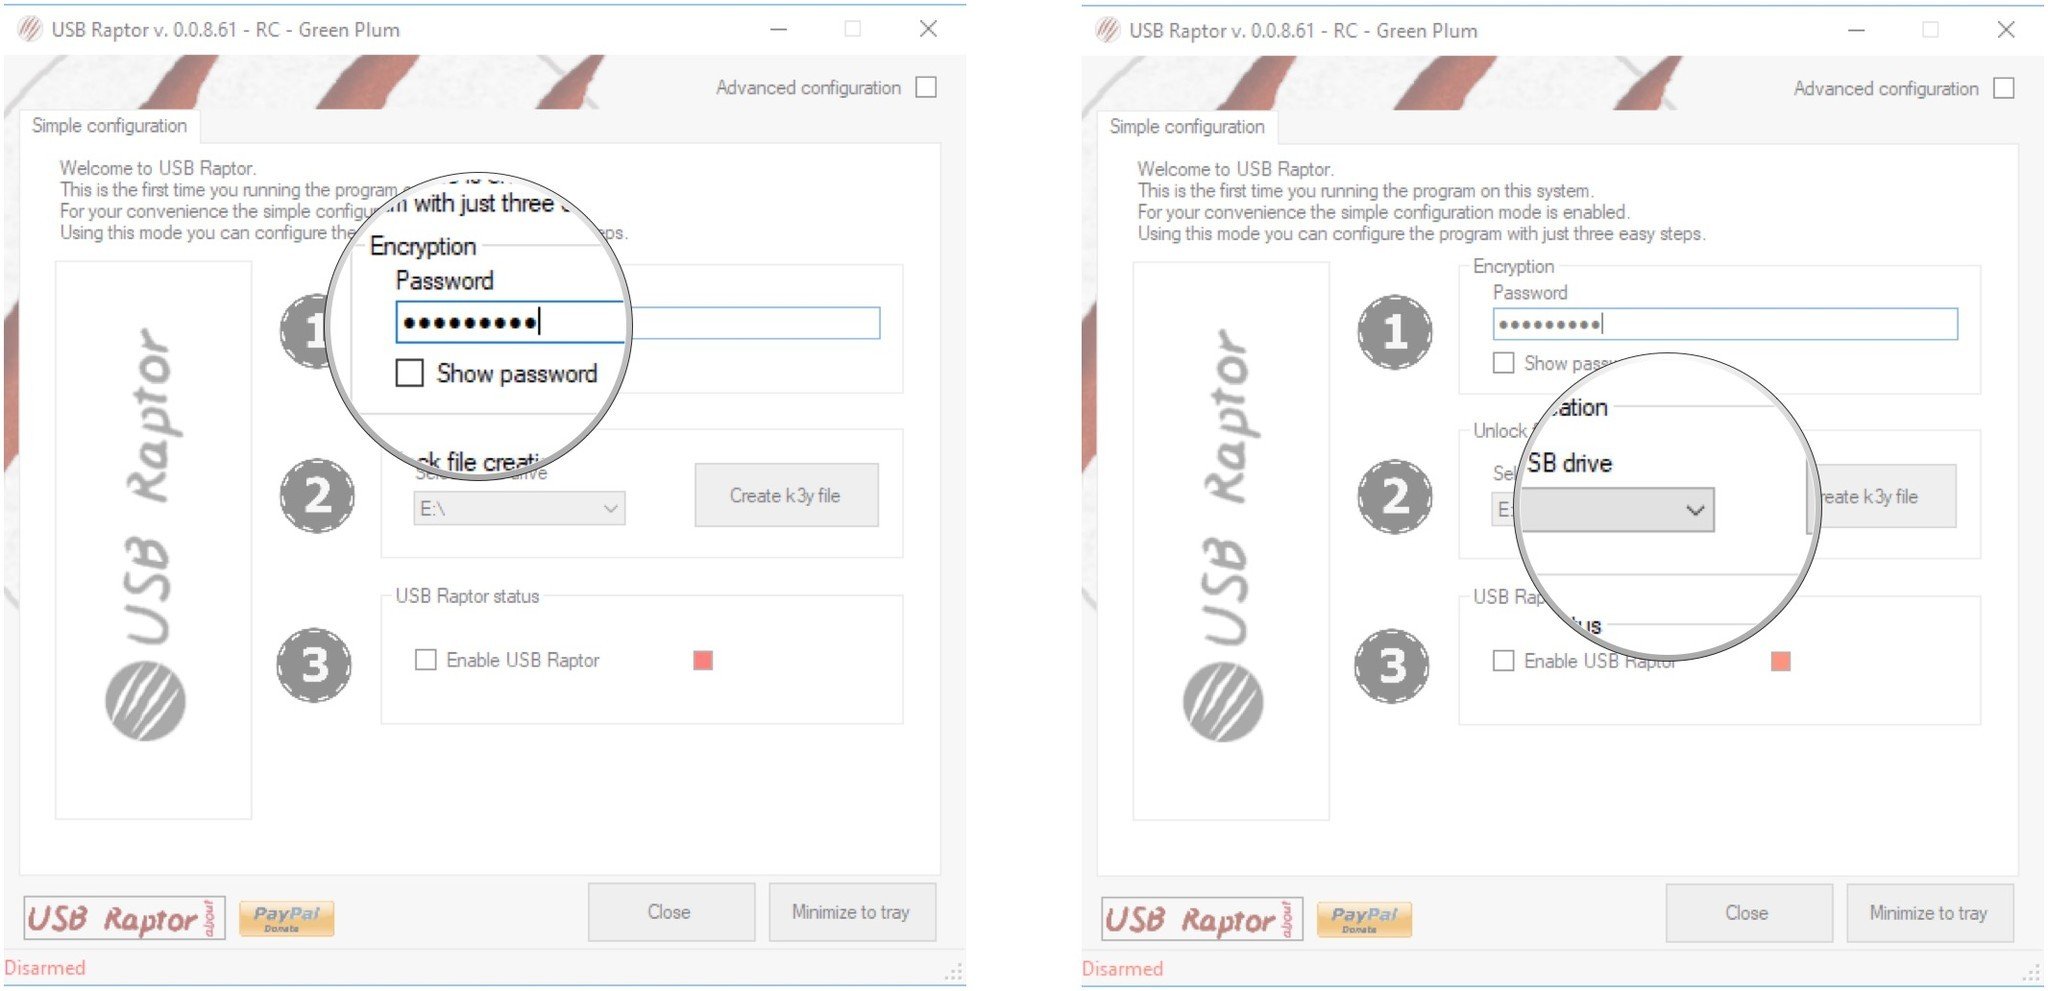
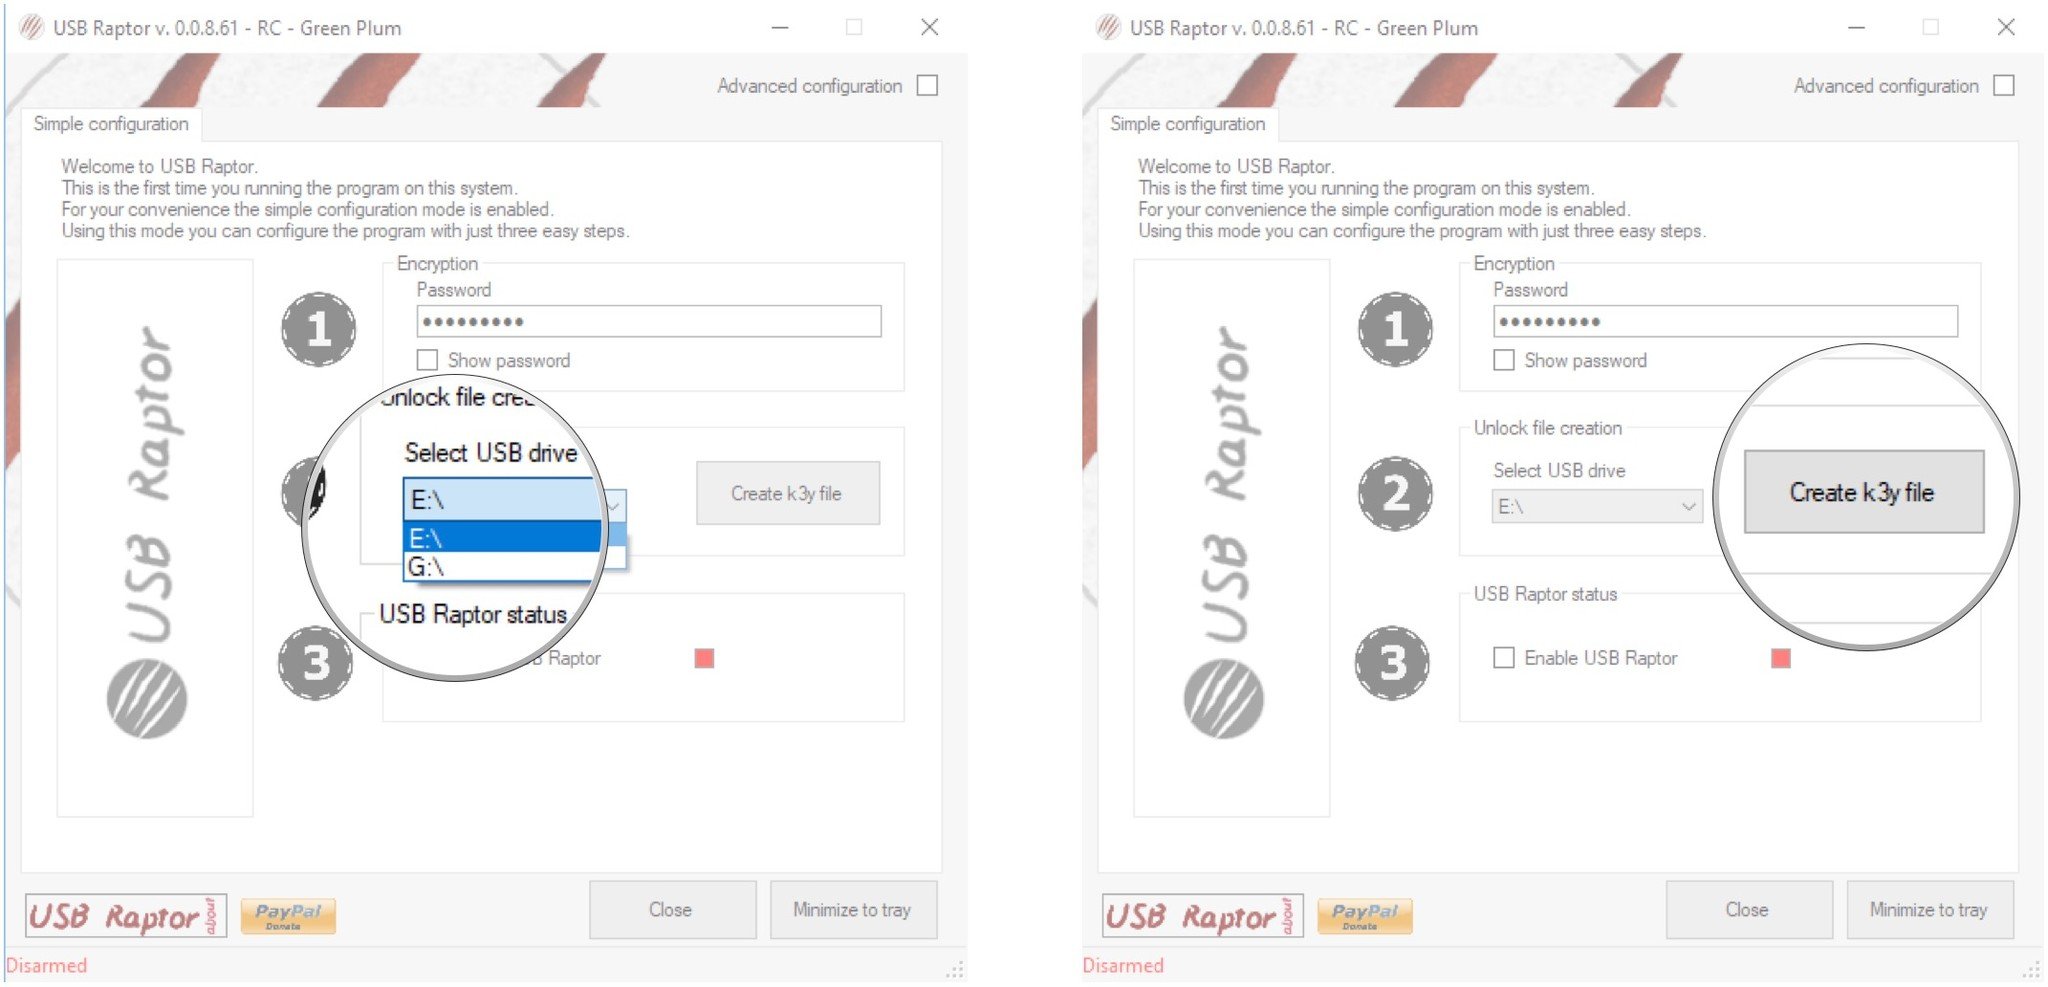
- Click a drive. If you only have your USB drive plugged into a USB port, there should only be one option available.
- Click Create k3y file.
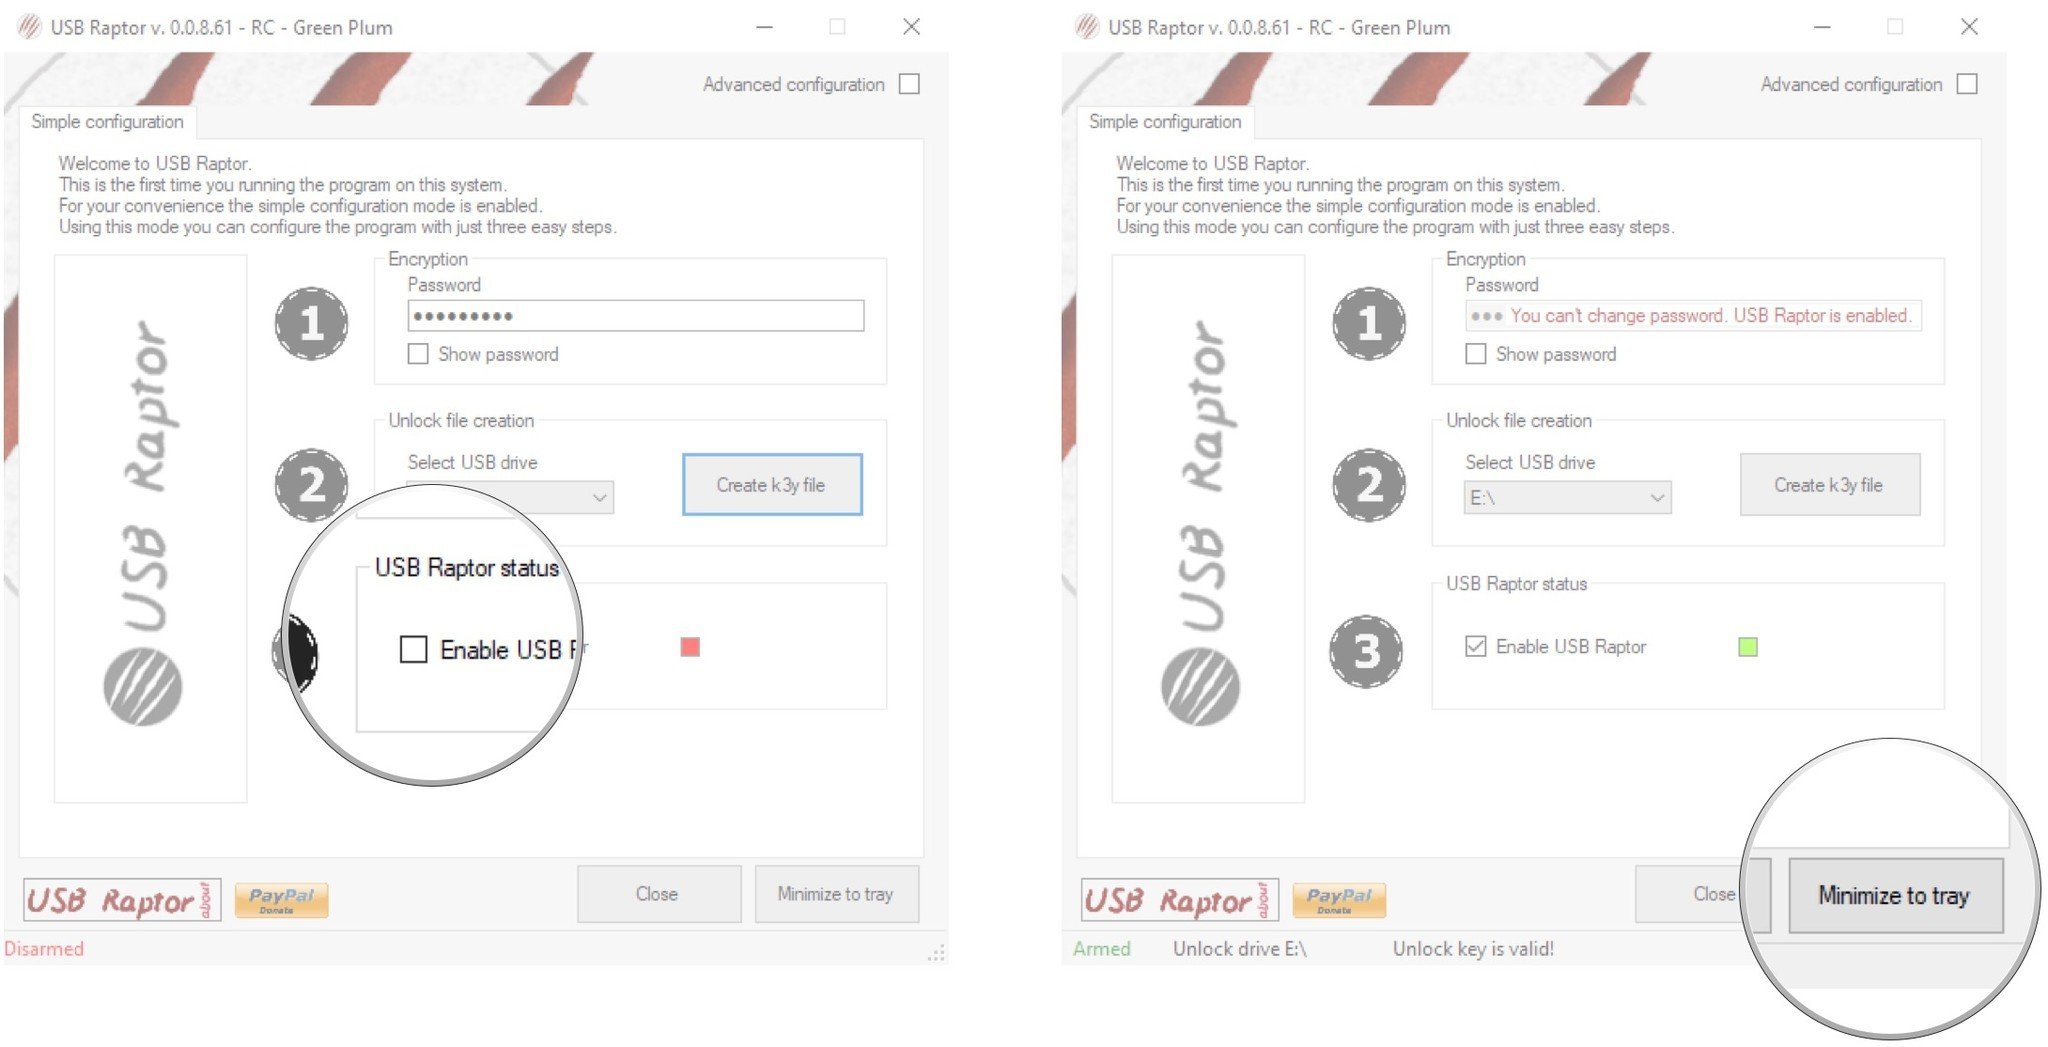
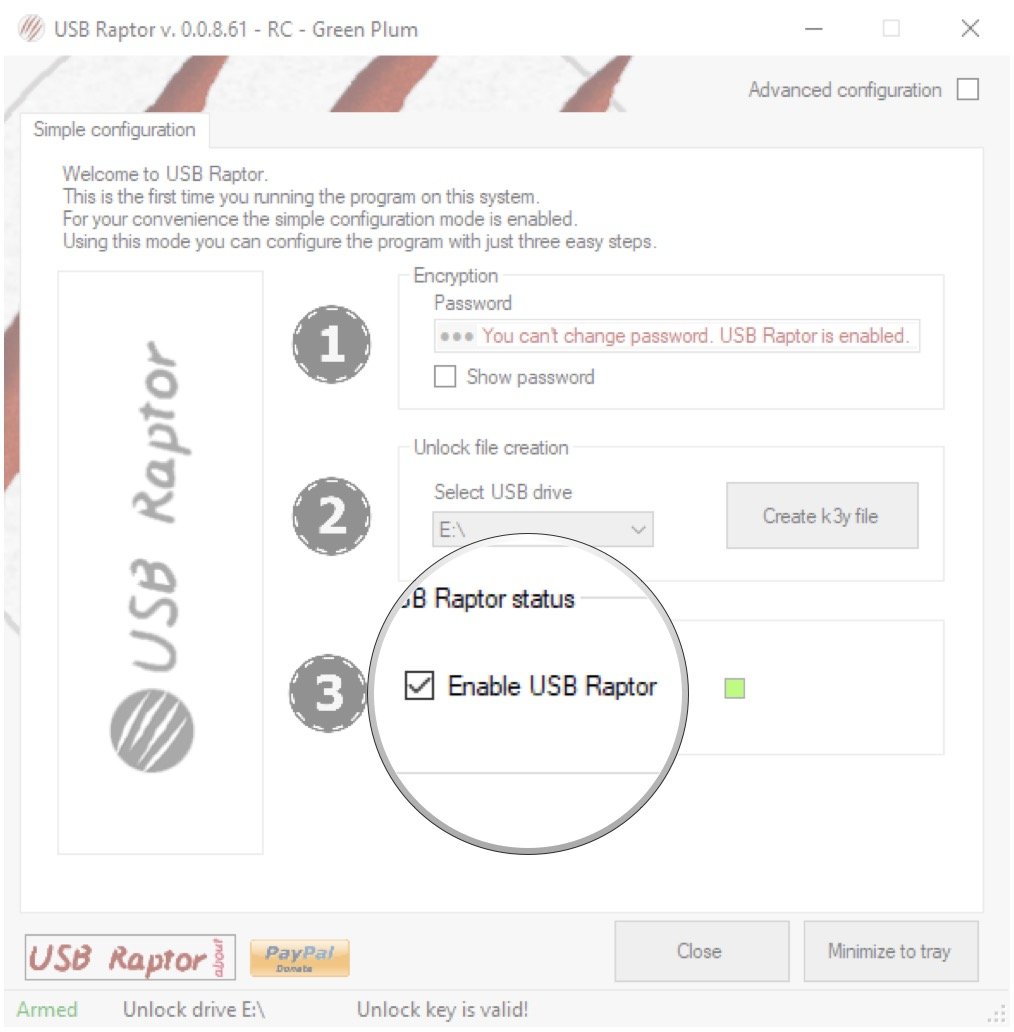
- Click the checkbox next to Enable USB Raptor when you’re ready to start using USB Raptor. A small window will pop up in the bottom-right corner of your screen letting you know that it is enabled.
- Click Minimize to tray.
As soon as you eject the USB drive or simply pull it out of the port, USB Raptor will kick in. A purple screen shows up with the USB Raptor logo. Only when you plug the USB key back in does it unlock, pretty much instantaneously.
To disable USB Raptor, simply open the app and uncheck the box next to Enable USB Raptor.
Advanced settings for USB Raptor
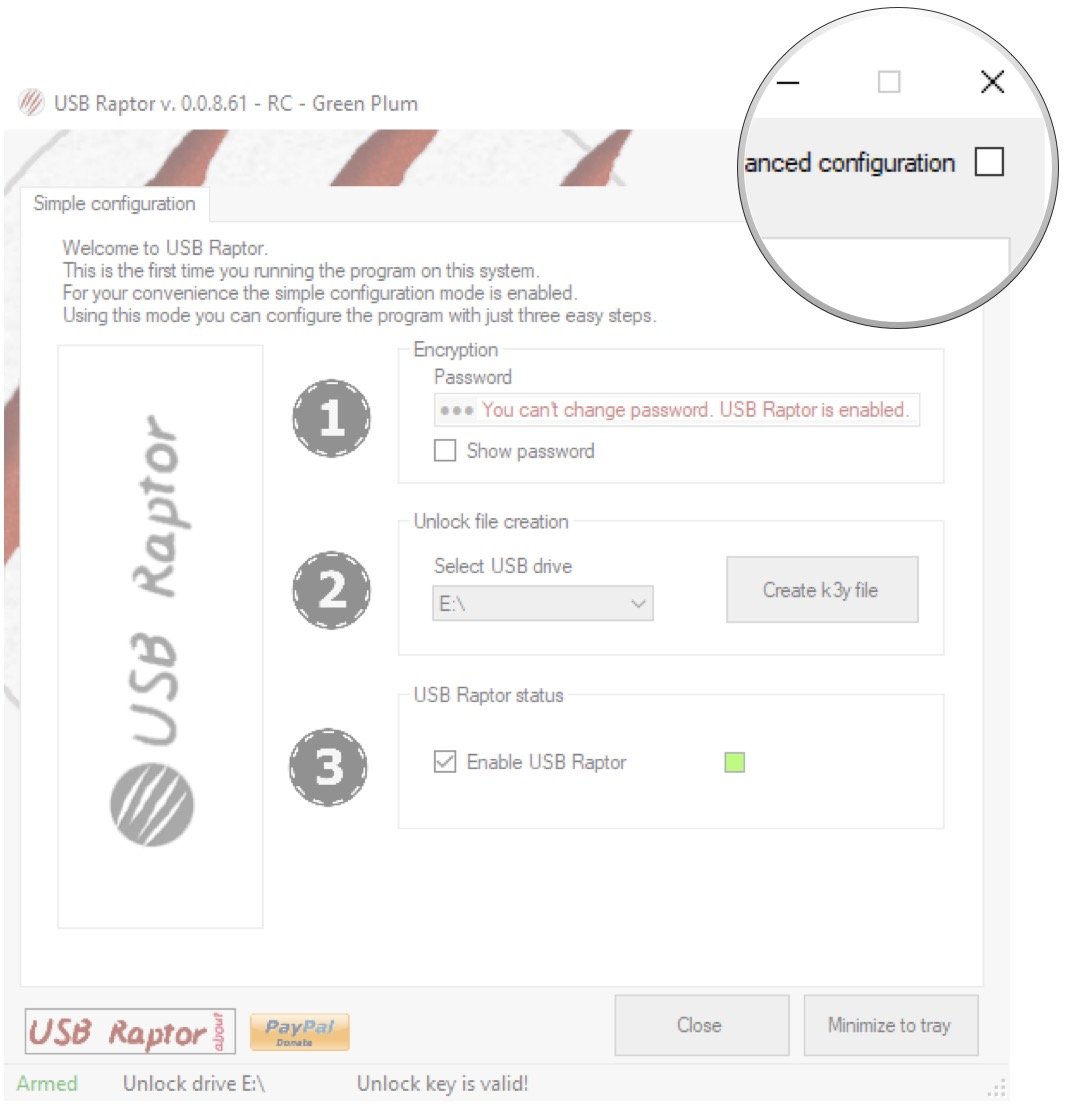
This covers the simple configuration that USB Raptor recommends, but there are quite a few advanced settings you can tweak by clicking the checkbox next to Advanced configurations near the top-right corner of the window.
Here you can choose whether or not you’d like to use a password as a backup in the event you lose your USB drive, whether there’s a delay on the lock when the USB drive is removed, whether or not the .k3y file is matched to the USB drive’s serial number (to prevent copying of the file), and more.
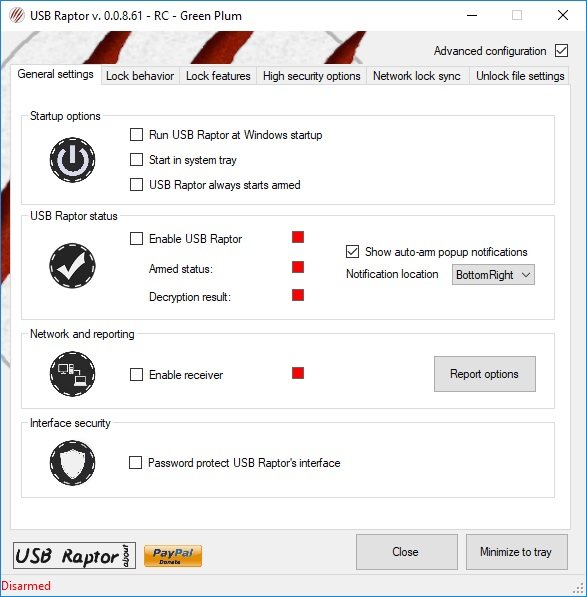
Of course, USB Raptor works perfectly well without messing with the advanced settings, so you don’t have to tweak anything you don’t want to.
Do you use a security key?
Have you tried out the YubiKey or created your own security key? How did it work? Any problems with losing your USB drive or having it fail? Let us know below.
Cale Hunt brings to Windows Central more than eight years of experience writing about laptops, PCs, accessories, games, and beyond. If it runs Windows or in some way complements the hardware, there’s a good chance he knows about it, has written about it, or is already busy testing it.
Хранение паролей на USB flash драйве (флешка) .
Кратко: Если вам не хочется запоминать пароли и постоянно их вводить ручками, например для включения Зашифрованного Диска и для доступа в Windows, то программы Rohos Logon Key и Rohos Disk помогут вам в этом. С их помощью можно хранить на 1 USB flash накопителе несколько паролей от Windows и зашифрованных дисков Rohos.
А поскольку зашифрованный Rohos Диск способен шифровать FireFox, Skype, Chrome и другие программы, выходит что этот пароль также защищает эти программы. В итоге на вашей любимой USB флешке хранятся пароли от многих систем.
Хранение паролей на USB flash drive.
Предположим, что у вас есть USB flash-диск, которым вы пользуетесь для хранения и переноса информации. Тогда при его настройке в качестве ключа для доступа к Зашифрованному Диску в Rohos Disk, или для входа в Windows Rohos Logon запишет на него свою служебную информацию, по которой затем будет восстанавливать пароль и идентифицировать владельца флэшки, как хозяина Зашифрованного Диска и учётной записи.
Служебная информация программы Rohos занимает 5-10 Кб. места, т.е. не повлияет на функциональность вашей флэшки, как средства для переноса и хранения информации.
На USB flash накопителе хранятся криптографические ключи, на которых зашифрован пароль к Windows и к Rohos диску. В свою очередь эти пароли в зашифрованном виде хранятся в реестре.
Вход в Windows с помощью USB ключа (USB flash drive).
С помощью программы Rohos Logon Key вы можете испытать для себя удобство использования USB flash drive в качестве ключа для входа в Windows и с Rohos Disk для доступа к Зашифрованному Диску.
Программа Rohos сама настроит USB Ключ, причем содержащий не сам пароль от вашего диска, а всего лишь служебную информацию о нем, необходимую программе Rohos, установленной на вашем компьютере для идентификации вас, как хозяина учётной записи и диска. То есть, если вы вдруг потеряли свой USB flash drive, то единственный вариант для злоумышленника воспользоваться вашим зашифрованным диском — это сесть с вашей флэшкой за ваш компьютер.
Мастер настройки USB flash drive для идентификации
(хранение пароля) к диску и Windows.
Итак, с USB flash drive:
- Вам не нужно помнить пароль от вашего зашифрованного диска и от учетной записи Windows
- Программа Rohos Logon и Rohos Disk сама заботится о создании своего служебного файла на вашей USB flash накопителе
- Ваша информация в безопасности, поскольку сами пароли не содержатся на USB flash накопителе
- Вы можете продолжать использовать свою USB флэшку для хранения и переноса информации.
Особые преимущества:
- Быстрый вход в Windows. Вам не надо вручную вводить свой пароль с клавиатуры, хотя система по-прежнему защищена паролем.
- Автоматическая Защита консоли — если вы отошли от компьютера. При отключени USB ключа автоматически срабатывает блокировка Windows. Вернулись — подключили USB ключ к компьютеру, и вы снова в работе.
- Дополнительная защита USB ключа PIN кодом. Для большей безопасности вы можете заменить ваш пароль на небольшой и легко запоминаемый PIN код. Об этом читайте далее.
- Универсальность USB ключа. Один USB ключ можно использовать для доступа к домашнему компьютеру и для доступа к рабочему ноутбуку. Хотя пароли могут быть разными.
Если вы используете PIN код, то нет необходимости постоянно пере-подключать USB ключ, чтобы снять блокировку Windows. Для блокировки нажмите Win+L (или создайте ярлык, если у вас Windows2000) — для снятия блокировки щелкните по надписи «компьютер заблокированн» (в окне блокировки Windows).
Принцип работы USB ключа.
При включении компьютера вы подключаете USB flash drive для аутентификации.
Окно Приветствия Rohos (Windows logon) обнаруживает USB Ключ, и предлагает вам войти в систему (выполняется аутентификация и идентификация пользователя по USB ключу).
Вы можете настроить Rohos Logon так, чтобы при отключении USB ключа:
- Заблокировать или выключить компьютер
- Выполнить завершение сеанса (LogOff)
- Запустить защищеный хранитель экрана
- Выключить Rohos диск
Использования USB flash диска в качестве Ключа для доступа к компьютеру не отменяет ее основного использования — для хранения и переноса файлов (хотя это можно запретить).
USB flash drive и безопасность.
Вы спросите: «Если флэшку у меня кото-то взял (украл), то он имеет доступ к Windows ?».
— На этот случай можно защитить USB ключ PIN кодом (пароль) для того, чтобы никто в ваше отсутствие не смог использовать USB flash drive для входа в Windows.
— Дубликат USB ключа невозможно изготовить простым копированием файлов на другой USB накопитель.
— По умолчанию на USB ключе не содержится пароль в открытом виде.
— По умолчанию USB Ключ привязан к конкретному компьютеру, где он был создан. USB ключ настроенный на другом компьютере (даже с теми же — login\пароль\имя компьютера) не возможно использовать для доступа на ваш компьютер.
Защита от несанкционированного использования USB ключа. Характеристики PIN кода для USB флэшки в Rohos Logon:
- Отдельная экранная клавиатура для ввода PIN кода
- Три неверных попытки ввода PIN и USB ключ блокируется
- Разблокировать USB ключ можно в окне Rohos Logon
- Если я потерял (украли, испортилась) флэшку, то все мои «секретные» диски накрылись? Как теперь открыть Rohos диск ?
— Для этого необходимо предварительно создать файл для восстановления
пароля к Rohos диску (резервные копии криптографических ключей от Rohos
диска).
- Многие пользователи часто спрашивают нас, можно ли обойти защиту USB ключа при загрузке Windows через Safe Mode (режим защиты от сбоев).
«- Иначе защита учетной записи и компьютера в целом, будет неполноценной — если можно будет загрузить ПК в Safe Mode и войти по обычному паролю в обход USB ключа…»
— Ответ: НЕТ. Начиная с версии 2.1 Rohos Logon Key работает даже в Safe mode.
Защита паролем USB флэш накопителя.
А что, если USB flash накопитель сделать не только ключом, но и сейфом для хранения вашей информации? Мы ответим: «Легко»! И совсем не преувеличим, сказав, что это одна из самых востребованных функций.
Пользователи часто задаются вопросом, как безопасно хранить и переносить данные на USB flash накопителе в конфиденциальном порядке. Либо как установить пароль на USB флеш диск. Представьте, что забыли свою флэшку в офисе или в гостях, ваша информация останется скрытой для других. Вы можете защитить USB flash накопитель паролем.
Rohos Mini Drive — бесплатная утилита которая поможет установить пароль на USB флеш диск а также надежно его зашифровать.
Преимущества шифрования c Rohos Mini Drive:
- Rohos Disk создаёт зашифрованный раздел на USB диске, защищенный паролем.
- Шифрование происходит «на лету», работа с защищенными файлами и папками проходит так же легко, как с обычным диском.
- Виртуальная клавиатура обезопасит от клавиатурного шпиона. Ваш пароль останется с вами.
- Портативность зашифрованных данных – доступ к Rohos диску можно получить на любом компьютере.
- Портативная утилита Rohos Mini Drive Portble — не требует установки и работает с USB диска.
В компаниях утечку паролей решают с помощью смарт-карт USB брелоков. Читайте об этом в разделе Советы и рекомендации .