
A lot of users complain that their microphone level is automatically adjusting without any user intervention. How to stop microphone auto adjusting Windows 10? If you are trying to fix the issue, this post of MiniTool is what you need.
Why Microphone Level Keep Changing on Windows 10
A lot of users reported that the microphone levels keep changing on Windows 10. This issue often occurs when using much multiple applications or third-party programs. According to investigating many user reports, there are several situations that can cause Windows 10 microphone level keeps changing.
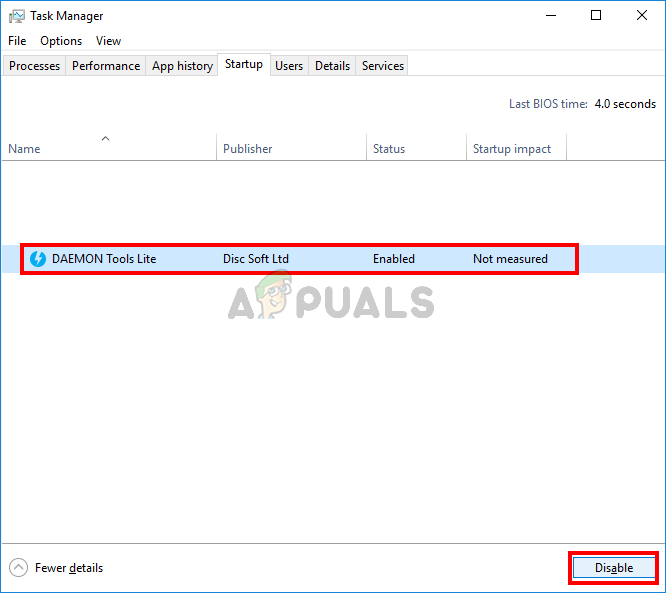
- It is commonly reported that Skype can cause microphone levels keep changing if it is configured to launch every system startup.
- Steam is also responsible for the automatic microphone adjustments issue. You can change its settings to fix the issue.
- If an application is allowed to take exclusive control of the microphone, it may automatically adjust the microphone levels.
- Outdated or corrupt microphone driver can cause the microphone issue as well.
Now, let’s see how to stop microphone auto adjusting Windows 10.
How to Stop Microphone Auto Adjusting Windows 10
Method 1. Prevent Skype from Auto Adjusting the Microphone
If Skype is configured by default to adjust the microphone levels, you may encounter the problem. So, it is necessary to prevent Skype from auto adjusting the microphone. Here’s how to do that:
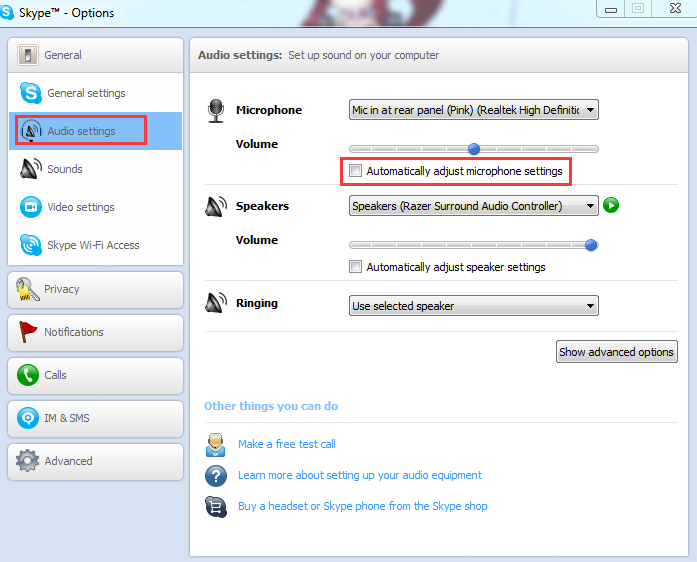
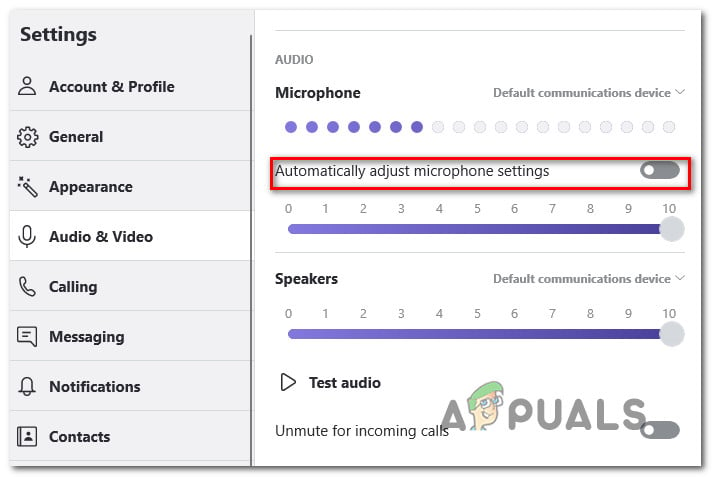
Step 1. Open the Skype UWP client, and then click the Action button (three-dot icon) at the upper left corner and select Settings from the context menu.
Tip: If you are using the desktop version, you can navigate to Tools > Options from the ribbon bar.
Step 2. Select the Audio &Video tab from the pane, and then scroll down to the Microphone section and untick the checkbox for Automatically adjust microphone settings.
If you are using the Desktop version, you can go to the Audio Settings and uncheck the box of Automatically adjust microphone settings.
Now, you can start your computer and see if the issue “mic volume keeps changing” still persists.
Method 2. Prevent Steam from Auto Adjusting the Microphone
As mentioned above, Steam is another application that may cause microphone levels keep changing. If you are using the Steam client and configure it to launch automatically at startup, you need to disable the Automatic volume settings. For that:
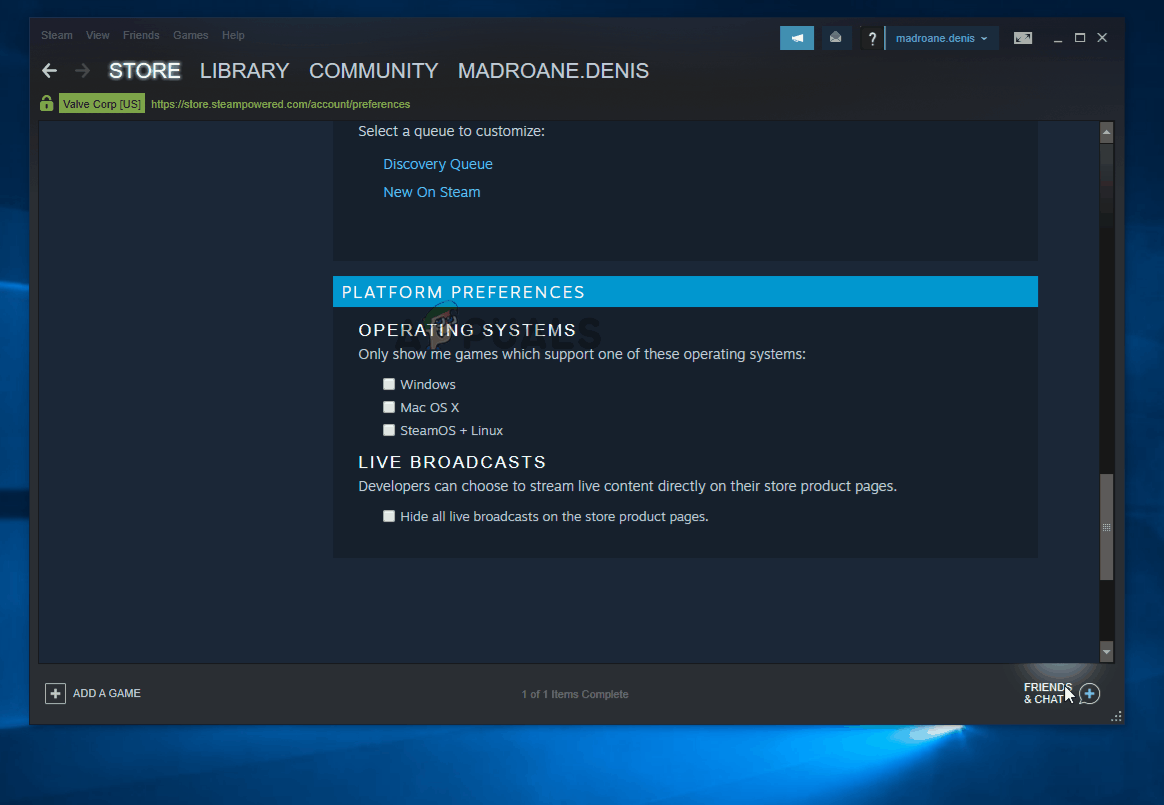
Step 1. Log in to your Steam client and click on the Friends & Chat icon at the bottom right corner of the window.
Step 2. Click on the Gear icon at the upper right corner and select the Settings menu.
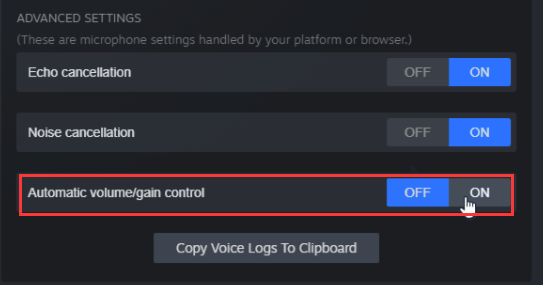
Step 3. In the Friends List settings, click on the Voice tab and scroll down to the bottom of the screen and click on Show Advanced Settings.
Step 4. Toggle off the switch of Automatic volume/gain control.
Restart Steam and see if Windows 10 microphone level keeps changing.
Method 3. Reconfigure the Microphone Settings
How to stop microphone auto adjusting Windows 10? Another effective method is to reconfigure the microphone settings. By doing so, no apps are allowed to take exclusive control of the microphone. Here’s how:
Note: This operation might cause some other voice features to function improperly. If this method fails to work, you’d better reverse its settings.
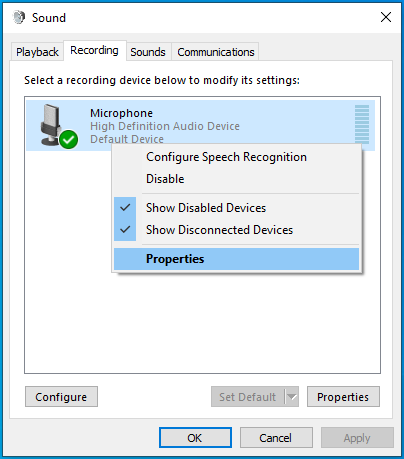
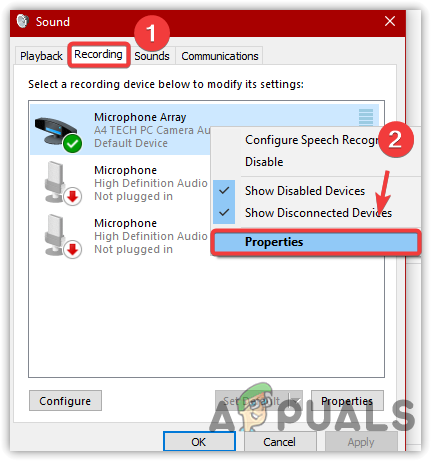
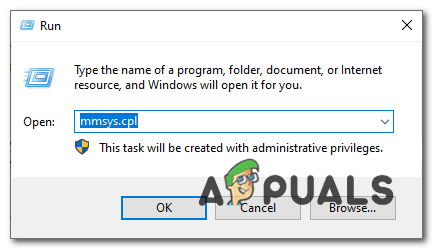
Step 1. Press Win + R keys to open the Run box, and then type mmsys.cpl in it and hit Enter.
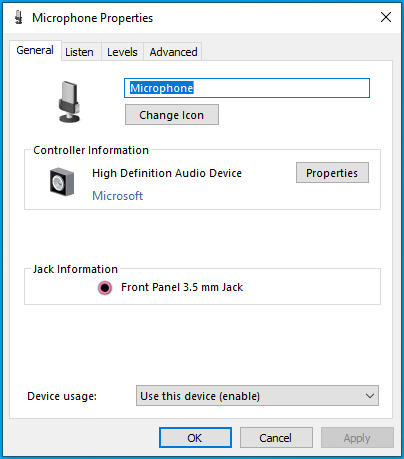
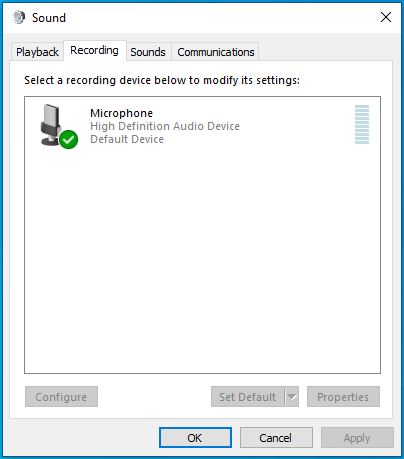
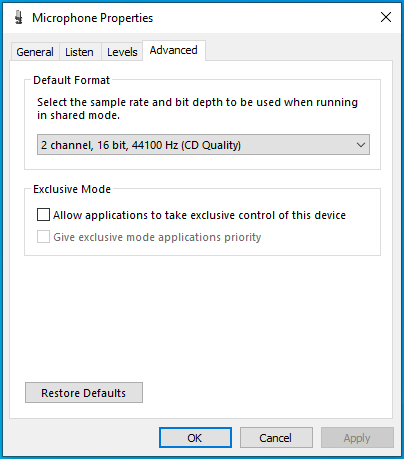
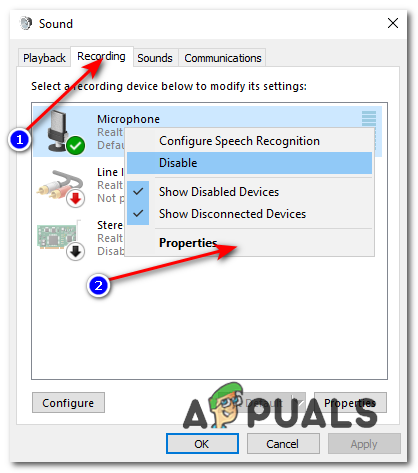
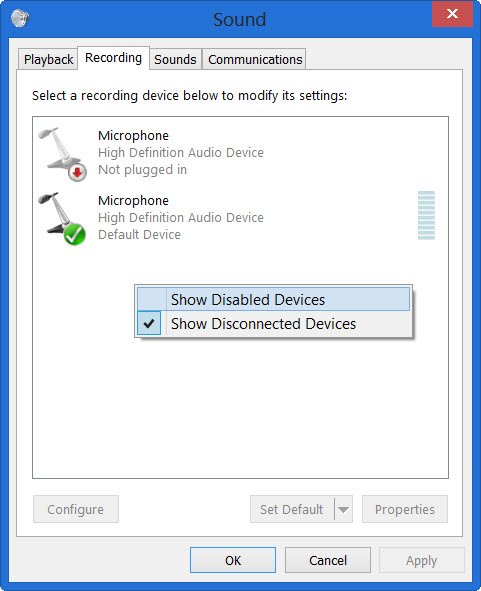
Step 2. Go to the Recording tab, and then select the affected microphone and click on Properties.
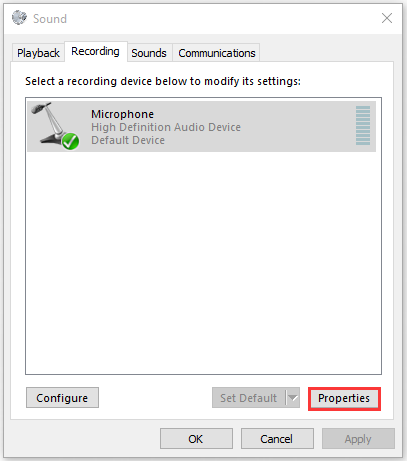
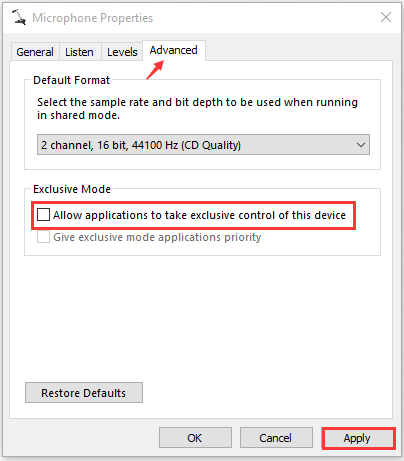
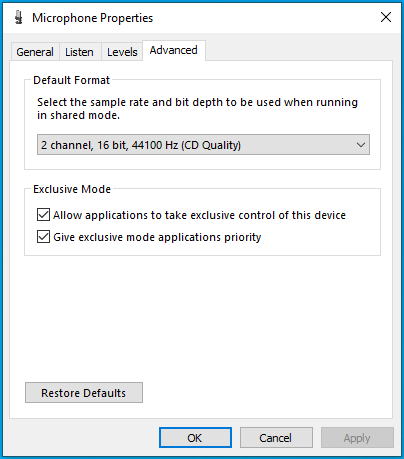
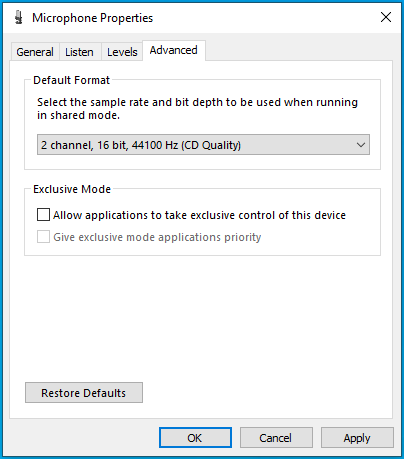
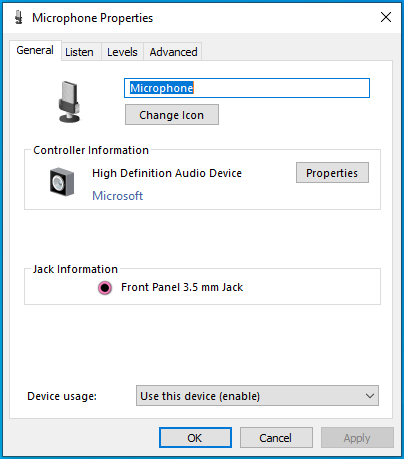
Step 3. Go to the Advanced tab inside the Properties window and then untick the checkbox next to Allow applications to take exclusive control of this device.
Step 4. Click on the Apply button to execute the changes.
After that, restart your computer and see if it stops microphone auto adjusting Windows 10
Method 4. Change the Microphone Levels Manually
Another quick fix is to set a default value for your microphone manually. This method has been proven to be useful. Try it now.
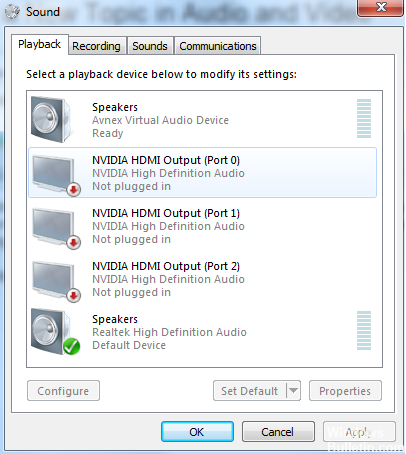
Step 1. Open the Sound window through the above method and go to the Recording tab. Alternatively, you can right-click the Speaker icon at the bottom of the notification screen and select Sound from the elevated menu.
Step 2. Select the affected microphone/headset and click on Properties.
Step 3. Navigate to the Levels tab inside the Microphone Properties window, and then adjust the value of the microphone via the slider and click on Apply to save the changes.

Method 5. Update the Microphone Driver
An outdated or corrupted audio driver is also responsible for the issue. To fix the problem, you can try updating the audio driver to the latest build. Here’s a quick guide:
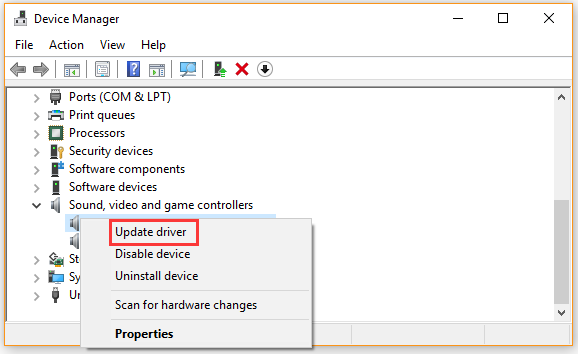
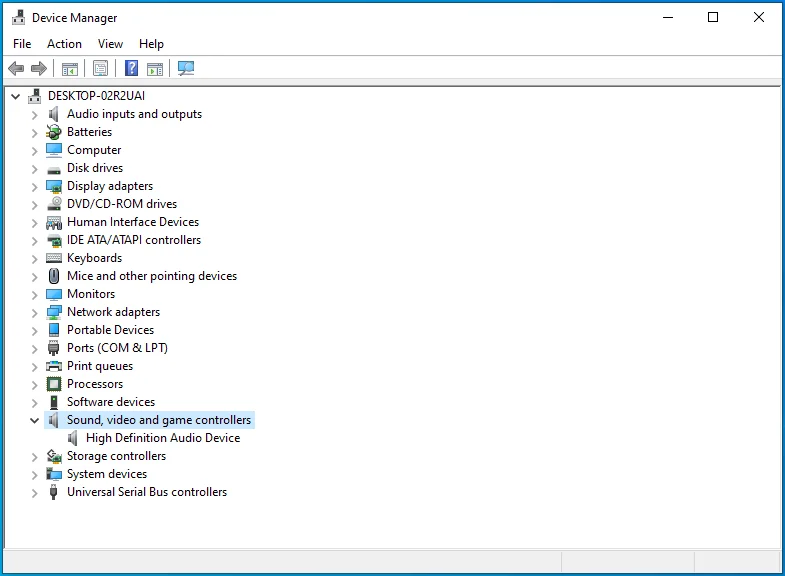
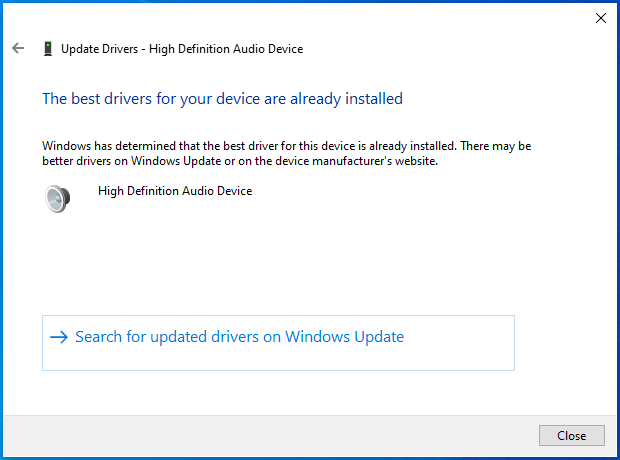
Step 1. Right-click the Start button and select Device Manager from the context menu.
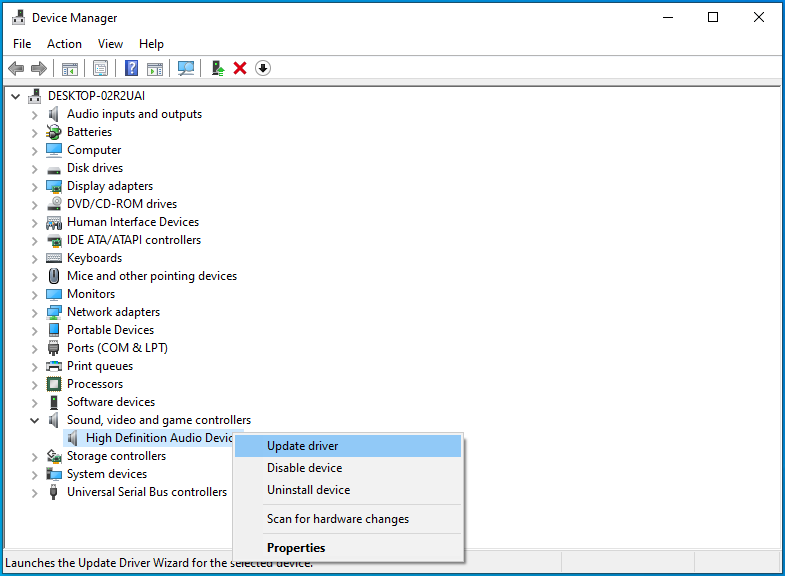
Step 2. Expand the Sound, video and game controllers category, and then right-click the audio device that needs to update and select Update Driver.
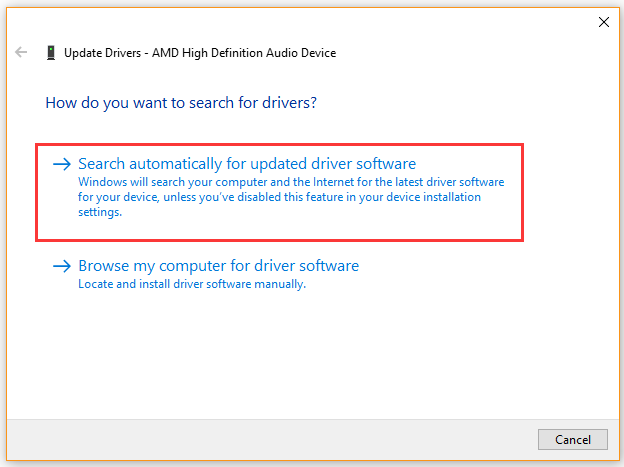
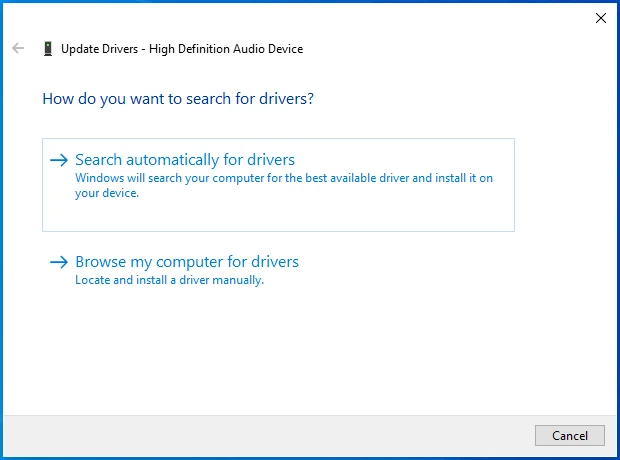
Step 3. Select the Search automatically for updated driver software option. Then follow the on-screen prompts to complete this update. Now, Windows will automatically any available updated driver and install it for you.
Once the update finishes, reboot your computer and see if the auto adjustment issue still persists.
How to stop microphone auto adjusting Windows 10? The top 5 methods have been introduced to you. Now, it’s your turn to have a try.
Table of contents
- What If a Microphone Keeps Muting Itself in Windows 10?
- 1. The system sound settings are incorrect
- 2. The sound drivers are outdated
- 3. Malware infection has corrupted the sound files
- How to Fix an Auto-Muting Microphone on Windows 10
- Solution 1: Temporarily disable your antivirus
- Solution 2: Change your microphone settings
- How to Fix an Auto-Muting Microphone on Windows 11
- Fix 1: Reinstall or update the sound drivers
- Fix 2: Use another format for the microphone
- Wrapping Up
- FAQ
The microphone is an essential part of the computer for those who spend a lot of time recording media files or using communication apps or unified communications systems. Imagine, therefore, the annoyance caused by an auto-muting microphone without user input. Some Windows 10 users report experiencing the issue with their microphone. Moreover, this issue affects internal and external mics equally.
Some issues are specific to a certain version of Windows, but the auto-muting mic issue isn’t one of them. The microphone can randomly start muting itself.
Suppose your PC’s mic suddenly starts muting itself – what do you do? This guide was created to answer this question for you.
If you’re looking for a way to resolve this malfunction on your PC, the tips we provided here will help you.
What If a Microphone Keeps Muting Itself in Windows 10?
If a microphone keeps going to zero volume levels in Windows 10, it can be incredibly frustrating. Imagine having to stop enjoying that fantastic and immersive conversation because you suddenly went silent.
Naturally, when something like this happens, knowledge of the immediate cause would help. If the microphone keeps resetting itself to zero volume despite your best efforts to fix it at a certain sound level, these are the likely reasons:
1. The system sound settings are incorrect
Most of us don’t need to configure any special settings for sound on Windows 10. We simply use the volume controls to increase or decrease audio per our requirements at any point during the viewing, gaming, streaming, chatting, or recording experience.
If sound keeps being muted, perhaps your system volume has been set to Mute unknowingly.
More likely, either the internal microphone or the external one has been disabled — which would prevent sound from coming through that device.
Other improper sound settings can have a similar effect.
2. The sound drivers are outdated
If you’re getting this sound malfunction on a PC that has seen better days, perhaps the sound drivers haven’t been updated for a long time.
If you have recently upgraded or updated the OS, the current sound drivers might have become incompatible with the firmware. Only compatible device drivers can be used by PC hardware, such as your video, sound and network cards.
Incompatible PC drivers may not work at all. When they do, they usually work incorrectly, leading to all manner of bugs, such as the auto-muting mic issue.
3. Malware infection has corrupted the sound files
There are many system files that play a role in delivering audio input. If these files get targeted by malware, the result will be myriad sound issues, including the mic randomly muting itself.
Now that we’ve explained the potential causes of the random microphone muting issue on Windows 10, let’s go ahead and check out the possible solutions.
PRO TIP
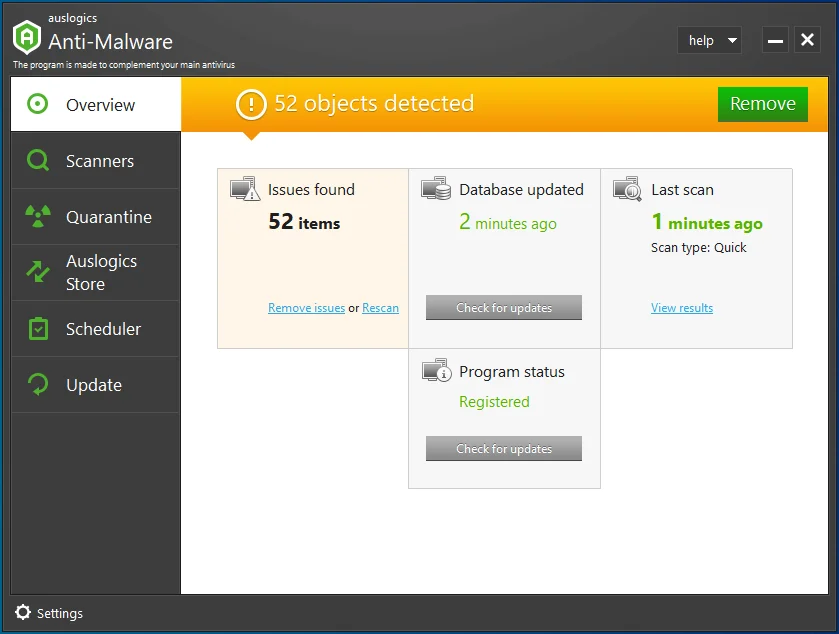
Don’t let malware compromise your audio experience or any other crucial system functions. Auslogics Anti-Malware is designed to detect and remove even the most elusive threats, providing you with peace of mind and reliable system performance. Keep your PC safe and enjoy uninterrupted audio and overall system functionality.
How to Fix an Auto-Muting Microphone on Windows 10
If your mic starts behaving erratically and mutes itself at random intervals, you won’t have a pleasant experience on Skype until the behavior returns to normal.
The following fixes have worked for a majority of Windows 10 users with the same issue, and there’s no reason yours won’t be resolved after applying them.
Solution 1: Temporarily disable your antivirus
Some antivirus tools, such as Norton, have been known to cause unintended side effects. They are very aggressive with their anti-malware measures and sometimes end up affecting system functioning.
If your mic keeps going to zero volume at inopportune times and without your manual input, try turning off your antivirus for a time and see what happens.
Whether you’re using Norton, Windows Defender or another popular security software tool, turning off real-time protection is pretty easy.
Once you’ve done that, use your mic for up to an hour and see if the problem happens again.
If it does, consider updating the antivirus software for better performance and fewer bugs.
Use Auslogics Anti-Malware
If no update is available, your best bet might be switching to a highly recommended security tool like Auslogics Anti-Malware.
This tool has been approved by Microsoft for use as a primary or secondary antivirus on Windows 10 systems.
It scrutinizes all parts of your system for potential threats that might be lurking in obscure locations and quarantines or removes them.
Related
: Auslogics Anti-Malware: Features and Reviews
Solution 2: Change your microphone settings
From the evidence of the users who have reported this issue in public Windows forums, incorrect sound settings are the prime culprit that causes device mics to self-mute at random intervals.
In that case, you might reasonably expect that introducing the correct sound settings will restore normal audio functioning. This is indeed the case.
Here’s what you need to do:
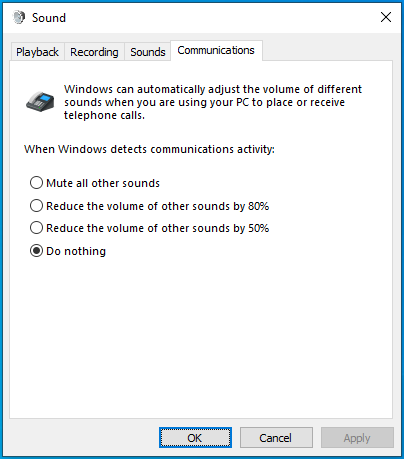
- There is a speaker icon in the right corner of your taskbar. Right-click it and select Recording Devices.
Note
On the latest version of Windows 10, the Recording Devices option no longer exists. You must select Sounds instead when you right-click the speaker icon.
- The Sound Control window will open.
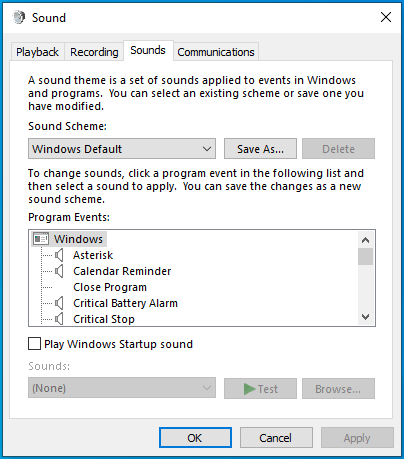
- Select the Communications tab.
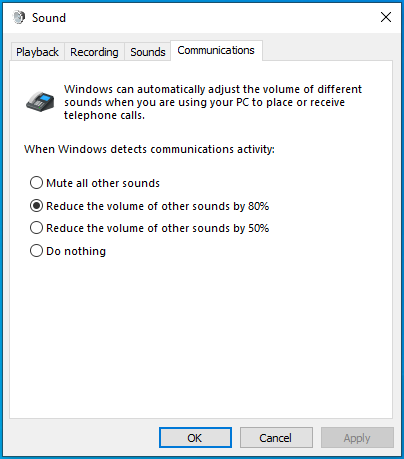
- Under When Windows detects communications activity, select Do nothing.
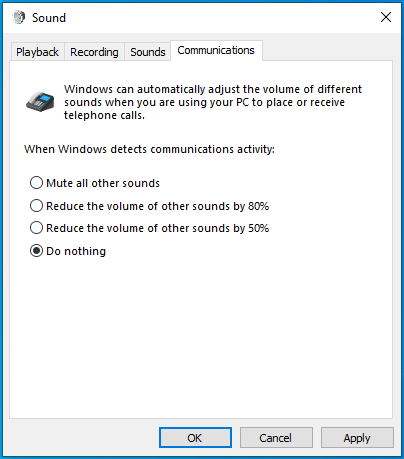
- Click Apply and then OK.
- Test your microphone for a few minutes. Has the random muting stopped? If the bug still occurs, repeat Step 1.
- Switch to the Recording tab.
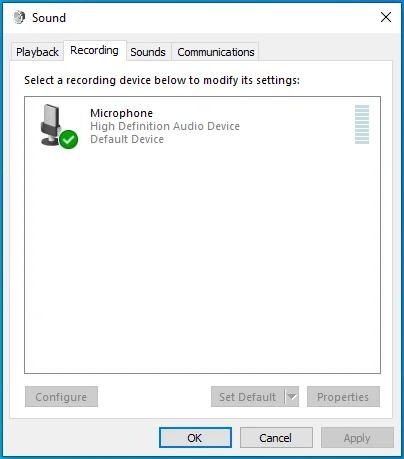
- Right-click your sound device and select Properties.
- The Microphone Properties window will open.
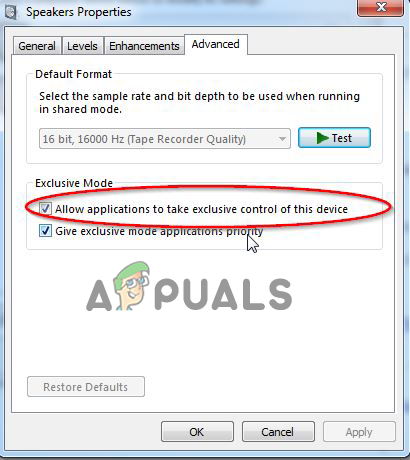
- Switch to the Advanced tab.
- In the Exclusive Mode group, deselect the Allow applications to take exclusive control of this device option.
- Click Apply to save your changes and then click OK to return to the Sound dialog.
Also Read:How to Fix Blue Yeti Microphone Not Detected or Recognized in Windows 10 and 11?
How to Fix an Auto-Muting Microphone on Windows 11
Note
You can implement the solutions discussed above to see if it works. if it doesn’t follow the solutions below.
Fix 1: Reinstall or update the sound drivers
The correct sound drivers are required for the best audio experience on a Windows 10 PC.
If the sound driver is corrupted by malware, damaged by manual modification, or has been rendered obsolete after an upgrade, you should update it to restore stable sound functionality.
Otherwise, be prepared to deal with annoying sound bugs, such as the microphone muting itself at random.
If the sound driver is old, an update is required. If the driver is already up to date but is buggy, reinstalling it can fix the issue. You can update your sound card driver or reinstall it using Device Manager.
Let’s show you how:
To reinstall the sound card driver, do the following:
- Press the
Windows key + Xcombination to bring up the Quick Access menu on Windows 10 or Windows 11.
- Select Device Manager.
- In Device Manager, locate “Sound, video and game controllers” and click it to expand its contents.
- Double-click your sound device to open its Properties dialog.
- Switch to the Driver tab.
- Click the Uninstall Device button.
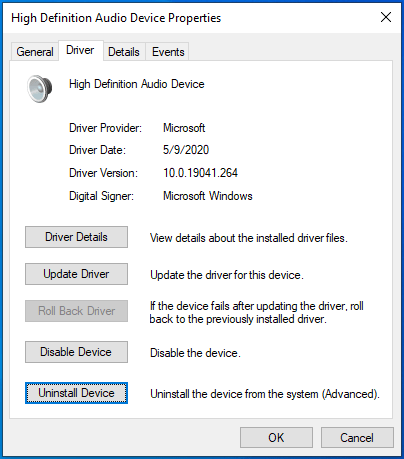
- When you get the warning prompt that you’re about to uninstall your sound device driver from your system, click Uninstall to confirm your action.
- Reboot your computer, and the sound driver will be automatically reinstalled.
Update your sound card driver if it’s old
If the sound card driver is old and requires an update, follow these steps:
- Right-click the Windows icon on the taskbar and select Device Manager.
- The Device Manager app will open.
- Locate the Sound, video and game controllers option and expand it.
- Right-click your sound device and select Update driver.
- Choose the Search automatically for updated driver software option.
Note
On the latest Windows 10 and Windows 11 versions, this option is named Search automatically for drivers.
- Windows will attempt to locate and download the latest driver for the device. If it can’t find any, it will inform you that the best drivers for your device are already installed.
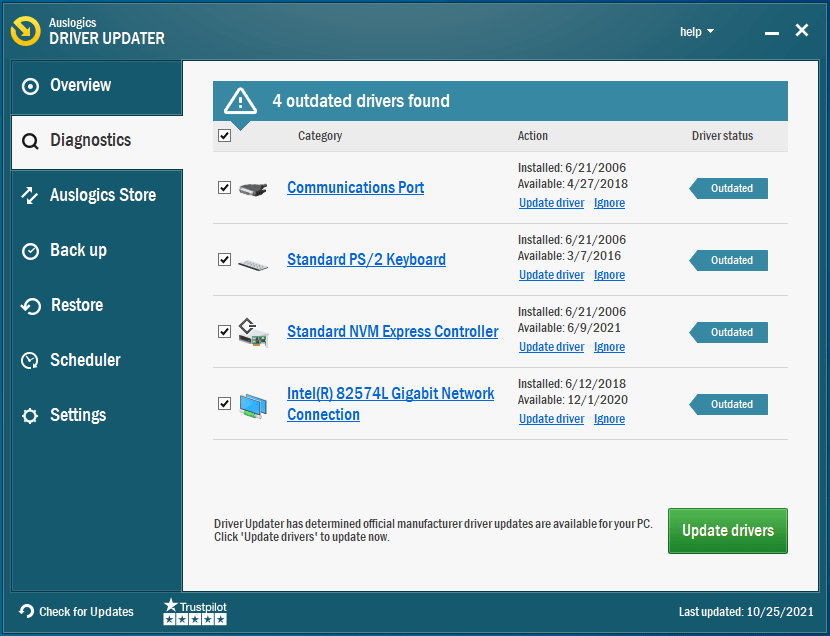
Use Auslogics Driver Updater to automatically update drivers
You can simplify the process of updating your sound drivers by using a reputable driver updater like Auslogics Driver Updater.
This tool will scan your PC and present a comprehensive list of devices with obsolete drivers.
You can update an individual driver by clicking the Update button or, if you have a premium license, bring all your device drivers up to date with a single click.
Download Auslogics Driver Updater
Prevent hardware errors and ensure problem-free device operation with this advanced tool that detects outdated drivers and safely gets them updated.
Related
: Auslogics Driver Updater: Update Your Drivers in One Click!
Fix 2: Use another format for the microphone
It is possible that the microphone malfunctions because the wrong audio format is in use. You can try other sound formats and stick with the one that stops further self-muting.
If you don’t know how to change the sound format, follow these steps:
- Right-click the icon and select Sound settings then scroll down the Sound window and click the More sound settings link.
- The Sound dialog will open.
- Make sure you’re on the Recording tab.
- Double-click your current sound device to open its Properties dialog.
- Switch to the Advanced tab.
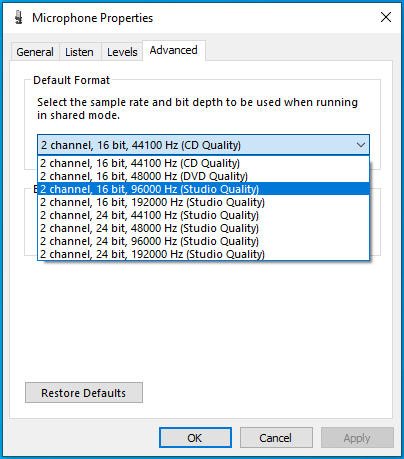
- Click the drop-down arrow under Default format and choose an option different from the one currently in use. The option you choose should be a 16-bit option.
- Click Apply to save your changes and then OK to close the dialog.
Your PC’s mic should be working fine now.
Wrapping Up
When a PC microphone keeps muting itself, it isn’t funny to the affected user. This type of bug interrupts conversations over VoIP software, like Skype, and should be nipped in the bud.
This article presents a few methods to stop the self-muting issue from happening again. It explains how to fix a microphone that keeps turning itself down using the correct steps.
Hopefully, this article has helped you to regain full control of your internal or connected microphone. We’d like to hear about your experience. Hit us up in the comments.
FAQ
How do I fix my microphone muted on my desktop?
If your desktop microphone is muted, you can unmute it by looking for the physical mute button or, if it doesn’t apply, turning on the microphone itself. Make sure the microphone is at the right volume and that the mute feature is turned off. If the microphone lacks physical mute controls, make sure it’s not muted or turned down by checking the sound settings in your operating system. Mice mute problems on your desktop can also be fixed by updating the audio drivers, looking for software conflicts, and adjusting the system-wide mute settings.
How do I fix mic muted by system settings in Windows 11?
You can resolve the issue of your microphone being muted in Windows 11 by modifying the operating system’s sound settings. To access the Sound settings, simply perform a right-click on the taskbar’s volume icon and choose “Open Sound settings.” Make sure the right microphone device is set as the default recording device by selecting it under the Input tab. Look for any volume or mute settings that might be interfering with the microphone and make the necessary adjustments. To ensure that the microphone works properly, make sure that any system-wide mute settings, such as those found in communication or conference applications, are disabled.
Why does my mic keep muting itself Windows 10?
There are several reasons why your microphone can keep muting itself, including wrong settings, program incompatibilities, or hardware problems. Check and make any necessary adjustments to any third-party programs or applications that might be in charge of the microphone settings. If the microphone is muting itself unintentionally, you can try to fix any compatibility issues by updating the audio drivers using Device Manager or the manufacturer’s website.
Microphone adjusting on its own can cause sudden volume changes, leading to uneven audio during calls or recordings. This usually happens when programs like Skype, Steam, or other communication software change the microphone volume automatically without user input. The primary reason is the “Allow applications to take exclusive control of this device” setting being turned on, which lets apps change volume levels on their own.
Other reasons include tools like Skype that have their own auto-adjustment features, like automatic gain control.
Now that you know the causes, lets discuss the solutions.
1. Stop Skype from Automatically Adjusting the Microphone (if applicable)
When Skype controls your microphone, it often changes the volume automatically based on background noise or call quality, causing uneven audio levels. By turning off Skype’s automatic gain control, you stop it from changing your microphone settings. This keeps your audio levels steady, providing stable input for all apps.
- Open Skype UWP, click the action button in the top-left corner, and then click the three-dot icon. From the context menu, click on Settings.

Accessing the settings menu of Skype Note: For the desktop version of Skype, use the ribbon bar at the top to go to Tools > Options.
- In the Settings tab, select Audio & Video from the menu on the left.
- In the Audio & Video tab, scroll down to the Microphone section and uncheck Automatically adjust microphone settings.

Preventing Skype from adjusting the microphone Note: For the desktop version of Skype, go to Audio Settings and uncheck Automatically adjust microphone settings.
- Use your computer normally to check if the microphone settings still auto-adjust. If the issue persists, proceed to the next method below.

2. Stop Steam from Automatically Adjusting the Microphone Level (if applicable)
If you notice your microphone volume changing on its own, stopping Steam from adjusting it might fix the problem. Steam’s voice chat has a feature that automatically changes microphone volume levels during conversations. By turning off this feature, Steam won’t mess with your computer’s audio settings, helping to keep the volume steady during games or voice chats.
- Open the Steam client, log in, and click the Friends & Chat icon at the bottom-right corner.
- In the Friends & Chat window, click the gear icon in the top-right corner to open Settings.
- In Friends List Settings, select the Voice tab from the left menu, then go to the right pane, and scroll down to click Show Advanced Settings at the bottom.
- In the Advanced settings menu, turn off the toggle for Automatic volume/gain control.
- Restart Steam and check if the automatic volume adjustments continue.
If this method wasn’t applicable to your current situation, move down to the next method below.
3. Stop Applications From Taking Exclusive Control of the Microphone
When Skype or Steam controls your microphone, it can change the volume automatically, leading to unpredictable audio levels during calls or recordings. By turning off these apps’ ability to change microphone settings, you can keep the volume stable.
- Press Windows + R, type “mmsys.cpl“, and press Enter.

- Click the Recording tab.
- Select the microphone you’re having issues with, and click Properties.

- Go to the Advanced tab and uncheck Allow applications to take exclusive control of this device.

Click on Allow applications to take exclusive control of this device. - Click Apply to save the changes, then restart your computer and check if the issue is resolved at the next startup.

4. Change the Microphone Value Manually
Manually setting your microphone’s volume gives you control over its sensitivity, stopping other apps from changing the settings. This avoids the software adjustments that often make the volume change automatically when apps like Skype or Zoom try to fix background noise.
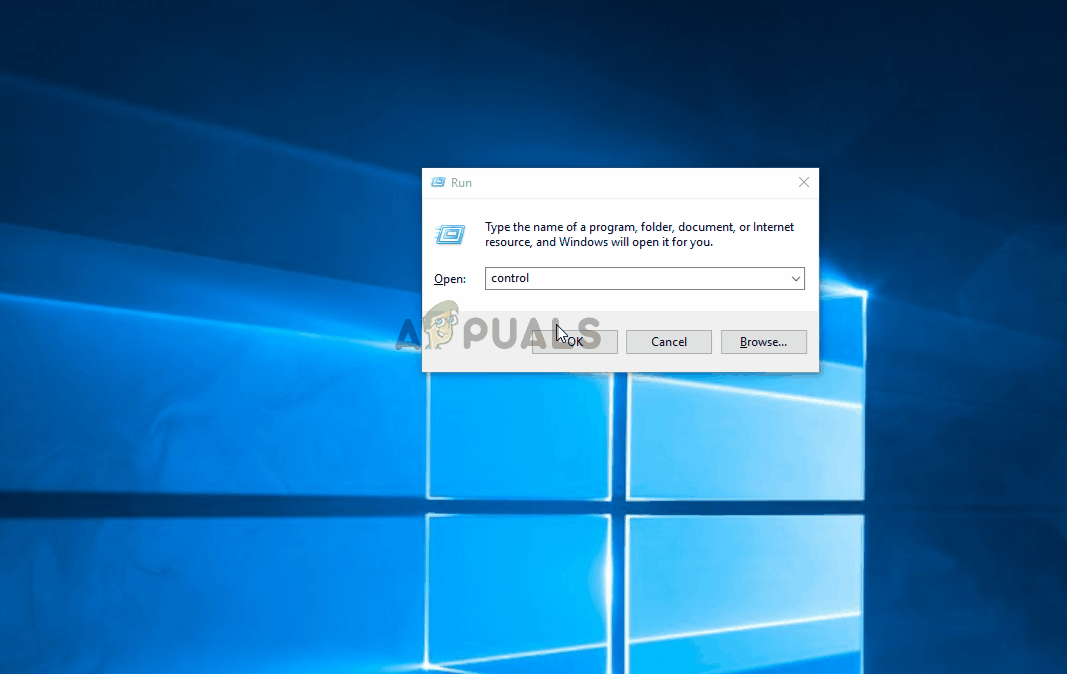
- Press Windows + R to open a Run dialog box. Type “control” in the text box and press Enter to open the Control Panel.
- In the Control Panel, use the search function in the top-right corner to find ‘sound’.
- Click on Sound from the search results.
- In the Sound window, select the Recording tab, choose the active microphone or headset, and click Properties.
- In the Properties window, go to the Levels tab and adjust the microphone level using the slider. Click Apply to save the changes.
- This should keep the microphone level steady, regardless of any changes third-party programs try to make in the future.
If this procedure wasn’t applicable to your current situation or you’re looking for a different approach, move down to the next method below.
5. Update your Microphone Driver
If your drivers are outdated, your microphone may not work properly with the system. Updating the driver ensures that your microphone functions smoothly with Windows, fixing any compatibility issues that can cause problems like auto-adjusting volume.
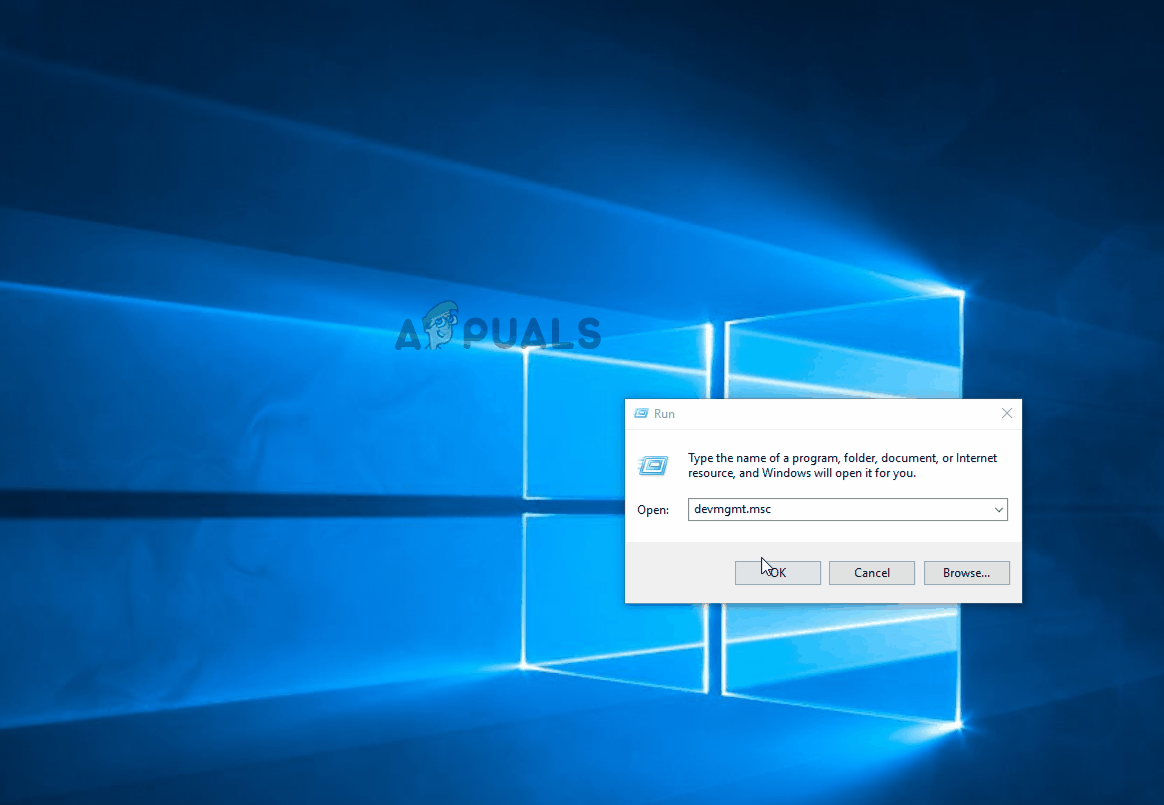
- Press Windows key + R to open a Run dialog box. Type “devmgmt.msc” and press Enter to open Device Manager.
- In Device Manager, expand the Sound, video, and game controllers section.
- Right-click the recording device you’re having issues with and select Properties from the context menu.
- In the properties screen, go to the Driver tab and click Update Driver.
- Click Search automatically for updated driver software and wait to see if a new driver is found.
- Once complete, restart your computer and check if the microphone level adjustments persist. If they do, or if no new driver is found, proceed to the next steps.
- Repeat steps 1 to 3 to return to the Driver tab of your recording device, but click Uninstall Device instead of Update Driver. Confirm the uninstallation and wait for it to finish.
- Restart your computer to allow Windows Update to install a clean driver.
- After the restart, check if the microphone auto adjustments continue.
6. Perform a Clean Boot
By turning off unnecessary startup programs and services, a clean boot helps find out if a background process is changing your microphone’s settings. Since volume changes can be caused by third-party software, this step finds the problem by running only important services. Once the system is steady with a clean boot, it’s easier to find the app that’s adjusting the microphone settings.
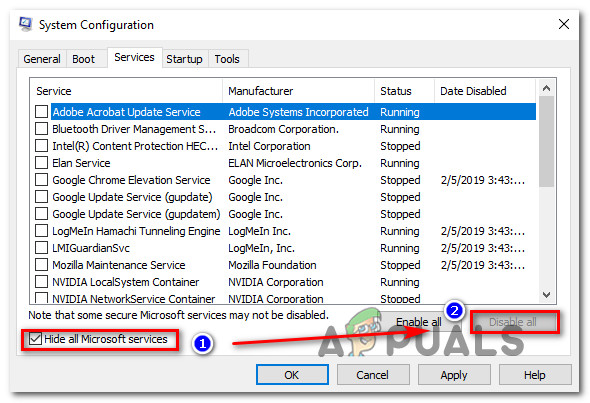
- Press Windows + R, type ‘msconfig‘, and hit Enter.
Running MSCONFIG from a Run dialog box - Navigate to the Services tab.
- Check Hide all Microsoft services.
- Click Disable all.

Disabling all Windows services
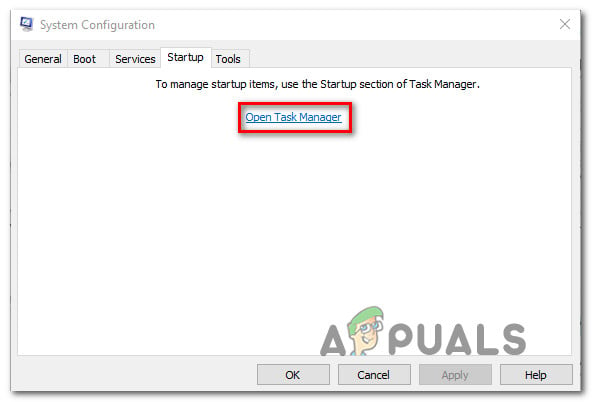
- Click Apply, then go to the Startup tab and click Open Task Manager.

Opening the Task Manager via System Configuration - Select each service individually and click Disable to stop it from running at startup.

Disabling Apps from Startup - Restart your PC.
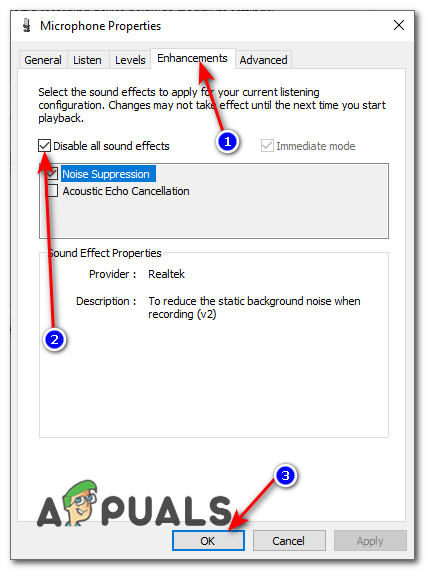
7. Disable Microphone Enhancements
Audio enhancements, meant to improve sound, can sometimes cause problems with the microphone, like changing its volume on its own. Turning off these enhancements lets the microphone work naturally, without extra processing that might clash with app settings or how the system works.
- Press Windows + R to open the Run dialog.
- Type mmsys.cpl and press Enter.

Opening Microphone Properties - Go to the Recording tab, right-click your microphone, and select Properties.

Opening the Microphone properties - Select the Enhancements tab in the Microphone Properties.
- Check the Disable all enhancements option.

Disabling all microphone enhancements
8. Edit Registry
Sometimes, the issue lies with the registry configuration of the microphone level. Windows might have stored a value in the registry for your microphone level which might receive precedence over the manual value that you select from the Sound Control Panel. You can adjust this value by:
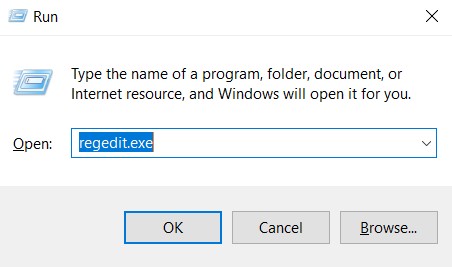
- Press Windows + R to open the run prompt. Type regedit and press Enter.

regedit.exe - Navigate to the following location:
HKEY_CURRENT_USER\Software\Microsoft\Speech\RecoProfiles\Tokens\{95CF724E-B3B5-4D94-A4FB-36AE77A88FE0}\{DAC9F469-0C67-4643-9258-87EC128C5941}\Volume - Double click on the following value:
HKEY_LOCAL_MACHINE\SOFTWARE\Microsoft\Speech\AudioInput\TokenEnums\MMAudioIn\{0.0.1.00000000}.{e4e24557-c9f8-46f6-8486-50981fcf3cc5} - Set its value to the Microphone level that you want. For example, 8888 for 88% and 2222 for 22%.
- Check to see if the issue persists.
Kevin Arrows
Kevin Arrows is a highly experienced and knowledgeable technology specialist with over a decade of industry experience. He holds a Microsoft Certified Technology Specialist (MCTS) certification and has a deep passion for staying up-to-date on the latest tech developments. Kevin has written extensively on a wide range of tech-related topics, showcasing his expertise and knowledge in areas such as software development, cybersecurity, and cloud computing. His contributions to the tech field have been widely recognized and respected by his peers, and he is highly regarded for his ability to explain complex technical concepts in a clear and concise manner.
Уровни микрофона постоянно меняются — как это исправить? [Решено]
Иногда нам приходится сталкиваться с проблемами со звуком в Windows 10. Одна из этих проблем — случайное изменение уровней микрофона без каких-либо внешних воздействий. Это очень раздражает и является распространенной проблемой, о которой сообщают пользователи Windows 10. Причины и исправления обсуждаются ниже, чтобы помочь вам защитить компьютер от этой ошибки.
Что вызывает постоянное изменение уровня микрофона?
Есть несколько причин, по которым громкость вашего микрофона может снижаться. Это включает аппаратный или программный сбой, поврежденный драйвер, неправильные настройки, дефектный порт, а также заражение вредоносным ПО. Ниже перечислены некоторые распространенные причины, чтобы вы знали об этой проблеме.
Исправлена ошибка «Уровень микрофона в Windows 10 постоянно меняется»
Если уровень вашего микрофона продолжает меняться без какого-либо влияния извне, не паникуйте! Некоторые исправления перечислены ниже. Если вы не знаете, как остановить автоматическую настройку микрофона в Windows 10, выполните следующие действия, чтобы легко решить проблему.
Решение 1. Проверьте подключенное аудиоустройство
Вы должны начать с проверки ваших аппаратных компонентов. Это может быть ваш порт USB или разъем для внешнего микрофона, который вызывает ошибку. Поэтому попробуйте изменить порт, к которому подключен микрофон, или вы можете подключить его к другому компьютеру. Этот процесс сообщит вам о любой неисправности в USB-порту или внешнем микрофоне.
Как сообщает пользователь, в микрофоне Windows 10 уровень постоянно меняется, когда он подключен к USB 3.0, но после подключения к USB-порту 2.0 проблема устранена навсегда.
Если вы заметили какие-либо проблемы с USB-портом или внешним микрофоном, замените их без колебаний.
Решение 2. Запустите средство устранения неполадок аудио
Вы можете попробовать средство устранения неполадок Windows, чтобы остановить автоматическую настройку микрофона в Windows 10. Чтобы запустить средство устранения неполадок, выполните следующие действия:
После завершения устранения неполадок вы получите отчет, который покажет ошибки в вашей системе. Если есть какие-либо проблемы, он покажет вам доступные решения, которые вы также можете использовать для исправления ошибки автоматической настройки громкости микрофона.
Если ошибка все еще сохраняется, вы можете попробовать следующие исправления.
Решение 3. Измените разрешение на управление микрофоном для других приложений
Некоторые сторонние приложения имеют разрешение на управление микрофоном, который включен по умолчанию. Это может быть причиной того, что уровни вашего микрофона постоянно меняются.
Чтобы решить эту проблему, вам придется отключить разрешение для этих сторонних приложений. Чтобы изменить его, выполните следующие действия:
Ваш микрофон теперь не подвержен влиянию сторонних приложений, а также, возможно, решил проблему с изменением уровня вашего микрофона.
Решение 4. Переустановите драйвер микрофона
Если звук все еще меняется, вы можете попробовать переустановить драйвер микрофона. Вы можете сделать это либо автоматически, либо вручную. Оба процесса обсуждаются ниже:
Решение 5. Удалите вредоносные программы из вашей системы
Иногда громкость микрофона продолжает падать из-за заражения вредоносным ПО. Вам следует выполнить полное сканирование системы с помощью антивирусного программного обеспечения, чтобы убедиться, что система заражена вредоносным ПО. Не забудьте удалить зараженный автоматически, если он обнаружен во время сканирования. Если у вас есть путаница, посмотрите, как запустить антивирус на вашем ПК.
После удаления вредоносных программ, ваш микрофон продолжает меняться должен быть решен.
Решение 6. Исправьте проблему с реестром
Вы должны попытаться очистить реестр и удалить все лишние элементы из реестра Windows. Это может устранить ошибку. Прочтите, как исправить проблему с реестром в Windows 10.
Решение 7. Установите микрофон в качестве аудио-рекордера по умолчанию
Иногда более чем одно подключенное устройство записи звука может быть причиной случайного изменения уровня микрофона. Вы должны установить микрофон в качестве записывающего устройства по умолчанию, чтобы решить эту проблему. Для этого выполните следующие действия:
Решение 8. Выполните восстановление системы
Выполнение восстановления системы может помочь вам решить, что уровень вашего микрофона Windows 10 постоянно меняется случайным образом. Этот процесс восстановит вашу Windows до ранее сохраненной версии. Выполните следующие действия, чтобы легко выполнить восстановление системы.
Теперь ваша громкость микрофона продолжает снижаться, возможно, проблема решена.
Вывод
Теперь вы знаете причины, по которым уровни вашего микрофона постоянно меняются, и как остановить автоматическую настройку микрофона в Windows 10. Если вы нашли эту статью полезной, сообщите нам об этом, прокомментировав ниже. Все еще есть вопросы? Не стесняйтесь, сообщите нам здесь.
Источник
Как настроить микрофон на Windows 10
Пользователь персонального компьютера или ноутбука постоянно использует микрофон для работы и общения. Несмотря на то, что в ноутбуках имеется встроенный микрофон, его стараются не использовать из-за низкой чувствительности, неудобного расположения и плохого качества звука. В десктопах встроенный микрофон не предусмотрен, поэтому пользователи компьютерной техники подключают и настраивают внешний микрофон. В ноутбуках гнёзда для подключения микрофона находятся на одной из боковых сторон корпуса. У старых моделей они могут быть расположены спереди. Микрофонное гнездо имеет пластиковую окантовку розового цвета и пиктограмму со значком устройства.
На десктопе, основное гнездо для подключения микрофона вынесено на переднюю панель. Кроме того оно дублируется на задней стенке устройства. Гнёзда стандартного типа предназначены для разъёма «Мини-джек» 3,5 мм. Кроме того пользователи часто применяют USB микрофоны Windows 10. Подключить микрофон к компьютеру Windows10 можно через любой из свободных портов. Эти устройства кроме микрофона имеют встроенный цифровой интерфейс. Малогабаритные микрофоны часто объединены с видеокамерой в одно устройство. Они обладают хорошей чувствительностью, но ограниченным частотным диапазоном и предназначены для общения в интернете.
Как включить микрофон на ноутбуке Windows 10
Включение микрофона на ноутбуке Виндовс 10 выполняется в несколько последовательных шагов. Встроенный микрофон включать не нужно, так как все функции выполняет операционная система. Настройка микрофона Виндовс 10 начинается с открытия всех звуковых устройств компьютера или ноутбука. Эта функция реализуется нажатием правой клавишей мыши на значок динамика, в правой части панели задач. Далее следует включить пункт «Записывающие устройства». На вкладке будут показаны все элементы системы, используемые для записи. К компьютеру или ноутбуку могут быть подключены несколько микрофонов, включая аналоговые и USB изделия. При настройке микрофона на Windows 10 нужно выбрать только одно устройство. Включить микрофон на Виндовс 10 нужно стандартными средствами операционной системы. Они позволяют выбрать нужный микрофон, включить и настроить его. Для этого выполняются следующие действия:
Для того чтобы реализовать настройку распознавания речи русского языка нужно иметь не русифицированную, а полностью русскую версию операционной системы Windows10. Для голосового управления компьютером на английском языке используется функция Cortana, которая адаптирована только под некоторые языки. Приложение работает только со следующими языками:
Следующая строка Включить/Отключить используется для активации конкретного микрофона. Если рядом с микрофоном отсутствует зелёная галочка, значит, он может быть в списке отключенных/отсоединённых устройств. Настроить микрофон на компьютере Windows 10 нужно в следующем окне. Оно откроется после нажатия пункта «Свойства».
Свойства микрофона в Windows 10
Используя кнопку «Прослушать» можно проверить, как будет слышен голос при записи или в звуковых устройствах собеседника, при обмене голосовыми сообщениями. Для контроля нужно указать устройство, на которое будет выводиться звук, и активировать функцию воспроизведения. Затем воспроизвести несколько фраз и послушать их звучание. Как настроить громкость микрофона на Windows 10. Для того чтобы настроить чувствительность микрофона на Windows 10 нужно активировать кнопку «Уровни». Там расположены два ползунковых регуляторауровня микрофона Виндовс10. Верхний отвечает за усиление микрофонного каскада, а нижний движок регулирует общее усиление. Чем больше вправо будут сдвинуты ползунки, тем больший уровень звука будет в колонках, и выше уровень сигнала при записи.
Как правильно настроить микрофон на ноутбуке на Windows 10. Окна управления уровнем записи и громкостью микрофона на десктопе и ноутбуке совершенно одинаковые, поэтому никаких специальных регулировок для компактных устройств не предусмотрено.Дополнительная настройка звука микрофона Windows 10 осуществляется во вкладке«Дополнительно». В окне можно выбрать частоту дискретизации.
На выбор предлагаются два режима. Один из них, с частотой 48 кГц, соответствует качеству записи DVD. Другой режим, с частотой 44,1 кГц аналогичен качеству записи CD диска. Чем выше частота, тем выше качество звучания, но при записи, такие файлы занимают больше места на жёстком диске и других носителях. Кроме уровня микрофона Windows 10 и выбора частоты на этой вкладке можно включить или запретить монопольный режим. Если он включен, то конкретные программы монополизируют микрофонный канал и другие программы не могут его использовать. Иногда нельзя включить микрофон на компьютере Windows 10. Начинается поиск неисправности, но микрофон не работает из-за включенного монопольного режима. В пользовательских настройках этого окна имеется строка «Улучшения», которая позволяет выполнить некоторые улучшения микрофона Windows 10. После нажатия на эту строку отрывается список следующих эффектов:
При включенном режиме «Удаление постоянной составляющей», входной сигнал смещается по уровню до оптимальной величины. Часто при использовании микрофона, в процессе записи и общения с собеседником возникает эффект реверберации или эха. Особенно это заметно, когда помещение больших размеров и «гулкое». В этом случае звук многократно отражается от стен и потолка, что негативно влияет на разборчивость звука. Включенный режим «Подавление эхо» автоматически гасит эффект отражённого сигнала. Включить шумоподавление для микрофона Windows 10 можно, нажав соответствующую кнопку.Этими настройками заканчиваются штатные возможности операционной системы Windows.
Как подключить микрофон к компьютеруили ноутбуку Windows 10
Стационарный компьютер оборудован двумя микрофонными разъёмами, один из которых находится на задней стенке устройства, а другой, для удобства пользователей, выведен на переднюю панель. Привключении микрофона на компьютере Виндовс 10 может возникнуть ситуация, когда микрофон с задней панели работает, а с передней нет. Проблема может заключаться в том, что гнёзда на передней панели компьютера подключаются к материнской плате отдельным разъёмом, и он может быть снят с посадочного места. В этом случае нужно открыть доступ к материнской плате. Стационарный разъём обозначается «AUDIO», «HD_AUDIO» или «AC’97». Аналогичные обозначения имеются и на съёмной части разъёма. Обычно достаточно только установить разъём на место и микрофон, подключенный к гнезду на передней панели, начинает работать. Иногда может потребоваться включение и настройка микрофона Win 10.
Настройка микрофона на компьютере и ноутбуке на Windows 10
Установить микрофон на Виндовс 10, записать звук с микрофона и прослушать то, что получилось, используя одну из встроенных функций операционной системы. Для этого нужно нажать кнопку «Пуск», далее строку «Все программы». В открывшемся списке выбрать пункт «Стандартные».
После включения функции «Запись голоса», откроется рекордер, где имеются значки «Стоп» и «Воспроизведение» в виде треугольника. После записи фрагмента его можно прослушать и внести необходимые коррективы по уровню записи и нужным эффектам. Если микрофон на Windows 10 установлен и отрегулирован по уровню, но записи не происходит, нужно попробовать обновить драйверы звука. Для этого, одновременным нажатием клавиш «Win+X», открыть список, где имеется строка «Диспетчер устройств».
Затем открывается пункт «Аудио входы и аудио выходы». В контекстном меню выбирается действие «Обновить драйверы». Поиск и установку программного обеспечения операционная система выполняет самостоятельно. Как настроить микрофон на ПК Windows 10 с помощью специальных программ. Существуют специальные редакторы звука, позволяющие управлять микрофоном и подключать в процессе записи различные эффекты.
Программы имеют доступный и понятный интерфейс. Самая простая программа это «Free MP3 Sound Recorder». Она скачивается бесплатно и имеет минимальное количество органов управления. «Sony Sound Forge» представляет собой профессиональный звуковой редактор. Она позволяет работать со звуком на студийном уровне.
Источник
Как остановить микрофон от автоматической настройки Windows 10
СОВЕТУЕМ: Нажмите здесь, чтобы исправить ошибки Windows и оптимизировать производительность системы
Несколько пользователей обращались к нам с вопросами после того, как их все больше раздражал тот факт, что их микрофон автоматически настраивается без какого-либо вмешательства пользователя. Большинство затронутых пользователей сообщают, что уровни микрофона либо повышаются, либо понижаются без явного срабатывания. Сообщается, что проблема возникает с несколькими приложениями (встроенными или сторонними).
Уровень микрофона автоматически регулируется в Windows 10
Что вызывает автоматическую настройку уровней микрофона в Windows 10?
Мы исследовали эту конкретную проблему, рассматривая различные пользовательские отчеты и стратегии исправления, которые обычно используются для решения этой конкретной проблемы в Windows 10. Как выясняется, существует несколько различных виновников, которые могут вызвать эту проблему:
Если вы в настоящее время пытаетесь устранить эту ошибку, эта статья предоставит вам несколько различных шагов по устранению неполадок. Ниже вы найдете коллекцию методов, которые другие пользователи в аналогичном сценарии успешно использовали для решения проблемы с микрофоном в Windows 10. Каждое из возможных исправлений, представленных ниже, подтверждается как эффективный по крайней мере одним уязвимым пользователем.
Для достижения наилучших результатов мы рекомендуем вам следовать методам в том порядке, в котором они представлены, поскольку мы упорядочили их по эффективности и строгости. Один из них должен решить проблему независимо от виновника, который ее вызвал.
Способ 1. Запрет Skype для автоматической настройки микрофона (если применимо)
Если у вас есть привычка держать Skype открытым большую часть времени, есть шанс, что VoIP-клиент на самом деле регулирует уровни вашего микрофона, не сообщая вам. Оказывается, Skype настроен по умолчанию так, что ему разрешено изменять громкость подключенных микрофонов. Это происходит как с настольной, так и с UWP-версией Skype.
Несколько затронутых пользователей сообщили, что им удалось решить проблему на неопределенный срок путем доступа к настройкам Skype и отключения возможности клиента регулировать уровень микрофона. Вот краткое руководство о том, как это сделать:
Доступ к меню настроек Skype
Запрет скайпу от настройки микрофона
Метод 2: Предотвращение автоматической настройки Steam уровня микрофона (если применимо)
Вот краткое руководство по запрету Steam автоматически регулировать уровень микрофона через окно списка друзей:
Предотвращение автоматической настройки Steam уровней микрофона в Steam
Если этот метод не применим к вашей текущей ситуации, перейдите к следующему способу ниже.
Метод 3: Предотвращение получения приложениями эксклюзивного контроля над микрофоном
Несколько затронутых пользователей сообщили, что им удалось решить проблему после повторной настройки параметров микрофона, чтобы ни одно приложение не могло получить эксклюзивный контроль над устройством. Эту процедуру довольно легко повторить, и она эффективно отключает любое вмешательство третьей стороны, которое может привести к автоматической настройке уровня микрофона.
Но имейте в виду, что эта процедура может также привести к тому, что некоторые голосовые функции перестанут работать так, как задумано. Просто имейте это в виду, прежде чем реализовывать это, и в случае, если некоторые функциональные возможности затронуты, перепроектируйте процедуру ниже:
Предотвращение получения приложениями эксклюзивного контроля над записывающим устройством
Если проблема все еще не решена, перейдите к следующему способу ниже.
Способ 4: изменение значения микрофона вручную
Если вы ищете быстрое решение, вы, вероятно, можете отменить все, что автоматически регулирует уровень вашего микрофона, установив значение по умолчанию для вашего уровня микрофона через панель управления. Как сообщают несколько пользователей, эта процедура может переопределить множество изменений уровня, которые инициируются сторонними приложениями.
Но имейте в виду, что эта процедура не позволит вам точно определить реальную причину проблемы и переопределит любой уровень микрофона, ранее установленный большинством сторонних приложений.
Вот краткое руководство по изменению значения микрофона вручную, чтобы исправить автоматическую настройку микрофона в Windows 10:
Регулировка значения микрофона вручную (через вкладку «Запись»)
Если эта процедура не применима к вашей текущей ситуации или вы ищете другой подход, перейдите к следующему способу ниже.
Метод 5: Обновление драйвера вашего микрофона
Драйверы вашего микрофона также могут быть ответственны за несоответствия уровней. Вы также можете решить проблему, обновив драйверы микрофона или удалив текущий драйвер, заставив Windows установить новый драйвер записывающего устройства.
Несколько пострадавших пользователей сообщили, что эта процедура решила проблему для них на неопределенный срок. Вот краткое руководство по использованию диспетчера устройств для обновления драйвера микрофона:
Если вы все еще сталкиваетесь с той же проблемой, перейдите к следующему способу ниже.
Метод 6: удаление вредоносной инфекции
Как выясняется, эта конкретная проблема также может быть вызвана вредоносным ПО, способным отключить микрофон или автоматически настроить уровень. Несколько пострадавших пользователей сообщили, что Защитнику Windows и нескольким другим сторонним клиентам не удалось обнаружить вредоносное ПО во время сканирования безопасности.
Однако большинство пользователей, столкнувшихся с этой проблемой, сообщили, что им удалось идентифицировать, изолировать и изолировать вредоносное ПО с помощью Malwarebytes. В большинстве случаев вредоносная программа пробивалась в систему из приложения или расширения. Если вы считаете, что проблема может быть вызвана вредоносным ПО, следуйте этой статье ( здесь ), чтобы узнать, как установить и выполнить глубокое сканирование с помощью вредоносных программ.
Выполнение сканирования с помощью Malwarebytes
Если проверка на вирусы не выявила никаких признаков вирусной инфекции, перейдите к следующим методам ниже.
Метод 7: Выполнение чистой загрузки
Если вы зашли так далеко безрезультатно, возможно, что проблема вызвана сторонним приложением, имеющим доступ администратора. Если виновник не очевиден для вас, вы можете проверить, вызывает ли проблема стороннее приложение, выполнив чистую загрузку.
Несколько затронутых пользователей подтвердили, что эта процедура позволила им подтвердить, что проблема была вызвана вмешательством стороннего приложения. Как только им удалось подтвердить, что приложение вызывало автоматическую настройку микрофона, они устранили всех потенциальных виновников, пока им не удалось изолировать приложение, которое выдало ошибку.
Вот краткое руководство о том, как выполнить чистую загрузку, чтобы определить, какое приложение вызывает автоматическую настройку микрофона:
Источник
Как исправить: Микрофон автоматически настраивается в Windows 10
В Windows многих очень раздражает проблемы с аудиозаписью может возникнуть. Многие пользователи задают нам вопросы после того, как им становится все скучнее, что их микрофон автоматически настраивается без вмешательства пользователя. Большинство заинтересованных пользователей сообщают, что уровень микрофона увеличивается или уменьшается без видимых триггеров. Сообщается, что проблема возникает с несколькими приложениями (встроенными или сторонними).
Если в настоящее время у вас возникают проблемы с решением этой проблемы, в этой статье предлагается несколько шагов для этого. Ниже приведен набор методов, которые другие пользователи успешно использовали в аналогичном сценарии для решения проблемы с микрофоном в Windows 10. Каждое из возможных исправлений, перечисленных ниже, проверяется по крайней мере одним заинтересованным пользователем.
Для достижения наилучших результатов мы рекомендуем вам следовать методам в том порядке, в котором они представлены, поскольку мы оценили их в соответствии с их эффективностью и серьезностью. Один из них обязан решить проблему, кем бы ни был автор.
Использование аудио устранения неполадок

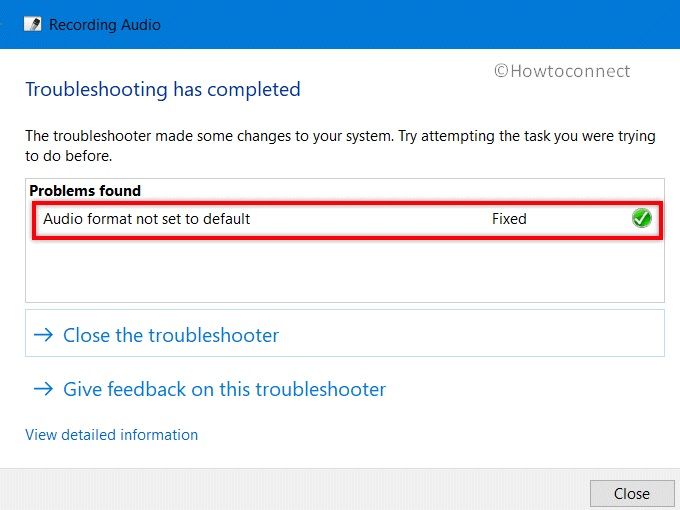
Вы можете попробовать программное обеспечение Windows для решения проблем. Microsoft интегрировала средство устранения неполадок для различных системных проблем в Windows, и средство устранения неполадок для проблем со звуком и записью является одним из них. Вот что вам нужно сделать для устранения неполадок со звуком в Windows:
Перейдите в Поиск, введите Устранение неполадок и откройте Устранение неполадок.
В окне устранения неполадок на левой панели перейдите в раздел «Оборудование и устройства» и нажмите «Запустить устранение неполадок».
Следуйте инструкциям на экране и позвольте мастеру сканировать ваш компьютер.
Обновление за апрель 2021 года:
Теперь мы рекомендуем использовать этот инструмент для вашей ошибки. Кроме того, этот инструмент исправляет распространенные компьютерные ошибки, защищает вас от потери файлов, вредоносных программ, сбоев оборудования и оптимизирует ваш компьютер для максимальной производительности. Вы можете быстро исправить проблемы с вашим ПК и предотвратить появление других программ с этим программным обеспечением:
Проверьте настройки на вкладке «Связь».
Включите усилитель микрофона вручную.
Проверить драйверы вашего микрофона.
Используйте редактор реестра


CCNA, веб-разработчик, ПК для устранения неполадок
Я компьютерный энтузиаст и практикующий ИТ-специалист. У меня за плечами многолетний опыт работы в области компьютерного программирования, устранения неисправностей и ремонта оборудования. Я специализируюсь на веб-разработке и дизайне баз данных. У меня также есть сертификат CCNA для проектирования сетей и устранения неполадок.
Источник