
Всем привет, с вами Искандер Рустамов, младший системный администратор Cloud4Y. Сегодня мы будем покорять развертывание центра сертификации (ЦС).
Из-за сложной геополитической обстановки резко усилился процесс импортозамещения, появилась необходимость в выстраивании инфраструктуры на базе государственных требований к решениям в области информационной безопасности. Одним из таких решений является организация доступа клиентов к веб-ресурсам через портал nGate по защищённому TLS соединению с использованием шифрования по ГОСТ криптопровайдера «КриптоПро». Для этого необходим собственный центр сертификации.
В данной статье мы рассмотрим установку Standalone Center Authority на базе Windows Server 2019. Если вам будет интересно, могу описать процесс привязки нашего центра сертификации к порталу nGate (спойлер: на самом деле там нет ничего сложного).
Вводные данные
КриптоПро NGate — это универсальное высокопроизводительное средство криптографической защиты сетевого трафика, объединяющее в себе функционал:
-
TLS-сервера доступа к веб-сайтам;
-
Сервера портального доступа;
-
VPN-сервера.
NGate обладает широкими возможностями по управлению доступом удалённых пользователей как с обеспечением строгой многофакторной аутентификации, так и прозрачно, обеспечивая при этом гибкое разграничение прав доступа к ресурсам. КриптоПро NGate реализует российские криптографические алгоритмы, сертифицирован по требованиям к СКЗИ, имеет сертификаты ФСБ России по классам КС1, КС2 и КС3 и может использоваться для криптографической защиты конфиденциальной информации, в том числе персональных данных, в соответствии с требованиями российского законодательства по информационной безопасности.
Кроме того, NGate:
-
Снижает нагрузку по обработке TLS-соединений с веб-серверов, позволяя им сосредоточиться на выполнении своих основных задач;
-
Исключает необходимость установки на каждом веб-сервере отдельного СКЗИ и проведения исследований по оценке влияния ПО веб-серверов на СКЗИ.
Процесс настройки
Ранее я не сталкивался с центрами сертификациями. Поскольку ОС Windows Server мне ближе, решил развернуть ЦС с использованием Server Manager. Разворачивать контроллер домена не нужно, так как сертификаты будут выдаваться внешним пользователям. Соответственно, можно обойтись «автономным» центром сертификации, подробнее о нём расскажу позже.
Перед развертыванием центра сертификации необходимо:
-
Установить СКЗИ КриптоПро CSP 5.0.12330:
-
Установить КриптоПро ЭЦП Browser plug-in;
Инсталляцию производим через «Дополнительные опции»
-
Выбираем язык установки, уровень защиты КС1 (другие уровни защиты требуют дополнительных аппаратных средств защиты);
-
В разделе «Установка компонентов» проверяем, что добавлен «Криптопровайдер уровня ядра ОС»; (рис. 1)

Криптопровайдер уровня ядра ОС необходим для работы криптопровайдера
в службах и ядре Windows.
3. В следующем окне оставляем пункты:
-
Зарегистрировать считыватель «Реестр» (позволит сохранять контейнеры ключей в реестр);
-
Усиленный контроль использования ключей;
-
Не разрешать интерактивные сервисы Windows;
4. Также «КриптоПро» предложит добавить сертификаты своих центров сертификации;
5. Устанавливаем, перезагружаемся.
Установка центра сертификации (Standalone CA Windows Server 2019)
Непосредственно перед самой установкой коротко объясню особенности Standalone CA:
-
Не интегрирован с Active Directory (а он нам и не нужен);
-
Публикация сертификатов происходит через запрос на WEB-сайте. Путем автоматического или ручного подтверждения администратором ЦС (ЕМНИП, ЦС предприятия было добавлена такая возможность, не проверял её работу);
-
Пользователь сам вводит идентификационную информацию во время запроса сертификата;
-
Не поддерживает шаблоны сертификатов (из-за этого всплывут некоторые моменты, которые раскрою в процессе развертывания).
Начинаем:
1. Измените имя компьютера до установки роли, после это будет сделать невозможно. «Далее (Next)» (рис.2):
2. Добавляем роль в «Диспетчере серверов» (Server Manager), «Далее (Next)» (рис. 3):
")
2.1. «Установка ролей и компонентов (Add roles and features wizard)». Нажимаем «Далее (Next)» — «Далее (Next)»;
2.2. «Тип установки: Установка ролей и компонентов (Installation type: Role-based or features-based installation». «Далее (Next)»;
2.3. «Выбор сервера (Server selection)». В нашем случае среди предложенных будет один сервер и имя компьютера. «Далее (Next)» (рис. 4);
»")
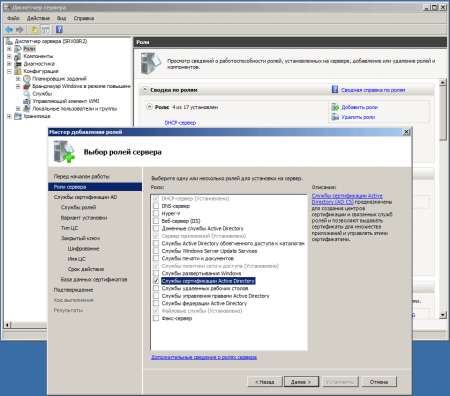
2.4. «Роли сервера (Server roles). Здесь необходимо отметить две роли: Служба сертификатов Active Directory (Certificate Services Active Directory), Веб-сервер IIS (Web-server IIS);
Во всплывающем окне перечня нажимаем «Добавить компонент (Add features)» — «Далее (Next)»;
2.5. «Компоненты (Features) оставляем как есть — «Далее (Next)» ;
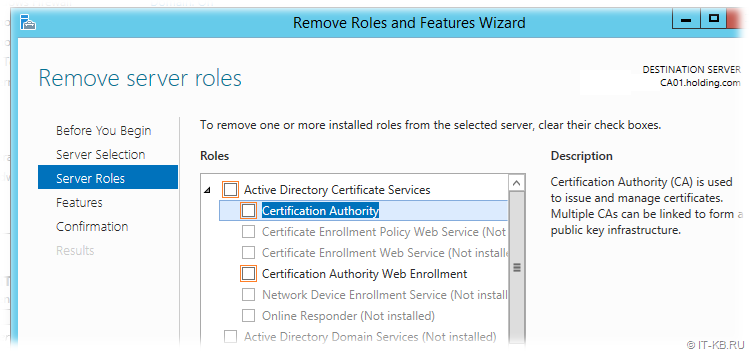
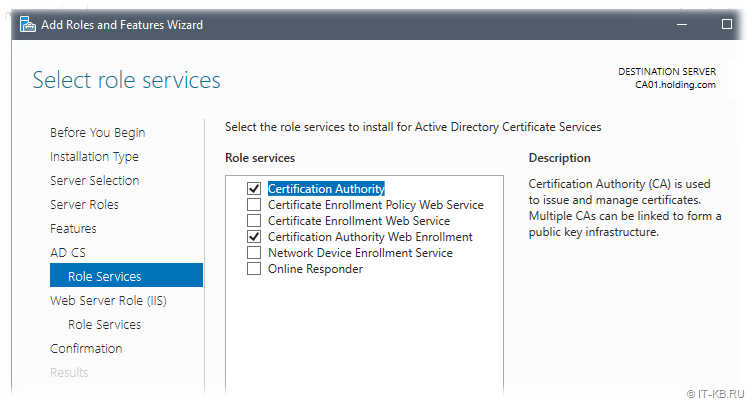
2.6. «Служба ролей (Role Services)» ЦС, необходимо выбрать:
-
«Центр сертификации (Certification Authority)»,
-
«Служба регистрации в центре сертификации через Интернет (Certification Authority Enrollment)»;
Сетевой автоответчик (Online responder) добавим уже после развертывания ЦА, в противном случае могут возникнуть проблемы.
2.7. В «Служба ролей (Role Services)» веб-сервера оставляем всё предложенное автоматически — «Далее (Next)»;
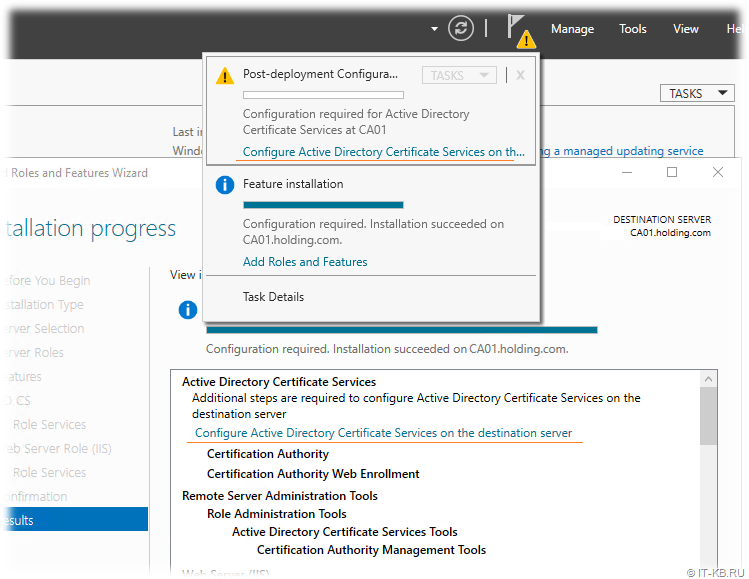
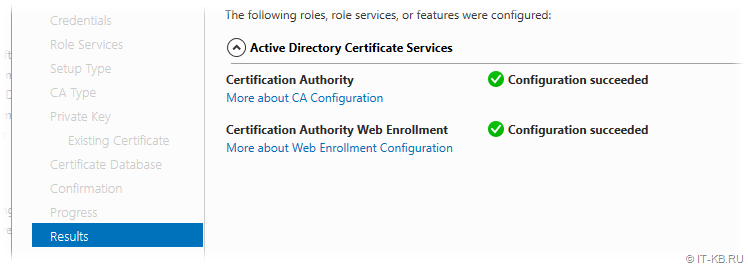
2.8. «Подтверждение (Confirmation).
На этом этапе запустится процесс установки роли.
3. После установки роли центра сертификации необходимо его настроить
(рис. 5). Выбираем:
3.1. «Настроить службы сертификатов Active Directory (Configure Active Directory-Certificate Services)

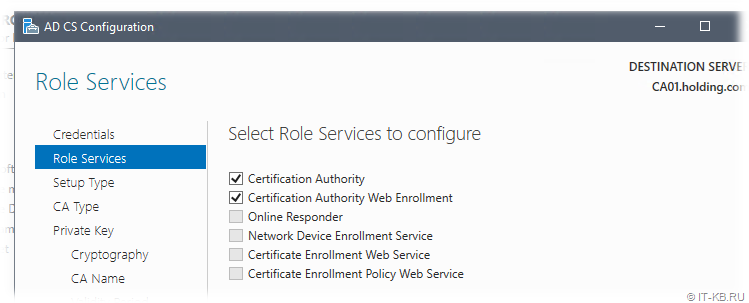
3.2. Указываем учетные данные. Так как мы развертываем Standalone центр сертификации, не нужно состоять в группе «Администраторов предприятия (Enterprise Administrators)» — «Далее (Next)»;
3.3. Выбираем установленные службы ролей для настройки (Select role services to configure) ЦС: «Центр сертификации (Certification Authority)», «Служба регистрации в центре сертификации через Интернет (Certification Authority Enrollment)»;
3.3.1. При выборе центра сертификации появится окно выбора ключевого носителя – КриптоПРО CSP, в качестве носителя для создания контейнера cngWorkAround используем хранилище ключей реестра Windows – Реестр. (рис. 6)

3.4. Указываем вариант установки ЦС (Specify the setup type of the CA):
Автономный центр сертификации (Standalone CA). «Далее (Next)»;
3.5. Указываем тип ЦС (Specify the type of CA) – Корневой ЦС (Root CA). «Далее (Next)»;
3.6. Необходимо создать закрытый ключ ЦС, чтобы он мог создавать и выдавать их клиентам. Для этого выбираем «Создать новый закрытый ключ (Create a new private key)».
В качестве поставщика службы шифрования выбираем один из трёх предложенных (не забывайте, что 2001 год уже устарел) Crypto-Pro GOST R 34.10-2012 Strong Cryptographic Service Provider с длиной 512 и открытого ключа 1024 бита. (рис.7)
И обязательно подтверждаем: «Разрешить взаимодействие с администратором, если ЦС обращается к закрытому ключу (Allow administrator interaction when the private key is accessed by the CA)»;

3.7. Укажите имя центра сертификации и суффиксы различающего имени, данные суффиксы будут отображаться в составе сертификата в графе «Издатель (Issuer)».
СN = Certificate Name, O = Organization, L = Locale, S = Street, C = Country, E = E-mail; (рис. 
3.8. Указываем необходимый «срок годности (validaty period)» корневого сертификата (в нашем случае было выбрано 15 лет). «Далее (Next)»;
3.9. Указываем расположение баз данных сертификатов (certificate database location). «Далее (Next)»;
3.10. В окне «Подтверждения (Confirmation) сверяем введённую информацию — «Настроить (Configure)»
3.11. Появится окно выбора носителя для создания контейнера нашего ЦС.
Где хранятся сами контейнеры ключей:
1. Реестр: (в качестве хранилища ключей используется реестр Windows), путь хранения контейнеров ключей следующий:
Ключи компьютера: HKEY_LOCAL_MACHINE\SOFTWARE\Wow6432Node\CryptoPro\Settings\Keys
Ключи пользователя ОС: HKEY_LOCAL_MACHINE\SOFTWARE\Wow6432Node\CryptoPro\Settings\Users\SID-пользователя\Keys
В некоторых случаях (было замечено в виртуальных машинах) сертификат попадает сюда: HKEY_USERS\S-1-5-21-{SID}_Classes\VirtualStore\MACHINE\SOFTWARE\[Wow6432Node]\
CryptoPro\Settings\USERS\{SID-пользователя}\Keys\ //
2. Директория: (в качестве хранилища ключей используется директория на жёстком диске), путь хранения контейнеров ключей следующий: C:\Users\All Users\Crypto Pro\Crypto
3.12. Далее откроется окно генерации начальной последовательности с помощью биологического ДСЧ. Для генерации случайной последовательности перемещайте указатель мыши или нажимайте различные клавиши.
3.13. После введите пароль на доступ к закрытому ключу.
3.14. Далее появится окно результатов об успешной установке компонентов (рис.

Настройка веб-сервера IIS
Теперь необходимо выполнить некоторые настройки веб-сервера: прицепить сертификат (самоподписанный или выпущенный нашим же ЦА). Кстати, он уже работает. В качестве примера выпустим самоподписанный сертификат.
1. Откроем Диспетчер служб IIS (Manager IIS) — Сертификат сервера (Server Certificates) (рис. 9);
1.1. В открывшемся окне в панели «Действия (Actions)» выберем – «Создать самоподписанный сертификат (Create Self-Signed Certificate);
1.2. Выбираем тип «Личный (Personal) и указываем «Имя сертификата (Friendly Name)»
1.3. Теперь необходимо привязать этот сертификат для доступа по https к веб-серверу.
1.3.1. Переходим «Сайты (Sites)» — Default Web Site – Bindings – добавить (Add) — выбрать https – и выбрать самоподписанный SSL-сертификат.
")
Также сертификат вы можете выпустить следующим образом:
На этой же панели создайте запрос (Create certificate request) для выпуска сертификата через наш ЦА и дальнейшей его загрузки в IIS (Complete Certificate Request). Но это по желанию.
Пример запроса (request) для формирования запроса вручную
[NewRequest]
Subject="CN=ИмяСертификата ,O=Организация, L=Город, S=Улица, C=Страна, E=Почта"
ProviderName="Crypto-Pro GOST R 34.10-2012 Cryptographic Service Provider"
ProviderType=80
KeySpec=1
Exportable = TRUE
KeyUsage=0xf0
MachineKeySet=true
RequestType=Cert
SMIME=FALSE
ValidityPeriod=Years
ValidityPeriodUnits=2
[EnhancedKeyUsageExtension]
OID=1.3.6.1.5.5.7.3.1
В целом с веб-сервером мы закончили, в default web site вы можете увидеть, что были автоматически созданы virtual directory и applications «CertSrv». При желании можно создать отдельную виртуальную директорию под CRL’ки.
Установка сетевого ответчика (Online responder)
А вот мы и вернулись к установке автоответчика.
1. Добавляем роль в «Диспетчере серверов» (Server Manager) — «Далее (Next)»
1.1. Установка ролей и компонентов (Add roles and features wizard)» — «Далее (Next)»;
1.2. «Роли сервера (Server roles), раскрываем роль: Служба сертификатов Active Directory (Certificate Services Active Directory); и устанавливаем галочку на «Сетевой ответчик» (Online Responder)
1.3. Завершаем работу с мастером ролей и компонентов, путём односмысленных нажатий «Далее (Next)».
В IIS была добавлена Applications: ocsp. Только не пугайтесь, что сама по себе директория пустая. Так и должно быть.
Нам осталось настроить центр сертификации и выпустить сертификат на OCSP.
Настройка центра сертификации
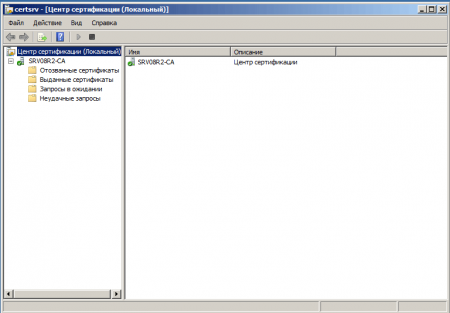
1. В «Диспетчере серверов (Server manager)» — выбираем «Служба сертификации Active Directory (AD CS) – правой клавишей по вашему серверу и открываем: «Центр сертификации (Certification Authority).
1.1. Вы попали в оснастку управления центром сертификации: certsrv.
1.2. Выбираем ваш центр сертификации и открываем свойства (рис. 10):

1.3. Следующим важным шагом выступает настройка точек распространения CDP и AIA.
Authority Information Access (AIA) — содержит ссылки на корневой сертификат центра сертификации (Certification Authority)
CRL Distribution Point — содержит ссылки на файлы CRL, которые периодически публикует сервер CA, который издал рассматриваемый сертификат. Этот файл содержит серийные номера и прочую информацию о сертификатах, которые были отозваны. (рис. 11)
Мы используем веб-сервер, который доступен как внутри сети, так и из интернета (так как сертификаты могут использоваться пользователями интернета) по одному и тому же URL.
1.4. В разделе свойства переходим в «Расширения (Extensions):
Удаляем ненужные точки распространения и оставляем локальную и внешнюю ссылку для CDP:
http://<ip_address/dns_name>/CertSrv/CertEnroll/<CaName><CRLNAmeSuffix><DeltaCRLAllowed>.crl
Ставим галочки «Включить в CRL. Включить в CDP (Include in CRL. Include in the CDP)».
AIA:
http://<ip_address/dns_name>/CertSrv/CertEnroll/<ServerDNSName>_<CaName><CertificateName>.crt
Ставим галочку: «Включать в AIA- расширение выданных сертификатов (Include in the AIA extension of issued certificates)»
OCSP:
https://<ip_address/dns_name>/ocsp
Ставим галочку: «Включать в расширение протокола OCSP (Include in the online certificate status protocol (OCSP) extension)»
В свойствах центра сертификации можно настроить автоматический выпуск сертификатов при поступившем запросе. Так вы исключаете возможность проверки указанных требуемых полей сертификатов. Для этого перейдите в «Модуль политик (Policy Module)» — «Свойства (Properties)» и выберите соответствующий пункт:
В первом случае сертификату присваивается режим ожидания, а одобрение выпуска сертификата остается за администратором;
Во втором случае из-за отсутствия шаблонов в Standalone CA сертификаты будут выпускаться автоматически. (рис. 12)
Да, центр сертификации уже функционирует и доступен по указанному dns-имени. Не забудьте открыть 80 и 443 порты для функционирования веб-сервера и online-reposnder’a, настройкой которого мы займёмся далее.
Проверить работу ЦС вы можете, перейдя в ChromiumGost или Internet Explorer или Edge (с поддержкой Internet Explorer(IE)): https://localhost/CertSrv.
При переходе по ссылке извне в IE необходимо добавить наш веб-сервер в «Надежные сайты (Trusted Sites)» в настройках в пункте «Безопасность». Не забудьте, что должен быть установлен КриптоПро CSP, в ином случае при выпуске сертификата вам не будет доступен выбор ГОСТовского криптопровайдера (рис.13).

Также вы можете здесь вручную скачать сертификат нашего ЦС, цепочку сертификатов, CRL и разностные CRL. Кстати говоря, их мы и забыли настроить.
Вернёмся в оснастку certsrv к нашему центру сертификации и настроим выпуск разностных CRL. Для этого необходимо открыть «Свойства (Properties)» раздела «отозванных сертификатов (Revoked Certificates)» (рис. 14).
1. Задаём «Интервал публикации CRL (CRL Publications interval)».
1.1. Включаем публикацию разностных CRL и задаём интервал.
Кажется, что все хорошо. Но есть один момент:
«ЦС будет публиковать Delta CRL, которые содержат символ плюс «+» в имени файла (например, contoso-pica+.crl). По умолчанию IIS будет расценивать этот символ в запросе как метасимвол и не позволит клиентам скачать список отзыва. Необходимо включить двойной эскейпинг в настройках IIS, чтобы расценивать знак плюса в запросе как литерал:»
Выполните следующую команду в power shell:
Import-Module -Name WebAdministration
Set-WebConfigurationProperty -PSPath 'MACHINE/WEBROOT/APPHOST' -Filter /system.webServer/security/requestFiltering -name allowdoubleescaping -Value 'true'Настройка OCSP — сетевого ответчика (Online responder)
Так как у Standalone центра сертификации нет шаблонов, нам необходимо вручную сформировать запрос и выпуск сертификата для конфигурации отзыва (Array configuration) в «Управление сетевым ответчиком (Online responder management). Для это используйте следующую конфигурацию для формирования запроса
1.1. Создайте: ocsp.txt cо следующим внутренним содержанием:
[NewRequest]
Subject = "CN=Имя"
PrivateKeyArchive = FALSE
Exportable = TRUE
UserProtected = FALSE
MachineKeySet = TRUE
ProviderName = "Crypto-Pro GOST R 34.10-2012 Cryptographic Service Provider"
KeyLength = 512
UseExistingKeySet = FALSE
RequestType = PKCS10
[ApplicationPolicyStatementExtension]
Policies = OCSPSigning
Critical = false
[OCSPSigning]
OID = 1.3.6.1.5.5.7.3.9
[EnhancedKeyUsageExtension]
OID="1.3.6.1.5.5.7.3.9"
[Extensions]
1.3.6.1.5.5.7.48.1.5 = Empty
1.2. Откройте командную строку cmd. Перейдите в директорию с текстовым файлом или в будущем просто укажите полный путь при формировании запроса.
1.3. Узнаем, на какой срок сейчас выпускаются сертификаты. Для этого воспользуемся командой - certutil –getreg ca\validityperiodunits
Результат — на рис. 15.

1.4. Изменим длительность выпуска сертификата:
 #Изменение выпуска сертификатов с текущего состояния на длительность в 5 лет
 certutil -setreg ca\ValidityPeriodUnits 5
 #Перезапуск сервера
 net stop certsvc
 net start certsvc
1.5. Сформируем запрос и выпустим сертификат для сетевого автоответчика (рис 16.):
#Конфигурирование запроса
 certreq -new <имя>.inf <имя>.req

#Формирование запроса в ЦС
 certreq -submit <имя>.req

#Одобрение запроса (Можно руками через оснастку управления центром сертификации)
 certutil.exe -Resubmit "Цифра запроса"
Во время конфигурирования запроса выбираем место хранения контейнера ключа и проходим процедуру ДСЧ.

1.6. Экспортируем сертификат из центра сертификации и устанавливаем его в личные сертификаты локального компьютера.
1.6.1. После запроса сертификата открываем оснастку: Certificates (Run — MMC – Add or remove Snap-ins – Certificate),
1.6.2. Выбираем сертификат, выданный для сетевого ответчика. Нажимаем правой клавишей и открываем «Все задачи (Управление закрытыми ключами (All Tasks — Manage Private keys)».
1.6.3. В открывшемся окне Permissions необходимо добавить в «Группы и пользователи (Group and Users): Network Service и выдать право Read для этой учётной записи. (рис.16.1)
Это нужно сделать, так как служба OCSP работает от лица Network Service.
1.7. Далее переходим в настройки самого сетевого ответчика. (рис. 17)
1.8. Нам необходимо добавить «Конфигурацию отзыва (Revocation Configuration) – «Добавить»
2. Предстоит небольшой процесс настройки конфигурации отзыва.
2.1. «Далее».
2.2. Введите имя конфигурации – «Далее».
2.3. Выбираем второй пункт: «Выбрать сертификат в локальном хранилище сертификатов (Select a certificate from the local certificate store)» — «Далее».
2.4. В следующем окне нажимаем «Обзор (Browse)» и выбираем корневой сертификат нашего ЦА – «Больше вариантов (More choices)». (рис. 17) – «Далее».
2.5. В следующем окне выбираем «Выбрать сертификат подписи вручную (Manually a signing sertificate)
2.6. В последнем окне нажимаем «Поставщик (Provider)». Здесь необходимо указать источник, из которого будут браться базовые и разностные CRL. В нашем случае: http://localhost/CDP/CA-C4Y-VPN.crl (для базового) и http://localhost/CDP/CA-C4Y-VPN+.crl (для разностного).
")

2.7. Осталось прицепить к нашей конфигурации выпускаемый ранее сертификат и проверить некоторые моменты.
2.7.1. Переходим в «Конфигурацию массива(array configuration)», выбираем конфигурацию и нажимаем «Назначить сертификат подписи (Assign Signing Certificate)». В появившемся окне нужно просто нажать «ОК».
2.7.2. Теперь необходимо «Обновить конфигурацию массива». Для этого выбираем «Конфигурация массива (Array configuration) – «Обновить (Refresh)»
2.7.3. После всех этих действий главное окно оснастки ocsp должно выглядеть так, как на рисунке 19.

В процессе самостоятельной настройки «сетевого ответчика» может возникнуть много вопросов, особенно если нет опыта работы с Standalone центром сертификации, в котором отсутствуют шаблоны, без которых можно обойтись, но пути становятся длиннее в исполнение. Кстати говоря, если после прикрепления сертификата вы не получили заветное Working, то проверьте следующее (рис.20, 20.1):

Чтобы проверить работу центра сертификации и сетевого автоответчика, выпустите сертификат для конечного пользователя, установите его и экспортируйте в какую-нибудь директорию. А после воспользуйтесь утилитой: Certutil –url /patch/test.crt
Для подробного отчёта вы можете воспользоваться: certutil –verify –urlfetch /patch/test.crt
На этом краткое руководство по развертыванию собственного центра сертификации подошло к концу. Я постарался рассказать о большинстве трудностей и нюансов, с которыми можно столкнуться в процессе работы. Надеюсь, это руководство поможет вам.
Дополнительно:
Что ещё интересного есть в блоге Cloud4Y
→ Малоизвестный компьютер SWTPC 6800
→ Сделайте Linux похожим на Windows 95
→ Бесплатные книги, полезные для IT-специалистов и DevOps
→ WD-40: средство, которое может почти всё
→ Игры для MS-DOS с открытым исходным кодом
Подписывайтесь на наш Telegram-канал, чтобы не пропустить очередную статью. Пишем только по делу.
Перед каждым администратором рано или поздно возникает необходимость обеспечить безопасный обмен информации через интернет, внешние и внутренние сети, а также проверку подлинности каждой из сторон, участвующих в обмене информацией. На помощь здесь приходит инфраструктура открытых ключей (PKI) и службы сертификации Windows.
Онлайн-курс по устройству компьютерных сетей
На углубленном курсе «Архитектура современных компьютерных сетей» вы с нуля научитесь работать с Wireshark и «под микроскопом» изучите работу сетевых протоколов. На протяжении курса надо будет выполнить более пятидесяти лабораторных работ в Wireshark.
Инфраструктура открытых ключей позволяет использовать цифровые сертификаты для подтверждения подлинности владельца и позволяет надежно и эффективно защищать трафик передаваемый по открытым сетям связи, а также осуществлять с их помощью аутентификацию пользователей. Основой инфраструктуры открытых ключей является центр сертификации, который осуществляет выдачу и отзыв сертификатов, а также обеспечивает проверку их подлинности.
Для чего это может быть нужно на практике? Цифровые сертификаты позволяют использовать шифрование на уровне приложений (SSL/TLS) для защиты веб-страниц, электронной почты, служб терминалов и т.п., регистрацию в домене при помощи смарт-карт, аутентификацию пользователей виртуальных частных сетей (VPN), шифрование данных на жестком диске (EFS), а также в ряде случаев обойтись без использования паролей.
Для создания центра сертификации нам понадобится сервер, работающий под управлением Windows Server, который может быть как выделенным, так и совмещать роль центра сертификации с другими ролями. Однако следует помнить, что после развертывания центра сертификации вы не сможете поменять имя компьютера и его принадлежность к домену (рабочей группе).
Центр сертификации (ЦС) может быть двух типов: ЦС предприятия и изолированный (автономный) ЦС, рассмотрим их отличительные особенности:
ЦС предприятия
- Требует наличия ActiveDirectory
- Автоматическое подтверждение сертификатов
- Автоматическое развертывание сертификатов
- Возможность запроса сертификатов через Web-интерфейс, мастер запросов и автоматическое развертывание
Изолированный (автономный) ЦС
- Не требует наличия ActiveDirectory
- Ручное подтверждение сертификатов
- Отсутствие возможности автоматического развертывания
- Запрос сертификатов только через Web-интерфейс
Методика развертывания ЦС для Windows Server 2003 и Windows Server 2008 несколько различаются, поэтому мы решили рассмотреть их в отдельности.
Windows Server 2003
Для возможности использования Web-интерфейса для выдачи сертификатов нам понадобится установленный web-сервер IIS. Установим его через диспетчер сервера: Пуск — Управление данным сервером — Добавить или удалить роль.
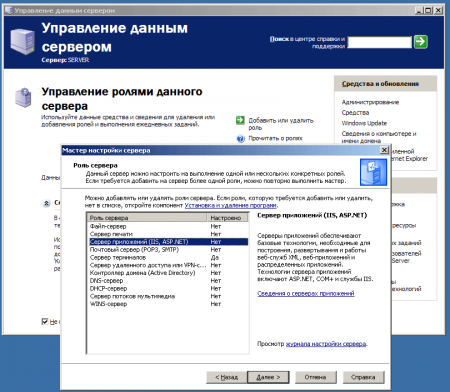
В списке ролей выбираем роль Сервера приложений. В следующем окне устанавливаем галочку Включить ASP.NET, если IIS уже установлен данный шаг можно пропустить.
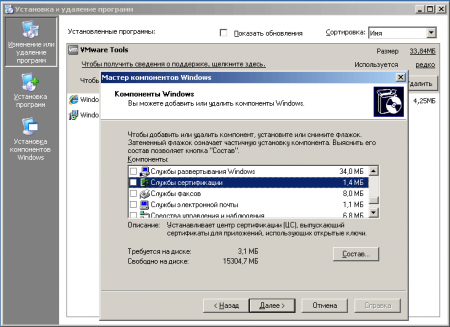
После установки IIS приступим к развертыванию Центра сертификации, это делается через оснастку Установка и удаление программ — Установка компонентов Windows, где выбираем Службы сертификации.
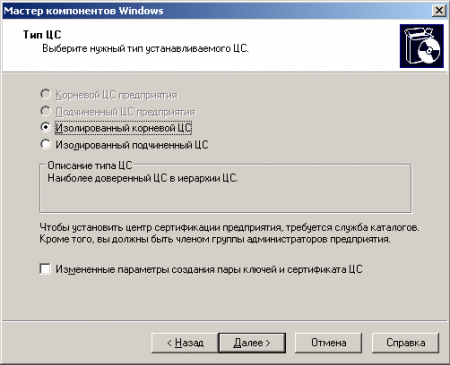
Следующим шагом выберите тип ЦС и его подчиненность. Так как в нашем случае сеть не имеет доменной структуры, то ЦС Предприятия недоступен для выбора. Поскольку это первый (и пока единственный ЦС) следует выбрать корневой сервер, подчиненный тип следует выбирать для развертывания следующих ЦС, например для филиалов.
Далее вводим имя ЦС (должно совпадать с именем сервера) и пути размещения файлов. В процессе установки программа предложит перезапустить IIS и, если не была включена поддержка страниц ASP.NET, предложит ее включить, с чем следует согласиться.
Windows Server 2008 R2
В Windows Server 2008 (2008 R2) все настройки консолидированы в одном месте, что делает установку ЦС более простой и удобной. Выбираем Диспетчер сервера — Роли — Добавить роли, в списке ролей выбираем Службы сертификации Active Directory.
В следующем окне обязательно добавляем компонент Служба регистрации в центре сертификации через интернет. При этом будут автоматически определены необходимые службы ролей и компоненты (такие как IIS) и будет предложено их добавить.

Дальнейшая настройка аналогична Windows Server 2003. Вводим тип ЦС, его имя и место хранения файлов, подтверждаем выбор компонент и завершаем установку.
Проверка работы ЦС
Для первоначальной проверки работоспособности ЦС можете запустить оснастку Центр сертификации (Пуск — Администрирование — Центр Сертификации). Если все сделано правильно вы должны увидеть следующее окно:
Попробуем теперь получить сертификат для клиентского ПК. Запустим браузер, в адресной строке которого укажем адрес http://имя_сервера/certsrv, где имя_сервера — имя сервера ЦС. Вы попадете на главную страницу центра сертификации.

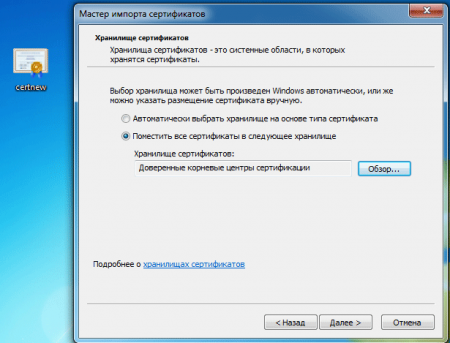
Прежде всего необходимо загрузить сертификат ЦС и поместить его в хранилище доверенных коренных центров сертификации. Если в вашей сети несколько ЦС следует загрузить и установить цепочку сертификатов. Для этого выбираем: Загрузка сертификата ЦС, цепочки сертификатов или CRL, затем Загрузка сертификата ЦС или Загрузка сертификата ЦС и сохраняем сертификат в любое удобное место.
Теперь перейдем к установке, для этого щелкнем правой кнопкой на файле сертификата и выберем Установить сертификат, откроется мастер импорта, в котором откажемся от автоматического выбора хранилища вручную выбрав Доверенные корневые центры сертификации, теперь данный ПК будет доверять всем сертификатам выданным данным ЦС.
Для получения клиентского сертификата снова откроем сайт ЦС и выберем Запрос сертификата — расширенный запрос сертификата — Создать и выдать запрос к этому ЦС. Заполняем форму запроса, в качестве имени указываем имя ПК или пользователя, в качестве типа сертификата указываем Сертификат проверки подлинности клиента и жмем кнопку Выдать.
При попытке создать запрос сертификата вы можете получить следующее предупреждение:
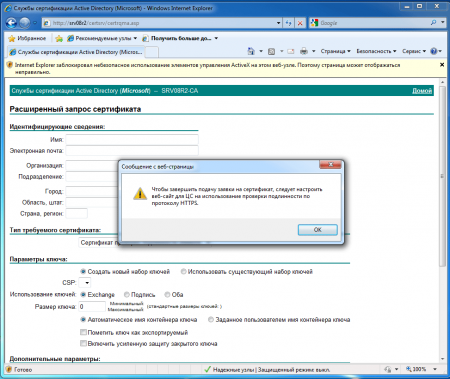
В этом случае можно добавить данный узел в зону Надежные узлы и установить низкий уровень безопасности для этой зоны. В Windows Server понадобится также разрешить загрузку неподписанных ActiveX.
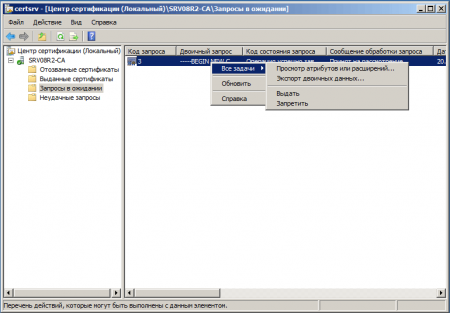
Теперь на сервере откроем оснастку Центр сертификации и в разделе Запросы на ожидание найдем наш запрос и щелкнув на него правой кнопкой выберем Все задачи — Выдать.
Теперь вернемся на клиентский ПК и еще раз откроем сайт ЦС. На этот раз выберем Просмотр состояния ожидаемого запроса сертификата, вы увидите свой запрос, щелкнув на которой вы попадете на страницу Сертификат выдан и сможете сразу его установить.
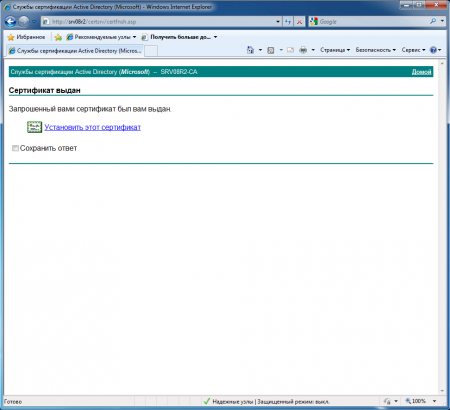
Если все сделано правильно, то сертификат успешно установится в хранилище личных сертификатов.
По окончании проверки не забудьте удалить ненужные сертификаты с клиентского ПК и отозвать их в центре сертификации на сервере.
Онлайн-курс по устройству компьютерных сетей
На углубленном курсе «Архитектура современных компьютерных сетей» вы с нуля научитесь работать с Wireshark и «под микроскопом» изучите работу сетевых протоколов. На протяжении курса надо будет выполнить более пятидесяти лабораторных работ в Wireshark.
В этой заметке мы рассмотрим процедуру миграции автономного центра сертификации (Standalone Certification Authority) с ОС Windows Server 2012 R2 на ОС Windows Server 2022 в рамках одного и того же виртуального сервера с переустановкой ОС. Одним из условий рассматриваемого примера будет сохранение имени сервера, хотя в целом данное условие не является обязательным.
Общий план действий будет следующий:
- Создание резервной копии данных ЦС в Windows Server 2012 R2
- Удаление служб ЦС из Windows Server 2012 R2
- Переустановка ОС и установка служб ЦС в Windows Server 2022.
- Первичная конфигурация ЦС
- Восстановление базы данных и конфигурации ЦС из резервной копии
Шаг 1. Резервное копирование данных ЦС в Windows Server 2012 R2
Резервное копирование ЦС будет представлять собой сохранение сертификата ЦС, закрытого ключа ЦС и базы данных выданных сертификатов. Помимо этого нам потребуется сохранить ключ системного реестра, который хранит все настройки ЦС.
На сервере с Windows Server 2012 R2 в оснастке управления Certification Authority (certsrv.msc) в основном контекстном меню для ЦС выбираем пункт «Back up CA…»

В открывшемся окне мастера резервного копирования включаем опции сохранения закрытого ключа и сертификата ЦС «Private key and CA certificate» и сохранения базы данных сертификатов «Certificate database and certificate database log«, а также указываем путь к защищённому от стороннего доступа каталогу для сохранения резервных копий.
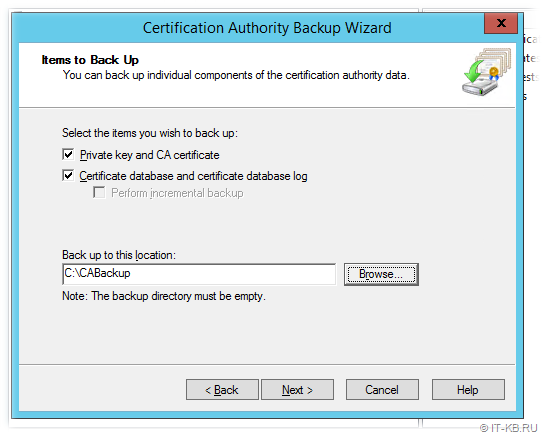
Для защиты закрытого ключа в составе резервной копии зададим некий сложный пароль.
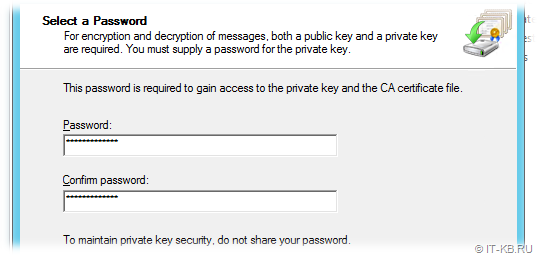
Мастер сохранит резервную копию данных в указанный каталог и среди прочего зашифрует данные о закрытом ключе с использованием указанного нами пароля в специальном файле-контейнере.
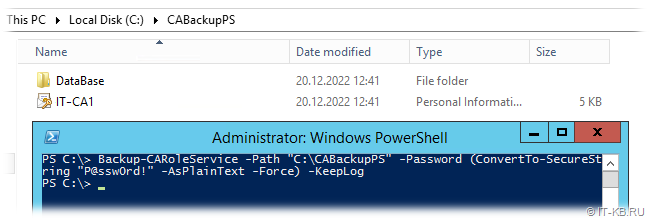
Процедуру создания резервной копии можно выполнить не только с помощью графической оснастки управления, но и с помощью PowerShell, командой следующего вида:
Backup-CARoleService -Path "C:\CABackupPS" -Password (ConvertTo-SecureString "P@ssw0rd!" -AsPlainText -Force) -KeepLog
На выходе мы получим подкаталог с базой данных сертификатов и зашифрованный файл-контейнер в формате *.p12, содержащий в себе закрытый ключ ЦС.
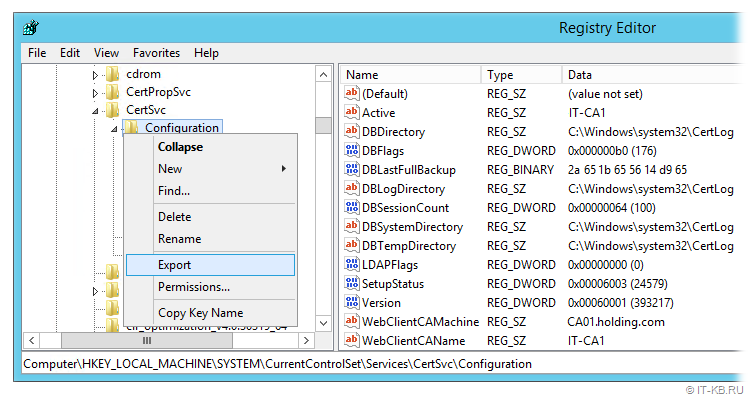
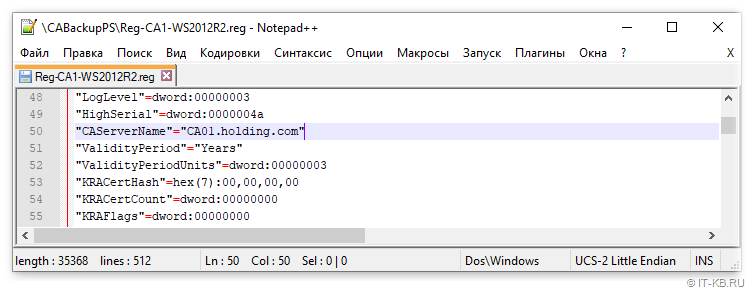
Далее переходим в редактор системного реестра Windows и находим в нём ключ реестра, который хранит расширенные настройки ЦС:
HKEY_LOCAL_MACHINE\SYSTEM\CurrentControlSet\Services\CertSvc\Configuration
Сохраняем содержимое этого ключа в *.reg файл, используя пункт меню «Export«.
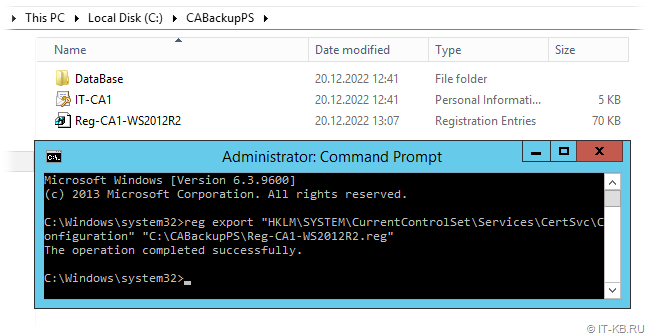
Аналогичное действие можно выполнить с помощью командной строки и команды следующего вида:
reg export "HKLM\SYSTEM\CurrentControlSet\Services\CertSvc\Configuration" "C:\CABackupPS\Reg-CA1-WS2012R2.reg"
Сохраняем содержимое каталога с файлами резервной копии в защищённое стороннее место.
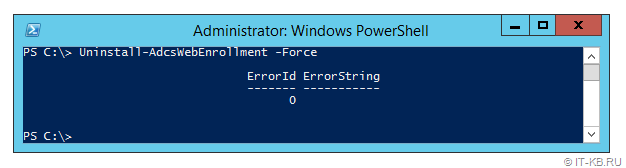
Шаг 2. Удаление служб ЦС из Windows Server 2012 R2
Данный шаг является опциональным для автономного ЦС, но будет желательным в случае, если выполняется переустановка/миграция доменного ЦС. В случае с доменным ЦС для удаления «Active Directory Certificate Services» нам потребуется права уровня Enterprise Admins.
Сначала деактивируем компоненту «Certification Authority Web Enrollment«, если она была установлена ранее. Если этого предварительно не сделать, то при попытке удаления ключевой компоненты «Certification Authority» мы получим ошибку с сообщением о том, что сначала необходимо удалить «Web Enrollment».
Uninstall-AdcsWebEnrollment -Force
Затем в оснастке «Server Manager» деактивируем компоненты роли «Active Directory Certificate Services«
Шаг 3. Переустановка ОС и установка служб ЦС в Windows Server 2022
После удаления роли AD CS, выводим сервер из домена, форматируем диск и начисто устанавливаем ОС Windows Server 2022. При настройке сервера (по условиям нашего примера) используем прежнее имя hostname.
После первичной настройки ОС и ввода в домен переходим в оснастку управления «Server Manager» и активируем ранее используемые компоненты «Certification Authority» и «Certification Authority Web Enrollment» для роли «Active Directory Certificate Services«
Шаг 4. Первичная конфигурация ЦС
После завершения процесса установки роли, переходим по ссылке «Configure Active Directory Certificate Services on the destination server«
Откроется мастер конфигурирования AD CS, в котором на шаге «Credentials» нужно указать учётные данные пользователя, от имени которого будет выполнять конфигурация ЦС. Для доменного ЦС требуются права уровня Enterprise Admins. А в нашем примере, для автономного ЦС, достаточно прав локального администратора сервера.
На шаге «Role Services» выбираем компоненты, которые хотим сконфигурировать.
На шаге «Setup Tyte» в нашем случае выбирается тип развёртывания – автономный ЦС: «Standalone CA«.
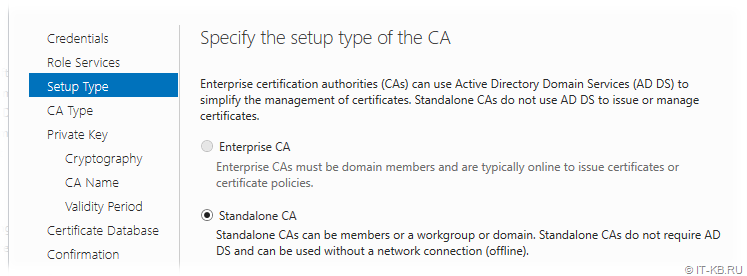
На шаге выбора типа ЦС в нашем случае выбирается «Root CA«, так как в нашем примере используется развёртывание автономного корневого ЦС.

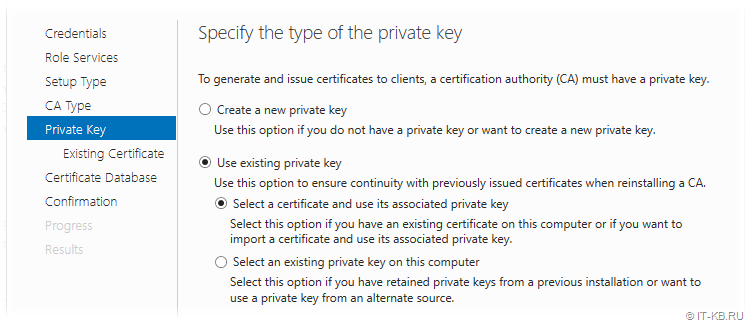
На шаге «Private Key» выбираем пункт экспорта сертификата ЦС и ассоциированного с ним закрытого ключа ЦС: «Use existing private key» > «Select a certificate and use its associated private key«.
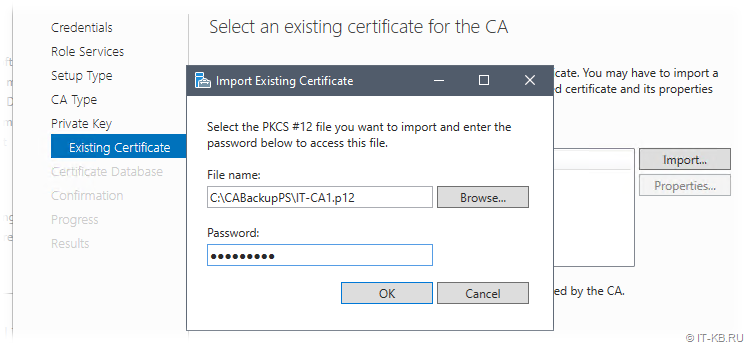
В окне импорта сертификата указываем путь к контейнеру *.p12 и пароль, который мы использовали ранее при создании резервной копии ЦС.
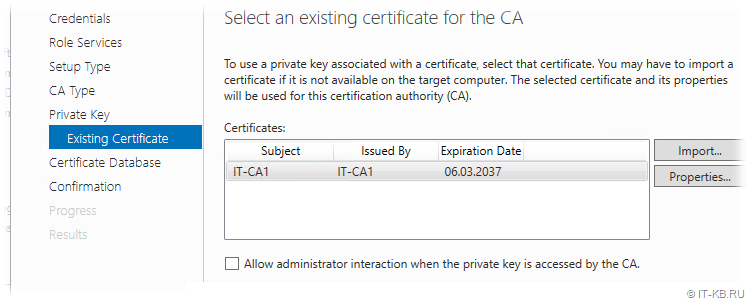
Убеждаемся в том, что сертификат ЦС подгрузился без ошибок.
На следующем шаге оставляем пути к БД в значениях по умолчанию и дожидаемся успешного завершения конфигурирования ЦС.
После этого можем перейти в оснастку Certification Authority и убедиться в том, что ЦС успешно запущен со своим прежним именем и сертификатом.
Шаг 5. Восстановление базы данных и конфигурации ЦС из резервной копии
Теперь настало время восстановить базу данных всех ранее выданных и отозванных сертификатов. Для этого в оснастке Certification Authority в основном контекстном меню для ЦС выбираем пункт «Restore CA…»
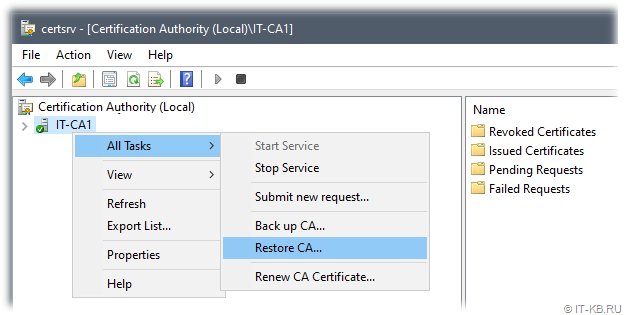
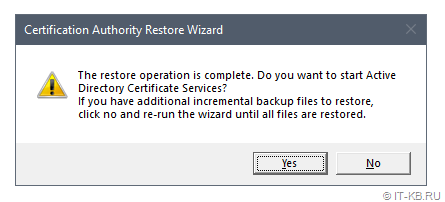
Перед началом работы мастера восстановления мы получим предупреждение о том, что в ходе восстановления служба сертификации будет будет остановлена.
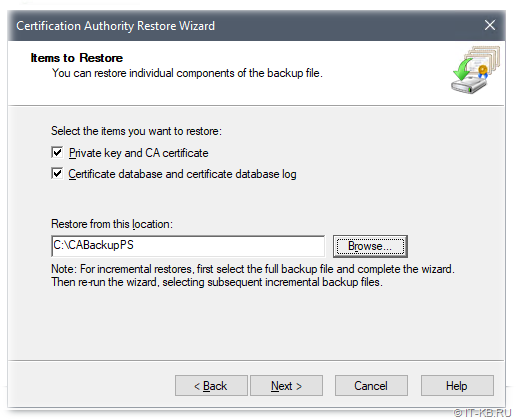
В открывшемся окне мастера восстановления включаем опции восстановления закрытого ключа и сертификата ЦС «Private key and CA certificate» и восстановления базы данных сертификатов «Certificate database and certificate database log«, а также указываем путь к каталогу с созданной ранее резервной копией ЦС.
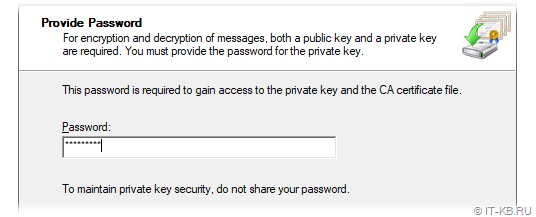
Далее укажем пароль, который мы использовали ранее для защиты закрытого ключа в составе резервной копии.
Мастер восстановления должен отработать без ошибок.
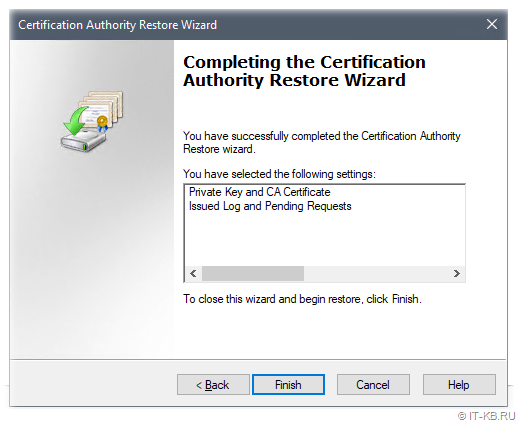
По окончании работы мастера восстановления будет предложено снова запустить службу сертификации.
После этого в оснастке Certification Authority проверяем наличие выданных и отозванных ранее сертификатов.
Далее нам остаётся восстановить информацию о конфигурации ЦС в системном реестре Windows из ранее сохранённого *.reg файла.
В нашем случае восстановление из *.reg файла выполняется без каких-либо изменений в этом файле. В случае же, если миграция ЦС выполняется с изменением имени сервера, то в файл потребуется внести корректировки.
В нашей резервной копии FQDN имя сервера встречается, как минимум, 2 раза — в параметрах CAServerName и WebClientCAMachine. В случае необходимости, вы можете изменить эти параметры.
Закрываем графическую оснастку Certification Authority, запускаем командную строку с правами администратора и выполняем последовательно команды остановки службы сертификации, восстановления настроек реестра из *.reg файла и повторного запуска службы сертификации.
net stop CertSvc
reg import "C:\CABackupPS\Reg-CA1-WS2012R2.reg"
net start CertSvc
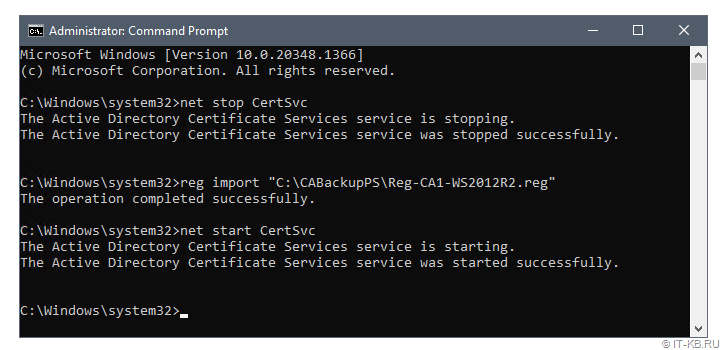
Снова открываем графическую оснастку Certification Authority и проверяем восстановленные настройки ЦС. Например, можно убедиться в том, что успешно восстановлены ранее настроенные точки публикации распространения списка отзыва сертификатов.
После окончания процедуры восстановления (в целях безопасности) не забываем провести зачистку резервных копий ЦС, содержащих закрытий ключ.
Автономный ЦС не поддерживает работу с шаблонами сертификатов, поэтому, в нашем случае, на данном этапе процесс миграции ЦС можно считать законченным. В случае же доменного ЦС, могут потребоваться дополнительные манипуляции с шаблонами сертификатов, информацию о которых можно найти по ссылкам ниже.
Дополнительные источники информации:
- Anthony Bartolo : Step-By-Step: Migrating The Active Directory Certificate Service From Windows Server 2008 R2 to 2019
- PeteNetLive KB ID 0001473 : Moving Certificate Services To Another Server
- Jack Roper : Migrating the AD Certificate Authority Service server role from 2012 R2 to 2019 — ‘template information could not be loaded’ error
- Microsoft Q&A : Move from DC 2012R2 to 2022 and move CA role
In this era of digital world, there is no need to explain the importance of a digital certificate or a system that manages the digital certificate, Public Key Infrastructure (PKI). If your company is quite behind in this and not implemented a PKI infrastructure yet, it’s time to do now. The very first thing you should do is to set up a root CA, then one or more subordinate CA according to the environment size and structure, and a CA database, enforcement servers, and many more. Well, when it comes to set up a root CA, there are two types of root CAs. Enterprise Root CA and Standalone Root CA. Let’s see about setting up a Enterprise Root CA in a different post, let’s limit this post to a Standalone Root CA (Certificate Authority). Let’s see a step-by-step procedure to set up a Standalone Root CA in ADCS with a list of requirements and benefits of setting up a Standalone Root CA in the PKI infrastructure.
What Is ADCS?
Microsoft ADCS is the Active Directory Certificate Services server role in Windows Server. It allows administrators to manage and generate digital certificates for use in a variety of scenarios, such as authenticating users and devices, encrypting communication, and validating signatures. ADCS is a key component of many PKI deployments and helps organizations to secure their data and communications.
ADCS includes a number of features that make it a powerful and flexible tool for certificate management. For example, ADCS can be used to issue certificates to user accounts and computers in an Active Directory domain. ADCS can also be configured to automatically enroll users and computers in a certificate program, making it easy to keep track of who has which certificates. In addition, ADCS provides a web enrollment interface that allows users to request and retrieve certificates without having to use the ADCS console.
ADCS is an important part of many PKI deployments and can help organizations to secure their data and communications.
What Is A Root CA?
A Root CA is a certification authority that is trusted by all other CAs in a given PKI hierarchy. A Root CA’s certificate is self-signed and contains information that identifies the Root CA as well as the Root CA’s public key. The Root CA’s public key is used to verify the signatures of all other certificates in the PKI hierarchy.
What Is A Standalone Root CA In ADCS?
A standalone root CA is a Certification Authority (CA) that is not integrated with an existing public key infrastructure (PKI). A PKI is a system of digital certificates, public and private keys, and other related components that are used to verify the identity of individuals or devices and to encrypt information. A standalone root CA can issue and manage digital certificates for use in a PKI, but it is not itself part of a PKI.
A standalone root CA is typically used in organizations that do not have an existing PKI, or in situations where it is not possible or desirable to integrate a new CA into an existing PKI. For example, a standalone root CA might be used to issue digital certificates for use in a PKI that is being created from scratch, or to issue digital certificates for use in a PKI that exists outside of the organization.
There are several benefits to using a standalone root CA. First, it can be faster and easier to deploy than a CA that is integrated into an existing PKI. Second, it can be less expensive to maintain and operate than a CA that is part of a PKI. Finally, it can provide more flexibility in terms of the types of certificates that can be issued and the way in which they are used.
However, there are also some drawbacks to using a standalone root CA. First, it is more vulnerable to attack than a CA that is part of a PKI. Second, it can be more difficult to manage and operate than a CA that is integrated into an existing PKI. Finally, it may not be possible to issue all types of certificates that are available from a CA that is part of a PKI.
In summary, a standalone root CA is a CA that is not integrated with an existing PKI. It has several benefits, but also some drawbacks. It is typically used in organizations that do not have an existing PKI, or in situations where it is not possible or desirable to integrate a new CA into an existing PKI.
Why You Should Need to Have a Root CA?
Why You Should Set Up A Standalone Root CA?
A lot of people ask why they should set up A Standalone Root CA. The answer is simple: because it’s more secure. When you set up A Standalone Root CA, your server will be its own Certificate Authority. This means that your server will generate its own certificates, and no one else will be able to issue certificates for your domain.
There are a few reasons why this is more secure:
-
It’s much harder for someone to spoof your certificates if they can’t generate their own.
-
If someone does manage to get ahold of your private key, they won’t be able to use it to issue new certificates – they’ll only be able to use it for the sites that already have certificates from your server.
-
set up A Standalone Root CA is more resistant to attack than other types of Certificate Authorities. This is because the attacker would need to compromise the server itself in order to issue new certificates.
Overall, set up A Standalone Root CA is a more secure way to manage your certificates. If you’re looking for the highest level of security possible, this is the way to go.
Things Required To Set Up A Standalone Root CA In ADCS:
There are nothing much required to set up Standalone Root CA server. You just need to have these two things. That’s all.
-
A Windows Server (a bare-metal or a virtual machine)
-
An Administrator account to set up ADCS
How To Set Up A Standalone Root CA On Windows Server?
Let’s see steps to set up a standalone root CA for your organization. We have created a Windows VM on our lab to demonstrate this demo. You can go through this steps on your production or test environments to set up a standalone root CA. Let’s get started.
Note: This server is not attached to the Active Directory. It’s a workgroup machine.
Step 1. Set up Active Directory Certificate Service (ADCS) Role- Open the ‘Add Roles and Features’
Let’s begin this process with setting up ADCS role. Open the ‘Add Roles and Features’.
In Server Manager, go to Manage –> Add Roles and Features
Step 2. Select Role-Based Installation
Click Next button in the ‘Add Roles and Features’ wizard.
Select Role based or Feature based installation since it is a role based
Click Next.
Step 3. Select the Server on that you are going to install the ADCS Role
Since it has only local server, select that local server then click Next.
Step 4. Select ‘Active Directory Certificate Services’ role
Select “Active Directory Certificate Services” role then click on Next.
Step 5. Add the ‘Add Features’
Click on ‘Add Features’ button to add the ADCS features.
Click on Next, and Next again.
Step 6. Initiate the ADCS installation process
Click on Next, and Next again. This will take you to the ADCS installation wizard.
Click the Next button to initiate the ADCS installation process.
Step 7. Select ‘Certificate Authority’ role
You will to greeted with multiple option to choose. Select the first option ‘Certificate Authority role alone then click Next.
Step 8. Begin the installation of ‘Certificate Authority‘ role
Click on the Install button to being the installation of ‘Certificate Authority‘ role.
Step 9. Installation of ‘Certificate Authority‘ role in progress…
Step 10. Start the Active Directory Certificate Service configuration wizard
Upon the completion of the installation process, it prompts for Configuration, Select “Configure Active Directory Certificate Services on destination server” to start the ADCS configuration wizard.
Step 11. Select the Administrator account in the ADCS configuration wizard
By default Local Administrator Account should be selected (Server is in WorkGroup). Just ensure it is selected then click Next.
Step 12. Select ‘Certificate Authority’ role in the ADCS configuration wizard
You are allowed to Check the ‘Certificate Authority’ role alone as we have installed only CA role. Select ‘Certificate Authority’ role then click Next.
Step 13. Select the Standalone CA in the ADCS configuration wizard
You will be greeted to choose two types of CAs, Enterprise CA and Standalone CA. Enterprise CA option should be greyed out since this computer is not attached to the Active Directory and not part of any domain.
You are allowed to select only Standalone CA option. Select the Standalone CA option then click on Nex
Step 14. Select the Root CA
You will be greated with two options. Root CA and Subordinate CA. Since we are going to set up standalone root CA in this demo go with the Root CA option. We will cover about the Subordinate CA in a different post when we show you how to create two tier PKI system. Select Root CA then click Next.
Step 15. Create a new private key for Standalone Root CA
Private key is the first element of trust for any Certificate Authority. Let’s create a private key for this root CA. Since this is the newly created CA. Create a new private key.
Select “Create a New Private Key” then click Next.
Step 16. Select Key Length & Hash Algorithm based on requirement
Select the Cryptographic Provider, Hash Alogarithm, and Key Length as per your design. Then Click Next.
Step 17. Specify the name of the Certificate Authority
Specify the name of your CA, By default, Common Name with ‘- CA’ will be taken as the CA name.
Step 18. Specify the Certificate validation period
Validity period is the expiration time of the CA’s certificate. Normal practice is to keep the validity period for up to 10 years for root CA certificates. However, you can keep the validity period anywhere between 5 to 10 years.
Step 19. Specify Database & Logs location for Standalone Root CA
Specify the location for database and logs for your Standalone Root CA. You can leave this default as it is then click Next.
Step 20. Verify the summary of the configuration
Take a look at all the configurations then click on Configure button.
Step 21. Close the configuration wizard after the completion
Click on the Close button upon the completion of the configuration wizard.
Step 22. Close the Certificate Authority configuration wizard
Step 23. Open Certificate Authority Console
Server Manager -> Tools -> Certificate Authority
Right click on the Certificate Authority on the console then select Properties
Step 24. View the Certificate of the Standalone Root CA
Click on the View Certificate to open the certificate.
Step 25. Certificate of Standalone Root CA
Now you can start issuing the Certificates from this Standalone Root Certificate Authority.
That’s it. You are done with setting up a Standalone Root CA. This concludes the demo of building the Certificate Authority.
We hope this post would help you know a step-by-step procedure to set up a Standalone Root CA in ADCS. Please share this post and help to secure the digital world. Visit our social media page on Facebook, LinkedIn, Twitter, Telegram, Tumblr,Medium & Instagram, and subscribe to receive updates like this.
You may also like these articles:
Note: This guide is archived and is no longer updated on this website. For any future updates to this guide, please refer to the version that can be found on docs.mjcb.ca.
The Server that will be hosting the Offline Root Certificate Authority requires minimal resources in order to operate. It is only to ever be used for issuing Subordinate Certificates to other TFS Labs Domain Servers and is also used to revoke or add new Subordinate Certificates if necessary. It is also used to refresh the CRL at least once a year.
The Server is setup as a standalone Windows Server and is never meant to be a member of an Active Directory Domain or even have any network connections to it. This means that it will require some local Security modifications that are normally handled through Group Policy from Active Directory. Since there is no connection to Active Directory, these changes will need to be applied locally.
Since there are no Network Connections to and from this virtual machine, create a virtual floppy disk that will be used for transferring files to and from the TFS-ROOT-CA Server. Name the file RootCAFiles (the file extension will vary based on whether you are using Hyper-V, VirtualBox or VMware) and store it in a location that will be available for all virtual machines that are being used. The first time that it is inserted into one of the virtual machines it will need to be formatted with the default settings.
Provision and configure a new virtual machine using the following settings:
- Create a new virtual machine with the following settings:
- Virtual CPU — 1
- Virtual Memory — 4096 MB
- Virtual Hard Disk — 60 GB
- Virtual Floppy Drive — 1
- Virtual Network Adapters — 0
- Install Windows Server 2019 Standard (Desktop Experience) with the default options.
- Set the hostname of the Server to TFS-ROOT-CA. Set it to be a member of the TFS-CA Workgroup instead of a Domain.
- Secure the local Administrator Account and additional User Accounts on the TFS-ROOT-CA Server:
- Use a complex password for the Administrator Account and store it securely.
- Ensure that there are no additional user accounts present on the Server. The Guest account should already be disabled by default and will be renamed in a further step in this guide.
- The Administrator account will be renamed to CA-Admin at a further step in this guide.
- There is no need to activate the Windows Server license, or even input a license key (make sure you are licensed though). If activation is ever needed on this Server, then the telephone option would be required in order to accomplish this since there is no network connection on this Server.
- On the root of the C:\ Drive create a folder called RootCA (C:\RootCA). This folder will store the Root Certificate, Subordinate Certificate and other necessary Certificate Files that are needed during the entire implementation process.
- Insert the RootCAFiles virtual floppy disk into the virtual floppy drive. Format the floppy disk with the default settings. Eject the disk when completed.
- Open the Local Group Policy Editor Console (gpedit.msc), confirm the following settings, and make any changes if necessary:
- Modify the Local Computer Policy > Computer Configuration > Windows Settings > Security Settings > Local Policies > Security Options settings to match the following:
- Accounts: Administrator account status — Enabled
- Accounts: Block Microsoft accounts — Users can’t add or log on with Microsoft Accounts
- Accounts: Guest account status — Disabled
- Accounts: Limit local account use of blank passwords to Console logon only — Enabled
- Accounts: Rename administrator account — CA-Admin
- Accounts: Rename guest account — Administrator
- Interactive Logon: Don’t display last signed-in — Enabled
- Interactive Logon: Don’t display username at sign-in — Enabled
- Network security: Do not store LAN Manager hash value on next password change — Enabled
- Network security: LAN Manager authentication level — Send NTLMv2 response only. Refuse LM & NTLM
- Modify the Local Computer Policy > Computer Configuration > Windows Settings > Security Settings > Local Policies > Security Options settings to match the following:
- Open the Local Security Policy Console (secpol.msc), confirm the following settings, and make any changes if necessary:
- Modify the Security Settings > Account Policies > Password Policy settings:
- Enforce password history — 24 passwords remembered
- Maximum password age — 90 days
- Minimum password age — 1 days
- Minimum password length — 14 characters
- Password must meet complexity requirements — Enabled
- Store passwords using reversible encryption — Disabled
- Modify the Security Settings > Account Policies > Account Lockout Policy settings:
- Account lockout threshold — 5 invalid login attempts
- Account lockout duration — 30 minutes
- Reset account lockout counter after — 30 minutes
- Modify the Security Settings > Account Policies > Password Policy settings:
- Restart the TFS-ROOT-CA Server to apply the updated security settings.
- Optional: Enable BitLocker in order to secure the TFS-ROOT-CA virtual machine while it is powered off or being stored in another location:
- Open the Server Manager Console (servermanager.exe), click on the Manage menu, and click on Add Roles and Features to start the installation wizard.
- On the Before You Begin screen, click the Next button to continue.
- On the Installation Type screen, select the option for Role-based or feature-based installation and click the Next button to continue.
- On the Server Selection screen, verify that the TFS-ROOT-CA Server is selected and click the Next button to continue.
- On the Server Roles screen, click the Next button to continue.
- On the Features screen, select the BitLocker Drive Encryption Feature. The installation wizard will ask to install the necessary management tools for the role. Click the Add Features button to continue.
- On the Features screen, click the Next button to continue.
- On the Confirmation screen, select the option to Restart the destination server automatically if required. When prompted with a warning about restarting the Server, click the Yes button (the Server must restart in order to continue). Click the Install button to continue.
- Once the TFS-ROOT-CA Server has restarted click the Close button on the Installation Progress screen.
- Open the Local Group Policy Editor Console (gpedit.msc) and modify the Computer Configuration > Administrative Templates > Windows Components > BitLocker Drive Encryption > Operating System Drives settings to match these settings:
- Require additional authentication at startup — Enabled
- Allow BitLocker without a compatible TPM (requires a password or a startup key on a USB flash drive) — Enabled
- Configure TPM startup: Allow TPM
- Configure TPM startup PIN: Allow startup PIN with TPM
- Configure TPM startup key: Allow startup key with TPM
- Configure TPM startup key and PIN: Allow startup key and PIN with TP
- Insert the RootCAFiles virtual floppy disk.
- Open File Explorer and go to This PC. Right-click on the C:\ Drive and select Turn on BitLocker.
- On the BitLocker Drive Encryption setup screen click the Next button to continue.
- On the Preparing your drive for BitLocker screen click the Next button to continue.
- On the BitLocker Drive Encryption setup screen, click the Next button to continue.
- On the Choose how to unlock your drive at startup screen, select the option to Enter a password.
- On the Create a password to unlock this drive screen, enter the password that you want to use to unlock the drive at boot up. Make sure that you do not forget this password as it will require the Recovery Keys in order to get back into the TFS-ROOT-CA virtual machine. Ensure that you use a complex password for this and make it at least 14 characters in length. Click the Next button to continue.
- On the How do you want to back up your recovery key? screen, select the option to Save to a file. Save the file to the A:\ Drive (floppy disk). Click the Next button to continue.
- Eject the RootCAFiles virtual floppy disk and then backup the recovery key to another device before you continue. This is critical in case there is an issue with the BitLocker password.
- On the Choose how much of your drive to encrypt screen, select the option to Encrypt entire drive (slower but best for PCs and drives already in use) and click the Next button.
- On the Choose which encryption mode to use screen, select the option for New encryption mode (best for fixed drives on this devices) and click the Next button to continue.
- On the Are you ready to encrypt this drive? screen, ensure that the Run BitLocker system check box is selected and then click the Continue button.
- When prompted, restart the TFS-ROOT-CA Server.
- Enter the password that you set for the drive to ensure that it is working correctly.
- Login to the TFS-ROOT-CA Server, you should receive a notification that the drive is encrypting. You can also check the status of BitLocker at anytime by going to File Explorer, then to This PC, right-clicking on the C:\ Drive and selecting the Manage BitLocker option.
1.2 Root CA CAPolicy.inf Installation
The CAPolicy.inf file is used to add configuration details to the Certificate at the time of creation. Create a file in the C:\Windows folder called CAPolicy.inf (ensure that it is saved with the inf extension and not the txt extension, otherwise these settings will be ignored). Copy the following contents into this file:
[Version]
Signature="$Windows NT$"

[PolicyStatementExtension]
Policies=AllIssuancePolicy,InternalPolicy
Critical=FALSE

; AllIssuancePolicy is set to the OID of 2.5.29.32.0 to ensure all Certificate templates are available.
[AllIssuancePolicy]
OID=2.5.29.32.0

[InternalPolicy]
OID=1.2.3.4.1455.67.89.5
Notice="The TFS Labs Certification Authority is an internal resource. Certificates that are issued by this Certificate Authority are for internal usage only."
URL=http://pki.corp.tfslabs.com/cps.html

[Certsrv_Server]
; Renewal information for the Root CA.
RenewalKeyLength=4096
RenewalValidityPeriod=Years
RenewalValidityPeriodUnits=10

; Disable support for issuing Certificates with the RSASSA-PSS algorithm.
AlternateSignatureAlgorithm=0

; The CRL publication period is the lifetime of the Root CA.
CRLPeriod=Years
CRLPeriodUnits=10

; The option for Delta CRL is disabled since this is a Root CA.
CRLDeltaPeriod=Days
CRLDeltaPeriodUnits=0
Note: You can update the OID number in the InternalPolicy section for your deployment if it is required. The OID number in this example is used in Microsoft examples, but it should work for your organization if it is only ever going to be used internally. You can register for one if you would like to through IANA.
Signature Algorithm Support Issues
The AlternateSignatureAlgorithm=0 flag in the CAPolicy.inf file explicitly uses SHA256 for the algorithm instead of RSASSA-PSS. This can cause issues with some devices (especially iOS) and by ensuring that it is disabled you shouldn’t have issues with these certificates.
1.3 Active Directory Certificate Services Role Installation
Once the TFS-ROOT-CA Server has been installed and configured properly, the Active Directory Certificate Services Role needs to be installed.
- Open the Server Manager Console (servermanager.exe), click on the Manage menu, and click on Add Roles and Features to start the installation wizard.
- On the Before You Begin screen, click the Next button to continue.
- On the Installation Type screen, select the option for Role-based or feature-based installation and click Next to continue.
- On the Server Selection screen, verify that the TFS-ROOT-CA Server is selected and click Next.
- On the Server Roles screen, select the Active Directory Certificate Services option. The installation wizard will ask to install the necessary management tools for the role. Click the Add Features button to continue.
- On the Server Roles screen, click the Next button to continue.
- On the Features screen, click the Next button to continue.
- On the Active Directory Certificate Services screen, click the Next button to continue.
- On the Role Services screen, select the option for Certification Authority and click the Next button to continue.
- On the Confirmation screen, select the option to Restart the destination server automatically if required. When prompted with a warning about restarting the Server, click the Yes button (the Server must restart in order to continue). Click the Install button to continue.
- Once the installation is completed, click the Close button.
1.4 Active Directory Certificate Services Role Configuration
Once the Active Directory Certificate Services Role has been added, it will need to be configured. In the process of configuring the role for the TFS Labs Domain, the following Root Certificate will be created:
| Root Certificate Setting | Value |
|---|---|
| Cryptographic Provider | RSA#Microsoft Software Key Storage Provider |
| Key Length | 4096 Bits |
| Signature Algorithm | SHA256RSA |
| Signature Hash Signature | SHA256 |
| CA Common Name | TFS Labs Certificate Authority |
| Validity Period | 10 Years |
- To begin the configuration of Active Directory Certificate Services on TFS-ROOT-CA, open the Server Manager Console (servermanager.exe). Click the Notifications icon in the upper-right hand corner and click the Configure Active Directory Certificate Services on the destination server link in the Post-deployment Configuration box.
- On the Credentials screen, verify that the Administrator credentials is set to TFS-ROOT-CA\CA-Admin and click Next to continue.
- On the Role Services screen, select the option for Certification Authority and click the Next button to continue.
- On the Setup Type screen, the option for Standalone CA should be selected. The option for Enterprise CA is not available since this Server is not a Domain Member Server. Click the Next button to continue.
- On the CA Type screen, ensure that the Root CA option is selected (the Subordinate CA option will be used later for the Enterprise CA). Click the Next button to continue.
- On the Private Key screen, verify that the Create a new private key option is selected. This is because this a new CA installation and the Private Key is not being restored from a previous Server. Click the Next button to continue.
- On the Cryptography for CA screen, make the following changes and then click the Next button to continue:
- Cryptographic Provider: RSA#Microsoft Software Key Storage Provider
- Key Length: 4096
- Hash Algorithm: SHA256
- On the CA Name screen, set the Common Name (CN) for the CA to TFS Labs Certificate Authority and click the Next button to continue.
- On the Validity Period screen, set the validity period to 10 Years and click the Next button to continue.
- On the CA Database screen, make no changes to the database location and click the Next button to continue.
- On the Confirmation screen, verify that the options are correct and click the Configure button to commit the changes.
- On the Results screen, click the Close button.
Certificate Validity Period
It is not advised to have the Root Certificate and the Subordinate Certificate set to have the same Validity Period. For example, if both Certificates have a 5 Year expiration date, it is possible that the Root Certificate will expire before the Subordinate Certificate since it was signed first. If this happens it will be extremely difficult to re-sign both Certificates because they will both be invalid at the same time.
1.5 Root Certificate Authority CRL Configuration
The CRL Configuration for the Root CA is configured in this step to give greater control over when this takes place, and the time is extended to 52 weeks since the CRL does not need to be updated often on the Root CA. It also ensures that the Subordinate CA lifetime is extended from 1 Year to 5 Years.
Active Directory Configuration Partition Distinguished Name
To determine what the correct format of this name would be for your domain you can check it in only a few steps.
- On one of your Domain Controllers, open the Active Directory Users and Computers Console (dsa.msc).
- Go to the View menu and select Advanced Features.
- Right-click on the root of your Domain and select Properties.
- Go to the Attribute Editor tab.
- Scroll down until you find the distinguishedName Attribute Field and click the View button.
- Copy the value in the Attribute Field, this is the information needed for Step 2 below.
Once the Active Directory Configuration Partition Distinguished Name has been determined, the rest of the configuration can continue.
- Open an Administrative Command Prompt.
- To define the Active Directory Configuration Partition Distinguished Name, run the following command:
Certutil -setreg CA\DSConfigDN "CN=Configuration,DC=corp,DC=tfslabs,DC=com"
- To define Validity Period Units for all issued certificates by this CA, run following commands:
Certutil -setreg CA\ValidityPeriodUnits 5
Certutil -setreg CA\ValidityPeriod "Years"
- To define CRL Period Units and CRL Period, run the following commands:
Certutil -setreg CA\CRLPeriodUnits 52
Certutil -setreg CA\CRLPeriod "Weeks"
- To define CRL Overlap Period Units and CRL Overlap Period, run the following commands:
Certutil -setreg CA\CRLOverlapPeriodUnits 12
Certutil -setreg CA\CRLOverlapPeriod "Hours"
- Restart the Active Directory Certificate Services service:
net stop CertSvc
net start CertSvc
CRL Renewal Period
As defined in Step 4 in Section 1.5, the CRL Period on the Root CA is set to 52 weeks. This means that every 52 weeks you will need to power on the TFS-ROOT-CA Server and renew the CRL. You should set a reminder in your calendar to do perform this task every 50 weeks to ensure that it is renewed in time.
1.6 Enable Auditing on the Root Certificate Authority
Auditing is needed on any Server running Active Directory Certificate Services. This will write logs to the Windows Event Log whenever a Certificate is issued or revoked.
- Open the Local Security Policy Console (secpol.msc) and modify the Security Settings > Local Policies > Audit Policy > Audit object access setting to audit Success and Failure.
- Enable auditing for the Certificate Authority by running the following command from an Administrative Command Prompt:
Certutil -setreg CA\AuditFilter 127
- Restart the Active Directory Certificate Services Service.
1.7 Root Certificate Authority CDP and AIA Configuration
Before the Subordinate Certificate Authority can be properly configured, the Certificate Revocation List needs to be configured on the Root CA Certificate. This configuration will be present in the Subordinate Certificate that will be issued on the Enterprise CA which will be installed on the TFS-CA01 Server.
- Open the Certification Authority Console (certsrv.msc) for the TFS-ROOT-CA Server.
- Right-click on TFS Labs Certificate Authority Server and select Properties.
- On the Extensions tab, verify that the CRL Distribution Point (CDP) extension is selected and click the Add button.
- Under the Location field, enter the following address and click the OK button:
http://pki.corp.tfslabs.com/CertData/<CaName><CRLNameSuffix><DeltaCRLAllowed>.crl
- Back on the Extensions tab, verify that the Include in CRLs. Clients use this to find Delta CRL locations. and Include in the CDP extension of issued certificates options are selected for the location that was just entered.
- Select the file:///CertEnroll/TFS%20Labs%20Certificate%20Authority.crl list item and click the Remove button. Click the Yes button to confirm that you want to remove the location.
- On the Extensions tab, verify that the Authority Information Access (AIA) extension is selected and click the Add button.
- Under the Location field, enter the following address and click the OK button:
http://pki.corp.tfslabs.com/CertData/<ServerDNSName>_<CaName><CertificateName>.crt
- Back on the Extensions tab, verify that the Include in the AIA extension of issued certificates option is selected for the location that was just entered.
- Select the file:///CertEnroll/_.crt list item and click the Remove button. Click the Yes button to confirm that you want to remove the location.
- Click the OK button to commit the changes. When prompted to restart Active Directory Certificate Services, click the Yes button.
- Verify that the settings are correct by running the following commands in an Administrative Command Prompt:
Certutil -getreg CA\CRLPublicationURLs
Certutil -getreg CA\CACertPublicationURLs
- In the Certification Authority Console (certsrv.msc), right-click on Revoked Certificates under TFS Labs Certificate Authority and select All Tasks > Publish.
- On the Publish CRL window, verify that New CRL is selected and click the OK button.
- Close the Certification Authority Console.
1.8 Root Certificate and CRL List Export
Exporting the Root Certificate CRL List is needed in order to make it available on the TFS-CA01 Server. The links to these files were referenced in the Certificate configuration, so they will need to be copied to the Subordinate CA Server for users to access these files.
- Add the RootCAFiles virtual floppy disk to the TFS-ROOT-CA virtual machine.
- Copy the contents of the C:\Windows\System32\CertSrv\CertEnroll folder to the C:\RootCA folder.
- Open the Certificates Console (certlm.msc) under the Local Computer Account and export the TFS Labs Certificate Authority Certificate from the Trusted Root Certification Authorities Store as a DER encoded binary. Save the file as C:\RootCA\TFS Labs Certificate Authority.cer.
- Copy the contents of the C:\RootCA folder to the A:\ Drive. The contents of the A:\ Drive should be the following:
A:\TFS Labs Certificate Authority.cer
A:\TFS Labs Certificate Authority.crl
A:\TFS-ROOT-CA_TFS Labs Certificate Authority.crt
- Eject the RootCAFiles virtual floppy disk.
Certificate Authority in Windows Server 2019
- Introduction
- Part 1 — Offline Root CA Setup
- Part 2 — Subordinate CA Setup
- Part 3 — Deploy Root and Subordinate Certificate
- Part 4 — Certificate Revocation Policies
- Part 5 — Configure Private Key Archive and Recovery
- Part 6 — Certificate Template Deployment
- Part 7 — Certificate Auto-Enrollment
- Part 8 — Final Steps