
Функция автономных (офлайн) файлов в Windows 10 позволяет сделать определенные сетевые папки или файлы доступными в автономном режиме, даже если ваш компьютер не подключен к корпоративной сети. В этой статье мы рассмотрим, как включить и настроить автономные файлы (Offline Files) в Windows 10/Windows Server 2016 вручную и с помощью групповых политик.
Автономные файлы доступны в экосистеме Windows довольно давно. Все что требуется от пользователя – включить Offline Files на компьютере и пометить определенные файлы или папки на сетевом ресурсе “всегда доступными в автономном режиме”. После этого Windows сохраняет указанные ресурсы в локальный кэш на диске и периодически обновляет его в фоновом режиме (раз в 2 часа — частоту синхронизации автономных файлов можно задать с помощью параметра GPO Configure Background Sync).
Содержание:
- Включить автономные файлы в Windows 10
- Включить Offline Files для сетевой папки на Windows Server
- Настройка автономный файлов с помощью групповых политик
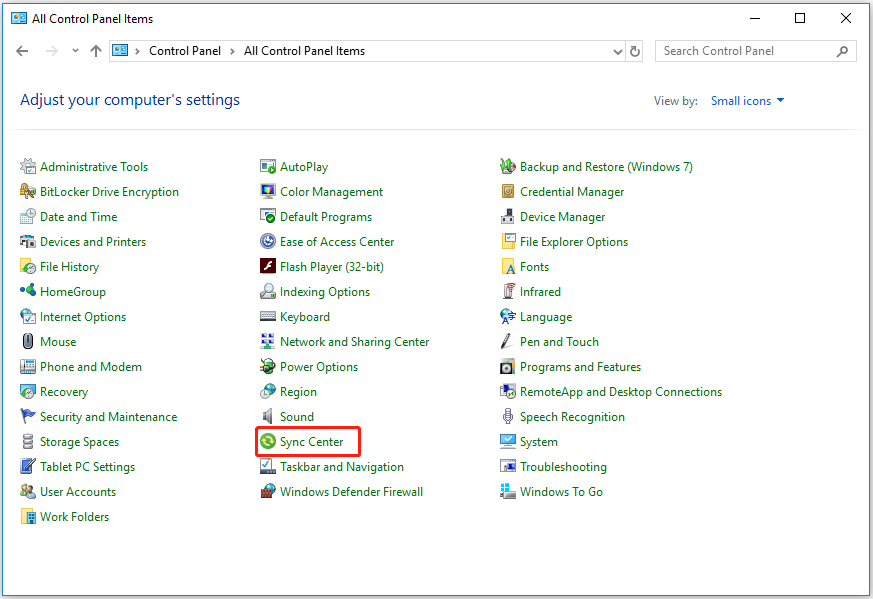
Включить автономные файлы в Windows 10
В Windows 10 можно включить автономное файлы через классическую Панель управления.
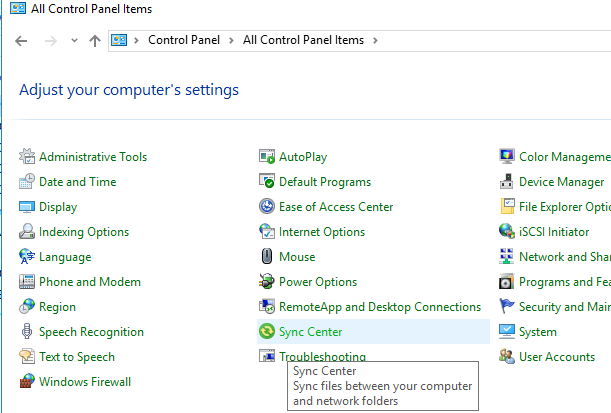
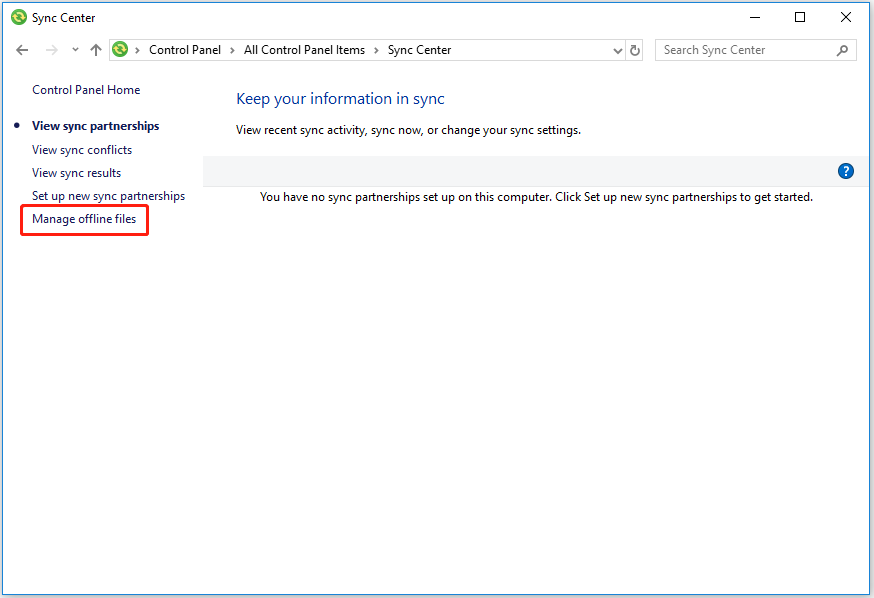
- Откройте Центр синхронизации (Sync Center);

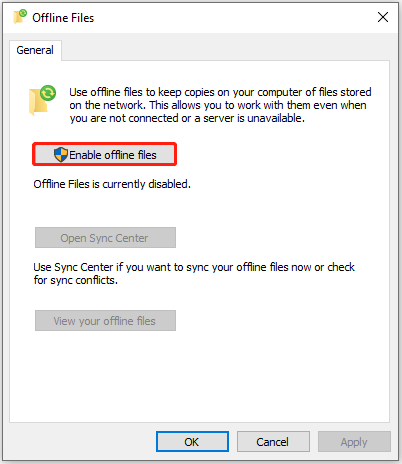
- В левой панели выберите “Управление автономными файлами” (Manage Offline Files);
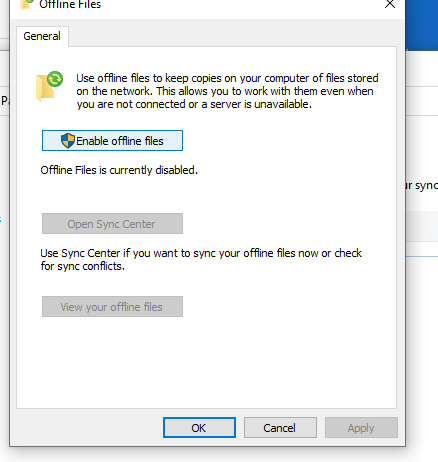
- Нажмите на кнопку “Включить автономные файлы” (Enable Offline Files);
- Перезагрузите компьютер.
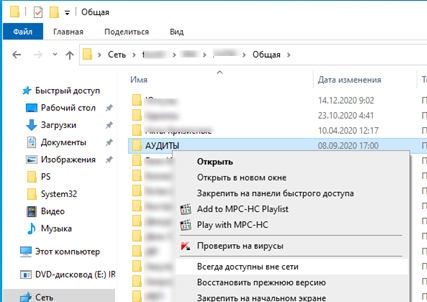
Теперь пользователю достаточно щелкнуть правой кнопкой мыши по файлу или папке в общей сетевой папке, который нужно сделать доступным автономном и выбрать пункт меню “Всегда доступно в автономном режиме” (Always available offline).
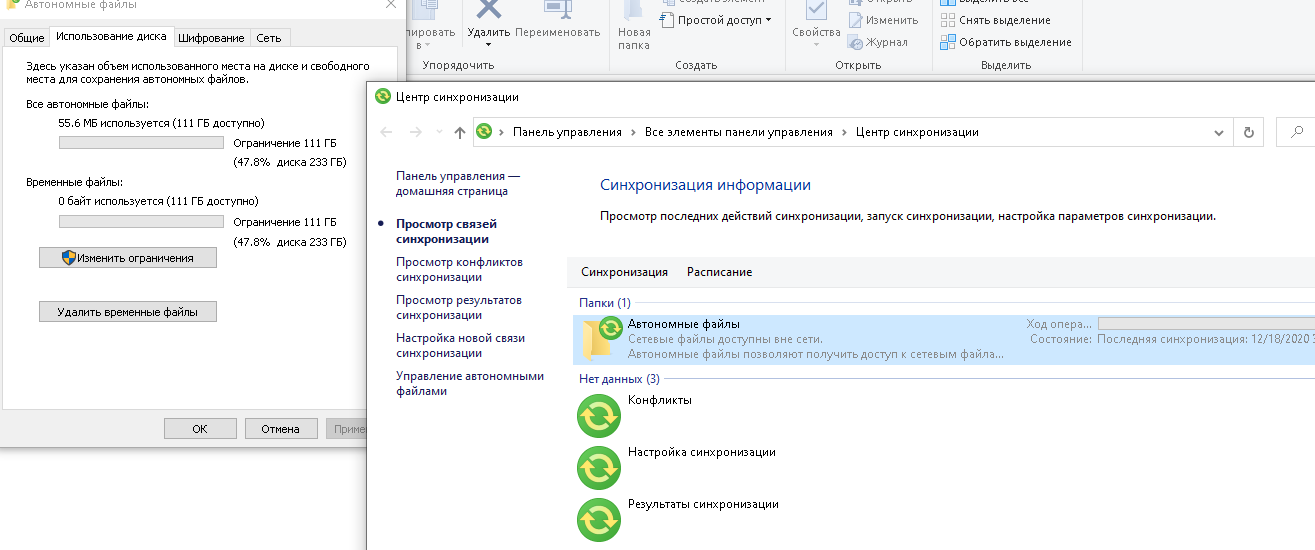
Windows начнет копировать указанные файлов в локальных кэш автономных файлов. По умолчанию размер кэша для автономных файлов в Windows составляет от 25% от емкости диска (в зависимости от версии Windows).
Теперь, если исходный файловый сервер недоступен, скорость сетевоегоподключения до него медленнее, чем заданное пороговое значение, эти файлы будут доступны для работы в автономном режиме через Центр синхронизации.
Все изменения, внесенные в автономные файлы, будут синхронизированы с сервером в следующий раз, когда компьютер подключится к сети.
Офлайн файлы сохраняются на клиентский компьютер в каталог
C:\Windows\CSC
и не доступны напрямую через File Explorer.
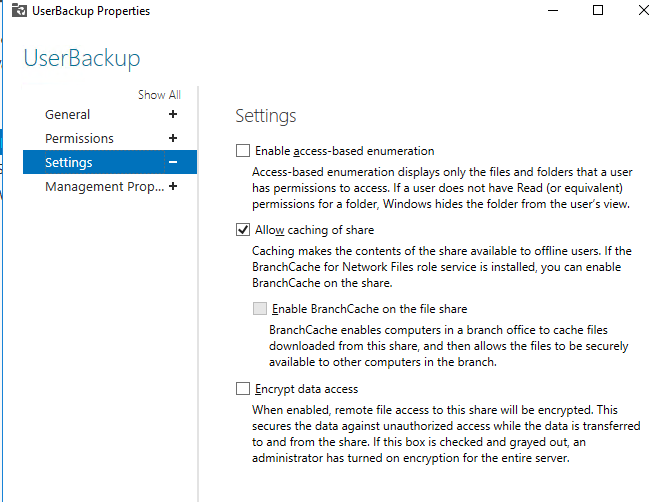
Включить Offline Files для сетевой папки на Windows Server
Чтобы пользователь мог помечать некоторые файлы доступными в автономном режиме, поддержка Offline Files должна быть включена в настройках сетевой папки.
В Windows Server 2016 запустите Server Manager и для роли File and Storage Services в свойствах общей сетевой папки включите опцию “Allow caching of share”.
Можно включить ручной режим кэширования для сетевой папки с помощью PowerShell (в этом режиме пользователи могут вручную выбрать папки и файлы, которые нужно сделать доступными офлайн):
Set-SMBShare -Name Docs -CachingMode Manual
Если сетевая папка находится на компьютере с десктопной редакцией Windows, нужно в свойствах общей сетевой папки включить опцию Caching -> Only the files and programs that users specify are available offline.

Настройка автономный файлов с помощью групповых политик
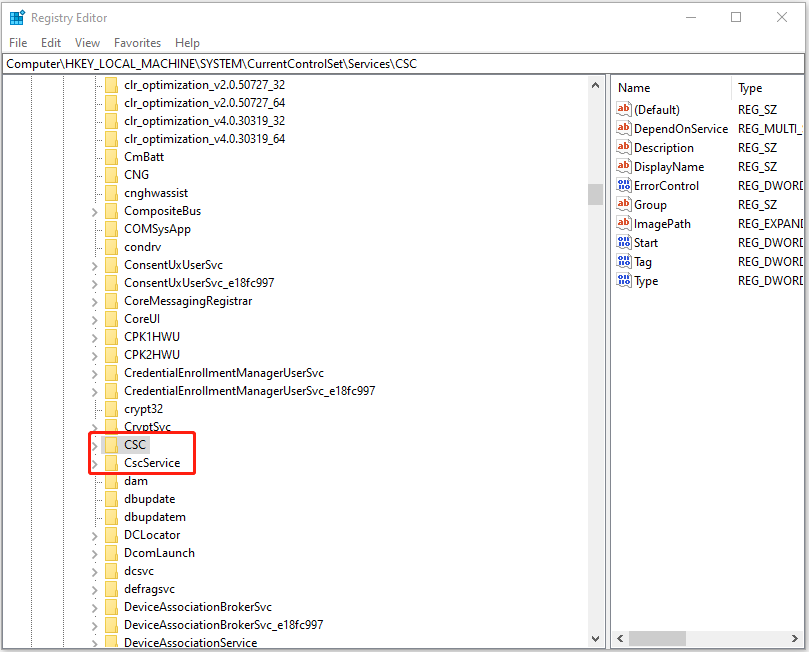
Если вы хотите включить службу автономных файлов на всех компьютерах в домене Active Directory, можно распространить на них следующие параметры реестра через GPO:
- HKEY_LOCAL_MACHINE\SYSTEM\CurrentControlSet\Services\CSC – тип DWORD Start = 1
- HKEY_LOCAL_MACHINE\SYSTEM\CurrentControlSet\Services\CscService
– тип DWORD Start = 2 - HKLM\Software\Policies\Microsoft\Windows\NetCache – тип DWORD Enabled=1
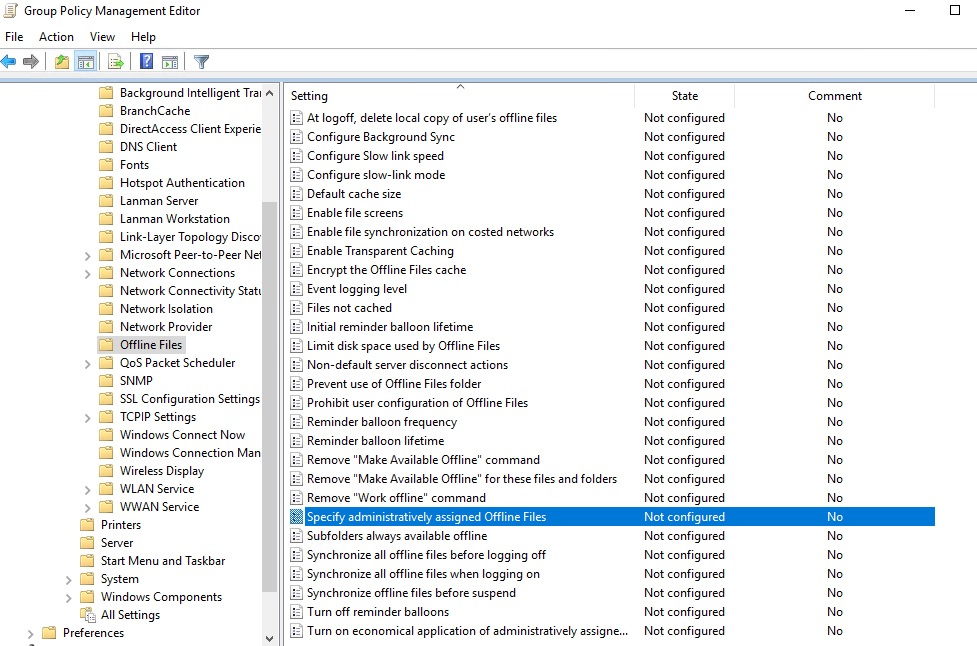
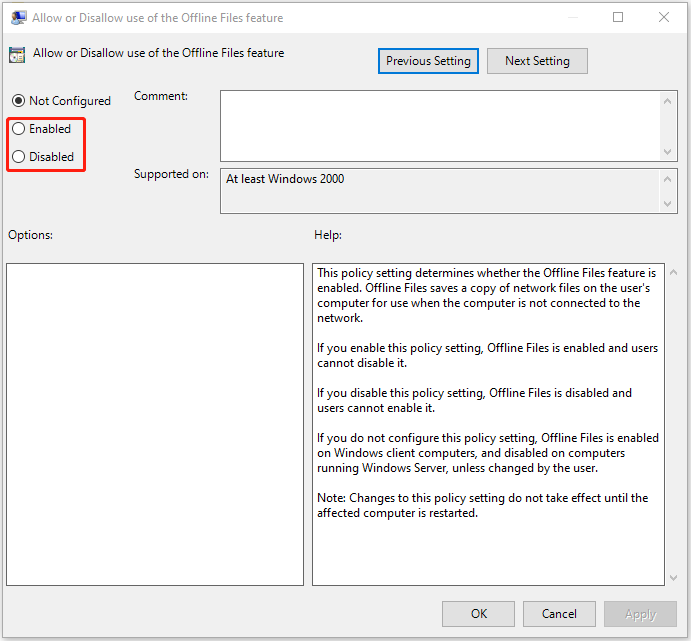
Либо можно использовать политику Allow or Disallow use of the Offline Files feature в разделе GPO Computer Configuration -> Policies -> Administrative Templates -> Network -> Offline Files. Здесь же можно настроить другие параметры Offline Folders:
- Configure Background Sync — включить фоновую синхронизацию и настроить интервалы синхронизации;
- Limit disk space used by Offline Files / Default Cache size – ограничить размер автономных файлов на диске;
- Specify administratively assigned Offline File – список сетевых ресурсов, которые автоматически должны быть синхронизированы на компьютеры пользователей и доступны в автономном режиме (можно указать UNC пути к любым сетевым папкам или личному каталогу пользователя \\Server1\Users$\%username%).
При анализе проблем работы с автономными файлами в Windows полезно исследовать события синхронизации в журнале Windows. Включите ведение лога синхронизации OfflineFiles:
wevtutil sl Microsoft-Windows-OfflineFiles/SyncLog /e:true /q
Затем, например, можно получить список успешно синхронизированных файлов за сутки с помощью такой PowerShell команды:
Get-WinEvent -oldest -filterhashtable @{ logname = "Microsoft-Windows-OfflineFiles/SyncLog"; starttime = (get-date).adddays(-1); id = 2005 } | select-object TimeCreated, @{ name = "Path"; expression = { ([xml]$_.toxml()).Event.UserData.SyncSuccessInfo.Path } }
Для очистки кэша автономных файлов нужно изменить параметра реестра Format Database и перезагрузить компьютер:
reg add HKEY_LOCAL_MACHINE\SYSTEM\CurrentControlSet\Services\Csc\Parameters /v FormatDatabase /t REG_DWORD /d 1 /f
shutdown –f –r –t 0
Способ 1: «Панель управления»
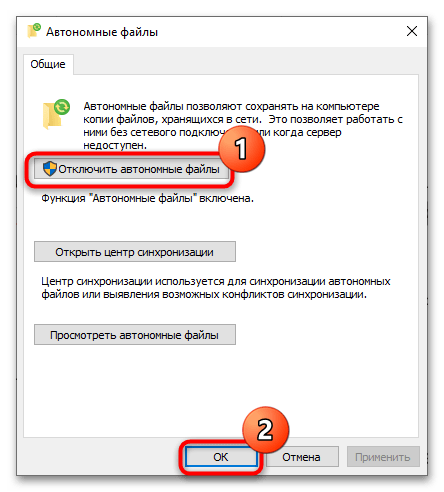
Использование соответствующего апплета классической «Панели управления» является наиболее удобным и очевидным способом управления службой «Автономные файлы» в Windows 10.
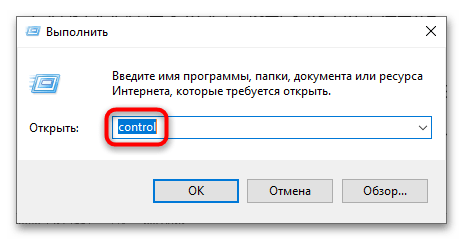
- Откройте классическую «Панель управления» командой
control, использованной в диалоговом окошке «Выполнить» (Win + R). - Найдите и запустите апплет «Центр синхронизации».
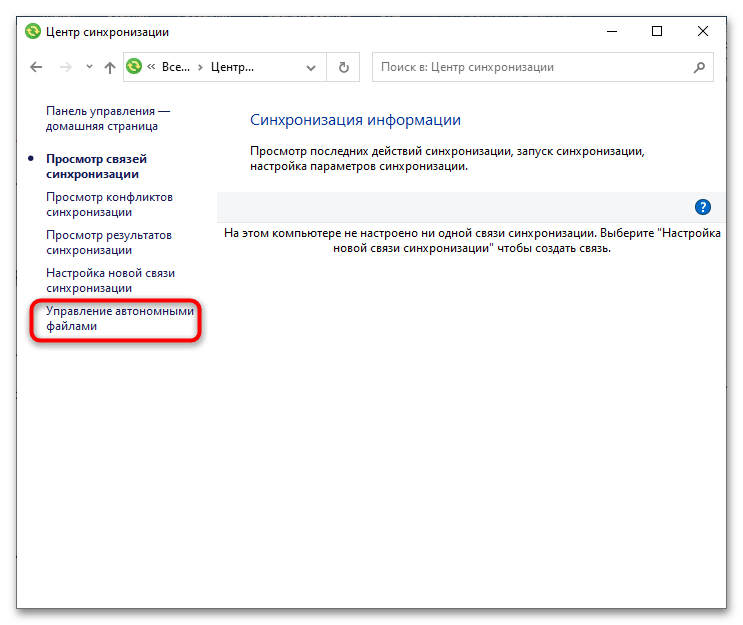
- Выберите в меню слева «Управление автономными файлами».
- Нажмите в открывшемся окошке кнопку «Отключить автономные файлы» и сохраните настройки.

Способ 2: Локальные политики
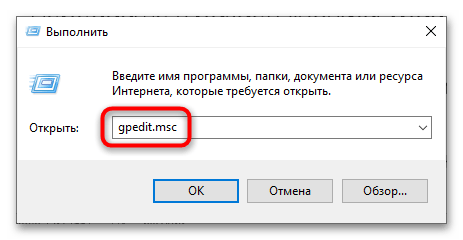
На более низком уровне отключить функцию «Автономные файлы» можно в «Редакторе локальных групповых политик». Этот способ доступен в Windows 10 редакции Pro и выше. Обладателям редакции Home следует воспользоваться следующим способом статьи.
- Откройте «Редактор локальных групповых политик» при помощи команды
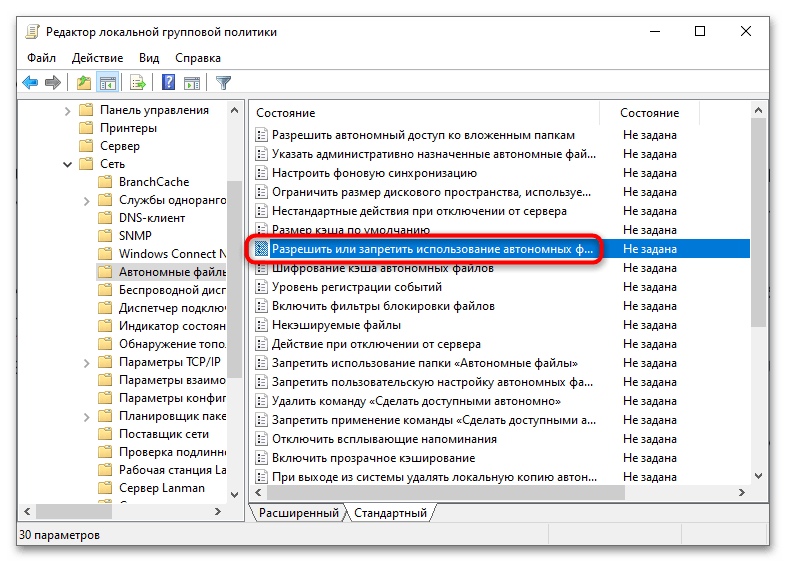
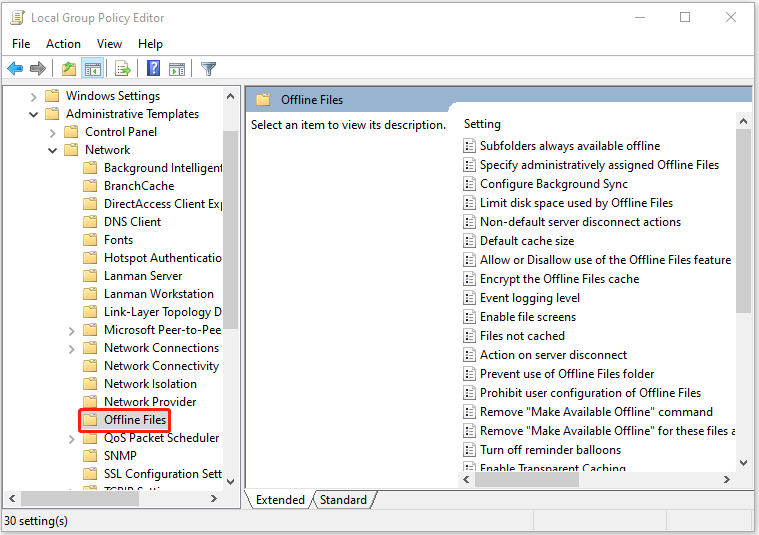
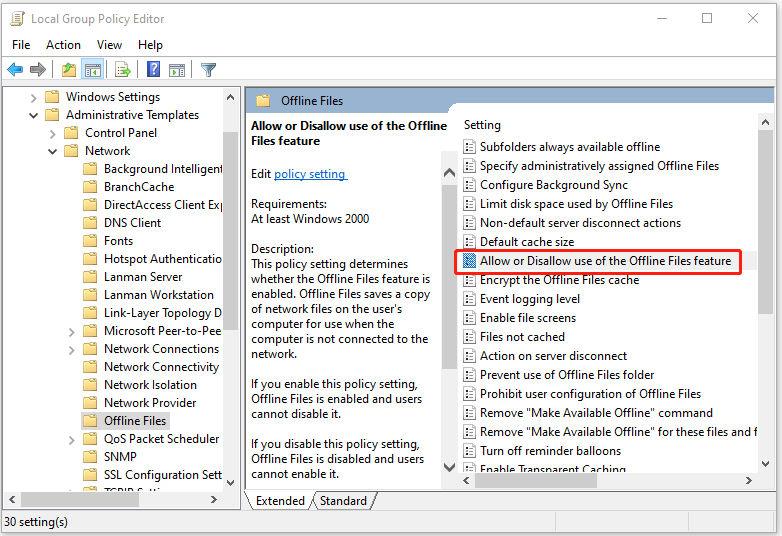
gpedit.mscи диалогового окна «Выполнить» (Win + R). - Перейдите в раздел «Конфигурация компьютера» → «Административные шаблоны» → «Сеть» → «Автономные файлы».
- Отыщите в правой колонке политику «Разрешить или запретить использование автономных файлов» и откройте ее настройки двойным по ней кликом.
- Активируйте радиокнопку «Отключено» и сохраните настройки.
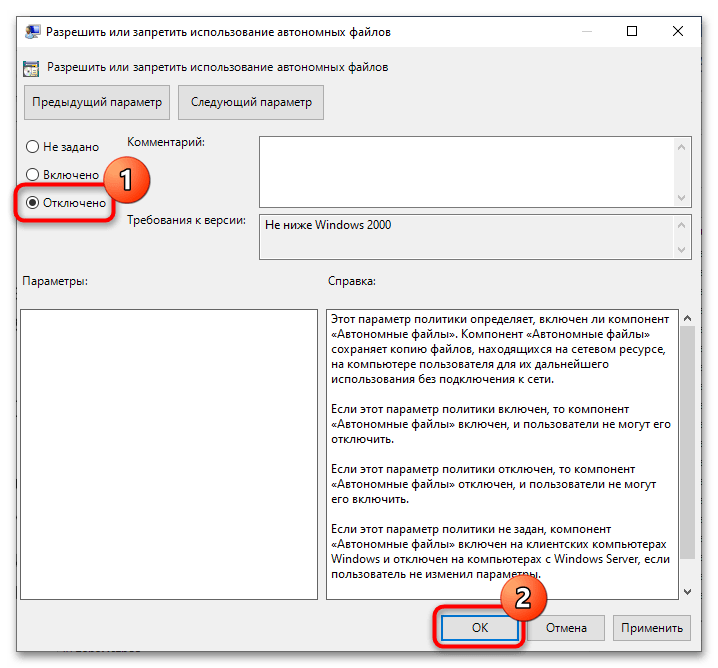
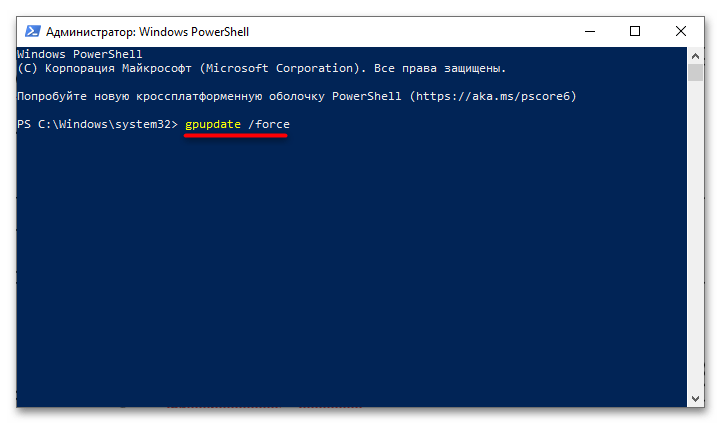
Чтобы настройки вступили в силу, необходимо будет перезагрузить компьютер либо обновить политики командой gpupdate /force, выполненной в классической «Командной строке» либо в консоли «PowerShell».
Способ 3: «Редактор реестра»
В Windows 10 Домашней редакции для отключения службы автономных файлов можно использовать «Редактор реестра».
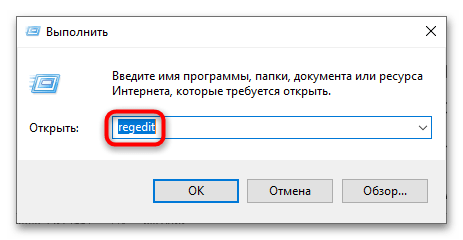
- Запустите «Редактор реестра», выполнив в диалоговом окошке «Выполнить» (Win + R) команду
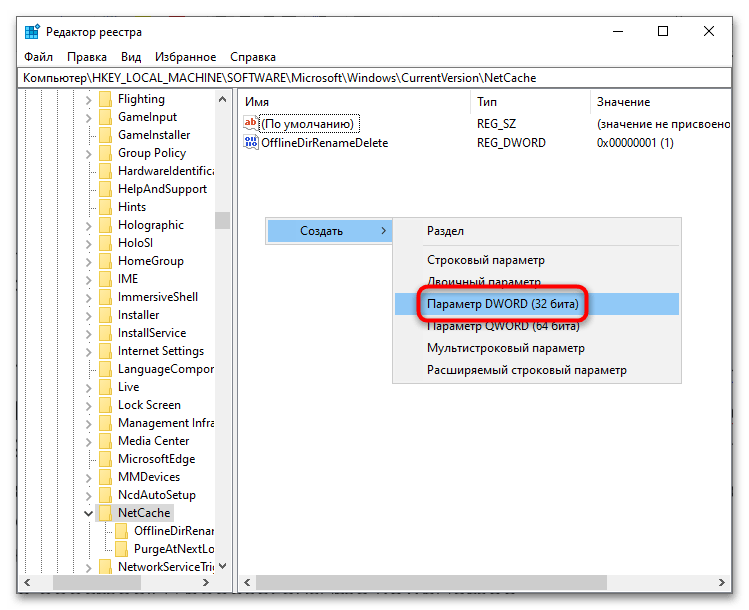
regedit. - Разверните ветку
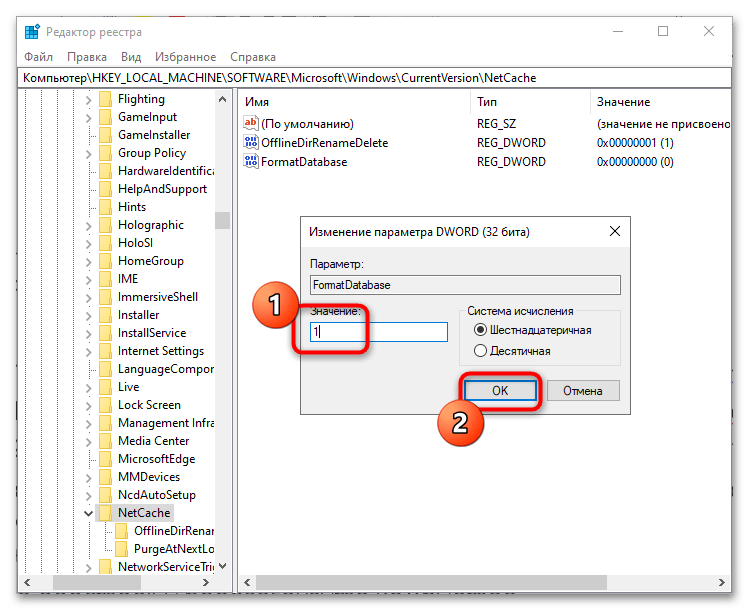
HKLM\SOFTWARE\Microsoft\Windows\CurrentVersion\NetCache, кликните по последнему подразделу правой кнопкой мыши и выберите из меню «Создать» → «Параметр DWORD». - Дайте название созданному параметру «FormatDatabase», откройте окошко редактирования его значения двойным кликом и установите в качестве значения «1». Если параметр уже существует, ограничьтесь изменением его значения.
- Закройте «Редактор реестра» и перезагрузите компьютер.
В результате функция «Автономные файлы» будет отключена. Этот способ дублирует предыдущий вариант, делая функцию управления автономными файлами недоступной.
Наша группа в TelegramПолезные советы и помощь
Accessing files on a corporate network is easy. What happens when you’re offline but still want to keep working? Run offline files on your device so you can continue working without an internet connection. This post from MiniTool provides details about offline files Windows 10.
What Is Offline Files Windows 10
What is offline file? The Windows 10 offline files feature is a network feature of Sync Center that allows users to access files stored at another point on their network than their own computer, even if the network connection is not working.
All data made offline are saved in the offline files folder. If your system drive letter is the C drive, it is located in the C:\windows\CSC folder. You can view them at any time. If your computer is not connected to a network drive, the online-only network folder is empty with no files by default.
Offline files in Windows 10 are only available in Pro, Enterprise, and Education editions of Windows 10.
In addition to enabling offline files and always-on offline mode in Sync Center, your files may also be offline in the following situations.
- The connected server is unavailable.
- You have enabled work offline mode in File Explorer.
- The network connection speed is below a configurable threshold.
Why You Need Offline Files Windows 10
Why do you need offline files on your Windows? The first is that offline files can help you make exact copies of the web files you want to protect and use. The second is that you can access and view them at any time, especially when your computer is not connected to the network and server.
How to Enable/Disable Offline Files Windows 10
How to enable or disable offline files in Windows 10? There following are three ways available. Before enabling offline files Windows 10, please do the following preparations:
1. Create a shared folder to save all network files and folders to be synchronized.
- Create a folder. Right-click it to choose Properties. Then, click the Sharing tab and click Share.
- Click the arrow to choose Everyone to share with and click Add.
- Choose Read/Write under Permission Level and click Share.
- Go to the Sharing tab again. Click Advanced Sharing… and check the Share this folder In the same window, click the Permissions button and check the Allow box next to the Full Control option.
- After creation, go back to the Sharing tab and note down the network path.
2. Map the network drive to the local computer.
- Open This PC and select Map network drive under the Computer tab. Then, type the path of your shared folder and click Finish.
- Then, go to the mapped network drive. Right-click the files or folder you want to access to select the Always available offline option.
Way 1: Via Sync Center
How to enable offline files Windows 10? The first method is via Sync Center. Follow the guide below:
Step 1. Type Control Panel in the Search box to open it. Then, find Sync Center and click it to open.
Step 2. Click Manage offline files in the left panel.
Step 3. Under the General tab, click Enable offline files and click Apply to enable it. After that, you will be asked to restart your computer. You just need to do that. Otherwise, you will encounter “Offline file is enabled but not yet active” in Windows 10 and your network files will not be synced to the local mapped drive.
How to disable offline files Windows 10? You need to click Disable offline files in the Offline Files window. By default, the Enable offline files option will change to Disable offline files after you enable it.
Way 2: Via Registry Editor
The second method for you to enable offline files on Windows 10 is via Registry Editor. Here is how to do that:
Step 1. Type Registry Editor in the Search box to open it.
Step 2. Go to the CSC and CscService key in order with the following path.
HKEY_LOCAL_MACHINE\SYSTEM\CurrentControlSet\Services\CSC
HKEY_LOCAL_MACHINE\SYSTEM\CurrentControlSet\Services\CscService
Step 3. Then, right-click the blank area in the right panel to select new and DWORD (32-bit) Value and set its name as Start.
Step 4. To enable offline files, set the start value of CSC and CscService to 1 and 2 in order.
Step 5. Restart your computer to save changes.
To disable offline files, you just need to set the start value of CSC and CscService to 4 and restart your computer to save changes.
Way 3: Via Local Group Policy Editor
How to enable offline files Windows 10? The third method for you is via Local Group Policy Editor.
Step 1. Type group policy in the Search box and then select Edit group policy from the start menu list.
Step 2. Go to Computer Configuration > Administrator templates > Network > Offline Files key.
Step 3. Scroll down the Offline Files setting to find Allow or Disallow the use of Offline Files feature. Double-click it.
Step 4. Then you can enable or disable offline files based on your needs. To enable offline files, select Enabled in the next window. To disable offline files, select Disabled in the next window.
How to Configure Offline Files Windows 10
While the default settings are adequate for most users, Windows 10 offline files provide many settings that you can customize. For example, you can control the amount of local space used to store network files. You can enable encryption to add an extra layer of security. You can optimize offline files for slow network connections, and view and manage conflicts and results.
Next, we will introduce how to configure offline files Windows 10. Continue to read.
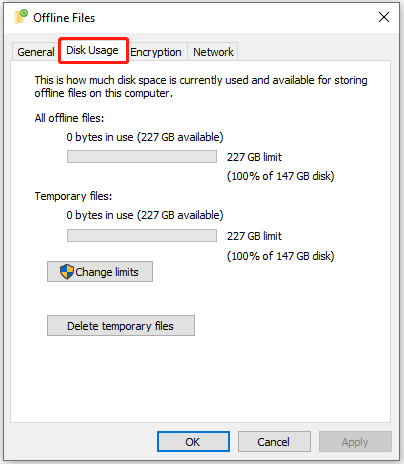
1. Check Offline Files disk usage
Follow the guide below:
- Type Control Panel in the Search box to open it. Then, find Sync Center and click it to open.
- Click Manage offline files in the left panel.
- Click the Disk Usage tab. Confirm the storage usage for the offline files.
- Click the Change limits button. Use the sliders to specify the maximum local space for offline and temporary files. Click the OK button.
- Click the Delete temporary files button and click the OK button.
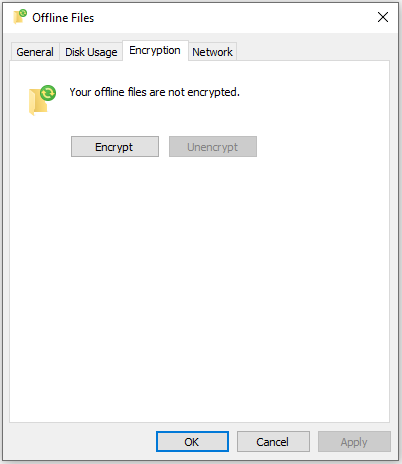
2. Encrypt or Unencrpt Offline Files
- Open Manage offline files again.
- Click the Encryption tab. Click the Encrypt button.
- Click the Unencrypt button to disable encryption and click the OK button.
- Once you complete the steps, the cached network files will remain encrypted.
3. Optimize sync for slow connection
- Open Manage offline files again.
- Click the Network tab. Confirm the time (minutes) to check for a slow connection to sync files.
- Click the Apply button and click the OK button.
After you complete the steps, when you are working offline because of a slow network connection, Windows 10 will check the connection speed using the time you specified. If the network is sluggish, you will continue to work offline, but it will switch the connection to online if it’s good again.
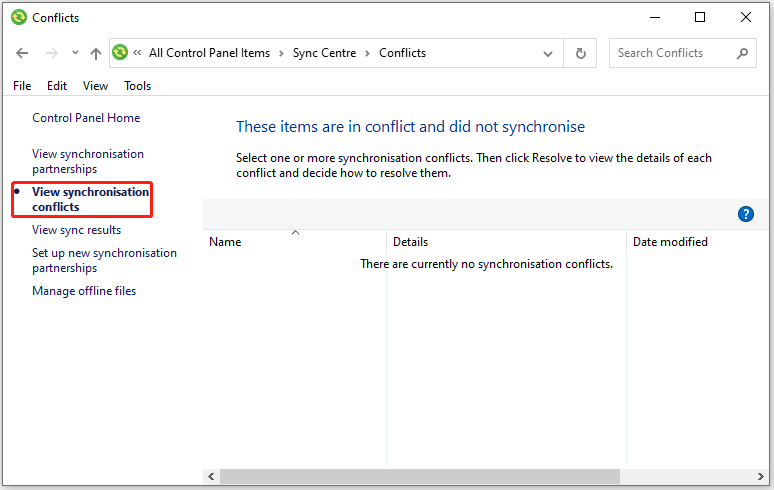
4. View Synchronisation Conflicts
- Click the View synchronisation conflicts button from the left pane.
- Then, you can see the name, details, and modified data of the conflicts.
5. View sync results
- Click the View sync results button from the left pane.
- Then, you can see the name, details, and modified data of the results.

How to Sync Offline Files Windows 10
How to sync offline files on Windows 10? There are two ways for you.
Method 1: Sync Offline Files Manually
Step 1. Go to File Explorer > This PC > network locations, then select the mapped network drive created in advance.
Step 2. Right-click folders that contain offline files, then select Sync > Sync selected offline files.
Method 2: Sync Offline Files Automatically
Step 1. Open Sync Center again.
Step 2. Click the Offline Files folder, then you will see all the shared folders for offline files sync. Click Sync to sync the network files to the local computer immediately. You can click Schedule to make your files always in sync.
How to Sync Files to Network Drive
By now, you probably know how to sync network files locally using Offline Files in Windows 10. This is very useful for users who want to work with network files, allowing you to access and view them anytime you are offline from your computer.
But its steps are a bit complicated. Also, syncing is not always smooth and you may encounter various errors such as offline file conflicts, access denied, sync hangs, etc. There is an easier way to sync network files and keep them offline in Windows 10.
MiniTool ShadowMaker is a piece of professional Windows 10 backup software and it is designed to back up the files, folders, disks, partitions and the operating system. It also comes with the Sync feature, ensuring the files are in two or more locations and kept in pace. MiniTool ShadowMaker is one-way sync.
MiniTool ShadowMaker TrialClick to Download100%Clean & Safe
Detailed operating steps are listed as follows:
Step 1: Launch MiniTool ShadowMaker
- Please launch MiniTool ShadowMaker.
- Click Keep Trial.
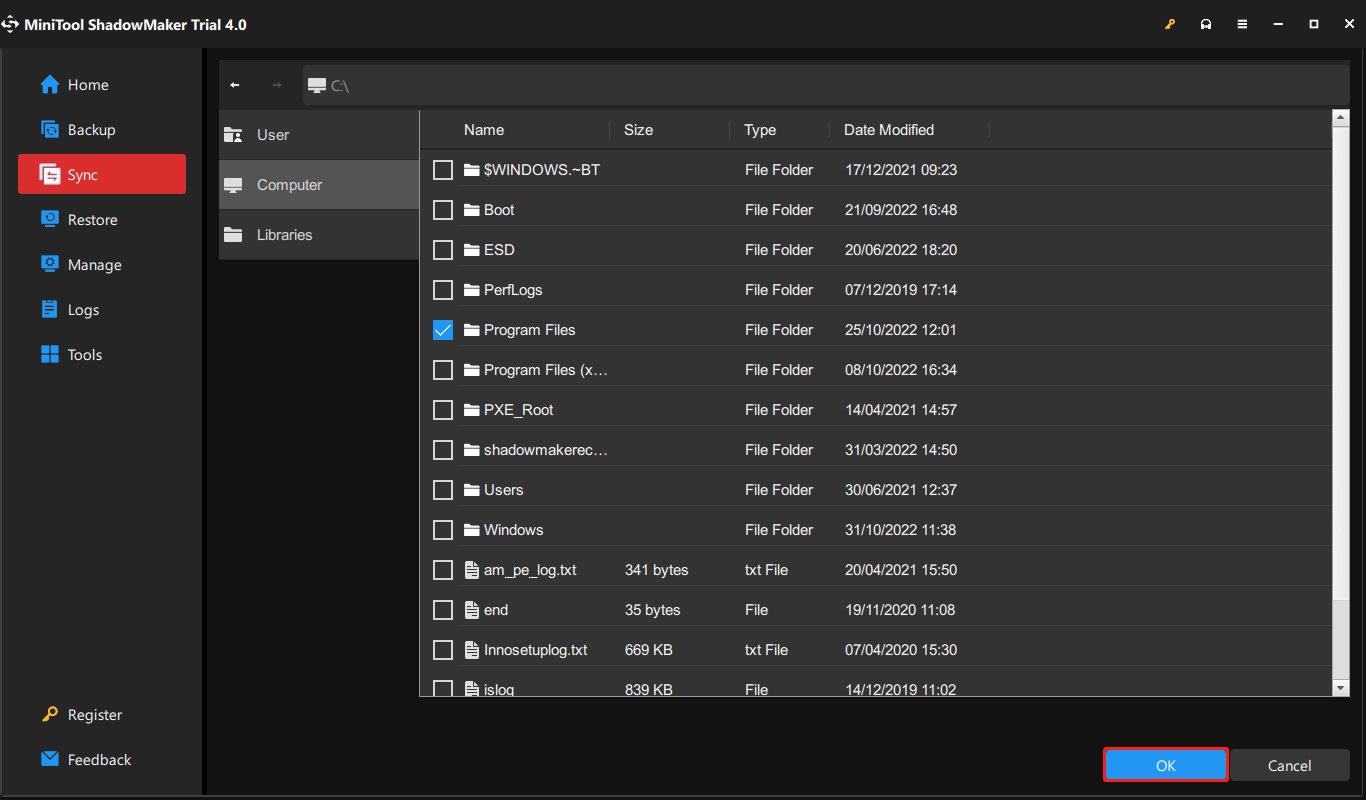
Step 2: Specify Folders and Path to Sync
- Go to the Sync page and click it in the toolbar.
- Specify the source and destination for file sync.
What to Sync
- Go to the SOURCE section.
- Under the SOURCE tab, three paths are available: User, Computer, and Libraries. You can choose a source to select files. Then click OK to continue.
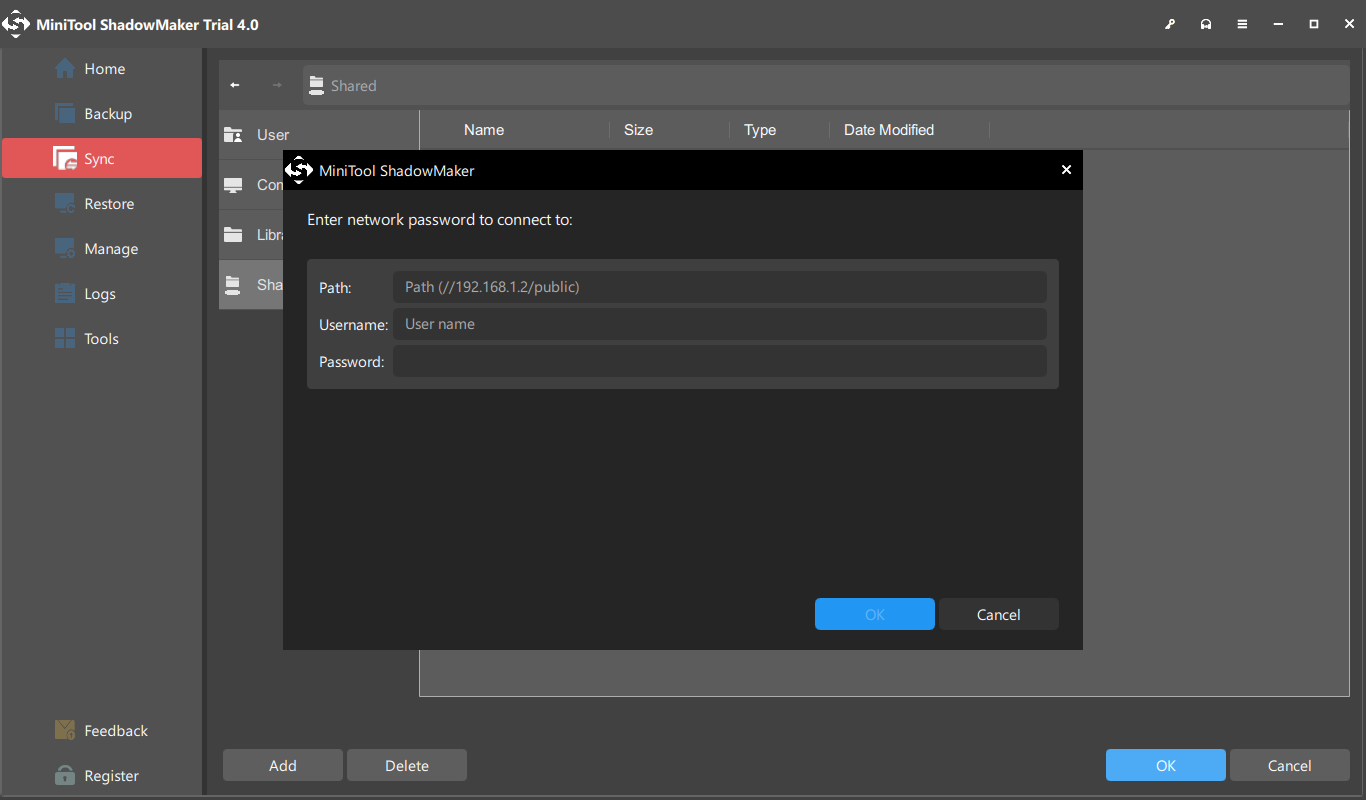
Where to save synchronized folders
Under the DESTINATION tab, there are four paths available: Administrator, Libraries, Computer, and Shared. To sync files among multiple computers, choose Shared, type Path, User name, and Password in sequence and click OK to finish.
Step 3: Start to Sync Files to Another Computer
- Please go to Sync.
- You can click Sync Now to perform file sync or click Sync Later to postpone it. Besides, you can continue this sync task on the Manage page.
Bottom Lines
To sum up, this post shows what offline files Windows 10 is and how to enable and disable offline files Windows 10. If you have any problem with MiniTool ShadowMaker, please feel free to contact us via email at [email protected] and we will reply to you as soon as possible.
- Windows 10 lets you enable Offline Files to make network files available without a connection.
- To enable Offline Files, right-click the shared folder or file and select the “Always available offline” option.
- To manage Offline Files settings: Go to Control Panel > Sync Center > Manage offline files.
- Sync Center settings let you enable or disable Offline Files, control disk usage, delete temp files, encryption, and more.
On Windows 10, Offline Files is a legacy feature that allows you to download and keep network files always available offline. This is a nifty feature that will come in handy when dealing with slow network connection problems to access files. The file server becomes unavailable. Or you usually have to work outside of the local network with files available in a shared folder.
Whatever the reason it might be, on Windows 10 Pro and Enterprise (excluding the Home edition), “Offline Files” provides a convenient and fast way to access files no matter the network condition. Then the next time you connect to the network, the files will synchronize automatically.
In this guide, you will learn the steps to make network files always available offline on Windows 10. In addition, we will outline the steps to use Sync Center to manage the feature settings, resolve conflicts, and delete temporary files.
- Enable Always available offline feature on Windows 10
- Enable Offline Files on Windows 10
- Disable Offline Files on Windows 10
- Manage Offline File settings on Windows 10
Enable Always available offline feature on Windows 10
To enable the “Always available offline” option for network files, use these steps:
-
Open File Explorer on Windows 10.
-
Navigate to the network folder you want to keep offline.
-
Right-click the folder and select the Always available offline option.


Once you complete the steps, the sync process will begin, and it may take some time to complete depending on the amount of data.
If you want to make the files always online again, use the same steps outlined above and clear the “Always available offline” option.
Windows 10 Pro and Enterprise ships with Offline Files enabled by default, but if it is disabled, you can turn on the feature using Control Panel.
You can enable Offline Files on Windows 10 through Control Panel. Here’s how:
-
Open Start.
-
Search for Control Panel and click the top result to open the legacy app.
-
Click the View by menu and select the Large icons option.
-
Click on Sync Center.

-
Click the Manage offline files option from the left pane.

-
Click the General tab.
-
Click the Enable offline files button.
-
Click the OK button.


After you complete the steps, you can use the previous steps to make files in a shared folder accessible without a network connection.
Disable Offline Files on Windows 10
To disable the Offline Files feature, use these steps:
-
Open Start.
-
Search for Control Panel and click the top result to open the legacy app.
-
Click the View by menu and select the Large icons option.
-
Click on Sync Center.
-
Click the Manage offline files option from the left pane.
-
Click the General tab.
-
Click the Disable offline files button.
-
Click the OK button.
Once you complete the steps, the feature to sync network files to your computer will be disabled.
Manage Offline File settings on Windows 10
Although the default settings will be enough for most users, Windows 10 Offline Files includes many settings you can customize. For example, you can control the amount of local space to store network files. You can enable encryption to add an extra layer of security. You can optimize the Offline Files for slow network connections, and you can view and manage conflicts and results.
Check Offline Files disk usage
To determine the storage usage of Offline Files, use these steps:
-
Open Start.
-
Search for Control Panel and click the top result to open the legacy app.
-
Click the View by menu and select the Large icons option.
-
Click on Sync Center.
-
Click the Manage offline files option from the left pane.
-
Click the Disk Usage tab.
-
Confirm the storage usage for the offline files.
-
(Optional) Click the Change limits button.
-
Use the sliders to specify the maximum local space for offline and temporary files.
-
Click the OK button.
-
(Optional) Click the Delete temporary files button.
-
Click the OK button.
After you complete the steps, you will understand how the local storage is being utilized to store offline files.
Enable Offline Files encryption
To enable encryption for offline network files, use these steps:
-
Open Start.
-
Search for Control Panel and click the top result to open the legacy app.
-
Click the View by menu and select the Large icons option.
-
Click on Sync Center.
-
Click the Manage offline files option from the left pane.
-
Click the Encryption tab.
-
Click the Encryption button.
-
(Optional) Click the Unencrypt button to disable encryption.
-
Click the OK button.
Once you complete the steps, the cached network files will remain encrypted,
Optimize sync for slow connection
To determine how often to check for slow network connections, use these steps:
-
Open Start.
-
Search for Control Panel and click the top result to open the legacy app.
-
Click the View by menu and select the Large icons option.
-
Click on Sync Center.
-
Click the Manage offline files option from the left pane.
-
Click the Network tab.
-
Confirm the time (minutes) to check for a slow connection to sync files.
-
Click the Apply button.
-
Click the OK button.
After you complete the steps, when you are working offline (File Explorer > Home > Easy access > Work Offline) because of a slow network connection, Windows 10 will check the connection speed using the time you specified. If the network is sluggish, you will continue to work offline, but it will switch the connection to online if it’s good again.
View sync conflicts
To view sync conflicts, use these steps:
-
Open Start.
-
Search for Control Panel and click the top result to open the legacy app.
-
Click the View by menu and select the Large icons option.
-
Click on Sync Center.
-
Click the View sync conflicts from the left pane.


Once you complete the steps, you will be able to see and resolve any syncing conflicts.
View sync results
To view sync results, use these steps:
-
Open Start.
-
Search for Control Panel and click the top result to open the legacy app.
-
Click the View by menu and select the Large icons option.
-
Click on Sync Center.
-
Click the View sync results from the left pane.

After you complete the steps, you will understand the syncing process on your computer.