Introduction
You can specify what programs you want to run on Windows boot.
All you have to do is add the script, executable, or shortcut in to
the startup folder. Alternatively you can use scheduled tasks to
manage startup scripts. This will show you how to use both methods.
Using startup folder to launch scripts
The easiest way to trigger scripts to run at startup is to drop
then inside the startup folder.
To easily navigate to the startup folder, Windows has an alias
available: shell:startup. Use shell:common startup
You can get to the startup folder a couple ways:
- Open the Run dialog with
WindowsKey+Rand entershell:startup. - In the command prompt, enter
explorer shell:startup.
Simply copy your files that you want run on startup in to the folder.
For example, in Windows 10, these paths work for me for user and global:
%APPDATA%\Microsoft\Windows\Start Menu\Programs\Startup
%ProgramData%\Microsoft\Windows\Start Menu\Programs\StartUp
Enable and disable startup apps
Many apps run on startup that do not have any files in the startup folder.
You can manage the startup apps from the Task Manager | Startup tab or
by running taskmgr.exe.
In addition you can disable scripts from your startup folder so you don’t have
to remove them to disable them.
Right click on an item to enable or disable it.
Using scheduled tasks
An alternative to the startup folder is scheduled tasks.
You can schedule a task to run on startup.
For a GUI, run taskschd.msc
to create, delete, enable, disable, and otherwise manage
all scheduled tasks.
To manage scheduled tasks from the command prompt, use schtasks.exe.
This program will allow you to create, delete, and run
scheduled tasks. You can get help about the commands
by running one of the following:
schtasks
schtasks /?
schtasks /Run /?
schtasks /End /?
schtasks /Create /?
schtasks /Delete /?
schtasks /Query  /?
schtasks /Change /?
schtasks /ShowSid /?
Remember to run an administrator command prompt for these commands.
Example for creating a script to launch on startup as local user on login:
schtasks /create /tn "MyCustomTask" /sc onlogon /tr "cmd.exe /c pause"
You can tell a script to run as system on start like this:
schtasks /create /tn "MyCustomTask" /sc onstart /ru system /tr "cmd.exe /c pause"
Conclusion
After this, you should understand how easy it is to launch your
own programs on startup.
If you want to run a long-running or background service, consider
setting up a Windows service so you can manage it with services.msc.
Last Updated :
14 Sep, 2021
Adding a Python script to windows start-up basically means the python script will run as the windows boots up. This can be done by two step process –
Step #1: Adding script to windows Startup folder
After the windows boots up it runs (equivalent to double-clicking) all the application present in its startup directory.
Address:
C:\Users\current_user\AppData\Roaming\Microsoft\Windows\Start Menu\Programs\Startup\
By default the AppData folder under the current_user is hidden so enable hidden files to get it and paste the shortcut of the script in the given address or the script itself. Also the .PY files default must be set to python IDE else the script may end up opening as a text instead of executing.
Step #2: Adding script to windows Registry
This process can be risky if not done properly, it involves editing the windows registry key HKEY_CURRENT_USER from the python script itself. This registry contains the list of programs that must run once the user Login. just like few application which pops up when windows starts because the cause change in registry and add their application path to it.
Registry Path:
HKEY_CURRENT_USER\Software\Microsoft\Windows\CurrentVersion\Run
Below is the Python code :
Python3
import winreg as reg
import os
def AddToRegistry():
pth = os.path.dirname(os.path.realpath(__file__))
s_name="mYscript.py"
address=os.join(pth,s_name)
key = HKEY_CURRENT_USER
key_value = "Software\Microsoft\Windows\CurrentVersion\Run"
open = reg.OpenKey(key,key_value,0,reg.KEY_ALL_ACCESS)
reg.SetValueEx(open,"any_name",0,reg.REG_SZ,address)
reg.CloseKey(open)
if __name__=="__main__":
AddToRegistry()
Note: Further codes can be added to this script for the task to be performed at every startup and the script must be run as Administrator for the first time.
Добавление скрипта в автозагрузку
Содержание
| Введение | |
| Пример | |
| Похожие статьи |
Введение
Функция автозапуска была введена в Windows 95, для упрощения установки программ не
квалифицированными пользователями и для уменьшения количества звонков в службу поддержки.
Когда записанный особым образом диск вставляли в привод, Windows определял наличие
специального файла с инструкциями.
Программное обеспечение записанное на диске, воспринимало инструкции как запуск к
установке, на жесткий диск. Чтобы максимально увеличить вероятность установки программы
на компьютер, те же самые действия происходили, если дважды нажать правой клавишей мыши
в проводнике Windows по диску.
Автозапуск выполняется Проводником. В Windows 7 (и более ранних версиях) может
быть выполнен добавлением ярлыка приложения в папку «автозагрузка» в меню «Пуск».
В Windows 8 такая возможность убрана, реализовано более сложным, но более функциональным
способом — через утилиту Планировщик заданий
(доступ к ней: экран «Пуск» → Параметры → Плитки → Показать средства
администрирования → найти утилиту в списке приложений).
Со стороны файловой системы настраивается с помощью autorun.inf.
Пример
Коротко:
Управление Копьютером → Планировщик задач → Создать Базовое Задание →
Ввести название и описание → Выбрать условие выполнения → Выбрать действие
→ Указать расположение скрипта
Правый клик на пуск, выбираем Управление Копьютером (Computer Management)
Планировщик задач (Task Scheduler) → Создать Базовое Задание (Create Basic Task)

Введите название и описание, затем нажмите Далее (Next)

Выберите при выполнении какого условия скрипт должен запускаться. Я выбрал вход в систему.

Выберите какое действие должно выполняться в задании. Мы собираемся запускать скрипт,
поэтому выбираем Start a program

Укажите расположение скрипта на компьютере.

Выберите нужный файл.

Нажмите Далее (Next).

Нажмите Завершить (Finish).

Скрипт должен появиться среди активных заданий (Active Tasks).

Автор статьи: Андрей Олегович
Похожие статьи
| Windows | |
| Terminal | |
| PowerShell | |
| Loudness Equalization | |
| Сеть: Firewall, RDP, SSH, Telnet… | |
| Драйверы в Windows | |
| Режим разработчика в Windows 10 | |
| Git Bash | |
| WSL: Windows Subsystem for Linux | |
| Системная переменная PATH | |
| Установка Windows на gpt диск | |
| batch file | |
| Удалённый рабочий стол | |
| Горячие клавиши | |
| BSOD просмотр логов ошибок | |
| Точки восстановления системы |

This is useful when you want to run any automation created using PowerShell on Windows Startup. To run PowerShell script on startup.
Create a Windows Command Script (.cmd file) i.e. create a file and save it with .cmd extension.

Write the below command in .cmd file.
powerShell path\to\powershell_script.ps1 >> “path\to\log_file.log”

If you want to run the script in background. Add -windowstyle hidden after powershell.

Place the file or its shortcut file at below path.
C:\Users\<user_name>\AppData\Roaming\Microsoft\Windows\Start Menu\Programs\Startup

Restart the computer and you can track its execution in log file.
Our script will open the Windows Calculator application at Windows startup and login based on the solution you will choose from. To meet your requirements, you can replace the script in
file.ps1with your script.
Using Startup Folder
Use the Startup folder to run the PowerShell script at startup. To do this, we must follow this section’s step-by-step instructions.
Create .ps1 File
Open Notepad, write the following command, and save the file with any name of your choice but with the .ps1 extension. You can store this PowerShell script file at any location on your local machine; we saved this file with the file.ps1 name at the E:\Test location.
|
powerShell «c:\windows\system32\calc.exe» |
This command would open the calculator on the local computer.
Create .cmd File
Launch Notepad, write the following commands, and save the file with a name but with the extension .cmd at %AppData%\Microsoft\Windows\Start Menu\Programs\Startup path. We named this file Startup.cmd and placed it in the Startup Folder.
While saving the .cmd file, don’t forget to select All Files for the Save as type: option and ANSI for the Encoding option; see the screenshot after the following script for clear understanding.
|
PowerShell —Command «Set-ExecutionPolicy Unrestricted» —Scope CurrentUser >> «%TEMP%\StartupLog.txt» 2>&1 PowerShell E:\Test\file.ps1 >> «%TEMP%\StartupLog.txt» 2>&1 |
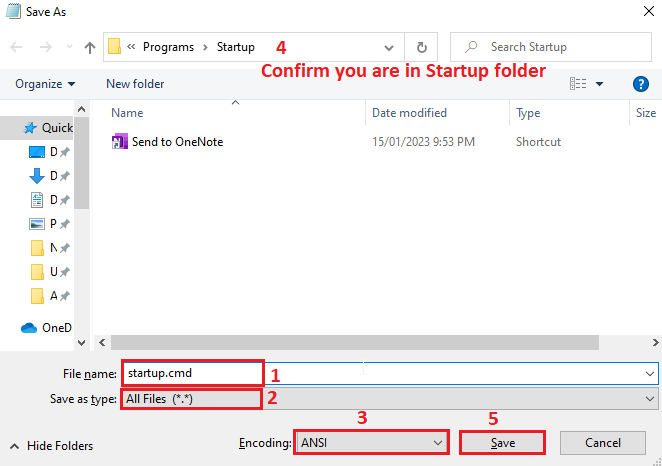
The above script did two things. First, it sets the execution policy to Unrestricted, and the second is to use PowerShell to run the .ps1 script file in the given path. Let’s break down the above commands to learn them in detail.
The first command:
- Runs the PowerShell with the
-Commandparameter to execute theSet-ExecutionPolicy Unrestrictedcommand, which modifies the PowerShell execution policy to let us run unsigned scripts. - The
-Scopparameter applies changes to the current user instead of the entire system. - The redirection operator represented by
>>redirects the command output (if any) to theStartupLog.txtfile in the user’s%TEMP%directory. The>>operator appends the output to the end of theStartupLog.txtfile if it already exists; otherwise, it creates it. - The
2>&1operator redirects the command’s error output (2) to the exact file as the standard output (&1).
The second command:
- Runs PowerShell with the E:\Test\file.ps1 script as an argument. You might have a different path if you have stored your
.ps1file in a different location on your PC. - The redirection operator (
>>) does the same as in the first command. - The
2>&1operator also does the same thing as in the first command.
Overall, both commands use the >> and 2>&1 operators to capture the errors and output of the PowerShell command or script and write them to a StartupLog.txt file in the user’s %TEMP% directory.
Restart Your PC
Now, you have the .ps1 file and .cmd file at the required locations, so it’s time to restart your computer. Once the computer is on, the script will be executed and open the Calculator app for you.
Using Task Scheduler
Use Task Scheduler to run PowerShell script at startup. Following the below steps to do it.
Open Task Scheduler
Press Windows+R key from the keyboard, type taskschd.msc in the Run prompt and hit OK. It will open the Task Scheduler window for you. See the following screenshot.
Otherwise, you can use the Windows search menu to open Task Scheduler.
Create a Task
-
In the
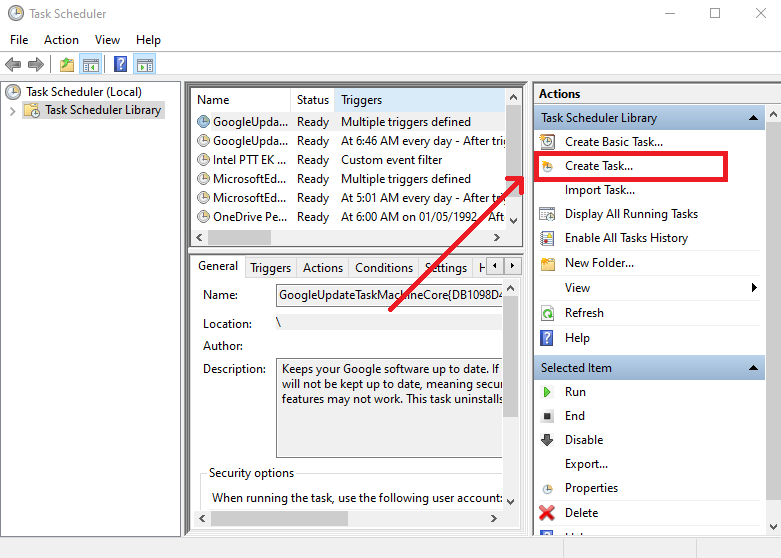
Task Schedulerwindow, clickCreate Taskas demonstrated below. -
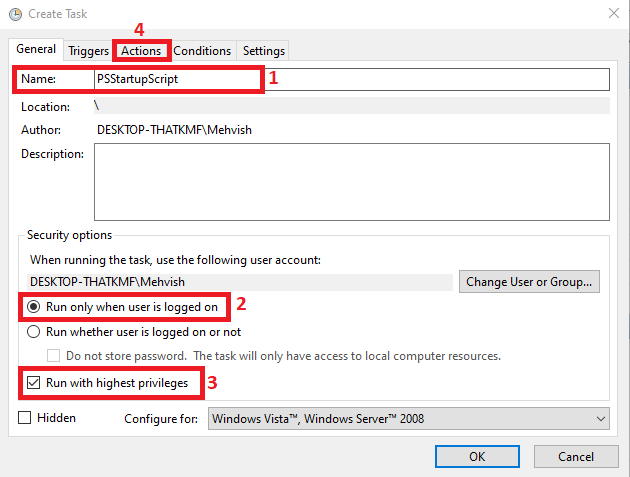
Ensure you are on the
Generaltab in theCreate Taskwindow. Then, write the name of the task (step-1), select theRun only when the user is logged onradio button (step-2), check theRun with highest privilegescheckbox (step-3), and click on theActionstab (step-4). -
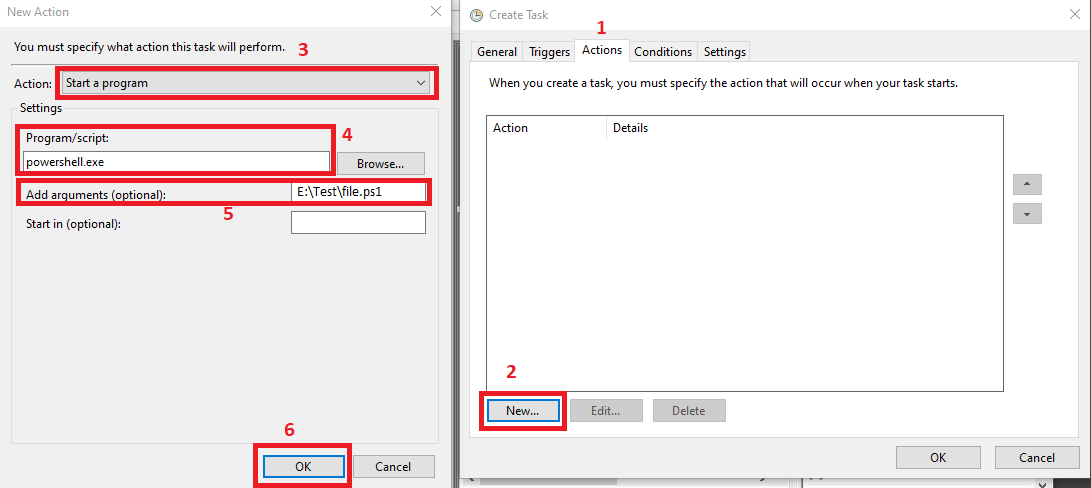
Once you are on the
Actionstab, click on theNewbutton (step-2), make sure theStart a programoption is selected forActions:option (step-3), writepowershell.exeforProgram/scriptoption (step-4), addE:\Test\file.ps1as the value ofAdd arguments (optional)option (step-5) and clickOKbutton (step-6). Remember, you can specify your arguments for step-5. -
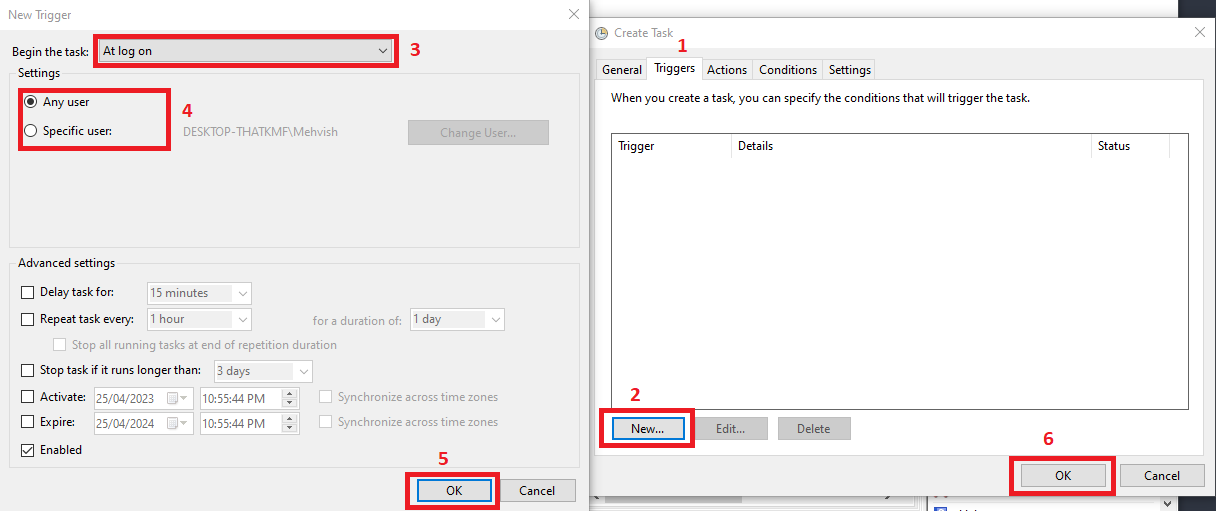
Now, click on the
Triggerstab (step-1), click on theNewbutton (step-2), selectAt log onforBegin the task:option (step-3), choose theAny userorSpecific userbased on your requirements (step-4), clickOK(step-5), and clickOKagain (step-6).Your task must be listed in the
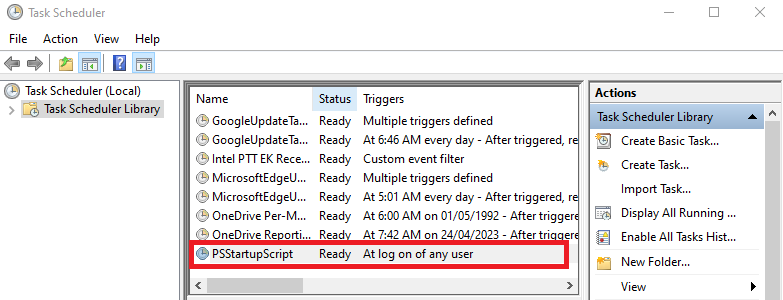
Task Schedulerwindow (see the following); if it is there, you have done everything right, close this window.
Log Out and Login Your PC
Log out and log in again to your computer. You don’t need to reboot the computer to run this script. This script will open the Windows Calculator application.
Using Registry Editor
Use Task Scheduler to run PowerShell script at startup. Following the below steps to do it.
Open Registry Editor
Press Windows+R key from the keyboard, type regedit.msc in the Run prompt and hit OK. It will open the registry editor window.
Add Entry to the Windows Registry Editor
-
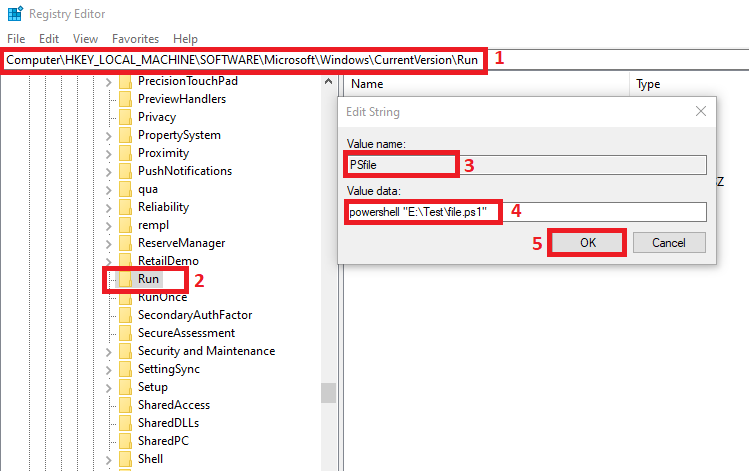
Navigate to the HKEY_LOCAL_MACHINE\SOFTWARE\Microsoft\Windows\CurrentVersion\Run in the registry editor (step-1).
-
Right-click the
Runkey and chooseNew->String Value(step-2). -
Give a new entry a meaningful name as we named it
PSfile. Note that this name must be unique; otherwise, you will get an error. -
Double-click on the new entry (
PSfile) to open theEdit Stringwindow. -
In the
Edit Stringwindow, you can confirm the new entry’s name (step-3). For theValue datafield, enter thepowershell "E:\Test\file.ps1"command (step-4); you can replace the path to point your PowerShell script file. Remember to surround the path with double quotes. -
Click
OKto exit theEdit Stringwindow (step-5). -
Close the Registry Editor.
Restart Your PC
Restart your computer to run the script automatically every time Windows starts up. This script will open the Windows Calculator application for you.

