
This service lets you create answer files (typically named unattend.xml or autounattend.xml) to perform unattended installations of both Windows 10 and Windows 11, including 24H2. Answer files generated by this service are primarily intended to be used with Windows Setup run from Windows PE to perform clean (rather than upgrade) installations.
Import a file generated by this service
Presets
| Region and language settings: |
Install Windows using these language settings: Windows display language: Windows features like Settings and File Explorer will appear in this language. It must match the language of your Windows 10/11 .iso file. Choose language preferences and keyboard layouts Specify the first language and keyboard layout Language: Keyboard layout / Input Method Editor: Specify a second language and keyboard layout Language: Keyboard layout / Input Method Editor: Specify a third language and keyboard layout Language: Keyboard layout / Input Method Editor: Home location: Windows and apps might use your country or region to give you local content. Select language settings interactively during Windows Setup |
||||||||||||||||||||||||
|---|---|---|---|---|---|---|---|---|---|---|---|---|---|---|---|---|---|---|---|---|---|---|---|---|---|
| Processor architectures: |
When you select multiple processor architectures, a single |
||||||||||||||||||||||||
| Setup settings: |
Bypass Windows 11 requirements check (TPM, Secure Boot, etc.) Allow Windows 11 to be installed without internet connection Only check this option if your computer really does not have internet access. You will still have to click the I don’t have internet button during Windows Setup in that case. If you just want to create local (“offline”) user accounts in Windows 11, you do not need this option – simply use the User accounts section of this form. Use a distribution share / configuration set Hide any PowerShell windows during Windows Setup |
||||||||||||||||||||||||
| Computer name: |
Let Windows generate a random computer name like Choose a computer name yourself Use this name: Provide a Windows PowerShell script to set the computer name dynamically: Your script will be evaluated during Windows Setup. The script must return a single string, which must be a valid computer name. You can also use a script such as |
||||||||||||||||||||||||
| Compact OS: |
Let Windows decide whether to use Compact OS Use Compact OS Do not use Compact OS |
||||||||||||||||||||||||
| Time zone: |
Let Windows determine your time zone based on language and region settings Set your time zone explicitly This is useful when your country or region spans multiple time zones, like Australia or the United States. Use this time zone: |
||||||||||||||||||||||||
| Partitioning and formatting: |
Partition the disk interactively during Windows Setup Let Windows Setup wipe, partition and format your hard drive (more specifically, disk 0) using these settings: Choose partition layout GPT The MBR MBR The MBR-based partition layout must be used for legacy BIOS systems. Choose how to install Windows RE Create a separate partition with a size of MB and install Windows RE to it. Install on Windows partition This will install Windows RE in Remove Windows RE This will delete the Use a custom If your disk is already partitioned and formatted, enter a Choose partition to install Windows to after script has run Install Windows to the first available partition that has enough space and does not already contain an installation of Windows Install to another partition:
When you let Windows Setup partition your disks unattendedly, there is a risk they were assigned unexpected index numbers. In rare cases, disk 0 does not refer to your primary hard drive, but rather your USB thumb drive. You can therefore provide VBScript code to check the assigned disk index numbers before Do not run a script Run this VBScript code to check disk layout: |
||||||||||||||||||||||||
| Windows edition: |
Use a generic product key Such a key can be used to install Windows, but will not activate it. You can change the product key later. Install this edition of Windows: Enter another product key Use this product key: Enter a product key interactively during Windows Setup You can also enter your key in the Use product key stored in BIOS/UEFI firmware Choose this if your computer came pre-installed with Windows and you want to reuse that license. |
||||||||||||||||||||||||
| User accounts: |
Let Windows Setup create the following local (“offline”) accounts:
Leave Display name empty unless you want it to be different from Account name. First logon Several settings will only be applied when an administrator logs on for the first time. You should therefore let Windows log you on to an administrator account once – this does not affect subsequent logons. Choose which account to use for this: Logon to the first administrator account created above Activate built-in account Set its password to: Do not logon The installation ends with the sign-in screen being shown. Obscure all account passwords in your Add a Microsoft (“online”) user account interactively during Windows Setup Add a local (“offline”) user account interactively during Windows Setup |
||||||||||||||||||||||||
| Password expiration: |
Passwords do not expire This is in accordance to NIST guidelines that no longer recommend password expiration. Use Windows default Passwords expire after 42 days. Use custom password expiration: Passwords expire after days. These settings only apply to local accounts. Also, the password of the built-in account |
||||||||||||||||||||||||
| Account Lockout policy: |
Use default policy By default, Windows will lock out an account after 10 failed logon attempts ( Disable policy Disabling Account Lockout might leave your computer vulnerable to brute-force attacks. Use custom policy: Lock out an account after failed logon attempts within minutes. After minutes, unlock the account automatically. |
||||||||||||||||||||||||
| File Explorer tweaks: |
Choose which files are hidden in File Explorer Use File Explorer default setting This will hide any file that has the Hide protected operating system files This will only hide files that have both the Show all files This setting is recommended for advanced users. Always show file extensions By default, File Explorer would hide extensions for known file types. Use classic context (right-click) menu in Windows 11 Open File Explorer to This PC instead of Quick access Show End task command in the taskbar |
||||||||||||||||||||||||
| Start menu and taskbar: |
Choose how to display the search box in the taskbar Full Icon and label Icon Hide Choose icons to display in the taskbar Use default icons Remove all icons Configure icons using an XML file: See Microsoft’s documentation for more examples. Disable widgets This hides the news and weather widget in the lower-left corner in Windows 11. Left-align the taskbar in Windows 11 Hide the Task view button from the taskbar Always show all tray icons On Windows 10, this will simply set the Do not show Bing results when searching in the Start menu or the search box Windows 10 Configure the tiles that are initially shown in the Windows 10 Start menu. You can add or remove tiles later. On Windows 11, this setting is simply ignored. Use default tiles If you select apps in the Remove bloatware section below, Windows 10 will automatically remove their tiles from the Start menu. Remove all tiles Configure tiles using an XML file created by PowerShell’s Windows 11 Configure the pins that are initially shown in the Windows 11 Start menu. You can add or remove pins later. On Windows 10, this setting is simply ignored. Use default pins Avoid this setting if you select apps in the Remove bloatware section below, as Windows 11 will deceptively retain their pins in the Start menu. Remove all pins Configure pins using a JSON file created by PowerShell’s |
||||||||||||||||||||||||
| System tweaks: |
Disable Windows Defender This disables certain services ( Disable Windows Update Disable User Account Control (UAC) Disable Smart App Control This turns Smart App Control off in Windows 11. Note that you will not be able to turn it back on. Disable SmartScreen in Windows and Edge Disable Fast Startup Disable System Protection / System Restore Windows will not create restore points for drive Enable long paths This sets the LongPathsEnabled registry value, which enables several programs (including PowerShell, 7-Zip and TreeSize) to use long paths with up to 32,767 characters without resorting to the Enable Remote Desktop services (RDP) Harden ACLs This removes write permissions on Allow execution of PowerShell script files This runs the command Do not update Last Access Time stamp This runs the command Prevent Windows Update from rebooting your computer This creates a scheduled task that periodically moves your active hours, tricking Windows into thinking your device is in use all the time. Turn off system sounds This changes the sound scheme from Windows Default to No sounds for all users. Disable app suggestions / Content Delivery Manager Prevent device encryption Windows 11 would otherwise enable BitLocker encryption automatically. Hide Edge First Run Experience This will skip the annoying dialogs when Edge is run for the first time. Disable Edge Startup Boost and Background mode This will stop Edge from running in the background all the time. Make Edge uninstallable This will modify the Disable the Enhance Pointer Precision mouse setting This may be useful for players of first-person shooters. Delete empty Audit process creation events Each time a new process is created, Windows writes an event to the Security log. This is a powerful tool for troubleshooting. Include command line in log events |
||||||||||||||||||||||||
| Visual effects: |
Use default settings chosen by Windows Adjust for best appearance Adjust for best performance Use custom settings: Animate controls and elements inside windows Animate windows when minimizing and maximizing Animations in the taskbar Enable Peek Fade or slide menus into view Fade or slide ToolTips into view Fade out menu items after clicking Save taskbar thumbnail previews Show shadows under mouse pointer Use drop shadows for icon labels on the desktop Show thumbnails instead of icons Show translucent selection rectangle Show window contents while dragging Slide open combo boxes Smooth edges of screen fonts Smooth-scroll list boxes Show shadows under windows |
||||||||||||||||||||||||
| Desktop icons: |
Show default desktop icons Show these desktop icons: Control Panel Desktop Documents Downloads Gallery Home Music Network Pictures Recycle bin This PC User’s Files Videos |
||||||||||||||||||||||||
| Virtual machine support: |
Install Oracle VirtualBox Guest Additions Install VMware Tools Install VirtIO Guest Tools and QEMU Guest Agent (e.g. for Proxmox VE) Make sure to check the usage notes for how to properly configure your VM. |
||||||||||||||||||||||||
| WLAN / Wi-Fi setup: |
Configure Wi-Fi interactively during Windows Setup Skip Wi-Fi configuration Choose this if you have a wired connection to the internet. Configure Wi-Fi using these settings:
If both your Wi-Fi router and your computer’s Wi-Fi adapter support it, make sure to select WPA3. Otherwise, Windows Setup will try to switch from WPA2 to WPA3 and require manual interaction. You should not enter your actual Wi-Fi password here. Once you have downloaded the Configure Wi-Fi using an XML file created by |
||||||||||||||||||||||||
| Express settings: |
Disable all Windows will not send diagnostic data, personalized input or your location history to Microsoft. Choose this if you value privacy. Enable all Windows will send data to Microsoft to provide location-based services, improve language recognition, and show personalized ads. Choose settings interactively during Windows Setup This lets you enable some settings while disabling others. |
||||||||||||||||||||||||
| Lock key settings: |
Use default lock key states and behaviors Configure the initial state and behavior of lock keys as follows:
This will affect all users and also the login screen. |
||||||||||||||||||||||||
| Personalization settings: |
These settings are particularly useful if you want to use Windows without activation when the Personalization settings page is not available. Colors Use default color theme Use custom color theme
Desktop wallpaper Use default wallpaper settings Use a solid color background: Provide a Windows PowerShell script to load a desktop wallpaper image: Your script will be evaluated during Windows Setup, after your computer has connected to a network. The script must return a |
||||||||||||||||||||||||
| Remove bloatware: |
Windows comes with several apps that many users do not want or do not need. Check all the apps you want removed during Windows Setup: 3D Viewer Bing Search Calculator Camera Clipchamp Clock Copilot Cortana Dev Home Family Feedback Hub Get Help Handwriting (all languages) Internet Explorer Mail and Calendar Maps Math Input Panel Media Features Mixed Reality Movies & TV News Notepad (modern) Office 365 OneDrive OneNote OneSync OpenSSH Client Outlook for Windows Paint Paint 3D People Photos Power Automate PowerShell 2.0 PowerShell ISE Quick Assist Recall Remote Desktop Client Skype Snipping Tool Solitaire Collection Speech (all languages) Steps Recorder Sticky Notes Teams Tips To Do Voice Recorder Wallet Weather Windows Fax and Scan Windows Hello Windows Media Player (classic) Windows Media Player (modern) Windows Terminal WordPad Xbox Apps Your Phone / Phone Link Bloatware removal works best with the original Windows 10 and 11 .iso images downloaded from Microsoft. I did not perform any tests with custom images. |
||||||||||||||||||||||||
| Run custom scripts: |
You may want to take a look at some sample scripts first. Scripts to run in the system context, before user accounts are created
Scripts to modify the default user’s registry hive This will automatically mount the
Scripts to run when the first user logs on after Windows has been installed The first user to log on is typically an administrator. In this case, these scripts will run with elevated privileges.
Scripts to run whenever a user logs on for the first time
Restart File Explorer after scripts have run This will restart the Your scripts will be run as follows:
|
||||||||||||||||||||||||
| Windows Defender Application Control: |
Do not configure WDAC policy Configure a basic WDAC policy using these settings: Applications in Choose how to enforce the policy Auditing mode Logs drivers and applications that would have been blocked. Auditing mode on boot failure When the policy blocks a system driver and thus would prevent Windows from booting, use audit mode. Otherwise, use enforcement mode. Enforcement mode Drivers and applications will be blocked unless allowed by the policy. Choose script enforcement Restricted PowerShell will run in Constrained Language Mode. See Script Enforcement for details. Unrestricted PowerShell will run in Full Language Mode. |
||||||||||||||||||||||||
| XML markup for more components: |
You can optionally add settings for all available components, with respect to their valid configuration passes.
The generator itself uses some components (displayed with a reddish background below). You may assign your own XML markup to these components, but this will completely replace their generated content, and there is no guarantee that the resulting Do not include
|
||||||||||||||||||||||||
| Download settings: |
Use filename Windows Setup will not process the |
||||||||||||||||||||||||
| Submit form: |
Файл ответов autounattend.xml интегрированный в установщик Windows 11/10 позволяет автоматизировать шаги при установке системы: от настройки региональных предпочтений и учетной записи пользователя до создания разделов на диске. Его можно создать вручную, используя документацию, но это может оказаться затратным по времени.
Бесплатная утилита DISMTools содержит простой визуальный редактор файла ответов для Windows, который позволяет создать его даже пользователю, который ранее был не знаком с unattended.xml. Пример использования — в этой статье.
Использование DISMTools для настройки файла unattended.xml
Программа DISMTools, её установка и функции описывались в отдельной инструкции, самый простой способ установки — запустить Windows PowerShell или Терминал Windows от имени администратора, например, через меню по правому клику на кнопке «Пуск» и ввести команду:
winget install CodingWondersSoftware.DISMTools.Preview
После чего скачивание и установка будут выполнены автоматически.
Далее переходим к примеру создания файла ответов unattended.xml в DISMTools:
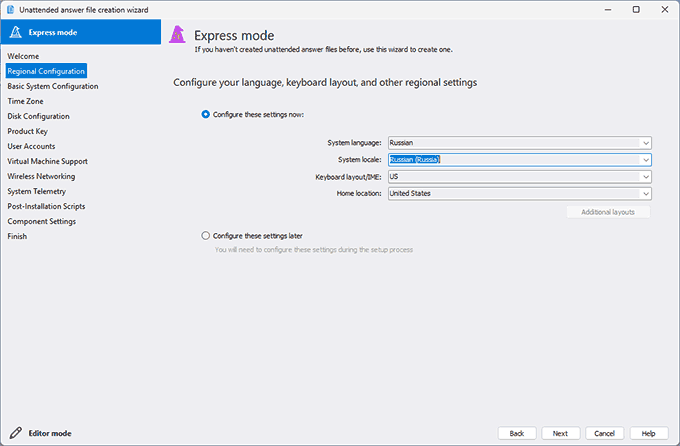
- Запустите DISMTools (будет расположен в списке всех программ в меню «Пуск»), в меню Tools откройте пункт «Unattended answer file creator». При первом запуске вам могут предложить доустановить компоненты .NET, согласитесь.
- Откроется мастер создания файлов ответов в экспресс-режиме, наиболее подходящем для начинающих. Нажмите «Next», после чего по порядку установите нужные настройки.

- Regional Configuration — региональные настройки: язык системы, региональные стандарты системы, язык клавиатуры, регион использования.

- Basic System Configuration — базовые настройки системы: архитектура процессора, обход системных требования и требования к наличию доступа в Интернет для Windows 11, настройка имени компьютера.

- Time Zone — настройки часового пояса (оставить автоматически определяемые или переопределить вручную).
- Disk Configuration — позволяет переопределить параметры диска и разделов системы. По умолчанию предполагается, что это будет выполнено на этапе установки, но если снять отметку «I want to configure these settings during installation», можно изменить таблицу разделов на диске (GPT или MBR), выбрать расположение и размер раздела для среды восстановления. Вторая возможность — прописать все необходимые команды в скрипт для DiskPart таким образом, чтобы разделы были созданы именно настроенным вами образом.

- Product Key — ключ продукта: ввод собственного Retail или OEM-ключа, либо использование общего (Generic) ключа продукта для определённой версии Windows 11/10. В последнем случае факт активации будет зависеть от наличия цифровой лицензии Майкрософт, привязанной к оборудованию.
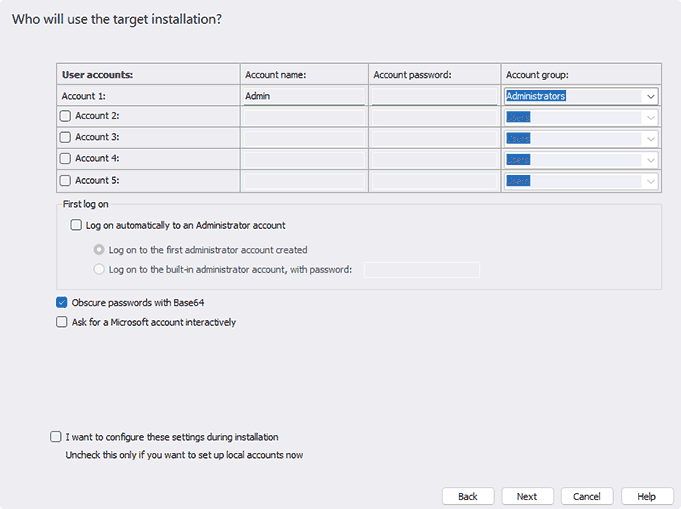
- User Accounts — настройка локальных учётных записей, создаваемых автоматически при установке и их параметров. При необходимости можно включить интерактивный запрос на создание учётной записи Майкрософт или оставить настройки без изменений, чтобы запрос о создании учётной записи появился при установке. Если вы изменили параметры учетных записей, то после нажатия «Next» вам также будет предложено ограничить время действия паролей, если это требуется.

- Virtual Machine Support — включение поддержки виртуальной машины (в случае если подготавливаемый образ планируется к установке в виртуальную машину).
- Wireless Networking — настройки параметров сети Wi-Fi, если требуется автоматическое подключение к определённой сети.
- System Telemetry — включение или отключение телеметрии Windows.
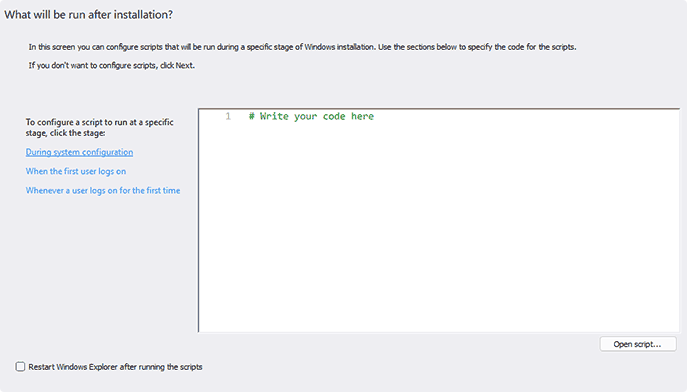
- Post-Installation Scripts — настройка сценариев для автоматического выполнения в разные моменты времени: при настройке системы, при первом входе первого пользователя, при каждом входе нового пользователя впервые.

- Component Settings — настройки компонентов Начинающим пользователям рекомендую не изменять настройки.
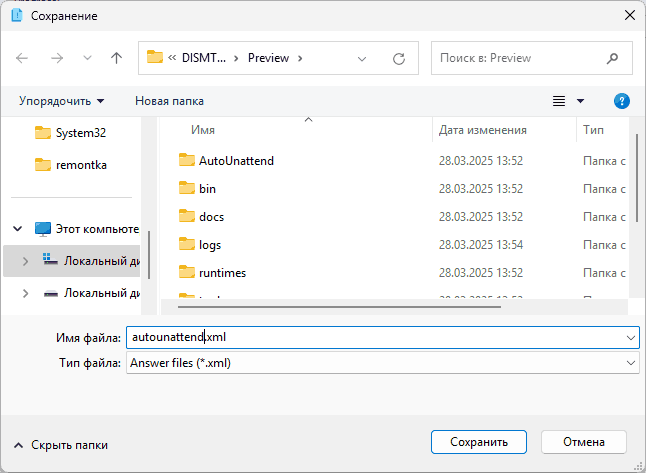
- На завершающем этапе вам будет предложено сохранить файл. Сохраните его с именем autounattend.xml


Готово, теперь, когда файл создан, вам останется скопировать его в корень загрузочной флешки (или, если требуется, в сам ISO образ) с дистрибутивом Windows 11 или 10, чтобы при чистой установке с этого накопителя были применены заданные вами в файле ответов настройки.
Важно: простое помещение в корневую папку установочного накопителя сработает только для тех накопителей, где присутствует единственный распакованный образ Windows 11/10, например, для загрузочных флешек, созданных с помощью Rufus или Media Creation Tool. В случае с флешками, содержащими сами файлы ISO, шаги могут быть другими, например, для Ventoy они описаны на соответствующей официальной странице.
Для установки Windows 11 (или при обновлении с Windows 10), ваш компьютер должен соответствовать определённом минимальным системам требованиям: наличие чипа TPM 2.0 (Trusted Platform Module), режим UEFI + Secure Boot, 4 Гб RAM, 64 Гб диск и совместимый двухъядерный процессор 1 ГГц (не все процессоры поддерживаются!). Microsoft ограничивает установку Windows 11 на несовместимые компьютеры, выполняя проверку на соответствие системным требования перед началом установки Windows. В этой статье мы покажем, как установить Windows 11 на несовместимые устройства без проверки требований к CPU, TPM, Secure Boot (и т.д.)
Если компьютер не соответствует минимальным требованиям для Windows 11, то при установке ОС появится ошибка:
Запуск Windows 11 на этом компьютере не возможен
. Этот компьютер не соответствует минимальным требованиям к системе для установки этой версии Windows. Дополнительные сведения см. на сайте aka.ms/WindowsSysReq
This PC can’t run Windows 11
. This PC doesn’t meet the minimum system requirements to install this version of Windows. For more information, visit aka.ms/WindowsSysReq<
Чтобы понять, каким конкретно требованиям не соответствует вашим компьютер, нужно изучить лог ошибок установки Windows 11 setuperr.log. В этом файле содержаться только ошибки установки Windows (полный лог установки находится в файле setupact.log, но изучать его сложно из-за большого объема).
Чтобы открыть файл лога ошибок установки Windows, откройте командную строку прямо на экране установки, нажав
Shift + F10
и выполните команду:
notepad x:\windows\panther\setuperr.log
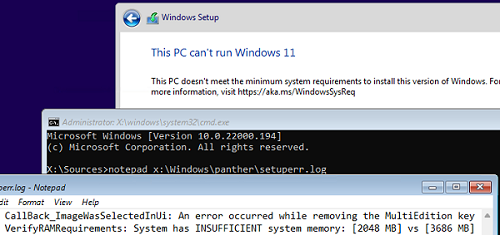
В нашем случае ошибка говорит, что на компьютере недостаточно оперативной памяти (всего 2 Гб вместо 3).
2021-11-11 10:57:51, Error VerifyRAMRequirements: System has INSUFFICIENT system memory: [2048 MB] vs [3686 MB]
Обратите внимание, что если ваш компьютер не соответствует нескольким системным требованиям для установки Windows, то в логе будет указана только первая из причин. Т.е. если вы исправили (или пропустили) одну из ошибок несовместимости, то при следующем запуске установки Windows 11 в логе будет содержаться следующая ошибка совместимости.
После того, как мы добавили RAM появилась другая ошибка:
2021-11-11 11:13:37, Error VerifyTPMSupported:Tbsi_GetDeviceInfo function failed - 0x8028400f[gle=0x0000007a]
Т.е. установщик определил, что на компьютере отсутствует TPM чип.
Если вы устанавливаете Windows 11 в виртуальную машину VMWare, вы можете добавить виртуальный TPM чип в соответствии с этой статьей. Для Hyper-V используется другая инструкция.
Однако вы можете продолжить установку Windows 11, просто игнорировал одно или все требования совместимости.
Для этого нужно в командной строке на экране установки Windows 11:
- Запустить редактор реестра
regedit.exe
; - Перейти в раздел HKEY_LOCAL_MACHINE\SYSTEM\Setup и создать новую ветку с именем LabConfig;
- В этой ветке нужно создать DWORD параметры со значением 1 для тех проверок совместимости, которые вы хотите пропустить при установке
Доступны следующие параметры, позволяющие установить Windows 11 на устройства:
-
BypassCPUCheck
– с несовместимыми процессорами; -
BypassTPMCheck
– без чипа TPM 2; -
BypassRAMCheck
– не проверять минимальное количество RAM -
BypassSecureBootCheck
–с Legacy BIOS (или UEFI с отключенным Secure Boot) -
BypassStorageCheck
– не проверять размер системного диска
Например, чтобы не проверять наличие TPM модуля при установке, нудно создать параметр реестра BypassTPMCheck со значением 1. Параметр можно создать с помощью графического редактора реестра или с помощью команды:
reg add HKLM\SYSTEM\Setup\LabConfig /v BypassTPMCheck /t REG_DWORD /d 1
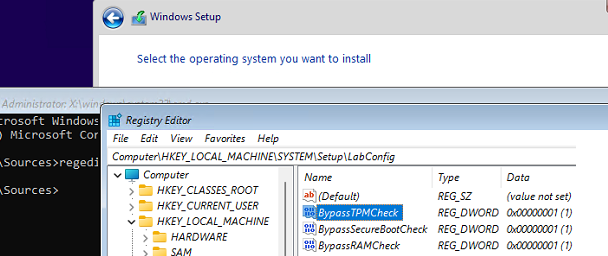
Аналогичным образом нужно создать другие параметры для проверок, который вы хотите пропустить при установке Windows 11.
Затем вернитесь в окно установки Window 11, вернитесь на шаг назад и продолжите обычную установки без проверки совместимости.
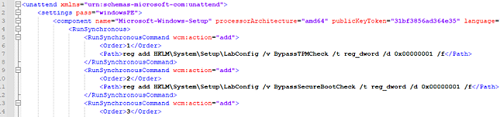
Вы можете модифицировать установочный ISO образ Windows 11, чтобы все эти проверки TPM, SecureBoot, диск, память, CPU) пропускались автоматически при установке ОС.
Для этого создайте текстовый файл AutoUnattend.xml со следующим содержимым:
<unattend xmlns="urn:schemas-microsoft-com:unattend">
<settings pass="windowsPE">
<component name="Microsoft-Windows-Setup" processorArchitecture="amd64" publicKeyToken="31bf3856ad364e35" language="neutral" versionScope="nonSxS" xmlns:wcm="http://schemas.microsoft.com/WMIConfig/2002/State" xmlns:xsi="http://www.w3.org/2001/XMLSchema-instance">
<RunSynchronous>
<RunSynchronousCommand wcm:action="add">
<Order>1</Order>
<Path>reg add HKLM\System\Setup\LabConfig /v BypassTPMCheck /t reg_dword /d 0x00000001 /f</Path>
</RunSynchronousCommand>
<RunSynchronousCommand wcm:action="add">
<Order>2</Order>
<Path>reg add HKLM\System\Setup\LabConfig /v BypassSecureBootCheck /t reg_dword /d 0x00000001 /f</Path>
</RunSynchronousCommand>
<RunSynchronousCommand wcm:action="add">
<Order>3</Order>
<Path>reg add HKLM\System\Setup\LabConfig /v BypassRAMCheck /t reg_dword /d 0x00000001 /f</Path>
</RunSynchronousCommand>
<RunSynchronousCommand wcm:action="add">
 <Order>5</Order>
<Path>reg add HKLM\System\Setup\LabConfig /v BypassCPUCheck /t reg_dword /d 0x00000001 /f</Path>
</RunSynchronousCommand>
<RunSynchronousCommand wcm:action="add">
<Order>4</Order>
<Path>reg add HKLM\System\Setup\LabConfig /v BypassStorageCheck /t reg_dword /d 0x00000001 /f</Path>
</RunSynchronousCommand>
</RunSynchronous>
<UserData>
<ProductKey>
<Key></Key>
</ProductKey>
</UserData>
</component>
</settings>
</unattend>
Если вы хотите отключить экран создания онлайн аккаунта Microsoft при установке Windows 11, добавьте в файл следующий секцию компонента:
<component name="Microsoft-Windows-Shell-Setup" processorArchitecture="amd64" publicKeyToken="31bf3856ad364e35" language="neutral" versionScope="nonSxS" xmlns:wcm="http://schemas.microsoft.com/WMIConfig/2002/State" xmlns:xsi="http://www.w3.org/2001/XMLSchema-instance">
<OOBE>
<HideOnlineAccountScreens>true</HideOnlineAccountScreens>
<HideWirelessSetupInOOBE>true</HideWirelessSetupInOOBE>
<ProtectYourPC>3</ProtectYourPC>
</OOBE>
</component>
Скопируйте данный файл в корень установочной USB флешки с Windows 11.
Если вам нужно добавить файл ответов в ISO образ Windows 11, распаккуйте его содержимое в любую папку на компьютере, скопируйте в этот каталог файл AutoUnattend.xml и пересоберите ISO образ.
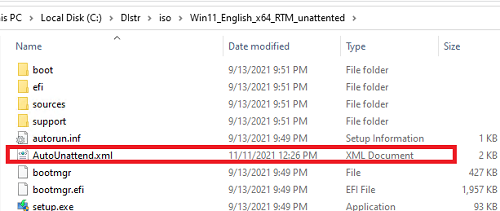
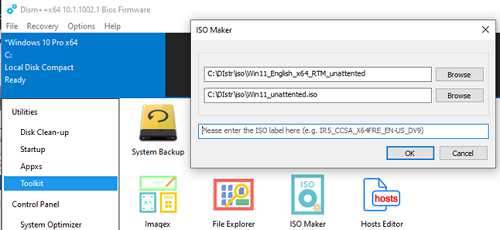
Я использовал для создания образа бесплатную утилиту DISM++ (Toolkit -> ISO maker).
Теперь никакие проверки совместимости не будут производится при установке Windows 11.
В новой версии утилиты Rufus, использующейся для создания загрузочных USB флешек, появилась специальная опция Extended Windows 11 Installation (no TPM/no Secure Boot/8Gb- RAM). Данная опция позволяет создать образ для установки Windows 11 без проверки TPM и Secure Boot:

Using Windows System Image Manager (WSIM)
6 STEPS
EASY
2 MIN
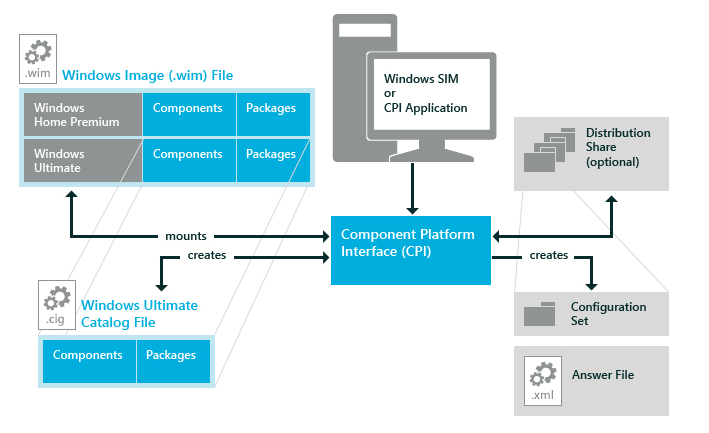
Method 1
Overview
Windows System Image Manager (WSIM) is a tool from Windows ADK used to create automated Windows installation files (autounattend.xml). The process involves six key steps as provided below.
Method 1 of 2
Next Method

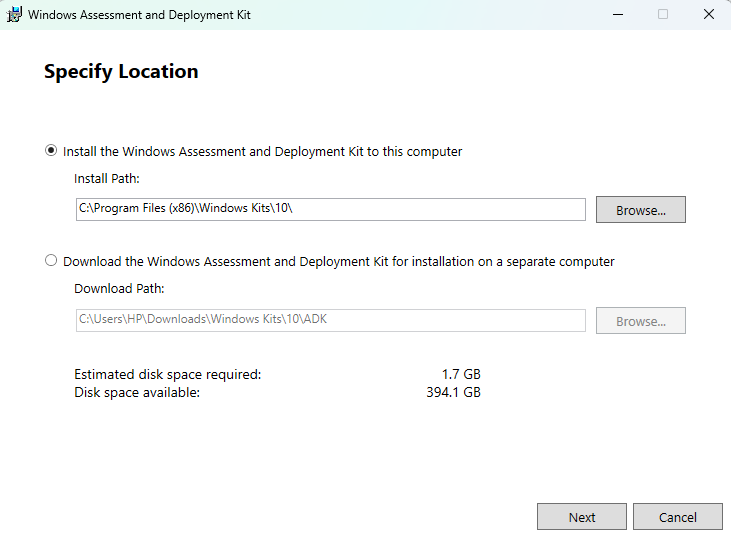
Download the Windows ADK from Microsoft and include Deployment Tools during installation. This provides WSIM for creating the autounattend.xml file.
Method 1 of 2
Step 1 of 6
Right-click the Windows 11 ISO and select Mount. In WSIM, go to File > Select Windows Image and browse for the install.wim file in the sources folder of the mounted ISO.
Method 1 of 2
Step 2 of 6

In WSIM, select File > New Answer File. Add components like Disk Configuration, User Accounts, and Regional Settings from the Windows Image pane by right-clicking and selecting Add to Answer File.
Method 1 of 2
Step 3 of 6
Configure Disk Partitioning
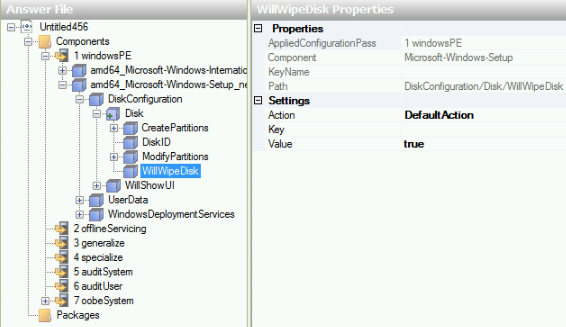
Go to Disk Configuration and define how Windows will partition the disk. Be careful, as incorrect settings can erase data.
Method 1 of 2
Step 4 of 6
Under Microsoft-Windows-Shell-Setup, configure the computer name, user accounts, time zone, and language settings.
Method 1 of 2
Step 5 of 6

Validate your answer file by selecting Tools > Validate Answer File. Save it as autounattend.xml. to your USB drive.
Info:
Always validate your file using Tools > Validate Answer File.
Method 1 of 2
Step 6 of 6
Creating Using PowerShell
4 STEPS
EASY
2 MIN

Method 2
Overview
To create an autounattend.xml file using PowerShell, open PowerShell as an admin, generate the file with New-ProvisioningPackage, customize it with settings using Add-ProvisioningPackageSetting, and save it. This can be done quickly in four steps.
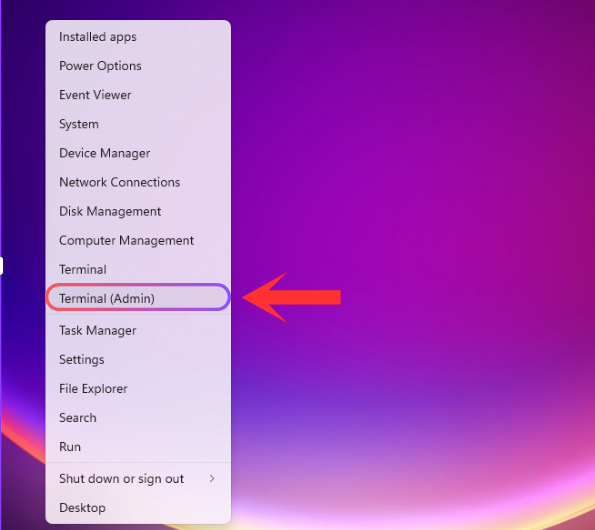
Launch PowerShell as an administrator. Right-click the Start button and select Windows Terminal (Admin).
Method 2 of 2
Step 1 of 4
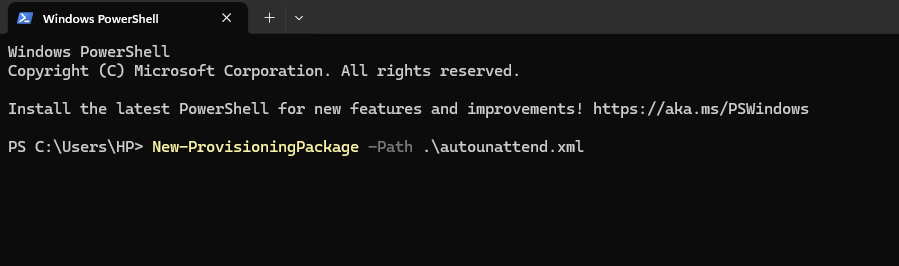
In PowerShell, run the following command to create a new autounattend.xml file: New-ProvisioningPackage -Path .\autounattend.xml
Method 2 of 2
Step 2 of 4
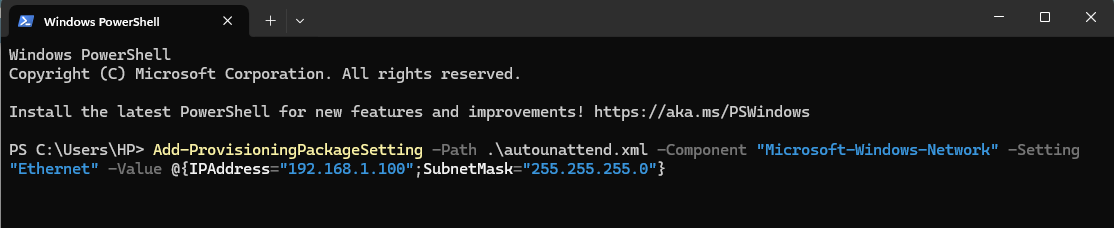
You can customize the file by using cmdlets like Add-ProvisioningPackageSetting. For example, to configure network settings:
Add-ProvisioningPackageSetting -Path .\autounattend.xml -Component "Microsoft-Windows-Network" -Setting "Ethernet" -Value @{IPAddress="192.168.1.100";SubnetMask="255.255.255.0"}
Method 2 of 2
Step 3 of 4
After configuring the necessary settings, save the answer file in the path you specified. Double-check the contents to ensure it’s been generated correctly.
Method 2 of 2
Step 4 of 4
Test in a Virtual Machine: Before using the autounattend.xml file on actual hardware, always test it in a virtual machine like Hyper-V to avoid errors during deployment.
Encrypt Sensitive Data: Never include plain text passwords in your autounattend.xml file. Use encryption to keep your deployment secure.
Include Post-Installation Scripts: You can automate post-install tasks by adding custom scripts (PowerShell, CMD) to the file for things like software installs or additional configuration steps.
Вы тут: Главная → Popular → Простой файл ответов для быстрой автоустановки Windows
Грядут длинные праздники, и я думаю многим из вас в перерывах между оливье доведется поставить Windows начисто — себе или близким людям, например, на новый SSD.
[+] Сегодня в программе
Файл ответов
За счет файла значительно сокращается количество экранов программы установки, из которых остаются только:
- выбор издания
- управление дисками
- подключение к Wi-Fi
- пароль учетной записи (можно задать)
Файл предназначен для 64-разрядной Windows. Сохраните его с именем AutoUnattend.xml в корень установочной флэшки.
<?xml version="1.0" encoding="utf-8"?>
<!-- https://www.outsidethebox.ms/19924/ -->
<unattend xmlns="urn:schemas-microsoft-com:unattend">
    <settings pass="windowsPE">
        <component name="Microsoft-Windows-International-Core-WinPE" processorArchitecture="amd64" publicKeyToken="31bf3856ad364e35" language="neutral" versionScope="nonSxS" xmlns:wcm="http://schemas.microsoft.com/WMIConfig/2002/State" xmlns:xsi="http://www.w3.org/2001/XMLSchema-instance">
            <InputLocale>en-US; ru-RU</InputLocale>
            <SystemLocale>ru-RU</SystemLocale>
            <UILanguage>en-US</UILanguage>
            <UserLocale>en-US</UserLocale>
        </component>
        <component name="Microsoft-Windows-Setup" processorArchitecture="amd64" publicKeyToken="31bf3856ad364e35" language="neutral" versionScope="nonSxS" xmlns:wcm="http://schemas.microsoft.com/WMIConfig/2002/State" xmlns:xsi="http://www.w3.org/2001/XMLSchema-instance">
            <UserData>
                <!-- KMS keys https://docs.microsoft.com/windows-server/get-started/kmsclientkeys -->
                <ProductKey>
                    <Key></Key>
                </ProductKey>
                <AcceptEula>true</AcceptEula>
            </UserData>
            <!-- Обход требований Windows 11 к TPM, SecureBoot, RAM
            BypassCPUCheck, BypassStorageCheck не нужны https://t.me/sterkin_ru/1303
            <RunAsynchronous>
                <RunAsynchronousCommand wcm:action="add">
                    <Description>Bypass TPM check</Description>
                    <Order>1</Order>
                    <Path>cmd /c reg add HKLM\SYSTEM\Setup\LabConfig /v BypassTPMCheck /t REG_DWORD /d 1</Path>
                </RunAsynchronousCommand>
                <RunAsynchronousCommand wcm:action="add">
                    <Description>Bypass SecureBoot check</Description>
                    <Order>2</Order>
                    <Path>cmd /c reg add HKLM\SYSTEM\Setup\LabConfig /v BypassSecureBootCheck /t REG_DWORD /d 1</Path>
                </RunAsynchronousCommand>
                <RunAsynchronousCommand wcm:action="add">
                    <Description>Bypass RAM check</Description>
                    <Order>3</Order>
                    <Path>cmd /c reg add HKLM\SYSTEM\Setup\LabConfig /v BypassRAMCheck /t REG_DWORD /d 1</Path>
                </RunAsynchronousCommand>
            </RunAsynchronous>  -->
        </component>
    </settings>
    <settings pass="oobeSystem">
        <component name="Microsoft-Windows-International-Core" processorArchitecture="amd64" publicKeyToken="31bf3856ad364e35" language="neutral" versionScope="nonSxS" xmlns:wcm="http://schemas.microsoft.com/WMIConfig/2002/State" xmlns:xsi="http://www.w3.org/2001/XMLSchema-instance">
            <InputLocale>en-US; ru-RU</InputLocale>
            <SystemLocale>ru-RU</SystemLocale>
            <UILanguage>en-US</UILanguage>
            <UserLocale>en-US</UserLocale>
        </component>
        <component name="Microsoft-Windows-Shell-Setup" processorArchitecture="amd64" publicKeyToken="31bf3856ad364e35" language="neutral" versionScope="nonSxS" xmlns:wcm="http://schemas.microsoft.com/WMIConfig/2002/State" xmlns:xsi="http://www.w3.org/2001/XMLSchema-instance">
		<!-- Пример запуска скрипта из корня установочного диска
            <FirstLogonCommands>
                <SynchronousCommand wcm:action="add">
                    <Description>Import Edge Policies https://www.outsidethebox.ms/22326/</Description>
                    <CommandLine>powershell -command "(Get-Volume).DriveLetter | Foreach-Object {if (Test-Path "${PSItem}:\edge-policy_v2.ps1") {powershell -ex bypass -file ${PSItem}:\edge-policy_v2.ps1}}"</CommandLine>
                    <Order>1</Order>
                </SynchronousCommand>
            </FirstLogonCommands> -->
            <OOBE>
                <HideEULAPage>true</HideEULAPage>
                <HideOnlineAccountScreens>true</HideOnlineAccountScreens>
                <ProtectYourPC>3</ProtectYourPC>
                <!-- Пропуск настройки сети, если не подключена https://t.me/sterkin_ru/1563 -->
                <HideWirelessSetupInOOBE>true</HideWirelessSetupInOOBE>
            </OOBE>
            <UserAccounts>
                <LocalAccounts>
                    <LocalAccount wcm:action="add">
                        <Group>Administrators</Group>
                        <Name>Admin</Name>
                        <!--<Password>
                            <Value>goofy reward replica danger</Value>
                            <PlainText>true</PlainText>
                        </Password> -->
                    </LocalAccount>
                </LocalAccounts>
            </UserAccounts>
           <!-- <AutoLogon>
                <Password>
                    <Value>goofy reward replica danger</Value>
                    <PlainText>true</PlainText>
                </Password>
                <Username>Admin</Username>
                <LogonCount>1</LogonCount>
                <Enabled>true</Enabled>
            </AutoLogon> -->
        </component>
    </settings>
</unattend>
Язык
Файл рассчитан на английскую ОС с этим же языком ввода по умолчанию, но русским языком для программ, не поддерживающих Юникод.
Для русской версии замените en-US на ru-RU и наоборот везде кроме SystemLocale (если ничего не менять, надо будет вручную указать язык интерфейса, форматов и метода ввода).
Издание, ключ продукта и активация
Издание выбирается на основе ключа продукта в файле ответов. Если ключ не указан, выводится список всех изданий в WIM-образе за исключением случая, когда ноутбук шел с Windows 8 и новее. В этом варианте эквивалентное издание Windows автоматически выбирается на основе данных UEFI BIOS, а после установки система активируется (верно на момент публикации статьи).
В файле ответов ключ пустой, поэтому окно его ввода пропускается. Вы можете прописать ключ KMS для установки (но не активации) или указать свой. В любом случае ключ можно сменить в параметрах после установки.
Это решается внесением в реестра трех параметров, два прочих не нужны. Я писал об этом в канале Telegram.
Учетная запись
Я создаю локальную учетную запись, убивая двух зайцев:
- Экран создания учетной записи Microsoft (MSA) пропускается. Это позволяет избежать генерации папки профиля по первым 5-6 буквам MSA. Я всегда подключаю ее в параметрах после установки.
- Локальной учетной записи не задаются три контрольных вопроса.
Имя учетной записи Admin можно поменять на любое. Если вы не хотите задавать имя заранее, закомментируйте раздел UserAccounts полностью. Заметьте, что в файле также задано HideOnlineAccountScreens = true, поэтому экран создания MSA все равно не появится.
Пароль и автоматический вход в аккаунт
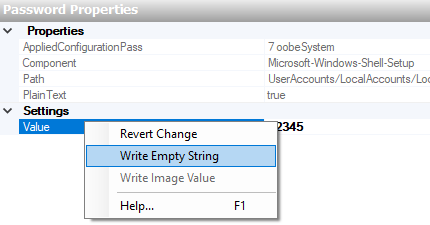
Пароль закомментирован, поэтому программа установки предложит сменить его – задайте любой или продолжайте с пустым, нажав стрелку рядом с подтверждением пароля.
Можно пропустить этот экран, настроив автоматический вход (в моем примере – однократный). Раскомментируйте разделы Password и Autologon, задайте пароль в открытом виде и не забудьте поменять имя учетной записи для автологона. В Windows System Image Manager можно замаскировать пароль или указать пустой, как показано на картинке.
Управление дисками
Я рекомендую UEFI и GPT.
- UEFI. Перед установкой задайте в UEFI BIOS нативный режим загрузки UEFI (если ноутбук шел с Windows, можно просто сбросить все на дефолт).
- GPT. В окне управления дисками нажмите Shift + F10, в командной строке очистите диск и конвертируйте в GPT, потом обновите информацию в окне.
diskpart
sel dis 0
clean
convert gpt
exit
Ссылки по теме
- Документация Microsoft по параметрам файла ответов.
- Сайт автоустановки. Практически все мои материалы времен Windows Vista до сих пор актуальны, поскольку базовые аспекты и подходы не изменились.
С таким файлом ответов я на днях поставил Windows на ноутбук с SSD за 9 минут. Быстрой вам установки!