
Когда вы подключаете карту памяти, флешку, внешний жесткий диск или оптический диск в Windows 11/10, при параметрах по умолчанию вы либо видите уведомление автозапуска «Нажмите, чтобы выбрать действие для тип накопителя», либо автоматически происходит какое-то из действий: открытие в Проводнике, приложении «Фотографии», воспроизведение медиа — конкретные варианты действий будут зависеть от типа содержимого.
При необходимости вы можете настроить это поведение: включить или отключить автозапуск, выбрать конкретное действие, которое требуется выполнять для флешек, карт памяти, оптических дисков и других съемных накопителей. О том, как это сделать — далее в инструкции.
Панель управления
Базовый способ настройки автозапуска накопителей, который продолжает работать в актуальных версиях Windows — соответствующий раздел панели управления. Достаточно выполнить следующие шаги:
- Откройте Панель управления, используя поиск в панели задач, либо с помощью сочетания клавиш Win+R и ввода control в окно «Выполнить».
- Переключите поле «Просмотр» в «Значки», после чего нажмите по пункту «Автозапуск».

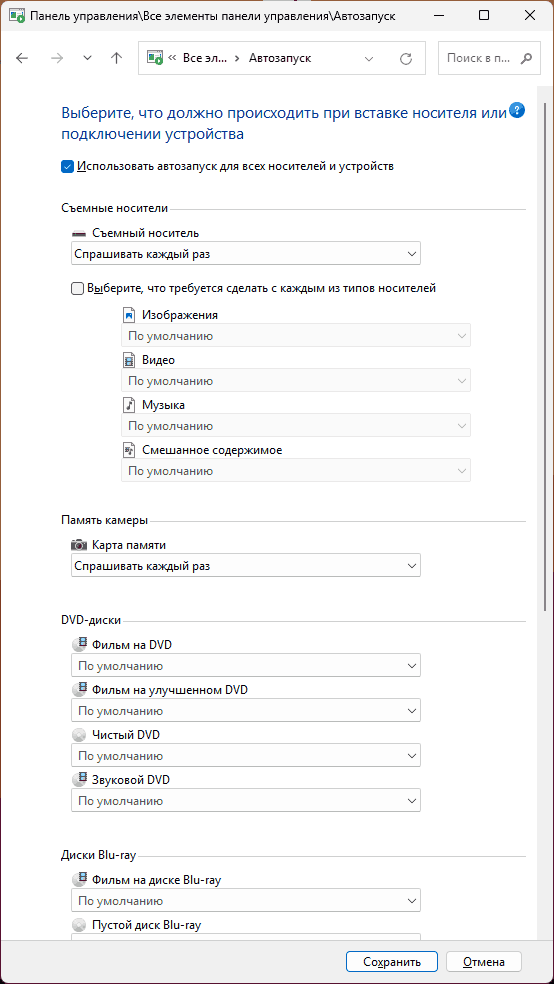
- Откроется окно, где вы можете полностью отключить (или включить, если он отключен) автозапуск подключаемых накопителей, а также настроить действия для каждого типа накопителя в зависимости от его содержимого: раздел «Съёмные носители» относится к флешкам, внешним жестким дискам и аналогичным накопителям, «Карта памяти» — к картам памяти, а ниже — разделы для различных типов оптических накопителей (которые также будут срабатывать при подключении образов ISO).

- Настроив необходимые параметры, нажмите «Сохранить».

Готово, теперь при подключении накопителей будет использовано выбранное вами действие.
В случае, если вы выберете «Спрашивать каждый раз» для какого-то из типа накопителей, при каждом его подключении вам будет предложено выбрать действие в уведомлении автозапуска, после чего вы сможете выбрать то, что требуется сделать:
Набор доступных действий будет разным в зависимости от того, какое содержимое было обнаружено и типа накопителя и присутствуют ли специальные файлы автозапуска (autorun.inf) на нём.
Параметры
Ещё одна возможность — использовать интерфейс «Параметров», однако в нём не представлены возможности настройки для оптических дисков. Действия будут следующими:
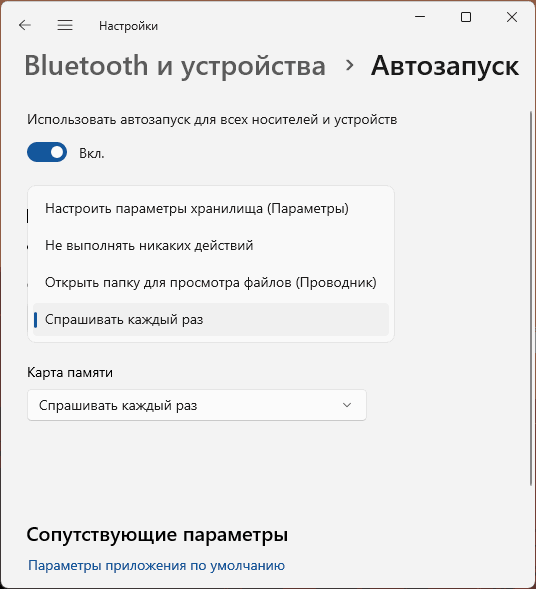
- Откройте «Параметры» — «Bluetooth и Устройства» в Windows 11, либо «Параметры» — «Устройства» в Windows
- Откройте пункт «Автозапуск» внизу списка в Windows 11 или в панели слева в Windows 10.
- Выберите нужные действия для съёмных накопителей и карт памяти, если нужно — включите или отключите автозапуск с помощью переключателя «Использовать автозапуск для всех носителей и устройств».

Интерфейс параметров в текущей версии не позволяет настраивать автозапуск столь же детально, как панель управления, но во многих случаях может быть достаточным.
Некоторые дополнительные нюансы, касающиеся автозапуска при подключении накопителей:
- Если вам требуется полностью отключить автозапуск устройств без возможности включения в «Параметрах», вы можете использовать соответствующую политику в Win+R — gpedit.msc — Конфигурация компьютера (или Конфигурация пользователя, если требуется отключение лишь для текущего пользователя) — Административные шаблоны — Компоненты Windows — Политики автозапуска (политику «Выключение автозапуска» следует включить).

- Раздел политик из предыдущего пункта также содержит возможность включить запрет запоминания выбора пользователя при автозапуске с тем, чтобы при следующем подключении устройства запрос о действии появлялся снова.
- Параметры автозапуска можно настроить в реестре в разделе
HKEY_CURRENT_USER\Software\Microsoft\Windows\CurrentVersion\Explorer\AutoplayHandlers
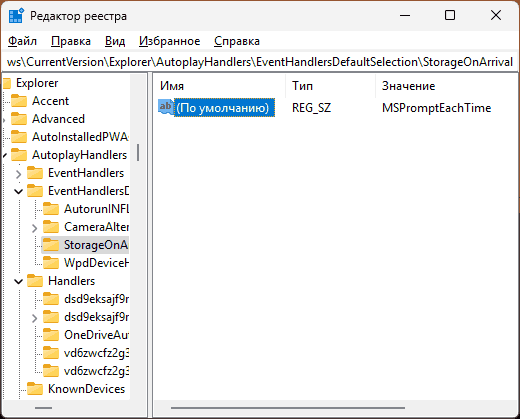
например, для отключения автозапуска, в этом разделе можно создать параметр DWORD с именем DisableAutoplay и значением 1, а для того, чтобы отключить действие для подключаемых накопителей, изменить значение «По умолчанию» в разделе
HKEY_CURRENT_USER\Software\Microsoft\Windows\CurrentVersion\Explorer\AutoplayHandlers\EventHandlersDefaultSelection\StorageOnArrival
на MSTakeNoAction (другие варианты: MSOpenFolder, MSPromptEachTime, MSStorageSense)


Если у вас остаются вопросы, касающиеся автозапуска подключаемых в Windows 11 и 10 носителей, вы можете задать их в комментариях ниже, я постараюсь помочь.
How to Autorun USB Windows 10: A Step-by-Step Guide
Introduction
Autorunning USB devices on Windows 10 is a convenient way to transfer files, install software, and even update drivers without having to physically plug in the device. In this article, we will guide you through the process of autorunning USB devices on Windows 10.
Why Autorun USB Devices?
Before we dive into the steps, let’s understand why autorun USB devices is useful. Autorun allows you to:
- Transfer files between devices without having to physically connect them
- Install software or drivers without having to manually install them
- Update drivers without having to manually update them
Preparation
Before you can autorun USB devices, you need to prepare your device and your computer. Here are the steps:
- Make sure your device is compatible: Not all USB devices are compatible with Windows 10. Make sure your device is compatible with Windows 10 before autorunning it.
- Update your device drivers: Outdated drivers can cause issues with autorunning USB devices. Update your device drivers to the latest version.
- Disable any antivirus software: Some antivirus software may interfere with autorunning USB devices. Disable any antivirus software that may be interfering with your autorun process.
Step-by-Step Guide to Autorun USB Devices
Here are the steps to autorun USB devices on Windows 10:
Step 1: Enable Autorun in Windows 10
- Go to Settings: Click on the Start button and select Settings.
- Click on Devices: In the Settings window, click on Devices.
- Click on Update & Security: In the Devices window, click on Update & Security.
- Click on Recovery: In the Update & Security window, click on Recovery.
- Click on Troubleshoot: In the Troubleshoot window, click on Troubleshoot.
- Click on Additional Troubleshooters: In the Troubleshoot window, click on Additional Troubleshooters.
- Click on Device Manager: In the Additional Troubleshooters window, click on Device Manager.
- Click on Action: In the Device Manager window, click on Action.
- Click on Enable Automatic Update: In the Device Manager window, click on Enable Automatic Update.
Step 2: Enable Autorun in Device Manager
- Click on Device Manager: In the Device Manager window, click on Device Manager.
- Click on Action: In the Device Manager window, click on Action.
- Click on Enable Automatic Update: In the Device Manager window, click on Enable Automatic Update.
Step 3: Configure Autorun Settings
- Click on Device Manager: In the Device Manager window, click on Device Manager.
- Click on Action: In the Device Manager window, click on Action.
- Click on Properties: In the Device Manager window, click on Properties.
- Click on Autorun: In the Properties window, click on Autorun.
- Check the box next to «Enable autorun»: In the Autorun window, check the box next to Enable autorun.
- Click on OK: In the Autorun window, click on OK.
Step 4: Autorun USB Devices
- Click on Device Manager: In the Device Manager window, click on Device Manager.
- Click on Action: In the Device Manager window, click on Action.
- Click on Properties: In the Device Manager window, click on Properties.
- Click on Autorun: In the Properties window, click on Autorun.
- Click on USB: In the Autorun window, click on USB.
- Click on Add: In the Autorun window, click on Add.
- Select the USB device: In the Add window, select the USB device you want to autorun.
- Click on OK: In the Add window, click on OK.
Troubleshooting
- If autorun is not working: Check that your device is compatible with Windows 10 and that your device drivers are up to date.
- If autorun is not working after enabling it: Check that your antivirus software is not interfering with autorun.
- If autorun is not working after configuring it: Check that your device is properly connected to your computer.
Conclusion
Autorunning USB devices on Windows 10 is a convenient way to transfer files, install software, and even update drivers without having to physically plug in the device. By following the steps outlined in this article, you can enable autorun on your Windows 10 device and start using it to its full potential.
Additional Tips
- Use a USB hub: If you have multiple USB devices, consider using a USB hub to connect them to your computer.
- Use a USB cable with a built-in switch: If you have multiple USB devices, consider using a USB cable with a built-in switch to connect them to your computer.
- Use a USB device with a built-in autorun feature: Some USB devices, such as flash drives and SD cards, have built-in autorun features that can simplify the process of autorunning them.
Conclusion
Autorunning USB devices on Windows 10 is a convenient way to transfer files, install software, and even update drivers without having to physically plug in the device. By following the steps outlined in this article, you can enable autorun on your Windows 10 device and start using it to its full potential.
Unlock the Future: Watch Our Essential Tech Videos!
- Does autorun INF work on Windows 10?
- How do I enable autorun on USB in Windows 10?
- How do I fix autorun INF?
- How do I run an autorun INF file?
- Is Autorun INF harmful?
- How do I enable AutoRun?
- How do I know if autorun is enabled?
- How do I change my USB settings on Windows 10?
- How do I remove autorun INF from USB?
- What is Autorun Inf in USB?
Does autorun INF work on Windows 10?
Windows 10 supports AutoRun, but the support is restricted in the same way as in Windows 7 and Windows 8 for security reasons. Most restricted is the support for USB flash drives.
How do I enable autorun on USB in Windows 10?
To enable or disable AutoPlay on Windows 10 with Control Panel, use these steps:
- Open Control Panel.
- Click on Hardware and Sound.
- Click on AutoPlay.
- Check the Use AutoPlay for all media and devices option to enable AutoPlay. (Or clear the option to disable the feature.)
How do I fix autorun INF?
Delete autorun. inf on hard drive of computer
- Boot your system in the safe mode and then open a command prompt.
- Delete the following files: %System%\config\csrss.exe. …
- Open the registry editor and delete following parameters: [HKCU\Software\Microsoft\Windows\CurrentVersion\Policies\System] …
- Reboot your computer.
How do I run an autorun INF file?
Choose «Open». Look for a setup.exe file or something similarly named. It could be called «autosetup.exe» or the like. Double-click to run it.
Is Autorun INF harmful?
Windows uses the autorun.
Viruses and other malware will attempt to use this feature to infect new computers when devices or media (like a USB drive) are moved between computers. Note: The «autorun. inf» file in and of itself, is not malicious.
How do I enable AutoRun?
Enabling or Disabling Autorun (Windows NT/2000)
- Click Start>Run.
- Type regedt32.exe in the Run field.
- Browse to HKEY_LOCAL_MACHINE/System/CurrentControlSet/Services/Cdrom .
- Change the Autorun value to 1 to enable autorn, and 0 to disable autorun.
- Close RegEdit.
How do I know if autorun is enabled?
To see what is enabled or disabled, open the Control Panel, search for «autoplay» and then click on the Autoplay entry. Under «Media», you’ll be able to find the types of media that you can change the AutoPlay settings for. If you want to disable it entirely, then this site provides you with steps to do this.
How do I change my USB settings on Windows 10?
USB settings in Power Plan Options on Windows 10 is missing, how to restore it?
- Press Windows + X.
- Choose Power Options.
- Select Choose when to turn off the display.
- Open Change advanced power settings.
- Expand USB settings and USB selective suspend setting.
- Select Enabled (default) or Disabled.
- Click Apply, then OK.
How do I remove autorun INF from USB?
Instructions to remove autorun.
Type the USB drive letter on to the command prompt. Type dir/w/a and press enter, which will show up a list of the files in your flash drive. If you find Ravmon.exe, New Folder.exe, ntdelect.com, kavo.exe, svchost.exe, autorun. inf, remove these files.
What is Autorun Inf in USB?
An autorun. inf file is a text file that can be used by the AutoRun and AutoPlay components of Microsoft Windows operating systems. … AutoRun enabled application CD-ROMs to automatically launch a program which could then guide the user through the installation process.
Do you want that a certain program should run when you insert your USB flash drive? Or do you want to add a custom icon for your flash drive? If the answer to any of the question is yes, then you have come to the right place.
It is possible to auto run the programs and applications from your removable USB flash drive like the autorun feature in CD/DVD drives. The autorun.inf file is the key to getting your USB drive to perform certain actions automatically and customize it’s look in My Computer. The purpose of this article is to shed some light on how this can be done.
Note: Autorun feature does not work in Windows 7 any more, Microsoft has disabled it due to security reasons. But this feature works fine in Windows Vista, Windows XP, and older OS.
Basic Autorun.inf Structure
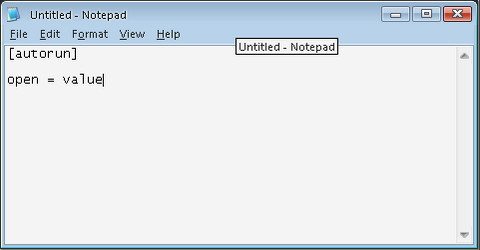
The autorun.inf file is a simple text file that can be opened up in any text editor (e.g. notepad). It always starts with a section header of:
[autorun]
Below this header is a list of different options. Each of these options is in the following format:
option=value
Setting Up AutoPlay Options
Autoplay allows you to set up what file is run when the USB drive is plugged into the computer. There are two options that work in concurrence with AutoPlay. The first is open which specifies the program that you can run automatically with AutoPlay. So, if we wanted to run a program called MyProgram.exe, you would add the this to your autorun.inf file:
open=MyProgram.exe
The second option that we add is the message the user is prompted with. To set this, we use the action option.
action=MyProgram Open Program
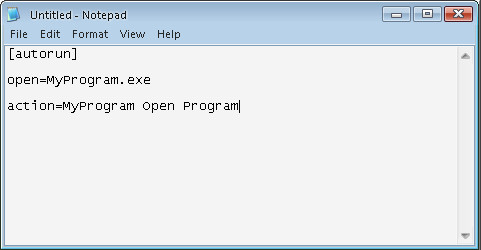
When your autorun file is done, save it as autorun.inf. Once the autorun.inf file is saved, the flash drive autoplay will look something like this:
Customize USB Flash Drive’s Icon
To create a custom icon for your USB drive, use the icon option. Set it to the name of the icon file.
For example, if you had an icon on the root of the USB drive called sun.ico and you wanted this to be the icon that showed up for the USB drive, you would enter:
icon=sun.ico
You can also use some other application’s icon by specifying
icon=Photo.exe
This is valid as long as Photo.exe is available on the root of the USB drive.
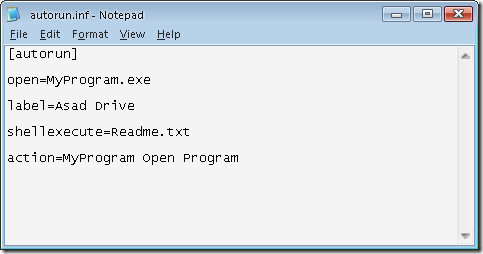
Label Your Flash Drive
If you want your USB drive to display a specific name other than the drive label created when it was formatted, then use the label option. For example, if I wanted to call my drive Asad Drive, I would add this to my autorun.inf file:
label=Asad Drive

Now, when you look at your USB drive in My Computer, it will say Asad Drive by the drive letter.
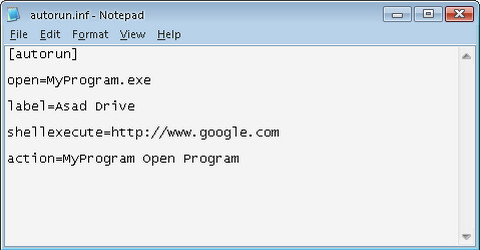
Autorun Files or Web Addresses
If you wanted to view a file on your USB drive in the default application instead of running a program on the drive, you can substitute the open option for the shellexecute option. For e.g
shellexecute=Readme.txt
if you wanted to open up a website www.google.com in the default web browser, you could use the following:
shellexecute=https://www.google.com
Now start customizing your USB drive now. Don’t forget to leave a comment. 🙂

[yasr_overall_rating] [yasr_visitor_votes]
This tutorial explains how to automatically launch a specific application when you plug in USB in Windows 10 PC. Whether you want to open some image editor, browser, screenshot capture software installed in your Windows 10 PC, or a portable application, it will launch automatically when you will plug in your USB drive. Only one application can be set to launch at a time, but it is handy when you have some favorite application that you need to launch as soon as your USB drive is plugged in.
To launch a specific application or program automatically when you plug in USB drive in your Windows 10 PC, you need to use a free software, called “APO Usb Autorun” and create an autorun file. The APO Usb Autorun software monitors the USB drive and autorun file executes the application specified by you. I have covered all steps to help you configure everything easily and launch a program of your choice automatically when you plug in USB in your Windows 10 PC.
Let’s see how to do this.
Step 1: First of all, grab the set up of APO Usb Autorun and then install it. After installation, launch it to run in the system tray. You don’t have to configure anything in this software.
Step 2: Plug in your USB drive and then add the executable file or portable application of program which you want to launch. For example, if you want to launch Chrome browser, then open its installation location, copy chrome application file and paste it in USB drive.

You can use USB to store other content (files, folders, etc.) also. It won’t affect your USB and you can use it like regularly.
Step 3: Open Notepad and copy and paste the following code in Notepad:
[autorun]
;Open=YourApplication.exe
ShellExecute=YourApplication.exe
UseAutoPlay=1

Replace “YourApplication” with the actual name of application that you want to launch. For example, if you want to launch Chrome browser, then add chrome.exe in “;Open” and “ShellExecute” fields.

Step 4: Save the code as “autorun.inf” file in your USB drive. Remember, you need to write File name as “autorun.inf” and set Save as type as “All Files” to save the code as autorun.inf file.

Now your USB drive will have the application that you want to launch and the autorun file.
Step 5: Eject USB drive and then plug it in again. Now, APO Usb Autorun application will detect that USB drive is plugged in. After that, autorun file will do its work and launch application specified by you.
This way you can configure some other application to launch automatically when you plug in USB drive in Windows 10 PC. You just need to edit the “;Open” and “ShellExecute” fields of autorun file.
You may also try How To Add Specific Store Apps To Launch At Startup In Windows 10 and How To Add Two Taskbars In Windows 10.
The Conclusion:
This trick is very helpful for users who regularly use a particular application but want to launch it automatically only when USB drive is plugged in. I will try to find if there is some other trick that can launch multiple applications when you plug in USB drive. Till then, you may give a try to this trick.