
Do you come across a message AutoIt Error Line 0 (File “C:\Users\Username\AppData\Roaming\xyz…”) that mostly appears at the startup of your computer? If yes then let’s see the solutions and meaning of this issue as well in this post. First of all; what is autoit error? AutoIt is a scripting language that enables users to automate Windows processes, it is frequently employed in software testing, system management, and other forms of automation. AutoIt scripts may be converted into executable files that can be executed on any Windows machine. Unfortunately, while running the scripts, users may occasionally receive an “AutoIt Error Line 0”. This error often indicates a problem with the script and can be caused by several reasons.
Some common factors responsible for this issue include outdated scripts, corrupted files, certain missing libraries or dependencies, or presence of malware. Eliminating all these reasons must assist in correctly resolving this problem. See – How to Fix PhoneExperienceHost.exe Error in Windows 11 or 10.
Autoit Error Line 0 in Windows 11 or 10
Here is How to Fix Autoit Error Line 0 in Windows 11 or 10 –
Way-1: Remove problematic files
Interference of scheduled tasks in running Autoit scripts may trigger the error message. Therefore, deleting the process can work like a resolver, particularly with the help of Autoruns for Windows Sysinternals tool. Furthermore, disabling the AutoIt script interfering with other processes running at Windows startup may fix the error.
When you switch on a Windows computer, several-configured apps, and background services begin to function. If one of these apps is an AutoIt script, removing it from the startup list may help.
- Download the Autoruns for Windows Sysinternals tool from this link.
- Double-click on Autoruns64.exe to start the application.
- Allow the tool to fully load.
- Type vapihas in the Quick filter bar.
- You should see a scheduled task called \Service\Diagnostic.
- Right-click on this item and select Delete.
- Launch File Explorer and navigate to C:\Users\yourusername\AppData\Roaming.
- Find ServiceGet folder and delete it. Note: Check the error message; if it is showing another file or folder, delete that one. Close the File Explorer.
- Press Windows+R and type %temp%.
- Press Enter.
- Select all items in the temp folder and delete them.
- Again open the Run dialog box and enter temp.
- Delete the files and folders in the appearing window.
- Once more open the File Explorer, type shell:startup in address bar, and hit Enter key.
- Look for any item name having suffix .url. They may be having weird names such as ezcrPlanZc.url. Delete all of them.
- Restart your computer and check if Autoit Error Line 0 is fixed.
- In case it is not resolved, Open Autoruns click on Category, and select Everything.
- Look for references to a3x and Google Chrome in the image path column of the Logon tab.
- Right-click on them and select Delete.
- A confirmation window will appear. Click the OK button.
- If you go to the Everything tab and can’t discover any such entries use Search bar to find Google Chrome.
- Once you’ve located the item, uncheck the checkbox next to it. This will remove the Registry record for that.
- Lastly, restart your computer, and you should no longer notice the AutoIt problem.
Way-2: Run Windows Defender Full Scan
A Windows security scan may be a potentially viable option to resolve AutoIt Error Line 0, particularly if the problem is caused by threats or other protection risks. Malware, which usually consists of viruses, spyware, and other sorts of malicious programs, may cause various computer problems, including the running one.
This is because threats may disrupt the operation of applications and AutoIt script, and may even change or delete important files. These steps you must follow for the same:
- Press the – Win+Q.
- Type – Security.
- Hit – Enter.
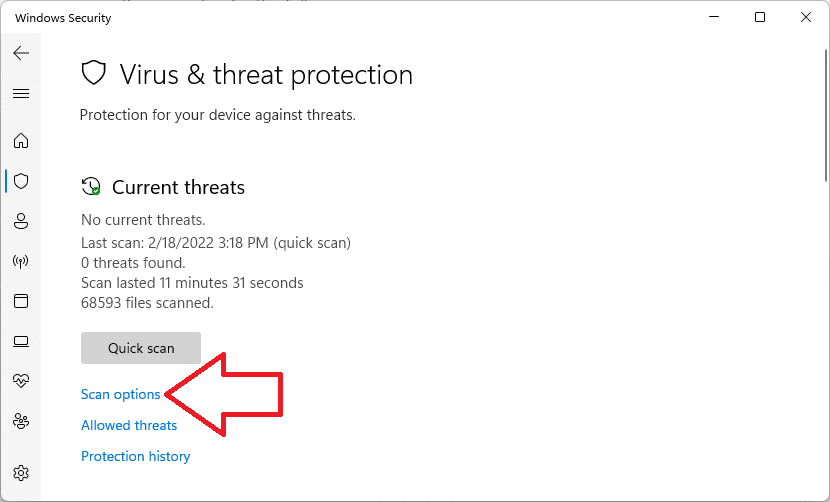
- At the very top, click on – Virus & threat protection.
- Choose the Scan options link.
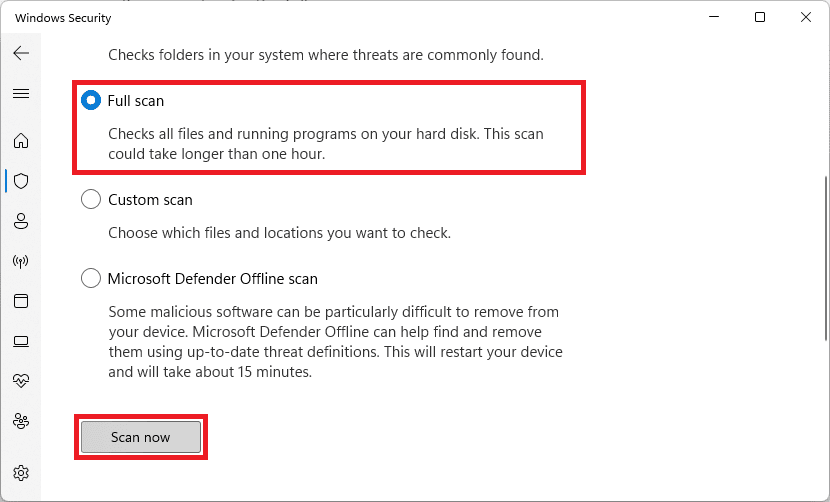
- Choose the radio button that is located before the Full scan option.
- Click the Scan now.
- Once the scanning is completed, go to Windows security > Virus & threat protection > Protection history to remove any malware that may have been discovered during the scanning process.
- Select the Actions.
- Click the Remove.
- Finally, you need to restart the Windows.
Way-3: Use System File Checker or SFC and DISM utilities to resolve Autoit Error Line 0
Malfunctioning system files and broken registry might be the root cause of Autoit Error Line 0. If you are clueless about what to do in this case System File checker can rescue you from the error running on Command Prompt which replaces the elements with the same located in cache folder.
Moreover, the DISM has the capability to repair the installation files and .wim which can solve the present issue. So run both utilities in following ways –
- Press Winkey+R.
- Type – cmd.
- Then, press “Ctrl +Shift + Enter”.
- On the User account control box, click – Yes.
- When “Administrator: Command Prompt” appears, write
SFC /SCANNOWand hit Enter. - You will see –
“Beginning verification phase of system scan.
Verification 100% complete.
Windows Resource Protection did not find any integrity violations.”
- Restart your computer to confirm that no problem occurs further.
- Oppositely, if Autoit Error Line 0 again shows up, run the below command lines sequentially –
DISM /Online /cleanup-Image /checkhealth
DISM /Online /cleanup-Image /scanhealth
DISM /Online /cleanup-Image /restorehealth- When completed, reboot the PC to solve the issue.
Way-4: Remove or Edit the AutoIt String Values using Registry Editor
If any problem is caused or originated by a faulty or incorrect AutoIt entry, deleting, or editing this Registry can help potentially in repairing the error. Because the registry is an organized collection of data that maintains configuration settings for Windows and the applications that are installed on it.
AutoIt scripts may use this to store settings or other information which might be corrupted and be the reason behind displaying the error. To rescue this,, move forward with –
- Pressing the Windows logo keys and R together.
- In the Run box, type the command: regedit.
- To launch the Registry Editor, click OK and select “Yes”.
- In the Editor, click File from the top menu.
- Select the Export option.
- Provide a File name for the registry backup.
- Choose a location to store the file.
- Click the Save button.
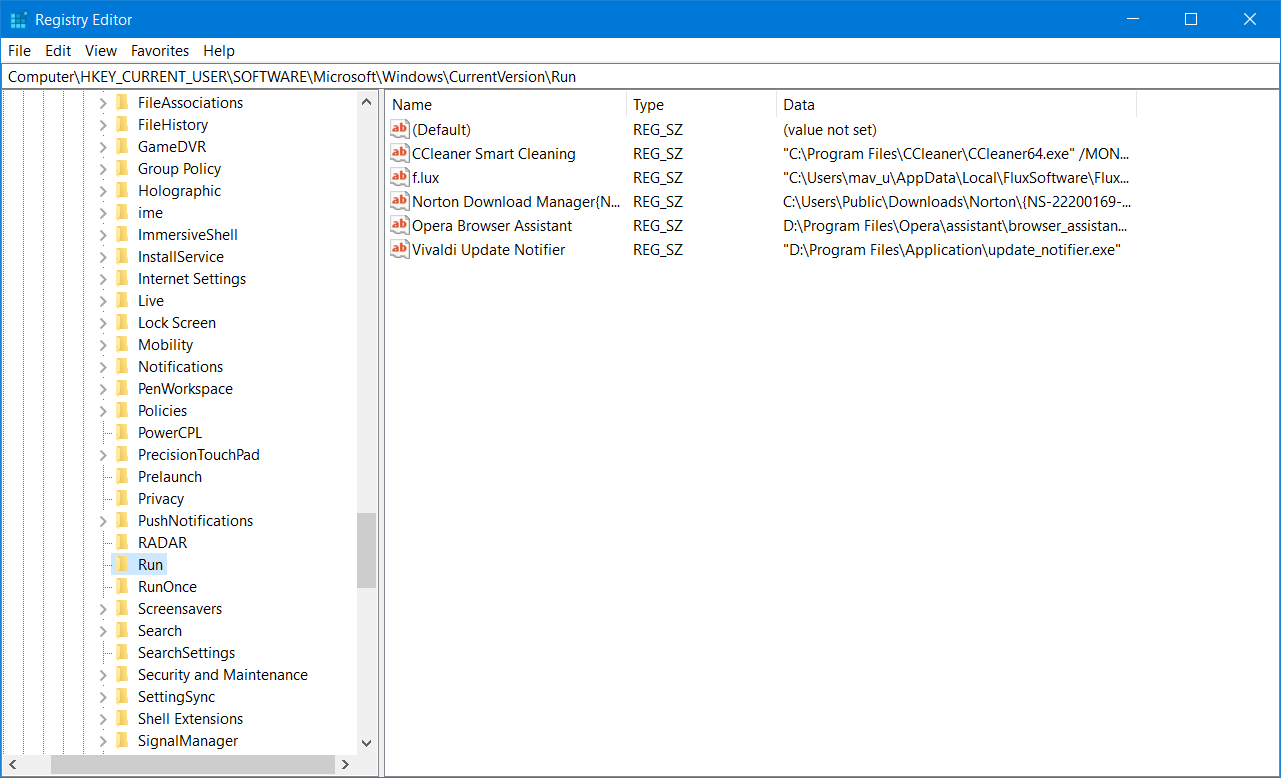
- Open the following registry key path:
Computer\HKEY_CURRENT_USER\Software\Microsoft\Windows\CurrentVersion\Run- Look in the Run registry key for the following REG_SZ strings: Adobe Flash Player, Windows Update, Adobe Update, and Google Chrome.
- To remove the strings, right-click them and select Delete one by one.
- Next, in the Registry Editor, browse to reach this key:
Computer\HKEY_LOCAL_MACHINE\Software\Microsoft\Windows\CurrentVersion\Run- Duplicate the previous steps for REG_SZ strings.
- Restart your computer after closing the Registry Editor.
Way-5: Unistall Autoit
If you are in the condition to sacrifice the program, uninstalling it can be one of the most basic and easiest steps in resolving “Autoit Error Line 0” issue. Hence, follow the instructions outlined below:
- Click on – Start.
- Then, type – appwiz.cpl.
- Hold down the Enter key to launch the Programs and Features window.
- Highlight the AutoIt by clicking on it from the list presented.
- Click the Uninstall option.
- If a confirmation window appears, select Yes to continue.
- Restart your PC after removing AutoIt.
Way-6: Perform Reset this PC
Another crucial reason for causing this problem may be faulty or damaged Windows system files, driver, and application which may be interfering with programming scripts. Reset this PC is a built-in arrangement in that might fix the AutoIt Error Line 0 keeping files and data.
As this reformat process in Windows will replace any damaged or corrupt files with new ones. The following are the procedures for the same:
- Launch the Settings application (Winkey+I), then click on Recovery.
- On the next page, click on Reset PC.
- Choose the option to Keep my files,
- Select – Local reinstall.
- Click on Next.
- Make sure that the PC is plugged in with Electric power and adhere to the on-screen instructions.
- Click on Reset.
- After the procedure of reset is completed see if the error is fixed.
Reference – 3 ways to Reset Windows 11 PC to Factory settings.
We hope these 5 ways must have helped you resolve the AutoIt Error Line 0 in your Windows 11 or 10.
Methods:
Way-1: Remove problematic files
Way-2: Run Windows Defender Full Scan
Way-3: Use System File Checker or SFC and DISM utilities to resolve Autoit Error Line 0
Way-4: Remove or Edit the AutoIt String Values using Registry Editor
Way-5: Unistall Autoit
Way-6: Perform Reset this PC
That’s all!!
In this post, we will show you how to remove the AutoIt Error in Windows 11/10 computer. Some users have this issue that every time they start their computer, they receive an error message because of some corrupt data related to AutoIt. It could be because of files, Registry values, and/or folders associated with AutoIt. If you are also facing the same problem, then the solutions added in this post might help you. The AutoIt error message received by users goes like this:
Line 0 (File “C:\GoogleChrome\GoogleChrome.a3x”):
Error: Error opening the file.

What is AutoIt?
AutoIt is a freeware BASIC-like scripting language designed for automating the Windows GUI and general scripting. However some malware are known to use this name or this script to inject malware, so one has to be careful.
To remove the AutoIt Error from your Windows 11/10 computer, the following solutions might come in handy:
- Delete AutoIt entries using File Explorer
- Delete AutoIt string values from Registry Editor
- Use your antivirus to perform a system scan for viruses
- Remove AutoIt scripts from Windows startup.
Let’s check these solutions one by one.
1] Delete AutoIt entries using File Explorer
If there are files (EXE, TXT, DLL, etc.) and folders associated with AutoIt present on your computer, then it is possible that you are getting this AutoIt error. In that case, you need to find and delete such AutoIt entries with the help of File Explorer.
So, open File Explorer, access C drive (or where you have installed Windows) and find and delete suspicious files like KHATRA.exe, names.txt, svchost.com, sass.exe, Ask.com.exe, Exterminate It!.exe, driver—grap.exe, xerox.exe, etc. You will find these files in different locations or folders such as Program Files, Windows, System, System32, and more. It will take some time but this might help you fix the problem.
Apart from that, also check if there are folders like cuhu, CIDD_P, and bycool1, present in the user profile, Windows, and System folder. If yes, delete such malicious folders from your computer. After that, restart your computer, and the problem should be gone now.
2] Delete AutoIt string values from Registry Editor

If there are suspicious string values like Windows Update, AutorunRemover.exe, GoogleChrome, UnlockerAssistant, USBScan.exe, NBKeyScan, ApnUpdater, SoundMan, ShStatEXE, PTHOSTTR, ShutdownEventCheck, WHITNEY_S2P, GhostStartTrayApp, igfxhkcmd, Adobe ARM, SkyTel, HotKeysCmds, BCSSync, GrooveMonitor, etc., present in Registry Editor, then you need to delete those AutoIt string values in order to solve this problem. Before doing that, it is recommended to backup Windows Registry so that you can restore it later if something wrong happens. Once it is done, follow these steps:
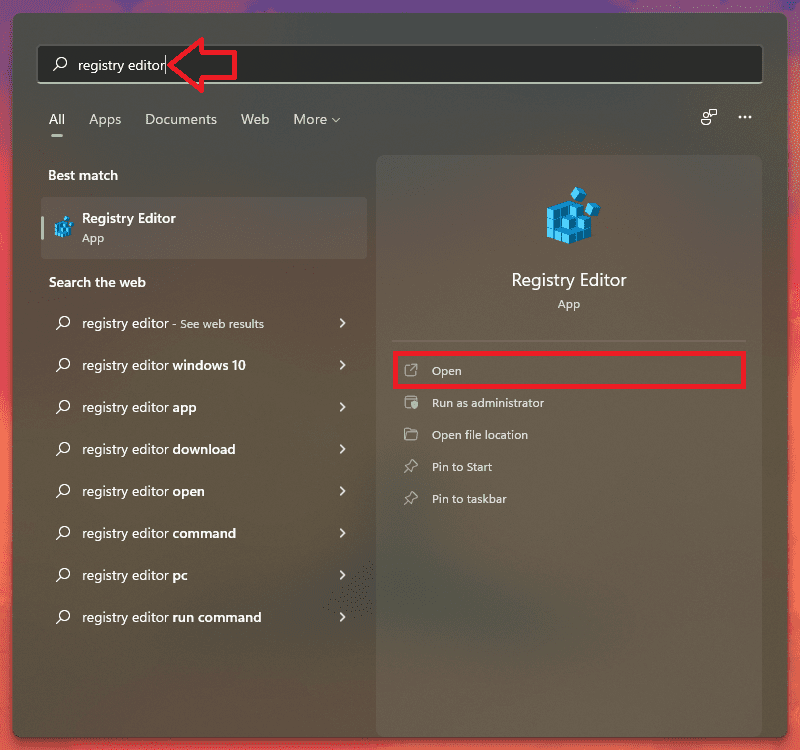
- Type regedit in the Search box of your Windows 11/10 computer
- Press Enter key to open Registry Editor
- Access the following path:
HKEY_CURRENT_USER\Software\Microsoft\Windows\CurrentVersion\Run
- On the right-hand section, select all those suspicious entries
- Right-click to open the context menu
- Click on the Delete A confirmation box will open
- Press the Yes button in that box
- Restart your computer.
3] Use your antivirus to perform a system scan for viruses
It is always good to have a good antivirus program installed on your computer and you should perform a system scan from time to time. If your antivirus is good, start a system scan to check for viruses and delete them (if found any). Otherwise, you can use some other antivirus program to fix this problem. Thankfully, there are a lot of good free antivirus tools available to use that you can try.
4] Remove AutoIt scripts from Windows startup

It might be possible that some AutoIt scripts are present in your computer that run automatically when Windows starts because of which you face this problem every time. Therefore, you need to remove such AutoIt scripts from the Windows startup. For this, use the following steps:
- Download and install Microsoft Autoruns for Windows
- Launch the tool to open its interface
- Click on the Logon tab
- In the image path column of the Logon tab, look for the references to a3x and GoogleChrome. If you find such references, select them
- Press the Delete button. A confirmation box will pop-up
- Press the OK button in that box
- If you are not able to find such entries, then switch to the Everything tab
- Click on the Search icon present on the top left part of its interface to find GoogleChrome
- Once you find that item, uncheck the checkbox selected for that entry. This will disable the Registry entry related to that item
- Finally, restart your computer, and you should not see that AutoIt error anymore.
Hope something from these solutions will be helpful for you.
Related: Fix Error opening file for writing on Windows
Is AutoIt a virus?
AutoIt (in its reasonable or acceptable form) is actually an automation language that is used for scripting Windows-based applications. On the other hand, if AutoIt is in its malicious form, then it can be used for creating malware with different functionality. So, if later is the case, and you are having issues like getting AutoIt error on Windows start, then you should remove all its entries from Registry Editor, remove its scripts from Windows startup, and delete files and folders from your computer. The solutions covered in this post above will help you remove such items.
How do I remove AutoIt EXE virus?
If AutoIt entries like its Registry string values, folders, EXE files, DLL files, etc., are present in your Windows 11/10 computer and you are having trouble with it, then you need to remove all such entries from your computer. You can perform a virus scan for your computer, delete its string values manually, and also use a free tool by Microsoft to remove AutoIt scripts from Windows startup. All such solutions are covered in this post above in detail.
Read next: Best free Automation software for Windows.
What is ‘AutoIt error’ in Windows 10/11?
In this article, we are going to discuss on How to fix AutoIt error Windows 10/11. You will be guided with easy steps/methods to resolve the issue. Let’s starts the discussion.
‘AutoIt’: AutoIt is freeware programming language for Microsoft Windows OS based computer. It was primarily intended to create automation scripts for Microsoft Windows programs but has since grown to include enhancements in both programming language design and overall functionality. AutoIt Syntax is similar to that found in BASIC family of languages. AutoIt is general purpose, third-generation programming language with classical data model and variant data type that can store several types of data including arrays.
However, several Windows users reported they faced AutoIt error when they tried to start their Windows 10/11 computer. Some users reported the issue is occurred possibly due to corruption in data relating to AutoIt. It could be because files, registry values, and/or folders relating to AutoIt. The error is appeared with path of AutoIt that is causing error. Let’s take a look at error message.
“Line 0 (File “C:\GoogleChrome\GoogleChrome.a3x”):
Error: Error opening the file.”
The possible way to fix the AutoIt error is to delete AutoIt entries from computer completely. Here, you are provided with several easy ways to remove AutoIt from your Windows 10/11 computer in order to fix the AutoIt error. This issue can also be occurred due to some malware or viruses infections in computer so you can run system scan for malware or viruses in computer with some powerful antivirus. Let’s go for the solution.
How to fix AutoIt error Windows 10/11?
Method 1: Fix ‘AutoIt error’ with ‘PC Repair Tool’
‘PC Repair Tool’ is easy & quick way to find and fix BSOD errors, DLL errors, EXE errors, problems with programs/applications, malware or viruses issues, system files or registry issues, and other system issues with just few clicks.
Method 2: Delete AutoIt entries using File Explorer
You can delete AutoIt entries including all files and folders relating to AutoIt from File Explorer in order to fix the issue.
Step 1: Open ‘File Explorer’ and go to ‘C: Drive’ or the drive where you have installed Windows. Or go to Program Files, Windows, System, System32, and more, in order to find suspicious files
Step 2: Find and delete suspicious files including KHATRA.exe, names.txt, svchost.com, sass.exe, Ask.com.exe, Exterminate It!.exe, driver—grap.exe, xerox.exe, etc, from there.
Step 3: Also check if there are folders like cuhu, CIDD_P, and bycool1, present in the user profile, Windows, and System folder. If yes, delete such malicious files/folders from there and once done, restart your computer and check if the issue is resolved.
Method 3: Delete AutoIt strings values using Registry Editor
If there are suspicious strings values like Windows Update, AutorunRemover.exe, GoogleChrome, UnlockerAssistant, USBScan.exe, NBKeyScan, ApnUpdater, SoundMan, ShStatEXE, PTHOSTTR, ShutdownEventCheck, WHITNEY_S2P, GhostStartTrayApp, igfxhkcmd, Adobe ARM, SkyTel, HotKeysCmds, BCSSync, GrooveMonitor, etc., then you need to delete these strings value in order to fix the issue.
Step 1: Open ‘Registry Editor’ in Windows PC via Windows Search Box and navigate to following path
HKEY_CURRENT_USER\Software\Microsoft\Windows\CurrentVersion\Run
Step 2: Select all those suspicious entries in right-pane, right-click on each of them and select ‘Delete’ to delete them.
Method 4: Remove AutoIt scripts from Windows Startup
You can also try to fix the issue by removing AutoIt scripts from Windows Startup.
Step 1: Download and install ‘Microsoft Autoruns for Windows’ from Microsoft Official site
Step 2: Once installed, open it and click ‘Logon’ tab
Step 3: Look for the references to ‘a3x’ and ‘GoogleChrome’. If you find such references, select them
Step 4: Press ‘Delete’ button and hit ‘Ok’ button to confirm
Step 5: If you are not able to find such entries, switch to ‘Everything’ tab, click ‘Search’ icon at top-left part of its interface to find ‘GoogleChrome’
Step 6: Once you find the item, uncheck the checkboxes selected for that entry. This will disable the Registry entry relating to that item. Once done, restart your computer and check if the issue is resolved.
Method 5: Uninstall AutoIt using Control Panel
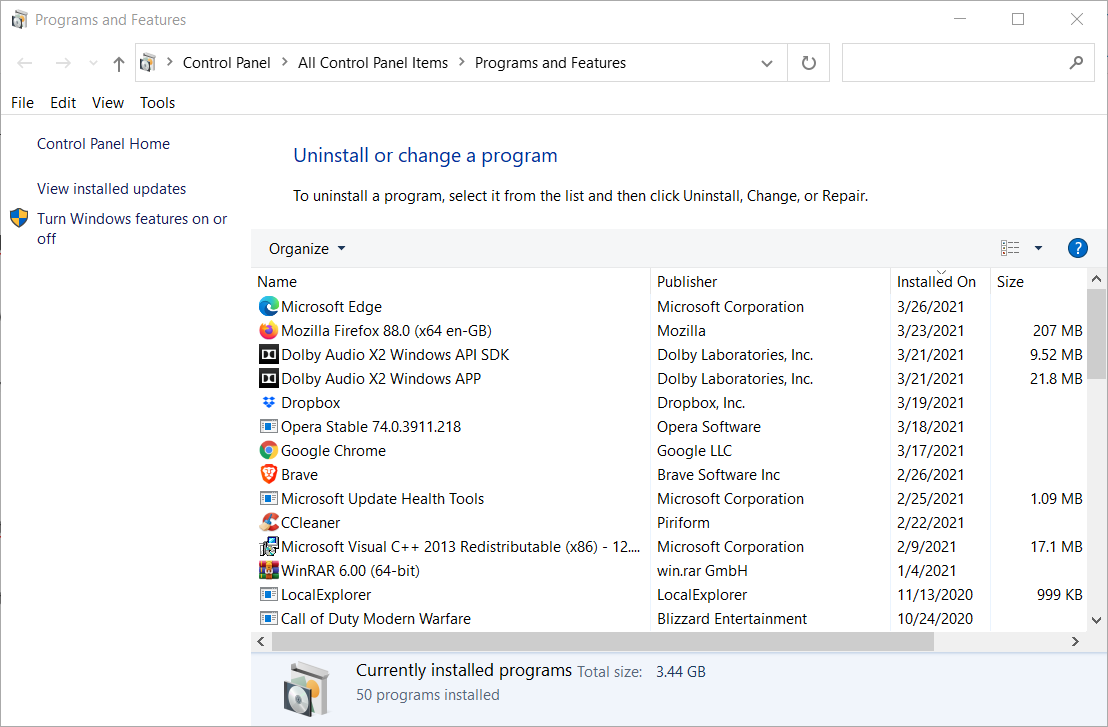
Step 1: Open ‘Control Panel’ in Windows PC and go to ‘Uninstall a Program > Programs & Features’
Step 2: Fins and select ‘AutoIt’, and click ‘Uninstall’ to uninstall it and once uninstalled, restart your computer and check if the issue is resolved.
Conclusion
I am sure this post helped you on How to fix AutoIt error Windows 10/11 with several easy steps/methods. You can read & follow our instructions to do so. That’s all. For any suggestions or queries, please write on comment box below.
Readers help support Windows Report. We may get a commission if you buy through our links.
Read our disclosure page to find out how can you help Windows Report sustain the editorial team. Read more
Some users have reported an AutoIt error on Microsoft’s support forum. When that issue arises, users see an AutoIt Error message pop up every time Windows starts up.
The specified file path within that error message can vary, but despite the file path, there are a couple of solutions that you can use to fix this problem.
What is AutoIt3 EXE?
AutoIt v3 is a scripting language developed for automating and mimicking keystrokes, mouse movement, and window/control manipulation.
Is AutoIt needed?
This is not a necessary operation for Windows and may be stopped if it is known to cause difficulties.
File corruption is a common cause of problems with Windows, including this one. This can happen anytime for unknown reasons, but the issues are minor and can be easily fixed by running scans with DISM and SFC.
If your computer has one or more autorun keys left behind by an application that is no longer available, you are likely to run into one of the most typical instances in which you would get this sort of error.
Another factor you should consider is the possibility that your Windows files have been compromised by a virus or other form of malicious software.
There are other causes, but these are the most common ones. Here are also the most common errors reported by our users regarding AutoIt:
- AutoIt Error Line 0 file C:/Users – Conceivably, the cause is a conflict between a program or service and one or more of Windows’s processes to boot up.
- AutoIt Error Line 0 – You may test whether or not this is the case by forcing Windows to boot with only the essential drivers and applications for the starting process.
- Allocating memory AutoIt error – Using File Explorer, delete all entries that include AutoIt.
- AutoIt Error opening the file – This can occur due to the residual autoruns.
- AutoIt Error ServiceGet – Delete any string values associated with AutoIt from the Registry Editor.
- Logonui.exe AutoIt error – Try using Startup Repair.
- AutoIt error line 865 – Delete any AutoIt scripts running when Windows starts.
- AutoIt error in Windows 7/10/11 – This issue is not specific to one OS iteration, but rather to all of them, or the latest ones. However, the solutions below are applicable to each iteration.
Without any further ado, let’s jump into the list of solutions to AutoIt errors in both Windows 10 and 11. Follow along!
How do I fix AutoIt error line 0 in Windows 10?
1. Run a malware scan
For those wondering how do I get rid of AutoIt virus, the error is often caused by malware known as Veronica, so you should start with a malware scan.
We suggest you use Eset HOME Security Essential because it has a very high detection rate and multiple security features to ensure you are protected on all fronts.
Eset is an award-winning antivirus with a powerful anti-malware engine. It protects your PC in real-time, at all times, without impacting its functionality.
Other notable features of Eset HOME Security Essential include:
- Banking and payment protection
- Parental controls
- Webcam protection
- Anti-phishing technology
- Multilayered protection
- Malware and ransomware protection
Eset lets you run a one-time full scan of your PC that will detect and remove any threats. It is online and completely free. It will help remove any threats and allow you to try the software.
ESET HOME Security Essential
Remove malware and secure your whole digital experience with award-winning antivirus technology.
2. Edit the registry
- 1. Open the Run tool
First, open the Run tool by right-clicking the Start button and selecting that option from the menu.
- 2. Enter this command in the Open box: regedit > Click Ok to open Registry Editor.
Enter the following command in the Open box: regedit. Then click OK to open the Registry Editor.
- 3. Click File on the Registry Editor window and select Export option.
Click File on the Registry Editor window. Select the Export option.

- 4. Enter a file name for the registry backup and save it.
Enter a file name for the registry backup. Choose a location for the registry backup file. Press the Save button.
- 5. Open this registry key path using a special coomand.
Open registry key path with:
Computer\HKEY_CURRENT_USER\Software\Microsoft\Windows\CurrentVersion\Run
- 6. Search for REG_SZ strings in the Run registry key.
Look for these REG_SZ strings in the Run registry key: AdobeFlash, Windows Update, Adobe Update, and Google Chrome. Right-click all those REG_SZ strings and select Delete to erase them.

- 7. Then open this key in the Registry Editor:
Computer\HKEY_LOCAL_MACHINE\Software\Microsoft\Windows\CurrentVersion\Run - 8. Repeat the 6th step
Repeat the 6th step for the LOCAL_MACHINE Run key you’ve just opened.
- 9. Close Registry Editor
Close the Registry Editor, and restart your PC to see if the issue persists.
The detailed solution below describes how to edit your Registry in order to resolve the AutoIt error on Windows PCs.


After making these changes, the AutoIt error in Windows 11 should be gone.
Note: The REG_SZ strings specified above will include autoit3.exe, windowsupdate.lnk, googleupdate.a3x, or googleupdate.lnk within their data paths. Entering those data path keywords within Registry Editor’s Find tool should also locate the REG_SZ strings you need to erase.
3. Uninstall AutoIt
- Open the Run window. Type this Programs and Features command into Run: appwiz.cpl

- Next, select the AutoIt program listed.

- Click the Uninstall option for AutoIt.
- Restart your desktop or laptop after uninstalling AutoIt.


You can uninstall AutoIt and more thoroughly erase its leftover files and registry entries with third-party uninstaller software.
- 5+ Best uninstallers to remove programs from Windows 7
- Can’t uninstall a program on Windows 10/11, what tools to use?
- Best 6 software uninstallers for Windows 11
4. Remove AutoIt scripts from startup
- Download Autoruns by pressing the Download Autoruns and Autorunsc option from Microsoft’s page.

- Extract it, locate its executable file and run it as administrator.
- Now input autoit3 in the Filter box.

- Locate AutoIt, right-click it, and choose Delete.


You can remove AutoIt scripts from the Windows startup with Autoruns. That’s one of the most detailed startup monitor tools for Windows. Using this tool, you should be able to fix the AutoIt error line 0 error opening the file message.
5. Reset your Windows 10
- Open the Settings app by pressing Windows + I and navigate to the Update & Security section.

- Select Recovery from the left pane. In the right pane, click on Get started button in the Reset this PC section.

- Choose the option to keep your files and follow the instructions on the screen.
- Once the process is finished, you’ll have a fresh installation of Windows ready.


Remember that factory reset removes installed applications, so you’ll have to install them again.
Is AutoIt V3 script a virus?
If you have used AutoIt for any significant amount of time, you are probably aware that it is an excellent and highly effective scripting language.
As is the case with all vital languages, one of the potential drawbacks is the generation of viruses by individuals with nefarious intentions.
Your installation of AutoIt does not include any viruses, and if a script you have written is flagged as a virus even though you do not intend to cause harm, it is an example of a false positive.
Is AutoIt malicious?
No, unless you haven’t downloaded the software from the official source, AutoIt is completely safe.
For more automation software, check out our article with the five best automated macro software.
Did you find a solution to this problem on your own? Feel free to share it with us in the comments section below.
Matthew Adams
Windows Hardware Expert
Matthew is a freelancer who has produced a variety of articles on various topics related to technology. His main focus is the Windows OS and all the things surrounding it.
He is passionate about the tech world, always staying up-to-date with the latest and greatest. With an analytical view, he likes problem-solving, focusing on errors and their causes.
In his free time, he likes to read and write about history and tries to always develop new skills.
There are a number of reports that have been seen in Microsoft Forums and on other platforms about the AutoIt Error message. This message pops up every time the user startup their Windows PC. The error message window titled, AutoIt Error with further information saying, “Line 0” along with the message “Error: Error opening the file.”
If you are also facing the same issue and want a resolution to this, then stick around to this fixing guide and I’ll show you the different ways to troubleshoot and fix the AutoIt Error on your Windows 11 or Windows 10 PC.

The AutoIt error message can occur due to a number of causes. It can be due to a virus/malware, due to some improperly-working registry settings, pending windows updates, etc. Based on the causes, here are the various ways to fix this issue.
1. Run a Virus Scan
Previous experiences have revealed that the AutoIt error message is usually caused due to malware called Veronica. This malware has been found in a number of Windows PCs affected by the AutoIt error message.
Hence there is a very high possibility that the issue is again being caused by malware (probably Veronica) and its direct solution is to run a system malware scan.
For this, you can either rely on 3rd-party antivirus software or can also try the windows built-in malware scan. To run the Windows default malware scan on Windows 11:
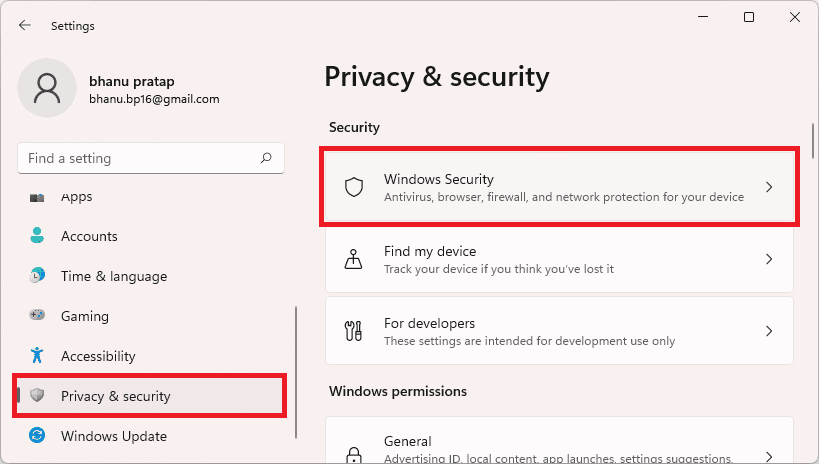
- Open the Windows Settings by using the Win + I key combination.
- Navigate to Privacy & security > Windows Security.

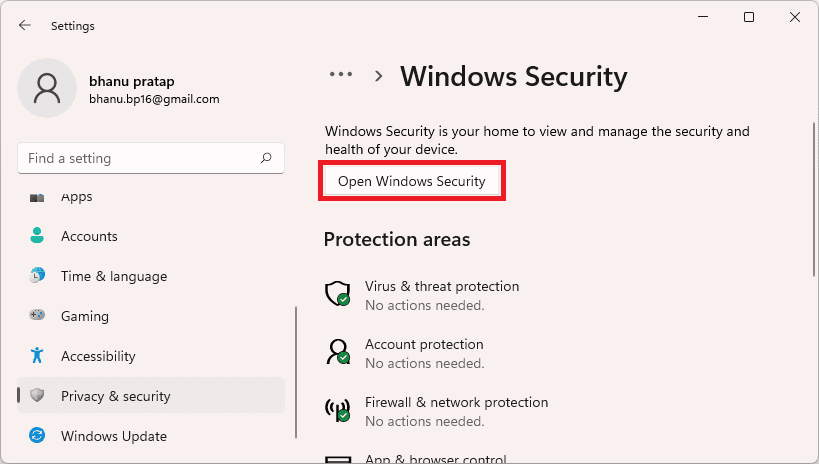
- Click on Open Windows Security.
- On the Windows Security window, click on Virus & threat protection.

- Click on Scan options located right below the Quick scan button. You can also run the Quick scan if you want, prior the full scan.
- Select the Full Scan from the list and hit the Scan now button.

Let Windows scan the system and if there is any threat (virus/malware) found, treat it accordingly i.e. remove it and see if the issue is fixed or not.
2. Edit the Windows Registry
- Search for the Registry Editor and open it. You can also enter
regeditin the Run dialog box (Win + R) to open it.
- Click on File and select Export… to export and backup the current registry setup. Select an accessible location to export the registry.
- Once done, Navigate to the following path:
Computer\HKEY_CURRENT_USER\Software\Microsoft\Windows\CurrentVersion\RunYou can also directly copy and paste the path to the address bar of the window. - In the Run directory delete all the strings with the type REG_SZ.

- Now navigate to the following path:
Computer\HKEY_LOCAL_MACHINE\Software\Microsoft\Windows\CurrentVersion\Run - Again select all the strings with the type REG_SZ and delete them.


Once done, restart your PC and your AutoIt error should be gone by now. If it’s not, then it is advised to import the registry backup that we backed up by going to Edit > Import… in the Registry Editor window.
3. Reinstall AutoIt
The files of the currently installed AutoIt might be facing some corruption. In such a case, you should try uninstalling and then reinstalling the AutoIt on your Windows PC.
- Open the Run dialog box by pressing Win + R on your keyboard.
- Enter
appwiz.cpland hit OK. - This will open the Programs and Features window in Control Panel.
- Here, select the AutoIt program and click on Uninstall.

- Click on Yes to confirm the selection and uninstall it.
- Restart your PC and then download AutoIt’s new and fresh installer setup file from here.
- After downloading the file, open it and install AutoIt on your PC.


Once done, again restart your PC and see if the issue is resolved or not.
4. Reset Windows
Finally, if nothing works, try resetting your Windows PC. Resetting the PC will restore all the system files, programs, and settings to their default state. Here’s how to reset Windows 11.
- Open Windows Settings by pressing Win + I.
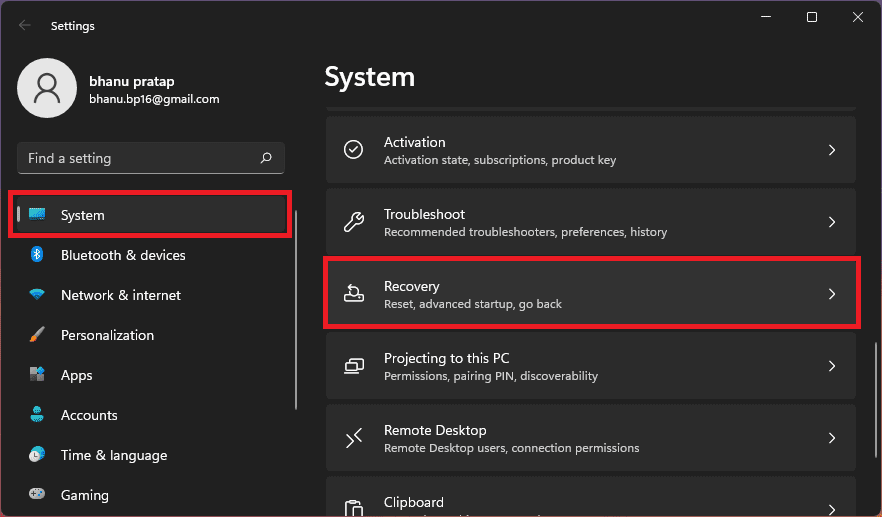
- Navigate to System > Recovery.

- Click on Reset PC under the Recovery options section.
- On the Reset this PC window, select an appropriate option. I would advise you to select the Keep my files option to prevent data loss.

- Now, follow the on-screen instructions to complete the resetting process.


Bottom Line
So these were the ways by which you can solve the AutoIt Error on your Windows PC. The issue is most probably happening due to some malware and hence running a thorough system scan is a really important thing to do.
If the windows system scan didn’t find any malware, you should consider a good third-party antivirus for your PC. However, if the malware is not the issue in your case, then editing the Windows registry in the way I have depicted above will definitely help.
For additional measures, you can also consider reinstalling AutoIt and can also try resetting the PC.
Also Read:
- Fix No Audio Output Device Is Installed on Windows 11/10
- Lid Open Action Missing? Try this fix on Windows 11/10
- Fix Discord installation has failed on Windows 11/10
- macOS DMG Files on Windows 11/10: How to Extract and Open
- How to Change Lid Open Action on Windows 11/10 Laptop
- Fix This File Is Too Big to Recycle on Windows 11/10
- How to Enable and use Microsoft Edge bar in Windows 11/10
- How to Downgrade/Rollback Nvidia GPU Drivers on Windows 11/10
- How to Change Default Font on Windows 11
- Fix Display Driver Stopped Responding And Has Recovered on Windows 11/10