
Applies ToMicrosoft Windows XP Home Edition Microsoft Windows XP Professional Microsoft Windows XP Tablet PC Edition
Автор:
Soumitra Sengupta MVP
ОТКАЗ ОТ ОТВЕТСТВЕННОСТИ ЗА СОДЕРЖИМОЕ ОБЩЕДОСТУПНЫХ РЕШЕНИЙ
КОРПОРАЦИЯ МАЙКРОСОФТ И/ИЛИ ЕЕ ПОСТАВЩИКИ НЕ ДЕЛАЮТ НИКАКИХ ЗАЯВЛЕНИЙ ОТНОСИТЕЛЬНО ПРИГОДНОСТИ, НАДЕЖНОСТИ ИЛИ ТОЧНОСТИ СВЕДЕНИЙ И СООТВЕТСТВУЮЩИХ ИЗОБРАЖЕНИЙ, ПРИВЕДЕННЫХ В НАСТОЯЩЕМ ДОКУМЕНТЕ. ВСЕ ЭТИ СВЕДЕНИЯ И СООТВЕТСТВУЮЩИЕ ИЗОБРАЖЕНИЯ ПРЕДОСТАВЛЕНЫ «КАК ЕСТЬ» БЕЗ КАКИХ-ЛИБО ГАРАНТИЙ. КОРПОРАЦИЯ МАЙКРОСОФТ И/ИЛИ ЕЕ ПОСТАВЩИКИ НАСТОЯЩИМ ОТКАЗЫВАЮТСЯ ОТ КАКИХ-ЛИБО ГАРАНТИЙНЫХ ОБЯЗАТЕЛЬСТВ И УСЛОВИЙ В ОТНОШЕНИИ ЭТИХ СВЕДЕНИЙ И СООТВЕТСТВУЮЩИХ ИЗОБРАЖЕНИЙ, ВКЛЮЧАЯ ВСЕ ПОДРАЗУМЕВАЕМЫЕ ГАРАНТИИ И УСЛОВИЯ ТОВАРНОЙ ПРИГОДНОСТИ, ПРИМЕНИМОСТИ ДЛЯ КОНКРЕТНЫХ ЦЕЛЕЙ, КАЧЕСТВА ИСПОЛНЕНИЯ, ПРАВ СОБСТВЕННОСТИ И ОТСУТСТВИЯ НАРУШЕНИЙ ПРАВ ИНТЕЛЛЕКТУАЛЬНОЙ СОБСТВЕННОСТИ. В ЧАСТНОСТИ, ВЫ ПОДТВЕРЖДАЕТЕ СВО СОГЛАСИЕ С ТЕМ, ЧТО КОРПОРАЦИЯ МАЙКРОСОФТ И/ИЛИ ЕЕ ПОСТАВЩИКИ НИ ПРИ КАКИХ ОБСТОЯТЕЛЬСТВАХ НЕ НЕСУТ ОТВЕТСТВЕННОСТИ ЗА ПРЯМОЙ ИЛИ КОСВЕННЫЙ УЩЕРБ, ШТРАФНЫЕ САНКЦИИ, СЛУЧАЙНЫЕ, ФАКТИЧЕСКИЕ, КОСВЕННЫЕ ИЛИ ИНЫЕ УБЫТКИ, ВКЛЮЧАЯ, В ЧАСТНОСТИ, УБЫТКИ ОТ УТРАТЫ ЭКСПЛУАТАЦИОННЫХ КАЧЕСТВ, ОТ ПОТЕРИ ДАННЫХ ИЛИ ПРИБЫЛЕЙ В СВЯЗИ С ИСПОЛЬЗОВАНИЕМ ИЛИ НЕВОЗМОЖНОСТЬЮ ИСПОЛЬЗОВАТЬ ЭТИ СВЕДЕНИЯ И СООТВЕТСТВУЮЩИЕ ИЗОБРАЖЕНИЯ, СОДЕРЖАЩИЕСЯ В НАСТОЯЩЕМ ДОКУМЕНТЕ, ВОЗНИКШИЕ ВСЛЕДСТВИЕ СОГЛАШЕНИЯ, ГРАЖДАНСКОГО ПРАВОНАРУШЕНИЯ, ХАЛАТНОСТИ, ОБЪЕКТИВНОЙ ОТВЕТСТВЕННОСТИ ИЛИ ИНЫМ ОБРАЗОМ, ДАЖЕ ЕСЛИ КОРПОРАЦИЯ МАЙКРОСОФТ ИЛИ ЕЕ ПОСТАВЩИКИ ЗАРАНЕЕ БЫЛИ ИЗВЕЩЕНЫ О ВОЗМОЖНОСТИ ТАКОГО УЩЕРБА.
АННОТАЦИЯ
Если приложение аварийно завершает работу, оно перестает отвечать на запросы, и его можно завершить вручную с помощью диспетчера задач. Но мы можем автоматически закрыть ее также с помощью настройки реестра.
Советы.
Если приложение аварийно завершает работу, оно перестает отвечать на запросы, и его можно завершить вручную с помощью диспетчера задач. Это может автоматически закрыть все приложения, которые перестали отвечать на запросы. 1] Запуск>выполнение>regedit>ОК] Теперь перейдите к следующему расположению:-HKEY_CURRENT_USER \Control панель \ настольные компьютеры, в правой области REG_SZ редактора реестра щелкните по AutoEndTasks нему правой кнопкой мыши и выберите команду изменить. Измените значение на 1.Значение по умолчанию — 0.Нажмите кнопку ОК и закройте редактор реестра. 4] перезагрузите систему.
Нужна дополнительная помощь?
Нужны дополнительные параметры?
Изучите преимущества подписки, просмотрите учебные курсы, узнайте, как защитить свое устройство и т. д.
AutoEndTasks is a feature in Windows that can be enabled or disabled to control how running applications and processes are handled during the shutdown, restart, or signing out of the system. When this feature is enabled, Windows will force-close all running applications and processes, even if they are unresponsive. Disabling this feature allows the applications and processes to continue running until they are manually closed.
In this article, we will guide you through the steps to enable or disable AutoEndTasks in Windows 11 or 10.
Enabling or disabling the AutoEndTasks feature in Windows 11 or 10 involves making changes to the Windows Registry Editor. Follow the steps below to enable or disable AutoEndTasks:-
Step 1. Open the Run dialog box by pressing Windows + R on your keyboard.
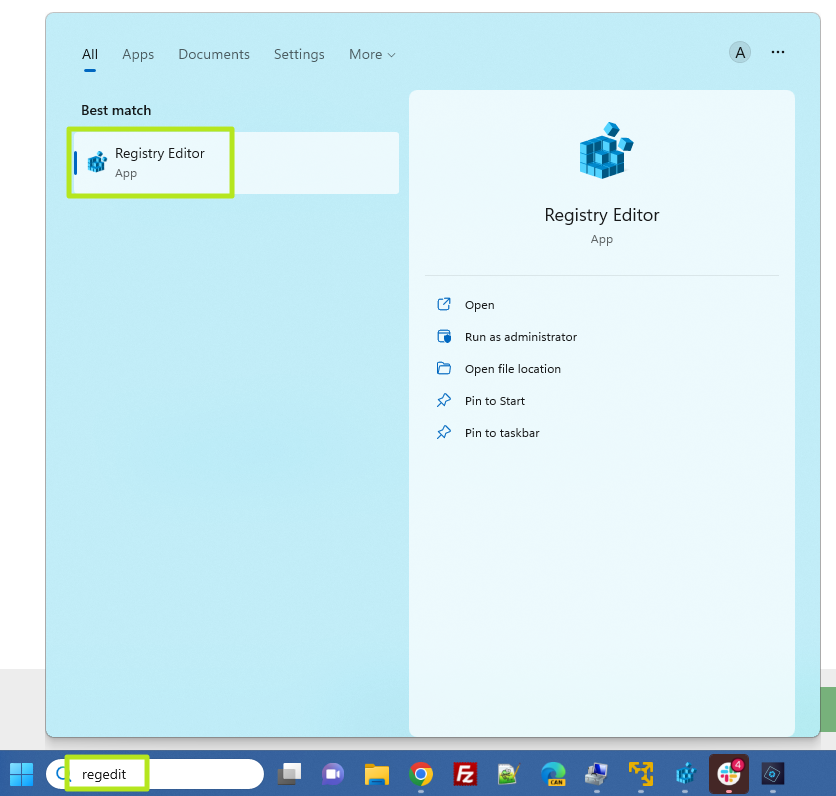
Step 2. Type “regedit” in the Run dialog box and hit Enter to open the Registry Editor.
Step 3. In the Registry Editor, navigate to the following path:-
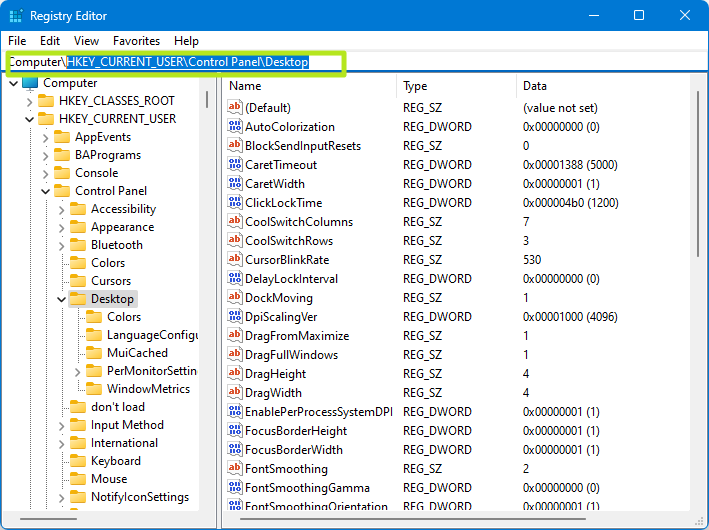
HKEY_CURRENT_USER\Control Panel\Desktop

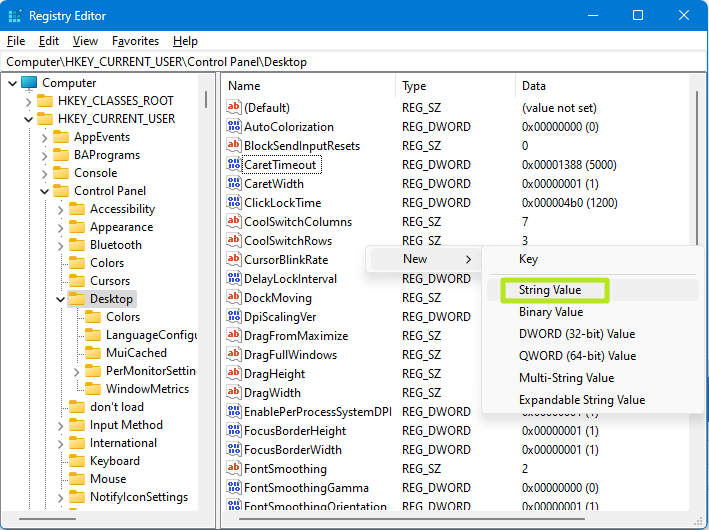
Step 4. On the right-hand side, right-click on the free space and select New > String Value.
Step 5. Name the new string value “AutoEndTasks.”
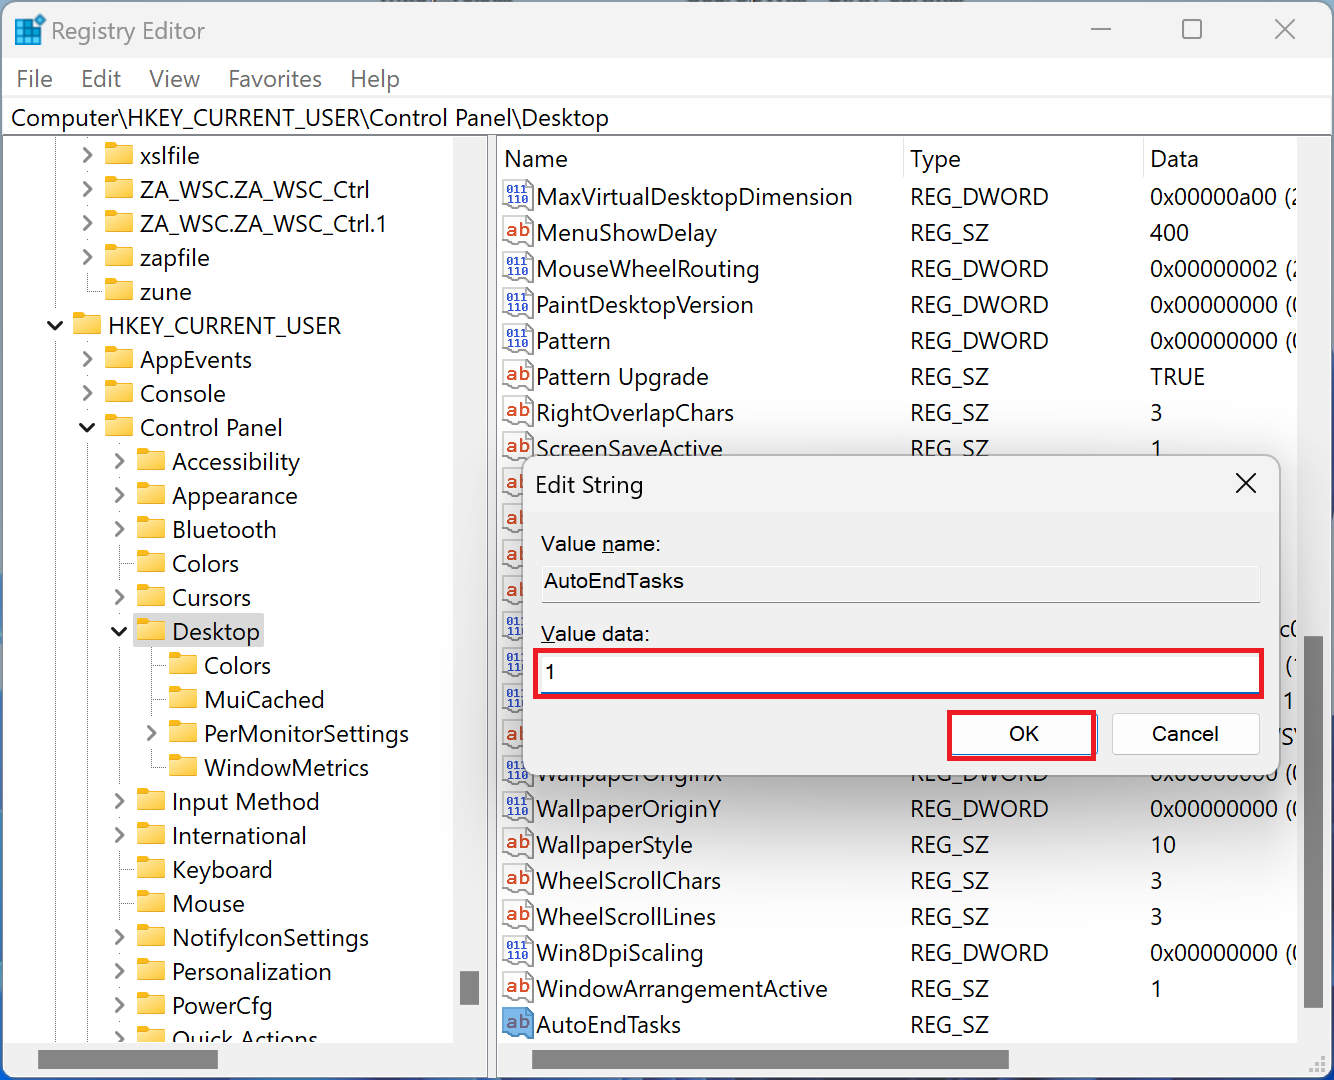
Step 6. Double-click on the “AutoEndTasks” string value to edit it.
Step 7. To enable AutoEndTasks, change the “Value data” to “1“. To disable it, change the “Value data” to “0“.
Step 8. Click “OK” to save the changes and close the Registry Editor.
After making the changes, the AutoEndTasks feature will be enabled or disabled for all users, depending on the value you have set.
Important Note: Before making any changes to the Windows Registry Editor, it is recommended to create a backup of the Registry. This will ensure that you can revert to the original settings if anything goes wrong.
Enabling the AutoEndTasks feature may cause applications and processes to be force-closed without warning, potentially leading to data loss or other issues. Therefore, it is important to use this feature with caution.
In case you’re not comfortable editing the registry or you’re not confident enough, it is recommended that you seek help from an expert to avoid making any errors that could cause problems with your system.
Conclusion
Enabling or disabling the AutoEndTasks feature in Windows 11 or 10 can be a useful tool for controlling how running applications and processes are handled during the shutdown, restart, or signing out of the system. By following the simple steps outlined in this article, users can easily enable or disable this feature. However, it is important to exercise caution when using this feature, as it may force-close applications and processes without warning, potentially leading to data loss or other issues. Always make sure to back up the registry before making any changes, and seek help from an expert if you’re not comfortable editing the registry yourself.
In the realm of operating systems, ease of use and efficiency are often at the forefront of user experience. Windows, one of the most widely used operating systems, offers various features intended to simplify and enhance user interactions. One such feature is the «AutoEndTasks» setting, which governs how the system handles unresponsive applications. Understanding how to enable or disable this feature can boost your productivity, especially for those who regularly use multiple applications. This article will guide you through the entire process of managing the AutoEndTasks setting in Windows 10 and Windows 11, ensuring you can tailor your experience to your specific needs.
What is AutoEndTasks?
AutoEndTasks is a feature in Windows that automatically closes unresponsive applications after a specified time period. When an application freezes or hangs, Windows typically prompts you with a dialog asking whether you want to wait for the program to respond or terminate it. With AutoEndTasks enabled, Windows automatically chooses to end the task without waiting for your input.
This functionality can be quite beneficial in scenarios where you might not be around to respond to pop-up dialogs, minimizing downtime. However, it can also lead to data loss if you’re not careful, as it might close an application that is just taking extra time to process a task. Adjusting this setting allows you to strike a balance between convenience and control.
Why You Might Want to Enable or Disable AutoEndTasks
Reasons to Enable AutoEndTasks
-
Saves Time: For users who often encounter unresponsive apps, enabling AutoEndTasks can save time by eliminating the need to manually close those applications.
-
Improves System Performance: Automatically ending tasks can help ensure that system resources are not tied up by non-responsive applications, offering a smoother experience overall.
-
Ideal for Multi-taskers: If you tend to run multiple applications simultaneously, this feature can prevent one unresponsive app from causing potential delays in your workflow.
Reasons to Disable AutoEndTasks
-
Data Loss Risk: If you are engaged in important tasks, such as editing documents or working on projects, you might not want Windows to terminate an application prematurely, thereby risking loss of unsaved work.
-
Control Over Applications: Some users prefer to maintain manual control over their applications, making decisions themselves instead of relying on an automated process.
-
Troubleshooting and Diagnosis: When diagnosing problems, it might be beneficial to keep an unresponsive program open in order to gather error messages or logs.
Steps to Enable or Disable AutoEndTasks in Windows 11/10
Adjusting the AutoEndTasks feature requires access to the Registry Editor or the Group Policy Editor. Below, we provide a detailed walkthrough for both methods.
Method 1: Using Registry Editor
The Windows Registry is a powerful tool that stores a wide range of settings and configurations. Here’s how to modify the AutoEndTasks setting via the Registry Editor.
Before You Begin
Modifying the registry can lead to issues if done incorrectly. It’s highly advisable to back up your registry before making changes. To back up your registry:
- Open the Run dialog by pressing
Windows + R. - Type
regeditand hit Enter, which will open the Registry Editor. - In the Registry Editor, select «Computer» from the left pane.
- Click on «File» in the top menu, then select «Export».
- Choose a location to save the backup, name the file, and ensure «All» is selected in the Export range.
- Click «Save».
Steps to Enable or Disable AutoEndTasks
-
Open the Registry Editor:
- Press
Windows + Rto open the Run dialog. - Type
regedit, then press Enter.
- Press
-
Navigate to the Key:
- In the Registry Editor, navigate to the following path:
HKEY_CURRENT_USERControl PanelDesktop
- In the Registry Editor, navigate to the following path:
-
Finding the AutoEndTasks Value:
- In the right pane, look for an entry called
AutoEndTasks. - If it doesn’t exist, you can create it by right-clicking in the blank space, selecting
New, thenString Value, and naming itAutoEndTasks.
- In the right pane, look for an entry called
-
Modify AutoEndTasks:
- Double-click the
AutoEndTasksentry. - Set the Value data to
1to enable AutoEndTasks, or set it to0to disable it. - Click «OK».
- Double-click the
-
Restart Your Computer:
- Close the Registry Editor and restart your computer to apply the changes.
Method 2: Using Local Group Policy Editor
For users on Windows 10 Pro, Enterprise, or Education editions, you can manage AutoEndTasks via the Local Group Policy Editor.
Steps to Enable or Disable AutoEndTasks
-
Open the Local Group Policy Editor:
- Press
Windows + R, typegpedit.msc, and hit Enter.
- Press
-
Navigate to the Policy:
- In the Group Policy Editor, navigate using the following path:
User Configuration -> Administrative Templates -> Start Menu and Taskbar
- In the Group Policy Editor, navigate using the following path:
-
Find the Policy Setting:
- Look for a setting named «Turn off Windows Store app auto-update».
- Double-click on it to open the settings window.
-
Configure Settings:
- To enable AutoEndTasks, choose «Enabled».
- To disable it, choose «Disabled» or «Not Configured».
-
Apply:
- Click «Apply» and then «OK».
-
Close Group Policy Editor:
- Exit the editor and restart your computer to ensure changes take effect.
Verifying if AutoEndTasks is Working
After enabling or disabling AutoEndTasks, you might want to see whether the feature behaves as expected. Here’s how you can do it:
-
Simulate an Unresponsive Application: Open an application and try to make it unresponsive. For instance, you could open Notepad and attempt to open a large file that takes time (or make the program busy manually).
-
Monitor the Outcome: If you have enabled AutoEndTasks, the application should close automatically after a short duration without popping up a dialog box.
-
Check Task Manager: You can also open Task Manager by pressing
Ctrl + Shift + Escand see if the unresponsive application has been terminated without your input.
Alternative Solutions for Managing Unresponsive Applications
If managing the AutoEndTasks feature through the Registry or Group Policy does not suit your needs, or if you simply want additional methods to handle unresponsive applications, there are alternative options to consider:
Using Task Manager
Task Manager can be used to manually end unresponsive applications. Here’s a quick guide:
- Press
Ctrl + Shift + Escto open Task Manager. - In the Processes tab, look for the unresponsive application.
- Right-click on the application and choose «End task».
Third-Party Tools
Several third-party tools can help manage application processes more efficiently. Programs such as Process Explorer or System Monitor provide more in-depth information and options for managing applications than the built-in Task Manager.
Improve System Performance
If you often encounter unresponsive applications, consider optimizing your system performance. You can:
- Free Up Disk Space: Use the built-in Disk Cleanup tool to remove unnecessary files.
- Disable Startup Programs: Limit the number of programs that start when your computer boots up.
- Upgrade Hardware: If possible, consider upgrading your RAM or SSD to improve performance.
Conclusion
Understanding how to enable or disable AutoEndTasks in Windows 10 and Windows 11 is essential for users looking to optimize their experience and control over applications. Whether you prefer the convenience of automated task management or the assurance that comes with manual control, you now have the necessary steps to tailor your settings to your liking.
AutoEndTasks serves a dual purpose; it can enhance productivity by reducing wait times for unresponsive programs while also posing a risk of data loss. As with all features, being aware of the implications of enabling or disabling AutoEndTasks is vital. Regularly back up your data and save your progress to mitigate any risks of unsaved information being lost.
Ultimately, whether you choose to embrace AutoEndTasks or manage unresponsive applications manually, the key is to create an environment that best supports your workflow and enhances your overall productivity in the Windows ecosystem.
AutoEndTasks is a registry key that comes automatically with Windows 10 and 11. When enabled, it facilitates a smoother shut down and restart process by automatically closing any unresponsive programs.
This guide outlines how to configure AutoEndTasks for faster Windows shutdown, as well as the best practices for doing so and tips for troubleshooting issues that may come up while configuring.
The easiest ways to enable or disable AutoEndTasks are through the Windows Registry Editor and Group Policy Editor. The steps for both methods are outlined below.
Method 1: Configuring AutoEndTasks via Windows Registry Editor
- Open the Start menu
- Click “Run,” then go to “Regedit” and click “OK.”
- If the “HKEY_CURRENT_USER\Control Panel\Desktop” string can be found, do the following:
- Right click “HKEY_CURRENT_USER\Control Panel\Desktop” AND select “Modify”
- The default value is 0, which means AutoEndTasks is disabled
- Change the value data to 1 to enable AutoEndTasks
- If “HKEY_CURRENT_USER\Control Panel\Desktop” string cannot be found, do the following:
- Right click on any empty space, select “New,” then select “String Value”
- Name the string value “AutoEndTasks” and click “OK”
- Double click the “AutoEndTasks” string value and modify the value to 1 (enabled) or 0 (disabled) depending on your needs
- Click “OK” and close the Windows Registry Editor
Optional Strings to Facilitate Easier Shut Down
Once you have figured out how to enable AutoEndTasks in Windows 10 using Registry Editor, you can add other string values that target Windows shutdown optimization.
After completing step 4.1, enter the following strings:
-
- WaitToKillAppTimeout, which tells Windows how long to wait before it closes an application
- The default value for this is 20,000 milliseconds or 20 seconds, while the lowest value it can be set to is 2,000 milliseconds or 2 seconds.
- HungAppTimeout, which tells Windows how long to wait for unresponsive applications to close automatically
- The default is 5,000 milliseconds or 5 seconds, while the lowest it can be set to is 2,000 milliseconds or 2 seconds.
- WaitToKillAppTimeout, which tells Windows how long to wait before it closes an application
Method 2: Configuring AutoEndTasks via Group Policy Editor
- Start up the Group Policy Management Console
- Find the Group Policy Object you need to alter and open User Configuration
- Open Administrative Templates, then Windows Components
- Navigate to Windows Explorer
- Locate the “Always end tasks when logging off” window choose “Enabled”
- Click “OK” and then close the window
Understanding AutoEndTasks in Windows10
As mentioned in the beginning, AutoEndTasks automatically detects unresponsive programs or applications and forces them to shut down. When enabled, this registry key helps with Windows shutdown optimization and can therefore contribute to an overall better user experience.
If AutoEndTasks is disabled and a program becomes unresponsive, a dialog box will appear that identifies the unresponsive program and asks users to either “Shut down anyway,” “Restart anyway,” or “Cancel.”
Alternatively, users can also manually close an unresponsive application either by:
- Using the “Alt + F4” keyboard shortcut while the program is active
- Opening Task Manager (which can be opened through with “Ctrl + Shift + Esc” and clicking “End task”
The Benefits of Configuring AutoEndTasks
Many users find AutoEndTasks helpful as a way to deal with programs or applications that do not automatically shutdown when they become unresponsive. In some instances, applications may still be running in the background even after users select the shutdown prompt.
Shutting down a program or application with Task Manager may take time, especially when dealing with unresponsive programs at shutdown.
Once AutoEndTasks is enabled, users will not have to spend time searching for the unresponsive program, which can be difficult to do for power users who frequently have multiple windows open.
Best Practices When Configuring the AutoEndTasks Registry Setting
Before you modify AutoEndTasks via Registry or with AutoEndTasks GPO, check that you have done the following:
- Operate using an administrator account
- Create a backup of your device
- Ensure you are copying the right string values
While the methods for modifying AutoEndTasks are fairly straightforward, they can only be completed with administrator privileges.
It is important to keep in mind that running changes via the Registry Editor may lead to data loss. As such, completing a backup is absolutely essential before attempting to configure AutoEndTasks.
Furthermore, changes to the Registry Editor may inadvertently affect other parts of your Windows system when done incorrectly. To mitigate this risk, make sure you have no typos when locating and/or inserting strings.
Troubleshooting and Reverting Changes to AutoEndTasks Settings
Some users may prefer having the option to cancel an automatic program shutdown.
Once you have successfully configured AutoEndTasks using either of the methods above, learning how to disable AutoEndTasks in Windows 10 safely is relatively straightforward: you will either change the AutoEndTasks value to “0” via Registry, or else deselect the “Enabled” option under “Always end tasks when logging off” in Group Policy Editor.
In case you run into issues, below are some tips for troubleshooting issues when making changes to your system via either method:
- Registry Editor
- Restore your computer with a previous backup
- Examine the registry hives using the Recovery Console
- Ensure that the CPU is not overclocked
- Check if the right firmware revisions are installed and that the drivers match the firmware disk controllers
- Group Policy Editor
- Use Event Viewer (Local) to check system logs and take note of the ActivityID within the “System” node
- Use Event Viewer to create a custom view of the issue
- Enable Group Policy Service debug logs with Registry Editor
The Importance of Knowing When and How to Configure AutoEndTasks in Windows 10
AutoEndTasks can be a useful tool for enhancing system performance and overall ease-of-use.
A final note to keep in mind is that any edits made via Registry may be overwritten with new Windows upgrades, so any changes made to the AutoEndTasks registry setting are not necessarily permanent.
Should you need to modify AutoEndTasks on your device, make sure to follow the steps above to avoid any issues with data loss or system corruption.
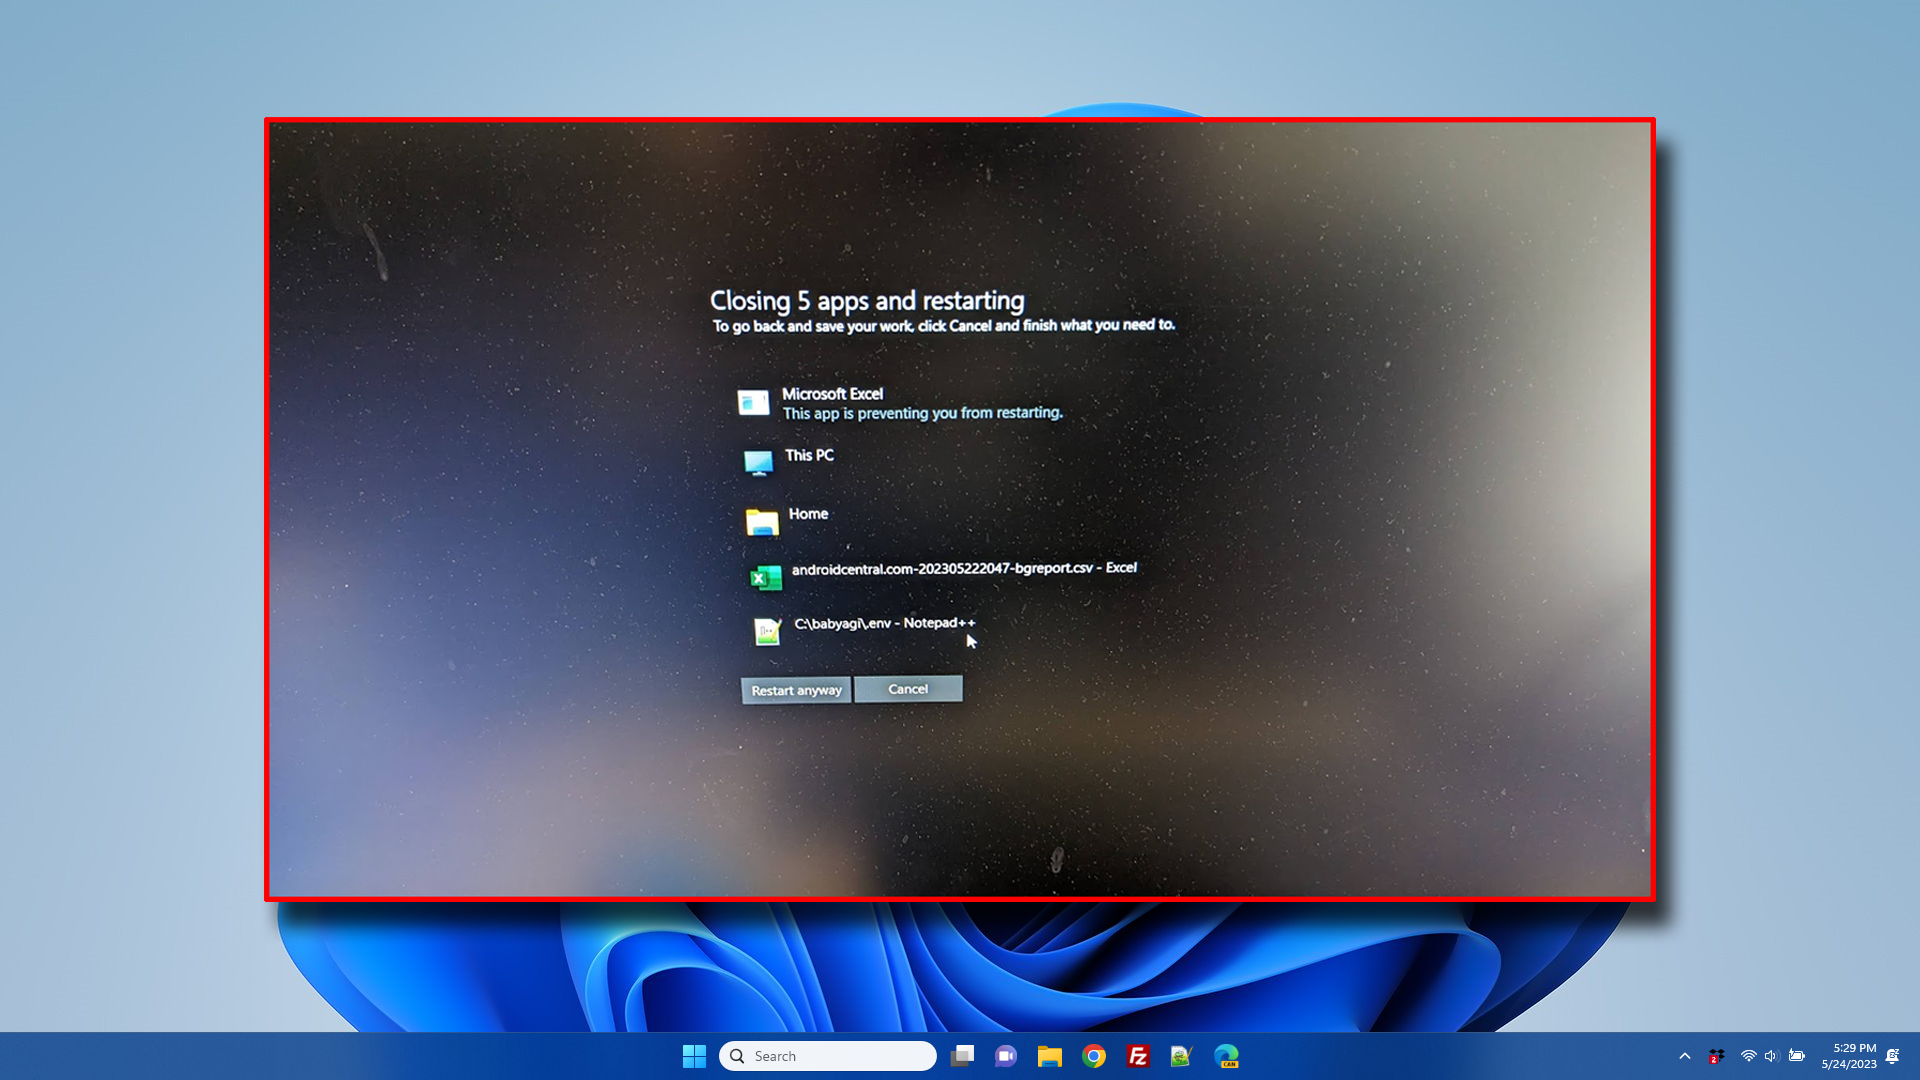
Windows 11 and Windows 10 have a lot of annoying default settings, but none is worse than the OS’s refusal to kill unresponsive tasks when you choose to shut down or restart. By default, if a single program — even a simple background program — refuses to shut itself down or claims to have unsaved data, the OS will throw up an error message which gives you the opportunity to either cancel your shutdown or force close the apps by hitting «Restart Anyway» or «Shutdown Anyway.»
In theory, this is a nice safety feature for people who are absent-minded about saving their work. Perhaps you had an important document open in Notepad, you went to restart to install an update and you forgot to save your work beforehand. This notice would give you the opportunity to go back to the Windows desktop, save your file and then initiate the restart again.
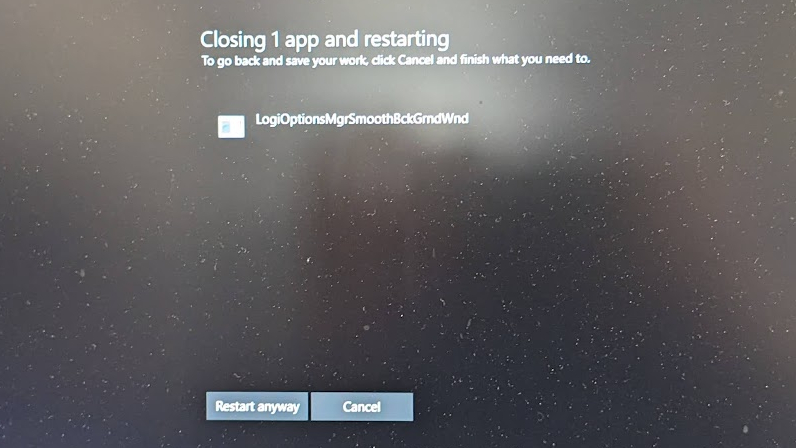
However, in reality, there are a ton of apps that refuse to shut down automatically — I’ve even seen peripheral control software do this. So you end up selecting restart, walking away from the computer for a few minutes while you wait for it to do its thing (perhaps running a Windows update) and then coming back to see that your PC is still waiting for your permission to restart. Give me a break!
Fortunately, it’s easy to fix this problem by editing the Windows registry. There are a few different settings you can tweak to change the amount of time Windows waits to kill a hanging app, but the most important thing to do is set HKEY_CURRENT_USER\Control Panel\Desktop\AutoEndTasks to 1. We’ll go through this step-by-step below.
How to Auto End Tasks in Windows 11 or 10
1. Open the registry editor. To get there search for «regedit» and click the top result. Click yes if prompted for permission.
2. Navigate to HKEY_CURRENT_USER\Control Panel\Desktop.
3. Create a String Value called AutoEndTasks if it doesn’t already exist. To create a string value, right click in the right pane and select New->String Value. Then rename the one it creates to AutoEndTasks.
Get Tom’s Hardware’s best news and in-depth reviews, straight to your inbox.
4. Set AutoEndTasks to 1. You can do that by doubleclicking on it and setting the number to 1.
5. Add the following optional strings to speed up shutdown time.
- WaitToKillAppTimeout: The amount of time windows waits before killing an open app. It defaults to 20,000 milliseconds (20 seconds), but you can set it as low as 2,000 (2 seconds) for less wait time.
- HungAppTimeout: The amount of time Windows waits for a non-responsive app to close itself. The default is 5,000 milliseconds but you can cut it to 2,000.
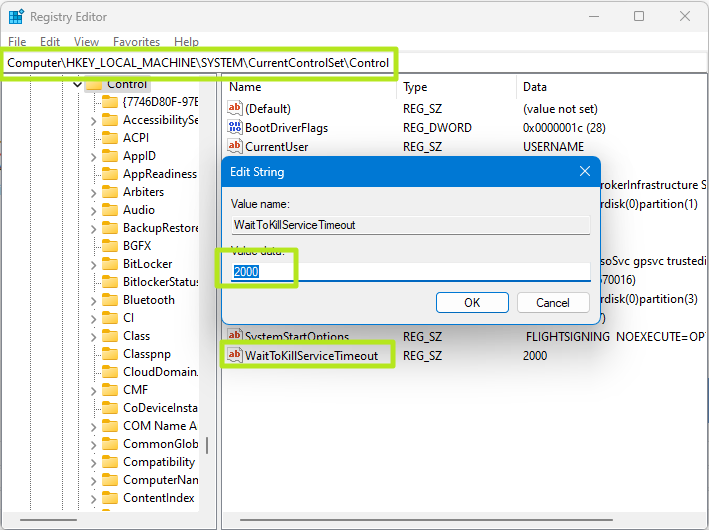
6. Set WaitToKillServiceTimeout to 2,000 under HKEY_LOCAL_MACHINE\SYSTEM\CurrentControlSet\Control if you want to speed up the time Windows waits for unresponsive services.
7. Close regedit and restart your PC.
From now on, Windows should wait just a couple of seconds before force-closing your apps on shutdown. So be sure you really have saved any work that you want to keep.
To change another annoying default Window setting that slows you down, see how to disable Windows web search.
Avram Piltch is Tom’s Hardware’s editor-in-chief. When he’s not playing with the latest gadgets at work or putting on VR helmets at trade shows, you’ll find him rooting his phone, taking apart his PC or coding plugins. With his technical knowledge and passion for testing, Avram developed many real-world benchmarks, including our laptop battery test.