
If you’re looking to make your computer automatically shut down at a specific time, Windows 10 has got you covered. This simple process involves using Task Scheduler, a built-in tool that allows you to schedule shutdowns and other tasks. By the end of this guide, you’ll know how to set your computer to shut down automatically.
In this section, I’ll walk you through the steps to set up an automatic shutdown for your Windows 10 computer using Task Scheduler. This process will ensure your PC shuts down at a specific time without you lifting a finger.
Step 1: Open Task Scheduler
To start, open the Start menu and type «Task Scheduler» into the search bar, then click on the Task Scheduler app.
Task Scheduler is a powerful tool that lets you automate various system tasks. Opening it is your first step toward setting up an automatic shutdown.
Step 2: Create a New Task
Step 2: In Task Scheduler, click on «Create Basic Task» in the right-hand pane.
Creating a new task is essential for setting up an automatic shutdown. The «Create Basic Task» wizard will guide you through the process with simple, step-by-step instructions.
Step 3: Name Your Task
Step 3: Name your task something descriptive like «Auto Shutdown» and provide a brief description.
Naming your task helps you identify it later. A descriptive name and a short description ensure you remember what the task is for, especially if you create multiple tasks.
Step 4: Set the Trigger
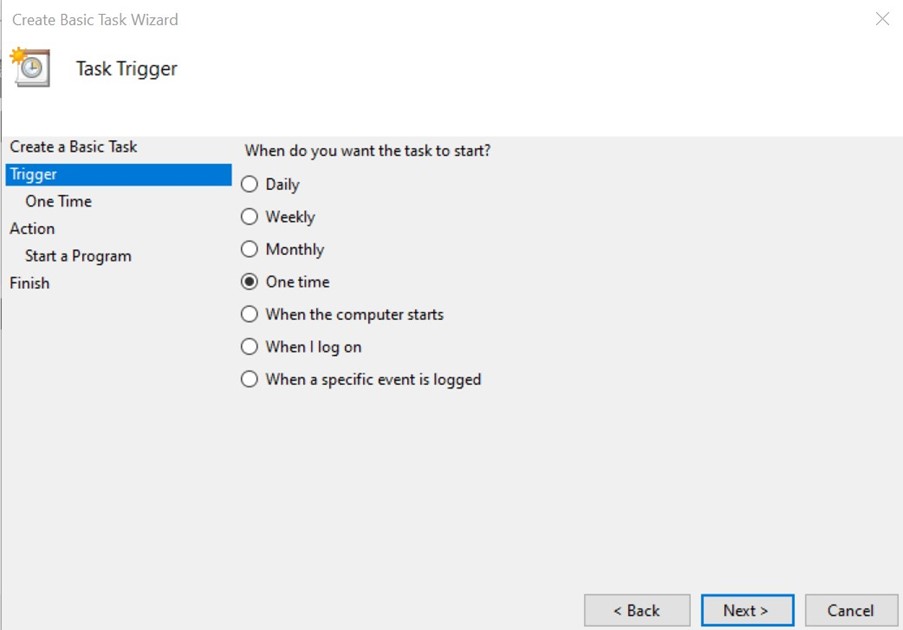
Step 4: Set the trigger for your task by selecting «Daily,» «Weekly,» «Monthly,» or another schedule, and then click «Next.»
The trigger determines when your task will run. For an automatic shutdown, you might choose «Daily» and specify the exact time when you want your computer to shut down.
Step 5: Set the Action
Step 5: Choose «Start a program» as the action and click «Next.»
Selecting «Start a program» is crucial because it allows you to specify the shutdown command. This action triggers the program or command you want to run—in this case, the shutdown command.
Step 6: Enter the Shutdown Command
Step 6: In the «Program/script» field, type «shutdown,» and in the «Add arguments» field, type «/s /f /t 0» and click «Next.»
These commands tell your computer to shut down immediately. The «/s» stands for shutdown, «/f» forces running applications to close, and «/t 0» sets the timer to zero seconds.
Step 7: Finish and Save
Step 7: Review your settings and click «Finish» to save your task.
Reviewing your settings ensures everything is correct. Once you’re satisfied, saving the task will set it up to run according to the schedule you specified.
Once you’ve completed these steps, your computer will automatically shut down at the time you’ve set.
Tips for How to Auto Shutdown Windows 10
- Double-check the Time: Always double-check the time you set for the shutdown to avoid any surprises.
- Backup Work: Make sure to save any work before the scheduled shutdown time to avoid data loss.
- Test the Task: Run the task manually once to ensure it works as expected.
- Adjust as Needed: You can always go back into Task Scheduler to adjust the schedule or settings if needed.
- Disable if Necessary: If you don’t need the auto shutdown anymore, you can disable or delete the task from Task Scheduler.
FAQs on How to Auto Shutdown Windows 10
Can I set the shutdown for a specific date and time?
Yes, you can use Task Scheduler to set a one-time shutdown for a specific date and time.
Will this affect programs running in the background?
The «/f» argument forces all programs to close, so make sure to save your work before the shutdown time.
Can I cancel a scheduled shutdown?
Yes, you can open Task Scheduler and either disable or delete the task.
Is there a way to warn users before shutdown?
Task Scheduler itself doesn’t provide warnings, but you can create a custom script to display a warning message before shutting down.
Can I use this method to restart my computer instead?
Yes, you can replace the «shutdown» command with «shutdown /r» to schedule a restart instead.
Summary
- Open Task Scheduler.
- Create a New Task.
- Name Your Task.
- Set the Trigger.
- Set the Action.
- Enter the Shutdown Command.
- Finish and Save.
Conclusion
Scheduling an automatic shutdown in Windows 10 is a straightforward and useful way to manage your computer’s power needs. By following the steps outlined in this guide, you can easily set up your PC to shut down at a specific time, ensuring it doesn’t stay on unnecessarily.
Whether you’re managing a single computer or multiple devices, this feature can help you save energy and prolong the lifespan of your hardware. Remember to regularly update your shutdown schedule to reflect any changes in your routine.
For further reading, consider looking into other Task Scheduler capabilities, such as automating software updates or running maintenance tasks. Utilizing these features can significantly enhance your overall computing experience.
Now that you know how to auto shutdown Windows 10, why not explore other automation options to make your life easier? Happy computing!
Kermit Matthews is a freelance writer based in Philadelphia, Pennsylvania with more than a decade of experience writing technology guides. He has a Bachelor’s and Master’s degree in Computer Science and has spent much of his professional career in IT management.
He specializes in writing content about iPhones, Android devices, Microsoft Office, and many other popular applications and devices.
Read his full bio here.
Auto shutdown in Windows 10 is one of the hidden features available by default. It allows the end-user to perform auto shutdown at a scheduled time. In this we post are going to cover five ways to auto shutdown Windows PC or laptop.
Before we begin various ways to achieve the task, let’s first understand how and why should you do it.

How Auto Shutdown in Windows 10 works?
The automatic shutdown process helps the end-user to shut down the computer (any Windows PC) by setting a time.
If a system is running and is scheduled to go on auto shutdown at a set time, it will automatically shut down by closing any open or running programs.
By doing auto-shutdown, it not only saves electricity but also keeps the computer performance optimum.
Why we need this?
Let’s imagine you want to download a big file from the internet and then shut down the PC, but you cannot wait that long for the download to complete. Hence, in this case, the auto-shutdown feature in Windows 10 comes handy.
Users can set a timeline by checking how much time the file download shows to complete and can set the auto-shutdown timer accordingly.
This feature also comes in handy when we want to restrict PC usage by children. In this, we can set a time frame for the children to enjoy using the PC and let the PC automatically shut down once the time is up. This not only helps to keep a check on PC usage by kids but also makes a habit.
As we covered explaining how and why about the auto-shutdown usages, now let’s talk about all different ways to do it.
1) From Run command prompt
Creating a shutdown script using Run window is the easiest and most popular option to achieve this
In this method, we first have to decide the duration after which we want the system to shut down automatically.
Once done, let’s begin with the steps, as shown below:
- Go to search bar near Start button -> Type “Run” -> enter
- In the Run window type below command to start the automatic shutdown timer
Shutdown -s -t 900
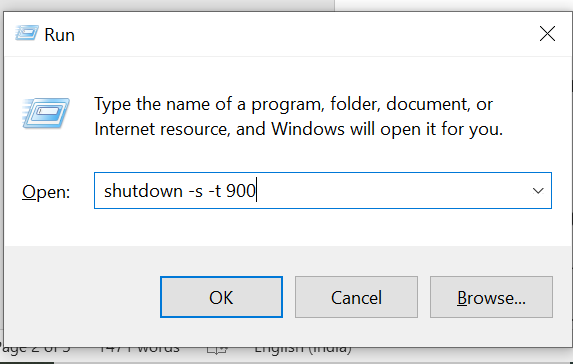
- In the above command, we have taken 15 minutes as a reference so 15*60s = 900s (User can change the value after -t based on their requirement)
- Once the above command is typed in the Run window, hit Enter key on your keyboard.
- Now your system is scheduled to shut down after 15minutes from now automatically.
2) From command prompt
This method will be liked by all those people who love working in Terminals.
In this method, we are going to use the command prompt feature on Windows to perform an auto-shutdown.
As usual, decide the system shutdown time. [ for our example, we’ll take it as 15 min= 900s]
- Go to search bar near Start button -> Type “cmd” -> enter
- A black window will appear on your screen, type in the same command mentioned above:
Shutdown -s -t 900
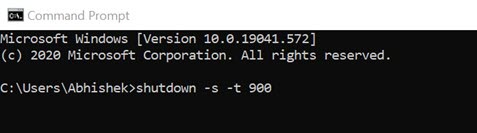
- After entering the above command, press enters to start the shutdown script. The system will auto shutdown after 15 minutes
3) Using Power Shell:
Power shell is an advanced version of the command prompt and comes with many powerful features.
To create an auto-shutdown timer in Power shell, please follow below steps:
- Go to Start -> In the search bar, type “Windows PowerShell” -> enter
- A blue window will pop up, waiting for commands to be executed
Keep in below command in the PowerShell window and hit enter
Shutdown -s -t 900
The system will add 900s of shutdown instruction in its memory and will shut down the computer after exact 900s.
4) Using Task Scheduler:
As the name suggests, Task Scheduler is used to schedule a task that the user wants to execute on the computer.
Be it creating a simple shutdown screenshot or setting things like launch a program on system start, or starting a specific event. Task Scheduler can do it with ease.
Now let’s talk about the steps that we need to follow to perform auto shutdown in Windows 10.
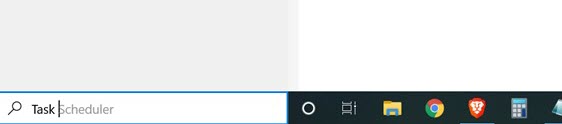
- Go to start -> Type in the search box -> “Task Scheduler” -> enter
- A task scheduler window will pop up as shown below
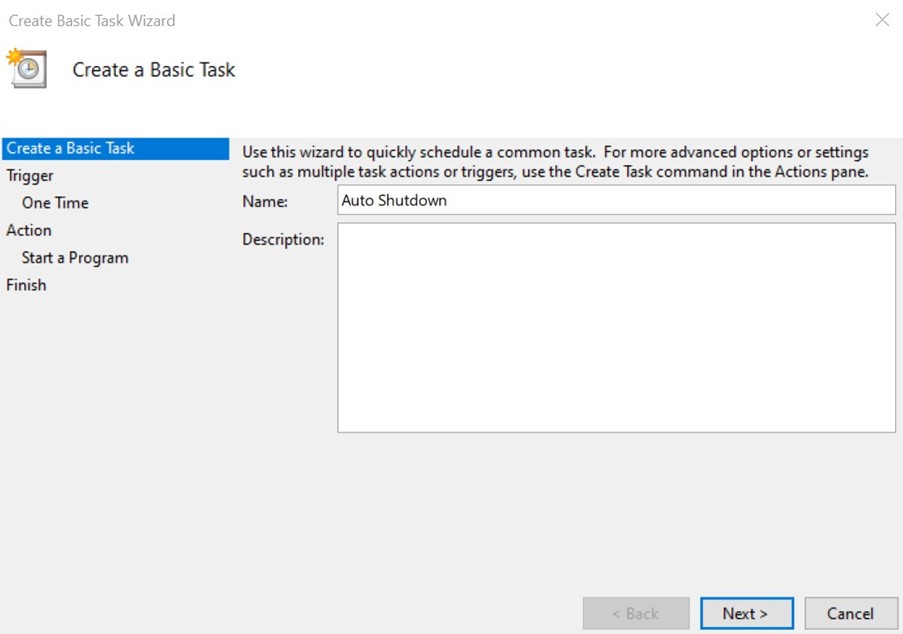
- From the right-hand side of the screen in Task Scheduler, look for “Create Basic Task.”
- A new window will appear asking to enter a name of the Basic Task -> key in the required information and hit the “Next” button
- Now in the “Trigger” section select when you want to start the task. For this step, we will go with the “One-time” option, which means it will execute only once. However, users are free to select the number of times they want a specific task to perform throughout the week or month.
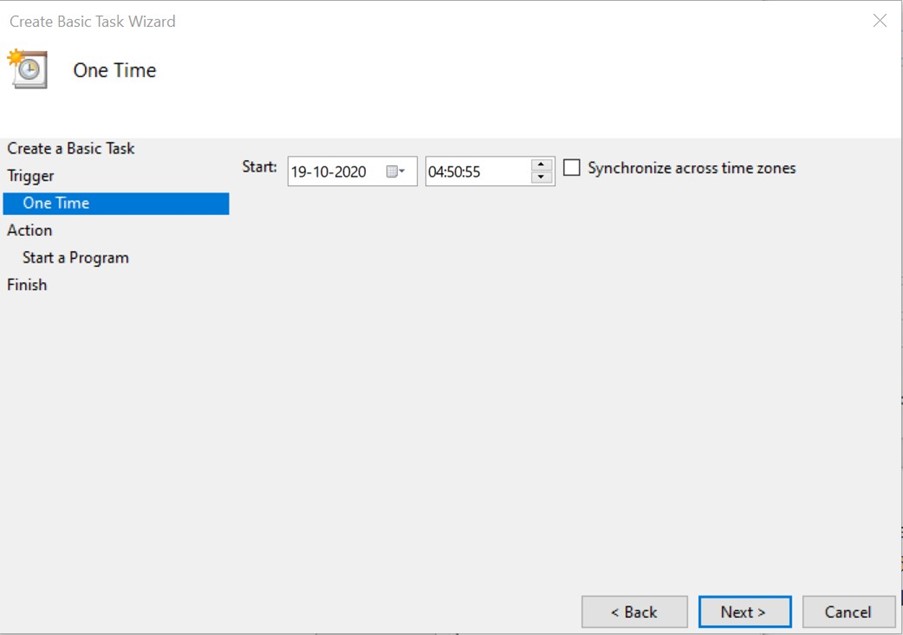
- Now, after selecting the “One-time” option on the next screen, it will ask you to enter the start time: Type in the time when you want the system to perform the task. We will select 15 minutes from the current time and move to the next step.
- In this step, it will ask to select from options listed: we will go for “Start a program” -> Next
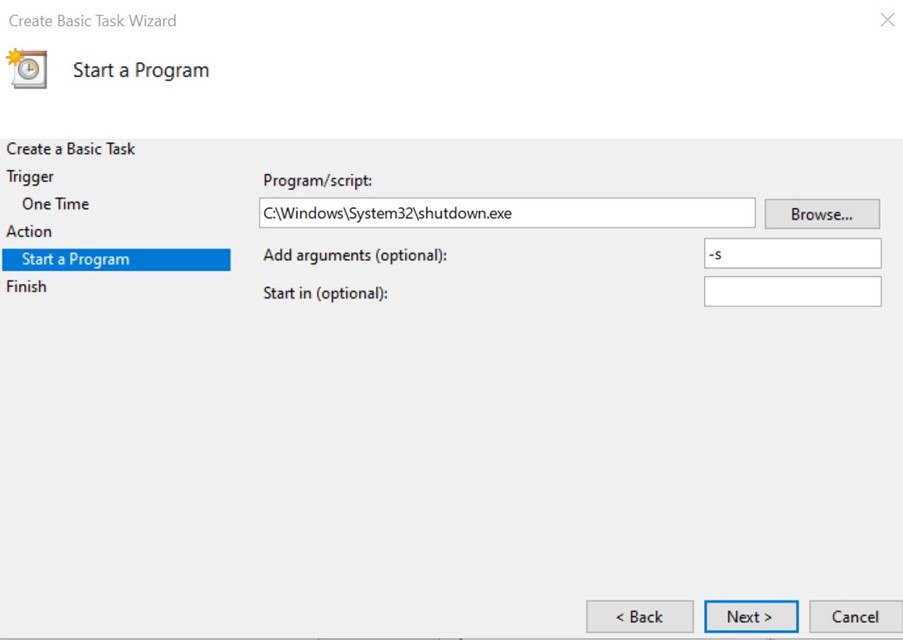
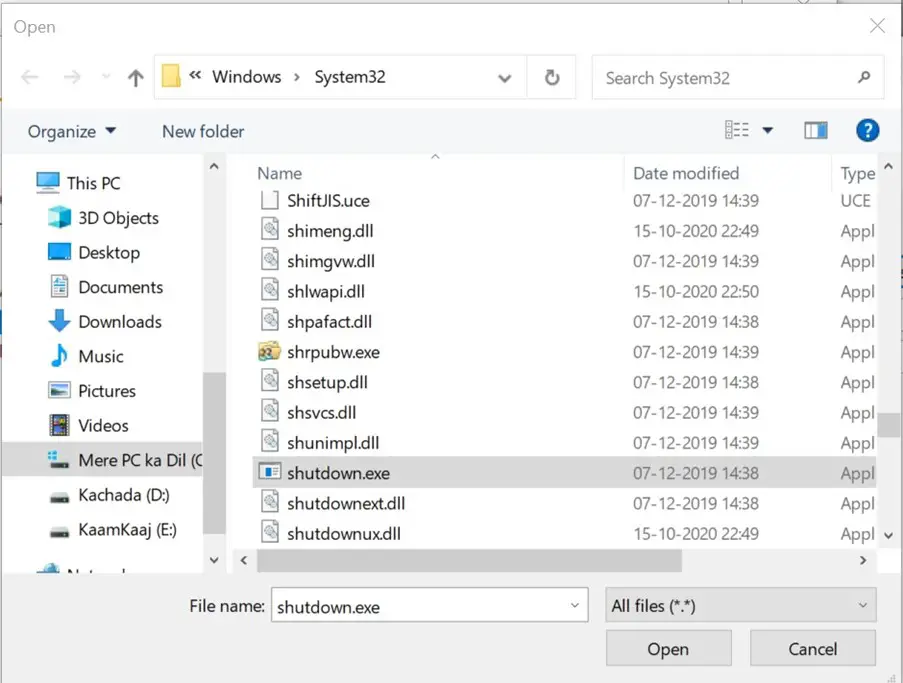
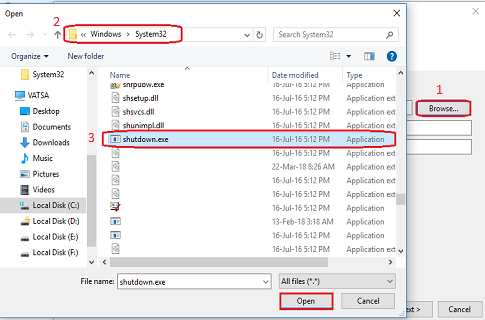
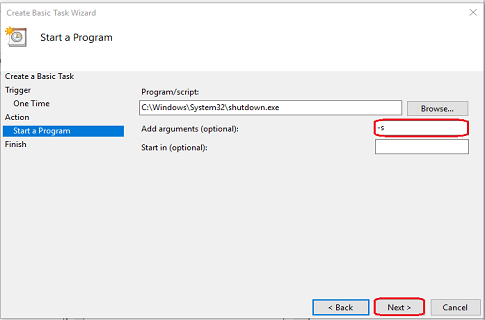
- Now its time to set an action item for the Start Program. We will hit browse option and will locate the shutdown executable file at C:\ Windows\System32\Shutdown.exe and in the Add argument section add “-s” so that system will close all program before performing the restart operations.
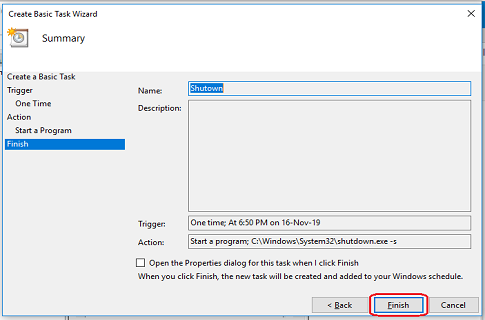
In the next screen check the summary and click on the “Finish” button
Now the system will auto shutdown if “One Time” option is selected, for all other shutdown options like Weekly or Monthly plan will perform the required steps at the scheduled time if the computer is running.
5) Using Third-Party Application:
This is the last method to perform auto shutdown on Windows. There are many free as well as paid applications available for PC that can help you achieve this task.
These applications offer many other useful features like a restart after shutdown, pause the shutdown timer and restart when required and many more.
All these options are not available by default in Windows but can be achieved using freeware like Sleep Timer.
This tool offers an elegant interface that helps end-user to shut down PC as and when required. It comes in handy for people who fall asleep while listening to music or Miners who want to set the auto-shutdown and restart option after the device is rebooted for periodic maintenance.
To being with the Sleep Timer application for Windows PC:
- Go to their website download and install the application
- Once the application is installed, launch the application
- In the Sleep Timer user interface, under the Action section select “Shutdown” and Mode = “Timer.”
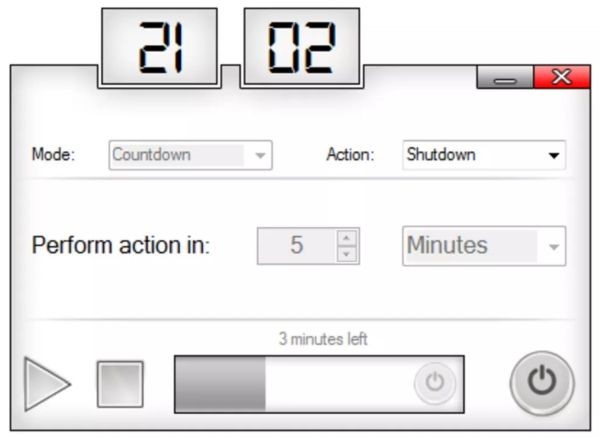
- Now select the time when you want to perform the action and click on the Start button.
- As soon the Start button is clicked, it will start showing the time which is left before the system will restart. In case the user wants to cancel or pause the timer, then they can do that using the stop and pause button.
FAQ’s on Auto Shutdown:
How can I shut down my computer automatically?
A computer can be automatically shut down by using Windows Run feature, Command prompt or even by using third-party tools.
How can I shut down my laptop automatically Windows 10?
The laptop or PC can be automatically shut down using Task Scheduler feature by scheduling the timer accordingly.
It can be shut down for a week or month or quarter using Task Scheduler and also by using third-party applications.
Why does Windows shut down unexpectedly?
Windows can shut down unexpectedly because of many reasons; some of the causes can be a power failure, hardware, or software error.
This kind of issue can be rectified by analysing Windows logs and performing troubleshooting as per issue diagnosis.
Does force shutdown damage the computer?
Yes, it does. It affects hardware and software both. It can damage important and highly sensitive components on the PC and also makes the system go into a no-boot situation.
Should I turn off my power supply when I turn off my computer?
Yes absolutely, you should do that, it not only helps saving electricity but it also keeps the device from any damage caused due to earthing or thundering.
How do I turn off sleep mode on Windows?
Sleep mode can be disabled by going to the Power option under the Windows control panel. Sleep mode is preferred by users who want to keep the device running at a bare minimum power consumption level.
Conclusion:
We tried to cover all methods to auto shutdown Windows 10 in 5 ways. Do let us know which one is your favourite option in the comments section below.
Рассказываем, как поставить таймер выключения компьютера на Windows. Это позволит настроить работу ПК так, чтобы он включался самостоятельно по расписанию.
Для чего нужен
Как установить
Как отключить
Чек-лист
Для чего нужен
Как установить
Как отключить
Чек-лист
Операционная система Windows довольно гибкая в плане настроек, поэтому многое можно сделать, используя встроенные средства и утилиты. А со сторонними приложениями возможности практически безграничные. Если вам необходимо поставить таймер выключения компьютера, проще всего воспользоваться специальной системной командой или установить приложение-планировщик.
Что такое таймер выключения компьютера и для чего он нужен
Предположим, вы уходите куда-то по делам, но компьютер нужно оставить включенным. Например, чтобы он докачал большую игру или чтобы коллега подключился по удаленному доступу. Переплачивать за электричество при этом смысла нет, поэтому лучше настроить ПК так, чтобы после выполнения задачи он выключился сам.
С этим и поможет таймер выключения — встроенная в Windows утилита, управляющая электропитанием.
Как установить таймер выключения на Windows: 7 способов
Существует несколько способов установить таймер выключения. Все они простые, поэтому выбирайте тот, что вам удобнее.
1. Через команду «Выполнить»
Функция «Выполнить» позволяет быстро отдать системе нужную команду при условии, что вы знаете, как эту команду сформулировать на понятном для утилиты языке.
-
Откройте окно «Выполнить» через сочетание клавиш Win+R.
-
Далее пропишите или скопируйте текст shutdown -s -t 1800.
На человеческом языке это значит, что компьютер должен выключиться через 1800 секунд (то есть 30 минут). Число 1800 вы можете поменять на любое другое. Например, три часа — это 10 800 секунд.

2. Через командную строку
Использовать команду shutdown для установки таймера выключения можно не только через меню «Выполнить», но и в командной строке Windows.
-
Доступ к командной строке можно получить через меню «Пуск». Введите название этого инструмента (или воспользуйтесь любым другим способом из нашего материала «Как открыть командную строку в Windows: 23 проверенных способа») и запустите программу от имени администратора.
-
Команда та же: shutdown -s -t 1800, где 1800 — время в секундах. При необходимости поменяйте значение на любое другое. Нажмите Enter.
-
После ввода команды появится уведомление о предстоящем отключении.

3. Через PowerShell
PowerShell — это почти то же самое, что и командная строка, но с расширенным инструментарием. Правда, нас он в рамках сегодняшней темы интересует мало. Способ практически ничем не отличается от предыдущего.
-
Найдите PowerShell в меню «Пуск», запустите от имени администратора.
-
Пропишите команду shutdown -s -t 1800, изменяя при желании количество секунд.

4. Через ярлык на рабочем столе
Если не хочется каждый раз открывать командную строку или PowerShell, создайте специальный ярлык, чтобы планировать выключение в пару кликов. Способ поможет тем, кому отключать компьютер по расписанию нужно регулярно.

-
Нажмите правой кнопкой мыши по незанятому месту на рабочем столе и выберите «Создать» > «Ярлык».
-
Система попросит указать путь к нужному объекту. Прописываем его, по желанию редактируя показатель секунд: C:\Windows\System32\shutdown.exe -s -t 1800.
-
В следующем окошке задаем имя «программы», в данном случае «Таймер полчаса». Далее нажмите ОК, чтобы завершить создание ярлыка.
Теперь достаточно двух щелчков, чтобы выключить ПК по расписанию. Для красоты можете выбрать тематический значок в разделе «Свойства» — «Ярлык» — «Сменить значок…».

5. Через bat-файл
Пакетный файл с расширением .bat, или просто «батник» — это текстовый документ, включающий определённую последовательность команд. С его помощью пользователи могут настроить и отключение компьютера по расписанию.
-
Создаём на рабочем столе текстовый документ и называем его так, чтобы было понятно, за что он отвечает. Внутри пишем привычную команду shutdown.exe -s -t 1800. Закрываем документ, сохраняем его.

-
Теперь надо включить отображение файловых расширений (если оно у вас выключено). Для этого идем в меню «Пуск», ищем там «Отображать расширения файлов».

-
Вы попадете в раздел «Для разработчиков». Ищем заголовок «Проводник», жмём кнопку «Показать параметры» справа от первого пункта.

-
Снимаем галочку, указанную на картинке ниже, применяем изменения.

-
Вернёмся к нашему текстовому документу. Чтобы сделать его «батником», нужно «переименовать» расширение, которое указано после точки. Измените его с txt на bat и подтвердите операцию. Файл получит новую иконку и способность выключать компьютер через заданное время.

Если добавите bat-файл в автозагрузку, пропадет необходимость каждый раз его запускать. Это удобно, если выключать компьютер по таймеру нужно ежедневно. Каталог с автозапуском открывается через окошко «Выполнить» (Win+R), где нужно ввести команду shell: Startup. Далее остается только закинуть «батник» в появившуюся папку.
6. Через планировщик Windows
В Windows встроена такая утилита, как «Планировщик заданий». Он позволяет в определённое время запускать нужные скрипты. Такой скрипт мы и создадим.
-
Войти в планировщик можно через меню «Пуск». Просто наберите название в поисковой строке.

-
В списке справа выбираем «Создать простую задачу». Выдаем ей название, описание можно не сочинять.

-
Раздел «Триггер» позволяет указать, как часто мы будем запускать задачу. Пока выберем «Однократно», но некоторым будет удобнее сделать так, чтобы компьютер выключался каждый день, например, в 19 часов. Для этого, соответственно, нужно указать «Ежедневно».

-
На следующей странице задаем время выключения. Тут не надо пересчитывать часы в секунды, всё доступно и понятно.

-
Раздел «Действие» оставляем без изменений, в подразделе «Запуск программы» прописываем shutdown в поле «Программа или сценарий» и -s в поле «Добавить аргументы».

-
На финальном экране сверяем данные и выбираем «Готово». В заданное время питание компьютера отключится.
7. Через сторонние программы
Если вам не понравился ни один из вышеописанных способов в силу их сложности, советуем скачать таймер отключения в виде отдельной программы. Найти такие можно как в магазине приложений Microsoft Store, так и на доверенных сайтах с софтом.
В Windows Store напишите в строке поиска shutdown timer. Варианты в основном платные, но есть и такие программы, за которые платить не нужно, например, Shutdown Timer Classic от разработчика Lukas Langrock. Скачать ее также можно на GitHub.

Для некоторых пользователей препятствием станет отсутствие локализации, так как приложение доступно только на английском. Впрочем, чтобы пользоваться основными функциями, глубоких знаний не потребуется. Доступно несколько режимов завершения работы (отключение, сон, гибернация, выход из системы) с различными опциями и собственно таймер. Настраиваем его, нажимаем Start и оставляем компьютер в покое.

Чтобы узнать, какие еще таймеры отключения присутствуют на рынке, промотаем страницу Shutdown Timer Classic вниз, в раздел «Пользователи также просматривают». Там собраны все похожие программы с указанием рейтинга. Скачаем самую высоко оцененную — Auto Device Shutdown. Ее оценка составляет 5 баллов.

В отличие от прошлого приложения, это доступно на русском, поэтому проблем возникнуть не должно.

Пользователь может заставить приложения закрываться принудительно, поскольку подтверждение выхода из программы иногда мешает системе выключиться. Также в наличии ряд продвинутых настроек: поддержка экрана в активном состоянии, автозагрузка и иное.
Как отключить таймер автовыключения компьютера
Рассмотрим, как отменить запланированное отключение питания теми же способами, какими мы его настраивали.
| Через команду «Выполнить» | Введите команду shutdown -a |
| Через командную строку | Введите команду shutdown -a |
| Через PowerShell | Введите команду shutdown -a |
| Через ярлык | В свойствах ярлыка удалите всё, что идет после shutdown.exe, и вместо этого пропишите -a |
| Через bat-файл | Откройте файл блокнотом, удалите весь текст, пропишите команду shutdown.exe -a, сохраните файл и запустите его заново |
| Через планировщик | Откройте планировщик, найдите раздел «Библиотека планировщика заданий», нажмите на задачу отключения правой кнопкой мыши и выберите «Отключить» |
Чек-лист для пользователя: как поставить таймер выключения ПК на Windows
Для удобства тезисно оформили весь гайд в виде списка.
- В Windows встроена возможность отключить компьютер по расписанию.
- Задать время до выключения компьютера можно в меню «Выполнить», командной строке и PowerShell с помощью команды shutdown -s -t, где после t нужно задать время в секундах.
- Также выключить компьютер по расписанию позволяют ярлык на рабочем столе, bat-файл и «Планировщик задач Windows», но усилий тут понадобится больше, чем в предыдущем пункте.
- Бесплатные программы на GitHub или в магазине приложений Windows обладают минимальной функциональностью, необходимой для выключения компьютера по расписанию.
- Таймер автовыключения всегда можно отключить тем же способом, каким вы его включили.
Introduction
Automatic shutdown in Windows 10 is one of the features of the Windows operating system, which makes your computer safe and secure. Generally, we prefer our system to properly shutdown every time to lengthen the operating system’s life. But sometimes, when you work on your computer late at night, it is really hard to remember to shut down your computer; in those cases, you should use the automatic shutdown scheduler on your computer.
This tutorial will show you various ways to Schedule Automatic Shutdown in Windows 10.
1. Auto Shutdown via Run
Follow the instructions below to proceed.
Step 1. From the Start menu, open the Run dialog box, or you can Press the «Window + R» key to open the RUN window.
Step 2. Type «shutdown -s -t <number in seconds>» and press Enter Key.
For example. if you want to shut down your PC/laptop after 10 minutes, then type- shutdown -s -t 600.
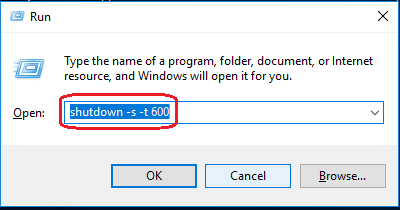
In this example, 600 represents the number of seconds, so in this example, your computer will turn off automatically after 10 minutes. You can experiment by taking the different values and setting the one you want.
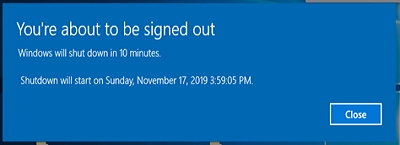
After finishing this setting, the system will prompt you about the auto-shutdown time, as shown in the following screenshot.
2. Auto Shutdown via Command Prompt
Using the «Command Prompt», the user can schedule the automatic shutdown. Follow the instructions below to proceed.
Step 1. Open Command Prompt.
Step 2. Type «shutdown -s -t <number in seconds>» and press enter key.
For example. if you want to shut down your PC/laptop after 15 minutes, then type- shutdown -s -t 900
In this example, 900 represents the number of seconds, so in this example, your computer will turn off automatically after 15 minutes. You can also experiment by taking the different values and setting the one you want.
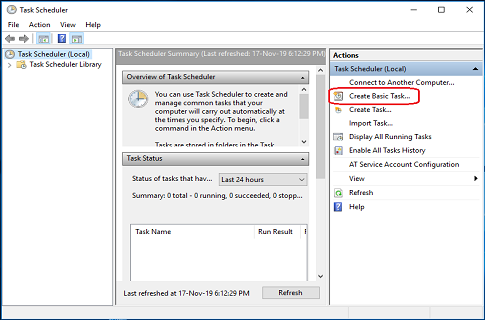
3. Auto Shutdown via Task Scheduler
Follow the instructions below to proceed.
Step 1. Open Start, Search for Task Scheduler, and press enter to open Task Scheduler.
Step 2. Click on the «Create Basic Task» option.
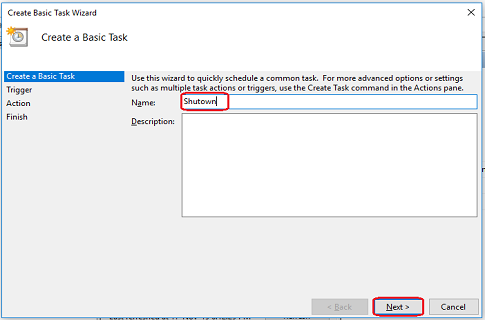
Step 3. Provide the Task Name, such as Shutdown, and click next.
Step 4. Choose when you would like your task to start and click next.
Step 5. Set the Start date and time of the task and click Next.
Step 6. Select the «Start a program» option from a various list of actions and then click on the «Next» button to proceed.
Step 7. Click on the Browse Button and choose «shutdown.exe» from C/Windows/System32.
Step 8. Enter «-s» as the argument and click on the «Next» button to proceed.
Step 9. Click the «Finish» button to complete the task.
Conclusion
By following any of the above methods, you can Schedule Automatic Shutdown in Windows 10.
If you want to Cancel the Auto Shutdown Command, then visit, How To Cancel Automatic Shutdown in Windows 10.
I hope you enjoyed this article. Follow C# Corner to learn more new and amazing things about Windows 10.
Thanks for reading this article.
How to Set Auto Shutdown in Windows 10: There are scenarios in which you want the PC to turn off automatically and once such a scenario is when you’re downloading a large file or program from the Internet or installing a program that’s going to take hours then you probably want to schedule automatic shutdown because it would be totally a waste of time to sit that long just to manually turn off your PC.

Now, sometimes you also forget to shut down your computer. Is there any way to set auto shut down in Windows 10? Yes, there are some methods through which you can set auto shut down in Windows 10. There could be many reasons behind opting for this solution. However, the benefit is that whenever due to any reasons you forget to shut down your PC, this option will turn off your PC automatically. Isn’t cool? Here in this guide, we will explain various methods to get this task done.
Table of Contents
Make sure to create a restore point just in case something goes wrong.
Method 1 – Schedule Automatic Shutdown Using Run
1.Press Windows key + R to launch Run prompt on your screen.
2.Type the following command into the run dialog box and hit Ener:
shutdown -s -t TimeInSeconds.
Note: TimeInSeconds here refers to the time in seconds after which you want the Computer to shut down automatically. For example, I want to shut down my system automatically after 3 minutes (3*60=180 Seconds). For this, I will type the following command: shutdown -s -t 180
3.Once you will enter the command and hit Enter or Press OK button, your system will shut down after that period (In my case, after 3 minutes).
4.Windows will prompt you about shutting down the system after the mentioned time.
Method 2 – Set Auto Shutdown in Windows 10 using Command Prompt
Another method is using the command prompt to set your computer to automatically shut down after a certain period. For that you need to follow the below given steps:
1.Open Command Prompt or Windows PowerShell with admin access on your device. Press Windows Key + X then select Command Prompt (Admin).
2.Type the below command into cmd and hit Enter:
shutdown -s -t TimeInSeconds
Note: Replace TimeInSeconds with the seconds after which you want your PC to shut down, for example, I want my PC to automatically shut down after 3 minutes (3*60=180 Seconds). For this, I will type the following command: shutdown -s -t 180


Method 3 – Create a basic task in task scheduler for auto shutdown
1.First open Task Scheduler on your device. Type Task Scheduler in Windows search bar.
2.Here you need to locate Create Basic Task option and then click on it.

3.In the Name box, you can type Shutdown as the task name and click on Next.
Note: You can type any name and description you want in the field and click Next.

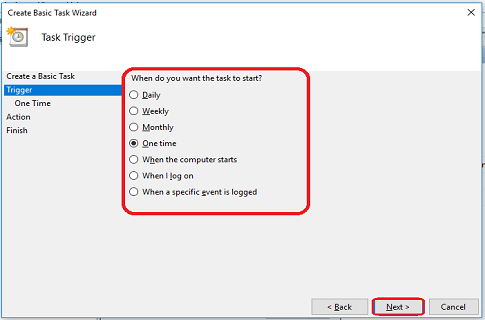
4.On the next screen, you will get multiple options to start this task: Daily, Weekly, Monthly, One time, When the computer starts, When I log on and When a specific event is logged. You need to select one and then click on Next to move further.

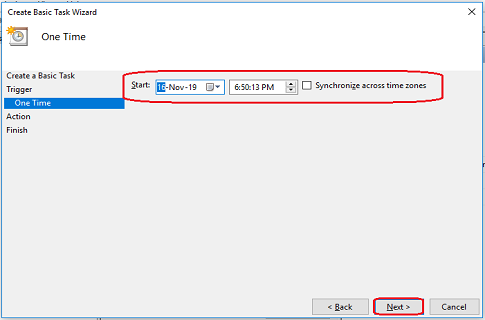
5.Next, you need to set the Task Start date and time then click on Next.

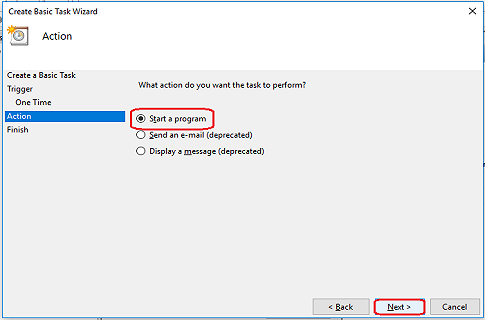
6.Choose “Start a program” option and click on Next.

7.Under Program/Script either type “C:\Windows\System32\shutdown.exe” (without quotes) or click on Browse after which you need to navigate to C:\Windows\System32 and locate the shutdowx.exe file and click on it.

8.On the same window, under “Add arguments (optional)” type the following and then click Next:
/s /f /t 0

Note: If you want to shut down the computer say after 1 minute then type 60 in place of 0, similarly if you want to shut down after 1 hour then type 3600. Also, this is an optional step as you have already selected the date & time to start the program so you could leave it at 0 itself.
9.Review all the changes you did until now, then checkmark “Open the Properties dialog for this task when I click Finish” and then click Finish.

10.Under General tab, tick the box which says “Run with highest privileges“.

11.Switch to the Conditions tab and then uncheck “Start the task only if the computer is on AC power”.

12.Similarly, switch to the Settings tab and then checkmark “Run task as soon as possible after a scheduled start is missed“.

13.Now your computer will shut down at the date & time you selected.
Conclusion: We have explained three methods that you can implement to execute your task of letting your computer automatically shut down. Depending on your preferences, you can choose the method to Set Auto Shutdown in Windows 10. It is basically useful for the people who often forget to shut down their system properly. You can initiate the task by implementing any of the given methods.
Recommended:
- Fix Desktop Window Manager High CPU (DWM.exe)
- What Can I Do If I Forgot My Instagram Password?
- Fix Taskbar Search Not Working in Windows 10
- How to Disable Windows 10 Firewall
I hope this article was helpful and you can now easily Set Auto Shutdown in Windows 10, but if you still have any questions regarding this tutorial then feel free to ask them in the comment’s section.