Applies ToWindows 11
В видео-играх HDR увеличенный цветовой диапазон и яркость по сравнению с играми SDR обеспечивает более подробный и иммерсивный игровой интерфейс на вашем компьютере с Windows. Когда вы играете в игры HDR, вы увидите в них все детали, начиная от всего в темных тени в тускло освещенных комнатах до удивительной яркости и отражения вещей в этих ярких солнечных сценах.
Хотя многие новые игры разработаны для HDR, некоторые более старые игры являются только SDR, например игры, использующие DirectX 11 или DirectX 12. Но с auto HDR это меняется. При включении функции Auto HDR цветовой диапазон и яркость автоматически увеличиваются до HDR. Это функция, которая позволяет играть и просматривать старые игры в новом свете с HDR на дисплее с поддержкой HDR. Все, что вам нужно сделать, это включить функцию Auto HDR.
Включение автоматического hdr
-
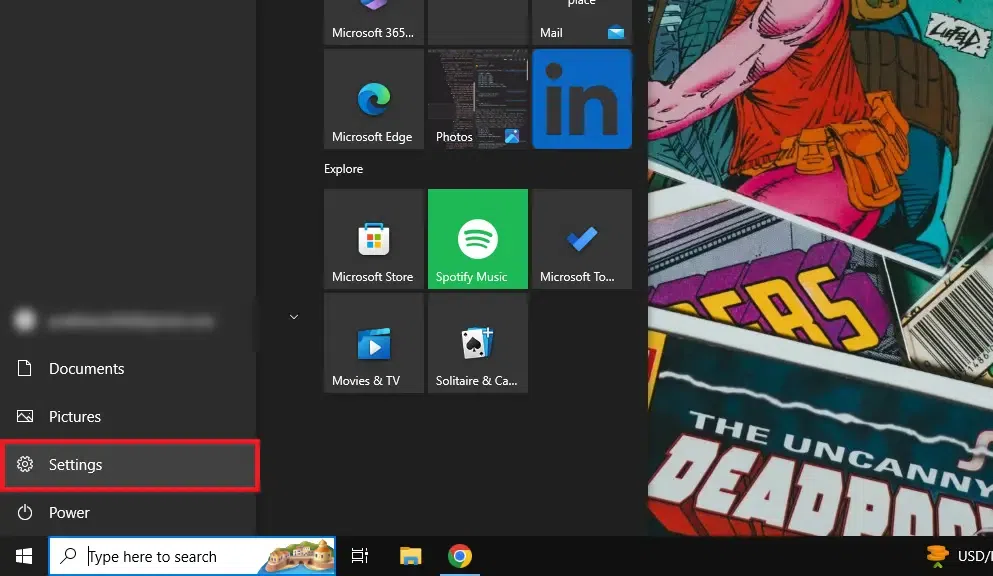
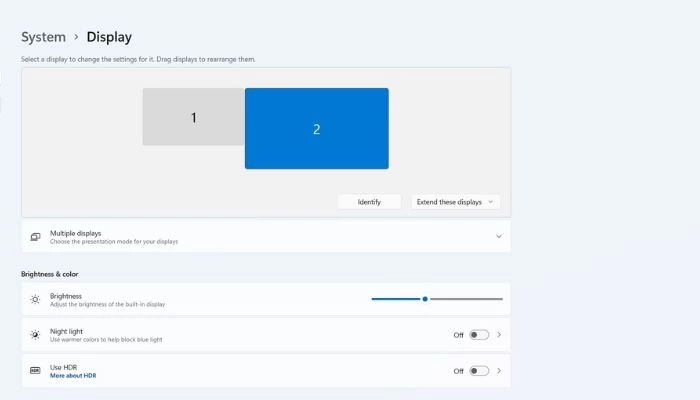
Выберите кнопку Пуск, а затем войдите впараметры. Выберите Параметры > Системный > дисплей.
-
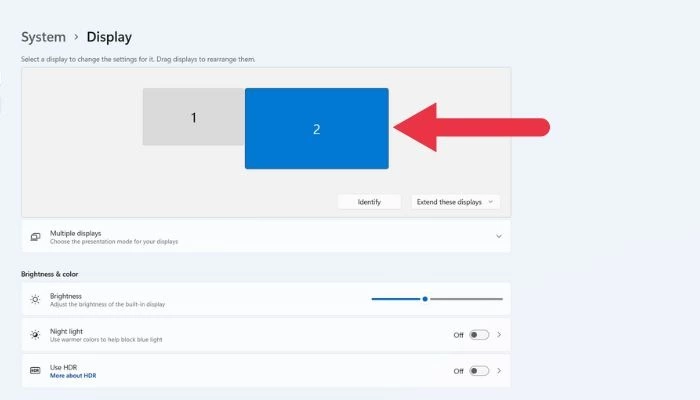
Если у вас несколько дисплеев, выберите дисплей с поддержкой HDR в верхней части экрана.
-
Включите параметр Использовать HDR, а затем выберите Дополнительные параметры (>).
-
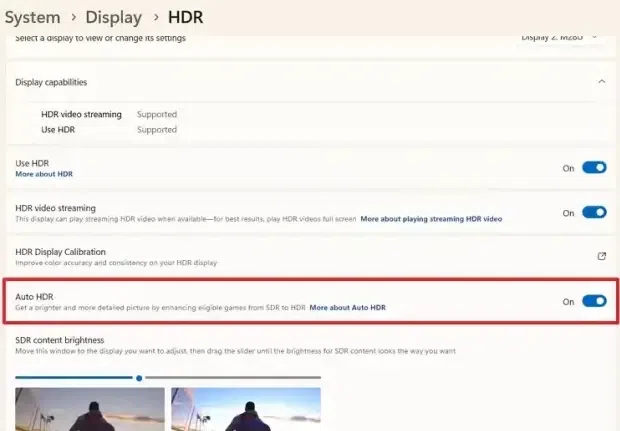
Включите функцию Auto HDR.
Нужна дополнительная помощь?
Нужны дополнительные параметры?
Изучите преимущества подписки, просмотрите учебные курсы, узнайте, как защитить свое устройство и т. д.
Last Updated :
30 Jan, 2025
Auto HDR is a feature in Windows 11 designed to enhance your gaming experience by automatically upgrading standard dynamic range (SDR) games to high dynamic range (HDR). This guide will walk you through the steps to enable Auto HDR, ensuring you can enjoy richer colors and improved visuals while gaming.
Gamers who prefer high-refresh-rate monitors (NVIDIA/AMD GPUs) can be amazed with the Auto HDR function that Windows 11 is offering with the help of AI. So, let’s understand how you can enable Windows 11 Auto HDR to enjoy the real-gaming experience now.
System Requirements:
- Hardware:
- Display: HDR-10 compatibility (Samsung Odyssey Ark 55″, Sony INZONE M9 27″, Lenovo ThinkVision P27u-20 27″)
- GPU: Nvidia GeForce GTX 900 series, AMD Radeon RX 400, etc.
- Display Ports: HDMI 2.1 or DP 1.4 (for 4K@ 120Hz HDR)
- Software:
- OS: Windows 11 Version 22H2 or later (*if not updated, Navigate to Settings > Windows Update)
- Gaming GPU Drivers: NVIDIA, AMD
What is AUTO HDR?
- HDR (High Dynamic Range): HDR technology expands the range of colors and brightness levels in visual content, resulting in more vibrant, lifelike, and detailed images.
- AUTO HDR: This feature automatically converts SDR content into HDR, improving the visual experience without requiring developers to update their games or applications.
How Does AUTO HDR Work?
- Detection of SDR Content: When you run an SDR game or application, Windows detects it and applies HDR enhancements in real-time.
- Dynamic Tone Mapping: AUTO HDR uses advanced algorithms to map SDR colors and brightness levels to the wider HDR color gamut and brightness range.
- Real-Time Processing: The conversion happens in real-time, ensuring that the enhanced visuals are displayed seamlessly.
How to Turn ON Auto HDR on Windows 11 — 4 Easy Steps
Windows 11’s Auto HDR feature improves your gaming experience by automatically enabling High Dynamic Range (HDR) in DirectX 11 and DirectX 12 games—even if they weren’t initially intended to support it. Turning on Auto HDR on your HDR-capable TV or monitor is a terrific way to get the most out of your display.
Now, see the below-mentioned easy steps and implement them properly to Enable Windows 11 Auto HDR for Gaming.
Step 1: Go to the Windows Settings
From the Start Menu click on the Settings icon to go to the Settings icon.
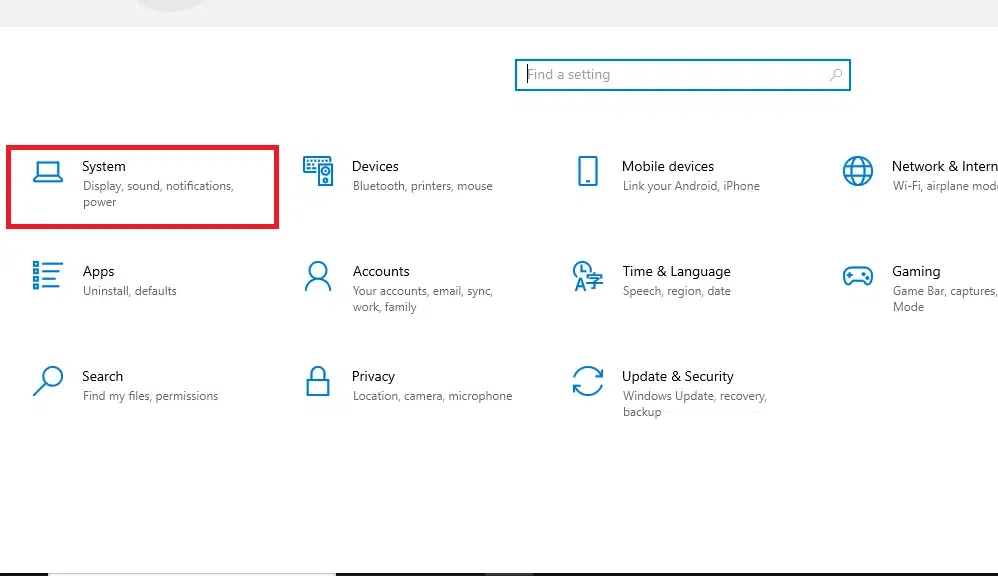
Step 2: Navigate to System
Now click on the System to go to the system settings of your laptop.
Step 3: Select Display Option
Select Display from the left pane of the interface, when you click on the Display button you will move to the Display settings of your laptop.
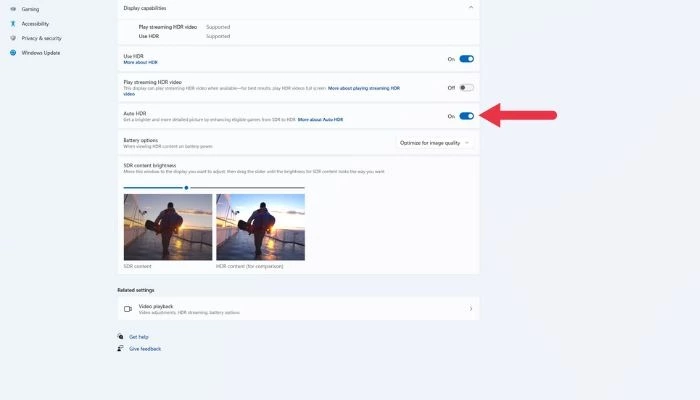
Step 4: Enable Auto HDR
Enable Auto HDR button and HDR settings will be enabled on your computer.
*Note: You can also click over HDR Display Calibration to adjust brightness/contrast using the built-in tool.
Adjusting Auto HDR Intensity
You can also adjust the intensity of Auto HDR using the Game Bar:
- Press Windows key + G to open the Game Bar while playing a game.
- Click on the Settings button in the Game Bar.
- Navigate to the Gaming features section and select Adjust HDR Intensity.
- Use the intensity slider to customize how vivid and bright you want the colors in your game.
How to Enable Auto HDR when playing Games using Game Mode
By using the above-mentioned 4 simple steps, you can enable Auto HDR on Windows 11 system. Now, let’s check how you can activate Auto HDR in games.
Step 1: Open the Windows Settings
Click on the Start Menu or Press the Win key to open the Start Menu and type «Settings» and hit the Enter button.
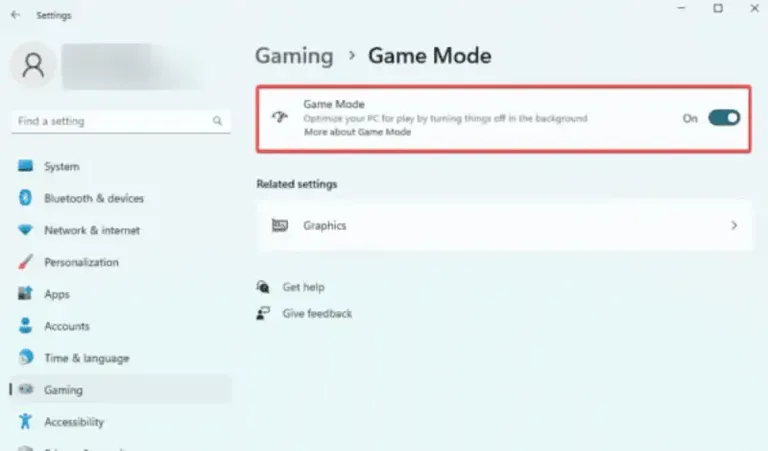
Step 2: Navigate to the Game Mode
Navigate to the Settings > Gaming > Game Mode
Step 3: Toggle ON the Game Mode
Click to toggle ON the Auto HDR. Also note that this feature will only works in DirectX 11/12 or Vulkan (low graphics) games.
Alternative:
- Launch your game
- Press Win + G ( access Xbox Game Bar )
- Navigate Settings > Gaming Features > Enable Auto HDR
Troubleshooting Common Issues
If you encounter issues with Auto HDR, consider these troubleshooting tips:
- Ensure your graphics drivers are up-to-date.
- Check if your monitor is properly set up for HDR.
- Restart your computer after making changes in settings.
- If problems persist, consult forums or support pages for specific solutions related to your hardware configuration.
Top Auto HDR-Compatible Games for 2025
- Grand Theft Auto V
- Cyberpunk 2077
- Forza Motorsport 8
- Starfield
- Red Dead
- Redemption 2
- The Witcher 4
- Resident Evil 7: Biohazard
Conclusion
Enabling Auto HDR in Windows 11 can significantly enhance your gaming experience by providing more vibrant colors and better contrast. By following this guide, you can easily activate this feature and enjoy a more immersive gaming environment. Make sure your hardware meets all necessary requirements for optimal performance, and don’t hesitate to explore further adjustments through the Game Bar settings for a personalized experience.
Windows 11 brings Auto HDR, first introduced on the Xbox Series X|S consoles, to the PC. The feature promises to make older titles look just as bright and vibrant as newer HDR-compatible releases without a major hit to performance. That’s sure to have PC gamers eyeing an upgrade to Windows 11. Is it worth making the leap?
We’ve dug deep into Windows 11’s Auto HDR to find the answer. Here’s everything you need to know, from the hardware you need to how to set it up, along with image quality comparisons with the feature on and off, and comparisons of how Windows 11’s Auto HDR compares to the version offered on the Xbox. With Microsoft eyeing ways to improve Windows 11’s HDR capabilities later this year, it’s worth taking stock in where Auto HDR is at today. Let’s dig in.
Here’s how to get Windows 11 for cheap (or even for free)
Auto HDR is a standard feature of Windows 11 and is available when high dynamic range (HDR) is turned on. The Auto HDR toggle is found in the Display menu alongside the HDR switch. (Here’s a step-by-step guide to turning on Auto HDR in Windows 11.) Some games will prompt you to turn Auto HDR on when launched if the feature is off.
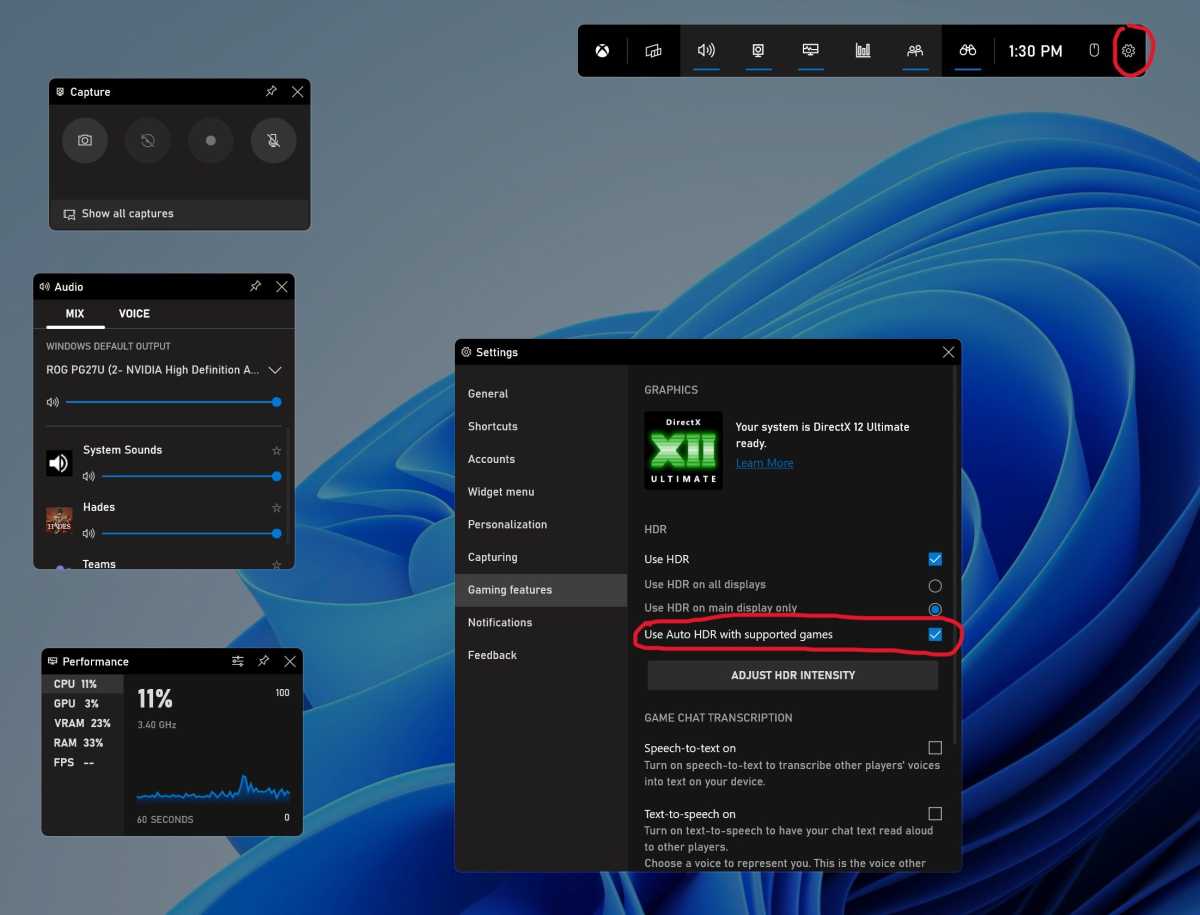
You can also turn on Auto HDR through the Windows Game Bar. Press the Windows + G keys to bring up the game bar, select Settings (represented by a gear icon), then open Gaming Features. Select Use Auto HDR with supported games to turn on Auto HDR.
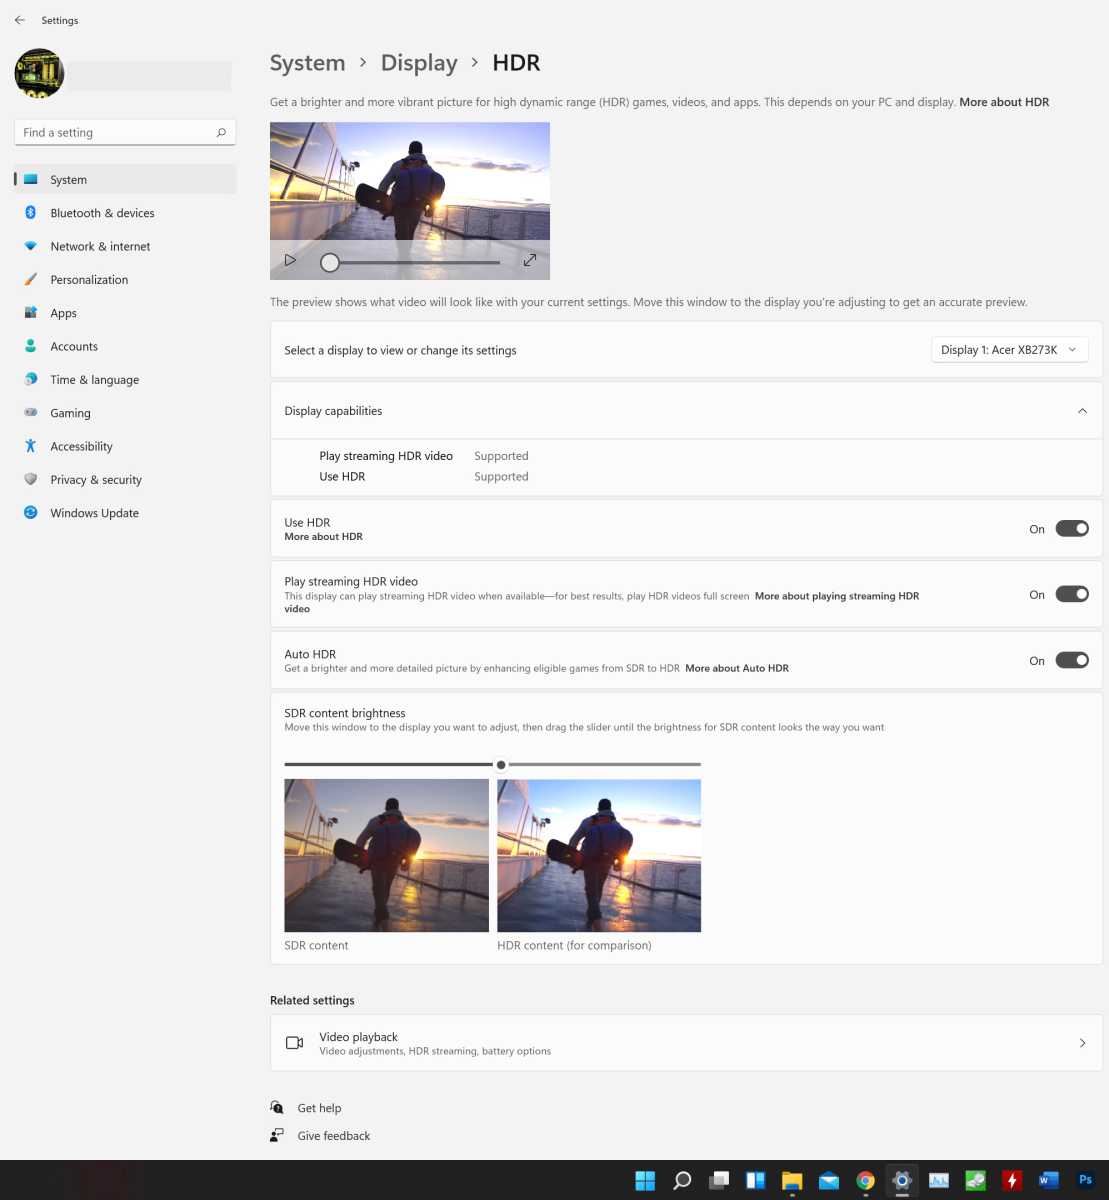
You’ll find the Auto HDR toggle in the HDR portions of Windows 11’s display settings.
Thiago Trevisan/IDG
You will also see an HDR Intensity option. Select this to open a slider that lets you enhance or decrease the HDR effect. I generally found Auto HDR was best at high intensity, though this could look overly sharp at times.
The Auto HDR intensity slider in the Windows 11 Game Bar.
Microsoft
The HDR intensity slider now appears in the Windows Game Bar, as well, and if you activate it there, the level of intensity is saved per game, rather than universally. That means “that you can set a certain level of intensity for AHDR for a particular game and it will not affect any Auto HDR settings in other games,” Microsoft explained when announcing the feature. “The next time you play the same game, the Auto HDR slider will remember your previous setting.”
While Auto HDR will work on any HDR monitor, the benefits depend on your monitor. HDR monitors are not hard to find, but most HDR monitors are rather bad at HDR. The majority deliver a maximum brightness of about 400 nits, at best, and budget models routinely fall below that. Entry-level HDR monitors also have a narrow color gamut that can’t display the full range of HDR color. Our guide to HDR on the PC explains everything you need to know about the technology, including what you should look for in an HDR monitor.
I used Samsung’s cutting-edge Odyssey G9 Neo super-ultrawide for most of my testing, but I also tried Auto HDR on Acer’s budget-friendly XV340CK ultrawide. The XV340CK supports HDR input but can’t even hit 400 nits of brightness. As a result, HDR tends to look very dull and doesn’t show much detail. Auto HDR doesn’t fix the issue. You will need a solid HDR monitor to see an improvement.
How Auto HDR works
Auto HDR uses an algorithm to analyze an standard dynamic range (SDR) image and convert it to HDR. The algorithm pays particular attention to SDR luminance data. Think of it like upscaling an image to a higher resolution, but with luminance data instead of resolution.
Still confused? Take a look at Jeff Grubb’s coverage of Auto HDR on the Xbox Series X, which includes HDR heatmap footage provided by HDR expert Adam Fairclough (aka EvilBoris). The HDR heatmap footage provides a sense of the raw luminance data Auto HDR is using to boost brightness and overall contrast.
Auto HDR works at the operating system level, so all games are compatible with Auto HDR. The only restriction noted by Microsoft is that a game must support DirectX 11 or DirectX 12 to enable Auto HDR. However, I found that titles which don’t support DirectX 11 or 12 seemed to work—or, at least, looked different. Microsoft’s documentation is unclear on this point.
Of course, there’s literally thousands of games you might use with Auto HDR. The feature’s presence doesn’t guarantee that it will work properly or improve your experience. Microsoft does not run an Auto HDR certification program and its official announcements surrounding Auto HDR tend to focus on games from Microsoft-owned studios. It’s the wild west, in other words: Auto HDR will always be an option if you have Windows 11, but it may not always have the intended effect.
Don’t let that put you off, though. Auto HDR does seem to function well with the majority of modern games and, if it doesn’t, you can simply turn it off.
Auto HDR image quality tested
Microsoft has put much effort into Auto HDR. But does it work as advertised?
To find out, I tested several games on Samsung’s Odyssey G9 Neo monitor. The G9 Neo is an ultrawide Mini-LED monitor that has a maximum peak brightness of 2000 nits in HDR content and, in my testing, can easily sustain over 600 nits in bright scenes. It’s a great choice for highlighting the impact of Auto HDR.
I used a DSLR camera to take photos of the monitor with Auto HDR in action. This isn’t a perfect solution. The camera’s photos are not in an HDR format and, if you’re reading this on a PC, it’s likely you’re not viewing on an HDR monitor. This blunts the effect. Still, the photos offer an example of what you can expect.
To examine the screenshots in finer detail, right-click on them in your browser and select “open image in new tab.”
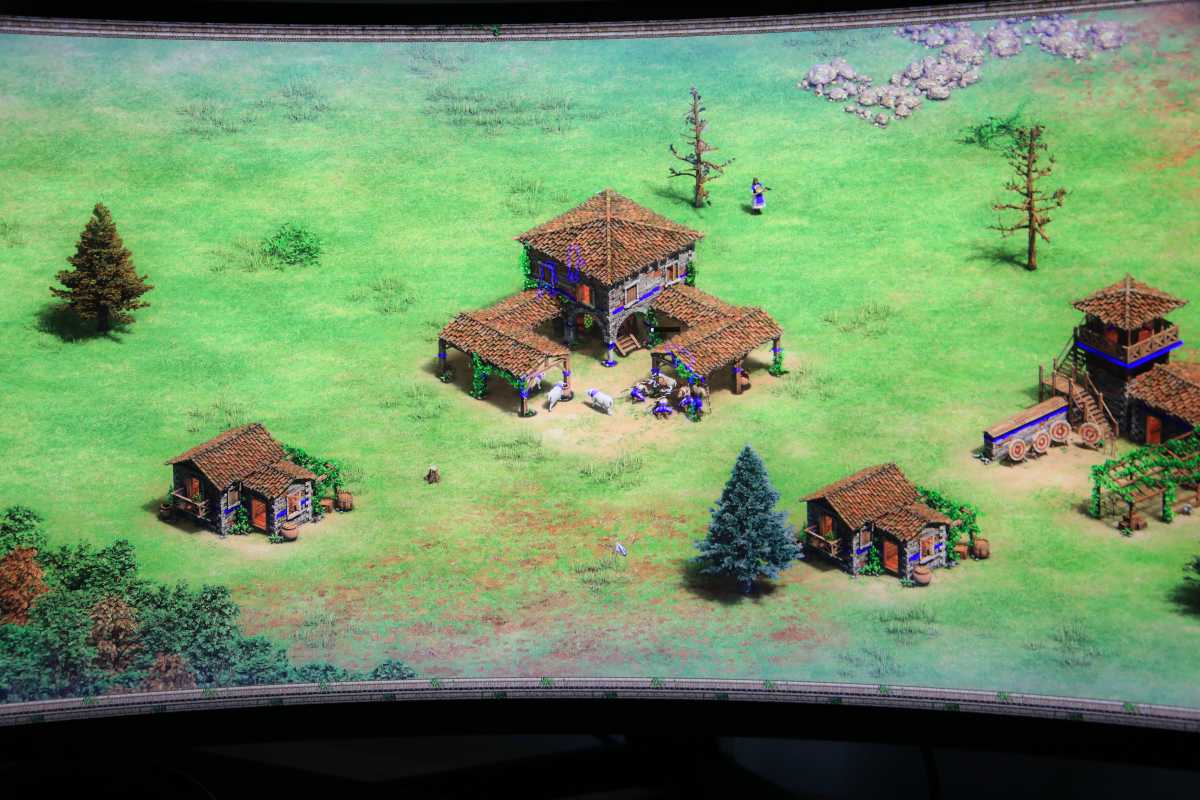
Age of Empires II: Definitive Edition
The remaster of Age of Empires II is not an ideal game for Auto HDR, which is precisely why I wanted to try it. Originally released in 1997, this historically themed real-time strategy game lacks flashy explosions or magical spell effects.
Auto HDR off
Matt Smith/IDG

Auto HDR on
Matt Smith/IDG
There’s not much to see here. The two photos look almost identical, with only a subtle boost in brightness Auto HDR turned on. Most players would have a hard time discerning whether the feature was on or off.
My real-life impression of the game was similar to what you see in the photos, but I encountered an issue you can’t see. Menus and loading screens were rendered with eye-searing brightness when Auto HDR was turned on. This is a known downside to Auto HDR.
On the whole, Auto HDR doesn’t do much for Age of Empires II: Definitive Edition. Let’s move on to more promising games. This underscores the limits of Auto HDR. It’s an algorithm, not magic, and will have less impact in games with few high-contrast scenes.
Final Fantasy XIV
Final Fantasy XIV is a game that embraces a flashy, high-contrast presentation. Originally released on PlayStation 3 and PC, the game’s engine doesn’t support HDR and seems unlikely to receive an HDR update in the near future. Auto HDR, you’re my only hope!
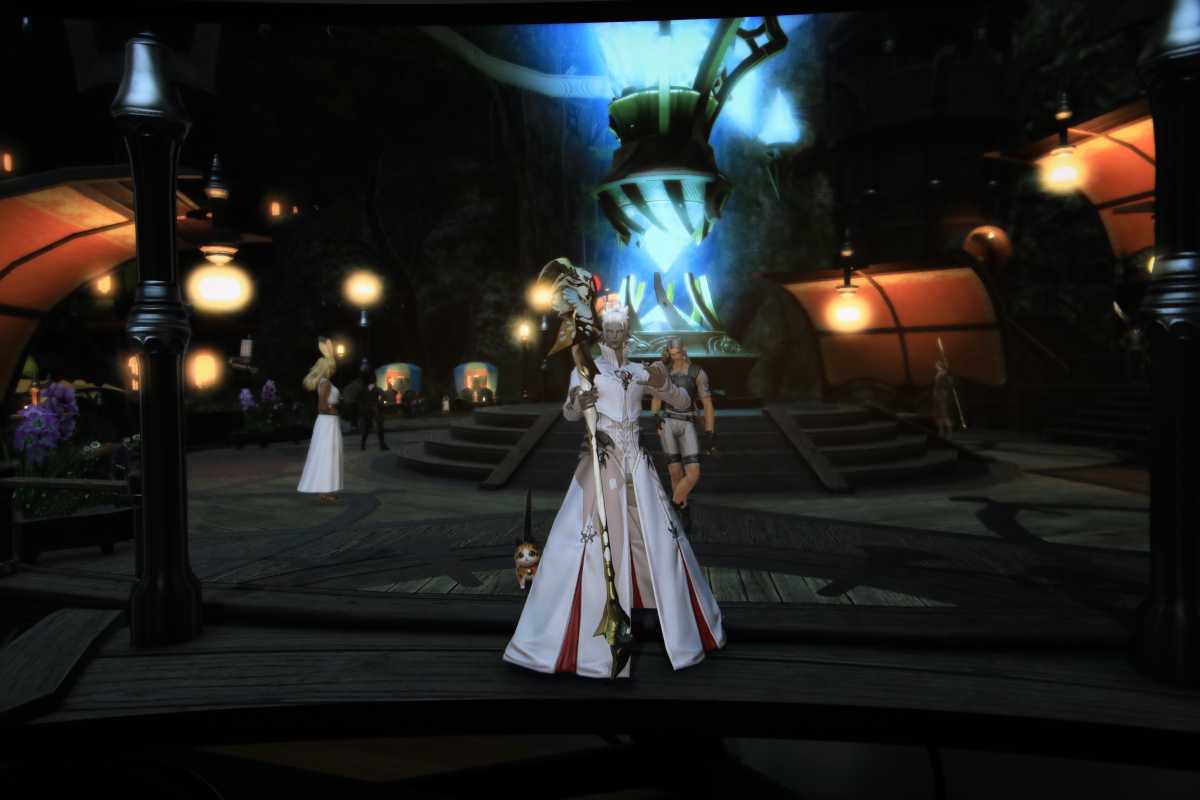
Auto HDR off
Matt Smith/IDG
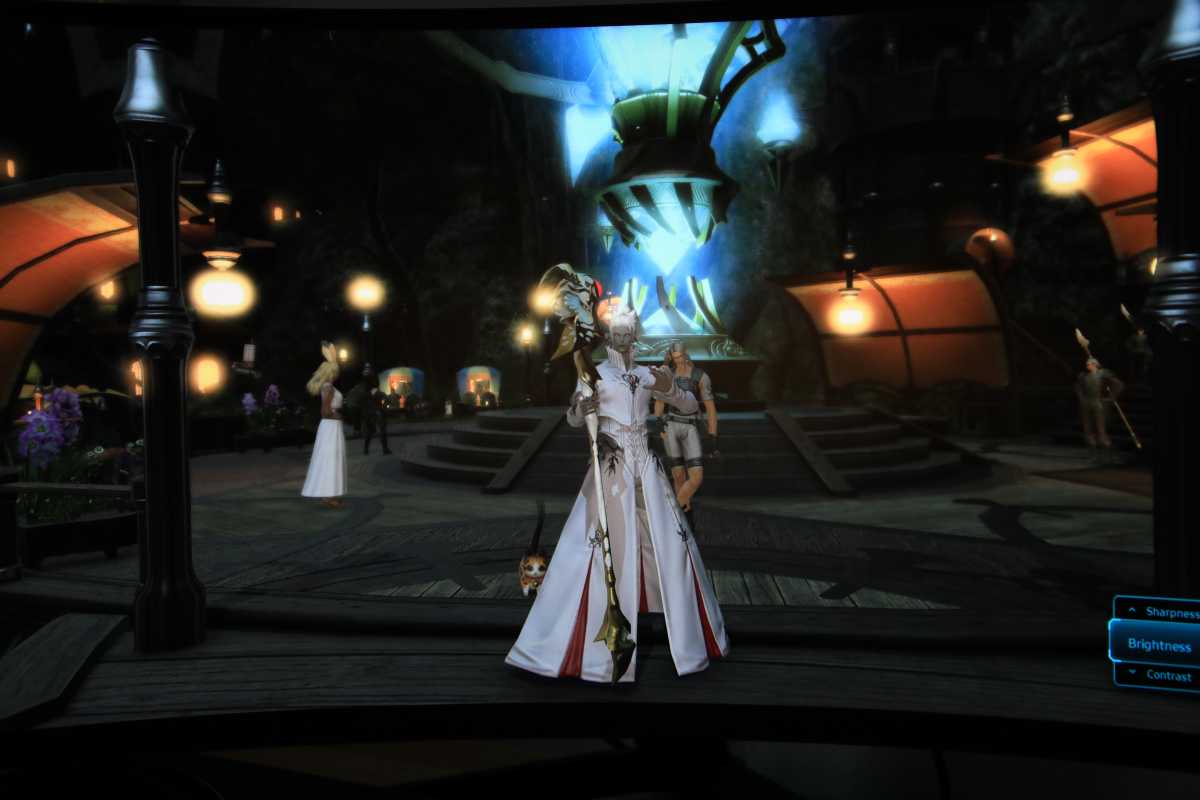
Auto HDR on
Matt Smith/IDG
It’s clear that Auto HDR doesn’t entirely change the game’s look even in this high-contrast scene. Look closely, though, and you may notice the Aether crystal, surrounded by a blue glow, shows more detail with Auto HDR. The street lights also appear less blown out. Finally, I think Auto HDR shows slightly more contrast overall. Dark areas appear darker and brighter areas brighter, yet both retain detail.
I also noticed spell effects had more punch with Auto HDR turned on. Spells cast by my White Mage appeared to peak at a higher maximum luminance. Spell effects looked more defined and impactful.
Auto HDR’s issues with loading screens and menus remain. Final Fantasy XIV, like most MMORPGs, has a lot of menus. Those with a brighter presentation, like the map, could appear overly bright when opened in an otherwise dark environment.
My feelings on Auto HDR in Final Fantasy XIV are mixed. I appreciate the added dazzle of spell effects which, on a good HDR monitor like the Samsung Odyssey G9 Neo, offer eye-searing results. Still, the overall improvement is just ok. Auto HDR is better, but I could take it or leave it.
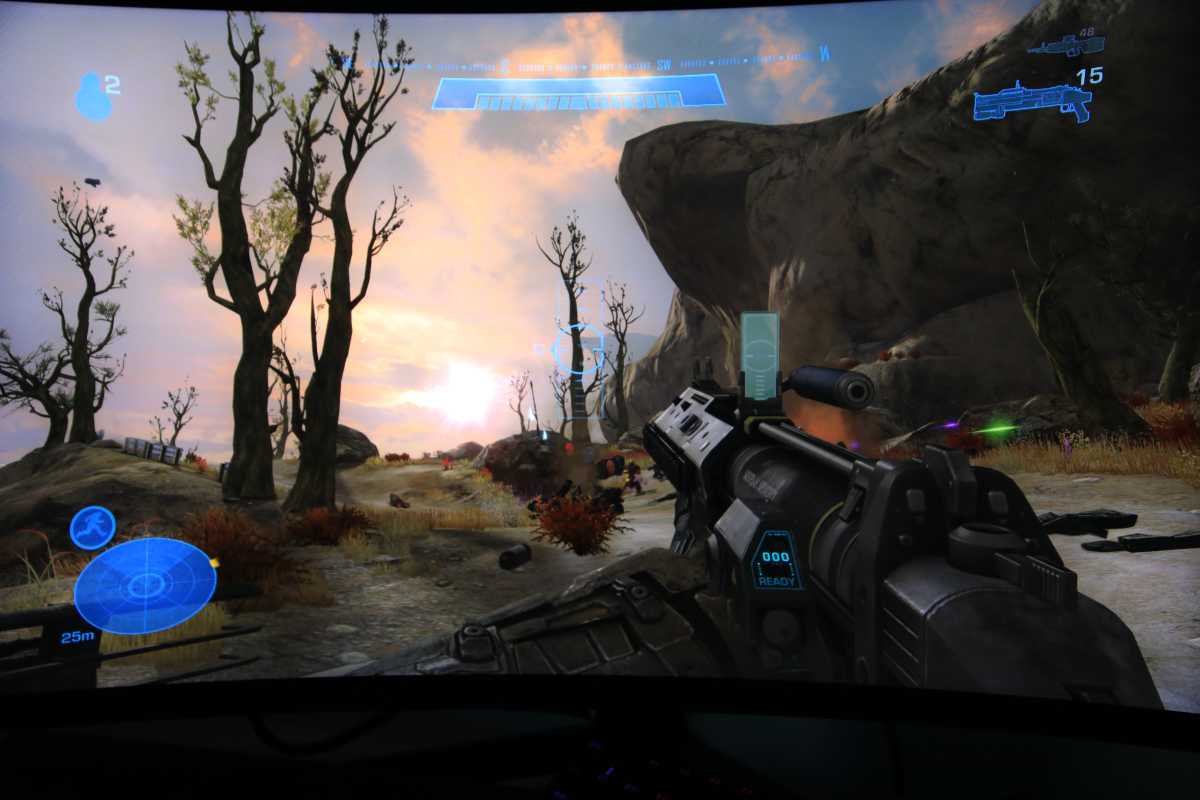
Halo: Reach (from Halo: The Master Chief Collection)
Halo: The Master Chief Collection includes HDR support on the Xbox, but HDR is not supported on the PC. That leaves PC gamers with no choice but to stick with Auto HDR. Fortunately, the results in Halo: Reach are solid.
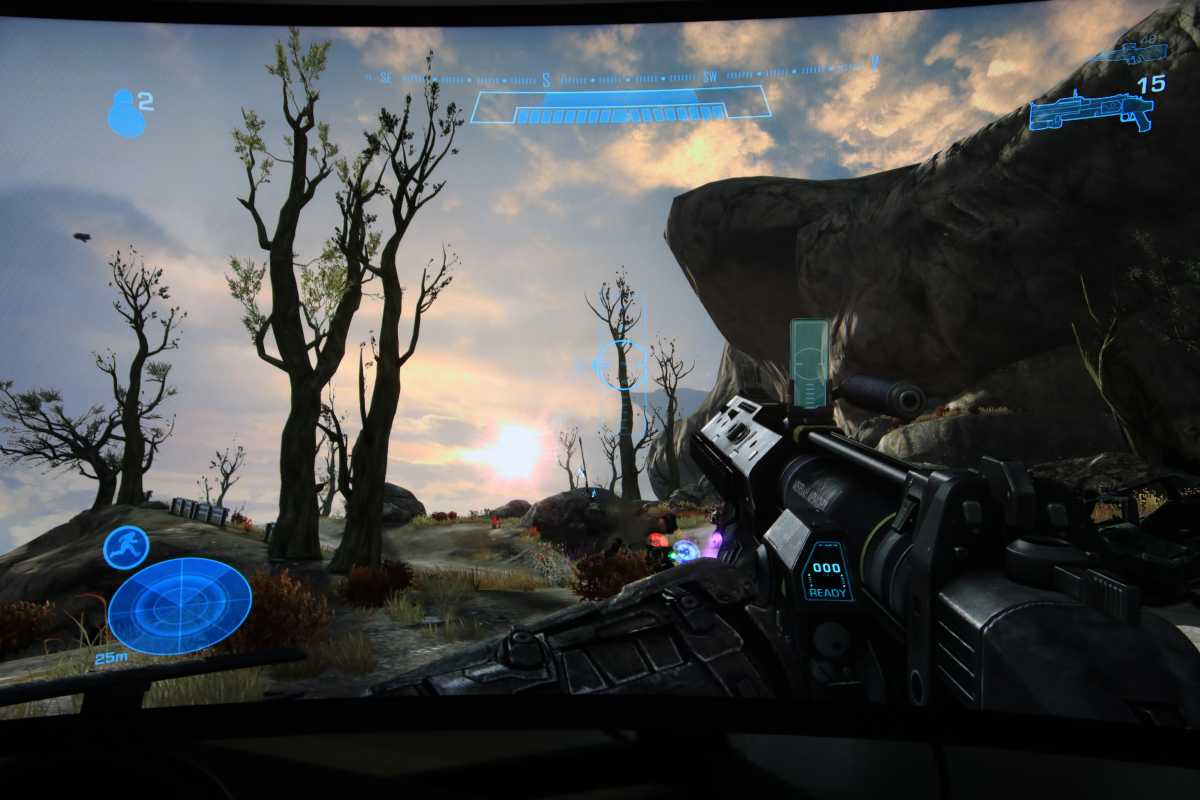
Auto HDR off
Matt Smith/IDG
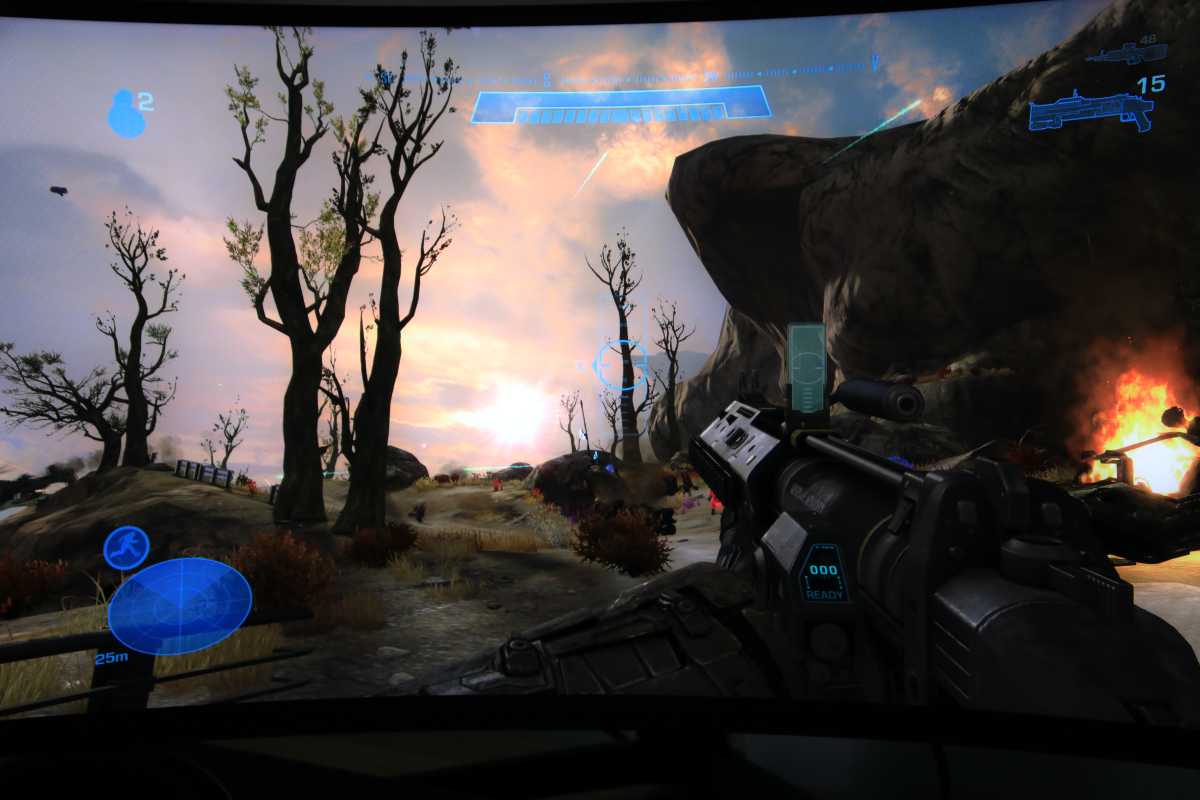
Auto HDR on
Matt Smith/IDG
These photos show a clear difference in overall contrast. The sun rising in the distance appears brighter in the sky. Turn your attention to the foreground, though, and you’ll see more depth in the character’s arms and gun.
I like what Auto HDR does with the gun’s ammo display. It appears flat in the SDR shot, as if it’s a decal stuck on the gun rather than a screen built into it. Auto HDR fixes this issue, providing a sense of depth that makes the screen appear set into the material around it.
There’s a noticeable increase in color and brightness in the sunrise. The SDR photo looks fine, but Auto HDR brightens and adds color to the clouds immediately surrounding the sunrise without losing detail. It better depicts the vivid glow you’ll see when watching a sunrise (or sunset) in real life.
It’s not all good news. Auto HDR is a clear improvement in-game, but the feature had a negative impact on the game’s interface. Halo: The Master Chief Collection plays pre-rendered video in the game’s menus. Using HDR led to distracting macroblocking artifacts in this video. This happened with Auto HDR on or off. It’s a minor annoyance, but one you’ll frequently encounter while navigating the game’s multiplayer matchmaking menus.
Skyrim Special Edition
Skyrim begs for HDR but, unfortunately for fans, was released years before HDR became available. Even the upcoming Skyrim Anniversary Edition won’t support it. That likely means it’s too large a technical lift to ever be included in the game’s official release. Fans have to rely on Auto HDR – so, how good is it?

Auto HDR off
Matt Smith/IDG
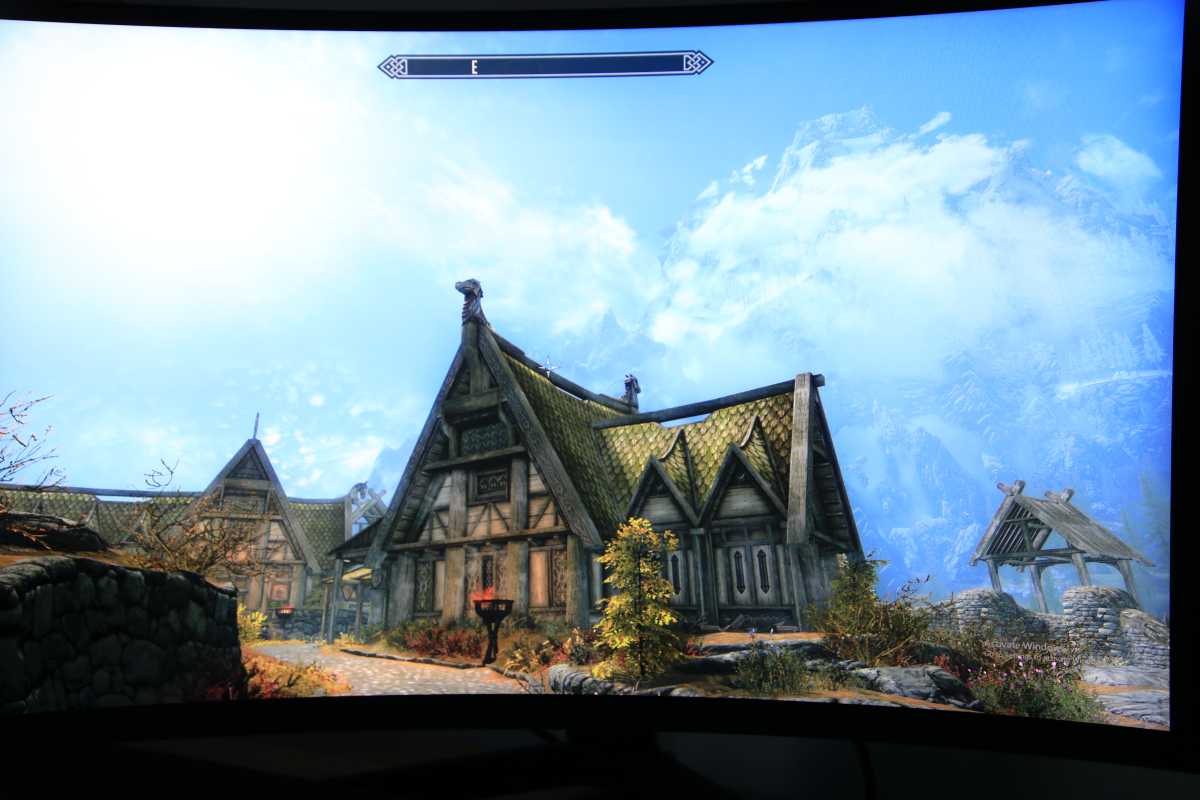
Auto HDR on
Matt Smith/IDG
Yes, I’ve saved the best for last. Auto HDR does a lot for Skyrim and provides a big boost over SDR. As with Halo: Reach, Auto HDR provides a noticeable boost to the scene’s overall contrast. The improved contrast is most obvious in the foreground buildings, which appear brighter, more vivid, and more detailed than in SDR.
Color presentation is enhanced, as well, with a richer yet more balanced look. The SDR shot is no slouch, but the foreground buildings have a warm hue that seems a bit unnatural by comparison.
You will see the sun is blown out in the Auto HDR shot, but don’t worry: this isn’t representative of reality. The Samsung Odyssey Neo G9’s peak HDR brightness is so extreme that I had trouble finding a level of camera exposure that retained detail in bright and dark areas at once. In reality, the level of detail in the sun was similar in both SDR and Auto HDR, but the sun appeared significantly brighter with Auto HDR on.
The only problem is one that you may, by now, expect: Skyrim’s out-of-engine menus have issues. The fog that rolls into the scene during the main menu displays wide gray bands and appears overblown.
It’s less of a problem with Skyrim than with Halo: The Master Chief Collection, though, because players have little reason to navigate this portion of the game’s menus and will instead jump straight into the game. Skyrim’s in-game menus, including the map and the magic selection screen, look fine with Auto HDR turned on.
Auto HDR on PC vs. Xbox Series X
Auto HDR is a feature that spans both the Xbox Series X and the PC, so I was curious how performance compared between PC and console. I connected the Xbox Series X to the Samsung Odyssey Neo G9 to see for myself. The Xbox Series X does not support super-ultrawide (or ultrawide) aspect ratios, of course, so I placed the Odyssey G9 Neo into 16:9 display mode. All other settings remained the same.
Halo: The Master Chief Collection
As mentioned before, Halo: The Master Chief Collection supports HDR on the Xbox Series X, but does not on the PC. This comparison is a battle of “true” HDR against Auto HDR.

Auto HDR on Windows 11
Matt Smith/IDG
Auto HDR on Xbox Series X
Matt Smith/IDG
The sunrise, and the area surrounding it, appears similar in both photos. Both Auto HDR on PC and native HDR on the Xbox Series X show a red-orange glow in clouds that doesn’t pop in SDR. Auto HDR and native HDR share an overall boost in contrast that provides a better sense of depth, especially in the foreground.
However, native HDR on the Xbox Series X has an advantage in dark portions of the image. The gun held by the character shows more detail and contrast than on PC with Auto HDR turned on. The same can be said of the cliffside and trees, where portions of the terrain faced away from the sun become so dark that detail is lost. The PC photo appears too dark by comparison.
Halo: Reach looks great in Auto HDR, but this is a win for native HDR on the Xbox Series X.
Skyrim Special Edition
Skyrim Special Edition does not natively support HDR on any platform, so relies on Auto HDR on both PC and Xbox Series X. So, does Auto HDR look the same on console and PC?

Auto HDR on Windows 11
Matt Smith/IDG
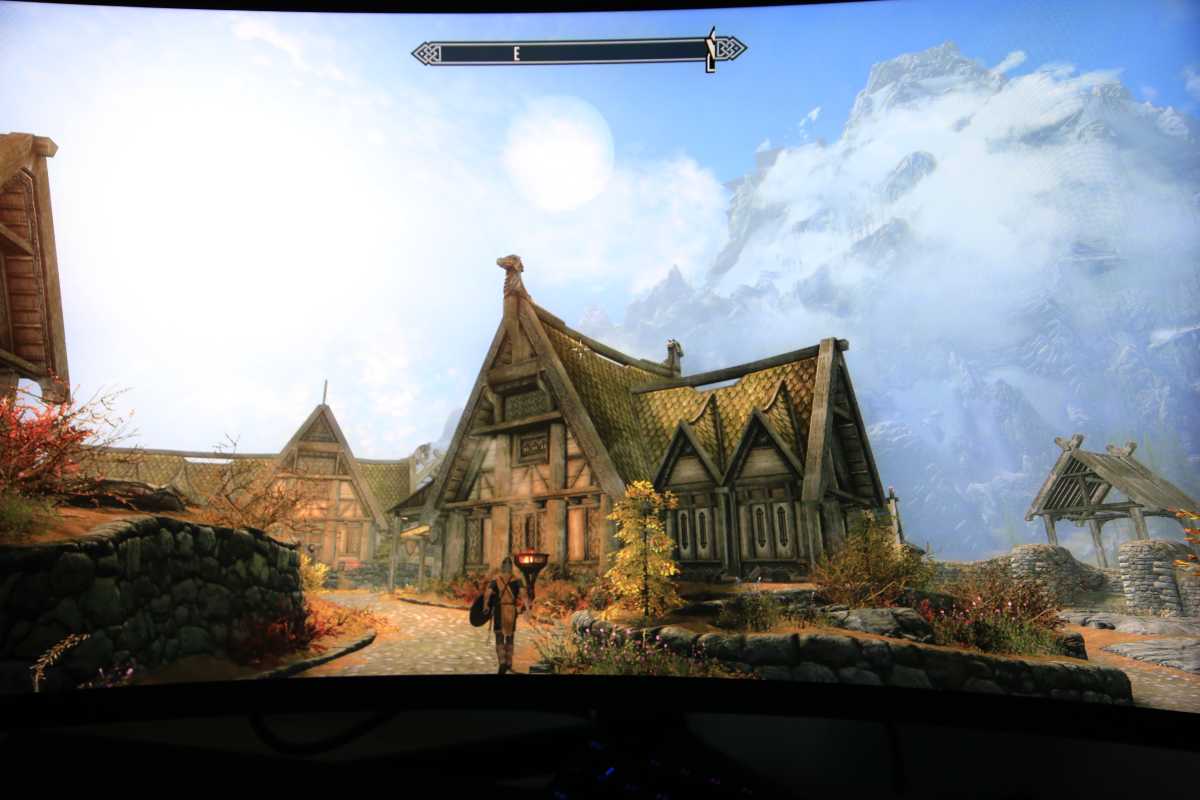
Auto HDR on Xbox Series X
Matt Smith/IDG
There’s a clear difference between the color in each shot. The image captured from Auto HDR on the PC has a cooler, cleaner look, while the image captured from the Xbox Series X looks warmer in the foreground.
It’s possible this is due to a variance in time of day or seasons. While the photos were taken at approximately the same time of day, they photos weren’t snapped at the exact same in-game minute.
Putting color aside, both photos are similar in contrast, detail, and brightness. Both offer better overall contrast compared to SDR. More detail is visible in the rock wall in the foreground, as well as along the darker portions of rooflines and in characters.
The sun appears blown out in both HDR photos, which is caused by the Odyssey Neo G9’s high maximum luminance. The sun was, in fact, clearly visible to my eyes, but the camera was not able to capture it.
I prefer the photo captured from Auto HDR on the PC, but I believe the differences in presentation are due to variances in in-game lighting and not Auto HDR itself. In any case, Auto HDR is an improvement over SDR on both PC and Xbox Series X.
The verdict: Windows 11 Auto HDR can be great on the right display
I spent several weeks testing Auto HDR in various situations beyond those I photographed, with the bulk of my time spent in Final Fantasy XIV and Skyrim. I also tried the feature on several monitors besides the Odyssey Neo G9. I enjoyed my time using Auto HDR, but the feature made me more aware of the problems facing HDR gaming on the PC.
The big issue is this: Auto HDR works best with a great HDR monitor, and great HDR monitors are hard to come by. You will want an OLED or Mini-LED display with a maximum peak brightness of at least 1,000 nits to fully appreciate what Auto HDR has to offer. Unfortunately, most monitors fall far below this requirement.
Auto HDR can make a difference when viewed on a solid HDR display, and the benefits are most noticeable in games with high-contrast scenes. Skyrim’s dramatic sunrises and copious god-rays look their best with Auto HDR. The flat, simple presentation of Age of Empires II: Definitive Edition gains little.
There’s no downside to Auto HDR, at least. The benefit is sometimes large, and sometimes small, but the feature is optional and can simply be turned off if you encounter a problem.
If Auto HDR is the reason you’re considering an upgrade to Windows 11, ask yourself this: Do you own a monitor with a peak brightness of at least 1,000 nits? If you do, making the leap to Windows 11 for Auto HDR is a good idea. If not, hold off on Windows 11 and invest in a monitor upgrade instead.
Editor’s note: This article originally published on October 22, 2021, but has been updated to include additional information, most recently the new addition of a per-game HDR Intensity slider to the Windows Game Bar.
HDR в Windows часто выглядит размытым и неприятным, будь то в игре или на рабочем столе. В результате большинство людей, вероятно, включают HDR один раз, отводят глаза в ужасе, а затем больше никогда не обращаются к этой функции. Но так не должно быть! Есть некоторые вещи, которые вы можете сделать, чтобы получить достойное HDR-изображение.
Как включить HDR в Windows
Раньше включение и выключение HDR было довольно трудоемкой задачей в Windows. Однако если ваша версия Windows обновлена, теперь для переключения HDR можно использовать простую комбинацию клавиш.
Нажмите Win + Alt + B в любое время, и HDR обязательно включится или выключится. В большинстве случаев экран будет мигать при смене режимов, а экранный дисплей (OSD) сообщит вам, что HDR включен или выключен.
Интересно: Как нормализовать громкость в Windows 11 и 10?
Это сочетание клавиш решает большинство жалоб на использование HDR на компьютере под управлением Windows, поскольку основной проблемой является плохое отображение SDR-контента. Именно поэтому никто не хочет оставлять HDR включенным во время работы на рабочем столе или копаться в куче меню и настроек при каждом запуске игры.
Просто имейте в виду, что для большинства игр, использующих HDR, вам нужно включить его до запуска программы. Это может быть справедливо и для других типов приложений, использующих HDR. Некоторые игры автоматически включают HDR при запуске, но такие игры встречаются относительно редко.
Регулировка SDR-контента в режиме HDR
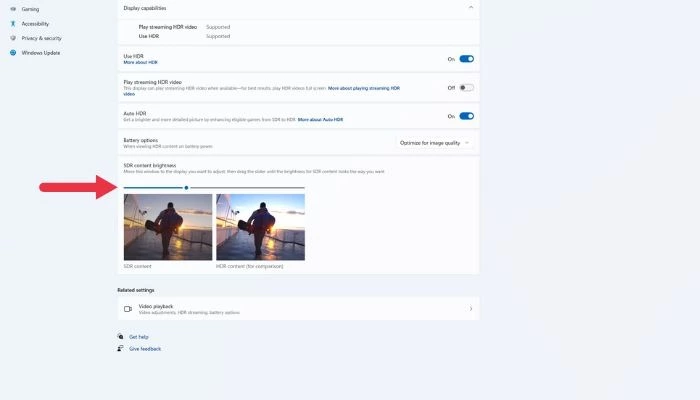
Если SDR-контент выглядит размытым или слишком темным при включенном HDR, вы можете отрегулировать относительную яркость этого контента, не затрагивая HDR-контент.
- На вашем ПК перейдите в «Пуск -> Настройки -> Система -> Дисплей.»

- Выберите монитор, который вы хотите настроить. Если у вас подключен только один монитор, этот шаг можно пропустить.
- Если HDR еще не включен, установите переключатель рядом с «Использовать HDR»; в противном случае нажмите на слово «HDR», чтобы продолжить.
- В разделе «Яркость SDR-контента» перетащите ползунок, как показано в окне примера, пока вас не устроит внешний вид SDR— и HDR-контента.
- Если вам удается добиться удовлетворительного вида SDR-контента в режиме HDR, вы можете оставить HDR включенным постоянно.

Проверьте настройки монитора
Если регулировка внешнего вида SDR-контента при активированном HDR не позволяет добиться нужного качества изображения, возможно, вам потребуется изменить настройки монитора в дополнение к настройкам, доступным в Windows.
Для начала стоит сбросить настройки изображения на стандартные. Если это не очевидно из экранного меню монитора, обратитесь к его руководству за инструкциями.
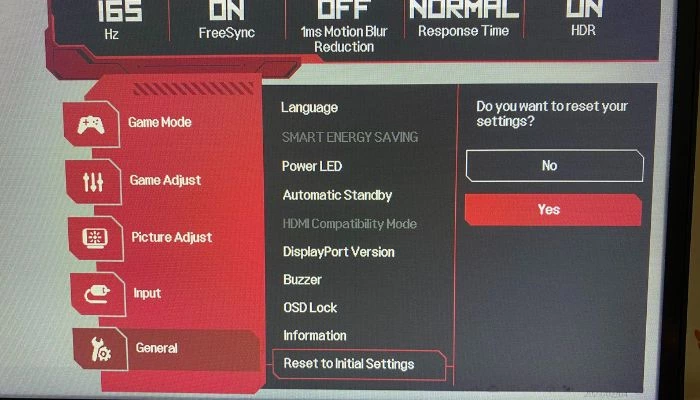
Вернитесь к ползунку SDR/HDR в настройках Windows и отрегулируйте его как можно ближе к желаемому уровню.
После этого отрегулируйте настройки яркости, контрастности и цвета монитора, чтобы пройти оставшийся путь.
Проверьте настройки HDR в приложении
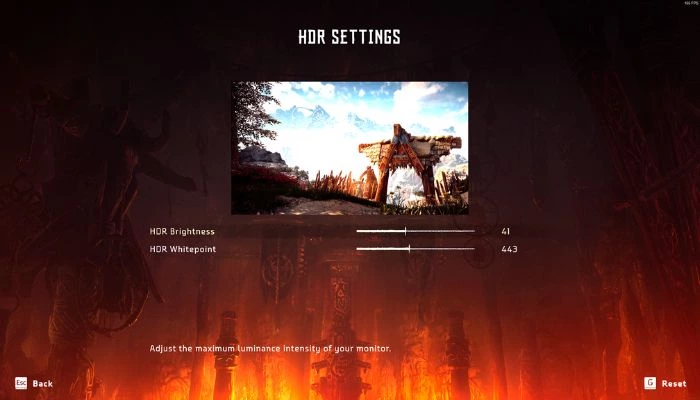
Многие игры и некоторые приложения для мультимедиа имеют свои собственные инструменты калибровки HDR. Обычно там есть образец изображения и элементы управления, позволяющие настроить пиковую яркость, уровни серого и т.д.
.
Если игра с поддержкой HDR выглядит неправильно, откройте ее графические настройки и проверьте параметры HDR, а затем следуйте инструкциям в этом меню, чтобы получить изображение, задуманное создателем.
Используйте приложения Auto HDR
Если вы используете Windows 11, у вас есть доступ к функции, известной как «Auto HDR». Это та же функция, что и в последних консолях Xbox. По сути, Windows вводит данные изображения HDR в конвейер рендеринга игры, предлагая очень HDR-подобное изображение, которое могло бы быть таким, как выглядит игра, если бы она была разработана для HDR изначально.
По умолчанию Auto HDR активируется, когда вы включаете HDR. Однако вы можете вручную отключить его в том же меню HDR, где вы настраивали ползунок SDR-изображения.
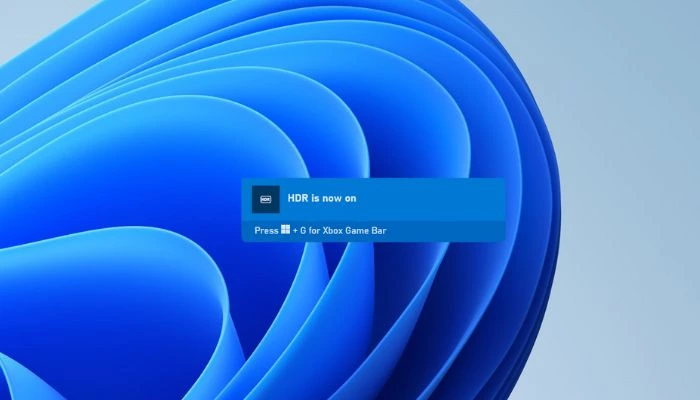
Чтобы воспользоваться преимуществами Auto HDR, не нужно делать ничего особенного. Если функция HDR включена, Windows 11 автоматически применит Auto HDR к играм, которые ее поддерживают. Что касается того, какие игры поддерживают эту функцию, то это меняется со временем. PC Gaming Wiki поддерживает список Auto HDR Games, но вы также можете просто запустить игру без HDR с включенным HDR, и Windows сообщит вам, включен ли Auto HDR, во всплывающем окне.
Не думайте, что раз некоторые SDR-игры выглядят плохо с включенным HDR, то все они будут выглядеть плохо. В большинстве случаев Auto HDR выглядит просто великолепно!
Плохая производительность HDR
Если вы использовали все вышеупомянутые настройки, а HDR по-прежнему выглядит ужасно по сравнению с выключенным HDR, скорее всего, HDR-возможности вашего монитора просто не очень хороши.
Это может быть тяжелой пилюлей, особенно если вы потратили значительную сумму на отличный игровой монитор или монитор для создания контента. К сожалению, основные стандарты HDR настолько нечеткие, что многие мониторы технически могут заявлять о поддержке HDR, хотя на самом деле они не могут достичь контрастности и яркости, необходимых для того, чтобы считаться настоящим HDR.

При поиске монитора, который будет отлично смотреться с HDR, вам нужно что-то с высокой пиковой яркостью (желательно 1000 нит или лучше) и технологией панели, которая может обеспечить достаточную контрастность. Это означает технологию подсветки с множеством отдельных зон затемнения или OLED, которая позволяет достичь истинно черного цвета, как технология эмиссионных дисплеев.
Мониторы, сертифицированные для более продвинутых стандартов HDR, таких как Dolby Vision или HDR10, заслуживают внимания, поскольку эти дисплеи должны пройти проверку, чтобы получить эти блестящие наклейки.
Часто задаваемые вопросы
Как HDR может быть полезен для настольных компьютеров, а не для просмотра фильмов или игр?
HDR – это технология, которая позволяет отображать более широкий диапазон цветов и более высокий коэффициент контрастности, что приводит к созданию более реалистичных изображений. Она может быть особенно полезна для настольных компьютеров при работе с изображениями высокого разрешения или редактировании видео, особенно при создании HDR-контента.
Может ли окружающее освещение улучшить HDR на моем компьютере?
Окружающее освещение, или освещение в комнате, где вы используете компьютер, может повлиять на восприятие HDR-контента на экране. В целом, лучше всего использовать компьютер в хорошо освещенной комнате с равномерным освещением, так как это поможет уменьшить блики и отражения на экране и облегчит восприятие всего спектра цветов и коэффициентов контрастности, которые может предложить HDR-контент.
Однако если окружающее освещение в комнате слишком яркое или неравномерное, оно может размыть цвета на вашем дисплее и затруднить восприятие всех преимуществ HDR. В таких случаях может быть полезно отрегулировать освещение в комнате или использовать защитный экран или бленду, чтобы уменьшить видимые блики.
Работает ли HDR с Gsync и другими подобными технологиями?
Да, контент с высоким динамическим диапазоном (HDR) можно отображать с помощью дисплеев G-Sync или аналогичных технологий. G-Sync – это технология, разработанная NVIDIA, которая помогает синхронизировать частоту обновления дисплея с частотой кадров отображаемого контента, уменьшая разрывы экрана и улучшая общее визуальное восприятие.
Чтобы использовать HDR с G-Sync или аналогичными технологиями, дисплей и видеокарта должны поддерживать HDR, а дисплей должен быть настроен на прием HDR-входа. Обычно это включает включение HDR в настройках дисплея и, в некоторых случаях, подключение HDR-совместимого кабеля.
В этой публикации, друзья, рассмотрим, как включить и настроить HDR в Windows 11. Это технология, улучшающая качество изображения на экране за счёт расширенного диапазона яркости, глубины цвета и контрастности. Детально об этой технологии, о том, что нужно для её использования, рассказано в статье «Что такое технология HDR». Если имеется всё то, что нужно для HDR – HDR-экран, фильм, игра и прочий контент с поддержкой HDR, самое время включить в Windows 11 эту технологию, ибо по умолчанию она отключена. При необходимости можем включить ещё и функцию Auto HDR для реализации HDR в играх без поддержки этой технологии. И можем настроить HDR в Windows 11.
Дисклеймер: друзья, включение HDR в Windows 11 не всегда работает корректно на всех мониторах, телевизорах и экранах ноутбуков. В некоторых случаях активация HDR может привести к искажению цветов, снижению производительности или увеличению энергопотребления. Возможно, потребуется настройка видеокарты в её фирменном ПО и экрана в его аппаратном меню или фирменном ПО.
Для включения HDR можем использовать системные настройки Windows 11. Запускаем приложение «Параметры». В нём идём по пути:
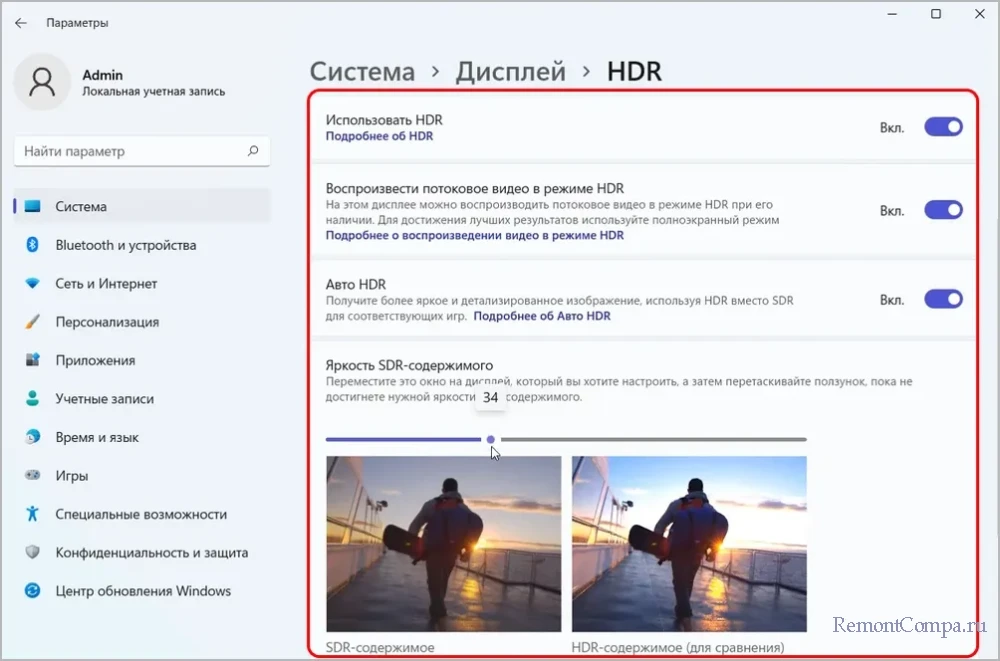
Включаем настройку «Использовать HDR». И заходим в её настройки.
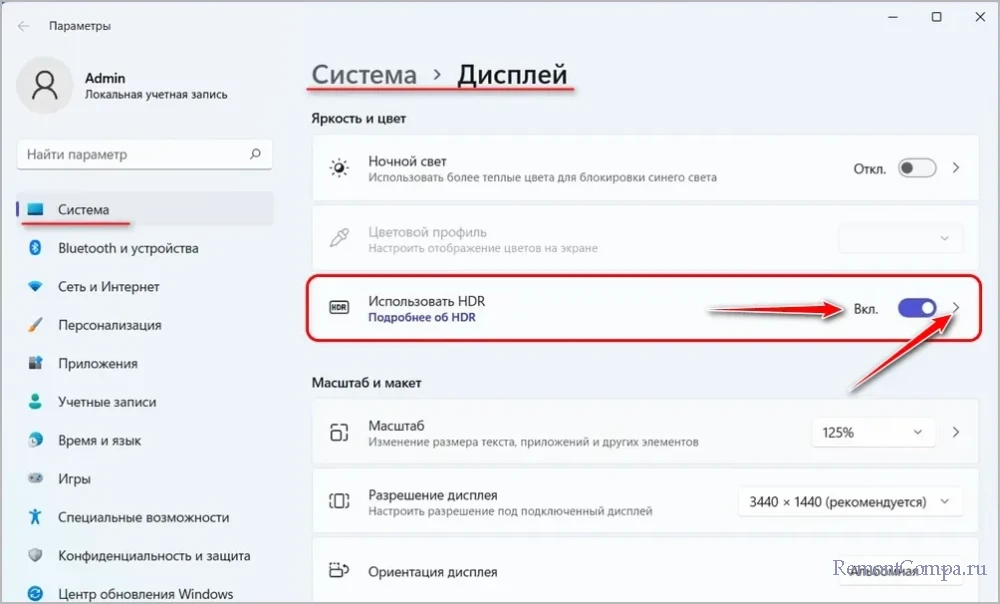
Здесь включаем две другие настройки HDR. Одна — это «Воспроизвести потоковое видео в режиме HDR», с ней всё понятно. Другая – «Auto HDR», это функция, автоматически преобразовывающая обычный диапазон яркости SDR в расширенный HDR в играх без поддержки HDR. После включений используем настройку «Яркость SDR-содержимого» и с помощью её ползунка яркости корректируем яркость в режиме сравнения SDR и HDR.
Включить HDR также можно в настройках системной игровой панели Windows 11 Game Bar. Запускаем её клавишами Win+G (при этом должно быть активно хоть какое-то окно, а не системный рабочий стол). Жмём настройки Game Bar.
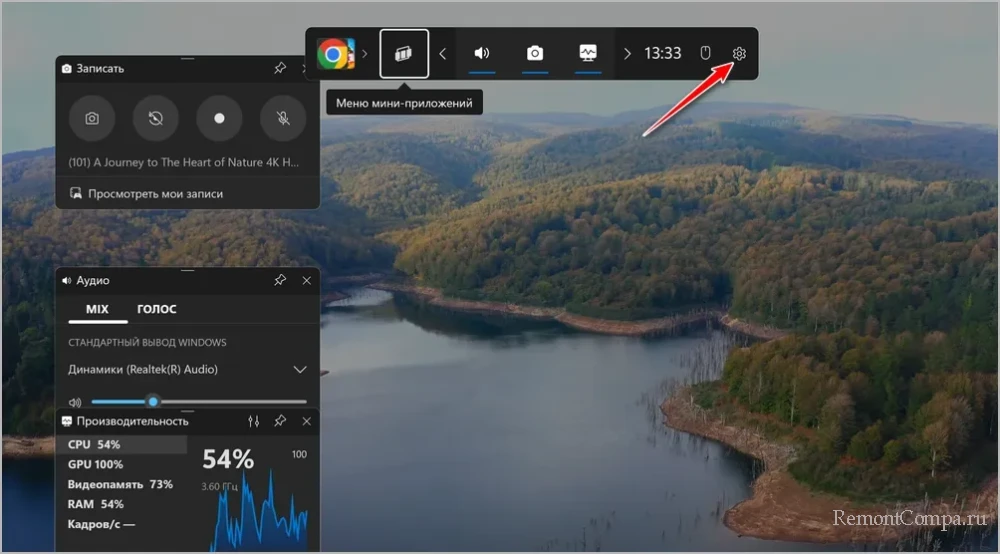
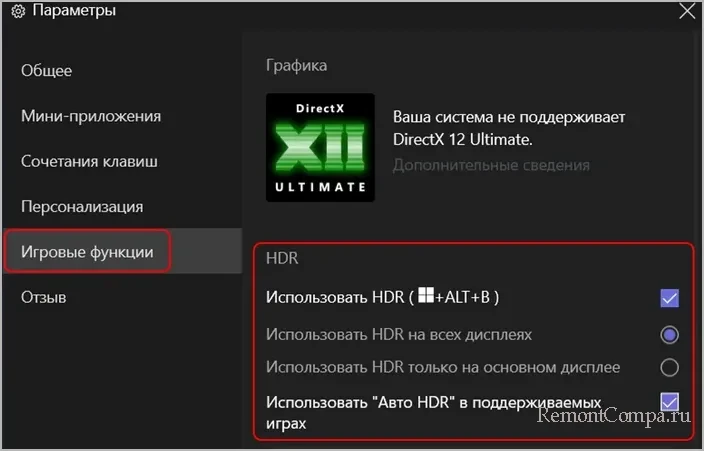
В настройках нам нужен раздел «Игровые функции». Устанавливаем галочки использования HDR и Auto HDR. Можем указать, хотим мы использовать HDR на всех дисплеях, либо только на основном. И можем обратить внимание на горячие клавиши включения/отключения HDR – Win+Alt+B.
Тонко настроить HDR под свои предпочтения можно с помощью бесплатного приложения из Microsoft Store — Windows HDR Calibration.
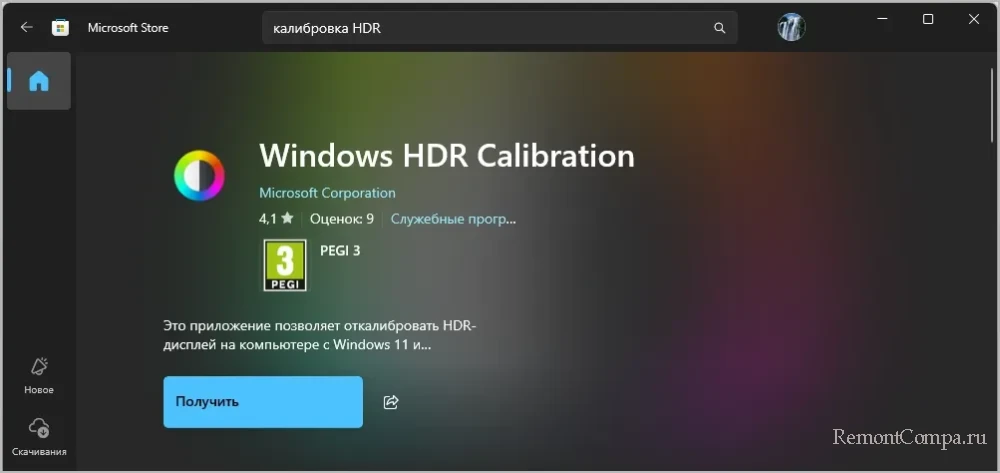
Это приложение от Microsoft, предназначенное для точной настройки HDR-экранов. Оно позволяет откалибровать яркость, контрастность и цветопередачу, чтобы обеспечить максимально корректное и реалистичное отображение HDR-контента. По итогу настроек нам будет предложено создать их профиль. Вводим любое имя профиля.
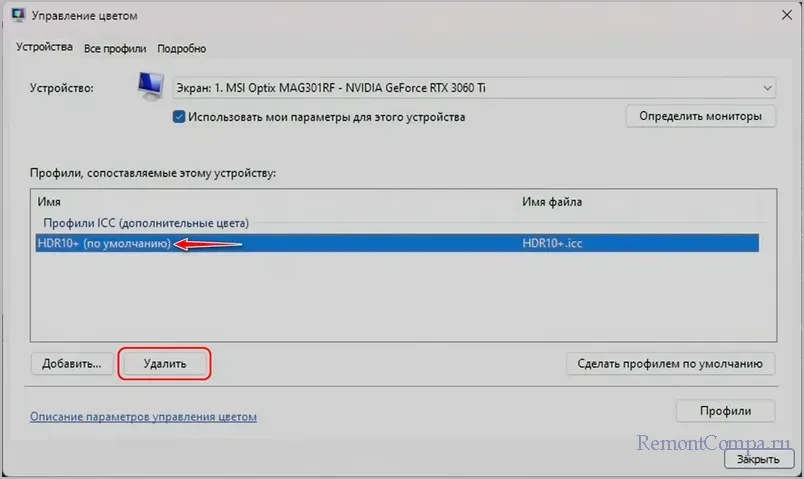
Впоследствии, если настройки окажутся неудачными, этот профиль можем удалить. И настроить всё по новой. Удаляется профиль в свойствах видеокарты. В приложении «Параметры» открываем путь:
Система → Дисплей → Расширенные настройки дисплея
Кликаем свойства видеоадаптера. Во вкладке «Управление цветом» жмём «Управление цветом».
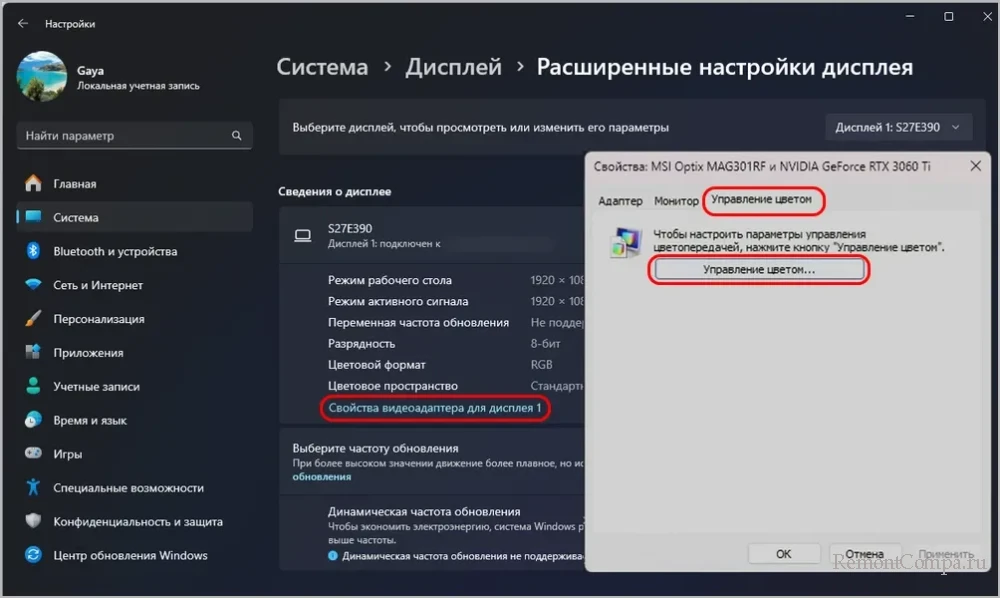
Кликаем созданный ранее профиль и жмём для него кнопку «Удалить».