
Добро пожаловать на WiFiGid! Если вы получили ошибку ATTEMPTED WRITE TO READONLY MEMORY, значит что-то в вашей системе пытается записать какую-то информацию в защищенный сегмент памяти, доступной только для чтения. Так как проблема вызывает синий экран, зачастую она связан с работой железа (аппаратной поломкой, кривым драйвером, неверной настройкой). В этой статье мы и попробуем побороть эту ошибку
Ошибка не указывает явно на проблему, поэтому придется пробовать все. Если она стала появляться после установки какого-то железа, чистки системы, работы с драйверами, установкой программы или игры – возможно, дело в этом. Но об этом можете знать только вы. Свои способы разрешения можно писать в комментариях, это поможет другим участникам!
Содержание
- Шаг 1 – Драйверы
- Шаг 2 – Проверяем память
- Шаг 3 – Целостность системы
- Шаг 4 – Программы и игры
- Шаг 5 – Вирусы и антивирусы
- Шаг 6 – Сброс BIOS
- Другие мысли
- Задать вопрос автору статьи
Шаг 1 – Драйверы
Первым этапом обновите все драйвера в системе на актуальные. Уверен, вы это и сами можете сделать:
- Зайти в Диспетчер Устройств (можно нажать правой кнопкой мыши по кнопке Пуск и выбрать Диспетчер Устройств), просмотреть все устройства. Если есть какие-то с восклицательными знаками – правой кнопкой мыши, «Обновить драйвер». Но Windows не всегда отдает самые новые драйвера.
- Далее идем на сайты производителя своего железа (больше думаем в сторону материнской платы) и скачиваем оттуда все актуальные драйвера. Производитель материнок обычно не отдает самые свежие версии, но зато они, как правило, оттестированы и работают надежно.
- Ну и можно вообще обновить все драйвера на последние версии. Для этого можно использовать, например, DriverPack Solution или Driver Booster. Но будьте осторожны, скачивайте только с официальных сайтов и читайте, чтобы вам они не устанавливали лишний софт, вам нужно всего лишь обновить драйверы.
После тотального обновления не забудьте перезагрузить компьютер. Так как драйверная проблема при этой ошибке возникает чаще всего, здесь и стоит заморочиться дольше. Но помним, что какой-то новый драйвер как раз и может вызывать проблему из-за какой-то ошибки, так что нужно проверять работу и с надежными драйверами, и с новыми.
Шаг 2 – Проверяем память
Так как ошибка возникает именно при работе с памятью, есть смысл ее проверить полностью. А вдруг проблема именно в ней, так что проще будет заменить модуль.
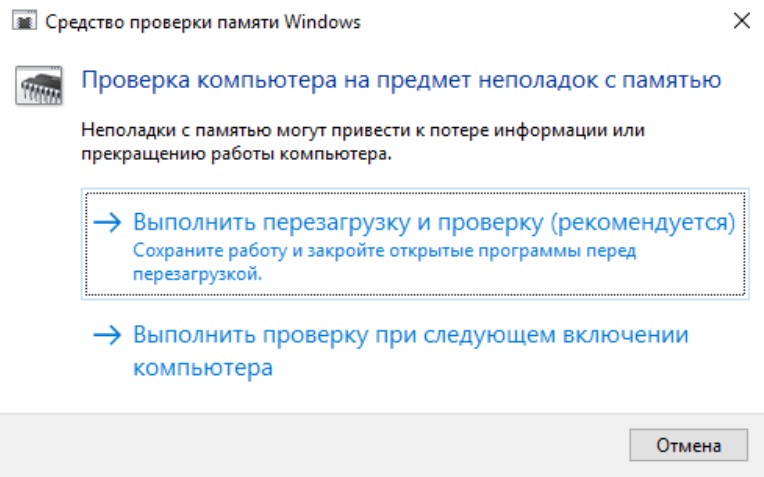
Первым этапом пользуемся штатной утилитой проверки.
- Запускаем «Выполнить» ( + R).
- Исполняем команду mdsched.exe.
- Появится сообщение о необходимости перезагрузки для проверки памяти. Соглашаемся и ждем результата.
Ну а кто опытнее, знают, что лучше прогонять оперативку с помощью MemTest86. Но на это у нас есть отдельная статья, тоже можно заморочиться, чтобы исключить проблемы на стороне оперативной памяти.
Проверка оперативной памяти
Шаг 3 – Целостность системы
Если предыдущие этапы не дали никакого эффекта, есть вариант стандартно проверить систему на целостность. Если вдруг какой-то файл был поврежден, система его восстановит.
- Запускаем командную строку от имени администратора (правой кнопкой по кнопке Пуск и выбираем там командную строку, Терминал или даже Windows PowerShell).
- Последовательно выполняем следующие команды:
chkdsk c: /f /r
sfc /scannow
DISM /Online /Cleanup-Image /RestoreHealth
Смотрим, чтобы не было никаких ошибок. А если на каком-то этапе как раз ошибка и появится, это будет лишний вариант для поиска реального источника проблемы.
Шаг 4 – Программы и игры
В начале я упомянул, что какие-то установленные на днях программы и игры могут вызывать эту ошибку. Просто, потому что криво работают. Напрягаем память, и если что-то подобное было, удаляем их из системы, а при необходимости ищем замену.
Если занимались разгоном процессора, видеокарты, памяти – сделайте все обратно
Шаг 5 – Вирусы и антивирусы
Кто может блокировать доступ к памяти? Интуиция подсказывает, что это какой-то особенный софт, которому нужен глубокий системный доступ. Раз это не драйверы (мы их рассмотрели на первом шаге), остаются подозрения в сторону вирусов и антивирусов, которые как раз и пытаются залезть поглубже, чтобы сработать на опережение. Поэтому:
- Сначала постарайтесь прогнать компьютер на вирусы. Например, с помощью того же Dr.Web CureIt! можно проверить систему до загрузки операционной системы. Если там была какая-то реальная зараза, очень здорово помогает.
- А теперь пробуем с другой стороны. Если у вас какой-то внешний антивирус, можно попробовать его удалить и проверить работу систему (установить заново всегда успеете).
Шаг 6 – Сброс BIOS
На работу железа еще может влиять настройка BIOS:
- Если залезали туда и что-то меняли, особое внимание (например, включена система Intel VT-d).
- Если занимались разгоном, тоже повышенное внимание.
- А еще видел случаи, когда система автоматом сама обновляла биос на ноутбуке, а обновление выходило с проблемами.
Во всех вариантах решение простой – зайти в BIOS и сбросить его настройки на умолчания:
Как сбросить BIOS
Другие мысли
Напоминаю, что вы можете написать историю своей борьбы с ошибкой в комментариях, потому что здесь действительно сложно найти решение в лоб. Конечно, можно попытаться восстановить систему или полностью переустановить Windows, но зачастую это может и не помочь, а дел нужно проделать много.
BSOD ATTEMPTED_TO_WRITE_TO_READONLY_MEMORY в Windows 11, 10
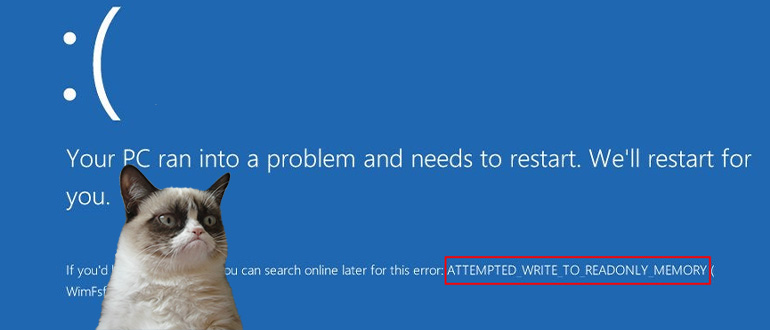
Снова разбираемся с очередной ошибкой, на этот раз затронем BSOD с кодом ATTEMPTED TO WRITE TO READONLY MEMORY. Неполадка затронула Windows 11, 10 и Server 2019, 2022. В самой проблеме уже зашита подсказка, что попытка записи или чтения памяти оказалась безуспешной. Конечно, это очень расплывчатое представление о проблеме, да и подобные сведения часто оказываются неприменимыми к реалиям. В этот раз сбой тоже может носить разные причины, да и проявляется различными способами.
Ошибка ATTEMPTED TO WRITE TO READONLY MEMORY может быть связана с различными кодами, а также ссылаться на некоторые файлы. Порой дополнительно могут фигурировать в сообщениях: 0x000000be, win32kbase.sys, ntfs.sys, ntoskrnl.exe. Если же заглянуть сейчас в системный отчет, то с большой долей вероятности можно найти следующее сообщение: «Операция ввода-вывода, инициированная реестром, завершилась неустранимым сбоем. Реестру не удалось очистить куст (файл)».
Почему появился BSOD:
- перегрев процессора и других комплектующих;
- повреждение оперативной памяти;
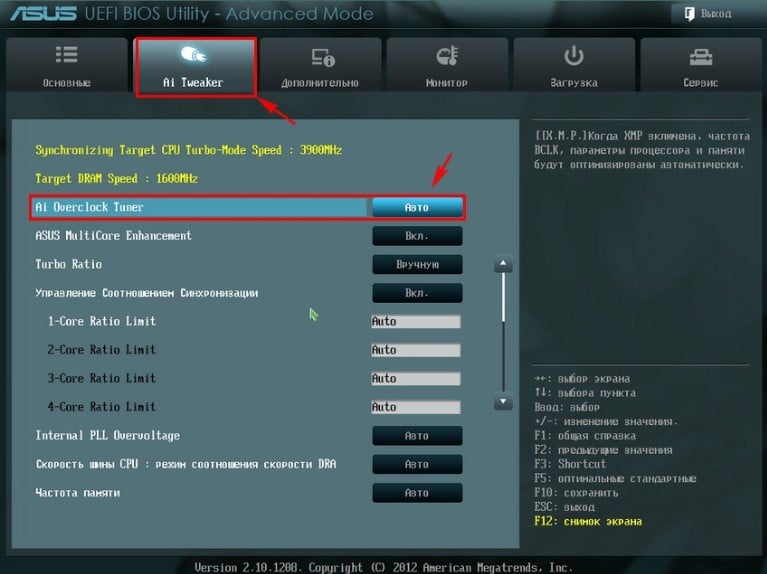
- неправильно настроенный XMP-профиль памяти;
- устаревшая версия BIOS;
- неисправность значений и ключей в реестре;
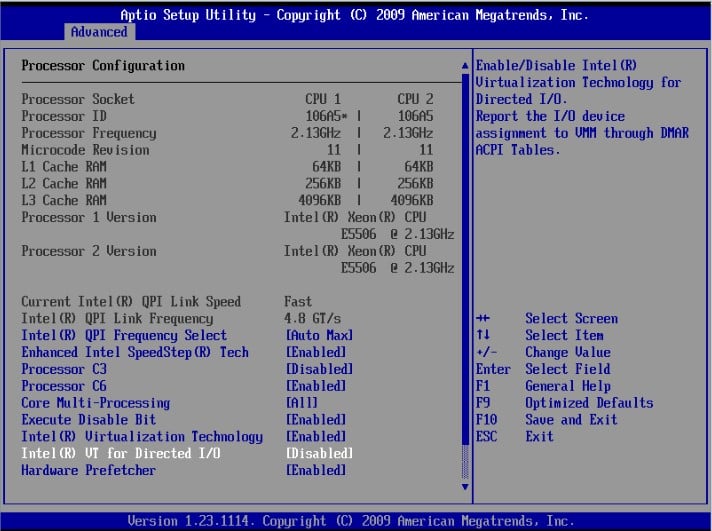
- проблема с виртуальным пространство и технологией Intel VT-d;
- несовместимость драйвера.
Как исправить ATTEMPTED TO WRITE TO READONLY MEMORY?
Исправлением для данного BSOD послужит устранение первопричины ошибки. Главная проблема в том, что мы не знаем, по какой именно причине произошел сбой в конкретном случае. Остается только пробовать решения в порядке от самых простых до более сложных. Что-то из перечисленного имеет хорошие шансы на успех.
Руководство по устранению BSOD:
- Проверить датчики. Следует провести стресс-тест через любую доступную утилиту, чтобы определить, не подвержена ли ваша система перегреву одной из комплектующих. Речь может идти о процессоре или видеокарте, как самых мощных источниках тепла. Важно обращать внимание на пиковую температуру. Если она достигает 80+ градусов, следует задуматься о дополнительном охлаждении.
- Восстановить реестр. С помощью специальных утилит можно в автоматическом режиме выполнить восстановление. Одна из самых популярных программ – CCleaner. На самом деле лучше было бы использовать резервный куст с этого же компьютера, но обычно его никто не создает заблаговременно.
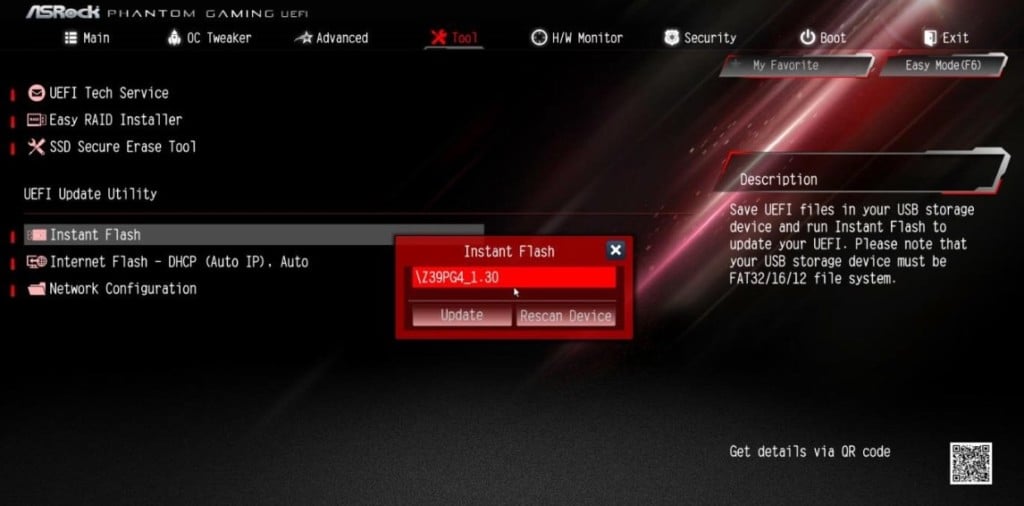
- Обновить BIOS. Особенно актуально для тех, у кого синий экран смерти появляется при попытке обновить Windows 11 или 10. Устаревшая версия BIOS является частым виновником. Процедура довольно простая: скачать прошивку с официального сайта разработчиков, загрузить на флешку, зайти в BIOS или UEFI и выбрать соответствующий пункт. Обычно он так и называется Update BIOS.
- Отключить Intel VT-d. По каким-то причинам, технология виртуального пространства порой выдает сбои и ее выключение помогло части пользователей. Предлагаем перейти в UEFI и выключить систему Intel VT-d, установив для нее значение Disable.
- Проверить оперативную память. С помощью Memtest86 следует просканировать ОЗУ. Еще более важный момент для тех, у кого в журнале событий числятся какие-то ошибки по видеокарте, так как ГПУ тянет часть ОЗУ, в последней может быть проблема.
- Настроить профиль XMP. Очень часто неполадка заключается в неправильных таймингах, а также в завышенной тактовой частоте. Следует опытным путем снижать скорость работу ОЗУ в поисках более стабильного режима. Также следует подобрать оптимальные тайминги для всех планок оперативной памяти. Все перечисленное выполняется через интерфейс BIOS.
- Отключить посторонние драйвера. Известно, что некоторые версии драйверов Kaspersky мешают обновить Windows 10, а также перейти к Windows 11 и Server 2022. И это далеко не единственный драйвер, который был замечен в подобных неполадках. Разумно на время отключить дополнительное оборудование, а также выключить вспомогательное программное обеспечение.
Как показывает практика, указанные выше решения должны повергнуть BSOD ATTEMPTED TO WRITE TO READONLY MEMORY в Windows 11, 10. В большинстве случаев мы предполагаем появление положительного эффекта. Однако мы нуждаемся в ваших комментариях, которые подтверждают или опровергают эффективность методов.
Top 8 Ways to Fix Windows 11/10 Attempted Write to Readonly Memory BSOD Error
Windows 11/10 BSOD error is no longer new to many Windows users. The «Attempted Write to Readonly Memory» BSOD error is still a troublesome issue for most ordinary Windows users to fix. Right here below, you’ll find X reliable solutions, and you can follow anyone to resolve the Windows 11/10 Attempted_Write_to_Readonly_Memory BSOD error.
A quick overview of all four troubleshooting methods of attempted write to readonly memory BSOD error:
| Workable Solutions | Step-by-step Troubleshooting |
|---|---|
| Fix 1. Rebuild MBR | Download and launch EaseUS Partition Master on a new PC which runs the same system as yours…Full steps |
| Fix 2. Enter Safe Mode | Restart your PC by pressing the Power button. Once the related options show up, hold the «Shift» key…Full steps |
| Fix 3. Check RAM | Press Win + R to open the Run dialog box. Type mdsched.exe in the blank area…Full steps |
| Fix 4. Run CHKDSK | Press the Windows key and type cmd. Right-click «Command Prompt»…Full steps |
| Other Useful Fixes | Update Device Driver > Uninstall Recent Software > Check for Windows 10 Update > Restore System…Full steps |
«Hi guys, do you know how to restore Windows 10 from BSOD issue with the error message ‘Your PC ran into a problem and needs to restart. We are just connecting some error info, and then we’ll restart for you. If you’d like to know more, you can search online for this error ATTEMPTED_WRITEN_TO_READONLY_MEMORY? I got this message this morning when I tried to open my PC. I waited for the PC to restart, but nothing changed. Then I reboot the PC, and this message popped up once again. Does anyone know how to fix the BSOD error with Attempted Write to Readonly Memory? I don’t even know what the error message means. Please do help me if you just know the solution. Thanks.»
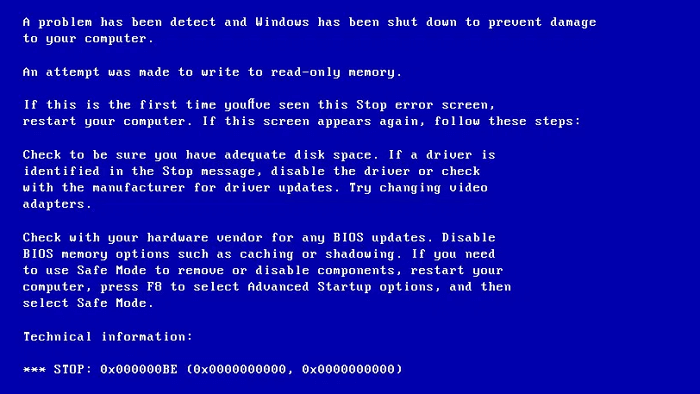
The error 0x000000BE (ATTEMPTED WRITE TO READONLY MEMORY) occurs when a driver tries to write on a read-only segment of your computer’s memory. If the system manages to identify the driver that caused the error, that driver is going to be mentioned near the STOP message on the Blue Screen of Death screen.
The following things could cause 0x000000BE error:
- Faulty or corrupt device driver
- Incompatible firmware software
- Corrupt system services
You can watch this video first to fix the BSOD error:
Let’s see how to fix this BSOD issue and make your Windows 10 Computer back to work normally again now.
Fix 1. Rebuild MBR to Fix Windows 11/10 Attempted Write to Readonly Memory BSOD
Let the best partition manager software — EaseUS Partition Master to help you boot PC and follow the below tips to solve this BSOD issue in Windows 11/10 now. This disk management tool enables you to create a WinPE bootable disk and enter your computer to make it bootable. Besides, it has many highlights:
- Combine partitions to enrich partition space
- Replace an old hard drive with a new one
- Convert basic disk to dynamic or dynamic to basic with ease
- Resize, format, create or delete a partition
Steps to rebuild MBR in Windows 11/10:
Step 1. Create a WinPE bootable disk
- Launch EaseUS Partition Master, and click «Bootable Media» on the toolbar. Select «Create bootable media».
- Click «Next» to finish the process.

Step 2. Boot EaseUS Partition Master Bootable USB
- Connect the bootable USB or CD/DVD to your PC.
- Press F2 or Del when you restart the computer to enter the BIOS screen. Set and boot your computer from «Removable Devices» or «CD-ROM Drive». And then EaseUS Partition Master will run automatically.
Step 3. Rebuild MBR
- Click «Toolkit» and choose «Rebuild MBR».

- Select the disk and the type of MBR. Then, click «Rebuild».

- After that, you can see «MBR has been successfully rebuilt on Disk X».

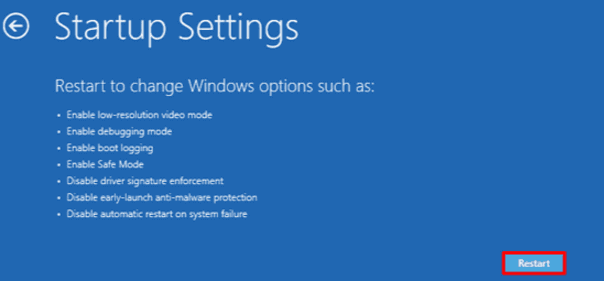
Fix 2. Enter Safe Mode to Fix Attempted Write to Readonly Memory error
Windows 11/10 receives «Attempted Write to Readonly Memory» BSOD error and needs to restart, how to fix? All you need to do is enter the safe mode to fix 0x000000BE if you are unable to enter Windows.
Step 1. Restart your PC by pressing the Power button.
Step 2. Once the related options show up, hold the «Shift» key and press «Restart» simultaneously.
Step 3. Select «Troubleshoot > Advanced options > Startup Settings > Restart». After your computer restart, press 4 or F4 on the keyboard to start your PC in Safe Mode.
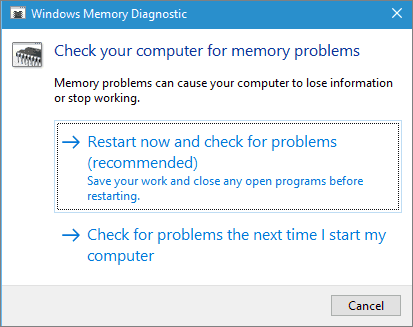
Fix 3. Check Computer’s Memory (RAM) to Fix Windows 11/10 BSOD Error
The error — attempted write to readonly memory is related to the computer’s memory. The lack of storage space on your computer leads to the BSOD. This solution is of vital importance. Follow the steps below to identify whether your PC’s memory is working properly or not.
Step 1. Press Win + R to open the Run dialog box.
Step 2. Type mdsched.exe in the blank area and click OK to proceed.
Step 3. Select the option «Restart now and check for problems» to detect the trouble in the memory immediately.
Then, the Memory Diagnostic Tool will automatically scan your PC. If errors are detected, change the current device with a new one to get rid of BSOD with ATTEMPTED_WRITE_TO_READONLY_MEMORY.
Do you know how to check RAM now? By clicking the buttons below, you can share this guide to let more users know about this method.
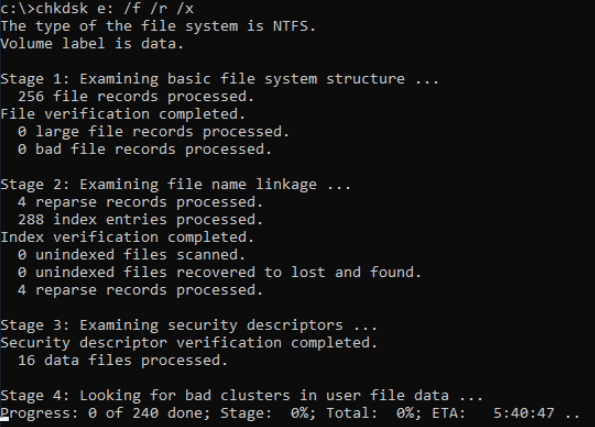
Fix 4. Remove Attempted Write to Readonly Memory BSOD with CHKDSK
System file error and bad sector error could result in this ATTEMPTED_WRITE_TO_READONLY_MEMORY. If the above solutions do not bring any relief, then stay into Safe Mode and run SFC and CHKDSK to repair the bad sectors and faulty system files. You can enter safe mode in Fix 1.
Step 1. Press the Windows key and type cmd.
Step 2. Right-click «Command Prompt» and choose «Run as administrator».
Step 3. Enter the following command:
sfc /scannow
Step 4. Once the scan gets over, run this command
chkdsk E: /f /r /x
«E» means the drive letter of the partition you want to repair.
Also read: Fix SFC/SCANNOW Cannot Repair Error.
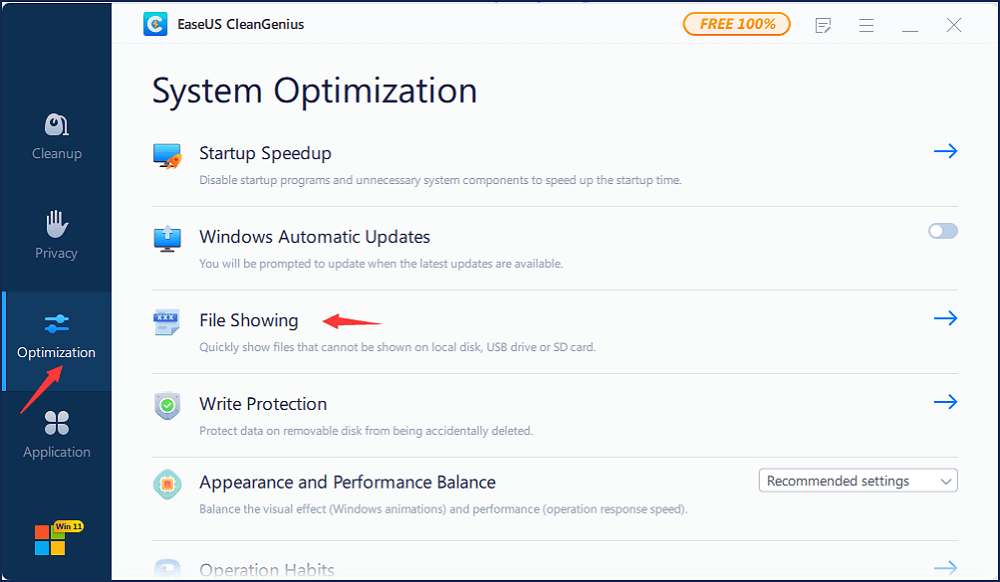
Use CHKDSK Alternative Tool
Download EaseUS CleanGenius and install it on your computer. Let’s start checking and refixing file system error on your device now.
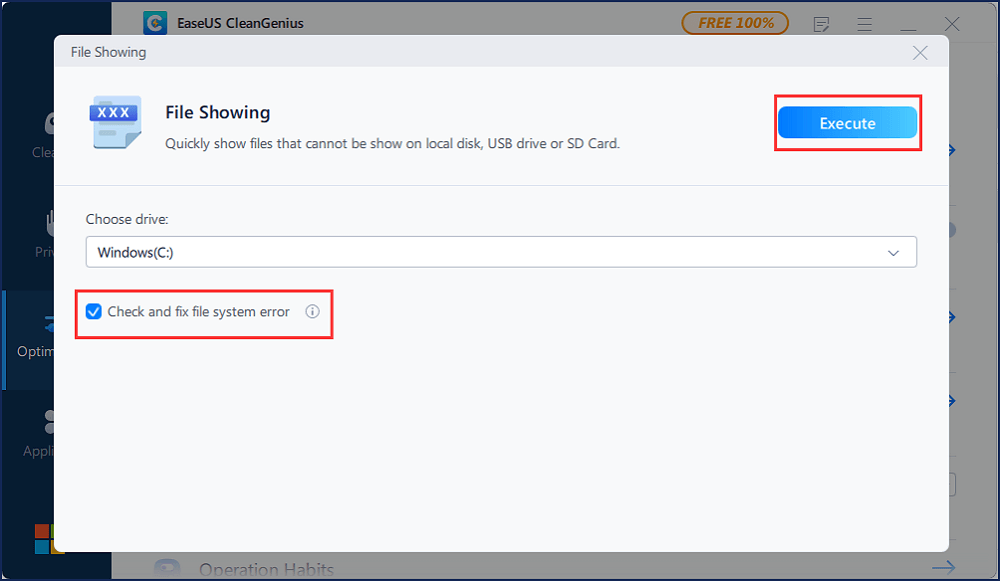
Step 1. Click «File Showing» to enter the next step.
Step 2. Choose the target device and tick the box of «Check and fix file system error». Click «Execute» to start fixing the problematic device.
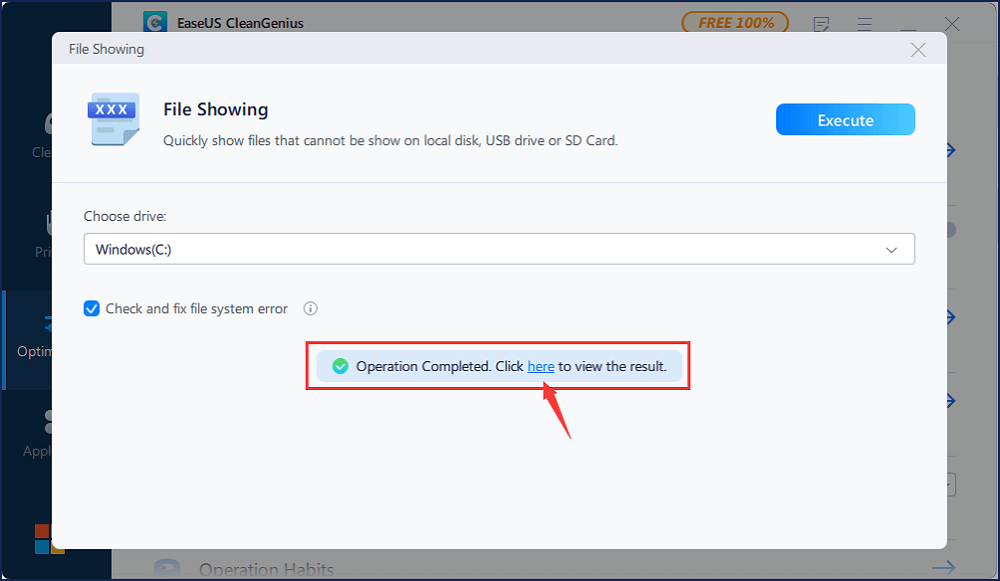
Step 3. When the fixing process completes, click «here» to open and use your device.
Fix 5. Update Device Driver to Fix Attempted Write to Readonly Memory
You need to update the driver after you have entered the safe mode in Fix 1. A faulty or corrupt device driver can cause ATTEMPTED_WRITE_TO_READONLY_MEMORY error. You need to update your device driver to get rid of attempted write to readonly memory in Windows 10.
Steps to update the device driver:
Step 1. Right-click on the Windows icon at the left corner and select «Device Manager».
Step 2. On the Device Manager, check for the problematic driver. Usually, the driver will display a yellow triangle next to the faulty driver.
Step 3. Right-click on the driver and click «update driver».
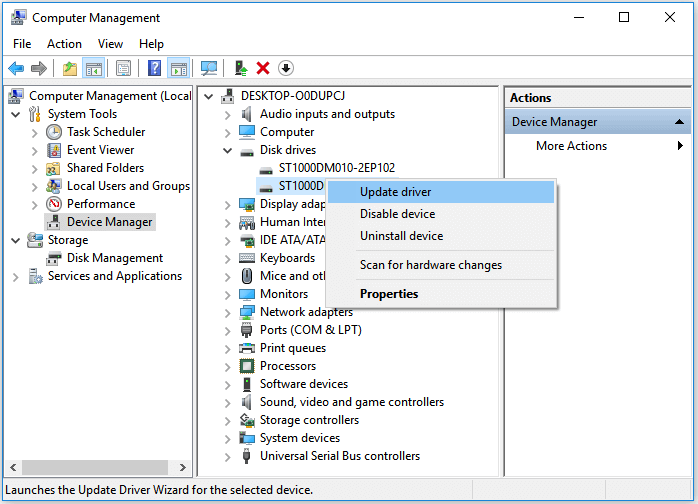
Step 4. Select «Search automatically for updated driver software».
- If Windows doesn’t find a new driver, try to download a new one from the device manufacturers’ website.
- If the update step doesn’t work, right-click each device driver and select «Uninstall».
After this, reboot the PC, and Windows 10 will update or reinstall the drive drivers for you.
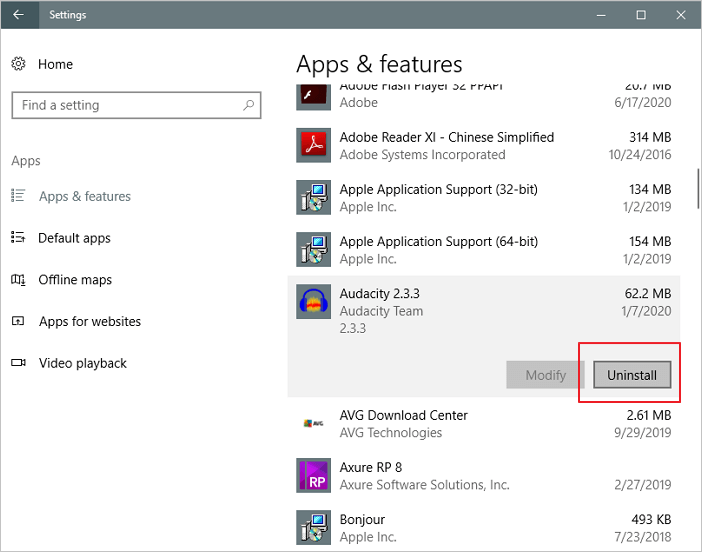
Fix 6. Uninstall Recent Software to Resolve the BSOD Error
The installation of new software on the system may be the possible reason for attempted write to readonly memory. You can resolve Windows 10 attempted write to readonly memory by uninstalling recent software.
Step 1. Open «Settings > Apps > Apps & features».
Step 2. Select the app or game that you want to remove and click the «Uninstall» button.
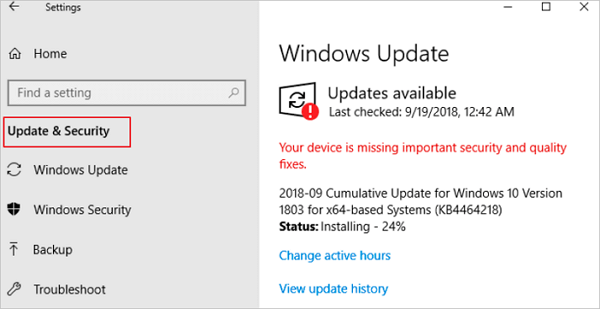
Fix 7. Check for Windows 11/10 Update to Fix 0x000000BE
Another way to fix Windows 10 attempted to write to readonly memory error is by updating Windows. Steps to get the latest Windows update.
Step 1. Click the «Start» icon.
Step 2. Go to «Settings > Update & Security settings > Windows Update».
Fix 8. Remove Attempted Write to Readonly Memory BSOD by System Restore
The last solution that can help you get rid of Attempted Write to Readonly Memory BSOD by System Restore is to perform System Restore.
Also read: How to back up system
Step 1. Turn on Windows and press F8/Shift and click «Repair Your Computer».
Step 2. When Windows repair mode is ready, click OK if it asks you to choose keyboard; Choose your account and click OK if it asks you to choose the account and enter a password if you have one.
Step 3. Choose «System Restore» under System Recovery Options, and you can see all Windows restore points.
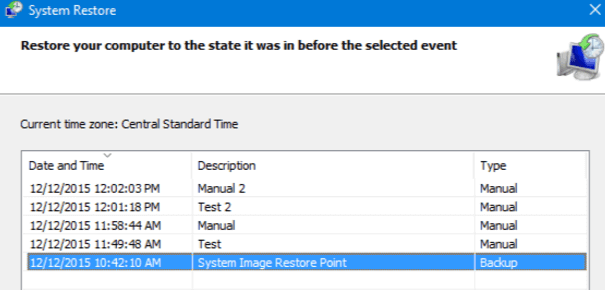
Step 4. Select the right restore point which was created when your computer is safe and sound, and check Show more restore points if you don’t see all restore points.
Step 5. Click «Next». Then all you need is to wait patiently to let it restore all your Windows to the point that you’ve selected.
Conclusion
These eight solutions above can fix the stop code attempted write to readonly memory error perfectly. You can try any one of these solutions to get help. If you still have a problem, you can contact us to get additional help.
May. 23, 2023 / Updated by
Renata to
Windows 10

The «Attempted Write to Readonly Memory» error is a type of blue screen of death (BSOD) error that occurs when the system attempts to write to a read-only memory location, resulting in a system crash. This error can be caused by various reasons, such as problematic device drivers, buggy software, corrupted system files, or damaged hardware. Here are some effective methods to fix this error and get your system working again:
Method 1: Restart your Computer
Method 2: Update Device Drivers
Method 3: Run System File Checker (SFC)
Method 4: Run Memory Diagnostic Tool
Method 5: Clean Boot your Computer
Method 6: Check your Hard Drive
Method 7: Perform a System Restore
Method 1: Restart your Computer
The first and easiest method to fix the «Attempted Write to Readonly Memory» error is to restart your computer. Sometimes, a simple restart can help resolve system glitches that cause BSOD errors. To restart your computer, follow these steps:
1. Click the Start button.
2. Click the Power button.
3. Click Restart.
4. Wait for your computer to restart.
Method 2: Update Device Drivers
A faulty or outdated network adapter driver can cause issues with attempted write to readonly memory.
Many computer problems are difficult to tackle. When users are having troubles to fix corrupted repositories or missing Windows files, their computer operating systems may be already broken.
It is highly recommended to download a driver updater—-Driver Talent which is free for scanning computers and providing updated driver.
1. Download and install Driver Talent
Download Driver Talent
2. Click on the «Scan» button to scan your computer for outdated, missing, or corrupt drivers.
3. Once the scan is complete, you will see a list of all the problematic drivers on your computer.
4. Click on the «Download» button next to the driver you want to update or install.
5. Wait for the download to finish, then click on the «Install» button to install the new driver on your computer.
6. You can also use Driver Talent to backup and restore your drivers or to uninstall unwanted drivers.
7. Once you have installed all the necessary drivers, restart your computer to apply the changes.

Method 3: Run System File Checker (SFC)
System File Checker (SFC) is a built-in tool in Windows 10 that scans and repairs corrupt or damaged system files. Running SFC might resolve the «Attempted Write to Readonly Memory» error caused by corrupted system files. To run SFC, follow these steps:
1. Click the Start button.
2. Type «cmd» in the search box.
3. Right-click on «Command Prompt» and select «Run as administrator».
4. Type the following command and press Enter: sfc /scannow
5. Wait for the scanning process to complete.
6. Restart your computer.
Method 4: Run Memory Diagnostic Tool
The «Attempted Write to Readonly Memory» error could also be caused by faulty RAM. The Memory Diagnostic Tool is a built-in tool in Windows 10 that checks your computer’s memory for errors. To run the Memory Diagnostic Tool, follow these steps:
1. Click the Start button.
2. Type «memory» in the search box.
3. Click «Windows Memory Diagnostic».
4. Click «Restart now and check for problems».
5. Wait for the computer to restart and run the memory test.
6. Once the test completes, Windows will automatically restart.
Method 5: Clean Boot your Computer
A clean boot starts your computer with the minimum number of drivers and startup programs. Performing a clean boot can help identify if any third-party software is causing the «Attempted Write to Readonly Memory» error. To perform a clean boot, follow these steps:
1. Press the Windows key + R.
2. Type «msconfig» in the Run dialog box and press Enter.
3. Click on the «Services» tab.
4. Check the box for «Hide all Microsoft services».
5. Click on the «Disable all» button.
6. Click on the «Startup» tab.
7. Click on «Open Task Manager».
8. Disable all the startup items.
9. Close Task Manager and click on «OK» in the System Configuration dialog box.
Method 6: Check your Hard Drive
The «Attempted Write to Readonly Memory» error could also be caused by a faulty hard drive. It is recommended to check your hard drive for errors and bad sectors. To check your hard drive, follow these steps:
1. Click the Start button.
2. Type «cmd» in the search box.
3. Right-click on «Command Prompt» and select «Run as administrator».
4. Type the following command and press Enter: chkdsk /f /r
5. Type «Y» to confirm that you want to check the drive the next time you restart your computer.
6. Restart your computer.
Method 7: Perform a System Restore
If the «Attempted Write to Readonly Memory» error started occurring after installing new software or making system changes, a system restore might help resolve the issue. System Restore is a feature in Windows 10 that allows you to revert your system to an earlier point in time. To perform a system restore, follow these steps:
1. Click the Start button.
2. Type «system restore» in the search box.
3. Click on «Create a restore point».
4. Click on «System Restore».
5. Follow the on-screen instructions to restore your system to an earlier point in time.
In Conclusion
The «Attempted Write to Readonly Memory» error is a frustrating issue that can cause your computer to crash repeatedly. However, with the above methods, you should be able to fix the issue and get your system working again. Remember to back up your files before attempting any of these methods to avoid losing your data. If the issue persists, you might want to seek professional help or contact Microsoft support for more assistance.
Recommended Download
|
ExplorerMax |
Driver Talent for Network Card | |||
| Smart and advanced file explorer tool for Windows platforms | Download & Install Network Drivers without Internet Connection | |||
|
30-day Free Trial |
Free Download |
Question
“Hi there! I’ve had my system since forever, but about a month ago, I
started to get BSOD crashes. The error I get all the time says ATTEMPTED
WRITE TO READONLY MEMORY. I think it is related to the RAM, but I’m not
entirely sure, so I’ve uploaded the MEMORY.DMP to be sure if it gets
better but no use. I didn’t have any minidumps and MSinfo32 as well. I am
writing in the hope that someone might help me with this.”
The case you just read is related to the error called
attempted write to readonly memory.
This error is not
common but is most likely to occur. If you are a Windows user and see this
problem, then this article is for you. The article will discuss ways to
remove the error attempted to write to readonly memory and explain the
step-by-step explanation of the methods.
Part 1: What Is «Stop Code Attempted Write to Readonly Memory.»
This error is called 0x000000BE and appears on a blue screen of death. When
you get redirected to the stop error code «Attempted to Write to Read-Only
Memory» at times, a BSOD (Blue Screen of Death) error usually occurs on
Windows 7/8/10. When any of the device drivers try to write to a read-only
memory segment, you end up with this error «Attempted Write to Read-Only
Memory» with the code 0x000000BE, as you can see below screenshot.
What exactly causes the “Attempted to Write to Read-Only Memory” error? The
“Attempted to Write to Read-Only Memory” error can emerge due to multiple
reasons of device driver issues.
One of the primary reasons or causes of the attempted Complications in the
device driver is mainly dangerous and causes an instant to write to read
only memory error. The main reasons causing the error 0x000000BE are:
- The device driver is faulty or corrupt
- Discordant software firmware
- The system services have gone corrupt
Operating system services:
an un-updated operating system or any
corrupted operating system problems on your Windows can bring the 0x000000BE
error.
Firmware or Malware:
Recently updated firmware or malware is another
liable reason for getting a read-only memory error. It means if Windows file
system falls under any virus attack. It will end up with an error message.
Part 2: Tips to Fix Attempted Write to Readonly Memory Windows 11/10/8/7
Before attempt to write to read only memory solutions, the user must boot
the PC into safe mode. The reason is the moment you get the stop code, your
PC will fail to boot to the desktop.
Tip 1: Run Windows Memory Diagnostic
The first fix for attempt to write to read only memory or 0x000000BE error
is to run a memory check.
-
Open the Run utility OR Press Win + R
-
Type mdsched.exe.
-
Press Enter to open the Windows Memory Diagnostic Tool.
-
The option «Restart now and check for problems» appears before you, and it is recommended to select it.
notes
It will immediately detect the
attempted_write_to_readonly_memory windows 10 trouble in the memory. You
should take action to fix issues based on the diagnosis.
Tip 2: Update or Reinstall Drivers in Windows
Attempted_write_to_readonly_memory issues arise when the device drivers are
not compatible with the Windows operating system. Outdated or corrupted
drivers are also responsible for the same problem. You can choose back to
back three options of updating, rolling back, or uninstalling drivers on
your computer.
To Update Drivers Follow The Steps:
-
Click on the start button and choose Device Manager.
-
Select each driver by clicking right and choosing Update Driver.
-
For the safe side, click Search automatically for updated driver software. It will lead you to the manufacturer’s website to download and install a driver for your PC.
To Rollback or Uninstall Drivers Follow The Steps:
-
Go to Device Manager.
-
Double-click each driver one by one; you will see options.
-
Select Roll Back Driver or Uninstall Device, whatever seems feasible.
-
Follow the on-screen instructions to finish your operations.
Tip 3: Uninstall Recently Installed Software
If the error occurs when you recently installed new software. It means the
installed software is creating a problem. The only method is to uninstall
the program and check if it is the cause behind the stop code attempted to
write to read only memory.
Follow the steps:
-
Open Control Panel.
-
Select the software.
-
Click Uninstall a program.
Tip 4: Check for Windows Update
Updating Windows is a reasonable key to fix the stop code attempted write to
readonly memory.
-
Check for Window Updates.
-
If it is not updated, boot the PC to the desktop update Windows using blue screen attempted write to readonly memory.
-
Restart your PC.
Tip 5: Blue Screen Troubleshooter
The last resort to resolve attempted to write readonly memory error is to
use the Blue Screen Troubleshooter option. Ensure the Windows 10 is on in
safe mode.
-
Go to Advanced Startup Settings and enter safe mode.
-
Restart the PC.
-
Go to settings and open Update & security.
-
Select Troubleshoot and then blue screen.
-
Run the troubleshooter.
Part 3: How to Recover Data from Windows with «Attempted Write to Readonly
Memory» Error?
If you are trying the above method, be sure to prepare a backup of your data
to avoid errors that could cause data loss. Also, because of the error
«attempted write to readonly memory», you may be at risk of losing valuable
data. If you are really experiencing this risk and are deeply troubled by
data loss,
Tenorshare 4DDiG
is a
good choice. It can help you get back your lost data quickly and
effectively. Besides, it has many valuable features that help in data
recovery, and these useful features make 4DDiG stand out among other
recovery tools. Download Tenorshare 4DDiG and get back your lost data.
To make full use of 4DDiG data recovery software to ensure your successful
data recovery, please follow these steps.
- Erased Files Recovery
- Organized Drive Recovery
- Lost Partition Recovery
- External Device Recovery
- Crashed Computer Recovery
- Raw File Recovery
-
Open the Tenorshare 4DDiG data recovery software and on the homepage,
select a location from a list of options like Devices and Drives,
Partitions, and Advanced Repair. Then, select the file types that are
missing and click «Start» to scan the folder/location. -
Start a scan to fully find missing files, and you can choose to pause at
any time during the process. -
After the scan is complete, you can preview the files and select the data
you need to recover.
Summary
In the hope, you get all your answers regarding attempted to write read only
memory, here is another remedy for recovering the lost data in the process.
It is a fact that all the fixes given above have equal chances of either
rescuing the situation or crashing the system. This recovery tool is for the
second option when you want your photos, files, documents, videos, and
others back. The
Tenorshare 4DDiG
is the most
recent and technically packed for the reliable, safe, and complete recovery
of the data lost in the process.
William Bollson (senior editor)
William Bollson, the editor-in-chief of 4DDiG, devotes to providing the best solutions for Windows and Mac related issues, including data recovery, repair, error fixes.