
Все способы:
- Вариант 1: Анализ дампа памяти
- Вариант 2: Выполнение общих рекомендаций
- Способ 1: Отключение антивируса
- Способ 2: Переустановка проблемного драйвера
- Способ 3: Отключение загрузки драйвера
- Способ 4: Восстановление целостности файлов
- Способ 5: Проверка оперативной памяти
- Способ 6: Восстановление системы
- Способ 7: Переустановка ОС
- Вопросы и ответы: 0
Вариант 1: Анализ дампа памяти
Лучшим вариантом исправления ошибки станет использование специального файла, генерирующегося при появлении ошибки и называющегося дампом памяти. В нем содержится информация о сбое, благодаря которому пользователь сможет понять, что конкретно стало причиной ошибки. Данный метод подойдет, если синий экран смерти исчезает быстро и вы не успеваете увидеть, что именно вызвало ошибку, или же такая информация попросту не отображается.
Создание дампов памяти при ошибках, вызывающих аварийное завершение работы компьютера, включено в системе автоматически. Если вы не отключали эту функцию, тогда файл будет расположен по адресу C:\Windows\Minidump. Также дамп может быть в корне диска C. Они оба имеют расширение DMP, но называться будут по-разному. Проще и удобнее всего проанализировать его при помощи специального софта, например BlueScreenView. Он поможет быстро понять, какой именно файл провоцирует появление ошибки. Все необходимые инструкции по анализу вы найдете в статье по ссылке ниже. Там же есть инструкция по включению создания дампов памяти — если они у вас сейчас отсутствуют, активируйте функцию и дождитесь следующего BSOD.
Подробнее: Как пользоваться BlueScreenView в Windows 10 и 11
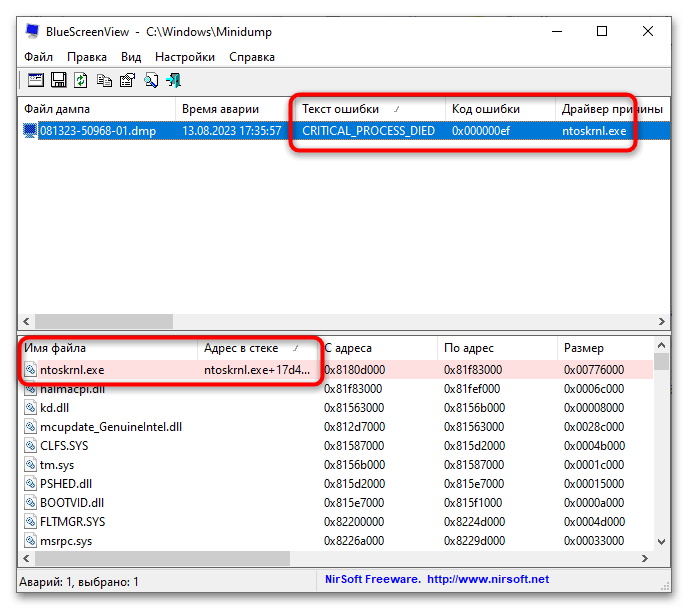
Если у вас установлен любой HEX-редактор или Notepad++, можете открыть DMP-файл через него. В этом дампе следует обратить внимание на такие строки:
BUGCHECK_CODE– код ошибки, указывающий, что именно сломалось. Например, если вы видите код c9, значит, ошибка будет 0xc9 — эту информацию и надо поискать вы интернете, чтобы понять, что именно обозначает данная ошибка. С 0x и начинаются все полноценные коды ошибок, поэтому следует подставлять данные символы в начало.IMAGE_NAME– конкретный драйвер или библиотека, вызвавшие сбой (например, ntoskrnl.exe или dxgmms2.sys).PROCESS_NAME– процесс, который работал в момент сбоя (но не всегда виноват, он вполне мог стать «жертвой» какого-либо сбоя).
Узнав название файла, остается понять, что с ним делать. Тут уже все зависит от того, что в вашем случае вызвало причину, поэтому универсальную инструкцию составить не представляется возможным. Как правило, если виновата программа или драйвер, их следует переустановить, возможно даже выбрав прошлую версию. Если проблема системы, то нужны какие-то конкретные исправления или, опять же, переустановка.
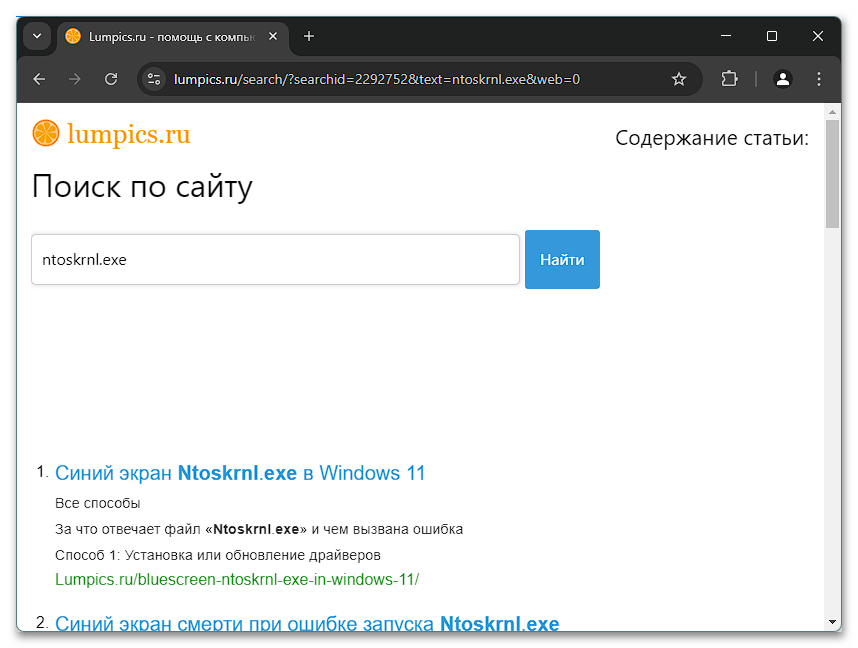
Кстати, некоторые инструкции по устранению тех или иных ошибок, связанных с процессами EXE и SYS вы можете найти на нашем сайте. Достаточно вписать в поиск имя драйвера или библиотеки, которое вы определили как источник неполадки, и посмотреть, есть ли статьи на эту тему.
Вариант 2: Выполнение общих рекомендаций
Когда дамп памяти не выдает конкретных результатов (к примеру, каждый раз вы сталкиваетесь с новыми причинами ошибок и все они кажутся несвязанными друг с другом) и понять причину не удается ввиду отсутствия знаний, стоит попробовать прибегнуть к выполнению тех действий, которые в большинстве случаев исправляют ошибку ATTEMPTED_WRITE_TO_READONLY_MEMORY.
Способ 1: Отключение антивируса
Если какая-то программа устанавливает дополнительное ПО для собственной работы (к примеру, виртуальный драйвер), слишком строгая защита антивируса может воспрепятствовать этому. Это же касается и ситуаций, когда вы сами пытаетесь установить малоизвестный драйвер, будучи уверенными в его безопасности. Чтобы ничего не мешало установке упомянутого и подобного по важности программного обеспечения, отключите антивирус и повторите попытку.
Подробнее: Отключение антивируса
При условии, что после отключения антивируса проблема больше не появляется, лучше всего добавить директорию, куда установлен драйвер, в список исключений защитного софта.
Подробнее: Добавление программы в исключения антивируса
Способ 2: Переустановка проблемного драйвера
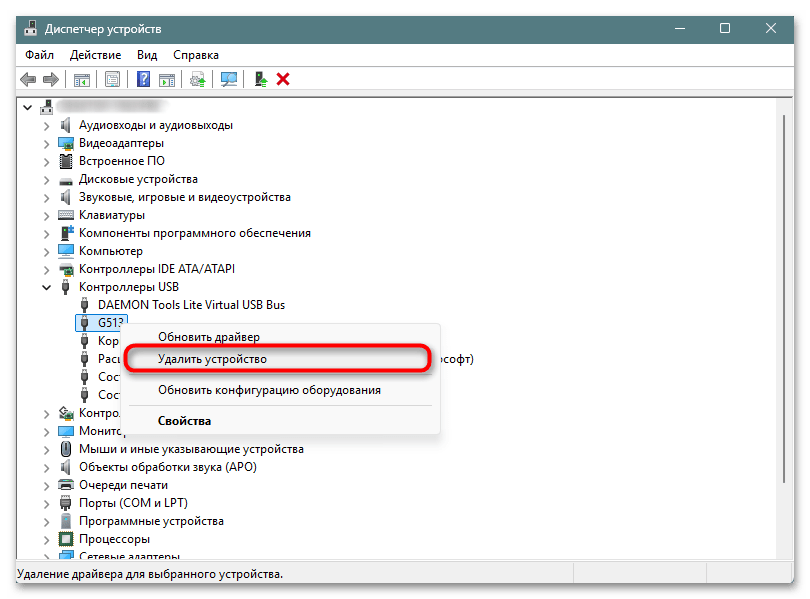
Возможно, драйвер попросту установился некорректно — тогда его следует переустановить, предварительно деинсталлировав предыдущую версию. Процесс удаления зависит от того, что именно за драйвер был установлен. Если это произошло при подключении какого-либо устройства, откройте системное приложение «Диспетчер устройств», найдите там подключенное устройство, кликните по нему правой кнопкой мыши и выберите пункт «Удалить устройство». После этого понадобится перезагрузка ОС и повторное подключение девайса.
Некоторые драйверы могут быть удалены через «Удаление программ», как обычные приложения.
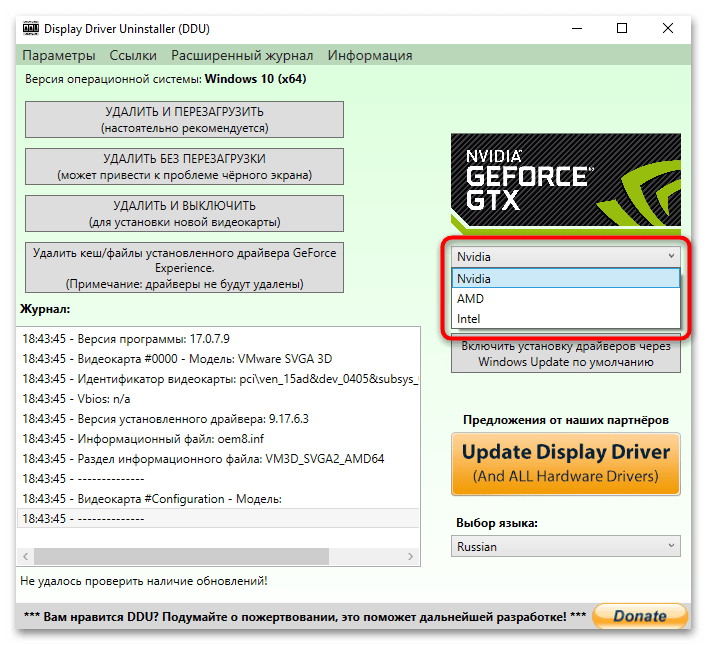
Возможно, в вашем случае сбой вызывает драйвер видеокарты. Его лучше удалить при помощи специальной программы, о чем развернуто рассказано в инструкции по следующей ссылке.
Подробнее: Удаляем драйверы видеокарты
Если вы скачали проблемный драйвер самостоятельно и даже после переустановки он провоцирует ошибку, попробуйте отыскать на сайте производителя одну из предыдущих версий. Есть вероятность, что последняя плохо совместима с вашей конфигурацией, вызывая ошибку.
Способ 3: Отключение загрузки драйвера
Возможно, вы столкнулись с тем, что операционную систему не удается запустить из-за того, что проблемный драйвер стартует вместе с компьютером, вызывая при этом BSOD сразу же, без возможности попасть на рабочий стол. Если на стоп-экране вы видите не только название ошибки, но и что его вызвало, то, зная эти сведения, можно заблокировать запуск драйвера через «Безопасный режим». В нем не работают никакие драйверы за исключением критически важных для ОС, поэтому с большей долей вероятности туда вы сможете попасть. К слову, через него можно попытаться проанализировать дамп памяти, если вдруг файл, вызвавший BSOD, в вашем случае не отображается.
- Запустите «Безопасный режим» через среду восстановления или при помощи флешки с образом Windows. Если не знаете, как это сделать, читайте следующую инструкцию.
Подробнее: Как войти в «Безопасный режим» в Windows 11 (см. Вариант 2)
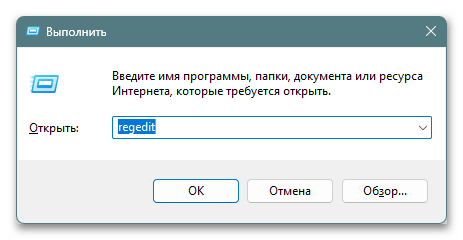
- Откройте в нем реестр, найдя его в «Пуске» или, например, вызвав окно «Выполнить» (Win + R) и введя
regedit. - Найдите в нем тот драйвер, который является причиной синего экрана смерти. Для этого откройте внутренний поиск (клавиши Ctrl + F или раздел «Правка» — «Найти…») и впишите его название. Удостоверьтесь, что в колонке слева выделение стоит на слове «Компьютер», чтобы поиск шел по всему реестру.
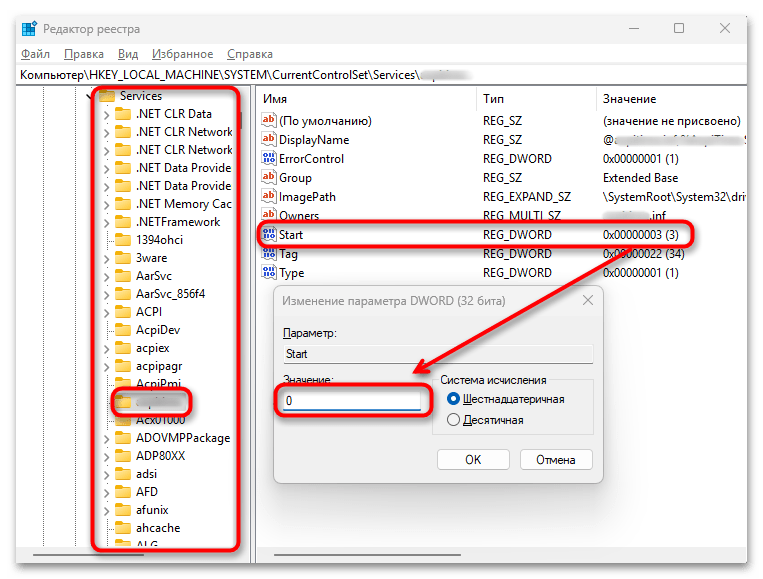
- Чаще всего драйверы находятся по пути
HKEY_LOCAL_MACHINE\SYSTEM\CurrentControlSet\Servicesвнутри последней папки (также вHKEY_LOCAL_MACHINE\SOFTWARE\Microsoft\Windows\CurrentVersion\Setup). Но, вероятно, вам понадобится проделать написанное ниже и в других директориях, если будут найдены еще совпадения.Найдите параметр «Start», кликните по нему дважды ЛКМ для смены значения и введите «0». Это будет означать отключение запуска драйвера при старте. Если вдруг инструкция не поможет, вы можете отменить внесенные изменения, изменив значение обратно на то, что было установлено изначально. Лучше запишите их и пути, в которых что-то меняете, чтобы в случае чего не усугубить положение.
- Пробуйте перезагрузить компьютер. Если он включился и ATTEMPTED_WRITE_TO_READONLY_MEMORY больше не появляется, лучше вовсе удалить драйвер или саму программу, которая за него отвечает.

Способ 4: Восстановление целостности файлов
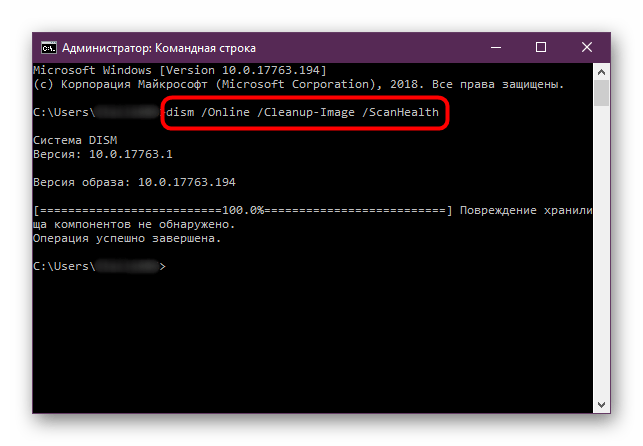
Ошибка может быть вызвана повреждением каких-либо системных файлов, которые требуются драйверу или библиотеке для работы. Это проявляется по-разному, в том числе и через BSOD с кодом ATTEMPTED_WRITE_TO_READONLY_MEMORY. Попробуйте просканировать системные файлы и хранилище компонентов Windows при помощи специальных консольных утилит. Сделать это можно как при запущенной операционной системе, так и в среде восстановления. В нашем отдельном материале по ссылке ниже вы найдете исчерпывающее руководство по их использованию, а также информацию о том, что делать, если проверка завершается с ошибками или зависает. Статья ориентирована на Windows 10, но полностью актуальна и для 11.
Подробнее: Как проверить целостность системных файлов в Windows 10
Способ 5: Проверка оперативной памяти
Оперативная память, а точнее ее неисправность, тоже может оказаться виноватой в происходящем. Узнать это можно лишь только проверив ее специальными программами. В Виндовс есть встроенная утилита для проверки, но большую точность дает использование стороннего ПО, предназначенного для полноценного (порой даже многочасового) сканирования. Если будут выявлены повреждения, компонент понадобится заменить. Увы, каким-либо исправлениям он не подлежит. Кликните по ссылке ниже для получения инструкций.
Подробнее: Проверка оперативной памяти в Windows 10

Если ошибка появилась на новом компьютере, вам следует убедиться, что оперативная память совместима с материнской платой (на официальном сайте производителя вашей модели материнской платы есть информационный раздел касательно совместимости с другими комплектующими, в том числе оперативной памятью). Кроме того, материнская плата может оказаться бракованной. Это определяется подключением к ней других планок оперативной памяти и мониторингом стабильности ее работы.
Подробнее: Проверяем совместимость оперативной памяти и материнской платы
Способ 6: Восстановление системы
В некоторых ситуациях действенным станет откат системы до точки восстановления. К примеру, это пригодится при неудачной установке драйвера или программы, провоцирующих конфликт с ОС. Конечно, для восстановления у вас заранее должна быть активирована соответствующая функция и создана точка восстановления до момента возникновения проблемы. О том, как пользоваться данным инструментом, читайте далее.
Подробнее: Откат к точке восстановления в Windows

Способ 7: Переустановка ОС
Когда ошибку выявить или исправить не удается, есть смысл прибегнуть к переустановке операционной системы. Современные Windows позволяют сохранить пользовательские файлы, снизив тем самым радикальность процедуры. Детально о процедуре переустановки без потери данных мы уже рассказывали ранее.
Подробнее: Как переустановить Windows без потери данных

Когда проблема наблюдается даже на чистой переустановленной Windows, стоит предположить, что виновата либо сборка (или то, как она была записана на флешку), либо имеется аппаратная неисправность. Так, ATTEMPTED_WRITE_TO_READONLY_MEMORY может быть свидетельством поврежденной материнской платы, что обычно приводит к необходимости ее замены. Более точную аппаратную диагностику вы можете получить в сервисном центре.
Наша группа в TelegramПолезные советы и помощь
The “Attempted Write to Readonly Memory” error, as it is generally called, is a Blue Screen of Death problem related to recent Windows variants. Normally, it tries to point to the fact that a driver or application software tried to write something to that part of the memory that was marked as read-only. The faster the action taken against this error, the more system stability there will be, and the lesser chance there is of data loss.
About the “Attempted Write to Readonly Memory” Error
Attempted_write_to_readonly_memory mainly occurs when a driver or software program illegitimately alters the protected sections of memory. This violation automatically brings up the BSOD to protect your system from further damage. The usual culprits are faulty device drivers, recently installed software, problems with the memory, or a malfunctioning operating system.
How to Fix the “Attempted Write to Readonly Memory” Blue Screen Error
Fix Problematic Device Drivers
The attempted_write_to_readonly_memory error concerns the device drivers that are either outdated or corrupted. Highlight problematic drivers and replace/correct them first:
- Press the Windows + X key and select Device Manager from the list.
- Look for devices with a yellow exclamation mark, indicating there is a driver issue.
- Right-click the problematic device and select Update Driver.
- Select Search automatically for drivers and let Windows find the latest version.
For a more comprehensive solution, use Outbyte Driver Updater to automatically identify and update all outdated drivers on your PC.
Also, in our Driver library you can find the most suitable System Drivers for your OS and a short guide on how to install it.
Uninstall Any Recent Program That You’ve Installed
If the error appeared after installation of some program, then possibly this program conflicts with your system:
- Open the Control Panel and enter ‘Programs > Programs and Features’.
- Find the recently installed application and right-click on it, then click on Uninstall.
- Restart your system now and check whether the problem is gone.
Update Your Windows OS Version
Running an older version of Windows can cause system errors. To upgrade your OS:
- Open the Settings app with Windows + I.
- Open Update & Security, then tap on Windows Update then click Check for updates.
- Run the pending updates, then reboot your device.
Reboot Windows into Safe Mode and Update the Faulty Device Driver
First of all, to resolve the “Attempted Write to Readonly Memory” error in Windows 10/11, restart your computer in Safe Mode:
- To open Safe Mode, under Advanced startup select Restart while holding the Power and Shift keys.
- In Safe Mode open the Device Manager via a right-click on the Start button.
- Locate the problematic device, right-click on it, enter Update Driver, and click ‘Search automatically for updated driver software’ or download it from the manufacturer’s website if need be.
- Restart your computer. Then Windows will reinstall the updated driver.
If the problem persists:
- Open Command Prompt (Admin) from the Start menu.
- Run
sfc /scannowto scan for system issues. - Next, run
chkdsk C: /f /r /x, replacingCwith the correct drive letter, to check and fix disk errors. - Restart your PC after the scans are complete.
These steps should help resolve the error and restore system stability.
Run Memory Diagnostics
Memory issues may be due to attempted write to readonly memory error. Employ the following utility that comes with Windows, called the Windows Memory Diagnostic:
- Press Win + R, enter
mdsched.exeand finally press Enter. - Select Restart now and check for problems.
- Let it scan the RAM for issues and follow any fixes it may suggest.
Update BIOS
Outdated BIOS firmware can also cause the “Attempted Write to Readonly Memory” problem to occur. To fix it, simply update the BIOS. However, this is something that not everybody can do as it requires technical expertise. What you can do is take your Windows computer to a certified Windows 10/11 technician and let him handle the job.
Run the Blue Screen Troubleshooter
Windows includes an in-built Blue Screen Troubleshooter that automatically detects and fixes the BSOD errors:
- Open Settings, then click on Troubleshoot under Update & Security.
- Go to Additional troubleshooters and select Blue Screen.
- Please follow the on-screen instructions and continue with the troubleshooting process.
FAQs
What triggers the attempted_write_to_readonly_memory error?
This error is usually due to out-of-date drivers, software conflicts, bad memory, or even hardware malfunction.
Can updating Windows fix this error?
Yes, the latest Windows updates frequently resolve system errors by patching the known bugs.
What problematic drivers does a driver detect?
Start Device Manager and look for devices that have a yellow warning icon. Use a driver updater tool to detect and solve issues automatically.
Does the Blue Screen troubleshooter work to resolve this error?
The BSOD troubleshooter will be helpful in diagnosing the BSOD issue and will walk you through the solution for this particular error.
Should I reinstall Windows in order to solve this?
Reinstallation of Windows should be considered the last resort after attempting all other repairs. This is quite a time-consuming activity and might lead to data loss if not done with care.
BSOD ATTEMPTED_TO_WRITE_TO_READONLY_MEMORY в Windows 11, 10
Снова разбираемся с очередной ошибкой, на этот раз затронем BSOD с кодом ATTEMPTED TO WRITE TO READONLY MEMORY. Неполадка затронула Windows 11, 10 и Server 2019, 2022. В самой проблеме уже зашита подсказка, что попытка записи или чтения памяти оказалась безуспешной. Конечно, это очень расплывчатое представление о проблеме, да и подобные сведения часто оказываются неприменимыми к реалиям. В этот раз сбой тоже может носить разные причины, да и проявляется различными способами.
Ошибка ATTEMPTED TO WRITE TO READONLY MEMORY может быть связана с различными кодами, а также ссылаться на некоторые файлы. Порой дополнительно могут фигурировать в сообщениях: 0x000000be, win32kbase.sys, ntfs.sys, ntoskrnl.exe. Если же заглянуть сейчас в системный отчет, то с большой долей вероятности можно найти следующее сообщение: «Операция ввода-вывода, инициированная реестром, завершилась неустранимым сбоем. Реестру не удалось очистить куст (файл)».
Почему появился BSOD:
- перегрев процессора и других комплектующих;
- повреждение оперативной памяти;
- неправильно настроенный XMP-профиль памяти;
- устаревшая версия BIOS;
- неисправность значений и ключей в реестре;
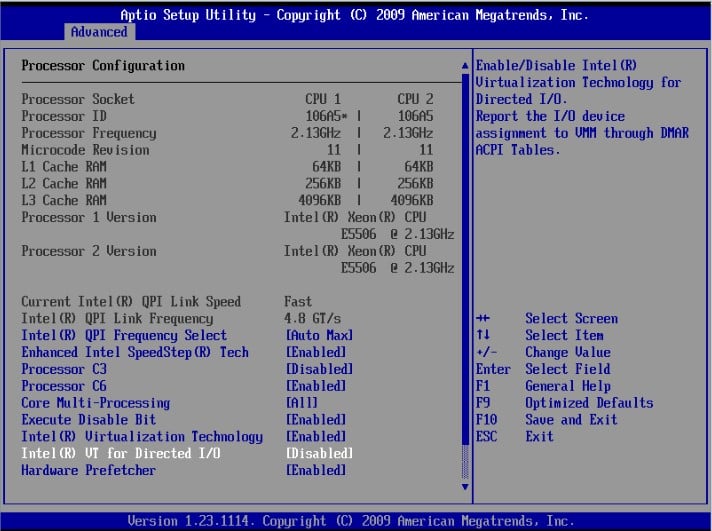
- проблема с виртуальным пространство и технологией Intel VT-d;
- несовместимость драйвера.
Как исправить ATTEMPTED TO WRITE TO READONLY MEMORY?
Исправлением для данного BSOD послужит устранение первопричины ошибки. Главная проблема в том, что мы не знаем, по какой именно причине произошел сбой в конкретном случае. Остается только пробовать решения в порядке от самых простых до более сложных. Что-то из перечисленного имеет хорошие шансы на успех.
Руководство по устранению BSOD:
- Проверить датчики. Следует провести стресс-тест через любую доступную утилиту, чтобы определить, не подвержена ли ваша система перегреву одной из комплектующих. Речь может идти о процессоре или видеокарте, как самых мощных источниках тепла. Важно обращать внимание на пиковую температуру. Если она достигает 80+ градусов, следует задуматься о дополнительном охлаждении.
- Восстановить реестр. С помощью специальных утилит можно в автоматическом режиме выполнить восстановление. Одна из самых популярных программ – CCleaner. На самом деле лучше было бы использовать резервный куст с этого же компьютера, но обычно его никто не создает заблаговременно.
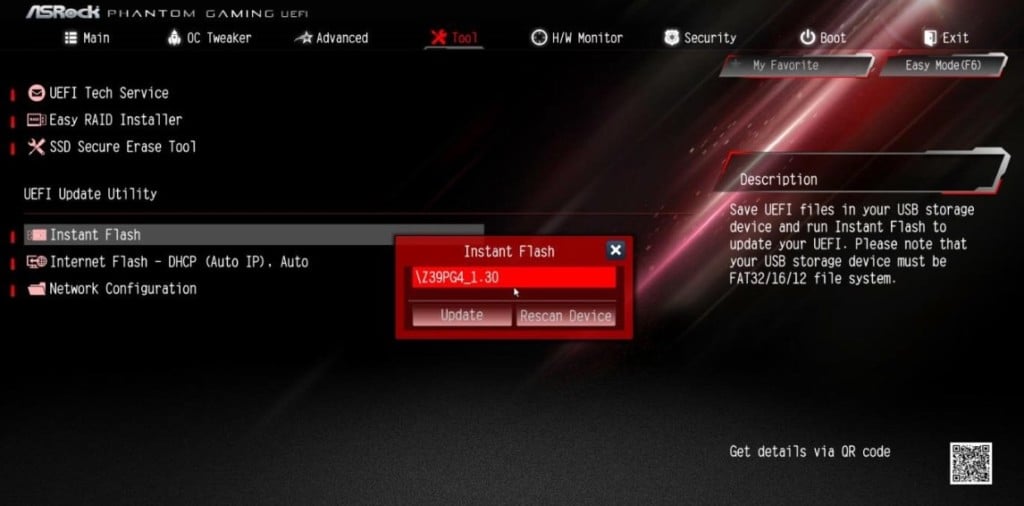
- Обновить BIOS. Особенно актуально для тех, у кого синий экран смерти появляется при попытке обновить Windows 11 или 10. Устаревшая версия BIOS является частым виновником. Процедура довольно простая: скачать прошивку с официального сайта разработчиков, загрузить на флешку, зайти в BIOS или UEFI и выбрать соответствующий пункт. Обычно он так и называется Update BIOS.
- Отключить Intel VT-d. По каким-то причинам, технология виртуального пространства порой выдает сбои и ее выключение помогло части пользователей. Предлагаем перейти в UEFI и выключить систему Intel VT-d, установив для нее значение Disable.
- Проверить оперативную память. С помощью Memtest86 следует просканировать ОЗУ. Еще более важный момент для тех, у кого в журнале событий числятся какие-то ошибки по видеокарте, так как ГПУ тянет часть ОЗУ, в последней может быть проблема.
- Настроить профиль XMP. Очень часто неполадка заключается в неправильных таймингах, а также в завышенной тактовой частоте. Следует опытным путем снижать скорость работу ОЗУ в поисках более стабильного режима. Также следует подобрать оптимальные тайминги для всех планок оперативной памяти. Все перечисленное выполняется через интерфейс BIOS.
- Отключить посторонние драйвера. Известно, что некоторые версии драйверов Kaspersky мешают обновить Windows 10, а также перейти к Windows 11 и Server 2022. И это далеко не единственный драйвер, который был замечен в подобных неполадках. Разумно на время отключить дополнительное оборудование, а также выключить вспомогательное программное обеспечение.
Как показывает практика, указанные выше решения должны повергнуть BSOD ATTEMPTED TO WRITE TO READONLY MEMORY в Windows 11, 10. В большинстве случаев мы предполагаем появление положительного эффекта. Однако мы нуждаемся в ваших комментариях, которые подтверждают или опровергают эффективность методов.
May. 23, 2023 / Updated by
Renata to
Windows 10

The «Attempted Write to Readonly Memory» error is a type of blue screen of death (BSOD) error that occurs when the system attempts to write to a read-only memory location, resulting in a system crash. This error can be caused by various reasons, such as problematic device drivers, buggy software, corrupted system files, or damaged hardware. Here are some effective methods to fix this error and get your system working again:
Method 1: Restart your Computer
Method 2: Update Device Drivers
Method 3: Run System File Checker (SFC)
Method 4: Run Memory Diagnostic Tool
Method 5: Clean Boot your Computer
Method 6: Check your Hard Drive
Method 7: Perform a System Restore
Method 1: Restart your Computer
The first and easiest method to fix the «Attempted Write to Readonly Memory» error is to restart your computer. Sometimes, a simple restart can help resolve system glitches that cause BSOD errors. To restart your computer, follow these steps:
1. Click the Start button.
2. Click the Power button.
3. Click Restart.
4. Wait for your computer to restart.
Method 2: Update Device Drivers
A faulty or outdated network adapter driver can cause issues with attempted write to readonly memory.
Many computer problems are difficult to tackle. When users are having troubles to fix corrupted repositories or missing Windows files, their computer operating systems may be already broken.
It is highly recommended to download a driver updater—-Driver Talent which is free for scanning computers and providing updated driver.
1. Download and install Driver Talent
Download Driver Talent
2. Click on the «Scan» button to scan your computer for outdated, missing, or corrupt drivers.
3. Once the scan is complete, you will see a list of all the problematic drivers on your computer.
4. Click on the «Download» button next to the driver you want to update or install.
5. Wait for the download to finish, then click on the «Install» button to install the new driver on your computer.
6. You can also use Driver Talent to backup and restore your drivers or to uninstall unwanted drivers.
7. Once you have installed all the necessary drivers, restart your computer to apply the changes.

Method 3: Run System File Checker (SFC)
System File Checker (SFC) is a built-in tool in Windows 10 that scans and repairs corrupt or damaged system files. Running SFC might resolve the «Attempted Write to Readonly Memory» error caused by corrupted system files. To run SFC, follow these steps:
1. Click the Start button.
2. Type «cmd» in the search box.
3. Right-click on «Command Prompt» and select «Run as administrator».
4. Type the following command and press Enter: sfc /scannow
5. Wait for the scanning process to complete.
6. Restart your computer.
Method 4: Run Memory Diagnostic Tool
The «Attempted Write to Readonly Memory» error could also be caused by faulty RAM. The Memory Diagnostic Tool is a built-in tool in Windows 10 that checks your computer’s memory for errors. To run the Memory Diagnostic Tool, follow these steps:
1. Click the Start button.
2. Type «memory» in the search box.
3. Click «Windows Memory Diagnostic».
4. Click «Restart now and check for problems».
5. Wait for the computer to restart and run the memory test.
6. Once the test completes, Windows will automatically restart.
Method 5: Clean Boot your Computer
A clean boot starts your computer with the minimum number of drivers and startup programs. Performing a clean boot can help identify if any third-party software is causing the «Attempted Write to Readonly Memory» error. To perform a clean boot, follow these steps:
1. Press the Windows key + R.
2. Type «msconfig» in the Run dialog box and press Enter.
3. Click on the «Services» tab.
4. Check the box for «Hide all Microsoft services».
5. Click on the «Disable all» button.
6. Click on the «Startup» tab.
7. Click on «Open Task Manager».
8. Disable all the startup items.
9. Close Task Manager and click on «OK» in the System Configuration dialog box.
Method 6: Check your Hard Drive
The «Attempted Write to Readonly Memory» error could also be caused by a faulty hard drive. It is recommended to check your hard drive for errors and bad sectors. To check your hard drive, follow these steps:
1. Click the Start button.
2. Type «cmd» in the search box.
3. Right-click on «Command Prompt» and select «Run as administrator».
4. Type the following command and press Enter: chkdsk /f /r
5. Type «Y» to confirm that you want to check the drive the next time you restart your computer.
6. Restart your computer.
Method 7: Perform a System Restore
If the «Attempted Write to Readonly Memory» error started occurring after installing new software or making system changes, a system restore might help resolve the issue. System Restore is a feature in Windows 10 that allows you to revert your system to an earlier point in time. To perform a system restore, follow these steps:
1. Click the Start button.
2. Type «system restore» in the search box.
3. Click on «Create a restore point».
4. Click on «System Restore».
5. Follow the on-screen instructions to restore your system to an earlier point in time.
In Conclusion
The «Attempted Write to Readonly Memory» error is a frustrating issue that can cause your computer to crash repeatedly. However, with the above methods, you should be able to fix the issue and get your system working again. Remember to back up your files before attempting any of these methods to avoid losing your data. If the issue persists, you might want to seek professional help or contact Microsoft support for more assistance.
Recommended Download
|
ExplorerMax |
Driver Talent for Network Card | |||
| Smart and advanced file explorer tool for Windows platforms | Download & Install Network Drivers without Internet Connection | |||
|
30-day Free Trial |
Free Download |
The BSOD stop code 0x000000BE often occurs during Windows startup. Normally, this error prompts up when an attempt is made by the computer to write to a memory location which is read-only. Blue Screen issues like this are actually due to the presence of faulty drivers or lack of storage space. In addition, installation of certain incompatible software may also lead to the problem. You will notice a warning message ATTEMPTED_WRITE_TO_READONLY_MEMORY with this stop code.
So, if you also encounter the Blue Screen of Death with error code 0x000000BE, then you are in the right place. In this article, we will discuss all the possible workarounds to deal with this problem. You need to update the problematic driver, run the Windows Memory Diagnostic Tool, uninstall the incompatible firmware and so on. These solutions will eventually help you to bypass ATTEMPTED_WRITE_TO_READONLY_MEMORY BSOD in Windows 10.
0x000000BE ATTEMPTED_WRITE_TO_READONLY_MEMORY BSOD Windows 10 Solutions
Here are how to fix 0x000000BE ATTEMPTED_WRITE_TO_READONLY_MEMORY BSOD Windows 10 –
Enter Safe Mode and Troubleshoot
In case, you are completely unable to get into Windows after multiple restarts, then you need to enter “Safe Mode” to settle 0x000000BE.
Step-1: Hit the Windows key on the keyboard and click the Power icon when Start Menu shows up.
Step-2: Once the related options show up, hold the SHIFT key and press Restart at the same time.
Step-3: Moving ahead, Windows 10 reboots and asks you to choose an option. Choose Troubleshoot.
Step-4: On the subsequent Troubleshoot screen, go ahead with Advanced options.
Step-5: Underneath the Advanced options menu screen, select “Startup Settings“. Now, click the Restart button on the next screen.
Step-6: You will get “Startup Settings” on screen, now press “F4” key to let the PC enter into Safe Mode.
For reference, you may like to learn the way to Boot into Safe Mode from Login Screen.
Update Device Driver
Once the PC startup in the Safe Mode, you need to update the device driver. The faulty or corrupt device driver can also be the possible reason behind the occurrence of ATTEMPTED_WRITE_TO_READONLY_MEMORY error. So give an attempt to keep your hardware device drivers up-to-date. Updating a specific device driver is pretty simple. All you have to do is to update the driver manually or download it from trusted and official website.
Perform a right-click on the Start icon at the taskbar and when a menu pops-up, click “Device Manager“.
On the Device Manager, check for the problematic driver. Usually, the driver will display a yellow triangle next to the faulty driver. So, once you find it, do a right-click on it and choose Update driver.
Go ahead with the first option namely Search automatically for updated driver software (see snapshot).
Now, wait for Windows to find and install the software right away.
In addition, you can also choose to download the latest driver software straightaway from the manufacturer’s website.
Check computer’s memory (RAM)
Sometimes, error 0x000000BE can also happen because of the computer’s memory. Basically, the lack of storage space on your computer leads to the BSOD. So, in this situation, running the “Windows Memory Diagnostic Tool” will be able to detect the hardware related problems. Moreover, the tool will also identify whether your PC’s memory is working properly or not.
Press on “Win logo and R” hotkey to open Run dialog box.
Type mdsched.exe in the blank area and click OK to proceed.
Here, select the option “Restart now and check for problems” to detect the trouble in the memory immediately ( see snapshot).
Wait for few minutes until the scan gets completed. In case, the scan result tells you that the RAM is defective you need to replace the same to resolve ATTEMPTED_WRITE_TO_READONLY_MEMORY.
3. Run System File Checker and CHKDSK
If the above workarounds do not bring any relief, then stay into Safe Mode and run these built-in tools to detect as well as repair the bad sectors and faulty files.
Type CMD in the taskbar search field and let the result display at the top. Right-click on “Command Prompt”. From the list and go with Run as administrator.
Click Yes if the UAC dialog box prompts up.
Now, type in the below-given command after C:\WINDOWS\system32> and hit Enter –
sfc /scannow
Once the scan gets over, type in or copy-paste the underneath command and press Enter to run it –
chkdsk C: /f /r /x
Note – Ensure to substitute C in the above command with your actual Windows drive partition letter.
See our full article on SFC /Scannow, DISM.Exe, CHKDSK Windows 10.
Uninstall Recent Software
Experts are with the view that the installation of a new software on the system may be the possible reason for ATTEMPTED_WRITE_TO_READONLY_MEMORY. So, uninstall such applications to resolve this BSOD error with the following method.
- Perform a right-click on Start and from the Win+X menu, choose Apps and Features.
- Find the recently installed application in the coming page and select it. Click Uninstall.
- Now, follow the uninstallation instruction of the software on the screen and finish the procedure.
Check for Updates
Sometimes certain stop code gets in your system because of bugs arriving through Windows update. Microsoft takes this seriously and the working developers fix the issues. In the next patch, They send the resolution that automatically set the errors. So getting the latest Windows update may solve 0x000000BE on your Windows 10 PC.
- Launch Settings application and to do so, first open Start Menu and click on the cog icon.
- Select Update & Security.
- Click Check for updates button on the right pane of the following page. After installing the updates, Restart Windows 10 PC and hopefully, this will fix the BSOD issue.
Perform System Restore
When every attempt fails to bypass ATTEMPTED_WRITE_TO_READONLY_MEMORY BSOD, the last resort is to perform a “System Restore“.
Bringing your system back to a restore point is the best way to avoid any trouble as at that time your PC had been running great. But remember that this method wipes out the software or 3rd party apps you have installed within the period. Another problem with this workaround is that you must have at least one restore point available on your PC. If not, then you are left with only one choice i.e. Reinstall Windows 10.
Performing System restore enables you to undo any changes made so far which is the culprit behind this BSOD error.
Go to Cortana, type system restore in the search area and then press Enter.
Stay on the “System protection” tab. Click “System Restore” button.
On the subsequent wizard – Restore system files and setting, click Next.
Click on a Restore point suitable when everything was ok and again select Next.
Click on Finish on the final dialog and then Yes on the Confirmation pop up.
That’s all!!!