
Сообщение об ошибке 0x8024000b не дает возможности обновить Windows версии от XP до 10. Корень неисправности — файл Update Manifest, который обязателен для апдейта, но в текущий момент времени не доступен. Способ исправления ошибки зависит от того, каким образом обновления попадают на ПК.
Методы решения ошибки 0x8024000b
№1: апдейт — с сервера Майкрософт
Зажмите комбинацию клавиш Win+R. В появившемся окне введите следующее: Cmd /c ren %systemroot%\System32\Spupdsvc.exe Spupdsvc.old. Выполните команду нажатием на Ок. После успешно обновляйте ОС.
№2: апдейт — с корпоративного сервера WSUS
Измените название файла Spupdsvc.exe. Скиньте настройки Центра обновлений. Переименуйте директорию SoftwareDistribution, перед этим приостановите службу обновления за счет запуска в командной строке запроса net stop wuauserv. После этого службу обязательно включите — net start wuauserv. Это должно избавить от ошибки 0x8024000b.
Attention Before you read this post, I highly recommend you check out my resources page for access to the tools and services I use to not only maintain my system but also fix all my computer errors, by clicking here!
Windows Updates are an integral part of your operating system as it adds much needed functionality as well as providing a plug for loopholes and vulnerabilities, from time to time. However, the Windows Update component itself, is not infallible, as there are oftentimes when it also incurs errors. Windows update error 0x8024000b is just one of these errors. This error occurs when the Update component is unable to read the Manifest file which is required when installing an update. The current operation (at the time) is thus cancelled either by the end user or the OS. Additionally, an inability to filter the results is also known to cause this error message:
Error 0x8024000B:
Operation was cancelled.
Microsoft is constantly releasing new patches and updates for the various programs on its operating system. These updates are designed to ensure everything runs smoothly, without hiccup. These updates usually come jam-packed with bug fixes and security patches, along with stability updates as well as additional features for already existing applications (as already touched on). Despite the positives associated with these many updates, we have errors that can and do occur; as a result of this component (Windows Update). Fixing them can be quite daunting, and that brings us to this tutorial. In this post we will be going through the numerous solutions that end users have used to successfully tackle error 0x8024000b.
What Causes Windows Update Error 0x8024000b?
When we look at the potential causes of error 0x8024000b, we find that, in most cases, the error is caused primarily by one of two things, these are as follows:
- Missing Manifest Files: Error 0x8024000b will occur when the Windows Update component is unable to access or read the manifest files, required to install the update. This may be as a result of the operating system or end user cancelling the Update process midway. That is what the ‘Operation was cancelled’ alludes to.
- Corrupted Windows Registry: As is the case with most Windows Update errors. Corruption within the registry may adversely affect the Windows Update component.
In addition, after doing my due diligence, I discovered that a lot of end users encountered error 0x8024000b right after or during the installation of update KB4494351 and KB4505220, both of which update Microsoft’s SQL.
That said, this error can and does occur during the installation of any and all Windows Updates.
How to Fix It
Windows Update error 0x8024000b is a very tricky error to rectify. However, there are some simple solutions you can try. Below you will find the solutions, arranged in order of difficulty.
Before we get into the more complex methods of fixing error 0x8024000b. The first thing I’d have to suggest you gave a try was the Windows Update Troubleshooter. It’s a built-in Windows tool, that when run, will attempt to fix the error using a number of simple methods. Its effectiveness is debatable, however, that doesn’t mean you should completely rule it out, as a possible fix.
You can find step-by-step instructions on how to use the Windows Update troubleshooter from my post on fixing error 0x80004005.
When it comes to fixing error 0x8024000b, one of the more effective, yet easier solutions to repairing it is to use an automated Windows repair tool like Advanced System Repair Pro. This tool is highly effective at fixing a plethora of issues that may occur on your system. Such as registry corruption, system instability and slow system performance.
In addition to that, it is also capable of cleaning your system of junk files, helping to free up much needed hard drive space. It comes bundle with a user friendly interface, making it easy for anyone to get to grips with.
For additional information on how this powerful tool may be able to help you, check out the link below:
CLICK HERE TO CHECK OUT ADVANCED SYSTEM REPAIR PRO
Rename Spupdsc.exe
If the error continues to persist after attempting the two solutions above, then I suggest you give this fix a shot.
Error 0x8024000b is known to occur as a result of one culprit file on your system (Spupdsvc.exe). Thus, to fix this error, you may want to consider renaming the file. It’s not too difficult, just follow the instructions below:
Note: You have the option of renaming the file to whatever you want, however it’s very important that you do not delete the file, as it’s likely you may need it in the future.
1. First, boot into your system as a full administrator.
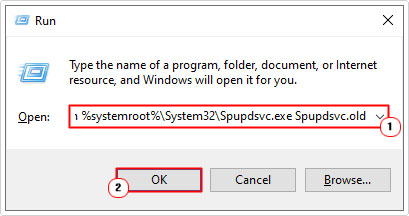
2. Next, press + R, type cmd /c ren %systemroot%\System32\Spupdsvc.exe Spupdsvc.old and press Enter.
3. Once completed, restart your computer.
After the computer successfully boots up, you can now try running Windows Update.
Delete Update Cache Files
Before an update is installed on your system, it is first downloaded to a specific folder. As you regularly update your computer, this folder grows, as more and more updates are copied to it. Now, if a virus were to infiltrate this folder, it could either inhibit or adversely affect future updates.
Thus, to rectify this problem (and fix Windows Update error 0x8024000b), you’d want to erase all the content from this folder and start a fresh.
You can find instructions on how to remove the contents from this folder on my post on fixing Windows Update error 0x8024200d.
Run PowerShell Script
If error 0x8024000b continues to persists even after attempting all the methods above, you may want to try running this PowerShell script. When run it will clear the superseded updates from WSUS.
To run this script, simply follow the instructions below:
1. First, you will need to boot into your system as a full administrator.
2. From there, you’ll want to visit the Microsoft TechNet website and download the Cleanup-WSUSserver.ps1 script. Alternatively you can acquire it from here: https://www.mediafire.com/file/g3u8wq61j5nvwz6/Cleanup-WSUSserver.ps1/file
Note: Once you have successfully downloaded the script to your system, you will need to modify the Server and Port values, before it will work for you.
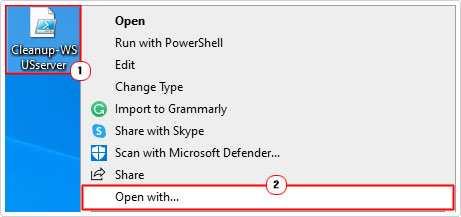
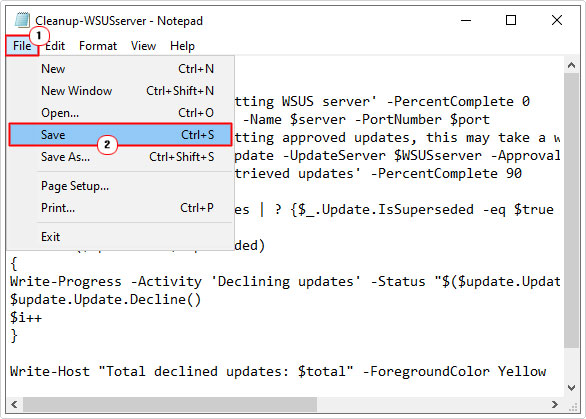
3. Next, right click on the script and select Open with -> Notepad.
4. When the Script opens up in Notepad, fill the empty $server and $port values with your WSUS port and server values.
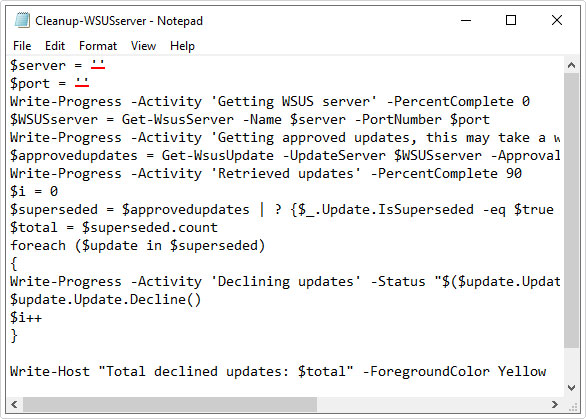
5. Once you have made the necessary changes, click on File -> Save to save changes, then close the Notepad.
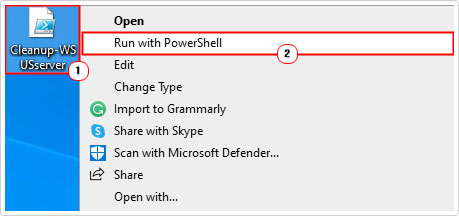
6. To finish off; simply right-click on the PowerShell Script and select Run with PowerShell.
Are you looking for a way to repair all the errors on your computer?
If the answer is Yes, then I highly recommend you check out Advanced System Repair Pro.
Which is the leading registry cleaner program online that is able to cure your system from a number of different ailments such as Windows Installer Errors, Runtime Errors, Malicious Software, Spyware, System Freezing, Active Malware, Blue Screen of Death Errors, Rundll Errors, Slow Erratic Computer Performance, ActiveX Errors and much more. Click here to check it out NOW!
-
Home
-
News
- How to Fix It: Windows Update Error 0x8024000B
By Stella | Follow |
Last Updated
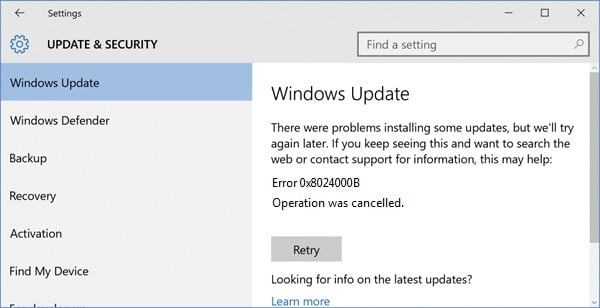
When you want to update your Windows system via Settings, you may receive a Windows update error 0x8024000B. Why does this issue happen? How to fix this issue? In this post, MiniTool Software shows you some effective solutions.
The Reason for Windows Update Error 0x8024000B
Windows update error 0x8024000B always happens when the Windows operating system can’t access the manifest update files. Like other Windows update errors, this error can prevent you from updating your Windows operating system.
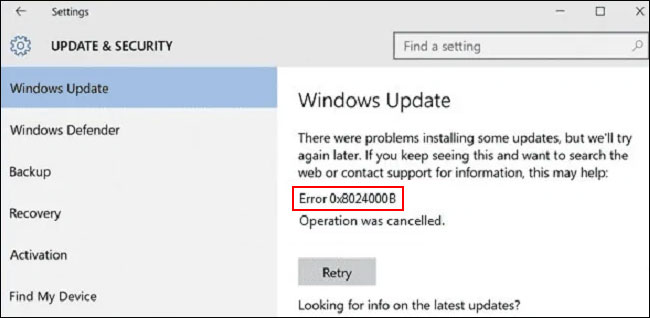
Where can you find the Windows update error 8024000B? If it happens, you can find it by going to Start > Settings > Update & security > Windows Update. It always comes with an error message saying:
There were problems installing some updates, but we’ll try again later. If you keep seeing this and want to search the web or contact support for information, this may help:
Error 0x8024000B
Operation was cancelled.
How to get rid of this Windows update error code 0x8024000B? Here are the things you can do.
How to Fix Windows Update Error 0x8024000B?
- Run the Windows Update Troubleshooter
- Clear the Superseded Updates
- Rename the Spupdsvc.exe File
- Reset the Windows Update Components
- Perform a System Restore
Method 1: Run the Windows Update Troubleshooter
The Windows update troubleshooter is specially used to find and fix Windows update errors like Windows update error 0xc1900107, Windows Update Fails with Error Code 0x80244007, Windows Update Cannot Currently Check for Updates, etc.
You can also use this tool to fix Windows update error code 0x8024000B.
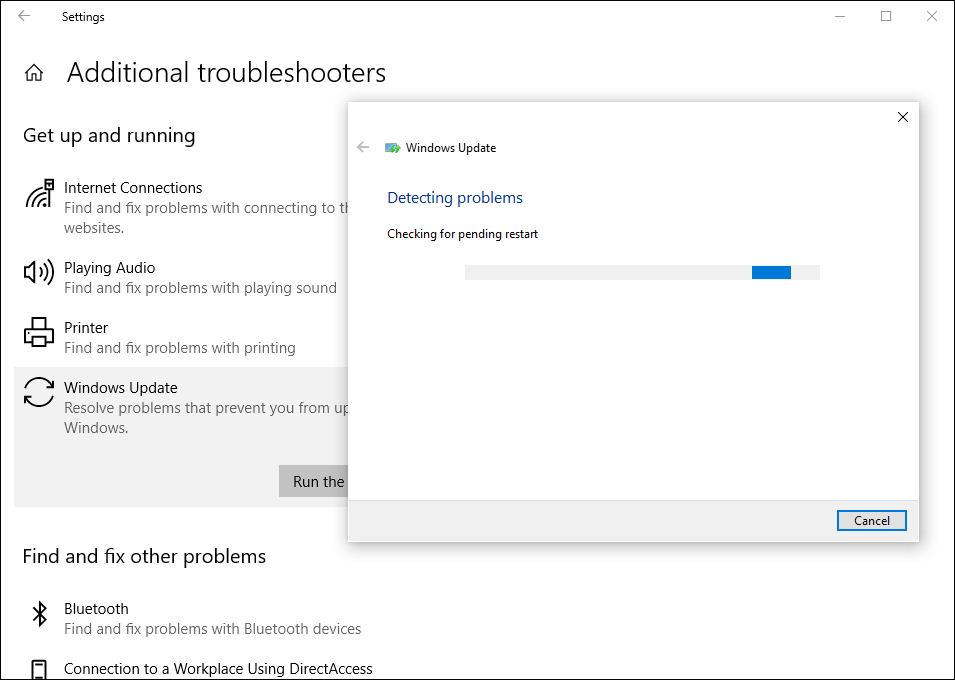
1. Click Start.
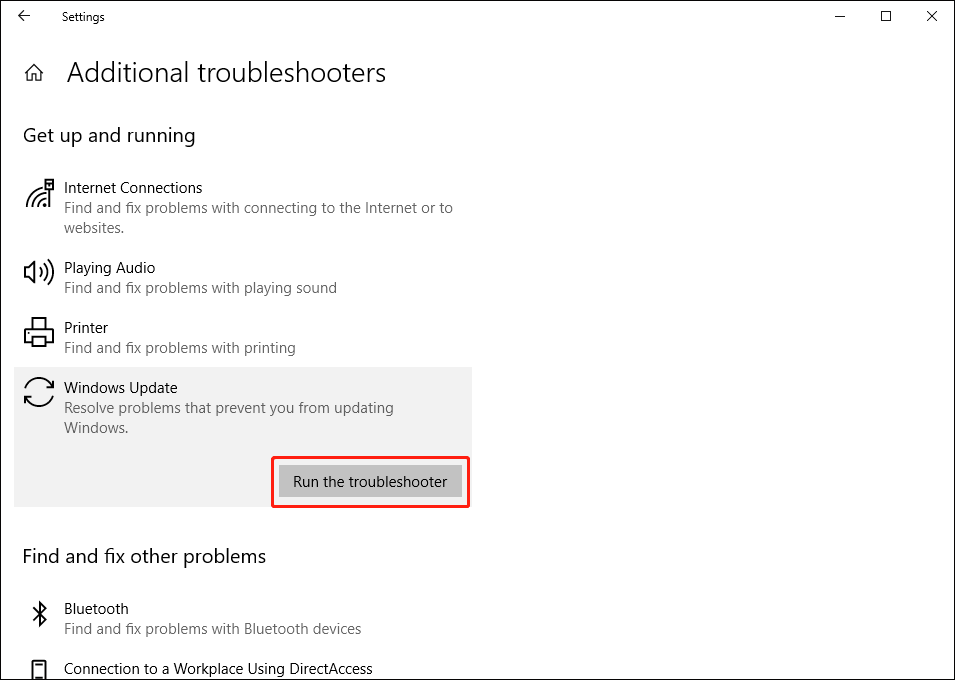
2. Go to Settings > Update & Security > Troubleshot.
3. Click the Additional troubleshooters link.

4. On the next page, click Windows Update and then click the Run the troubleshooter button.
5. The troubleshooter will start to run. You need to wait until the whole process ends. If this tool finds some issues, you can follow the on-screen guide to fix them.
Method 2: Clear the Superseded Updates
The superseded updates can also give rise to Windows update error 0x8024000B. To get rid of this error, you need to clear the superseded updates. This article is helpful: The complete guide to WSUS and Configuration Manager SUP maintenance.
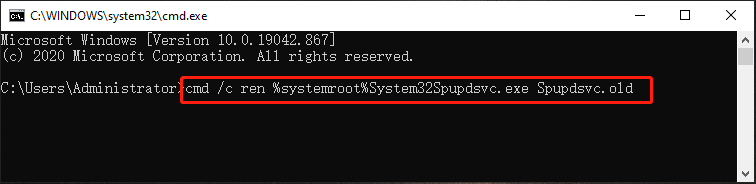
Method 3: Rename the Spupdsvc.exe File
You can use Command Prompt to rename the Spupdsvc.exe file.
Here are the steps:
- Press Win+R to open Run.
- Type cmd into the Run box and press Enter to open Command Prompt.
- Input this command and press Enter: cmd /c ren %systemroot%System32Spupdsvc.exe Spupdsvc.old.
- When the command is executed successfully, you need to reboot your computer.
Method 4: Reset the Windows Update Components
1. Run Command Prompt as administrator.
2. Input the following commands and press Enter after each:
net stop wuauserv
net stop cryptSvc
net stop bits
net stop msiserver
3. Input Ren C:WindowsSoftwareDistribution SoftwareDistribution.old and press Enter.
4. Input Ren C:WindowsSystem32catroot2 Catroot2.old and press Enter to edit the title of the catroot2 folder.
5. Input the following commands and press Enter after each:
net start wuauserv
net start cryptSvc
net start bits
net start msiserver
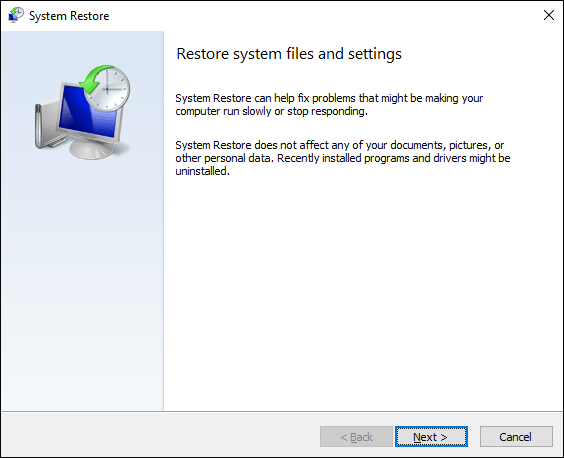
Method 5: Perform a System Restore
If you have created system restore points, you can also perform a system restore to make your computer go back to a state when Windows update is normal.
1. Press Win+R to open Run.
2. Type rstrui in Run and press Enter.
3. Click Next on the System Restore interface.
4. Select a suitable restore point when there are no Windows update issues and press Next.
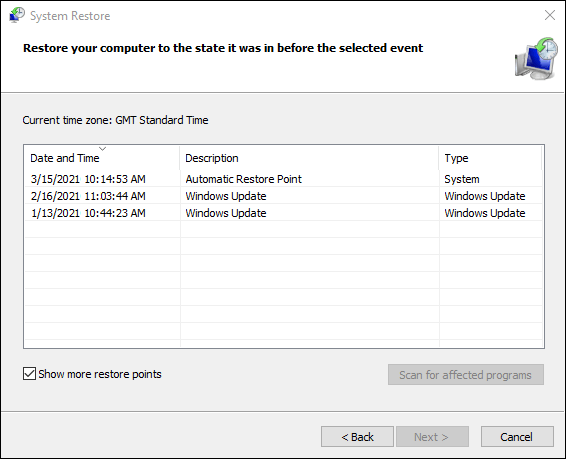
5. Click Finish on the next page.
Wait until the process ends. Don’t interrupt it in the process.
These are the solutions to Windows update error 0x8024000B. We hope they are useful to you.
About The Author
Position: Columnist
Stella has been working in MiniTool Software as an English Editor for more than 8 years. Her articles mainly cover the fields of data recovery including storage media data recovery, phone data recovery, and photo recovery, videos download, partition management, and video & audio format conversions.
Microsoft regularly comes up with new builds, cumulative updates, and more in order to maintain smooth operation of the system. But some users confront Failed to Install 0x8024000b Error during their update attempt. The issue mostly occurs when the operating system fails to decode the Update Manifest file required for installing the patches.
This happens when users cancel Windows Update service in the middle either accidentally or intentionally. The updates are often packed with fixes for several bugs and issues, new features, security updates, and more. So to get them successfully installed in the system without the above error, the following workarounds will be helpful.
0x8024000b Windows Update Error
Here is how to Fix Failed to Install 0x8024000b Windows Update Error in Windows 10 –
1] Run the Windows Update Troubleshooter
Windows Update troubleshooter is one of the finest utilities to mitigate any issues regarding updating the operating system. The tool can also fix the Install error 0x8024000b easily. To accomplish the task, follow the below steps –
- Fire up the Start Menu and click the gear icon.
- Click Update & Security.
- Moving forward to the next page, choose Troubleshoot located at the left pane.
- Jump to alongside pane and select Windows update under Get up and running section.
- Hit Run the troubleshooter button.
- The tool will, therefore, detect and find the associated issues from the system. Make sure the device is connected to an active internet connection. Follow the tasks guided by the tool on display to end this process.
- When the process ends finally, Restart Windows 10 PC to make the changes effective.
2] Execute PowerShell script to fix Failed to Install 0x8024000b Error
The most prominent way of fixing Install 0x8024000b error is to run a PowerShell script which will eventually clean all the superseded updates from system. Microsoft Technet has provided the script hence, it’s purely trustworthy. To run it, follow the below steps –
- Open any web browser and visit this site of Technet. Download the script from there. If legal terms and conditions stuff pop-up for confirmation, agree to them.
- Once the downloading gets over, launch File Explorer and go to Downloads folder and make a right-click on it.
- Select Run with PowerShell option and execute the script.
- Once the process ends successfully, reboot the device to implement the changes.
- After coming back to the new session, there will be no issues with Windows Update as expected.
3] Rename the Spupdsvc.exe File
Renaming a file entitled spupdsvc.exe. is often found to resolve the Install error 0x8024000b. This file usually stands for Microsoft Update RunOnce Service and it’s a process that is necessary for downloading Windows Update. The renaming must be done using the Run dialog as shown in below instructions –
- Right-click on Start icon and select Run from the Win+X menu.
- Insert the following text in the empty typing box and click OK or press Enter to execute it.
cmd /c ren %systemroot%\System32\Spupdsvc.exe Spupdsvc.old
- Once the process ends, reboot Windows 10 to save the changes.
4] Fix 0x8024000b by Resetting Windows Update Components
Sometimes, error 0x8024000b can occur due to some of the faulty update cache files in the system. Therefore, deleting those related files may resolve the issue. For that, follow-through below guidelines –
- Open Run dialog box by pressing “Winlogo+R” hotkey together. Type services.msc in the void text space and click OK.
- Once the Services Manager shows up, locate, and right-click Background Intelligent Transfer Service (BITS).
- Select Stop from the list of options.
- Now, move forward to Windows Update Service (wuauserv) and do a right-click on it as well.
- Choose Stop from the appearing menu.
- After stopping both the services, fire up File Explorer pressing Win+E hotkey at once.
- Navigate to the below-mentioned path –
C:\Windows\SoftwareDistribution
- Press Ctrl+A to select all from SoftwareDistribution folder and press Delete key on the keyboard. If a pop-up appears for confirmation, click Continue.
- Again head back to the Services console and right-click on Background Intelligent Transfer Service (BITS) and Windows Update Service (wuauserv) respectively.
- Choose Start and then make an attempt to grab the updates. Hopefully, this will mitigate the 0x8024000b Windows Update Error.
5] Perform System File Checker
To resolve any Windows 10 issues, executing the System File Checker tool is very handy. Certain significant system files go missing or get faulty due to several reasons. This built-in utility will detect and restore the corrupted files.
- Go to the taskbar search box and type in cmd.exe in its text box.
- Right-click on Command Prompt and choose Run as administrator.
- Upon a UAC popup, click Yes to proceed ahead.
- Once the black window shows up, insert the below command line and press Enter –
sfc /scannow
- The entire scan will take some good amount of time to complete. If the utility detects any issues, it will replace them with the files from the Windows cache folder.
- To successfully make this workaround effective, it is best to reboot the device.
6] Change Advanced Windows Update Settings
Failed to Install 0x8024000b can occur when the Windows Update Settings are faulty. In that case, tweaking the settings a bit can provide good results. Here are the instructions you can follow –
- Open Windows Settings app pressing “Win+I” hotkeys at once.
- When in the UI, click the Update & Security tile.
- Upon opening the next page, select Windows Update from the left pane.
- Jump to the right side pane and click the Advanced options.
- When the succeeding page unrolls, toggle OFF the slider under “Receive updates for other Microsoft products when you update Windows“.
- Now, reboot the device and upon startup navigate to the Windows Updates Settings page once again.
- Click the Check for updates button.
- Once all the patches are installed, you will see “Your device is up to date.” dialog.
- Do a click on the Advanced options again and pass forward to the next page.
- If you prefer, then turn ON the slider under “Receive updates for other Microsoft products when you update Windows“.
Methods:
1] Run the Windows Update Troubleshooter
2] Execute PowerShell script
3] Rename the Spupdsvc.exe File
4] Reset Windows Update Components
5] Perform System File Checker
6] Change Advanced Windows Update Settings
That’s all!!
Привет, дорогие читатели! Сегодня я хочу поделиться с вами личным опытом, как я столкнулся и успешно справился с ошибкой 0x8024000b на своем ПК с Windows 10. Этот неожиданный «гость» может появиться на вашем компьютере в самый неподходящий момент, но не беспокойтесь: вместе мы найдем решение!
Встреча с 0x8024000b
Помню, как однажды, среди важной работы, мой компьютер решил обновиться. «Ну что ж, — подумал я, — пусть обновляется». Но вот ошибка — и все планы рухнули. Код ошибки, который я увидел, выглядел как абракадабра: 0x8024000b.
Причины Возникновения
Погружение в мир информации и несколько часов исследований помогли мне узнать, что эта ошибка связана с процессом обновления Windows. Ее могут вызвать:
— Поврежденные Файлы Обновления: Иногда файлы, необходимые для обновления, могут быть повреждены или неполны.
— Проблемы с Службой Windows Update: Если служба обновления не работает должным образом, вы можете столкнуться с этой проблемой.
— Нестабильное Интернет-Соединение: Иногда даже нестабильное интернет-соединение может быть виновником.
Мой Путь к Решению
1. Перезагрузка и Очистка: Первое, что я сделал – перезагрузил компьютер. Затем почистил папку SoftwareDistribution, где хранятся временные файлы обновления.
2. Инструмент Устранения Неполадок: Microsoft предоставляет специализированный инструмент для устранения неполадок с обновлениями Windows. Я запустил его и следовал инструкциям на экране.
3. Проверка Интернет-Соединения: Я убедился, что мой интернет стабилен и надежен. Сомневаетесь в своем соединении? Попробуйте подключить компьютер к интернету кабелем.
4. Ручное Обновление: Я пошел на сайт Microsoft и скачал обновление вручную. Это действие иногда может обойти ошибки, возникающие во время автоматического обновления.
5. Техническая Поддержка: Наконец, я обратился к технической поддержке Microsoft. Это всегда хороший выбор, если вы чувствуете, что сами не можете справиться с проблемой.
Взгляд в Будущее
Ошибки — это нормально. Они — часть пути к знанию и опыту. Хотя ошибка 0x8024000b и застала меня врасплох, я не пожалел о потраченном времени на ее решение. Ведь теперь я знаю, как справиться с ней, и готов поделиться этим знанием с вами!
Мой совет: не бойтесь ошибок. Они – не конец света, а шанс узнать что-то новое и стать опытнее. Если вы столкнулись с ошибкой 0x8024000b – примените мои методы, и, возможно, она исчезнет так же быстро, как появилась.
Удачи вам, дорогие друзья, и помните: каждая проблема – это новая возможность для роста и развития! Если у вас возникнут вопросы, не стесняйтесь задавать их в комментариях ниже. Вместе мы найдем решение!